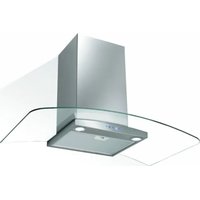
GHS972BK - Basket Glem Gas - Free user manual and instructions
Find the device manual for free GHS972BK Glem Gas in PDF.

User questions about GHS972BK Glem Gas
0 question about this device. Answer the ones you know or ask your own.
Ask a new question about this device
Download the instructions for your Basket in PDF format for free! Find your manual GHS972BK - Glem Gas and take your electronic device back in hand. On this page are published all the documents necessary for the use of your device. GHS972BK by Glem Gas.
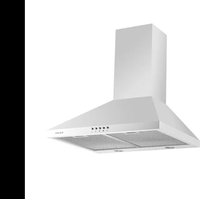
USER MANUAL GHS972BK Glem Gas
Read this guide carefully before installing and using this product and retain for future reference.
For information on the necessary space for the installation and mounting of the device, refer to the "INSTALLATION" section.
For detailed information on replacing the bulbs, refer to the "REPLACING THE BULB" section.
For detailed information on the dimensions and position of the means to support and attach the device in this space, refer to the "INSTALLATION" section.
For detailed information on the minimum distances between the different parts of the device and the surrounding structure, refer to the "INSTALLATION" section.
For detailed information on the minimum dimensions of the ventilation openings and their correct arrangement, refer to the "INSTALLATION" section.
Always turn off the power before installing or servicing, including replacing a bulb.
The range hood must be installed in accordance with the installation instructions and all measures must be observed.
The entire installation must be entrusted to a competent person or to a professional electrician.
Please dispose of packaging materials carefully. They are dangerous for children. Check that the ducts do not have bends greater than 90 degrees. This would reduce the efficiency of the rangehood.
This range hood is intended exclusively for domestic use.
Do not blaze food under the hood.
Do not try to use the kitchen hood without the grease filters or if the filters are too full of grease!
The air must not be discharged into a flue that is used for exhausting fumes from appliances burning gas or other fuels.
Do not leave frying pans unattended during use as overheated fats or oils may catch fire.
Never leave naked flames under the range hood.
If the hood is damaged, do not attempt to use it.
If the supply cord is damaged, it must be replaced by the manufacturer, its service agent or similarly qualified persons in order to avoid a hazard.
This appliance can be used by children aged from 8 years and above and persons with reduced physical, sensory or mental capabilities or lack of experience and knowledge if they have been given supervision or instruction concerning use of the appliance in a safe way and understand the hazards involved. Children shall not play with the appliance. Cleaning and user maintenance shall not be made by children without supervision.
Watch your children to make sure they do not play with the device.
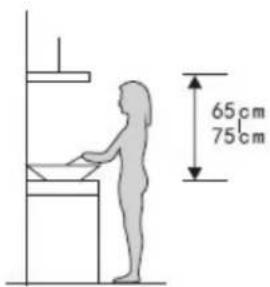
The plug must be easily accessible after installation. There is minimum distance between the support surface of cookware on the cook top and the lowest part of the cooker hood. (When the range hood is placed over a gas appliance, this distance must be at least 65~cm . If the installation instructions for the gas cook top specify a larger distance, this should be taken into account.
Proper ventilation of the room must be provided when a kitchen hood is used simultaneously with appliances using gas or other fuel.
Clean your appliance periodically using the method suggested in the MAINTENANCE chapter.
There is a risk of fire if the cleaning is not done according to the instructions.
Regulations regarding the discharge of air must be respected.
Clean the grease filter every month to prevent fire.
The charcoal filter traps odors and must be replaced at least once a year depending on the frequency of use of the range hood.
WARNING: Accessible parts of this appliance may become hot when used with cooking appliances.
For air extraction to be as efficient as possible, use a straight duct or with a minimum of elbows. Number of technicians recommended for installation: 2 to 3. Use appropriate wall plugs and screws on the wall where the hood is to be installed. Ask a qualified installer or technician to select the right dowels and screws. In a cold climate, it is advisable to install an additional check valve to minimize cold air return, as well as a nonmetallic thermal barrier to minimize heat transfer by conduction to the outside. The valve must be installed on the side of the thermal barrier where the air is cold.
The thermal barrier must also be installed as close as possible to the point where the duct enters the heated part of the building.
TO REDUCE FIRE HAZARDS, USE ONLY METALLIC DUCTS.
COMPONENT LIST
Presentation
Thank you for choosing this range hood. This user manual is designed to provide all necessary instructions for the installation, operation and maintenance of this appliance.
In order to operate the unit correctly and safety, please read this instruction manual carefully before installation and usage.
Warning: Failure to install the screws or fixing device in accordance with these instructions may result in electrical hazards.
PARTS SUPPLIED
| Description Drawing | QTY(pc/set) | |
| Cooker Hood | 1 | |
| Glass | 1 | |
| Outside chimney | 1 | |
| Inside chimney | 1 | |
| Outside chimney bracket | 1 | |
| Inside chimney bracket | 1 | |
| Hook | 1 | |
| Wall plug | 9 | |
| Screw(ST4*40mm) | 7 | |
| Screw(ST4*30mm) | 2 | |
| Screw(ST4×8mm) | 4 | |
| Rubber cushion for glass | 4 | |
| Screw(M4 x 25mm) | 4 | |
| Washer | 4 | |
| V-flap (150) | 1 pair | |
| Adaptor | 1 | |
| Carbon filter | 2 |
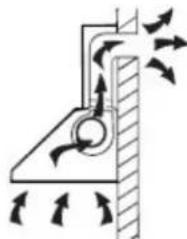
INSTALLATION (VENT OUTSIDE)
If you have an outlet to the outside, your cooker hood can be connected as below picture by means of an extraction duct (enamel, aluminum, flexible pipe or non-flammable material with an interior diameter of 120/150mm)
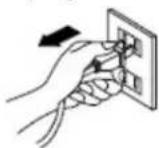
Before installation, turn the unit off and unplug it from the outlet.
Method 1(Installation with hook):
- The cooker hood should be placed at a distance of 65 75cm above the cooking surface for best effect.
Pic 1
-
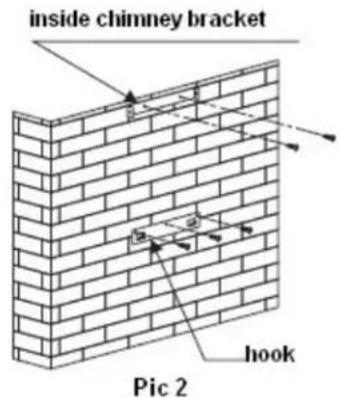
Install the hook on a suitable place once the installation height is fixed, and keep it in line. The fixed position of the inside chimney bracket is the place of chimney. See pic 2.
-
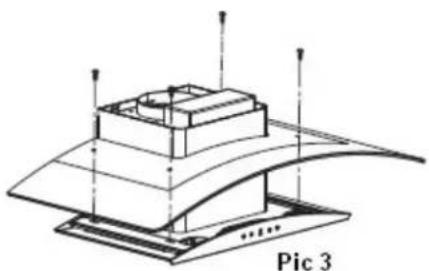
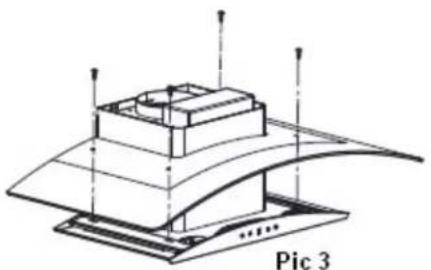
Put the glass according to the lead direction and way on the cooker hood, and then use 4pcs screws + washers + rubber cushions for glass to fix the glass. See pic 3.
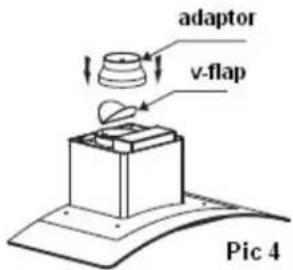
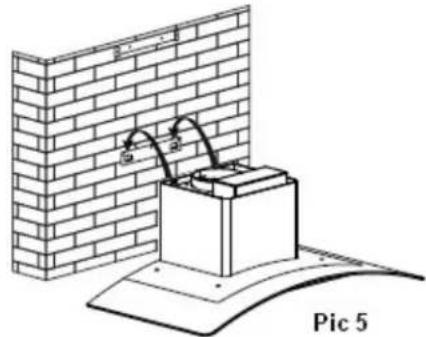
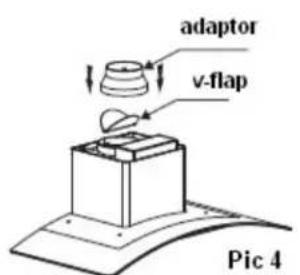
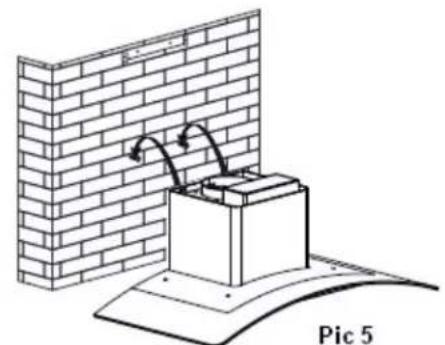
- Equip the adaptor on the outlet, See pic 4. Put the cooker hood on the hook. See pic 5.
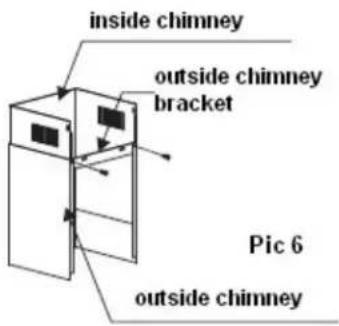
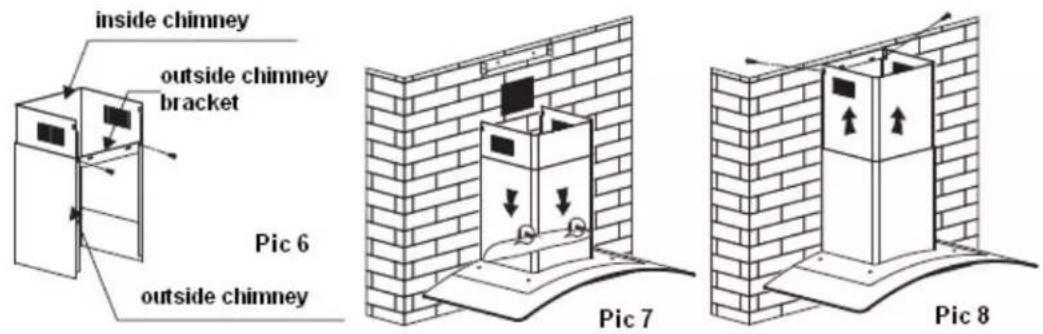
- Install the outside chimney bracket onto the outside chimney with 2pcs ST4*8mm screws, make sure the inside chimney can be moved inside freely. See pic 6.
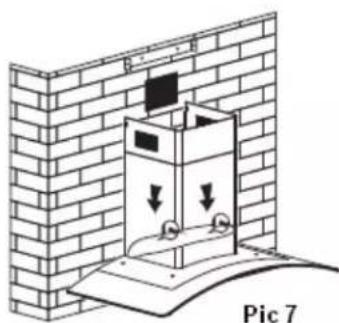
- After adjust the height, fix the body with 2 pcs ST4*30mm safety screws. Note: The two safety vents are positioned on the back housing, with a diameter of 6mm. Then put the two chimneys together onto the cooker hood body. See Pic 7.
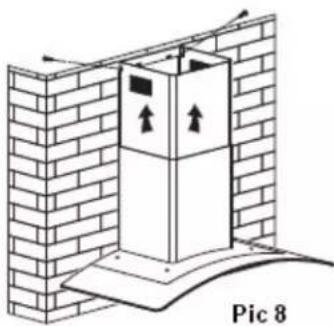
- Adjust the height of the inside chimney into the suitable height, and fix the inside chimney to the inside chimney bracket with 2pcs ST4*8mm screws. See Pic 8.
Method 2(Installation without hook):
- The cooker hood should be placed at a distance of 65 75cm above the cooking surface for best effect.
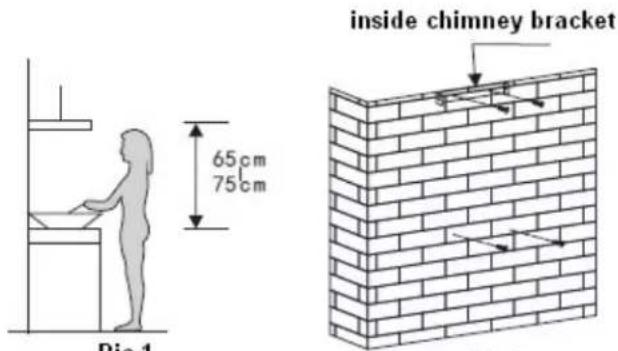
Pic 2
- After decide the cooker hood height, measure the position of the holes for hanging the hood and inside chimney bracket. Drill 4 pcs 8 holes, they are for fixing inside chimney bracket and the hood, and keep the hood level. The fixed position of the outside chimney bracket is the highest place of outside chimney. Screw 2pcs ST4 30mm screws on the wall with wall plugs and then use 2pcs ST4 40mm screws to fix the inside chimney bracket. The screws (ST4× 30mm) installed should leave for 3-5mm out of the wall to hang the hood. See pic 2.
- Put the glass according to the lead direction and way on the cooker hood, and then use 4pcs screws + washers + rubber cushions for glass to fix the glass. See pic 3.
- Equip the adaptor on the outlet, see pic 4. Put the cooker hood on the wall mounted screws. See pic 5.
-
Install the outside chimney bracket onto the outside chimney with 2pcs ST4*8mm screws, make sure the inside chimney can be moved inside freely. See pic 6.
-
After adjust the height, fix the body with 2 pcs ST4*30mm safety screws. Note: The two safety vents are positioned on the back housing, with a diameter of 6mm. Then put the two chimneys together onto the cooker hood body. See Pic 7.
- Adjust the height of the inside chimney into the suitable height, and fix the inside chimney to the inside chimney bracket with 2pcs ST4*8mm screws. See Pic 8.
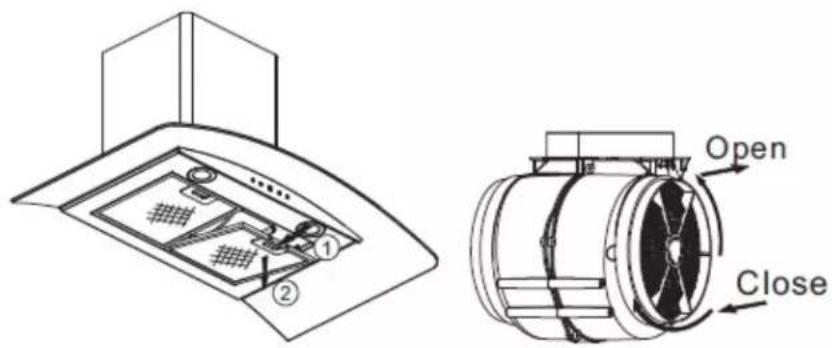
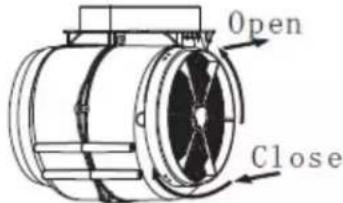
Carbon filter installation:
(1) The aluminum filter should be detached first. Press the lock and pull it downward.
(2) Install the carbon filter by rotating the carbon filter clockwise.
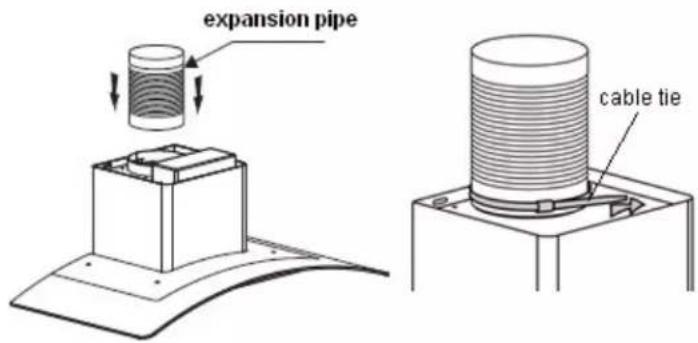
Remark:
Install the expansion pipe on the cooker hood if need. Fix the expansion pipe with a cable tie.(The expansion pipe and cable tie are not supplied with the product. They are optional)
OPERATION


There are five buttons: (Low), (Mid), (High), (Lamp), (Power). See picture above.
- After connecting to power, indicator light will lit on, all the output close and the hood will enter standby mode. The indicator light will be off automatically after reminding if no operation.
- Power on: Press power button once, its indicator light will lit on, the hood works at low speed. Indicator light of low speed will be bright. Press power button again to close it, and its indicator light will be off. All the function operation of the hood will be closed, the hood enters into standby mode, and run by circle.
The speed buttons and lamp button can work separately and not controlled by the power button. When a certain function button is pressed, the hood operates at that function status. Press (Power) button under any status, the cooker hood will be switched off without any functions.
- Press lamp button once; lights will be turn on. Indicator light of lamp button and power button will lit on. Press lamp button again to turn off the lights. Indicator light of lamp button and power button will be off. And recycle like this.

- Press the (High) button once, motor runs on high speed, the indicator light of high button and power button will beam. Press high button again and the motor will stop. Indicator light of high button and power button will be off, and run by circle.
- Press the (Mid) button once, motor runs on middle speed, the indicator light of middle button and power button will beam. Press middle button again and the motor will stop. Indicator light of middle button and power button will be off, and run by circle.
- Press the (low) button once, motor runs on low speed, the indicator light of low button and power button will beam. Press low button again and the motor will stop. Indicator light of low button and power button will be off, and run by circle.
- Low speed, mid speed and high speed cannot work at the same time. When hood is on high speed, press low speed, it will turn to low speed at once; when it is in low speed, press middle speed, it will turn to middle speed immediately, and so on.
CARBON FILTER REPLACEMENT
Activated carbon filter can be used to trap odors. Normally the activated carbon filter should be changed every 3 to 6 months according to your cooking habits. The installation procedure of activated carbon filter is as below:
(1) Before installing or replacing the carbon filters, disconnect the mains power to the unit.
(2) Press the filter lock and remove the mesh filter.
(3) Turn the old carbon filter on both sides of the motor anti-clockwise. Replace the carbon filters with the new carbon filters.
(4) Replace the mesh filter.
(5) Connect the mains power supply to the wall socket.
NOTE:
Make sure the filter is securely locked. Otherwise, it would loosen and cause dangerous.
- When activated carbon filter attached, the suction power will be lowered.
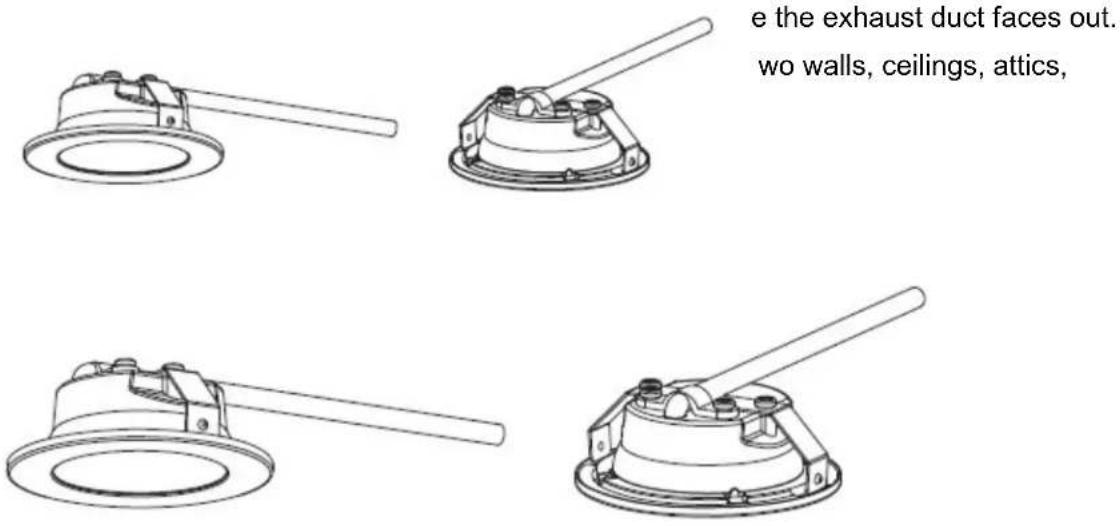
REPLACING THE BULB:
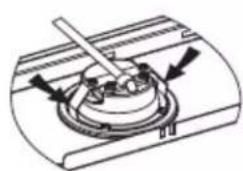
Remove the grease filter.
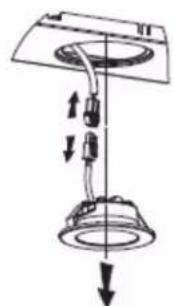
Use a tool or the hand to press the spring splinter of both sides of LED light to the inside, until the light is pressed out, see pic 1. Then slightly pull the light connecting wire out, and dismantle the terminal of the light connecting wire. See pic 2.
Apply the reverse procedure to install the light back.
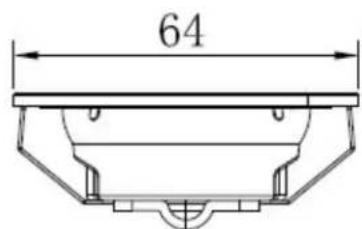
- ILCOS D code for this lamp is: DSR-1.5/65-S-64
-LED modules-round lamp
- Max wattage: 2x1.5 W
Voltage range: DC 12V
-Dimensions:
Pic 1
Pic 2
MAINTENANCE
Before cleaning, switch the unit off and unplug the appliance.
I. Regular Cleaning
Use a soft cloth moistened with hand-warm mildly soapy water or household cleaning detergent. Never use metal pads, chemical, abrasive material or stiff brush to clean the unit.
II. Monthly Cleaning for metallic anti-grease filter
ESSENTIAL: Clean the filter every month can prevent any risk of fire.
The filter collects grease, smoke and dust.... so the filter is directly affecting the efficiency of the cooker hood. If not cleaned, the grease residue (potential flammable) will saturate on the filter. Clean it with household cleaning detergent.
INFORMATION FOR COOKER HOOD
| Symbol Value Unit | |||
| Reference GHS972IX/GHX972BK | |||
| Model identification | SY-3388C2-E2-C29-L12-900 | ||
| Annual Energy Consumption | AEChoad 15,4 kWh/a | ||
| Time increase factor f 0,7 | |||
| Energy Efficiency class | Class A++ | ||
| Energy Efficiency Index | EEIhoad 34,5 | ||
| Fluid Dynamic Efficiency | FDEhoad 35,3 | ||
| Measured air pressure at best efficiency point | P BEP | 249 | Pa |
| Measured airflow rate at the best efficiency | QBEP 252,4 | m | 3/h |
| Measured electric power input at best efficiency point | W BEP | 49,4 | W |
| Fluid Dynamic Efficiency class | Class A | ||
| Nominal power of the lighting system | WL 3,8 W | ||
| Light Efficiency LE | hood 33,9 | Lux/W | |
| Light Efficiency Class | A | ||
| Average illumination of the lighting system on the cooking surface | Emiddle 129 | lux | |
| Grease Filtering Efficiency | GFEhood 77,2 | ||
| Grease Filtering Efficiency(GFE hood) class | Class C | ||
| Air flow at working point | Highest setting:561 Lowest setting: 190 | m³/h | |
| Maximum airflow Q | max 596 | m | ³/h |
| Air flow in intensive mode ('boost') | |||
| Noise emission at maximum speed in normal use | LWA | 63 | dB |
| Noise emission at minimum speed in normal use | LWA | 51 | dB |
| Measured power consumption on off mode | Po | 0,34 | W |
| Measured power consumption on standby mode | Ps | - | W |
The measurement and calculation method of the above table was done in accordance with commission regulation (EU) No 65/2014 & 66/2014.
Note:
The following shows how to reduce total environmental impact (e.g. energy use) of the cooking process).
(1) Install the cooker hood in a proper place where there is efficient ventilation.
(2) Clean the cooker hood regularly so as not to block the airway.
(3) Remember to switch off the cooker hood light after cooking.
(4) Remember to switch off the cooker hood after cooking.
Information for dismantling
Do not dismantle the appliance in a way which is not shown in the user manual. The appliance could not be dismantled by user. At the end of life, the appliance should not be disposed of with household waste. Check with you Local Authority or retainer for recycling advice.
ENVIRONMENTAL PROTECTION:
This product is marked with the symbol on the selective sorting of waste electronic equipment. This means that this product must not be disposed of with household waste but must be supported by a system of selective collection in accordance with Directive 2012/19/EC. It will
then be recycled or dismantled to minimize impacts on the environment, electrical and electronic products are potentially dangerous for the environment and human health due to the presence of hazardous substances.
For more information, please contact your local or regional authorities.
Environment friendly disposal! You can help protect the environment! Please remember to respect the local regulations: hand in the non-working electrical equipments to an appropriate waste disposal centre. The packaging material is recyclable. Dispose of the packaging in an environmentally friendly manner and make it available for the recyclable material collection-service.