Soundweb Contrio AC-V - Controller BSS Audio - Free user manual and instructions
Find the device manual for free Soundweb Contrio AC-V BSS Audio in PDF.

User questions about Soundweb Contrio AC-V BSS Audio
0 question about this device. Answer the ones you know or ask your own.
Ask a new question about this device
Download the instructions for your Controller in PDF format for free! Find your manual Soundweb Contrio AC-V - BSS Audio and take your electronic device back in hand. On this page are published all the documents necessary for the use of your device. Soundweb Contrio AC-V by BSS Audio.
USER MANUAL Soundweb Contrio AC-V BSS Audio
soundweb CONTROLI0 controllers
Installation Guide
Analog Wall Controllers:
AC-V
AC-5S

IMPORTANT SAFETY INSTRUCTIONS

ATTENTION
CHHATBCCHC
PAV
WARNING: To remove the text, please use the Escalable
中
ATTENION: PAAH CAVVPE AAN 1
TCCCTCCTTCCTTATAPPAH1A
1.2018年1月1日
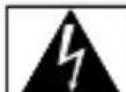
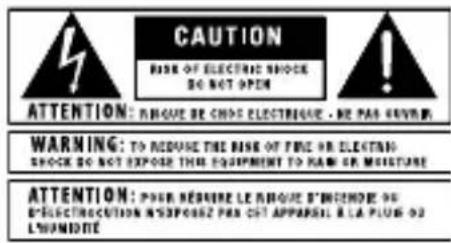
The symbols shown above are internationally accepted symbols that warn of potential hazards with electrical products. The lightning flash with arrowpoint in an equilateral triangle means that there are dangerous voltages present within the unit. The exclamation point in an equilateral triangle indicates that it is necessary for the user to refer to the owner's manual.
These symbols warn that there are no user serviceable parts inside the unit. Do not open the unit. Do not attempt to service the unit yourself. Refer all servicing to qualified personnel. Opening the chassis for any reason will void the manufacturer's warranty. Do not get the unit wet. If liquid is spilled on the unit, shut it off immediately and take it to a dealer for service. Disconnect the unit during storms to prevent damage.
The following is indicative of low altitude use; do not use this product above 2000m.

U.K. MAINS PLUG WARNING
A molded mains plug that has been cut off from the cord is unsafe. Discard the mains plug at a suitable disposal facility.
NEVER UNDER ANY CIRCUMSTANCES SHOULD YOU INSERT A DAMAGED OR CUT MAINS PLUG INTO A 13 AMP POWER SOCKET.
Do not use the mains plug without the fuse cover in place. Replacement fuse covers can be obtained from your local retailer. Replacement fuses are 13 amps and MUST be ASTA approved to BS1362.
WARNING
Use only VW-1 rated wiring and Ethernet cables for RJ45 POE and analog connections. Equipment to be powered by certified POE power adaptor with rated output of 48VDC, 13W.
SAFETY INSTRUCTIONS
NOTICE FOR CUSTOMERS IF YOUR UNIT IS EQUIPPED WITH A POWER CORD.
WARNING: THIS APPLIANCE SHALL BE CONNECTED TO A MAINS SOCKET OUTLET WITH A PROTECTIVE EARTHING CONNECTION.
THE CORES IN THE MAINS LEAD ARE COLOURED IN ACCORDANCE WITH THE FOLLOWING CODE:
AS COLOURS OF THE CORES IN THE MAINS LEAD OF THIS APPLIANCE MAY NOT CORRESPOND WITH THE COLOURED MARKINGS IDENTIFYING THE TERMINALS IN YOUR PLUG, PROCEED AS FOLLOWS:
- THE CORE WHICH IS COLOURED GREEN AND YELLOW MUST BE CONNECTED TO THE TERMINAL IN THE PLUG MARKED WITH THE LETTER E, OR WITH THE EARTH SYMBOL, OR COLOURED GREEN, OR GREEN AND YELLOW.
- THE CORE WHICH IS COLOURED BLUE MUST BE CONNECTED TO THE TERMINAL MARKED N OR COLOURED BLACK.
- THE CORE WHICH IS COLOURED BROWN MUST BE CONNECTED TO THE TERMINAL MARKED L OR COLOURED RED.
THIS EQUIPMENT MAY REQUIRE THE USE OF A DIFFERENT LINE CORD, ATTACHMENT PLUG, OR BOTH, DEPENDING ON THE AVAILABLE POWER SOURCE AT INSTALLATION. IF THE ATTACHMENT PLUG NEEDS TO BE CHANGED, REFER SERVICING TO QUALIFIED SERVICE PERSONNEL WHO SHOULD REFER TO THE TABLE BELOW. THE GREEN/YELLOW WIRE SHALL BE CONNECTED DIRECTLY TO THE UNITS CHASSIS.
| CONDUCTOR | WIRE COLOR | |
| Normal Alt | ||
| L LIVE BROWN BLACK | ||
| N NEUTRAL BLUE WHITE | ||
| E EARTH GND GREEN/YEL GREEN | ||
WARNING: IF THE GROUND IS DEFEATED, CERTAIN FAULT CONDITIONS IN THE UNIT OR IN THE SYSTEM TO WHICH IT IS CONNECTED CAN RESULT IN FULL LINE VOLTAGE BETWEEN CHASSIS AND EARTH GROUND. SEVERE INJURY OR DEATH CAN THEN RESULT IF THE CHASSIS AND EARTH GROUND ARE TOUCHED SIMULTANEOUSLY.
WARNING:
- APPARATET MÁ TILKOPLES JORDDET STIKKONTAKT.
- APPARATEN SKALL ANSLUTAS TILL JORDAT UTTAG.
LAITE ON LIETETAVA SUOJAKOSKETTIMILA VARUSTETUUN PISTORASIAAN.
IMPORTANT SAFETY INSTRUCTIONS
WARNING FOR YOUR PROTECTION READ THE FOLLOWING:
READ THESE INSTRUCTIONS.
KEEP THESE INSTRUCTIONS.
HEED ALL WARNINGS.
FOLLOW ALL INSTRUCTIONS.
DO NOT USE THIS APPARATUS NEAR WATER.
CLEAN ONLY WITH A DRY CLOTH.
FOR INDOOR USE ONLY.
DO NOT BLOCK ANY OF THE VENTILATION OPENINGS. INSTALL IN ACCORDANCE WITH THE MANUFACTURER'S INSTRUCTIONS.
DO NOT INSTALL NEAR ANY HEAT SOURCES SUCH AS RADIATORS, HEAT REGISTERS, STOVES, OR OTHER APPARATUS (INCLUDING AMPLIFIERS) THAT PRODUCE HEAT.
ONLY USE ATTACHMENTS/ACCESSORIES SPECIFIED BY THE MANUFACTURER.
UNPLUG THIS APPARATUS DURING LIGHTNING STORMS OR WHEN UNUSED FOR LONG PERIODS OF TIME.
Do not defeat the safety purpose of the polarized or grounding-type plug. A polarized plug has two blades with one wider than the other. A grounding type plug has two blades and a third grounding prong. The wide blade or third prong are provided for your safety. If the provided plug does not fit your outlet, consult an electrician for replacement of the obsolete outlet.
Protect the power cord from being walked on or pinched particularly at plugs, convenience receptacles, and the point where they exit from the apparatus.
Use only with the cart stand, tripod bracket, or table specified by the manufacture, or sold with the apparatus. When a cart is used, use caution when moving the cart/apparatus combination to avoid injury from tip-over.

Refer all servicing to qualified service personnel. Servicing is required when the apparatus has been damaged in any way, such as power-supply cord or plug is damaged, liquid has been spilled or objects have fallen into the apparatus, the apparatus has been exposed to rain or moisture, does not operate normally, or has been dropped.
POWER ON/OFF SWITCH: The Power switch used in this piece of equipment DOES NOT break the connection from the mains.
MAINS DISCONNECT: The plug shall remain readily operable. For rack-mount or installation where plug is not accessible, an all-pole mains switch with a contact separation of at least 3mm in each pole shall be incorporated into the electrical installation of the rack or building.
If connected to 240V supply, a suitable CSA/UL certified power cord shall be used for this supply.
ELECTROMAGNETIC COMPATIBILITY
This device complies with part 15 of the FCC Rules and the Product Specifications noted on the Declaration of Conformity.
Operation is subject to the following two conditions:
- this device may not cause harmful interference, and
- this device must accept any interference received, including interference that may cause undesired operation.
Operation of this unit within significant electromagnetic fields should be avoided. - use only shielded interconnecting cables.

If you want to dispose this product, do not mix it with general household waste. There is a separate collection system for used electronic products in accordance with legislation that requires proper treatment, recovery and recycling.
Private households in the 25 member states of the EU, in Switzerland and Norway may return their used electronic products free of charge to designated collection facilities or to a retailer (if you purchase a similar new one).
For Countries not mentioned above, please contact your local authorities for a correct method of disposal.
By doing so you will ensure that your disposed product undergoes the necessary treatment, recovery and recycling and thus prevent potential negative effects on the environment and human health.
CONSIGNES DE SECURITÉ IMPORTANTES
DECLARATION OF CONFORMITY
Manufacturer's Name: BSS Audio
Manufacturer's Address: 10653 South River Front Parkway Suite 300
South Jordan, Utah 84095, USA
declares that the product:
Product name: ACV and AC5S
Note: Product name may be suffixed by the EU.
Product option: None
conforms to the following Product Specifications:
Safety: IEC 60065-01 + AM1 + AM2
EMC: EN 61000-4-2
EN 61000-4-3
EN610000-4-4
EN610000-4-6
Supplementary Information:
The product herewith complies with the requirements of the:
Low Voltage Directive 2006/95/EC
EMC Directive 2004/108/EC
RoHS Directive 2011/65/EC
WEEE Directive 2002/96/EC
With regard to Directive 2005/32/EC and EC Regulation
1275/2008 of 17 December 2008, this product is designed, produced, and classified as Professional Audio Equipment and thus is exempt from this Directive.
C. Rex Reed
Director, Engineering
Signal Processing
10653 South River Front Parkway
Suite 300
South Jordan, Utah 84095, USA
Date:November 5,2014
European Contact: Your local BSS Audio Sales and Service Office or
Harman Signal Processing
10653 South River Front Parkway
Suite 300
South Jordan, Utah 84095, USA
Ph: (801) 566-8800
Fax: (801) 568-7583
Déclaration de CONFORMITE
Directive 2004/108/CE
Directive RoHS 2011/65/UE
Directive DEEE 2002/96/CE
10653 South River Front Parkway
Suite 300
South Jordan, Utah 84095, ETATS-UNIS
Date:5novembre2014
Harman Signal Processing
10653 South River Front Parkway
Suite 300
South Jordan, Utah 84095, ETATS-UNIS
Product Registration/Warranty
To register your product, please visit http://bssaudio.com/en-US/support/warranty-registration.
For warranty information, please visit http://bssaudio.com/en-US/support/warranty_policy.
Included Items
AC-V, AC-5S:
- Contrio Analog Wall Controller
- Wall Plate
-
(Qty 2) 6 / 32" Mounting Screws
-
AC-V-EU, AC-5S-EU:
- Contrio Analog Wall Controller
- [Qty 2] 3.5mm Mounting Screws
- (Qty 2) 3mm Mounting Screws
Introduction
This guide was written with the aim of guiding you through the installation of a Soundweb Contrio wall controller. We recommend that you read this install guide before attempting to install and operate the controller.
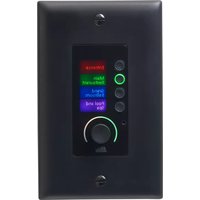
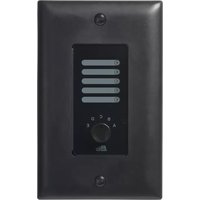
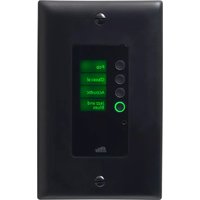
BSS Audio Soundweb Contrio wall controllers are the next-generation controllers for use with BSS Audio Soundweb London and other compatible devices. Attractively priced analog and Ethernet HiQnet™ controller options are available. Each controller model is available in black or white and in US or EU mounting variants.
The analog controllers consist of simple resistor-based switches and rotary potentiometers to control Soundweb London devices though their Control Input ports via 2-conductor wire.
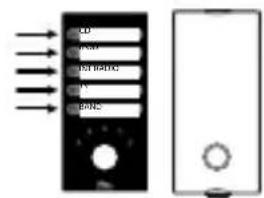
Front Panel

1. Volume Potentiometer
This resistor-based potentiometer is used for controlling volume.
2. 5-Position Selector Switch
This resistor-based, 5-position switch can be programmed to control source selection, preset selection, or any other assignable state variable.
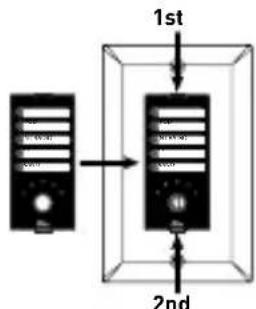
Mechanical Installation
The US versions of the Contrio wall controllers were designed to fit into standard 1-gang wall boxes. The EU versions were designed to fit into standard EU 1-gang square or round boxes. Screws are provided with each controller to fix them in place. Both 3mm and 3.5mm screws are provided with EU models for mounting as required.
Dimensions of each analog wall controller model are shown below.
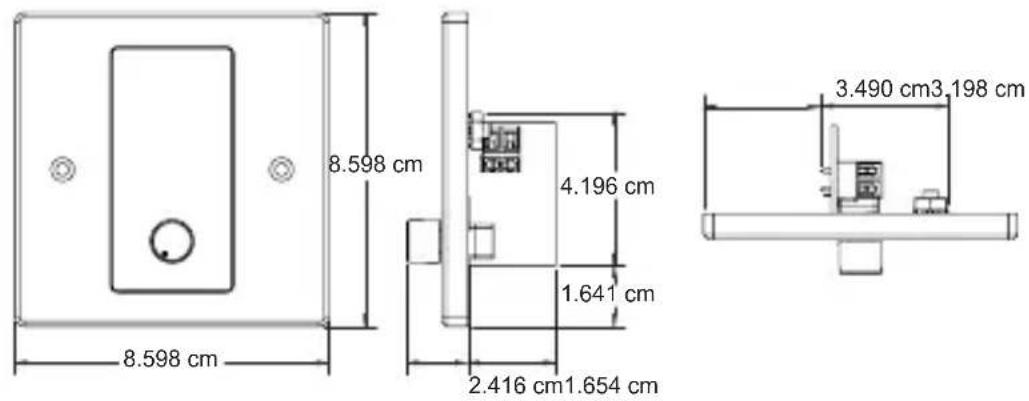
AC-V-EU, AC-5S-EU (EU Versions)
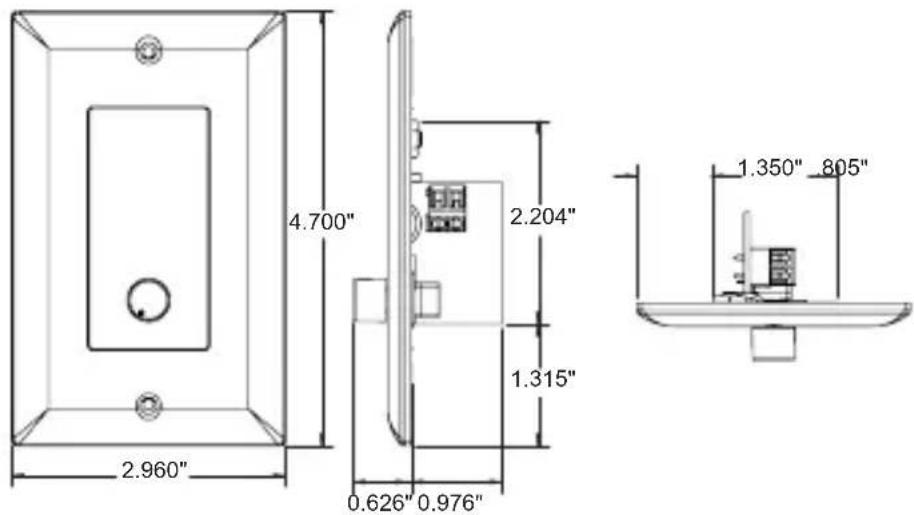
AC-V, AC-5S (US Versions)
Connections
The analog Contrio controllers have 2 terminals: one which carries the voltage for source or level control (depending on controller type) and one for ground (or common). The below diagram shows how a single controller would be connected to the Control Input ports for control over port 1. Each Soundweb London chassis can support connections of up to twelve analog Contrio controllers.
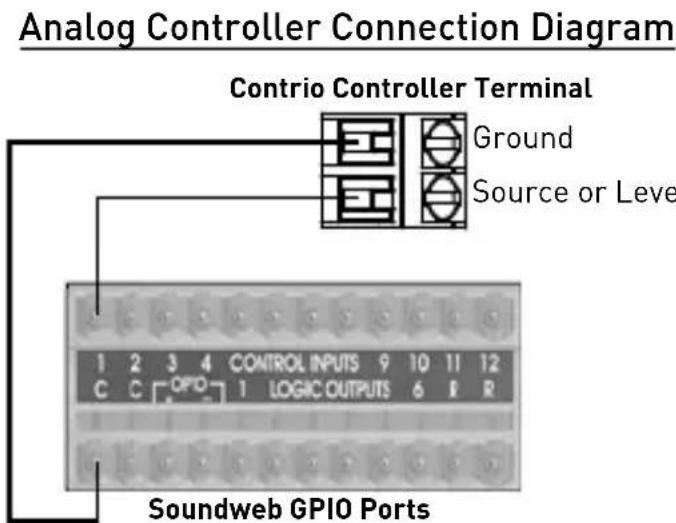
NOTE: The Soundweb device must be configured for 2-wire mode when using the analog Contrio controllers. This is the default mode.
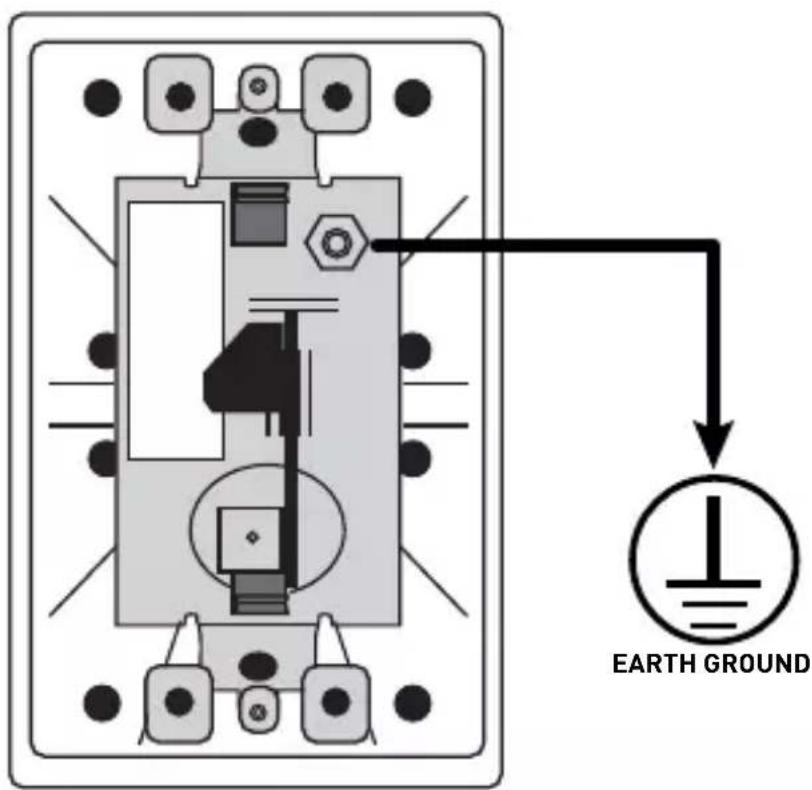
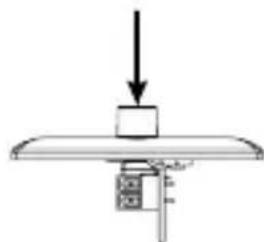
Ground Lug Connection (Optional)
A ground lug is provided on all Contrio controllers for connecting to an earth ground. This can provide further protection against ESD (Electrostatic Discharge). In most cases this connection should not be necessary. However, if you experience irregular behavior when testing a Contrio controller, connecting this lug to an earth ground may resolve the issue.
Applying Labels To The Controllers
The analog Contrio controllers allow you to remove the window lens overlay so you can apply labels to the window insert beneath it.
To apply labels to an analog controller:
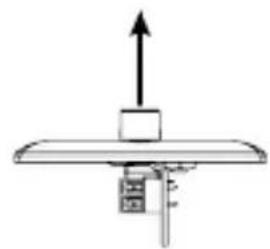
- Carefully pull the knob straight off.
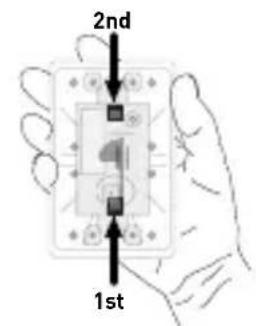
- Hold the controller upside down in the palm of one hand. With the fingernails of the other hand, press and release the tab closest to the pot first and then press and release the other tab, allowing the insert and overlay to fall into the palm of the hand holding the controller.
- Remove the window insert from the window lens overlay then affix labels to the window insert.
- Place window insert back into window lens overlay and insert the tab furthest from the pot into the slot first, then insert the tab closest to the pot so that the lens clicks into place.
- Place the knob back on the pot shaft, ensuring to align the flat side of the knob with the flat side of the pot shaft.
Technical Specifications
Recommended wiring: VW-1 Rated, 5V, 1mA
品
by HARMAN
Phone: (801) 566-8800
Website: bssaudio.com
Support: bssaudio.com/en-US/support
Contrio Install Guide
PN:5048980-C
BSS Audio is a registered trademark of Harman
© 2015 Harman
All rights reserved
Printed in China