Soundweb Contrio Server - Controller BSS Audio - Free user manual and instructions
Find the device manual for free Soundweb Contrio Server BSS Audio in PDF.

| Brand | BSS Audio |
| Model | Soundweb Contrio Server |
| Product Type | Network Audio Controller |
| Dimensions (W x D x H) | 48.3 x 25.4 x 4.4 cm (19 inches, 1U) |
| Weight | Approximately 4.5 kg |
| Power Supply | 100-240 V AC, 50/60 Hz, max consumption 50 W |
| Operating Temperature Range | 0 °C to 40 °C |
| Operating Relative Humidity | 20% to 80% non-condensing |
| Main Functions | DSP audio processing, audio routing and mixing, network control, Soundweb device management, software configuration interface |
| Connectivity | Ethernet ports, RS-232 serial ports, analog and digital audio inputs/outputs (depending on configuration) |
| Supported Protocols | TCP/IP, UDP, CobraNet (depending on version), Audio over Ethernet |
| Rack Type | 19-inch rack mount, 1U |
| Enclosure Material | Steel with black finish |
| Ventilation | Internal fans, lateral airflow |
| Maintenance and Cleaning | Disconnect the device before cleaning. Use a soft, dry cloth. Do not use liquid or abrasive products. |
| Safety | Installation in accordance with local electrical standards. Do not obstruct ventilation openings. Use only in a dry environment away from water splashes. |
| Spare Parts and Repairability | Contact BSS Audio after-sales service or an authorized technician for any repairs. Use original parts. |
| General Information | Professional device intended for fixed installation or touring use. Configuration via dedicated software (Soundweb London). |
Frequently Asked Questions - Soundweb Contrio Server BSS Audio
User questions about Soundweb Contrio Server BSS Audio
0 question about this device. Answer the ones you know or ask your own.
Ask a new question about this device
Download the instructions for your Controller in PDF format for free! Find your manual Soundweb Contrio Server - BSS Audio and take your electronic device back in hand. On this page are published all the documents necessary for the use of your device. Soundweb Contrio Server by BSS Audio.
USER MANUAL Soundweb Contrio Server BSS Audio
IMPORTANT SAFETY INSTRUCTIONS

CAUTION
RISK OF ELECTRIC SHOCK DO NOT OPEN

ATTENTION: RISQUE DE CHOC ELECTRIQUE - NE PAS OUVRIR
WARNING: TO REDUCE THE RISK OF FIRE OR ELECTRIC
SHOCK DO NOT EXPOSE THIS EQUIPMENT TO RAIN OR MOISTURE
ATTENTION: POUR RÉDUIRE LE RISQUE D'INCENDIE OU
D'ÉLECTROCUTION N'EXPOSEZ PAS CET APPAREIL À LA PLUIE OU L'HUMIDITÉ
The symbols shown above are internationally accepted symbols that warn of potential hazards with electrical products. The lightning flash with arrowpoint in an equilateral triangle means that there are dangerous voltages present within the unit. The exclamation point in an equilateral triangle indicates that it is necessary for the user to refer to the owner's manual.
These symbols warn that there are no user serviceable parts inside the unit. Do not open the unit. Do not attempt to service the unit yourself. Refer all servicing to qualified personnel. Opening the chassis for any reason will void the manufacturer's warranty. Do not get the unit wet. If liquid is spilled on the unit, shut it off immediately and take it to a dealer for service. Disconnect the unit during storms to prevent damage.
The following is indicative of low altitude use; do not use this product above 2000m.

U.K. MAINS PLUG WARNING
A molded mains plug that has been cut off from the cord is unsafe. Discard the mains plug at a suitable disposal facility.
NEVER UNDER ANY CIRCUMSTANCES SHOULD YOU INSERT A DAMAGED OR CUT MAINS PLUG INTO A 13 AMP POWER SOCKET.
Do not use the mains plug without the fuse cover in place. Replacement fuse covers can be obtained from your local retailer. Replacement fuses are 13 amps and MUST be ASTA approved to BS1362.

If you want to dispose this product, do not mix it with general household waste. There is a separate collection system for used electronic products in accordance with legislation that requires proper treatment, recovery and recycling.
Private households in the 25 member states of the EU, in Switzerland and Norway may return their used electronic products free of charge to designated collection facilities or to a retailer (if you purchase a similar new one).
For Countries not mentioned above, please contact your local authorities for a correct method of disposal.
By doing so you will ensure that your disposed product undergoes the necessary treatment, recovery and recycling and thus prevent potential negative effects on the environment and human health.
WARNING FOR YOUR PROTECTION READ THE FOLLOWING:
READ THESE INSTRUCTIONS.
KEEP THESE INSTRUCTIONS.
HEED ALL WARNINGS.
FOLLOW ALL INSTRUCTIONS.
DO NOT USE THIS APPARATUS NEAR WATER.
CLEAN ONLY WITH A DRY CLOTH.
FOR INDOOR USE ONLY.
DO NOT BLOCK ANY OF THE VENTILATION OPENINGS. INSTALL IN ACCORDANCE WITH THE MANUFACTURER'S INSTRUCTIONS.
DO NOT INSTALL NEAR ANY HEAT SOURCES SUCH AS RADIATORS, HEAT REGISTERS, STOVES, OR OTHER APPARATUS (INCLUDING AMPLIFIERS) THAT PRODUCE HEAT.
ONLY USE ATTACHMENTS/ACCESSORIES SPECIFIED BY THE MANUFACTURER.
UNPLUG THIS APPARATUS DURING LIGHTNING STORMS OR WHEN UNUSED FOR LONG PERIODS OF TIME.
Do not defeat the safety purpose of the polarized or grounding-type plug. A polarized plug has two blades with one wider than the other. A grounding type plug has two blades and a third grounding prong. The wide blade or third prong are provided for your safety. If the provided plug does not fit your outlet, consult an electrician for replacement of the obsolete outlet.
Protect the power cord from being walked on or pinched particularly at plugs, convenience receptacles, and the point where they exit from the apparatus.
Use only with the cart stand, tripod bracket, or table specified by the manufacture, or sold with the apparatus. When a cart is used, use caution when moving the cart/apparatus combination to avoid injury from tip-over.

Refer all servicing to qualified service personnel. Servicing is required when the apparatus has been damaged in any way, such as power-supply cord or plug is damaged, liquid has been spilled or objects have fallen into the apparatus, the apparatus has been exposed to rain or moisture, does not operate normally, or has been dropped.
POWER ON/OFF SWITCH: The Power switch used in this piece of equipment DOES NOT break the connection from the mains.
MAINS DISCONNECT: The plug shall remain readily operable. For rack-mount or installation where plug is not accessible, an all-pole mains switch with a contact separation of at least 3 mm in each pole shall be incorporated into the electrical installation of the rack or building.
If connected to 240V supply, a suitable CSA/UL certified power cord shall be used for this supply.
This Equipment is intended for rack mount use only.
IMPORTANT SAFETY INSTRUCTIONS
ELECTROMAGNETIC COMPATIBILITY
This device complies with part 15 of the FCC Rules and the Product Specifications noted on the Declaration of Conformity. Operation is subject to the following two conditions:
- this device may not cause harmful interference, and
- this device must accept any interference received, including interference that may cause undesired operation.
Operation of this unit within significant electromagnetic fields should be avoided.
- use only shielded interconnecting cables.
SAFETY INSTRUCTIONS
NOTICE FOR CUSTOMERS IF YOUR UNIT IS EQUIPPED WITH A POWER CORD.
WARNING: THIS APPLIANCE SHALL BE CONNECTED TO A MAINS SOCKET OUTLET WITH A PROTECTIVE EARTHING CONNECTION.
THE CORES IN THE MAINS LEAD ARE COLOURED IN ACCORDANCE WITH THE FOLLOWING CODE:
AS COLOURS OF THE CORES IN THE MAINS LEAD OF THIS APPLIANCE MAY NOT CORRESPOND WITH THE COLOURED MARKINGS IDENTIFYING THE TERMINALS IN YOUR PLUG, PROCEED AS FOLLOWS:
- THE CORE WHICH IS COLOURED GREEN AND YELLOW MUST BE CONNECTED TO THE TERMINAL IN THE PLUG MARKED WITH THE LETTER E, OR WITH THE EARTH SYMBOL, OR COLOURED GREEN, OR GREEN AND YELLOW.
- THE CORE WHICH IS COLOURED BLUE MUST BE CONNECTED TO THE TERMINAL MARKED N OR COLOURED BLACK.
- THE CORE WHICH IS COLOURED BROWN MUST BE CONNECTED TO THE TERMINAL MARKED L OR COLOURED RED.
THIS EQUIPMENT MAY REQUIRE THE USE OF A DIFFERENT LINE CORD, ATTACHMENT PLUG, OR BOTH, DEPENDING ON THE AVAILABLE POWER SOURCE AT INSTALLATION. IF THE ATTACHMENT PLUG NEEDS TO BE CHANGED, REFER SERVICING TO QUALIFIED SERVICE PERSONNEL WHO SHOULD REFER TO THE TABLE BELOW. THE GREEN/YELLOW WIRE SHALL BE CONNECTED DIRECTLY TO THE UNITS CHASSIS.
| CONDUCTOR | WIRE COLOR | ||
| Normal | Alt | ||
| L | LIVE BROWN | BLACK | |
| N | NEUTRAL | BLUE | WHITE |
| E | EARTH GND | GREEN/YEL | GREEN |
WARNING: IF THE GROUND IS DEFEATED, CERTAIN FAULT CONDITIONS IN THE UNIT OR IN THE SYSTEM TO WHICH IT IS CONNECTED CAN RESULT IN FULL LINE VOLTAGE BETWEEN CHASSIS AND EARTH GROUND. SEVERE INJURY OR DEATH CAN THEN RESULT IF THE CHASSIS AND EARTH GROUND ARE TOUCHED SIMULTANEOUSLY.
WARNING:
• APPARATET MÅ TILKOPLES JORDET STIKKONTAKT.
• APPARATEN SKALL ANSLUTAS TILL JORDAT UTTAG.
• LAITE ON LIITETTÄVÄ SUOJAKOSKETTIMILLA VARUSTETTUUN PISTORASIAAN.
DECLARATION OF CONFORMITY
Manufacturer's Name: BSS Audio
Manufacturer's Address: 10653 South River Front Parkway
Suite 300
South Jordan, Utah 84095, USA
declares that the product:
Product name: BSS Contrio Sever
Note: Product name may be suffixed by the EU.
Product option: None
conforms to the following Product Specifications:
Safety: IEC 60950-1
EMC: EN 55022:2010 EN 55024:2010
FCC Part 15
Supplementary Information:
The product herewith complies with the requirements of the:
Low Voltage Directive 2006/95/EC
EMC Directive 2004/108/EC.
RoHS Directive 2011/65/EC
WEEE Directive 2002/96/EC
With regard to Directive 2005/32/EC and EC Regulation 1275/2008 of 17 December 2008, this product is designed, produced, and classified as Professional Audio Equipment and thus is exempt from this Directive.
Rex C. Reed
Director, Engineering
Signal Processing
10653 South River Front Parkway
Suite 300
South Jordan, Utah 84095, USA
Date: May 21, 2015
European Contact: Your local BSS Audio Sales and Service Office or:
Harman Signal Processing
10653 South River Front Parkway
Suite 300
South Jordan, Utah 84095, USA
Ph: (801) 566-8800
Fax: (801) 568-7583
CONSIGNES DE SÉCURITÉ IMPORTANTES


ATTENTION: RISQUE DE CHOC ELECTRIQUE - NE PAS OUVRIR
WARNING: TO REDUCE THE RISK OF FIRE OR ELECTRIC
SHOCK DO NOT EXPOSE THIS EQUIPMENT TO RAIN OR MOISTURE
ATTENTION: POUR RÉDUIRE LE RISQUE D'INCENDIE OU
D'ÉLECTROCUTION N'EXPOSEZ PAS CET APPAREIL À LA PLUIE OU L'HUMIDITÉ
DÉCLARATION DE CONFORMITÉ
Directive 2004/108/CE.
Directive RoHS 2011/65/UE
Directive DEEE 2002/96/CE
10653 South River Front Parkway
Suite 300
South Jordan, Utah 84095, ÉTATS-UNIS
Date : 21 mai 2015
Harman Signal Processing
10653 South River Front Parkway
Suite 300
South Jordan, Utah 84095, ÉTATS-UNIS
Product Registration/Warranty 2
Important User Information ....2
Included Items....2
Introduction 2
Rack Installation ....3
Front/Rear Panel 4
Cable Recommendations ....5
Connecting To A Contrio Server ....5
Determining Which Port To Use For HiQnet & Dante 6
Determining Dante Port 6
Self Addressing or Direct Connection .... 7
Automatic Addressing - DHCP 12
Static or Manual IP Addressing 17
Specifications 22
Product Registration/Warranty
To register your product, please visit http://bssaudio.com/en-US/support/warranty_registration.
For warranty information, please visit http://bssaudio.com/en-US/support/warranty_policy.
Important User Information
Do not remove covers. No user serviceable parts inside, refer servicing to qualified service personnel. For continued compliance with international EMC regulations, it is important that all cables be screened, and connected as follows:
- Network cables should be of type Cat 5 or higher, fitted with a clip-on ferrite sleeve (STEWART TYPE 28A2029-0A0) near the network socket end.
- This equipment must be earthed. It should not be necessary to remove any protective earth or signal cable shield connections to prevent ground loops. Any such disconnections are outside the recommended practice of BSS Audio, and will render the EMC or safety certificate void.
Included Items
• Soundweb Contrio Server
- Rack Rail Installation Kit
- Power Cables
Introduction
This guide was written with the aim of guiding you through the installation of a Soundweb Contrio Server. We recommend that you read this installation guide before attempting to install and operate the server.
The Soundweb Contrio Server allows logic tasks to be offloaded from BSS Soundweb London devices on the network and managed on a single, more capable, centralized HiQnet™ device. This frees up logic processing power on the Soundweb London devices. The Soundweb Contrio Server also provides self-healing capabilities and functions as a multi-channel media device.
Rack Installation
The Soundweb Contrio Server must be installed according to the guidelines laid out in this document. Damage caused to the Soundweb Contrio Server resulting from a failure to follow these guidelines is not covered by the warranty. The Soundweb Contrio Server MUST be installed using the provided rack rails.
Front/Rear Panel

text_image
1 2 SOUND-VEEL CONTRIO LAVEL
text_image
Diagram of a network device rear panel with labeled ports and connectors1. Front Panel Release
Slide this release up to get access to the power switch.
2. Power Switch
The power switch is located behind the removable front panel. Use this switch to turn the Soundweb Contrio Server on or off.
3. Gigabit Network/Dante Ethernet Ports
Connect one of these ports to the network switch for communication with the HiQnet network. By default both ports have HiQnet control enabled on them, but only one of the ports has Dante enabled. Dante provides up to 64 x 64 Dante I/O channels for connecting to other Dante-equipped audio devices. For information on verifying which port has Dante enabled, see 'Determining Which Port To Use For HiQnet & Dante' on page 6.
4. IEC Power Inlet
Select the appropriate IEC power cable for the country of installation (included) and connect it to this power inlet.
5. Power Cable Retaining Clip
Route the IEC power cable through this retaining clip for power cable management.
Cable Recommendations
Network Connections
For Gigabit speeds, use Cat 5e or Cat 6 cables for all network connections. Cat 5 cable may be used for networks running at a speed of 10/100Mbps.
Dante Connections
For Gigabit speeds, use Cat 5e or Cat 6 cables for all Dante connections. Cat 5 cable may be used for networks running at a speed of 10/100Mbps.
Connecting To A Contrio Server
After mounting the server properly in the rack and applying power, basic configuration is needed. Depending on how your network is configured will determine which method you should use. There are basically three options to choose from:
- Self Addressing (a network without a DHCP server or static IP addresses)
- Automatic Addressing (a network with a DHCP server)
- Static IP addresses (the IP addresses are assigned manually)
No matter which option you chose, there is a requirement to have Audio Architect 1.90.1 or higher to configure the device and update to the latest firmware. If you do not have the software, you may download it from http://audioarchitect.harmanpro.com. If you have problems, the direct connect method (outlined in 'Self Addressing or Direct Connection' on page 7) is the way to verify the most basic of communications.
Determining Which Port To Use For HiQnet & Dante

text_image
IDRAC Gb 1 Gb 2Ports Gb1 are functionally identical. By default both ports have
HiQnet control enabled on them, but only one of the ports has Dante enabled. It is not possible for the configuration process to pre-determine which port will have Dante enabled. For that reason it is necessary to confirm which port Dante is using. Typically it is port Gb 2.
NOTE: If you do not require the use of the built in media engine and therefore the use of Dante, you can skip this next section and go straight to configuring the HiQnet port, starting on page 12.
Determining Dante Port
To determine the Dante port you will need a computer running Audinate's Dante Controller software. The software is free to download from http://www.audinate.com.
To determine the Dante port:
- Connect your PC to the Gb 2 port on the server directly with a Cat 5e or better cable.
- If the computers are not on, power them up and wait approximately 60 seconds for the addressing process to take place.
- Verify that there are amber or green LEDs on the rear of the Contrio server at Gb 2. This indicates that you have a connection between your computer and the server. If the indicators are not illuminated or flashing, check that the cables are seated fully and that the adapter is enabled on your computer.
- Launch Dante controller on the computer.
- If Dante Controller discovers the HiQnet Contrio Server, then the Dante port has been confirmed.
- If Dante Controller does not discover the HiQnet Contrio Server, then move the LAN cable to the other Gb port on the server. Allow time for the address process to take place. After approximately 90 seconds, the HiQnet Contrio Server should appear in the Dante Controller software
- If the Dante Interface of the HiQnet Contrio Server is not found on either port, please check your firewall settings to verify that Dante Controller is not being blocked and repeat the process again.
Self Addressing or Direct Connection
This approach to addressing is the most basic and simplest, but requires time for all of the negotiations to take place. These negotiations can take up to two minutes after the boot up of the server and your computer. This approach removes many of the variables.
To connect using a self-assigned IP address:
- With both your computer and the server turned off, using a Cat 5e or higher cable, directly connect your laptop to port Gb 1 on the rear of the server. The port on the server has auto sensing so you do not need to worry about a crossover cable.
- Turn on both the server and your computer and allow them to boot up. There is no user intervention needed for the server other than applying power. The server will be ready to function after the boot up cycle.
- Verify that there are amber and green LEDs on the rear of the Contrio server at Gb 1. This indicates that you have a connection between your computer and the server. If the indicators are not illuminated or flashing, check that the cables are seated fully and that the adapter is enabled on your computer.
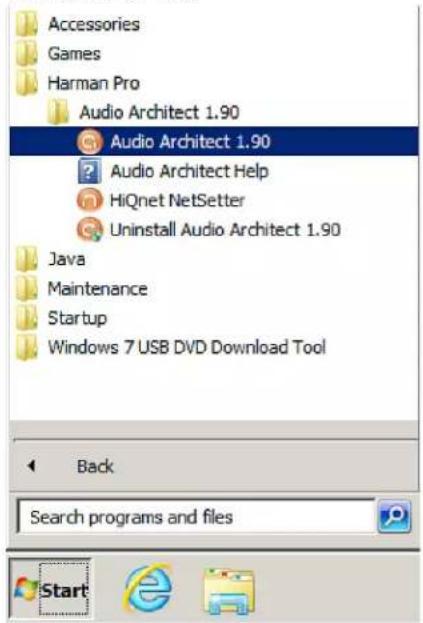
- After verifying connection, on your computer, launch HiQnet NetSetter from the Start Menu — typically under Programs, HARMAN Pro.

text_image
Accessories Games Harman Pro Audio Architect 1.90 Audio Architect 1.90 Audio Architect Help HiQnet NetSetter Uninstall Audio Architect 1.90 Java Maintenance Startup Windows 7 USB DVD Download Tool Back Search programs and files Start- NetSetter may come up with the wrong network adapter selected to communicate with. In the upper left hand corner there is a drop down menu that will list the IP addresses your computer has. Select the IP address that begins with 169.254 the last two numbers will vary. If you do not see that address as one of the options, please verify that your network is enabled and the cables are connected.

text_image
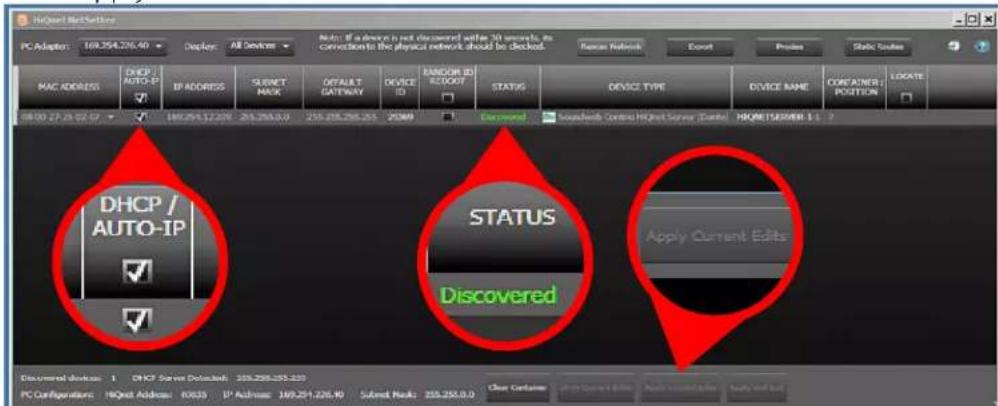
HiQnet NetSetter PC Adapter: 127.0.0.1 ▼ Display: All Devices ▼ No : If a device is not discovered within 30 seconds, its connection to the physical network should be checked. Rescan Network MAC ADDRESS 169.254.226.40 IP ADDRESS SUBNET MASK DEFAULT GATEWAY DEVICE ID RANDOM ID REBOOT STATUS DEVICE TYPE DEVICE NAME CONTAINER : LOCATION LOCATE- If the HiQnet Contrio Server is not found, please check your firewall settings to verify that HiQnet NetSetter is not being blocked and repeat the process again.
- After selecting the network interface, wait up to one minute while the software discovers the address of the Contrio Server. Once it has been discovered, it will appear in the table within NetSetter. The Status column should say 'Discovered' if everything is correct. If the status column does not say 'Discovered', ensure that the DHCP/Auto-IP is checked for the server. If it is not, click to enable it and then at the bottom of the window click Apply Current Edits
text_image
HiQwest Network PC Adapter: 169.254.226.40 Display: All Devices MAC ADDRESS DHCP AUTO-IP IP ADDRESS SUBJECT MASK DETAIL A T GATEWAY DEVICE ID ENSOR ID REQUEST STATUS DEVICE TYPE DEVICE NAME CONTAINER POSITION LOCATE 08:00 27:25:02:57 169.254.12.229 205.255.0.0 255.255.255.255 25389 Discovered Soundheds Controls HQnet Server (Turbo) HMQW1500WBI 1.5 2 DHCP / AUTO-IP STATUS Discovered Apply Current Edits Document Device: 1 DHCP Server Default: 205.255.255.233 PC Configurations: HiQwest Address: 80655 IP Address: 169.254.226.40 Subnet Mask: 205.255.0.0 Close Contains Start Current Edits Apply Current Edits Apply End Eds- Next move the LAN cable to Gw2 approximately 90 seconds and then choose 'Rescan Network' in NetSetter. You should then configure your Gb2 port accordingly. This is most likely your Dante port, so choose the settings appropriate to Dante operation. When finished, click Apply Current Edits to accept changes.
-
You have now established communication between your computer and the server. There is one more piece of configuration that HARMAN recommends.
-
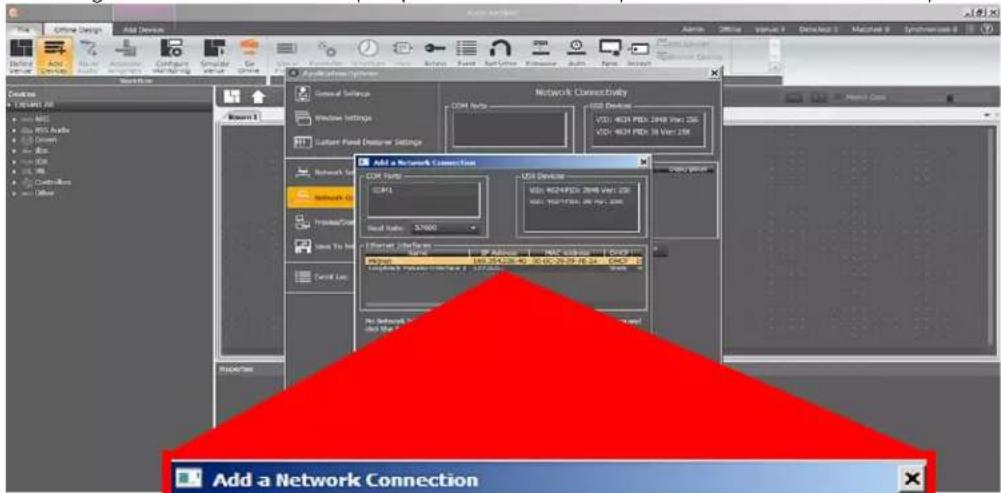
Launch Audio Architect from the Start Menu — typically under Programs, HARMAN Pro.

text_image
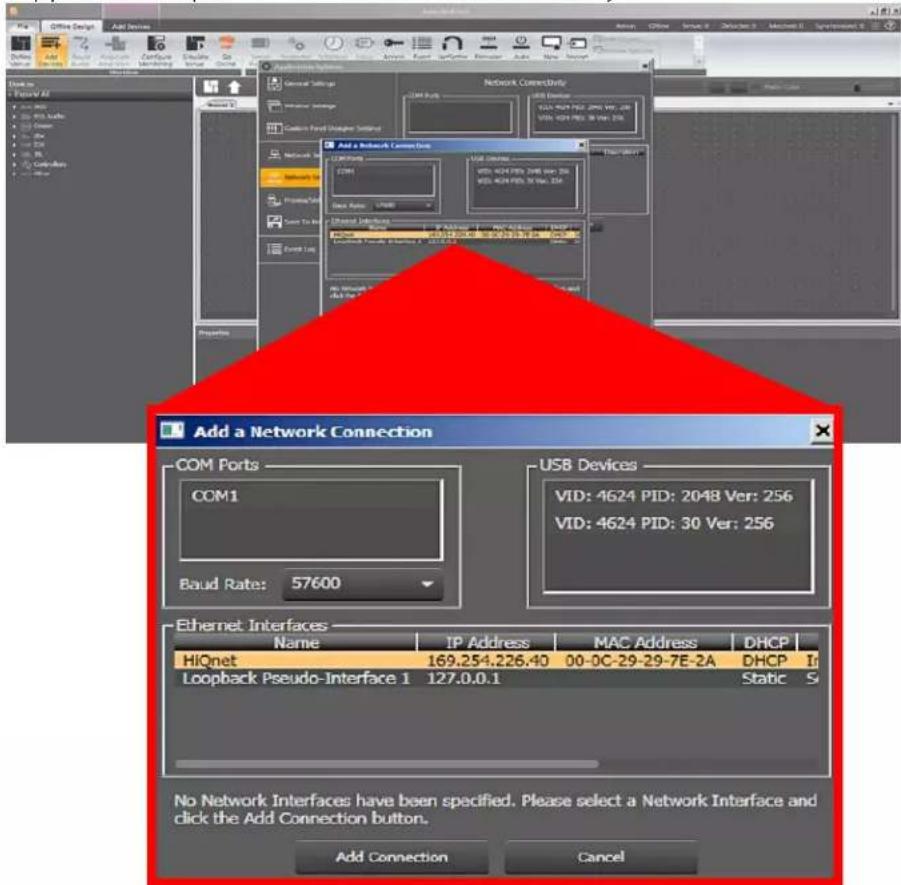
Accessories Games Harman Pro Audio Architect 1.90 Audio Architect 1.90 Audio Architect Help HiQnet NetSetter Uninstall Audio Architect 1.90 Java Maintenance Startup Windows 7 USB DVD Download Tool Back Search programs and files- If you have not launched Audio Architect before, the software will initially ask you to configure the network settings. In the Ethernet Interfaces window, click 'Add Connection' and select the same network adapter as chosen in Step 5. This window can also be found by clicking on 'File' → 'Application Options' → 'Network Connectivity'.
text_image
Add a Network Connection COM Ports COM1 USB Devices VID: 4624 PID: 2048 Ver: 256 VID: 4624 PID: 30 Ver: 256 Baud Rate: 57600 Ethernet Interfaces Name IP Address MAC Address DHCP HiQnet 169.254.226.40 00-0C-29-29-7E-2A DHCP Loopback Pseudo-Interface 1 127.0.0.1 Static S No Network Interfaces have been specified. Please select a Network Interface and click the Add Connection button. Add Connection Cancel
- Close the options window, as it has been verified that there is communication between the server and your computer. The Contrio Server should appear in the Discovered devices. Simply drag it into the venue file.
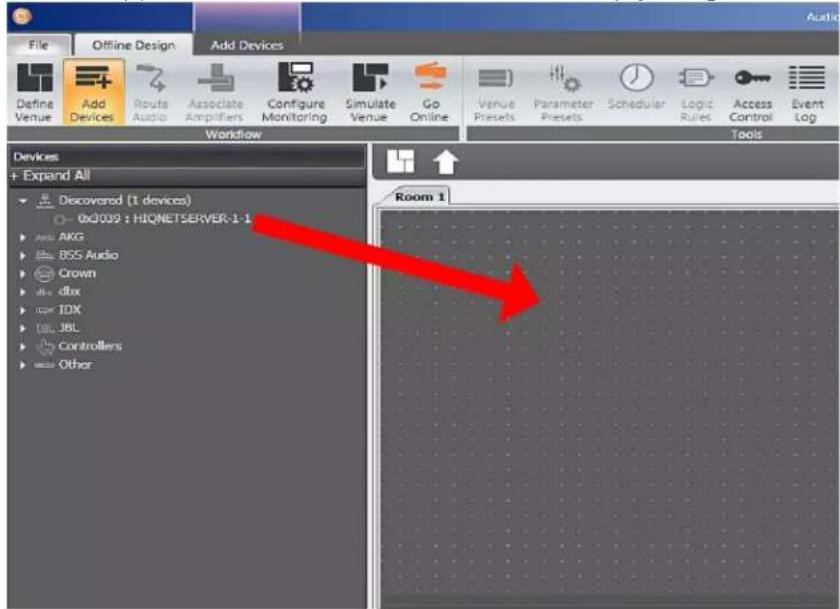
text_image
File Offline Design Add Devices Define Venue Add Devices Route Audio Associate Amplifiers Configure Monitoring Simulate Venue Go Online Venue Presets Parameter Presets Scheduler Logic Rules Access Control Event Log Workflow Tools Devices + Expand All • Discovered (1 devices) 0x3009 : HIQNETSERVER-1-1 • ACG • BSS Audio • Crown • dbx • IDX • JBL • Controllers • Other Room 1- If the HiQnet Contrio Server is not found, please check your firewall settings to verify that HiQnet Audio Architect is not being blocked and repeat the process again.
- Highlight the Server by first clicking on the rack, then clicking on the device. When the device turns yellow, right click on the Contrio Server and select 'Change HiQnet Adapter'.
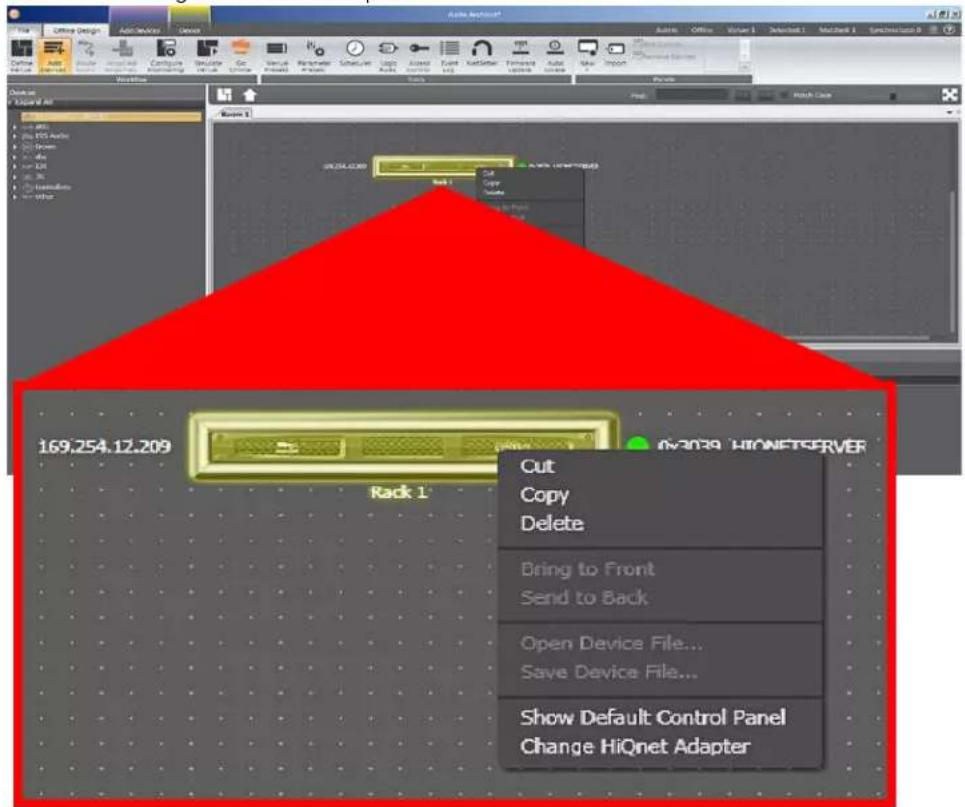
text_image
169.254.12.209 Rack 1 Cut Copy Delete Bring to Front Send to Back Open Device File... Save Device File... Show Default Control Panel Change HiQnet Adapter- In the resulting window from the drop down menu, select Adapter 1. What this step does is configures the server to send all the HiQnet control traffic through Gb 1. Note that if Dante is on Gb 1 in it is recommended that you set this setting to Adapter 2 so as to separate HiQnet from Dante.
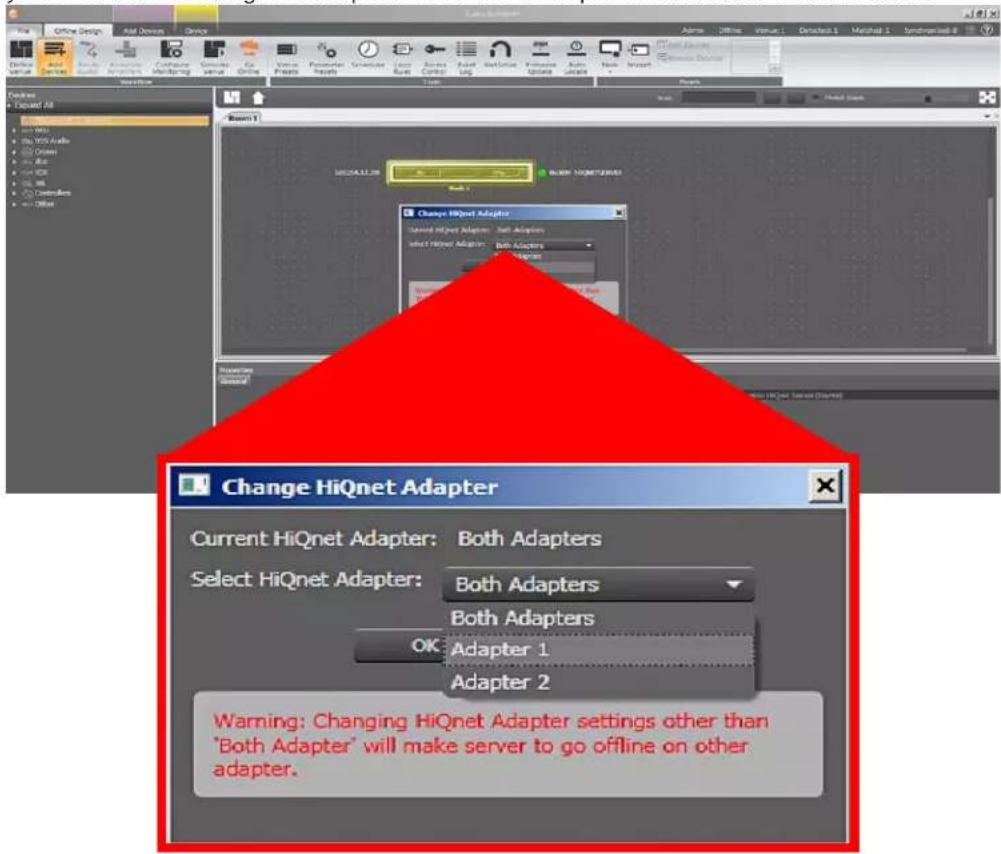
text_image
Change HiQnet Adapter Current HiQnet Adapter: Both Adapters Select HiQnet Adapter: Both Adapters Both Adapters OK Adapter 1 Adapter 2 Warning: Changing HiQnet Adapter settings other than 'Both Adapter' will make server to go offline on other adapter.- You may now connect your configured Contrio Server to both your control and Dante networks. If it is the same network, this splitting of the network cards simplifies the configuration of Dante.
Automatic Addressing - DHCP
To connect using DHCP:
- With both your computer and the server turned off, using a Cat 5e or higher cable, directly connect your laptop to a network switch that is connected to the DHCP server. Also connect portGb 1 on the rear of the server to the same network.
- Turn on both the server and your computer and allow them to boot up. There is no user intervention needed for the server other than applying power. The server will be ready to function after the boot up cycle.
- Verify that there are amber and green LEDs on the rear of the Contrio server at Gb 1. This indicates that you have a connection between the switch and the server. If the indicators are not illuminated or flashing, check that the cables are seated fully or replace the cable.
- After verifying connection, on your computer, launch HiQnet NetSetter from the Start Menu — typically under Programs, HARMAN Pro.

text_image
Accessories Games Harman Pro Audio Architect 1.90 Audio Architect 1.90 Audio Architect Help HiQnet NetSetter Uninstall Audio Architect 1.90 Java Maintenance Startup Windows 7 USB DVD Download Tool Back Search programs and files Start5◆ NetSetter may come up with the wrong network adapter selected to communicate with. In the upper left hand corner there is a drop down menu that will list the IP addresses your computer has. Select the IP address that is not 127.0.0.1. If you do not see an additional address as one of the options, please verify that your network is enabled and the cables are connected.

text_image
HiQnet NetSetter PC Adapter: 127.0.0.1 Display: All Devices No: If a device is not discovered within 30 seconds, its connection to the physical network should be checked. Rescan Network MAC ADDRESS 169.254.226.40 IP ADDRESS SUBNET MASK DEFAULT GATEWAY DEVICE ID RANDOM ID REBOOT STATUS DEVICE TYPE DEVICE NAME CONTAINER : POSITION LOCATE6 After selecting the network interface, wait up to one minute while the software discovers the address of the Contrio Server. Once it has been discovered, it will appear in the table within NetSetter. The Status column should say 'Discovered' if everything is correct. If the status column does not say 'Discovered', ensure that the DHCP/Auto-IP is checked for the server. If it is not, click to enable it and then at the bottom of the window click Apply Current Edits.

text_image
HiQnet Bit Settings PC Adapter: 169.254.226.40 Display All Devices Note: If a device is not discovered within 30 seconds, its connection to the physical network should be checked. MAC ADDRESS DHCP AUTO IP BYADDRESS SELECT MODE DEFAULT GATEWAY DEVICE ID HANDOR ID ACCESS STATUS DEVICE TYPE DEVICE NAME CONTAINER POSITION LOCATE 08:00:27:18:02:07 169.254.12.220 268.255.0.0 238.255.255.255 2589 Engine/Control Soundweb Control HiQnet Server /Dams HMQNETDAIVER 1-1 DHCP / AUTO-IP STATUS Apply Current Edits Discovered Documental Devisions: DHCP Server Default Job: 258.255.255.255 PC Configurations: HiQnet Address 60035 IP Address 169.254.226.40 Subnet Rank: 258.255.0.0 Clear Contains Start Current Edits Apply Current Edits Apply and Use7 If the HiQnet Contrio Server is not found, please check your firewall settings to verify that HiQnet NetSetter is not being blocked and repeat the process again.
8 Next move the LAN cable to Gb 2, wait approximately 90 seconds and then choose 'Rescan Network' in NetSetter. You should then configure your Gb 2 port accordingly. This is most likely your Dante port, so choose the settings appropriate to Dante operation.
9◆ You have now established communication between your computer and the server. There is one more piece of configuration that HARMAN recommends.
- Launch Audio Architect from the Start Menu — typically under Programs, HARMAN Pro.

text_image
Accessories Games Harman Pro Audio Architect 1.90 Audio Architect 1.90 Audio Architect Help HiQnet NetSetter Uninstall Audio Architect 1.90 Java Maintenance Startup Windows 7 USB DVD Download Tool Back Search programs and files Start- If you have not launched Audio Architect before, the software will ask you some questions to configure itself. The main one to be concerned about is making sure to select the proper network adapter as was done in step 5.

text_image
Add a Network Connection COM Ports COM1 Baud Rate: 57600 USB Devices VID: 4624 PID: 2048 Ver: 256 VID: 4624 PID: 30 Ver: 256 HiQnet 169.254.226.40 00-0C-29-29-7E-2A DHCP Ir Loopback Pseudo-Interface 1 127.0.0.1 Static S No Network Interfaces have been specified. Please select a Network Interface and click the Add Connection button. Add Connection Cancel- Close the options window, as it has been verified that there is communication between the server and your computer. The Contrio Server should appear in the Discovered devices. Simply drag it into the venue file.

text_image
File Offline Design Add Devices Define Venue Add Devices Route Audio Associate Amplifiers Configure Monitoring Simulate Venue Go Online Venue Presets Parameter Presets Scheduler Logic Rules Access Control Event Log Workflow Tools Devices + Expand All • Discovered (1 devices) 0x3009 : HIQNETSERVER-1-1 • AKG • BSS Audio • Crown • dbx • IDX • JBL • Controllers • Other Room 1- If the HiQnet Contrio Server is not found, please check your firewall settings to verify that HiQnet Audio Architect is not being blocked and repeat the process again.
- Right click on the Contrio server and select 'Change HiQnet Adapter'.

text_image
Audio abstract* Actions View1 Actions 1 Match 1 Synchlab 8 File Edit View1 File Edit View2 File Edit View3 File Edit View4 File Edit View5 File Edit View6 File Edit View7 File Edit View8 File Edit View9 File Edit View10 File Edit View11 File Edit View12 File Edit View13 File Edit View14 File Edit View15 File Edit View16 File Edit View17 File Edit View18 File Edit View19 File Edit View20 File Edit View21 File Edit View22 File Edit View23 File Edit View24 File Edit View25 File Edit View26 File Edit View27 File Edit View28 File Edit View29 File Edit View30 File Edit View31 File Edit View32 File Edit View33 File Edit View34 File Edit View35 File Edit View36 File Edit View37 File Edit View38 File Edit View39 File Edit View40 File Edit View41 File Edit View42 File Edit View43 File Edit View44 File Edit View45 File Edit View46 File Edit View47 File Edit View48 File Edit View49 File Edit View50 File Edit View51 File Edit View52 File Edit View53 File Edit View54 File Edit View55 File Edit View56 File Edit View57 File Edit View58 File Edit View59 File Edit View60 File Edit View61 File Edit View62 File Edit View63 File Edit View64 File Edit View65 File Edit View66 File Edit View67 File Edit View68 File Edit View69 File Edit View70 File Edit View71 File Edit View72 File Edit View73 File Edit View74 File Edit View75 File Edit View76 File Edit View77 File Edit View78 File Edit View79 File Edit View80 File Edit View81 File Edit View82 File Edit View83 File Edit View84 File Edit View85 File Edit View86 File Edit View87 File Edit View88 File Edit View89 File Edit View90 File Edit View91 File Edit View92 File Edit View93 File Edit View94 File Edit View95 File Edit View96 File Edit View97 File Edit View98 File Edit View99 File Edit View100 169.254.12.209 Rack 1 Cut Copy Delete Bring to Front Send to Back Open Device File... Save Device File... Show Default Control Panel Change HiQnet Adapter
- In the resulting window from the drop down menu, select Adapter 1. What this step does is configures the server to send all the HiQnet control traffic through Gb 1. Note that if Dante is on Gb 1 in it is recommended that you set this setting to Adapter 2 so as to separate HiQnet from Dante.
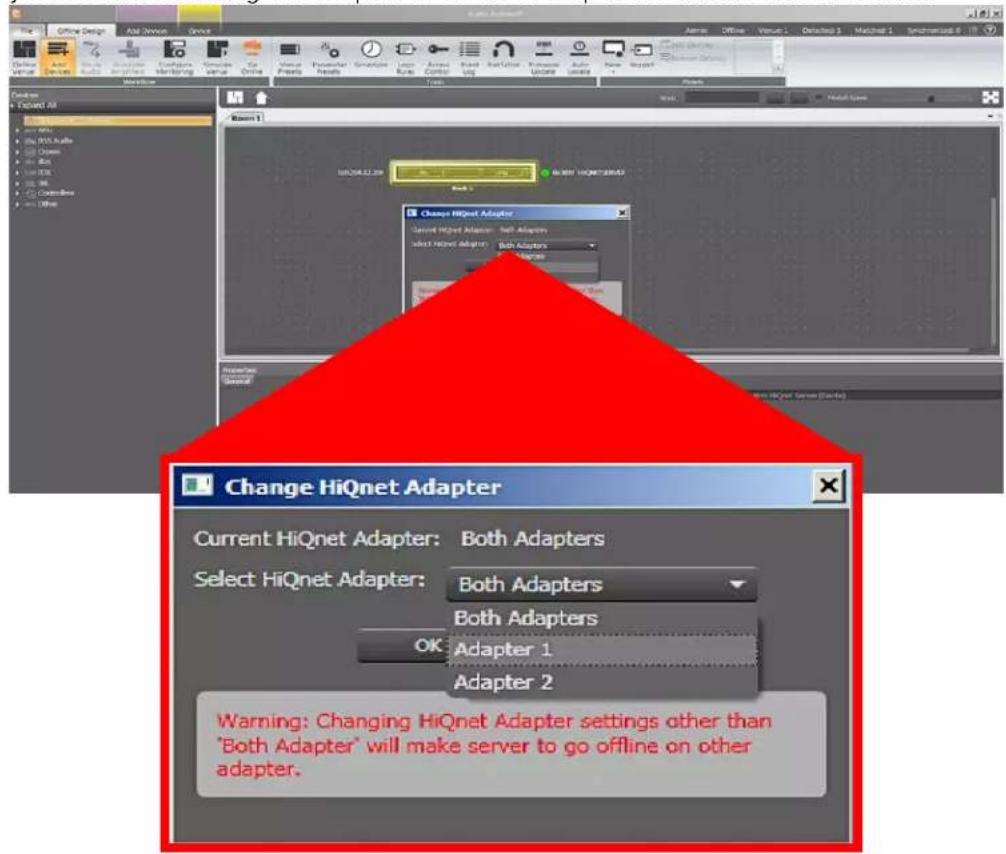
text_image
Change HiQnet Adapter Current HiQnet Adapter: Both Adapters Select HiQnet Adapter: Both Adapters Both Adapters OK Adapter 1 Adapter 2 Warning: Changing HiQnet Adapter settings other than "Both Adapter" will make server to go offline on other adapter.- You may now connect your configured Contrio Server to your control and Dante networks. If it is the same network, this splitting of the network cards simplifies the configuration of Dante.
Static or Manual IP Addressing
To connect using a static or manual IP address:
- With the server turned off, using a Cat 5e or higher cable, directly connect your laptop to Gb 1 or to a switch if you would prefer.
- Turn on the server and allow it to boot up. There is no user intervention needed for the server other than applying power. The server will be ready to function after the boot-up cycle.
- Verify that there are amber and green LEDs on the rear of the Contrio server at Gb 1. This indicates that you have a connection with the server. If the indicators are not illuminated or flashing, check that the cables are seated fully or replace the cable.
- After verifying connection, on your computer, launch HiQnet NetSetter from the Start Menu — typically under Programs, HARMAN Pro.

text_image
Accessories Games Harman Pro Audio Architect 1.90 Audio Architect 1.90 Audio Architect Help HiQnet NetSetter Uninstall Audio Architect 1.90 Java Maintenance Startup Windows 7 USB DVD Download Tool Back Search programs and files Start- NetSetter may come up with the wrong network adapter selected to communicate with. In the upper left hand corner there is a drop down menu that will list the IP addresses your computer has. Select the IP address from the list that your computer is using. If you do not see an additional address as one of the options, please verify that your network is enabled and the cables are connected.

text_image
HiQnet NetSetter PC Adapter: 127.0.0.1 169.254.226.40 MAC ADDRESS IP ADDRESS SUBNET MASK DEFAULT GATEWAY DEVICE ID Random ID REBOOT STATUS DEVICE TYPE DEVICE NAME CONTAINER : POSITION LOCATE
- After selecting the network interface, wait up to one minute while the software discovers the address of the Contrio Server. Once it has been discovered, it will appear in the table within NetSetter.
- If the HiQnet Contrio Server is not found, please check your firewall settings to verify that HiQnet NetSetter is not being blocked and repeat the process again.
- Most likely the server will not fully populate and will have information of the IP address but not the description. The server and the computer being on different networks cause this situation.
- In the table, edit the IP information for the server to the desired IP address.
- Click Apply Current Edits at the bottom of the software.
- The Status column should say 'Discovered' after approximately 60 seconds if everything is correct. If you do not get that indication, make sure that you have unique IP addresses for every device, and verify that you have entered the information correctly and clicked the Apply Current Edits button.

text_image
HQNet Network PC Adapter 169.254.226.40 Display All Devices Note: If a device is not discovered within 30 seconds, so connection to the physical network should be checked. Passer Network Export Print Static Tools MAC ADDRESS DHCP AUTO-IP IP ADDRESS SUENET MASK DEFAULT GATEWAY DEVICE ID MASCOR IE REDOUT STATUS DEVICE TYPE DEVICE NAME CONTAINER POSITION LOCATE 08:00-27:18:02:GP 169.254.12.209 255.255.0.0 255.255.255.255 25389 Discovered SoundSwab Continu HQnet Server /Doints MQNETSERVER 1 : DHCP / AUTO-IP STATUS Discovered Apply Current Edits Discovered device 1 DHCP Server Delivered 255.255.255.255 PC Configurations HQnet Address 60630 IP Address 169.254.226.40 Sualed Hanks 255.255.0.0 Close Contains Under Current Edits Apply Current Edits Apply and Sell- Next move the LAN cable to Gb 2 approximately 90 seconds and then choose 'Rescan Network' in NetSetter. You should then configure your Gb 2 port accordingly. This is most likely your Dante port, so choose the settings appropriate to Dante operation.
-
You have now established communication between your computer and the server. There is one more piece of configuration that HARMAN recommends.
-
Launch Audio Architect from the Start Menu — typically under Programs, HARMAN Pro.
text_image
Accessories Games Harman Pro Audio Architect 1.90 Audio Architect 1.90 Audio Architect Help HiQnet NetSetter Uninstall Audio Architect 1.90 Java Maintenance Startup Windows 7 USB DVD Download Tool Back Search programs and files Start- If you have not launched Audio Architect before, the software will ask you some questions to configure itself. The main one to be concerned about is making sure to select the proper network adapter as was done in step 5.
text_image
Add a Network Connection
text_image
Add a Network Connection COM Ports COM1 Baud Rate: 57600 USB Devices VID: 4624 PID: 2048 Ver: 256 VID: 4624 PID: 30 Ver: 256 Ethernet Interfaces Name IP Address MAC Address DHCP HiQnet 169.254.226.40 00-0C-29-29-7E-2A DHCP Tr Loopback Pseudo-Interface 1 127.0.0.1 Static S No Network Interfaces have been specified. Please select a Network Interface and click the Add Connection button. Add Connection Cancel
- Close the options window, as it has been verified that there is communication between the server and your computer. The Contrio Server should appear in the Discovered devices. Simply drag it into the venue file.

text_image
File Offline Design Add Devices Define Venue Add Devices Route Audio Associate Amplifiers Configure Monitoring Simulate Venue Go Online Venue Presets Parameter Presets Scheduler Logic Rules Access Control Event Log Workflow Tools Devices + Expand All • Discovered (1 devices) 0x3009 : HIQNETSERVER-1-1 • Add: AKG • BSS Audio • Crown • dbx dBox • IDX • JBL JBL • Controllers • Other Room 1- If the HiQnet Contrio Server is not found, please check your firewall settings to verify that HiQnet Audio Architect is not being blocked and repeat the process again.
- Right click on the Contrio server and select 'Change HiQnet Adapter'.

text_image
Audio Architect Add Device Options Active Active Active Active Active Active Active Active Active Active Active Active Active Active Active Active Active Active Active Active Active Active Active Active Active Active Active Active Active Active Active Active Active Active Active Active Active Active Active Active Active Active Active Active Active Active Active Active Active Active 169.254.12.209 Stack 1 Stack 2 Stack 3 Stack 4 Stack 5 Stack 6 Stack 7 Stack 8 Stack 9 Stack 10 Stack 11 Stack 12 Stack 13 Stack 14 Stack 15 Stack 16 Stack 17 Stack 18 Stack 19 Stack 20 Stack 21 Stack 22 Stack 23 Stack 24 Stack 25 Stack 26 Stack 27 Stack 28 Stack 29 Stack 30 Stack 31 Stack 32 Stack 33 Stack 34 Stack 35 Stack 36 Stack 37 Stack 38 Stack 39 Stack 40 Stack 41 Stack 42 Stack 43 Stack 44 Stack 45 Stack 46 Stack 47 Stack 48 Stack 49 Stack 50 Stack 51 Stack 52 Stack 53 Stack 54 Stack 55 Stack 56 Stack 57 Stack 58 Stack 59 Stack 60 Stack 61 Stack 62 Stack 63 Stack 64 Stack 65 Stack 66 Stack 67 Stack 68 Stack 69 Stack 70 Stack 71 Stack 72 Stack 73 Stack 74 Stack 75 Stack 76 Stack 77 Stack 78 Stack 79 Stack 80 Stack 81 Stack 82 Stack 83 Stack 84 Stack 85 Stack 86 Stack 87 Stack 88 Stack 89 Stack 90 Stack 91 Stack 92 Stack 93 Stack 94 Stack 95 Stack 96 Stack 97 Stack 98 Stack 99 Stack 100- In the resulting window from the drop down menu, select Adapter 1. What this step does is configures the server to send all the HiQnet control traffic through Gb 1. Note that if Dante is on Gb 1 in it is recommended that you set this setting to Adapter 2 so as to separate HiQnet from Dante.

text_image
Change HiQnet Adapter Current HiQnet Adapter: Both Adapters Select HiQnet Adapter: Both Adapters Both Adapters OK Adapter 1 Adapter 2 Warning: Changing HiQnet Adapter settings other than 'Both Adapter' will make server to go offline on other adapter.- You may now connect your configured Contrio Server to your control and Dante networks. If it is the same network, this splitting of the network cards simplifies the configuration of Dante.
Specifications
COMPUTER DETAILS
OS Storage Size: 40GB partition
Data Storage Size: 60GB partition
MEDIA AUDIO
Supported File Types: WAV, MP3
Supported Sample Rates: 44.1k, 48k, 88.2k, 96k, 176.4k, and 192k
Supported Bit Depths: 8, 16, and 24
Max Audio Storage: \~85 hrs (Stereo WAV/44.1 kHz/16-bit)
\~12 hrs (Stereo WAV/192 kHz/24-bit)
CONTROL NETWORK
Connectors: 2 x RJ45 Ethernet connector
Maximum cable length: 100m/328ft on Category 5 cable between device and Ethernet switch
DANTE™ AUDIO NETWORK
Connectors: 1 x RJ45 connector
Maximum cable length: 100m/328ft on Category 5 (100Mbps) or Category 5e/Category 6 (Gigabit) cable between devices
Latency: 0.15ms-5.0ms
POWER/TEMPERATURE
Mains Voltage: 100-240V AC, 50/60Hz
Power Consumption: <45 VA
BTU Rating: <155 BTU/hr
Operating Temperature Range: 5 [41] to 35 [95] degrees C [degrees F]
PHYSICAL
Weight: 17.5 lbs.
7.94 kg
Dimensions: 19" (W) x 1.66" (H) x 22.25" (D)
482.6 mm (W) x 42.4 mm (H) x 565.2 mm (D)

text_image
B S by HARMAN®Phone: (801) 566-8800
Website: bssaudio.com
Support: bssaudio.com/en-US/support
Soundweb Contrio Server Installation Guide
PN: 5047991-C
BSS Audio is a registered trademark of HARMAN
© 2017 HARMAN
All rights reserved
Printed in USA