
5RH84353 - Cooker BLAUPUNKT - Free user manual and instructions
Find the device manual for free 5RH84353 BLAUPUNKT in PDF.
| Product type | Induction hob |
| Brand | Blaupunkt |
| Model | 5RH84353 |
| Dimensions (W × D) | 784 × 524 mm |
| Height | 57 mm |
| Cutout dimensions (W × D) | 750 × 490 mm |
| Weight (estimated) | 15 kg |
| Power supply | 230 V ~ 50/60 Hz (1 phase + N) or 400 V ~ 50/60 Hz (2 phases + N) |
| Total power | 7000 W |
| Cooking zones | 4 induction zones |
| Front left zone | Ø 145/220 mm, 1000/2200 W |
| Rear left zone | Ø 155 mm, 1200 W |
| Rear right zone | Ø 270/177.5 mm, 1500/2400 W |
| Front right zone | Ø 155 mm, 1200 W |
| Functions | Touch control, digital display, residual heat indicator, extension zone, control panel lock, automatic cooking Stop & Go, timer (0-99 min) |
| Cleaning | Ceramic glass surface, clean with a damp cloth and diluted dish soap, avoid abrasive products |
| Safety | Automatic safety shut-off, control lock, residual heat indicator, pan detection |
| Repairability | Repair only by an approved specialist; contact after-sales service |
| Energy consumption | 175.4 Wh/kg (whole hob) |
Frequently Asked Questions - 5RH84353 BLAUPUNKT
User questions about 5RH84353 BLAUPUNKT
0 question about this device. Answer the ones you know or ask your own.
Ask a new question about this device
Download the instructions for your Cooker in PDF format for free! Find your manual 5RH84353 - BLAUPUNKT and take your electronic device back in hand. On this page are published all the documents necessary for the use of your device. 5RH84353 by BLAUPUNKT.
USER MANUAL 5RH84353 BLAUPUNKT
natural_image
Symbol of a trash bin crossed out by diagonal lines, representing waste sorting or disposal (no text or labels)INSTALLATIONSHINWEISE
2 SAFETY INFORMATION
2 Precautions before use
2 Start-up
3 Precautions to avoid damage to the appliance
4 Precautions in the event of an appliance fault
4 Further protective measures
5 DESCRIPTION OF THE APPLIANCE
5 Technical features
6 Operating panel
6 USING THE APPLIANCE
6 Display
7 START-UP AND OPERATION
7 Before using for the first time
7 Touch operation
7 Switching on
8 Residual heat display
8 Extension zone
8 Locking the operating panel
9 "Stop & Go" automatic cooking
9 Timer
11 NOTES ON COOKING
11 Examples of cooking settings
11 MAINTENANCE AND CLEANING
12 TROUBLESHOOTING
13 ENVIRONMENTAL PROTECTION
14 INSTALLATION INSTRUCTIONS
16 ELECTRICAL CONNECTION
SAFETY INSTRUCTIONS
- Unpack all materials.
- The appliance must be installed and connected by approved professionals. The manufacturer cannot be held responsible for damage caused by installation or connection errors.
- To use the appliance, it must be well equipped and installed in a kitchenette and a suitable and approved work surface.
- This household appliance is intended exclusively for cooking food. It may not be used for any other household, commercial or industrial purpose.
- Remove all labels and stickers from the ceramic glass.
- The appliance may not be modified or converted.
- The hob can neither be used as a free-standing unit nor as a work surface.
- The appliance must be earthed and connected in accordance with local standards.
- Do not use an extension cord for the connection.
- The appliance cannot be used over a dishwasher or tumble dryer as escaping steam can cause damage.
- The appliance is not intended for use with an external timer or separate remote control.
START-UP
- Switch off the cooking zones after use.
- Keep an eye on the hob when cooking with fats or oils, which can ignite quickly.
• Take care not to burn yourself while or after using the appliance. - Make sure that no cable from a fixed or movable appliance comes into contact with the glass or a hot pot.
- No magnetic objects (credit cards, floppy disks, calculators) should be placed near the appliance when it is switched on.
- With the exception of pans or cooking utensils, do not place metal objects on the hob. They can heat up, melt or even burn if the appliance is switched on prematurely or if there is residual heat.
-
Never cover the appliance with a cloth or protective film. They can become very hot and catch fire.
-
This appliance may be used by children over 8 years of age and by persons with reduced physical, sensory or mental abilities or lack of experience and knowledge provided that they have been instructed in the use of the appliance by a person responsible for them and that they understand and appreciate the risks and dangers involved.
• Children may not play with the appliance. - Children may only clean and maintain this appliance under supervision.
- Metal objects like knives, forks, spoons and lids may not be placed on the hob, since they may become hot.
PRECAUTIONS TO AVOID DAMAGE TO THE APPLIANCE
- Rough pan bases or damaged pots (non-enamelled cast iron pots) can damage the ceramic glass.
- Sand or other abrasive materials can damage the ceramic glass.
- Avoid dropping objects onto the ceramic glass.
- Do not strike the edges of the ceramic glass with pots.
- Make sure that the ventilation of the appliance operates according to the manufacturer's instructions.
- Do not place empty pots on the ceramic glass.
- Sugar, plastic or aluminium sheets may not come into contact with the hobs. These can cause cracks or other changes to the ceramic glass when it cools down: Switch on the appliance and remove them immediately from the hobs (Caution: avoid burning yourself).
- WARNING: Fire hazard: Do not store any objects on the cooking surface.
- Never place a hot container on the operating panel.
- If there is a drawer under the built-in appliance, ensure that the distance between the contents of the drawer and the bottom of the appliance is large enough (2 cm). This is important to ensure proper ventilation.
- Do not place flammable objects (e.g. sprays) in the drawer under the hob. All cutlery drawers must be heat-resistant.
PRECAUTIONS IN THE EVENT OF AN APPLIANCE FAULT
• If a defect is detected, switch off the appliance and the main power supply.
- If the ceramic glass has cracks or fissures, disconnect the appliance from the power supply and contact customer service.
• Repairs must be carried out by qualified professionals. Do not open the appliance yourself.
- WARNING: If the surface has cracks, turn the appliance off to avoid electric shock.
FURTHER PROTECTIVE MEASURES
- Make sure that the cookware is always centred on the cooking zone. The base of the cookware must cover the cooking zone as much as possible.
- If you have a pacemaker, the magnetic field could affect the function of the pacemaker. We recommend that you consult your dealer or doctor about this.
- Do not use aluminium or plastic cookware: It could melt on still hot cooking zones.
- NEVER try to put out a fire using water; instead, switch off the appliance and cover the flames, for instance with a lid or fire blanket.
DESCRIPTION OF THE APPLIANCE
TECHNICAL FEATURES
| Type | 5RG64361 5RG74351 5RH84353 |
| Total outputEnergy consumption of the EChob hob* | 7000 W175.4 Wh/kg |
| Front left cooking zoneRated output*Category with standardised cookware*Energy consumption of the ECcw hob* | ∅ 145/220 mm1000 W/2200 WC172.7 Wh/kg |
| Rear left cooking zoneRated output*Category with standardised cookware*Energy consumption of the ECcw hob* | ∅ 155 mm1200 WA173.8 Wh/kg |
| Rear right cooking zoneRated output*Category with standardised cookware*Energy consumption of the ECcw hob* | ∅ 270/177.5 mm1500 W/2400 WD181.3 Wh/kg |
| Front right cooking zoneRated output*Category with standardised cookware*Energy consumption of the ECcw hob* | ∅ 155 mm1200 WA173.8 Wh/kg |
*calculated according to the method for measuring performance (EN 60350-2)
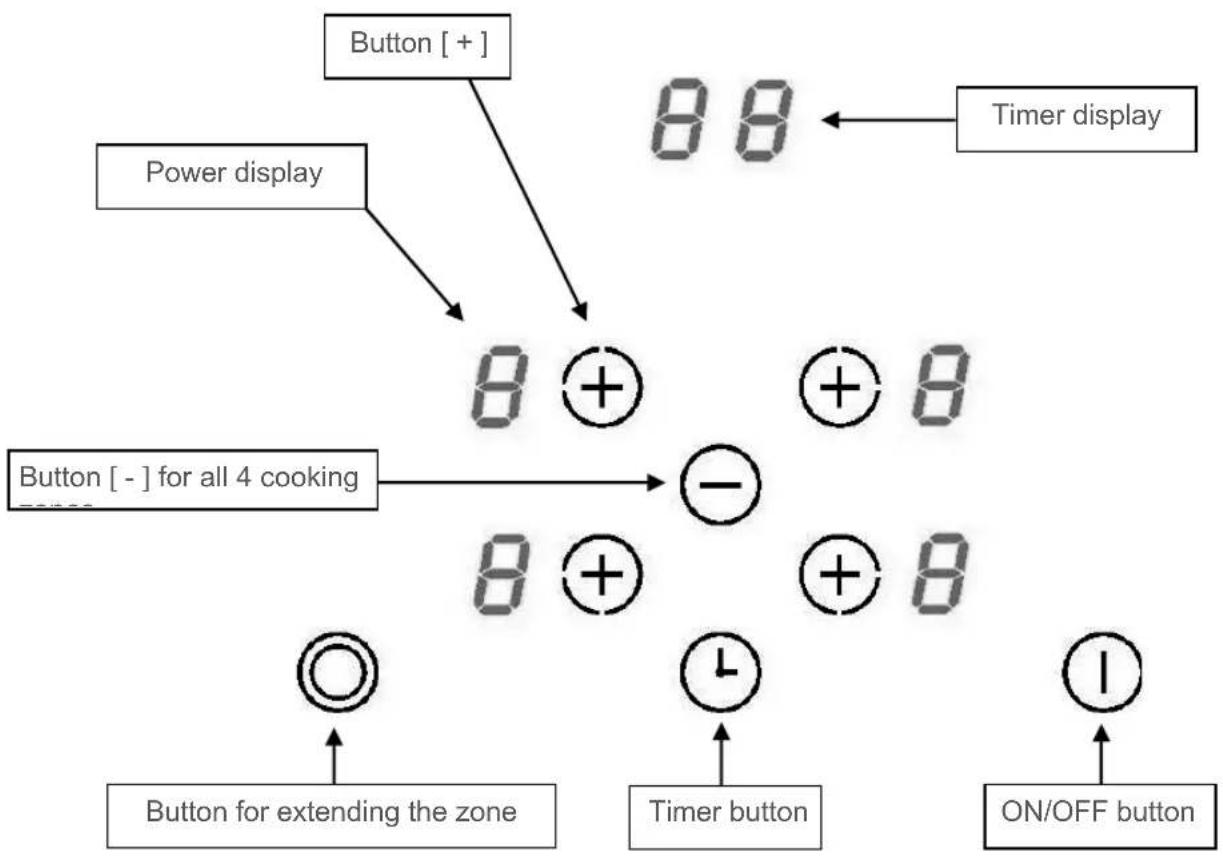
flowchart
graph TD
    A["Button [+"] --> B["8 +"]
    C["Power display"] --> B
    D["Timer display"] --> B
    E["Button [-"] for all 4 cooking] --> F["-"]
    G["8 +"] --> F
    H["+ 8"] --> F
    I["8 +"] --> F
    J["+ 8"] --> F
    K["○"] --> L["Button for extending the zone"]
    M["↓"] --> N["Timer button"]
    O["●"] --> P["ON/OFF button"]
USING THE APPLIANCE
DISPLAY
Display Designation
0 Zero
1...9 Power level
A Heat accelerator
E Error message
H Residual heat
L Lock
Description
The hub is activated
Selection of cooking level
Automatic cooking
Electronics error
The cooking zone is hot
The hob is locked
START-UP AND OPERATION
BEFORE USING FOR THE FIRST TIME
Clean the hob with a damp cloth and then dry the surface thoroughly. Do not use any cleaning agents, which could result in a bluish tint on the glass surface.
TOUCH OPERATION
Your ceramic hob is equipped with an electronic control for touch operation. When your finger touches the button, the corresponding command is activated. This activation is confirmed by a control lamp, a letter or number on the display and/or a beep.
Only touch one button at a time.
SWITCHING ON
| Switching the hob on/off: | ||
| Action | Operating panel | Display |
| To switch on | Tap [1] | [0] |
| To switch off | Tap [1] | Nothing or [H] |
| Switching a cooking zone on/off: | ||
| Action | Operating panel | Display |
| Increase power | Tap [ + ] | [ 4 ] to [ 9 ] |
| Decrease power | Tap [ - ] | [ 9 ] to [ 1 ] |
| Stop | Tap [ + ] and [ - ] at the same time | [ 0 ] or [ H ] |
After switching off the hob, the cooking zones remain hot and [H] will appear on the display. The [H] symbol will disappear as soon as the cooking zones can be touched safely. Do not touch the cooking zones or place heat-sensitive objects on them while the residual heat display is lit. There is a risk of burns and fire.
EXTENSION ZONE
| Action | Operating panel | Display |
| Select zone | Tap [ + ] | Control lamp flashes |
| Switch off | Tap [ Ⓞ] | Lamp for extension zone is off |
| Switch on | Tap [ Ⓞ] | Lamp for extension zone is on |
To prevent the cooking zone settings from being altered, especially during cleaning, the operating panel can be locked (except the On/Off button [d]).
| Locking: | ||
| Action | Operating panel | Display |
| Start | Tap [ ] | [0] or [H] on 4 displays |
| Lock hob | Tap [ + ] and [- ] at the same time in the front right zone.Tap [ + ]. | No change[L] on 4 displays |
| Unlocking: | ||
| Action | Operating panel | Display |
| Unlock hob | Tap [ + ] and [ - ] at the same time in the front right zone.Tap [ - ]. | [ 0 ] or [ H ] on 4 displaysNo lamp on the displays |
All cooking zones are equipped with an automatic “Stop & Go” cooking function. The cooking zone starts at full power for a certain time and then automatically reduces its power to the pre-selected level.
| Switching on: | ||
| Action | Operating panel | Display |
| Select zone | Tap [ + ] | [ 0 ] and control lamp on |
| Full power | Tap [ + ] | [ 1 ] to [ 9 ] |
| Automatic cooking | Tap [ + ] | [ 9 ] flashes with [ A ] |
| Selection of power level (for example: 7) | Tap [- ] | [ 9 ] [ 8 ] [ 7 ] to [ 1 ][ 7 ] flashes with [ A ] |
| Switching off automatic cooking: | ||
| Action | Operating panel | Display |
| Select zone | Tap [-] | [9][8][7] to [0] |
| Selection of power level | Tap [ + ] | Power level selected |
TIMER
The timer can be used simultaneously with all 4 cooking zones and with different time settings (from 0 to 99 minutes) for each cooking zone.
| Setting and changing the cooking time: | ||
| Action | Operating panel | Display |
| Select zone | Tap [ + ] of the zone | [ 0 ] |
| Increase power | Tap [ + ] or [ - ] | [ 1 ] to [ 9 ] |
| Select timer | Tap [ Ⓤ] | Timer [ 00 ] min |
| Reduce time | Tap [ - ] | [ 00 ] switches to 60, 59 ... |
| Increase time | Tap [ Ⓤ] | The time is extended |
After a few seconds, the control lamp will stop flashing.
The time is confirmed and the cooking process begins until time [00] is reached.
| Stopping the cooking time: | ||
| Action | Operating panel | Display |
| Select zone | Tap [ + ] of the zone | [ 0 ] |
| Select timer | Tap [ Ⓤ] | The remaining time until the timer expires is displayed |
| Stop timer | Tap [ - ] and [ Ⓤ] at the same time | Timer displays [ 00 ] and stops |
If several timers are activated, you have to repeat this procedure for each timer individually.
| Automatic stop at the end of the cooking time: |
| As soon as the selected cooking time is finished, the timer will flash [ 00 ] and a tone will sound. To stop the sound and flashing, simply press the [ Ⓞ] key. |
| Egg timer: | ||
| Action | Operating panel | Display |
| Activate the hob | Tap [ Ⓤ] | [ 0 ] or [ H ] 3 or 4x |
| Select timer | Tap [ Ⓤ] | Timer [ 00 ] min |
| Reduce time | Tap [- ] | [ 00 ] switches to 60, 59 ... |
| Increase time | Tap [ Ⓤ] | The time is extended |
After a few seconds, the control lamp will stop flashing.
As soon as the selected cooking time is finished, the timer will flash [00] and a tone will sound. To stop the sound and flashing, simply press the [icon] key.
NOTES ON COOKING
EXAMPLES OF COOKING SETTINGS
(The following values are guidelines)
| 1 to 2 | Melting, heating | Sauces, butter, chocolate, gelatine, precooked dishes |
| 2 to 3 | Swelling, defrosting, keeping warm | Rice, pudding, sugar syrup, dried vegetables, fish, frozen foods |
| 3 to 4 | Steaming | Vegetables, fish, meat |
| 4 to 5 | Steaming, swelling, defrosting | Steamed potatoes, soups, pasta, fresh vegetables |
| 6 to 7 | Preheating, continued cooking | Goulash, roulades, sausage, hard-boiled eggs |
| 7 to 8 | Gentle frying | Potatoes, fish, schnitzel, fried sausage, fried eggs |
| 9 | Baking, roasting, boiling water | Steaks, omelets, fried dishes, water |
MAINTENANCE AND CLEANING
Switch off the appliance before cleaning.
Do not clean the hob if the glass is too hot: Risk of burns.
- Remove light stains with a damp cloth with detergent diluted in a little water. Then rinse with cold water and dry the surface thoroughly.
- Strongly corrosive or abrasive cleaning agents and cleaning equipment that can cause scratches must be avoided at all costs.
- Never use steam cleaners or high-pressure cleaners.
- Do not use any objects that could scratch the ceramic glass.
- Make sure that the cookware is dry and clean. Ensure that there are no dust particles on the ceramic hob or on the cookware. If you slide rough cookware around, it will scratch the surface of the hob.
- Spilled sugar, jam, jelly, etc. must be removed immediately. This will prevent the surface from being damaged.
TROUBLESHOOTING
The hob or cooking zone cannot be switched on:
- The hob is not connected to the mains power.
- The protective fuse is switching the hob.
• The lock is activated - The touch buttons are covered with grease or water.
- There is an object on the buttons.
The [F] symbol is displayed:
- You can no longer use this cooking zone.
- Contact customer service.
The [E] symbol is displayed:
• The electronics are defective.
- Contact customer service.
One or all of the cooking zones are switched off:
• The safety switch-off is activated.
- You have forgotten to switch off the cooking zone for a long period of time.
- One or more touch buttons are covered.
- The cookware is empty and its base is overheated.
The "Stop & Go" automatic cooking system is not starting:
• The cooking zone is still hot [H].
- The highest power level [9] is set.
• The cooking level was set with [-].
The [L] symbol is being displayed:
• See the chapter on locking the operating panel.
The [Er03] symbol is displayed:
- An object or liquid is covering the operating buttons. The symbol will disappear as soon as the button is uncovered or cleaned.
The [ER21] symbol is displayed:
- The hob is overheated. Let it cool down and then switch it on again.
The [U400], [Er25] or [U4] symbol is displayed:
- The hob is not connected to the mains power. Check the connection and re-connect the hob.
If any of the above symbols are still displayed, contact customer service.
ENVIRONMENTAL PROTECTION
- The packaging material is ecological and can be recycled.
-
The appliances contain certain precious metals. Check with local authorities about recycling options.
-
Do not dispose of the appliance in household waste.
- Contact the local waste collection centre responsible for recycling of household appliances.
natural_image
Symbol of a trash bin crossed out by diagonal lines, representing waste sorting or disposal (no text or labels)INSTALLATION INSTRUCTIONS
Installation falls under the exclusive responsibility of specialists.
The installer must comply with local laws and applicable standards.
Fitting the seal
The seal supplied with the hob prevents liquids from entering the cabinet.
The seal supplied with the appliance also holds the appliance in position. It is not necessary to use another fixing system.
Installation must be carried out carefully and in accordance with the following drawing.
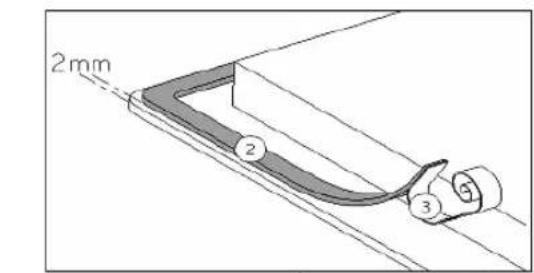
Glue the seal (2) two millimetres from the outer edge of the glass after removing the protective film.
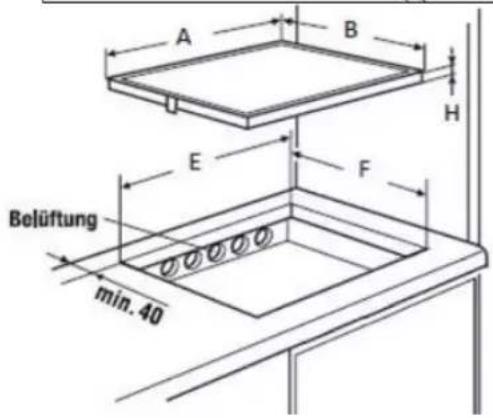
Mounting – Installing
The cut sizes are:
| A B E F H | |||||
| 5RG64361 | 590 mm | 520 mm | 560 mm | 490 mm | 57 mm |
| 5RG74351 | 780 mm | 520 mm | 750 mm | 490 mm | 57 mm |
| 5RH84353 | 784 mm | 524 mm | 750 mm 490 mm | 57 mm | |
- Ensure that there is a distance of 50 ~mm between the hob and the wall or sides.
- This appliance complies with type Y with regard to protection against fire hazards. Only appliances of this type may be installed on one side of adjacent tall cupboards or walls. However, no furniture or appliances may be higher than the hob from the other side.
- The furniture item or base in which the hob is to be installed, as well as the furniture edges, the laminate coatings and the adhesive used to fix them, must be able to withstand temperatures up to 100 °C.
• The wall bars of the edge must be heat-resistant. - The hob may not be installed on top of a non-ventilated oven or dishwasher.
- There must be a clearance of 20 mm beneath the bottom of the hob casing to ensure good air circulation.

- If there is a drawer under the hob, no flammable (e.g. sprays) or heat-resistant objects should be stored there.
- Materials frequently used to make worktops expand on contact with water. To protect the cut-out edge, a layer of lacquer or a special sealant should be applied. Special care must be taken when applying the adhesive joint supplied with the hob to prevent leakage into the furniture below. In combination with smooth worktops, this seal guarantees proper sealing.
- The safety distance between the hob and the extractor hood mounted above it must comply with the hood manufacturer's instructions. In the absence of such instructions, a minimum distance of 650 mm must be maintained.
- The connection cable may not be subjected to mechanical stress after installation.
- WARNING: Only use hob covers designed or specified as suitable by the manufacturer of the cooking appliance or hob covers built into the appliance. Using unsuitable hob covers may cause accidents.
ELECTRICAL CONNECTION
- This appliance should only be installed and connected to the electrical system by a qualified electrician.
- Protection against live parts must be ensured after installation.
- The required connection data can be found on the labels on the hob casing near the connection box.
- The connection to the mains must be made via an earthed plug or via an all-pole separator with a contact opening of at least 3 mm.
- The electric circuit must be separated from the mains by means of suitable devices, e.g: circuit breakers, fuses or contactors.
- If the appliance is not equipped with an accessible plug, separators must be installed in the system in accordance with the installation instructions.
- The input cable must be laid so that it does not touch any of the hot parts of the hob.
Caution!
This appliance may only be connected to a mains supply with 230 V/400 V \~ 50/60 Hz.
Always connect the earth cable.
Please observe the wiring diagram.
The connection box is located on the back of the hob casing. To open the lid, use a medium-sized screwdriver. Insert it into the slots and open the cover.
| Mains | Connection | Cable diameter | Cable | Protection class |
| 230V~50/60Hz | 1 phase + N | 3 × 2.5 mm^2 | H 05 VV - FH 05 RR - F | 25 A * |
| 400V~ 50/60Hz | 2 phases + N | 4 × 2.5 mm^2 | H 05 VV - FH 05 RR - F | 16 A * |
* calculated with the simultaneity factor according to the standard EN 60335-2-6

Setting up the configurations:
For the different connection types, use the brass bridges in the box next to the terminal.
Single-phase 230V\~1P+N:
Place a bridge between terminals 1 and 2.
Connect the earth to the earth connection, the neutral conductor N to terminal 4 and phase L to one of the terminals 1 or 2.
Two-phase 400V\~2P+N:
Connect the earth to the earth connection, the neutral conductor N to terminal 4, phase L1 to terminal 1 and phase L2 to terminal 2.
Caution!
Frequent loosening and tightening the screws on the connection box may affect their tightness. Therefore, it is advisable to keep screwing and unscrewing to a minimum. Ensure that the cables are correctly inserted and tightly screwed.
We cannot be held responsible for accidents caused by incorrect connection or which may result from the use of an appliance which is not earthed or which is equipped with an incorrect earth connection.
TABLE DES MATIÈRES
2 CONSIGNES DE SÉCURITÉ
natural_image
Symbol of a trash bin crossed out by diagonal lines, representing waste or disposal (no text or labels)REMARQUES SUR L'INSTALLATION

- INSTALLATIONSHINWEISE
- SAFETY INFORMATION
- DESCRIPTION OF THE APPLIANCE
- USING THE APPLIANCE
- START-UP AND OPERATION
- NOTES ON COOKING
- MAINTENANCE AND CLEANING
- TROUBLESHOOTING
- ENVIRONMENTAL PROTECTION
- INSTALLATION INSTRUCTIONS
- ELECTRICAL CONNECTION
- SAFETY INSTRUCTIONS
- START-UP
- PRECAUTIONS TO AVOID DAMAGE TO THE APPLIANCE
- PRECAUTIONS IN THE EVENT OF AN APPLIANCE FAULT
- FURTHER PROTECTIVE MEASURES
- DESCRIPTION OF THE APPLIANCE
- USING THE APPLIANCE
- DISPLAY
- START-UP AND OPERATION
- BEFORE USING FOR THE FIRST TIME
- TOUCH OPERATION
- SWITCHING ON
- EXTENSION ZONE
- TIMER
- NOTES ON COOKING
- EXAMPLES OF COOKING SETTINGS
- MAINTENANCE AND CLEANING
- Switch off the appliance before cleaning.
- TROUBLESHOOTING
- The hob or cooking zone cannot be switched on:
- The [F] symbol is displayed:
- The [E] symbol is displayed:
- One or all of the cooking zones are switched off:
- The "Stop & Go" automatic cooking system is not starting:
- The [L] symbol is being displayed:
- The [Er03] symbol is displayed:
- The [ER21] symbol is displayed:
- The [U400], [Er25] or [U4] symbol is displayed:
- ENVIRONMENTAL PROTECTION
- INSTALLATION INSTRUCTIONS
- Fitting the seal
- Mounting – Installing
- ELECTRICAL CONNECTION
- Caution!
- Setting up the configurations:
- Single-phase 230V\~1P+N:
- Two-phase 400V\~2P+N:
- TABLE DES MATIÈRES
- CONSIGNES DE SÉCURITÉ
- REMARQUES SUR L'INSTALLATION
Brand : BLAUPUNKT
Model : 5RH84353
Category : Cooker