ATV3F - Cooker AYA - Free user manual and instructions
Find the device manual for free ATV3F AYA in PDF.
| Brand | AYA |
| Model | ATV3F |
| Product type | Built-in ceramic hob |
| Number of cooking zones | 3 |
| Control type | Touch control |
| Approximate dimensions (W x D x H) | 580 x 510 x 50 mm |
| Cut-out dimensions (W x D) | 560 x 490 mm |
| Power supply | 220-240 V ~, 50-60 Hz |
| Maximum power | 5.2 kW |
| Electrical connection | 30 A (double-pole switch with 3 mm contact opening) |
| Cooking zones | Front left zone: 1800 W (Ø 200 mm); Rear left zone: 1200 W (Ø 165 mm); Left zone (large): 2200 W (Ø 160/230 mm, dual zone) |
| Functions | 9 power levels, rapid heating (boost), timer (1-99 min), child lock, residual heat indicator (H), dual zone (outer ring) |
| Safety | Overheat protection, automatic shut-off after 10s of inactivity, child lock, residual heat indicator, pan detection (not mentioned but standard) |
| Surface material | Ceramic glass |
| Maintenance and cleaning | Ceramic glass cleaner, scraper for sugar/plastic residues; no steam cleaner |
| Warranty | Legal 2-year warranty |
| After-sales service | Contact BUT: 09 78 97 97 97 (local call rate), Mon-Fri 9am-7pm, Sat 9am-6pm |
| Country of origin | France (distributor: BUT INTERNATIONAL) |
Frequently Asked Questions - ATV3F AYA
User questions about ATV3F AYA
0 question about this device. Answer the ones you know or ask your own.
Ask a new question about this device
Download the instructions for your Cooker in PDF format for free! Find your manual ATV3F - AYA and take your electronic device back in hand. On this page are published all the documents necessary for the use of your device. ATV3F by AYA.
USER MANUAL ATV3F AYA
MANUEL D'UTILISATION
ATV3F/2
FR
natural_image
Three white concentric circles on a black background, no text or symbols presentTable vitroceramique
TABLE DES MATIERES
CONSIGNES DE SECURITE -1-
DESCRIPTION DE LA DISPOSITION DE LA TABLE DE CUISSON CERAMIQUE -10-
INSTALLATION -12-
UTILISATION -19-
CONSIGNES RELATIVES A LA TABLE DE CUISSON EN CERAMIQUE -28-
ENTRETIEN ET NETTOYAGE -30-
SPECIFICATIONS TECHNIQUES - 32-

LE TRI

FACILE

text_image
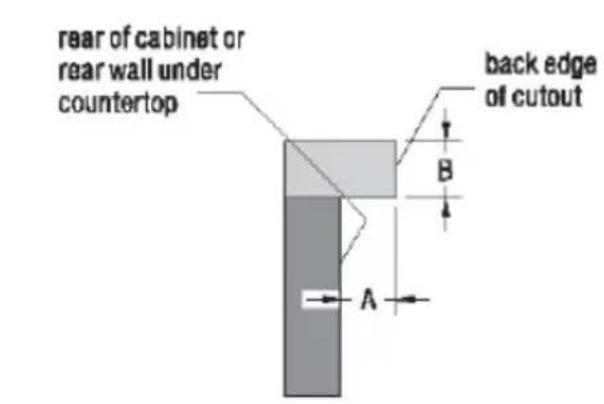
rear of cabinet or rear wall under countertop back edge of cutout B AFig.5
A. 40mm min
B. 40mm max
text_image
≥100 500 400 2.40Installation de plaque
text_image
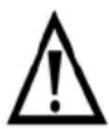
Warning sign with exclamation mark and hand symbol, commonly used for safety or hazard preventionAvertissement
Risque de coupure
Attention aux bords
natural_image
Line drawing of a rectangular electronic device with ventilation slots and mounting holes (no text or symbols)
natural_image
Pure mechanical part diagram showing a bent pipe or bracket with no text, numbers, or symbols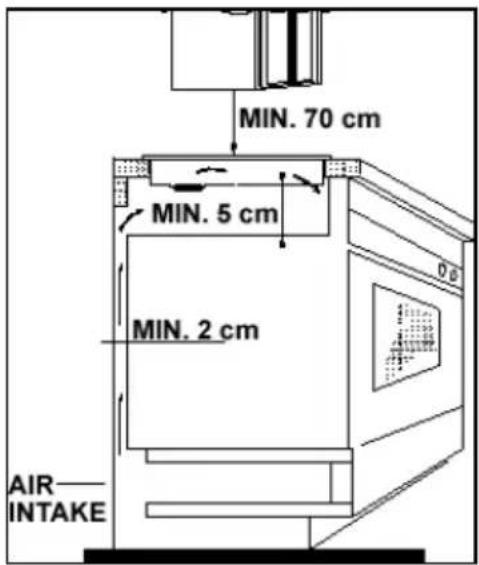
text_image
MIN. 70 cm MIN. 5 cm MIN. 2 cm AIR INTAKEnatural_image
Symbol of a trash bin with crossed lines indicating no waste or discharge, and a solid black rectangle below (no text or labels)natural_image
Three white concentric circles on a black background, no text or symbols presentCeramic hob
TABLE OF CONTENTS
SATEFY INSTRUCTIONS -1-
DESCRIPTION -8-
INSTALLATION -9-
USING THE CERAMIC HOB -16-
HOB GUIDELINES -25-
CLEANING AND MAINTENANCE - 27-
TECHNICAL DATA -30-

THIS PRODUCT IS INTENDED FOR HOUSHOLD USE ONLY!
Please read these instructions carefully before the first use of this product and save this manual for your future reference.
Safety instructions
Caution!
- Do not use the ceramic hob until you have read this instruction manual.
The ceramic hob is intended for household use only. - If the supply cord is damaged, it must be replaced by the manufacturer, its service agent or similarly qualified persons in order to avoid a hazard.
The appliance becomes hot during operation. Take care not to touch the hot surface. -
Always keep children away from the ceramic hob.
-
While in operation direct contact with the ceramic hob may cause burns!
- Ensure that small items of household equipment, including connection leads, do not touch the hob as the insulation material of this equipment is usually not resistant to high temperatures.
- Do not leave the ceramic hob unattended when frying. Oils and fats may catch fire due to overheating or boiling over.
- Do not switch on the hob until a pan has been placed on it.
- Do not put pans weighing over 25kg on the hob.
- Do not use the ceramic hob in the event of a technical fault. Any faults must be fixed by an appropriately qualified and authorized person.
-
In the event of any incident caused by a technical fault, disconnect the power and report the fault to the service centre to be repaired.
-
The rules and provisions contained in this instruction manual should be strictly observed. Do not allow anybody who is not familiar with the contents of this instruction manual to operate the ceramic hob.
-
The ceramic hob should not be cleaned using steam cleaning equipment.
- IMPORTANT: The adjacent furniture or housing and all materials used in the installation must be able to withstand a minimum temperature of 95°C above the ambient temperature of the room it is located in, whilst in use.
- Any damage can be caused by the appliance being installed in contravention of this temperature limit, or by placing adjacent cabinet materials closer than 4mm to the appliance.
● This appliance complies with all current European safety legislation.
We do wish to emphasize that this compliance does not remove the fact that the appliance surfaces will become hot during use and retain heat after operation.
Child Safety
- We strongly recommend that babies and young children are prevented from being near to the appliance and not allowed to touch the appliance at any time.
- If it is necessary for younger family members to be in the kitchen, please ensure that they are kept under close supervision at all times.
General Safety
● Children less than 8 years of age shall be kept away unless continuously supervised.
- This appliance can be used by children aged from 8 years and above and persons with reduced physical, sensory or mental capabilities or lack of experience and knowledge if they have been given supervision or instruction concerning use of the appliance in a safe way and understand the hazards involved. Children shall not play with the appliance. Cleaning and user maintenance shall not be made by children without supervision.
- NEVER try to extinguish a fire with water, but switch off the appliance and then cover flame e.g. with a lid or a fire blanket.
● WARNING: Danger of fire: do not store items on the cooking surfaces.
● Means for disconnection must be incorporated in the fixed wiring in accordance with the wiring rules.
- Do not allow electrical fittings or cables to come into contact with areas on the appliance that get hot.
- Do not use the appliance to heat the room it is located in or to dry clothing.
- Do not install the appliance next to curtains or soft furnishings.
- If the supply cord is damaged, it must be replaced by the manufacturer, its service agent or similarly qualified persons in order to avoid a hazard.
● The appliance is not intended to be operated by means of an external timer or separate remote-control system.
● This product can be worked but not through outside timer and remote control.
- Do not use the hob if the surface
becomes broken or cracked. You should switch off the appliance to avoid the possibility of electric shock.
- Do not leave pans with prepared dishes based on fats and oils unattended on the switched-on plate; hot fat can spontaneously catch fire.
● WARNING: Use only hob guards designed by the manufacturer of the cooking appliance or indicated by the manufacturer of the appliance in the instructions for use as suitable or hob guards incorporated in the appliance. The use of inappropriate guards can cause accident.
● WARNING: Unattended cooking on a hob with fat or oil can be dangerous and may result in fire.
● CAUTION: The cooking process has to be supervised. A short term cooking process has to be supervised continuously.
● WARNING: If the surface is cracked, switch off the appliance to avoid the possibility of electric shock.
● The fixed wiring for applicant shall have an all-pole disconnection device
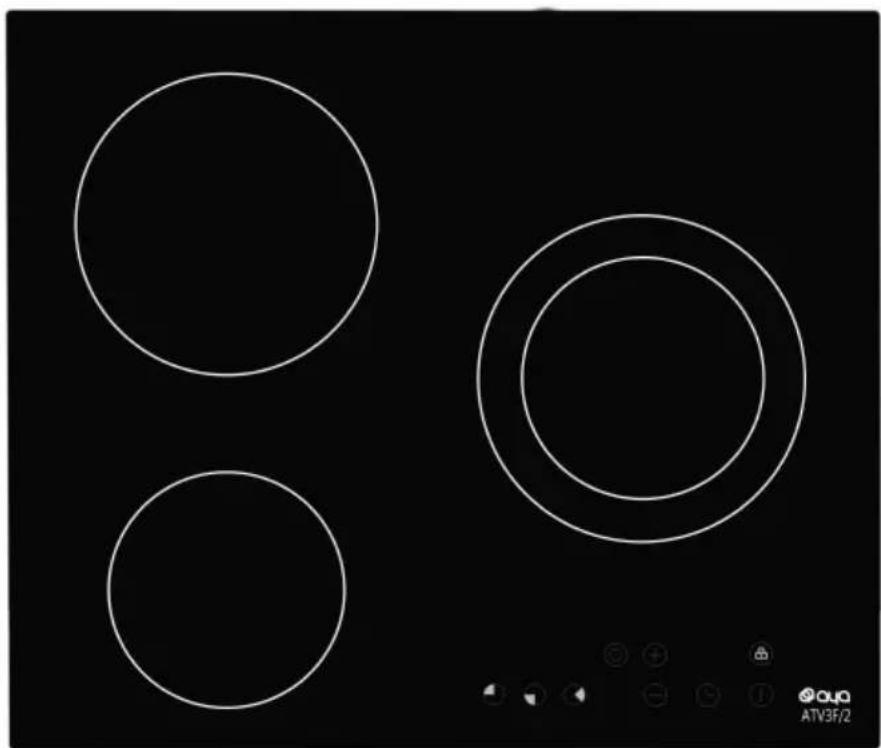
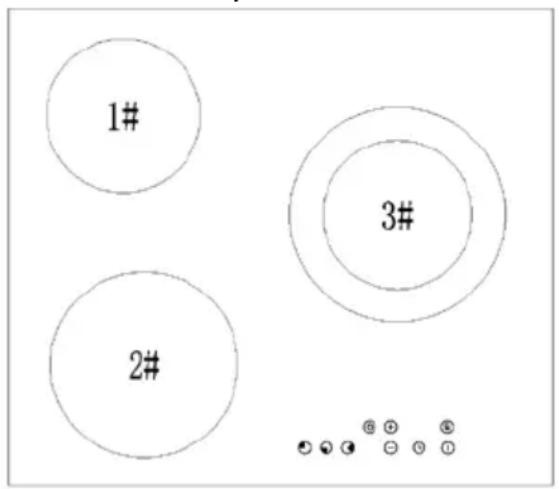
DESCRIPTION
3 zone ceramic hob schematic diagram
1) 1.2 kW hyperspeed zones (diameter 165 mm)
2) 1.8 kW hyperspeed zones (diameter 200 mm)
3) 2.2 kW hyperspeed zones (inside diameter 160 mm, outside diameter 230 mm).
text_image
1# 2# 3#Control panel
Control panel layout
- Cooking zone select button(#1)
- Cooking zone select button(#2)
- Cooking zone select button(#3)
- minus button
- Timer selector
- ON/OFF button
- Safety lock button
- Timer display
- Plus button
- Double zone select button(ON/OFF)
- Cooking zone indicator (#3)
- Cooking zone indicator (#2)
- Cooking zone indicator (#1)
Display: can operate that cooking zone
Non-display: not selected that cooking zone, can not operate.
text_image
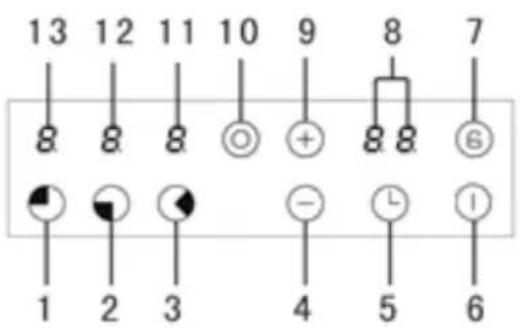
13 12 11 10 9 8 7 8 8 8 + 8 8 6 1 2 3 - L I 4 5 6INSTALLATION
Electrical connection
Before connecting the appliance, make sure that the supply voltage marked on the Rating Plate corresponds with your mains supply voltage.
WARNING: THIS APPLIANCE MUST BE EARTHED.
- If you have to change the oven power cord, the earthing (yellow/green) conductor must always be 10 mm longer than the line conductors.
- Care must be taken to ensure that the temperature of the mains supply cable does not exceed 50°C.
- If the mains supply cable is damaged, then it must be replaced by an appropriate replacement which can be obtained from Spares Department.
Assembly of ceramic hob

text_image
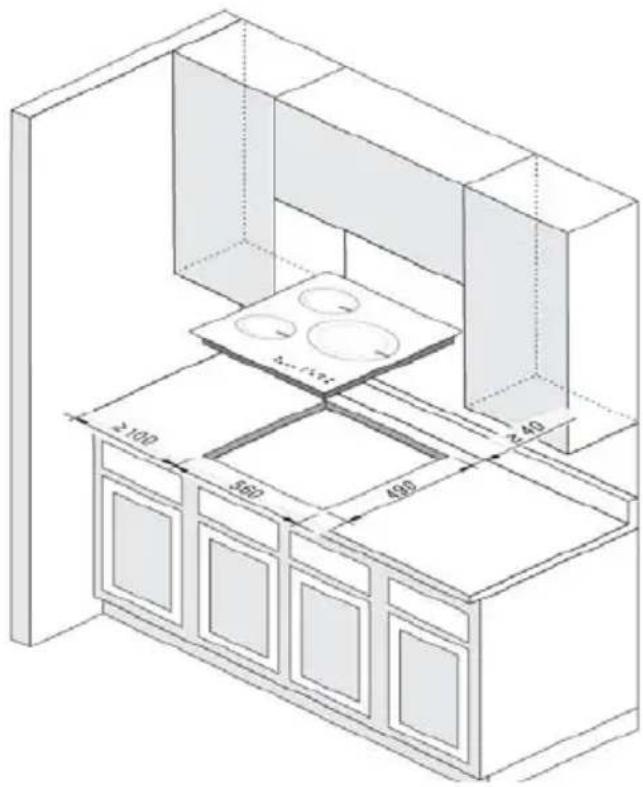
510 580 50 560 490Preparing the unit for a built-in appliance

WARNING
- The kitchen units that are in direct contact with the appliances must be heat-proof(min. 95°).
- The appliance can be installed on a work surface with a thickness of 30 an dd40 mm and near to walls which are higher than the work surface, maintaining a minimum distance of 100 mm.
- Carry out all cutting of the unit and work surface then carefully remove shavings or sawdust before inserting the appliances.
- To ensure a correct ventilation of the hob please comply with the dimensions shows in figures.
● Always refer to the manufacturer for specific instructions,
● Make sure the surface is level and square and that no part interferes with the space required for installation.
● Prepare the cut as indicated(see installation dimensions).
text_image
rear of cabinet or rear wall under countertop back edge of cutout B AFig.5
A. 40mm min
B. 40mm max

text_image
2×100 300 400 240EN-11
Installing the hob
text_image
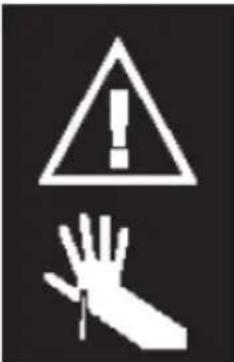
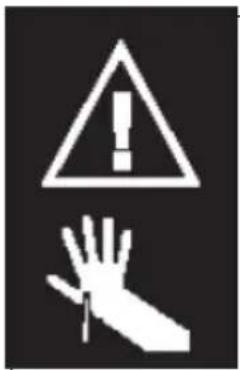
Warning sign with exclamation mark and hand symbol, commonly used in safety or hazard prevention contextsWARNING
Risk of cutting.
Be careful of cutting edges.
End parts in foamed plastic - be careful.
During transportation these could cause slight injury or cuts.
Remove the material and envelope of documents from the packaging.
Before proceeding with installation read the work instructions carefully.
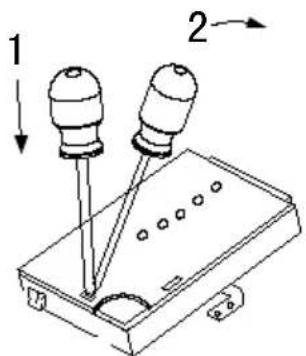
Step.1
Put a towel or cloth on the work surface. Place the hob face down on the protected surface.
Step.2
Apply the strip seal,supplied with the hob,which is for sealing it onto the work surface.

text_image
Bottom of hob Glass surface ClothDo not use silicone. Apply the seal to the edge of the bottom of the hob, leaving about 3mm from the edge of the glass.
Apply the seal all around the circumference.
Cut any excess and bring the two ends of the seal together so they match.

text_image
Seal Self-adhesive sealStep.3
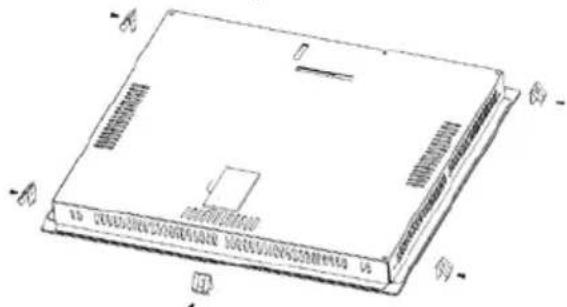
Fix the brackets(4 or 5 pcs) on the front side and rear side by screw. Put the hob in the cut-
out cabinet, and make it centered. Ensure that the front edge of the hob is parallel to the side edge of the work surface.
natural_image
Line drawing of a rectangular electronic device with ventilation slots and a small component, no text or symbols present.
natural_image
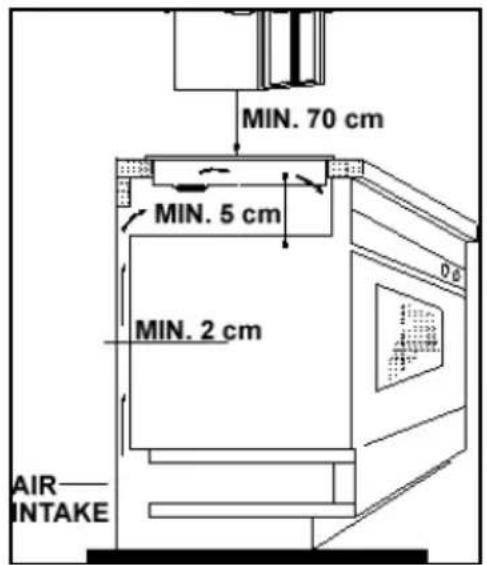
Pure mechanical part diagram showing a bracket and mounting edge without any text or symbols- IMPORTANT: You must observe the ventilation requirements shown in the drawing opposite.
- IMPORTANT: There are ventilation holes around the outside of the hob. YOU MUST ensure that these holes are not blocked by the work top, when you put the hob into position (see drawing opposite).
- IMPORTANT: Do not use a silicon sealant to seal the appliance against the aperture. This will make it difficult to remove the hob from the aperture in future, particularly if it needs to be serviced.
- Carefully turn the hob back over and then gently lower it into the aperture hole that you have cut out.
text_image
MIN. 70 cm MIN. 5 cm MIN. 2 cm AIR INTAKEFitting guidelines
The ceramic hob is manufactured to work with two-phase alternating current (400V2N\~50Hz). The voltage rating of the ceramic hob heating elements is 230V. Adapting the ceramic hob to operate with one-phase current is possible by appropriate bridging in the connection box according to the connection diagram below. The
text_image
1 2connection diagram is also found on the cover of the connection box. Remember that the connection wire should match the connection type and the power rating of the ceramic hob.
The connection cable must be secured in a strain-relief clamp.
Warning!
Remember to connect the safety circuit to the connection box terminal marked with ⏻.The electricity supply for the ceramic hob must have a safety switch which
enables the power to be cut off in case of emergency. The distance between the working contacts of the safety switch must be at least 3mm.
Before connecting the ceramic hob to the power supply it is important to read the information on the data plate and the connection diagram.
| wires for each domino hob with touch control models | |||
| model | Adaptive voltage range and wires | The wiring diagram | |
| 220-2401N~50-60Hz | 380-4202N~50-60Hz | KADO K 1/5 | |
| ATV3F/2 | H05VV-F3G2.5 | H05VV-F4G2.5 | 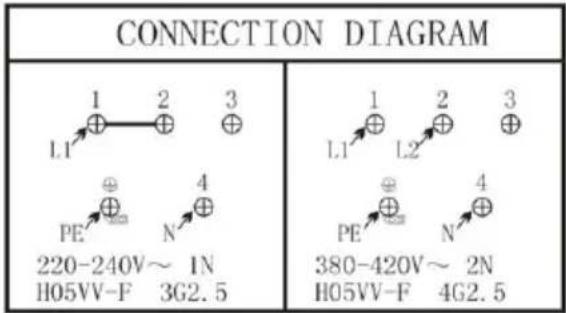 |
- The cable connections must be in accordance with the diagram located on the bottom of the hob.
- You should use a good quality screwdriver to carefully, fully tighten All of the terminal screws.
- If when the hob is first switched on, only two of the zones work, you should recheck that the terminal screws are all fully tightened. This should be done before contacting the Customer Care Department.
- IMPORTANT: The appliance must NOT be connected to the mains supply by means of a 13A plug and socket.
- This appliance must be wired into a 30 A double pole switched fused spur outlet, havi3 mm contact separation and placed an easily accessible position adjacent to the appliance. It should not be located above the appliance and no more than 1.25m away from it.
- The cable can be looped if necessary, but make sure that is not kinked or trapped when the hob is in position. Care must be taken to avoid the cable being in contact with hot parts of the appliance.
Replacing the mains supply cable
- If the mains supply cable is damaged, then it must be replaced by an appropriate replacement.
● The mains supply cable should be replaced in accordance with the following instructions:
Switch the appliance off at the control switch.
- Open the terminal block on the underside of the hob.
- Unscrew the terminal screws fixing the cable.

text_image
connect to the mains power supply 220-240V 1 N~ PE green-yellow N blue grey L brown blackThe “green-yellow” earth wire must be connected to the terminal marked 12 . It must be about 10 mm longer than the live and neutral wires.
The “blue” neutral wire must be connected to the terminal marked with letter (N) - the live wire must be connected to the terminal marked with letter (L).
USING THE CERAMIC HOB
Before first use

IMPORTANT: You should clean the ceramic hob surface (see "Cleaning and maintenance" section).
- You should switch on one cooking zone at a time, for 5 minutes at the maximum setting. This will help to eliminate any new smell that exists and evaporate any humidity that has formed on the heating elements during transit.
- Do not burn off more than one zone at once.
- You must place a saucepan filled half full with cold water on each zone as you burn it off.
Touch controls
- All o perations are performed by means of the touch controls that can be found on the control panel.
● Each touch control has a visual display that corresponds to it.
Operation instruction
1. Power on
√ After switch on the appliance, the hob will beep to remind power on, all of the indicator lights on the display screen and digital tube will lit on for 2s, then the appliance goes into power off mode. Note: The indicator lights will not lit on if there is no multiple-ring heating function.
√ Power off mode: All the display will close except the residual heat indicator Except long press the “on/off” button, other buttons can not be operated.
2. Standby mode
√ Under power off mode, long press "on/off" button for 3s, the hob will beep and then enter standby mode.
√ All of the number in the cooking zone indicator reaches "0" (The letter "H" will show in the cooking zone indicator if there is residual heat, and decimal point will flash), timer place will show "00" as well, it will not heat at this time.
√ Under standby mode, heating operation can be carried out on each cooking zone; if no any cooking zone heating operation, the appliance will go into power off mode automatically after 10s and beep once.
3. Power off
√ Under standby mode or heating mode, long press “on/off” button for 3s a short audible signal will be heard, the appliance will go into power off mode. If the corresponding cooking zone surface has residual heat at this time, the digital tube of power level indicator will flash display “H”, and indicate residual heat warning.
4. Heating control
√ Under standby mode, you can choose the target heating hob top by pressing the cooking zone select button, then press “+” and “-” buttons to adjust the power level of the target heating hob top. Long press plus/minus buttons can continuously increase or decrease the power level.
√ When the hob top is in heating status, long press “on/off” button for 3s to switch off, and stop the 4 cooking zones to heat, the corresponding cooking zone indicator of the hob top which has heated before will flash and display high temperature warning symbol “H”.
√ Under standby mode, if some hob tops still exist residual heat, display will show "H".
√ If needing to switch off one of the cooking zones, you can select that zone first, then press the minus button until “0” power level to switch off that zone, and will not affect the heating of the other cooking zones. When power level reaches “0”, the corresponding cooking zone indicator of the hob top which has heated before will display high temperature warning symbol “H”.
√ If more than one zone is operating at the same time, total power will equal to the sum power of all the working cooking zones, each cooking zone will work according to their power modulation ratio, and will not affect each other.
- Note: 1. During the same period, only one hob top button is valid, that is only one decimal point can be displayed.
-
Press minus button to set the power level to "0", then the heating hob top will close automatically.
-
Each cooking zone has 9 power levels.
5. Multiple-ring heating function
5.1 Open double ring heating function: The outer ring can only start after the inner ring is open.
1) Touch the cooking zone select button which need to heat, corresponding cooking zone digital tube decimal point will display.
2) Select the power level you need.
3) Touch the double-ring select button to open the outer ring, the c corresponding i ndicator l ight of cooking zon e outer ring will lit on afterwards.
5.2 Open tricyclic heating function : The outer ring can only start after the inner ring is open.
1) Touch the cooking zone select button which need to heat, corresponding cooking zone digital tube decimal point will display.
2) Select the power level you need.
3) Touch the double-ring select button to open the outer ring, the corresponding indicator light of cooking zone outer ring will lit on afterwards. It will open the second ring when press for the first time, the third ring when press the second time, and it will close the outer ring heating when pressing the third time.
5.3 Close multiple-ring heating function
1) Touch the cooking zone select button which need to heat, corresponding hob top digital tube decimal point will display.
2) Touch the double ring/ multiple-ring select button to close the outer ring.
6. Power level adjustment
√ Press cooking zone select button to choose the corresponding cooking zone, using the plus and minus buttons to adjust the porper output power level.
√ By holding down either of these buttons, the value on the zone i ndicator wi ll ad just u p o r d own.Each p ressing “ +’ button,power level will add one,until level 9; Each pressing “-” b utton,power l evel w ill r educe one,until level 0 (Each
pressing of “+” or “-” button, a short audible signal will be heard). Keep pressing “+”, “-” buttons will make continuously press effect.
Upon completion of power level adjustment, the decimal point of digital tube will stop flashing and normally display the power level within 10 seconds of no operation.
√ When switching any of the cooking zone power level to 0, it will stop the power output of that cooking zone.
√ If power level of all the cooking zone are "0", the appliance will automatically enter into power off status after 1 minute no operation.
7. Fast-heating function
Your hob can fast-heating following the below steps:
√ Press plus buttons or minus buttons to set the power to level 9, then touch plus buttons to let the burner alternately display “A” and “9”.
√ Press minus buttons to set the final fast-heating level you need.
√ Press “plus button” to achieve 9 speed, and then press one more time to activate fast-heating function. Cooking zone indicator will display “A”. Continue to press “minus button” and choose the cooking speed
The power level and time corresponding tables of Fast-heating are as below:
| Power Level | 1 | 2 | 3 | 4 | 5 | 6 | 7 | 8 | 9 |
| Fast-heating time (minute) | 1 | 3 | 4.8 | 6.5 | 8.5 | 2.5 | 3.5 | 4.5 | 5 |
For example, press “plus button” to achieve “A”, and press “minus button” to select speed 4. The cooktop will start cooking at speed 9 for 6.5 mins. After then it returns back to the set speed 4.
Notice:
- Only if fast-heating at max power within 30s, press minus button can reduce the power, if press minus button after 30s, it will exit the fast-heating mode.
- If fast-heating at max power after 30s, as long as it is still alternately display "A" and "9", press plus button the hob will stay at fast-heating mode.
- When changing power level, the passed time will be automatically calculated into the corresponding heating time of the new power level.
- Within 30s fast-heating time, if press minus button to any level, the passed time will be calculated to the new set level time, after heating at that remaining time, the hob will return to normal heating mode.
8. Safety lock button
√ The whole hob top can be locked by long pressing the safety lock button for 3S whilst the appliance is under standby status or heating status, and the safety lock icon will display. When the appliance switch off the safety lock icon will extinguish.
√ To disable the safety lock feature, you should long press the safety lock button.
√ When the safety lock has been switched on, it will disable any of the other buttons on the control panel, apart from the ON/OFF button.
- Note: To avoid misoperation, if activate the safety lock by pressing the safety lock button, and the safety lock is not cancelled before the controller is switched off, the safety lock function will continue to be effective when the controller is switched on again. It will disable any of the other buttons except ON/OFF button if not cancelling the safety lock.
9. Timer adjustment
Your hob has a timer which will countdown a period of time between 1 and 99 minutes. If timer display shows 0 for the initial status, press minus button, countdown period will be 30 to 0. At the end of the countdown period an audible signal will sound for 2 minutes, press any key within 2 minutes can close the audible signal.
√ Press the timer button, use the plus button and minus button to set the countdown time, first pressing "+" button, timer will begin from 1.
√ If you want to cancel the timer, you can adjust the countdown time to 0.
√ The timer display will show the countdown time that is being set.
√ The timer display will increase in 1 minute intervals each time the timer plus button is pressed, and a short audible signal will be heard.
√ The timer display will decrease in 1 minute intervals each time the timer minus button is pressed, and a short audible signal will be heard.
√ If the set time exceeds 99 minutes, the timer display will return to showing 0.
- Note: 1. For timer adjustment, touch timer button and use plus button or minus button to input new time.
-
After selecting the burner, you can set the timer before setting the power level of the burner, within 10S (decimal point of corresponding digital tube will flash, 1 time/S) no operation after timer adjustment, timer will automatically return to 0 (display show 00), and decimal point will extinguish.
-
After the burner is working, during timer setting and completed, indicator of corresponding burner will
flash(1 time/S), and it will keep flashing until end of the timer.
9.1 Partition timing
The hob timer can be used as a minute minder for any of the cooking zones without affecting the cooking process or power setting of each burner, and each value can be different.
- Single cooking zone timing
√ When setting a countdown time for a cooking zone, press timer button first, the indicator light of the selected cooking zone will flash display, the decimal point of digital tube will display, and to indicate the set timer has been related with the selected cooking zone. At this time, you can use the plus button and minus button to set the countdown time.
- Several cooking zones timing
- Each timer setting operation will be same as “Single cooking zone timing”. As long as setting a countdown time for the burner, the corresponding indicator light of that burner will flash.
√ Press any of the cooking zone select button, the digital tube will show the timer value of that burner.
√ When not selecting any burner, the digital tube will show the minimum timer value of all burners, that is associated with the cooking zone of the cookingzone indicator lamp.
9.2 Default timing
√ All of the 3 cooking zones have default timing function, if not setting the timer manually, the relationship of default timing and power level refers to table below:
| Power Level | 1 | 2 | 3 | 4 | 5 | 6-9 |
| Default timing | 6h | 6h | 5h | 5h | 4h | 1.5h |
√ When all the default timing is reached, the cooking zones will switch off automatically and enter into standby mode.
10. High temperature warning
√ Manual long press “on/off” button for 3s till power off, the whole appliance will stop heating, but the cooking surface still h as h igh temperature, t he indicator o f corresponding cooking zone which stop heating will show residual heat warning symbol “H”, to indicate c corresponding c ooking surface high temperature.
√ As long as the burner has heated before, the indicator of the corresponding burner will continued display "H" for 20 minutes after switched off.
11. Protection function
√ High temperature p protection: When t he t emperature of the hob p late is too high, t he m echanical t emperature limiting protection device of its own will start up, then the hob will stop heating, it will return to heat after the temperature falls.
√ Residual heat protection: When the whole appliance stops heating, the digital tube of the relative heating zone will display residual heat warning symbol "H", cooking surface temperature is too high, please do not touch to a void getting burned.
√ Safety cut-off protection: For the models with plug, when cut off after 1S at any time, the voltage between L/N of the plug should fall to below safe voltage range.
√ Connection of d isplay board and power supply board breakdown: When the appliance is switched on, if the display board does not receive the correct power board signal for 20 consecutive seconds, the timer 2 digit digital tube will display "E1" and all loads stop working. It will return to power off mode after 1 minute, and display will continuously show residual heat warning symbol "H" for the one which under residual heat protection.
How to use the hot plate
Put the pot in center of the heating z one, Press the ON /OFF button to switch on the appliance.
High temperature indication lamp:
When the glass plate is too hot, the high temperature indication lamp will light up, don't touch the glass plate until the indication lamp goes out.
Shut down:after using,please press the button"OFF",the hob will stop heating.
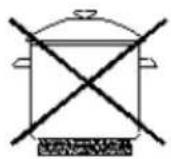
wrong
wrong
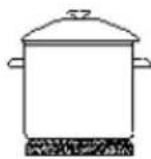
right

wrong

wrong
Caution!
➢ Ensure the heating plate is clean-a soiled zone does not transfer all of the heat.
Protect the plate against corrosion.
Switch off the plate against corrosion.
Do not leave pans with prepared dishes based on fats and oils unattended on the switched-on plate; hot fat can spontaneously catch fire.
HOB GUIDELINES
The first few times the hob top is used, it may give off an acrid, burning smell. This smell will disappear completely with repeated use.
The worktop is fitted with cooking areas of different diameter and power.
The positions where the heat will radiate from are clearly marked on the h ob top. The sa ucepans must be p positioned exactly on these zones for efficient heating to occur. Pans should have the same diameter as the cooking zone that they are being used on.
You should not use saucepans with rough bottoms, as this can scratch the ceramic surface.
Before use, make sure that the bottoms of the saucepans are clean and dry.
When cold, the bottom of the pans should be slightly concave, as they expand when hot and lie flat on the surface of the hob. This will allow the heat to transfer more easily.
The best thickness for the bottom of the pans is 2 - 3 mm of enameled steel and 4 - 6 mm for stainless steel with sandwich type bottoms.
If these rules are not followed, then there will be a great loss of heat and energy. He at not ab sorbed by the sau cepan, will spread to the hob, frame and surrounding cabinets.
Preferably cover pans with a lid to permit cooking at a lower heat.
Always cook vegetables and potatoes, etc. in as little water to reduce cooking times.
Food or liquid that has high sugar content may damage the hob top if it comes into contact with the ceramic hob surface.
Any sp illages sh ould b e wi ped up i mmediately, however th is may not prevent the hob surface from becoming damaged.
IMPORTANT: The ceramic h ob surface is to ugh; however it is not unbreakable and can be damaged. Especially if pointed or hard objects are allowed to fall on it with some force.
DO NOT USE THE HOB IF THE SURFACE BECOMES BROKEN OR CRACKED. YOU SHOULD SWITCH OFF THE APPLIANCE TO AVOID THE POSSIBILITY OF ELECTRIC SHOCK AND CONTACT THE BAUMATIC CUSTOMER CARE DEPARTMENT IMMEDIATELY.
CLEANING AND MAINTENANCE

Cleaning operations must only be carried out when the hob is cool.
The appliance should be disconnected from your mains supply before commencing any cleaning
process.
Cleaning the ceramic hob top
Any residues that are left on the hob top surface from cleaning agents will damage it. You should remove any residues with warm water mixed with a little
washing up liquid.
Abrasive cleaners or sharp objects will damage the hob surface; you should clean it using warm water
mixed with a little washing up liquid.

You may find it easier to clean some deposits whilst the hob surface is still warm. However you should take care not to burn yourself if cleaning the hob surface when it
is still warm.
After each use
Wipe the appliance over with a damp cloth.
Dry the appliance by rubbing the surface with a clean cloth.
Cleaning table
| Type of deposit | Remove immediately? | Remove when the appliance has cooled down? | What should I use to remove the deposit? |
| Sugar or food/liquid containing sugar | Yes | No | Ceramic hob scraper |
| Tin foil or plastic | Yes No Ceramic | hob scraper | |
| Fat splashes No | Yes Ceramic | hob cleaner | |
| Metallic discolouration | No Yes | Ceramic | hob cleaner |
| Water splashes or water rings | No Yes | Ceramic | hob cleaner |
Important!
The inside of the hob should only be washed with warm water and a small amount of washing-up liquid.
Caution!
Ensure the heating plate is clean-a soiled zone does not transfer all of the heat.
Protect the hob against corrosion.
Switch off the hob against corrosion.
Do not leave pans with prepared dishes based on fats and oils unattended on the switched-on plate; hot fat can spontaneously catch fire.
IMPORTANT: If your appliance appears not to be operating correctly, Please contact with dealer.
DO NOT ATTEMPT TO REPAIR THE APPLIANCE YOURSELF.
Please note that if an engineer is asked to attend whilst the product is under guarantee and finds that the problem is not the result of an appliance fault, then you may be liable for the cost of the call out charge.
The appliance must be accessible for the engineer to perform any necessary repair. If your appliance is installed in such a way that an engineer is concerned that damage will be caused to the appliance or your kitchen, then he will not complete a repair.
TECHNICAL DATA
Rated Voltage: 220 - 240 V\~, 50 - 60 Hz
Supply Connection: 30 A (double pole switched fused outlet with 3mm contact gap)
Max Rated Inputs: 5.2 kW
Energy information
Information for domestic electric hobs
| Table-Information for domestic electric hobs | |||
| Symbol | Value | Unit | |
| Model identification | - ATV3F/2 | - | |
| Type of hob | - | Electric hob | - |
| Number of cooking zones and/or areas | -- | ||
| Heating technology (induction cooking zones and cooking areas, radiant cooking zones, solid plates) | - | Radiant cooking zones | - |
| For circular cooking zones or area:diameter of useful surface area per electric heated cooking zone, rounded to the nearest 5mm | Left front zone :20,0Left rear zone :16,5Right zone(large) :23,0Right zone(small):16,0 | cm | |
| For non-circular cooking zones or areas:length and width of useful surface area per electric heated cooking zone or area,rounded to the nearest 5mm | LW | cm | |
| Energy consumption per cooking zone or area calculated per kg | EC_electric cooking Front zone :179,9Rear zone :192,2Right zone(large):185,2 | Wh/kg | |
| Energy consumption for the hob calculated per kg | EC_electric hob | 185,8 | Wh/kg |
The measurement and calculation method of the above table was done in accordance with commission regulation(EU) No 65/2014 & 66/2014.
The following shows how to reduce total environmental impact (e.g. energy use) of the cooking process.
(1). Use suitable size of pan for cooking.
(2). Cover the pan with lid if possible during cooking.
(3). Choose pan which has better retaining heat capacity.
(4). If possible, defrost frozen food in a way which does not need any power consumption.
(5). It takes less time to cook food which has large surface area to volume ratio.
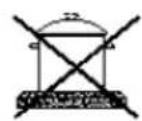
Information for dismantling
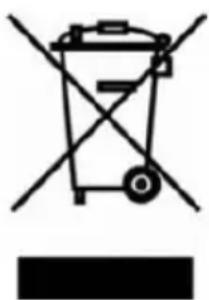
Do not dismantle the appliance in a way which is not shown in the user manual. The appliance could not be dismantled by user. At the end of life, the appliance should not be disposed of with household waste. Check with you Local Authority or retainer for recycling advice,
Environmental note
natural_image
Symbol of a trash bin with crossed lines indicating no waste or discharge (no text or labels)European directive 2012/19/EU on Waste from Electrical and Electronic Equipment (WEEE), requires that used household appliances are not thrown into the normal municipal waste stream. Used appliances must be collected separately in order to optimize the rate of recovery and recycling of materials that compose them, and to reduce the impact on human health and on the environment. The crossed bin symbol is affixed to all the products to remind you of the obligations of separated collection.
In accordance with Article L. 217 of the Consumer Code, your product benefits from a legal guarantee of conformity of 2 years.
To contact our After-Sales Service, before going to your BUT store, call 09 78 97 97 97, From Monday to Friday from 9:00 to 19:00, Saturday from 9:00 to 18:00 (local call price).

LE TRI

FACILE