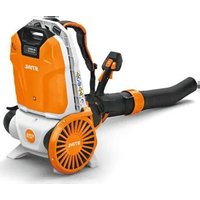
BGA 300.0 - Blower STIHL - Free user manual and instructions
Find the device manual for free BGA 300.0 STIHL in PDF.



| Product type | Battery-powered blower |
| Brand | STIHL |
| Model | BGA 300.0 |
| Weight (without battery) | 7,4 kg |
| Power supply | STIHL AR L battery or STIHL AP battery with ADA 1000 adapter |
| Blowing force | 26 N |
| Maximum air speed | 86 m/s |
| Average air speed | 72 m/s |
| Maximum air flow | 1345 m³/h |
| Volumetric air flow | 970 m³/h |
| Sound pressure level (LpA) | 84 dB(A) |
| Sound power level (LwA) | 94 dB(A) (guaranteed 96 dB(A)) |
| Vibration level (handle) | < 0,2 m/s² |
| Adjustable power levels | 3 levels + boost function |
| Adjustable tube length | Yes, tool-free |
| Carrying system | Adjustable back harness |
| Rotatable nozzle | Yes, installed by turning |
| Safety features | Trigger lock, engine stop, thermal protection |
| Maintenance | Regular cleaning, annual inspection by a STIHL dealer |
| Spare parts | Use only genuine STIHL parts |
| Warranty | EU conformity, CE declaration included |
Frequently Asked Questions - BGA 300.0 STIHL
User questions about BGA 300.0 STIHL
0 question about this device. Answer the ones you know or ask your own.
Ask a new question about this device
Download the instructions for your Blower in PDF format for free! Find your manual BGA 300.0 - STIHL and take your electronic device back in hand. On this page are published all the documents necessary for the use of your device. BGA 300.0 by STIHL.
USER MANUAL BGA 300.0 STIHL
natural_image
Exterior view of a STIHL brand air purifier with black and white body (no text or symbols visible)2 - 17 Gebrauchsanleitung
17 - 31 Instruction Manual
31 - 48 Notice d'emploi
48 - 63 Istruzioni d'uso
63 - 78 Handleiding
Inhaltsverzeichnis
1 Stecker
natural_image
Technical illustration of a vacuum cleaner assembly with an inset close-up showing internal components (no text or symbols)natural_image
Line drawing of a person's torso and back with a belt buckle (no text or symbols)natural_image
Line drawing of a person using a handheld air purifier outdoors (no text or symbols)natural_image
Line drawing of a person cleaning a tiled floor with a hose, no text or symbols presentRobert Olma, Vice President, Regulatory Affairs & Global Governmental Relations
2 Guide to Using this Manual....17
3 Overview.... 18
4 Safety Precautions....19
5 Preparing the Blower for Operation...... 22
6 Assembling the Blower.... 22
7 Removing and Fitting the Battery......23
8 Adjusting Blower for User.... 23
9 Switching the Blower On/Off.... 24
10 Checking the Blower.... 24
11 Operating the Blower.... 25
12 After Finishing Work....26
13 Transporting....26
0458-724-9602-A 17
14 Storing....26
15 Cleaning....26
16 Maintenance and Repairs...... 26
17 Troubleshooting.... 27
18 Specifications....27
19 Spare Parts and Accessories....28
20 Disposal.... 28
21 EC Declaration of Conformity.... 28
22 UKCA Declaration of Conformity...... 29
23 General Power Tool Safety Warnings.....29
1 Introduction
Dear Customer,
Thank you for choosing STIHL. We develop and manufacture our quality products to meet our customers' requirements. The products are designed for reliability even under extreme conditions.
STIHL also stands for premium service quality. Our dealers guarantee competent advice and instruction as well as comprehensive service support.
STIHL expressly commit themselves to a sustainable and responsible handling of natural resources. This user manual is intended to help you use your STIHL product safely and in an environmentally friendly manner over a long service life.
We thank you for your confidence in us and hope you will enjoy working with your STIHL product.
Dr. Nikolas Stihl
IMPORTANT! READ BEFORE USING AND KEEP IN A SAFE PLACE FOR REFERENCE.
2 Guide to Using this Manual
2.1 Applicable documents
The local safety regulations apply.
English 3 Overview
▶ In addition to this User Manual, you should also read, understand and retain the following documents:
- User manual for the STIHL AR L battery
- User manual for STIHL ADA 1000 dual battery compartment adapter
- User manual for STIHL AL 101, 301, 301-4, 500 chargers
– Safety notices and precautions for STIHL AP battery - Safety information for STIHL batteries and products with built-in battery: www.stihl.com/safety-data-sheets
2.2 Symbols used with warnings in the text

WARNING
■ This symbol indicates dangers that can cause serious injuries or death.
- The measures indicated can avoid serious injuries or death.
NOTICE
■ This symbol indicates dangers that can cause damage to property.
- The measures indicated can avoid damage to property.
2.3 Symbols in Text

This symbol refers to a chapter in this instruction manual.
3 Overview
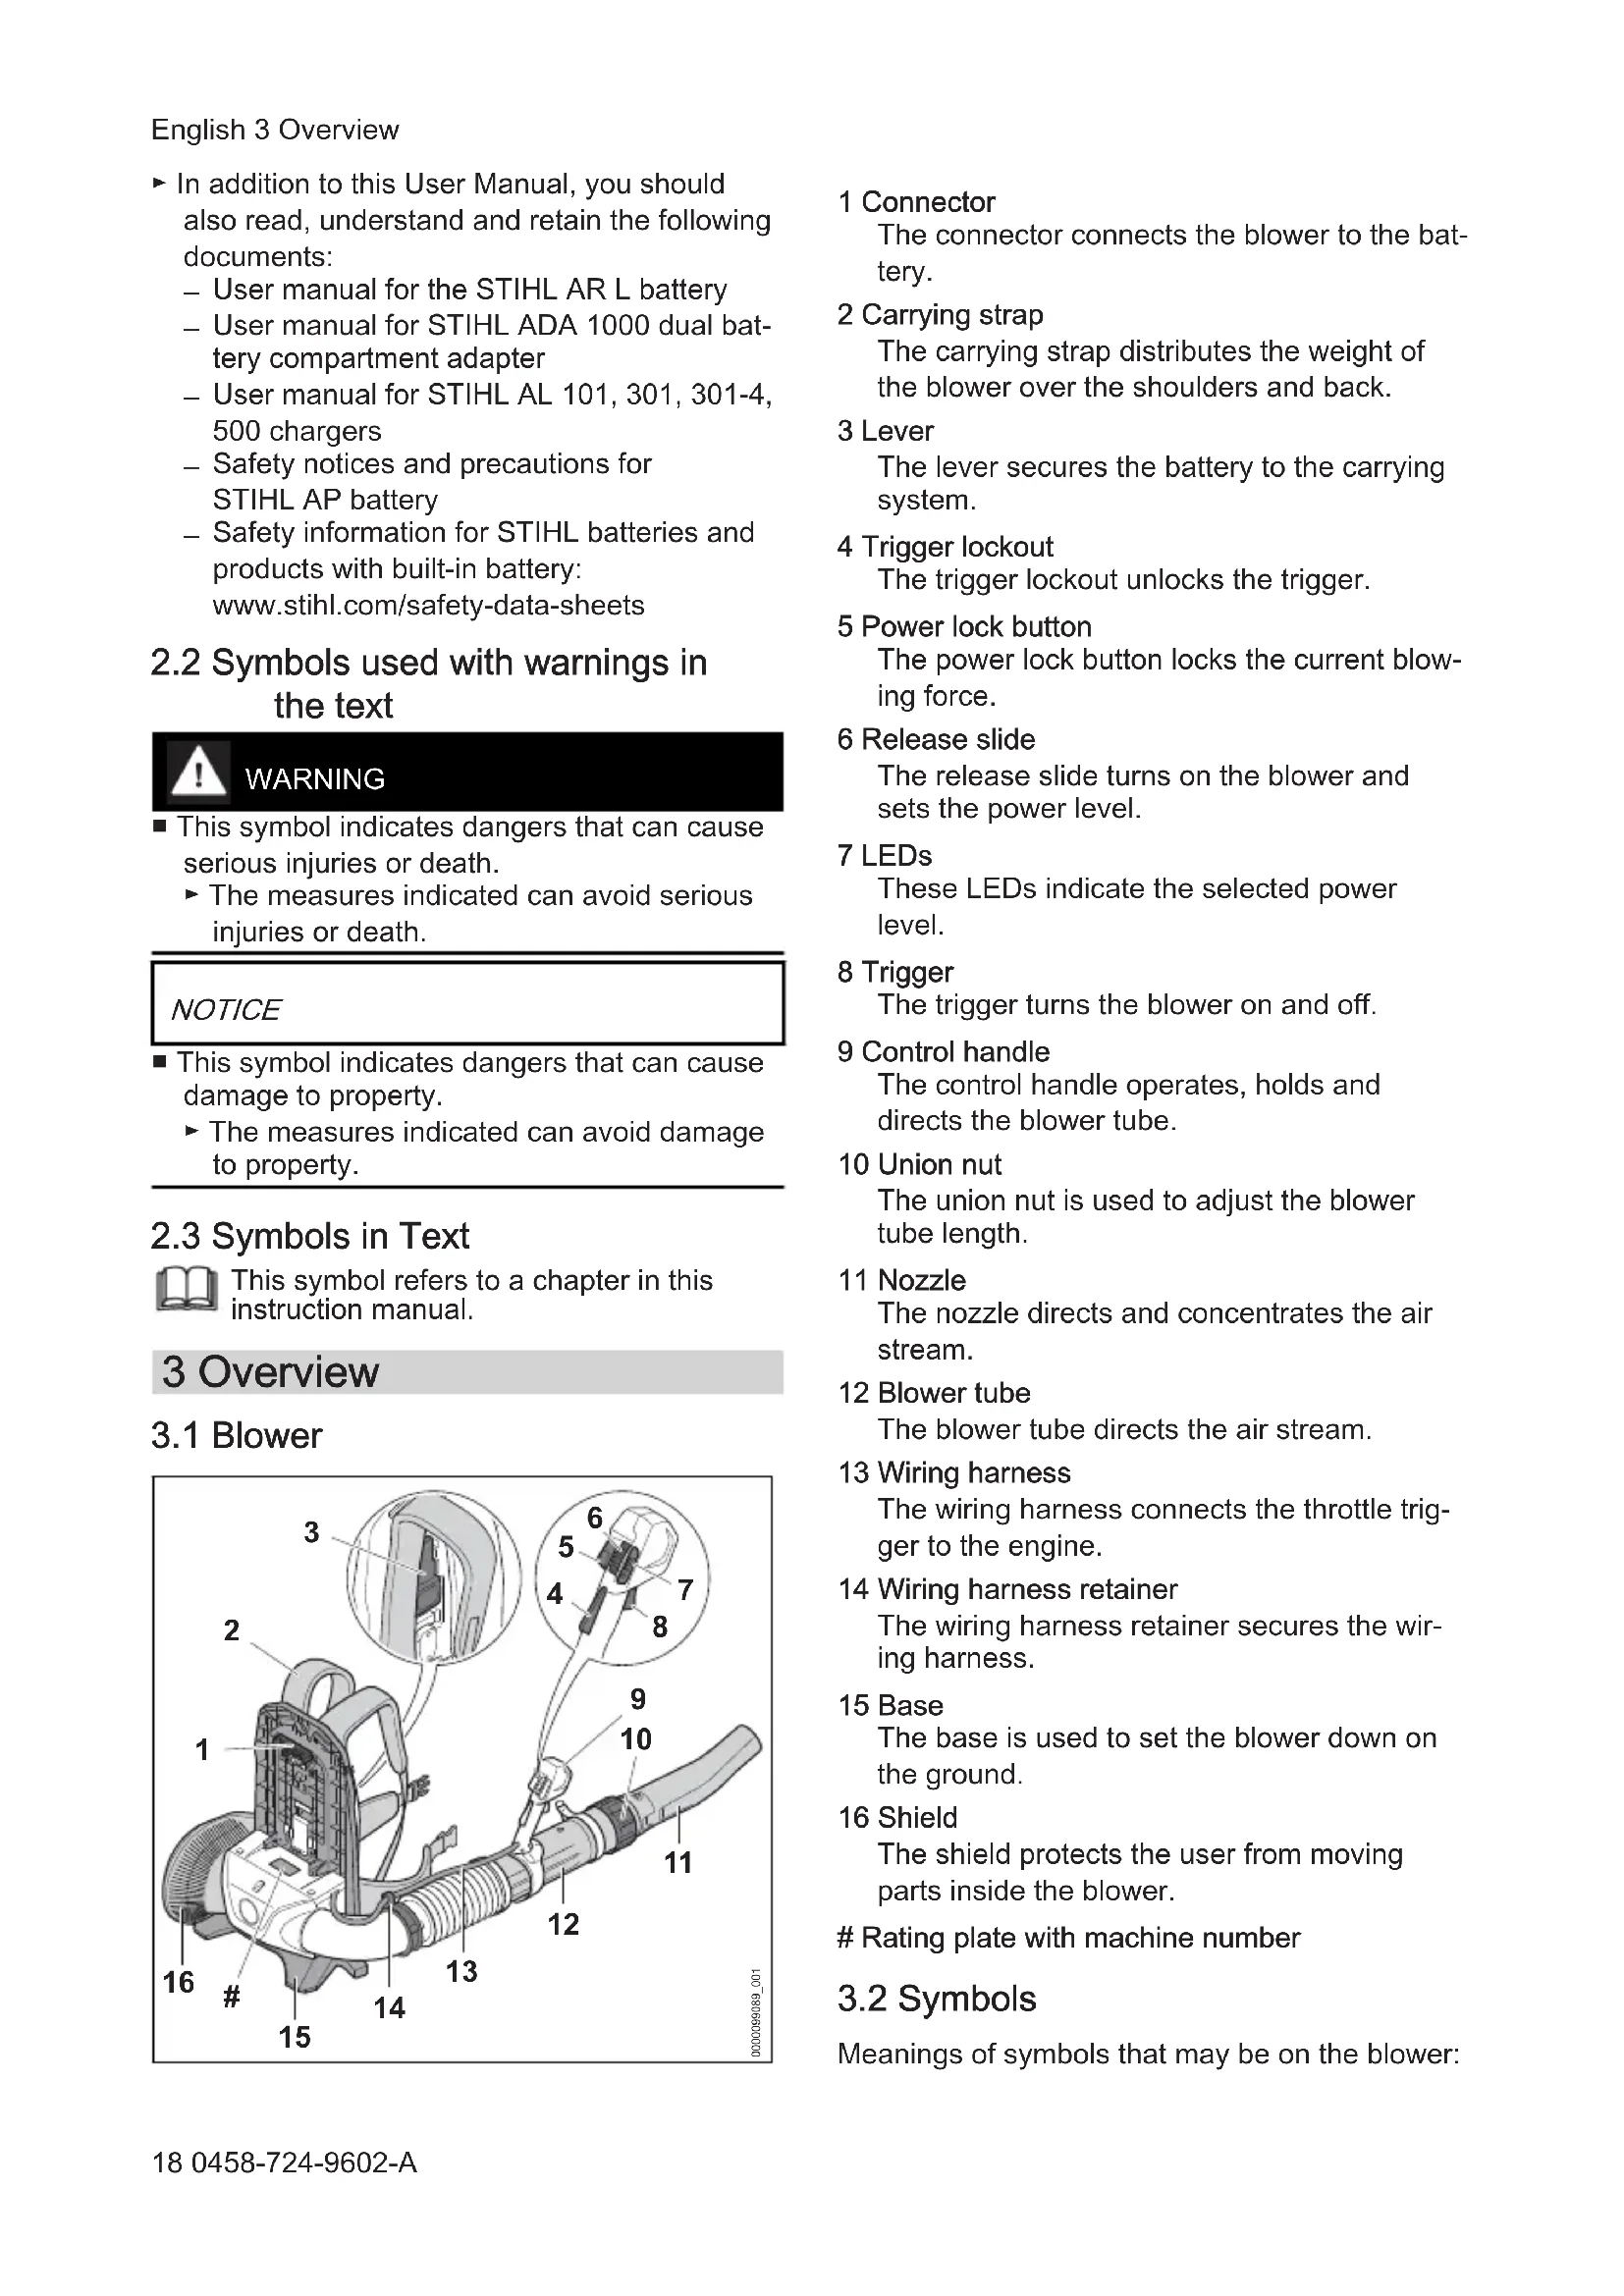
3.1 Blower
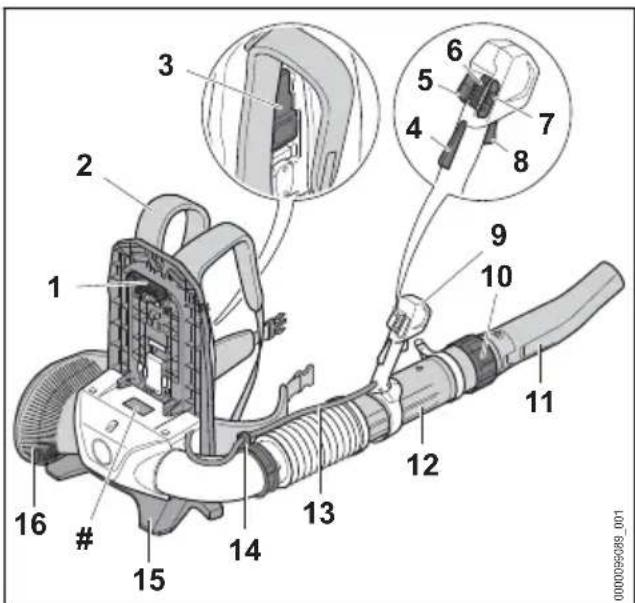
1 Connector The connector connects the blower to the battery.
2 Carrying strap The carrying strap distributes the weight of the blower over the shoulders and back.
3 Lever The lever secures the battery to the carrying system.
4 Trigger lockout The trigger lockout unlocks the trigger.
5 Power lock button The power lock button locks the current blowing force.
6 Release slide The release slide turns on the blower and sets the power level.
7 LEDs These LEDs indicate the selected power level.
8 Trigger The trigger turns the blower on and off.
9 Control handle The control handle operates, holds and directs the blower tube.
10 Union nut The union nut is used to adjust the blower tube length.
11 Nozzle The nozzle directs and concentrates the air stream.
12 Blower tube The blower tube directs the air stream.
13 Wiring harness The wiring harness connects the throttle trigger to the engine.
14 Wiring harness retainer The wiring harness retainer secures the wiring harness.
15 Base The base is used to set the blower down on the ground.
16 Shield The shield protects the user from moving parts inside the blower.
# Rating plate with machine number
3.2 Symbols
Meanings of symbols that may be on the blower:
4 Safety Precautions English

The union nut is unscrewed in this position. The blower tube can be extended.

The union nut is locked in this position. The blower tube cannot be extended.

The lever engages in position with an audible click.

Turn in this direction to attach the nozzle.
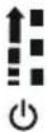
Push the release slide forward to turn the blower on and set the power levels.

Activate and deactivate power lock button.

WA
Guaranteed sound power level in accordance with Directive 2000/14/EC in dB(A) for the purpose of comparing the sound emissions of products.

Do not dispose of the product with domestic waste.
4 Safety Precautions
4.1 Warning Symbols
Meanings of warning symbols on the blower:

Observe safety warnings and take the necessary precautions.

Read and understand the User Manual and keep it in a safe place for reference.

Wear protective glasses and ear muffs.
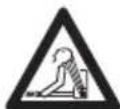
Secure long hair so that it cannot be pulled into the blower.
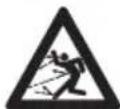
Comply with the safety instructions concerning ejected objects and take the necessary precautions.
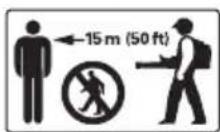
Maintain a safe distance.
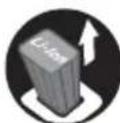
Remove the battery during work interruptions, transport, storage, maintenance or repair.
4.2 Intended Use
The STIHL BGA 300.1 blower is designed for blowing leaves, grass, paper and similar materials.
The blower can be used in the rain.
This blower is supplied with energy by a STIHL AR L battery or a STIHL AP battery together with the STIHL ADA 1000 dual battery compartment adapter.
WARNING
■ Batteries not approved by STIHL for the blower can cause fires and explosions. Persons may be seriously or fatally injured, and property may be damaged.
▶ Operate the blower with a STIHL AR L battery or a STIHL AP battery together with the STIHL ADA 1000 dual battery compartment adapter.
■ Using the blower or the battery for purposes for which it was not intended may result in serious or fatal injuries and damage to property.
▶ Always use the blower as described in this user manual.
▶ Use the battery as described in this user manual or the user manual for the STIHL ADA 1000 dual battery compartment adapter.
4.3 The Operator
WARNING
■ Users who have had no instruction cannot recognize or assess the risks involved in using the blower. The user or other persons may sustain serious or fatal injuries.

▶ Read, understand and save the instruction manual.
▶ If you pass the blower on to another person: Always give them the instruction manual.
▶ Make sure the user meets the following requirements:
- The user must be rested.
- The user must be in good physical condition and mental health to operate and work with the blower. If the user's physical, sensory or mental ability is restricted, he or she may work only under the supervision of or as instructed by a responsible person.
English 4 Safety Precautions
- The user is able to recognize and assess the risks involved in using the blower.
- The user must be of legal age or is being trained in a trade under supervision in accordance with national rules and regulations.
- The user has received instruction from a STIHL servicing dealer or other experienced user before working with the blower for the first time.
- The user must not be under the influence of alcohol, medication or drugs.
▶ If you have any queries: Contact a STIHL servicing dealer for assistance.
4.4 Clothing and Equipment
WARNING
■ Long hair may be pulled into the blower while working. This may result in serious injury to the user.
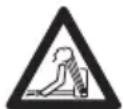
▶ Tie up and confine long hair above your shoulders so that it cannot be pulled into the blower.
■ Objects can be thrown at high speed during operation. This may result in injury to the user.

▶ Wear close-fitting safety glasses. Suitable safety glasses tested to standard EN 166 or national standards and bearing the corresponding mark are available to buy.
▶ Wear long trousers.
■ Noise is generated during operation. Noise can damage your hearing.

▶ Wear ear protection.
■ Dust can be whipped up during operation. Whipped up dust can damage the respiratory passages and cause allergic reactions.
▶ If dust is generated: Wear a dust respirator mask.
■ Unsuitable clothing can snag on wood or scrub and may become caught in the blower. Users not wearing suitable clothing are at risk of serious injury.
▶ Wear close-fitting clothing.
▶ Remove scarves and jewelry.
■ Wearing unsuitable footwear may cause the user to slip. This may result in injury to the user.
- Wear sturdy, closed-toed footwear with non-slip soles.
4.5 Working Area and Surroundings
WARNING
■ Bystanders, children and animals are not aware of the dangers of the blower and objects being thrown into the air and cannot assess them. This may result in serious injury to bystanders, children and animals and damage to property.
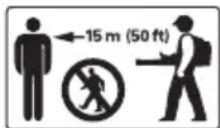
▶ Do not allow bystanders, children or animals within 15 meters of the work area.
- Maintain a clearance of 15 meters from objects.
▶ Do not leave the blower unattended. - Ensure that children cannot play with the blower.
■ Electrical components of the blower can produce sparks. Sparks may cause fires and explosions in highly flammable or explosive environments. Persons may be seriously or fatally injured, and property may be damaged.
- Do not work in a highly flammable or explosive environment.
4.6 Safe Condition
The blower is in a safe condition if the following conditions are fulfilled:
– The blower is undamaged.
- Blower must be clean and dry.
- The controls function properly and have not been modified.
– Original STIHL accessories are fitted.
– The accessories are correctly attached.
WARNING
■ If not in safe condition, components may no longer operate correctly and safety devices may be rendered ineffective. There is a risk of serious or fatal injury.
▶ Never use a damaged blower.
▶ If the blower is dirty or wet: Clean the blower and allow it to dry.
▶ Do not modify the blower. Exception: Mounting a nozzle approved for this blower model.
▶ If the controls do not function properly: Do not work with the blower.
▶ Fit original STIHL accessories designed for this blower model.
▶ Attach accessories as described in this user manual or in the user manual for the accessories.
4 Safety Precautions English
- Do not insert objects into the openings in the blower.
- Replace worn or damaged labels.
▶ If you are unsure: Consult a STIHL servicing dealer.
4.7 Working
WARNING
■ In certain situations, the user may no longer be able to concentrate on their work. This may result in the user stumbling, falling and suffering serious injury.
▶ Work calmly and in a considered manner.
▶ If light and visibility are poor: Do not work with the blower.
▶ Do not use the blower on your own.
▶ Do not work above shoulder height.
▶ Watch out for obstacles.
▶ Work standing on the ground and keep your balance. If you have to work at a height: Use a mobile elevating work platform or secure scaffolding.
▶ If you start feeling fatigue: Take a break. If you start feeling fatigue: Take a break.
▶ Blow in direction of the wind.
■ Objects can be thrown at high speed during operation. This can result in injuries to persons and animals and damage to property.
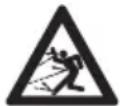
▶ Do not direct air blast towards people, animals or objects.
■ If the blower starts behaving differently or in an unusual way while operating, the blower may be in an unsafe condition. This may result in serious injury to people and damage to property.
- Stop working, remove the battery and consult a STIHL servicing dealer.
■ Vibrations may occur during blower operation.
▶ Take breaks.
▶ If signs of a circulatory disturbance occur: Consult a doctor.
■ The dust whipped up may cause the blower to be electrostatically charged. In certain conditions (e.g. dry environment) the blower may discharge suddenly and emit sparks. Sparks may cause fires and explosions in highly flammable or explosive environments. Persons may be seriously or fatally injured, and property may be damaged.
- Do not work in a highly flammable or explosive environment.
■ In an emergency, the user may start to panic and forget to take off the carrying system. This may result in serious injury to the user.
▶ Practice taking off the carrying system.
4.8 Transport
WARNING
■ The blower may topple over or move during transport. Persons may be injured or property may be damaged.
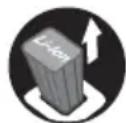
▶ Remove the battery.
- Secure the blower with lashing straps, belts, or a net so that it cannot tip over or move.
4.9 Storage
WARNING
■ Children are not aware of and cannot assess the dangers of a blower Children may be seriously injured.
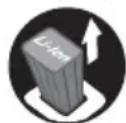
▶ Remove the battery.
- Store the blower out of the reach of children.
■ Moisture may cause the electrical contacts on the blower and metal components to corrode. The blower may be damaged.
▶ Remove the battery.
- Store the blower in a clean, dry state.
4.10 Cleaning, Maintenance and Repair
WARNING
■ If the battery is inserted when carrying out cleaning, servicing or repairs, it is possible for the blower to be switched on unintentionally. This may result in serious injury to people and damage to property.
▶ Remove the battery.
■ Harsh detergents, cleaning with a water jet or sharp objects can damage the blower and the
English 5 Preparing the Blower for Operation
battery. If the blower or battery are not cleaned as described in this user manual, components may no longer function properly and safety devices may be rendered inoperative. People may be seriously injured.
- Clean the blower and battery as described in this user manual.
■ If the blower or battery are not properly serviced or repaired, components may no longer function properly and safety devices may be rendered inoperative. Persons may be seriously injured or killed. - Do not attempt to service or repair the blower or the battery yourself.
▶ If the blower or the battery require servicing or repairs: Contact a STIHL dealer for assistance.
5 Preparing the Blower for Operation
5.1 Preparing the Blower for Operation
The following steps must be performed before commencing work:
▶ Ensure that the following components are in a safe condition:
- Blower, 4.6.
- Use the battery as described in the user manual for the STIHL AR L battery or in the user manual for the STIHL ADA 1000 dual battery compartment adapter.
▶ Check the battery as described in the user manual for the STIHL AR L battery.
▶ Fully charge the battery as described in the user manual for the STIHL AL 101, 301, 301-4, 500 chargers.
▶ Clean blower, 15.1.
▶ Attach blower tube, 6.1.
▶ Attach nozzle, 6.2.
- Put on and adjust the carrying strap, 18.1.
▶ Check the controls, 10.1.
▶ If it is not possible to carry out these steps: Do not use the blower and consult a STIHL authorized dealer.
6 Assembling the Blower
6.1 Attaching the Blower Tube
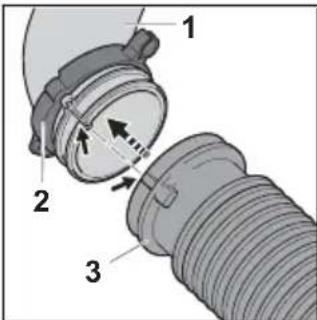
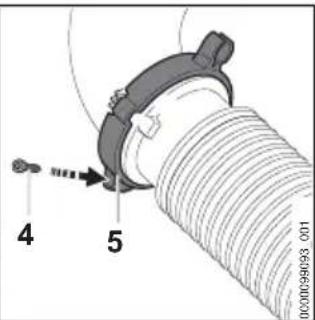
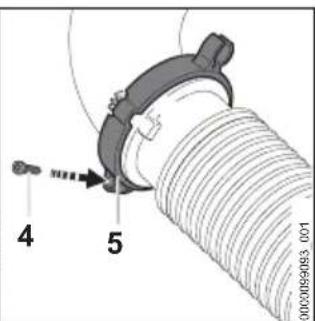
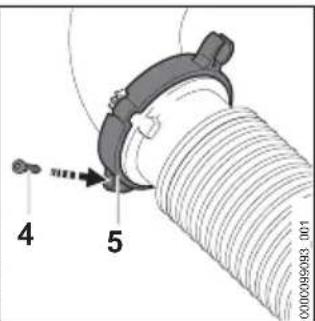
▶ Push "clamp with wiring harness retainer" (2) onto the elbow (1).
▶ Push the pleated hose (3) onto the elbow (1). The pleated hose (3) fits flush with the elbow (1).
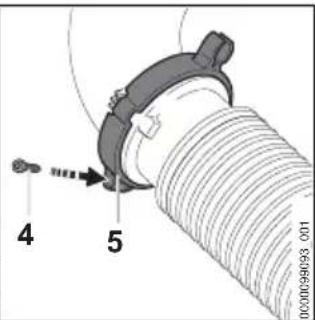
▶ Push the "clamp with wiring harness retainer" (2) onto the pleated hose (3) up to the limit stop and align it so that the screw eye (5) points downward.
- Insert the screw (4) and secure it firmly.
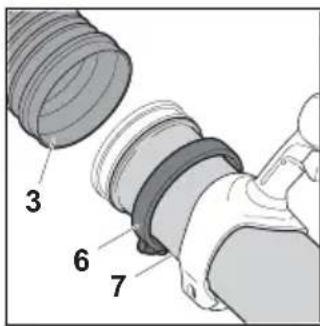
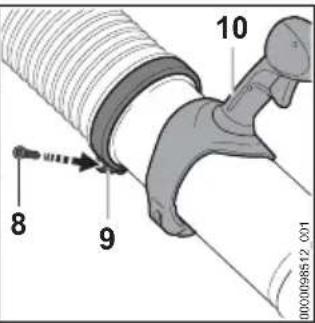
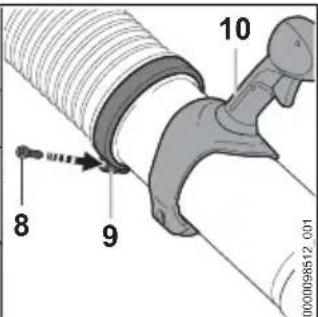
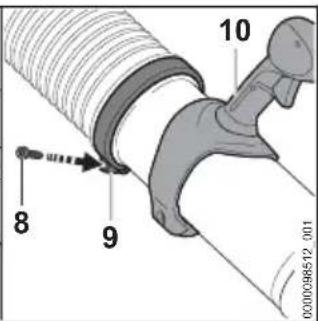
▶ Push clamp (6) onto the blower tube (7).
▶ Push the blower tube (7) into the corrugated hose (3) as far as it will go.
- Align the blower tube (7) so that the handle (10) points upwards.
▶ Push the clamp (6) onto the pleated hose (3) as far as it will go and align it so that the screw eye (9) points downwards.
▶ Insert and firmly tighten the screw (8).
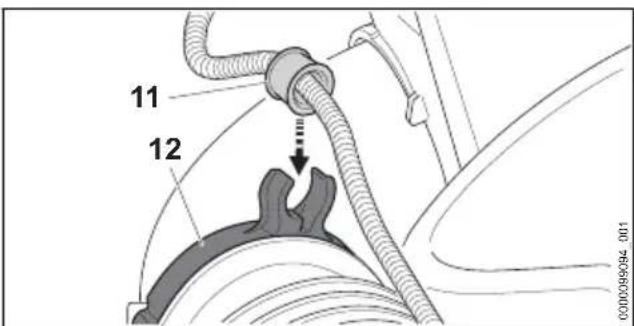
▶ Press socket (11) into the wiring harness retainer (12).
The socket engages with an audible click.
7 Removing and Fitting the Battery English
6.2 Attaching and Removing the Nozzle
▶ Shut off the engine.
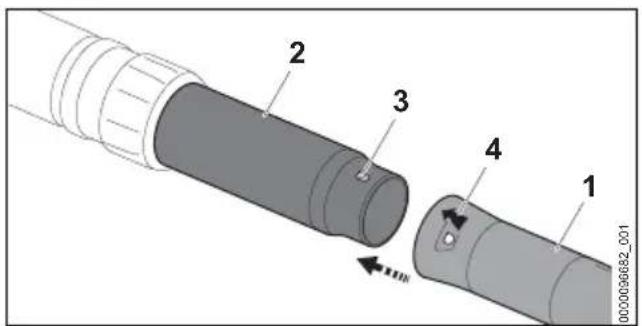
▶ Line up the pin (3) and hole (4).
▶ Push nozzle (1) onto the blower tube (2).
▶ Turn the nozzle (1) until it engages.
The nozzle does not need to be removed again.
7 Removing and Fitting the Battery
7.1 Inserting the Battery
- Place the blower on a level surface.
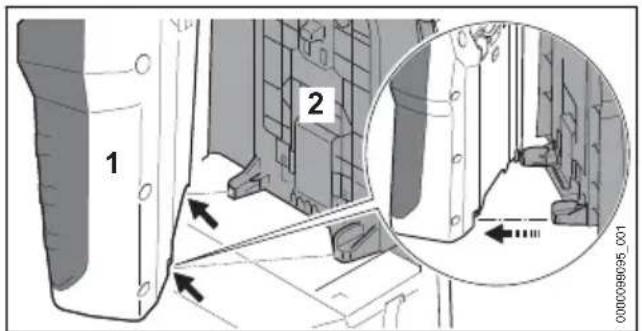
▶ Place the battery (1) on the back plate (2) so that the guides on the back plate (2) fit into the recesses on the battery (1).
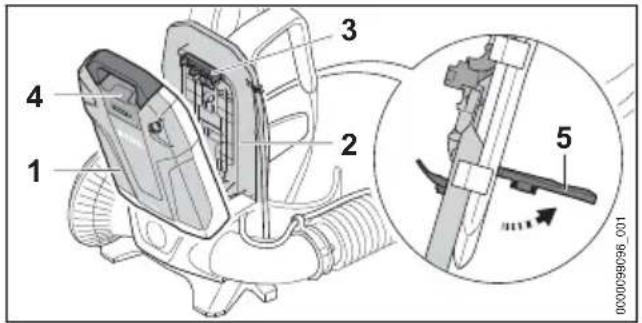
▶ Open and hold the lever (5).
▶ Press the battery (1) against the back plate (2) until the connector (3) rests against the socket (4).
natural_image
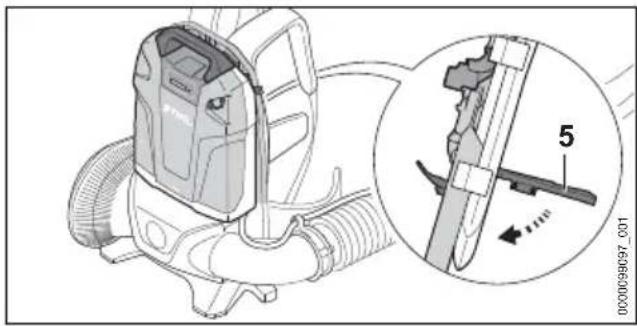
Technical illustration of a vacuum cleaner assembly with an inset close-up showing internal components (no text or symbols)- Press the lever (5) down until it engages with an audible click.
7.2 Removing the Battery
▶ Place blower on a level surface.
▶ Open the lever.
▶ Remove the battery.
8 Adjusting Blower for User
8.1 Fitting and Removing Harness
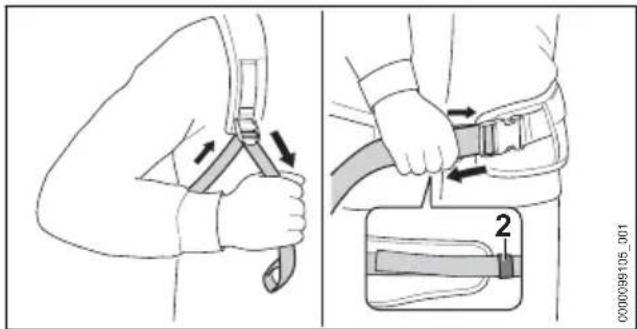
8.1.1 Fitting and Adjusting the Carrying Strap
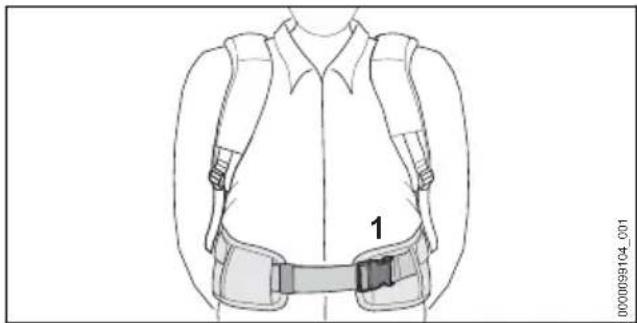
▶ Put the blower on your back.
natural_image
Line drawing of a person wearing a full-body medical harness and belt (no text or symbols)▶ Close buckle (1) on the waist belt.
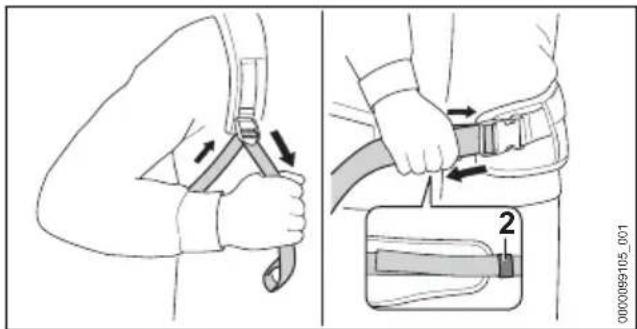
▶ Tighten the straps until the waist belt fits snugly on your hips and the back padding is against your back.
- Thread the end of the waist belt through the buckle (2).
8.1.2 Removing the Carrying Strap
▶ Loosen the straps.
▶ Open the buckle on the waist belt.
▶ Take the blower off your back.
8.2 Adjusting the Control Handle
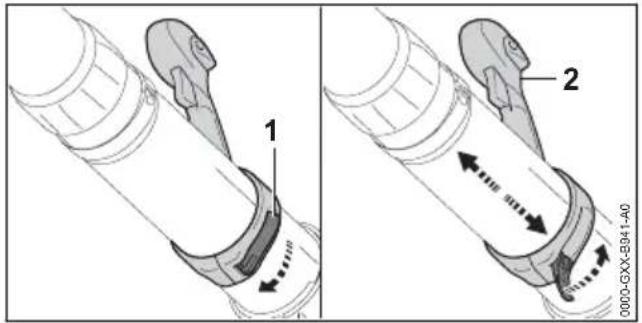
▶ Open quick release (1).
- Slide the control handle (2) to the required position.
▶ Close quick release (1).
The quick release engages in position with an audible click.
8.3 Adjusting the Blower Tube
The nozzle can be continuously adjusted depending on the height of the user and the work situation.
▶ Shut off the engine.
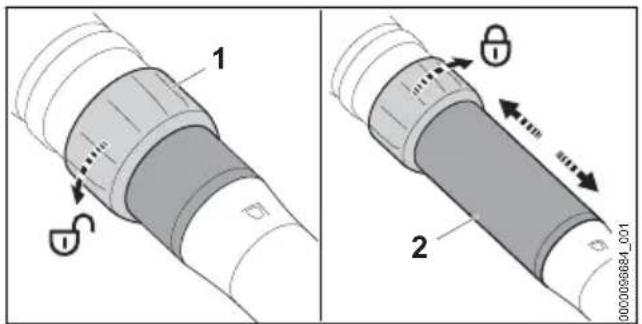
▶ Turn union nut (1) a half rotation toward 🍻
- Adjust the blower tube (2) to the required length.
▶ Turn union nut (1) toward as far as the limit stop.
9 Switching the Blower On/Off
9.1 Switching on the Blower
- Hold the blower firmly with your right hand on the control handle – wrap your thumb around the handle.
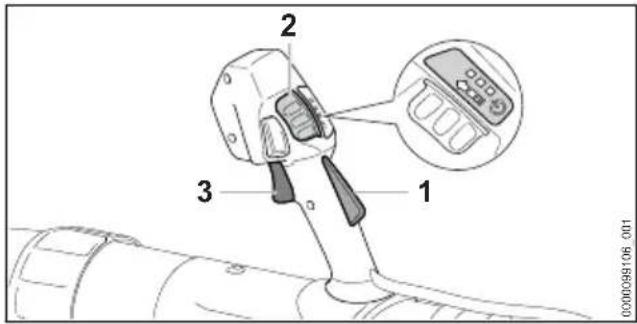
▶ Press the trigger lockout (1) with your hand and keep it pressed.
▶ Push release slide (2) in direction of arrow with your thumb and allow it to spring back. The LEDs emit light to indicate the power level used last.
- Press the trigger (3) with your index finger and keep it depressed.
The blower accelerates and air flows out of the nozzle.
The further the trigger switch (3) is depressed, the more air flows out of the nozzle.
The blower can also be switched on by first pressing the release slide (2) and pressing the trigger lockout (1) within 3 minutes (as long as the LEDs are lit). The trigger (3) is now unlocked and the blower is ready for use.
The LEDs continue to be lit for 3 minutes after the trigger (3) and trigger lockout (1) are released after the blower is switched on. As long as the LEDs are lit, the blower can be switched on again without having to operate the release slide (2).
9.2 Turning off the blower
▶ Release the trigger and trigger lockout. Air stops flowing out of the nozzle.
▶ If air continues to flow out of the nozzle:
Remove the battery and consult a STIHL servicing dealer.
The blower is faulty.
10 Checking the Blower
10.1 Checking the Controls
Trigger
▶ Remove the battery.
▶ Try pressing the trigger without pressing the trigger lockout.
▶ If the trigger can be pressed: Do not use the blower and consult a STIHL servicing dealer. The trigger lockout is faulty.
▶ Push release slide in direction of arrow with your thumb and allow it to spring back.
11 Operating the Blower English
▶ Press and hold the trigger lockout.
▶ Press the trigger.
▶ Release the trigger and trigger lockout.
▶ If the release slide, trigger or trigger lockout is stiff or does not spring back to the starting position: Do not use the blower and contact a STIHL servicing dealer.
The release slide, trigger or trigger lockout is faulty.
Turning on the Blower
▶ Insert battery.
- Press the trigger lockout lever with your hand and hold it pressed.
▶ Push release slide with your thumb in direction of arrow and allow it to spring back.
▶ Press and hold the trigger.
Air flows out of the nozzle.
▶ If 3 LEDs flash red: Remove the battery and consult a STIHL dealer.
There is a fault in the blower.
▶ Release the trigger.
Air stops flowing out of the nozzle.
▶ If air continues to flow out of the nozzle:
Remove the battery and consult a STIHL servicing dealer.
The blower is faulty.
11 Operating the Blower
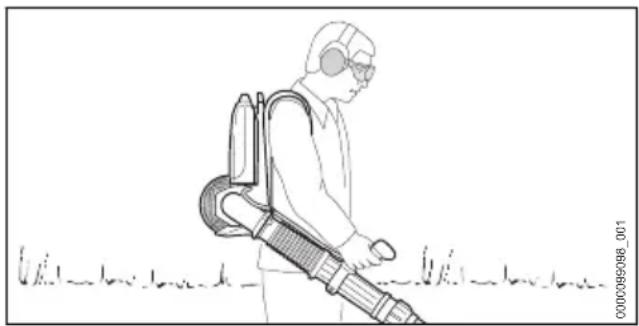
11.1 Holding and Guiding the Blower
natural_image
Line drawing of a person using a handheld air purifier outdoors (no text or symbols)- Carry the blower on your back.
▶ Hold and guide the blower firmly with your right hand on the control handle so that your thumb wraps around the control handle.
11.2 Setting the Power Level
Depending on the application, you can set 3 power levels. The LEDs indicate the selected power level. The higher the power lever, the higher the volume of air that flows from the nozzle.
The selected power level affects the battery's runtime. The lower the power level, the longer the runtime.
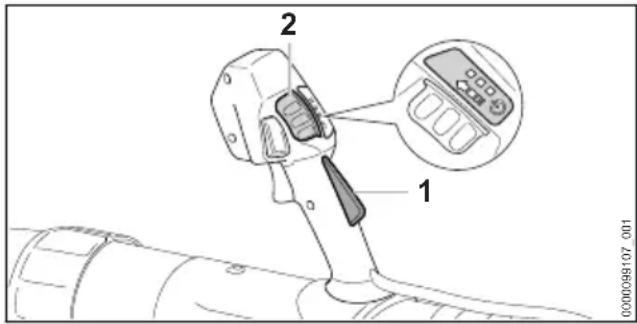
▶ Press and hold the trigger lockout (1).
▶ Push release slide (2) in direction of arrow with your thumb and allow it to spring back. The LEDs illuminate to indicate the selected power level.
▶ Push the release slide (2) forward and allow it to spring back.
This selects the next power level. After the third performance level, it starts again with the first performance level.
▶ Push the release slide (2) forward and allow it to spring back as many times as necessary until the desired power level is set.
11.3 Activating and Deactivating the Power Lock
The power lock can be activated independently of the selected power level. Any desired blowing force can be locked by using the power lock button.
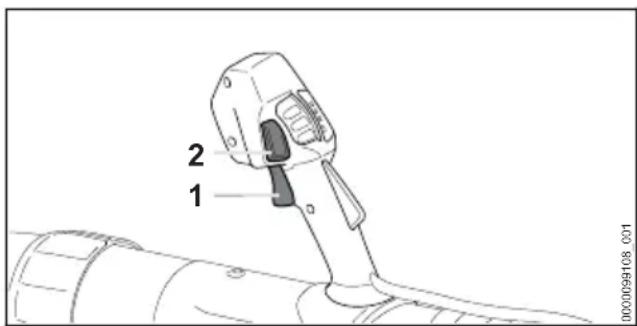
▶ Turn on blower.
▶ Set the power level.
▶ Use trigger (1) to adjust blowing force.
▶ Press the power lock button (2).
The blowing force is locked. You can let go of the trigger.
To deactivate the power lock, depress the power lock button (2) again.
11.4 Activating the Boost Function
The boost function can be activated independently of the selected power level. The blower operates at maximum power when the boost function is activated.
The boost function affects the battery's runtime. The longer the boost function is activated, the shorter the battery runtime.
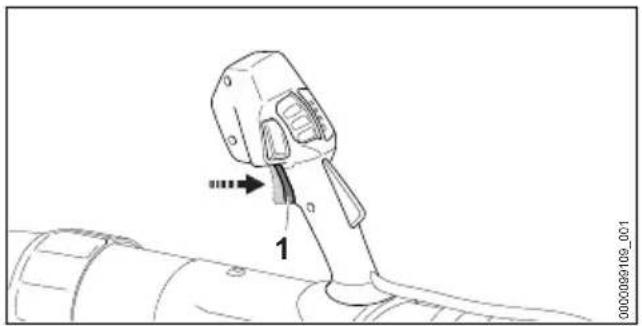
natural_image
Technical line drawing of a mechanical component with labeled parts (no readable text or symbols)▶ Override the trigger (1) and keep it pressed. The LEDs flash one after the other. The boost function is activated.
The boost function is deactivated when you release the trigger (1). The previously selected power level is reset.
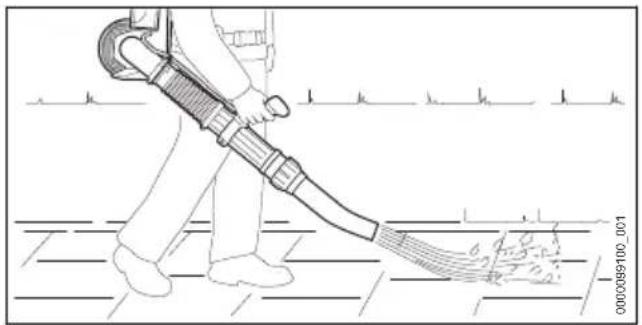
11.5 Blowing
natural_image
Line drawing of a person sweeping the floor with a hose, no text or symbols present▶ Point the nozzle at the ground.
▶ Move forward slowly in a controlled manner.
12 After Finishing Work
12.1 After Finishing Work
▶ Turn off the blower and remove the battery.
▶ If the blower is wet: Allow the blower to dry.
▶ Clean the blower.
13 Transporting
13.1 Transporting the blower
▶ Switch off the blower and remove the battery.
Carrying the blower
- Carry the blower on your back and hold the blower with your right hand on the control handle.
Transporting the blower in a vehicle
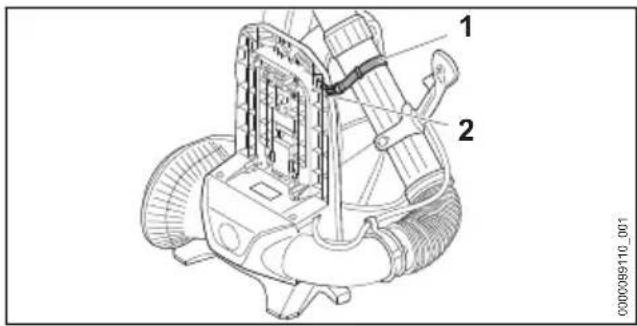
▶ Using the strap (1), attach the blower to the hook (2) of the back plate.
- Secure the blower so that it cannot tip over or move.
14 Storing
14.1 Storing the Blower
▶ Turn off the blower and remove the battery.
▶ The blower should be stored in such a way that the following conditions are fulfilled:
- The blower cannot topple over and cannot move.
- The blower must be out of the reach of children.
- The blower must be clean and dry.
15 Cleaning
15.1 Cleaning the Blower
▶ Switch off the blower and remove the battery.
▶ Clean blower with a damp cloth.
▶ Clean vents with a paintbrush.
- Clean the shield with a paintbrush or soft brush.
16 Maintenance and Repairs
16.1 Maintenance Intervals
The maintenance intervals are dependent on the environmental and operating conditions. STIHL recommends the following maintenance intervals:
Every 12 months
▶ Have the blower checked by a STIHL servicing dealer.
16.2 Servicing and Repairing the Blower
The blower cannot be serviced or repaired by the user.
▶ If your blower has a malfunction or is damaged or requires servicing: Contact your STIHL servicing dealer.
17 Troubleshooting
17.1 Troubleshooting the Blower and Battery
| Fault LEDs on the battery | Cause Remedy | |
| The blower does not start when switched on. | 1 LED flashing green. | State of charge of the battery is too low. |
| 1 LED emits red light. | The battery is too warm or too cold. | |
| 3 LEDs flash red. | There is a fault in the blower. | |
| 3 LEDs light up red. | The blower is too warm. | |
| 4 LEDs flash red. | There is a fault in the battery. | |
| There is a break in the electrical connection between the blower and the battery. | Remove the battery. ▶If the blower still does not start when turned on: Clean the contacts of the connector as described in the user manual for the STIHL AR L battery or in the STIHL ADA 1000 double-battery compartment adapter. | |
| The blower or the battery is damp. | Allow blower or battery to dry. | |
| Trigger is pressed before operating the release slide. | Turn on the blower as described in this user manual. | |
| The blower turns off while in operation. | 3 LEDs light up red. | The blower is too warm. |
| There is an electrical fault. | Remove the battery and reinsert it. ▶If the blower still does not start when turned on: Clean the contacts of the connector as described in the user manual for the STIHL AR L battery or in the STIHL ADA 1000 double-battery compartment adapter. ▶Switch on the blower. | |
| The blower operating time is too short. | The battery is not fully charged. | Fully charge battery as described in the User Manual for the STIHL AL 101, 301, 301-4, 500 chargers. |
| The battery service life has been exceeded. | Replace battery. |
18 Specifications
18.1 STIHL BGA 300.1 Blower
- Permitted batteries:
- STIHL AR L
- STIHL AP together with the ADA 1000 dual battery compartment adapter
- Blowing force: 26 N
– Maximum air velocity: 86 m/s
– Average air velocity: 72 m/s
English 19 Spare Parts and Accessories
– Maximum air flow rate (without blower tube assembly): 1345 m³/h
– Air throughput: 970 m³/h
– Weight without battery: 7.4 kg
For runtime, see www.stihl.com/battery-life.
18.2 Sound Values and Vibration Values
The K-value for the sound pressure levels is 2 dB(A). The K-value for the sound power levels is 2 dB(A). K-value for vibration level is 2 m/s ^4 .
STIHL recommends wearing ear defenders.
- Sound pressure level L_p measured according to EN 50636-2-100: 84 dB(A).
- Sound power level L_wA measured as specified in EN 50636-2-100: 94 dB(A).
- Vibration level a_hv measured according to EN 50636-2-100, control handle: < 0.2 m/s^2 .
The vibration levels indicated were measured according to a standardized test method and can be used as a basis for comparing electric power tools. The vibration levels actually occurring may vary from the values indicated, depending on the type of application. The vibration levels indicated can be used for an initial estimate of the vibration stress. The actual vibration stress has to be estimated. The times can be taken into account in the estimate when the electric power tool is turned off and also when it is turned on but running without any load.
For information on compliance with Employers' Vibration Directive 2002/44/EC see www.stihl.com/vib.
18.3 REACH
REACH is an EC regulation and stands for the Registration, Evaluation, Authorisation and Restriction of Chemical substances.
For information on compliance with the REACH regulation see www.stihl.com/reach.
19 Spare Parts and Accessories
19.1 Spare parts and accessories
These symbols indicate original STIHL spare parts and original STIHL accessories.
STIHL recommends the use of original STIHL spare parts and accessories.
Despite ongoing market observation, STIHL is unable to judge the reliability, safety and suitability of other manufacturers' spare parts and accessories; accordingly, STIHL cannot warrant for the use of those parts.
Original STIHL spare parts and original STIHL accessories are available from STIHL dealers.
20 Disposal
20.1 Disposing of Blower
Contact the local authorities or your STIHL dealer for information on disposal.
Improper disposal can be harmful to health and pollute the environment.
▶ Take STIHL products including packaging to a suitable collection point for recycling in accordance with local regulations.
- Do not dispose with domestic waste.
21 EC Declaration of Conformity
21.1 STIHL BGA 300.1 Blower
declares under our sole responsibility that
- Type: Cordless blower
– Manufacturer's brand: STIHL - Model: BGA 300.1
- Serial number: BA03
conforms to the relevant provisions of Directives 2011/65/EU, 2006/42/EC, 2014/30/EU and 2000/14/EC and has been developed and manufactured in compliance with the following standards in the versions valid on the date of production: EN 55014-1, EN 55014-2, EN 62841-1, taking EN 50636-2-100 into account.
The measured and guaranteed equivalent sound power level has been determined in accordance with Directive 2000/14/EC, Annex V.
– Measured sound power level: 94 dB(A)
– Guaranteed sound power level: 96 dB(A)
The technical documents are stored at ANDREAS STIHL AG & Co. KG Produktzulassung.
The year of construction, the country of manufacture and the machine number are shown on the blower.
22 UKCA Declaration of Conformity English
Waiblingen, 2022-12-15
Robert Olma, Vice President, Regulatory Affairs & Global Governmental Relations
22 UKCA Declaration of Conformity
22.1 STIHL BGA 300.1 Blower

declares under our sole responsibility that
- Type: Cordless blower
– Manufacturer's brand: STIHL - Model: BGA 300.1
- Serial number: BA03
complies with the relevant provisions of the UK regulations The Restriction of the Use of Certain Hazardous Substances in Electrical and Electronic Equipment Regulations 2012, Supply of Machinery (Safety) Regulations 2008, Electromagnetic Compatibility Regulations 2016 and Noise Emission in the Environment by Equipment for use Outdoors Regulations 2001 and has been developed and manufactured in accordance with the versions of the following standards valid on the date of manufacture: EN 55014-1, EN 55014-2, EN 62841-1, taking EN 50636-2-100 into account.
The measured and guaranteed sound power levels have been determined in accordance with UK regulations Noise Emission in the Environment by Equipment for use Outdoors Regulations 2001, Schedule 8.
– Measured sound power level: 94 dB(A)
– Guaranteed sound power level: 96 dB(A)
The technical documentation is stored at ANDREAS STIHL AG & Co. KG.
The year of construction, the country of manufacture and the machine number are shown on the blower.
Waiblingen, 2022-12-15
Robert Olma, Vice President, Regulatory Affairs & Global Governmental Relations
23 General Power Tool Safety Warnings
23.1 Introduction
This chapter reproduces the pre-formulated, general safety precautions specified in the IEC 62841 standard for hand-held motor-operated electric tools.
STIHL is obliged to publish these texts.
The safety precautions and warnings on avoiding an electric shock given under "Electrical Safety" do not apply to STIHL cordless products.

WARNING
- Read all safety warnings, instructions, illustrations and specifications provided with this power tool. Failure to follow all instructions listed below may result in electric shock, fire and/or serious injury. Save all warnings and instructions for future reference.
The term "electric power tool" in the safety warnings refers to mains-operated (corded) power tools or battery-operated (cordless) power tools.
23.2 Work area safety
a) Keep work area clean and well lit. Cluttered or dark areas invite accidents.
b) Do not operate power tools in explosive atmospheres, such as in the presence of flammable liquids, gases or dust. Power tools create sparks which may ignite the dust or fumes.
c) Keep children and bystanders away while operating a power tool. Distractions can cause you to lose control.
23.3 Electrical safety
a) Power tool plugs must match the outlet. Never modify the plug in any way. Do not use any adapter plugs with earthed (grounded) power tools. Unmodified plugs and
English 23 General Power Tool Safety Warnings
matching outlets will reduce risk of electric shock.
b) Avoid body contact with earthed or grounded surfaces, such as pipes, radiators, ranges and refrigerators. There is an increased risk of electric shock if your body is earthed or grounded.
c) Do not expose power tools to rain or wet conditions. Water entering a power tool will increase the risk of electric shock.
d) Do not abuse the cord. Never use the cord for carrying, pulling or unplugging the power tool. Keep cord away from heat, oil, sharp edges or moving parts. Damaged or entangled cords increase the risk of electric shock.
e) When operating a power tool outdoors, use an extension cord suitable for outdoor use. Use of a cord suitable for outdoor use reduces the risk of electric shock.
f) If operating a power tool in a damp location is unavoidable, use a residual current device (RCD) protected supply. Use of an RCD reduces the risk of electric shock.
23.4 Personal safety
a) Stay alert, watch what you are doing and use common sense when operating a power tool. Do not use a power tool while you are tired or under the influence of drugs, alcohol or medication. A moment of inattention while operating power tools may result in serious personal injury.
b) Use personal protective equipment. Always wear eye protection. Protective equipment such as a dust mask, non-skid safety shoes, hard hat or hearing protection used for appropriate conditions will reduce personal injuries.
c) Prevent unintentional starting. Ensure the switch is in the off-position before connecting to power source and/or battery pack, picking up or carrying the tool. Carrying power tools with your finger on the switch or energising power tools that have the switch on invites accidents.
d) Remove any adjusting key or wrench before turning the power tool on. A wrench or a key left attached to a rotating part of the power tool may result in personal injury.
e) Do not overreach. Keep proper footing and balance at all times. This enables better control of the power tool in unexpected situations.
f) Dress properly. Do not wear loose clothing or jewellery. Keep your hair and clothing away from moving parts. Loose clothes, jewellery or long hair can be caught in moving parts.
g) If devices are provided for the connection of dust extraction and collection facilities, ensure these are connected and properly used. Use of dust collection can reduce dust-related hazards.
h) Do not let familiarity gained from frequent use of tools allow you to become complacent and ignore tool safety principles. A careless action can cause severe injury within a fraction of a second.
23.5 Power tool use and care
a) Do not force the power tool. Use the correct power tool for your application. The correct power tool will do the job better and safer at the rate for which it was designed.
b) Do not use the power tool if the switch does not turn it on and off. Any power tool that cannot be controlled with the switch is dangerous and must be repaired.
c) Disconnect the plug from the power source and/or remove the battery pack, if detachable, from the power tool before making any adjustments, changing accessories, or storing power tools. Such preventive safety measures reduce the risk of starting the power tool accidentally.
d) Store idle power tools out of the reach of children and do not allow persons unfamiliar with the power tool or these instructions to operate the power tool. Power tools are dangerous in the hands of untrained users.
e) Maintain power tools and accessories. Check for misalignment or binding of moving parts, breakage of parts and any other condition that may affect the power tool's operation. If damaged, have the power tool repaired before use. Many accidents are caused by poorly maintained power tools.
f) Keep cutting tools sharp and clean. Properly maintained cutting tools with sharp cutting edges are less likely to bind and are easier to control.
g) Use the power tool, accessories and tool bits etc. in accordance with these instructions, taking into account the working conditions and the work to be performed. Use of the power tool for operations different from those
intended could result in a hazardous situation.
h) Keep handles and grasping surfaces dry, clean and free from oil and grease. Slippery handles and grasping surfaces do not allow for safe handling and control of the tool in unexpected situations.
23.6 Battery tool use and care
a) Recharge only with the charger specified by the manufacturer. A charger that is suitable for one type of battery pack may create a risk of fire when used with another battery pack.
b) Use power tools only with specifically designated battery packs. Use of any other battery packs may create a risk of injury and fire.
c) When battery pack is not in use, keep it away from other metal objects, like paper clips, coins, keys, nails, screws or other small metal objects, that can make a connection from one terminal to another. Shorting the battery terminals together may cause burns or a fire.
d) Under abusive conditions, liquid may be ejected from the battery; avoid contact. If contact accidentally occurs, flush with water. If liquid contacts eyes, additionally seek medical help. Liquid ejected from the battery may cause irritation or burns.
e) Do not use a battery pack or tool that is damaged or modified. Damaged or modified batteries may exhibit unpredictable behaviour resulting in fire, explosion or risk of injury.
f) Do not expose a battery pack or tool to fire or excessive temperature. Exposure to fire or temperature above 130 °C may cause explosion.
g) Follow all charging instructions and do not charge the battery pack or tool outside the temperature range specified in the instructions. Charging improperly or at temperatures outside the specified range may damage the battery and increase the risk of fire.
23.7 Service
a) Have your power tool serviced by a qualified repair person using only identical replacement parts. This will ensure that the safety of the power tool is maintained.
b) Never service damaged battery packs. Service of battery packs should only be performed by the manufacturer or authorized service providers.
Table des matières
2.1 Documents applicables
1 Fiche
natural_image
Technical diagram of a mechanical device with an inset showing a component labeled '5' (no text or symbols present)natural_image
Line drawing of a person's torso and back with a belt buckle (no text or symbols)▶ Fermer la boucle (1) de la ceinture abdominale.
natural_image
Line drawing of a person using a handheld air purifier outdoors (no text or symbols)natural_image
Person cleaning a tiled floor with a hose and cloth (no text or symbols visible)Robert Olma, Vice President, Regulatory Affairs & Global Governmental Relations
natural_image
Technical illustration of a mechanical component with an inset showing a close-up view of a tool or device (no text or symbols present)natural_image
Line drawing of a person's torso and back view showing a belt buckle with straps (no text or symbols)natural_image
Line drawing of a person using a handheld air purifier outdoors (no text or symbols)natural_image
Illustration of a person cleaning a tiled floor with a hose and spray gun (no text or symbols)Robert Olma, Vice President, Regulatory Affairs & Global Governmental Relations
1 Stekker
natural_image
Technical diagram of a mechanical device with an inset showing a close-up of a component labeled '5' (no text or symbols present)natural_image
Line drawing of a person wearing a full-body belt with straps and a seatbelt (no text or symbols)natural_image
Line drawing of a person using a handheld air purifier outdoors (no text or symbols)natural_image
Line drawing of a person cleaning a tiled floor with a hose, no text or symbols presentRobert Olma, Vice President, Regulatory Affairs & Global Governmental Relations
Robert Olma, Vice President, Regulatory Affairs & Global Governmental Relations
0458-724-9602-A

- Inhaltsverzeichnis
- Introduction
- Guide to Using this Manual
- Applicable documents
- English 3 Overview
- Symbols used with warnings in the text
- WARNING
- NOTICE
- Symbols in Text
- Overview
- Blower
- Symbols
- Safety Precautions English
- Safety Precautions
- Warning Symbols
- Intended Use
- The Operator
- English 4 Safety Precautions
- Clothing and Equipment
- Working Area and Surroundings
- Safe Condition
- Working
- Transport
- Storage
- Cleaning, Maintenance and Repair
- Preparing the Blower for Operation
- Preparing the Blower for Operation
- Assembling the Blower
- Attaching the Blower Tube
- Attaching and Removing the Nozzle
- Removing and Fitting the Battery
- Inserting the Battery
- Removing the Battery
- Adjusting Blower for User
- Fitting and Removing Harness
- Fitting and Adjusting the Carrying Strap
- Removing the Carrying Strap
- Adjusting the Control Handle
- Adjusting the Blower Tube
- Switching the Blower On/Off
- Switching on the Blower
- Turning off the blower
- Checking the Blower
- Checking the Controls
- Trigger
- Operating the Blower English
- Turning on the Blower
- Operating the Blower
- Holding and Guiding the Blower
- Setting the Power Level
- Activating and Deactivating the Power Lock
- Activating the Boost Function
- Blowing
- After Finishing Work
- After Finishing Work
- Transporting
- Transporting the blower
- Carrying the blower
- Transporting the blower in a vehicle
- Storing
- Storing the Blower
- Cleaning
- Cleaning the Blower
- Maintenance and Repairs
- Maintenance Intervals
- Every 12 months
- Servicing and Repairing the Blower
- Troubleshooting
- Troubleshooting the Blower and Battery
- Specifications
- STIHL BGA 300.1 Blower
- Sound Values and Vibration Values
- REACH
- Spare Parts and Accessories
- Spare parts and accessories
- Disposal
- Disposing of Blower
- EC Declaration of Conformity
- STIHL BGA 300.1 Blower
- UKCA Declaration of Conformity English
- UKCA Declaration of Conformity
- STIHL BGA 300.1 Blower
- General Power Tool Safety Warnings
- Introduction
- Work area safety
- Electrical safety
- Personal safety
- Power tool use and care
- Battery tool use and care
- Service
- Table des matières
- Documents applicables
- Fiche
- Stekker
Brand : STIHL
Model : BGA 300.0
Category : Blower