FP-130587.1 - Food Dehydrator Emerio - Free user manual and instructions
Find the device manual for free FP-130587.1 Emerio in PDF.

| Product type | Multi-function food processor (chopper, blender, grater, citrus press, grinder) |
| Brand | Emerio |
| Model | FP-130587.1 |
| Power supply | 220-240 V ~ 50-60 Hz |
| Rated power | 1000 W |
| Main bowl capacity | Approx. 1.5 L (estimated) |
| Blender capacity | Up to 1 L liquid |
| Grinder capacity | 100 g max |
| Max minced meat quantity | 400 g per cycle |
| Max flour quantity (kneading) | 375 g (with water up to 600 g total) |
| Main functions | Chopping, slicing, grating, shredding, blending, kneading, whipping, citrus juicing, grinding |
| Included accessories | Stainless steel blade, plastic blade, slicing disc, shredding disc, grating disc, whipping disc, citrus press, grinder, blender jar, pusher, spatula |
| Safety | Safety switch (bowl/lid locking), overheating protection (30 min pause after 3 cycles) |
| Care and cleaning | Wipe main unit; other parts dishwasher safe (water <60°C, cycle <45 min) |
| Approximate weight | 3.5 kg (estimated) |
| Approximate dimensions (L x W x H) | 22 x 22 x 38 cm (estimated) |
| Warranty | 2 years |
| Materials | Plastic (bowl, lid), stainless steel (blades) |
Frequently Asked Questions - FP-130587.1 Emerio
User questions about FP-130587.1 Emerio
0 question about this device. Answer the ones you know or ask your own.
Ask a new question about this device
Download the instructions for your Food Dehydrator in PDF format for free! Find your manual FP-130587.1 - Emerio and take your electronic device back in hand. On this page are published all the documents necessary for the use of your device. FP-130587.1 by Emerio.
USER MANUAL FP-130587.1 Emerio
natural_image
Product photo of a kitchen blender with three different shades of liquid, no visible text or labelsFood Processor (EN)
Küchenmaschine (DE)
Robot ménager (FR)
Keukenmachine (NL)
Robot kuchenny (PL)
Content – Inhalt – Teneur – Inhoud – Treść
Instruction manual – English ...... - 2 -
Instruction manual – English
SAFETY INSTRUCTIONS
Before use make sure to read all of the below instructions in order to avoid injury or damage, and to get the best results from the appliance. Make sure to keep this manual in a safe place. If you give or transfer this appliance to someone else make sure to also include this manual.
In case of damage caused by user failing to follow the instructions in this manual the warranty will be void. The manufacturer/importer accepts no liability for damages caused by failure to follow the manual, a negligent use or use not in accordance with the requirements of this manual.
- Warning: Potential risk of injuries from misuse.
- Always disconnect the appliance from the supply if it is left unattended and before assembling, disassembling or cleaning.
- This appliance shall not be used by children. Keep the appliance and its cord out of reach of children.
- Appliances can be used by persons with reduced physical, sensory or mental capabilities or lack of experience and knowledge if they have been given supervision or instruction concerning use of the appliance in a safe way and if they understand the hazards involved.
- Children shall not play with the appliance.
- If the supply cord is damaged, it must be replaced by the manufacturer, its service agent or similarly qualified persons in order to avoid a hazard.
- Switch off the appliance and disconnect from supply before changing accessories or approaching parts that move in use.
- Care shall be taken when handling the sharp cutting blades, emptying the bowl and during cleaning.
- Be careful if hot liquid is poured into the food processor as it can be ejected out of the appliance due to a sudden steaming.
- Before inserting the plug into the mains socket, please check that the voltage and frequency comply with the specifications on the rating label.
- If an extension cord is used it must be suited to the power consumption of the appliance, otherwise overheating of the extension cord and/or plug may occur. There is a potential risk of injuries from tripping over the extension cord. Be careful to avoid dangerous situations.
- Disconnect the mains plug from the socket when the appliance is not in use and before cleaning.
- Ensure that the mains cable is not hung over sharp edges and keep it away from hot objects and open flames.
- Do not immerse the appliance or the mains plug in water or other liquids. There is danger to life due to electric shock!
- To remove the plug from the plug socket, pull the plug. Do not pull the power cord.
- Do not touch the appliance if it falls into water. Remove the plug from its socket, turn off the appliance and send it to an authorized service center for repair.
- Do not plug or unplug the appliance from the electrical outlet with a wet hand.
- Never attempt to open the housing of the appliance, or to repair the appliance yourself. This could cause electric shock.
- Children are unable to recognize the hazards associated with incorrect handling of electrical appliances. Therefore, children should never use electric household appliances unsupervised.
- Never leave the appliance unattended during use.
- This appliance is not designed for commercial use. Household use only. Do not use outdoors.
- Do not use the appliance for other than intended use.
- Do not wind the cord around the appliance and do not bend it.
- The use of accessory attachment not recommended by the appliance manufacturer may cause injuries.
- Do not interfere with any safety switches.
-
Wait until moving parts stop running before you remove the lid of machine.
-
Keep hands and utensils away from moving blades or discs while processing food to reduce the risk of severe injury to persons or damage to the appliance. A scraper or spatula may be used, but must be used only when the appliance is not running.
- Avoid contacting moving parts.
- Never feed food by hand. Always use food pusher.
- Do not use fingers to scrape food away from any accessory while the appliance is operating. Cut type injury may result.
- Be sure the lid is securely locked into place before operating the appliance.
- Be sure to switch off the appliance after each use. Make sure the motor stops completely before disassembling.
- Do not put your fingers or other objects into the unit opening while it is in operation. If food becomes blocked in opening, use food pusher to push it down. When this method is not possible, turn off the appliance and disassemble to remove the remaining food.
- The metal blades are extremely sharp, handle with care. Always hold the blade assembly by the finger grip or stem, away from the cutting edge, both when handling and cleaning.
- To reduce the risk of injury, never place processing blade on drive shaft without the processing jar locked properly in place.
- Regarding the instructions for cleaning the surfaces which come in contact with food, speed settings and operating times, please refer to the below paragraph of the manual.
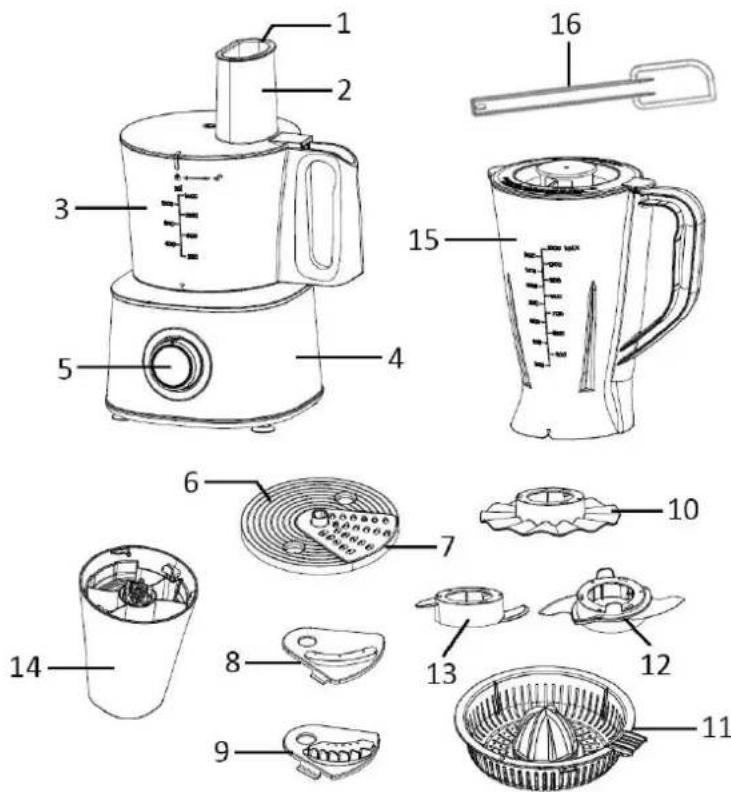
PARTS DESCRIPTION
- Food pusher
- Feeding tube
- Food processor jar
- Main unit
- Control knob
- Disc to hold blade
- Chipping blade
- Slicing blade
- Shredding blade
- Whisking disc
- Citrus juicer
- Stainless steel knife blade
- Plastic knife blade
- Grinder
- Blender jar
- Spatula
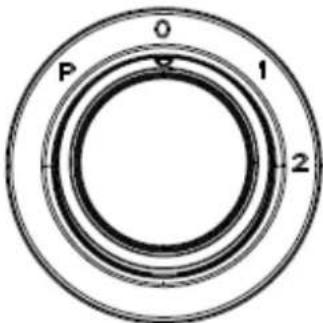
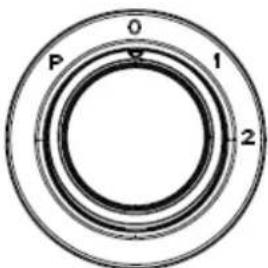
Control knob
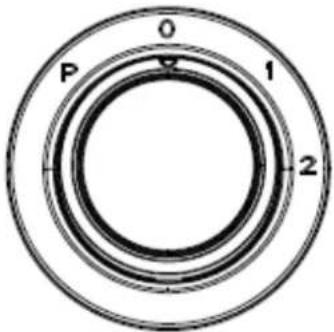
P = Pulse speed
0 = Off
1 = Low speed
2 = High speed
BEFORE FIRST USE
Before first use, carefully unpack the food processor and its attachments and remove any package material or label or stickers. Clean the appliance according to the instructions in section "CLEANING AND MAINTENANCE". Handle the blades with extreme care as they are sharp. The appliance can be used for chopping the meat or vegetable and fruit, kneading, beating and whisking, shredding, slicing and chipping the vegetables or potatoes, blending the smooth soup, sauces, creams, fruit purees, milk and so on, using different accessories to perform different tasks.
OPERATION
• Before processing the ingredients, please let them cool down to the room temperature.
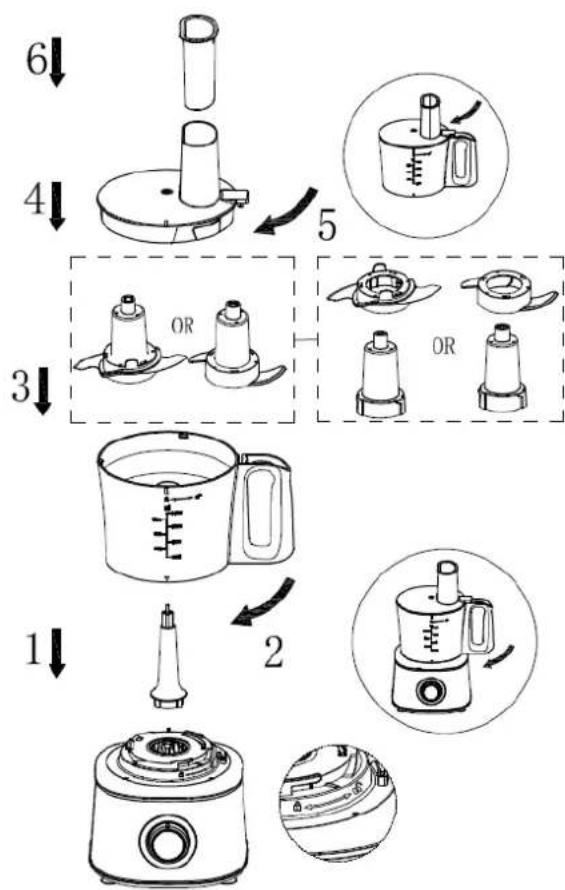
- Before use, assemble your appliance according to below pictures.
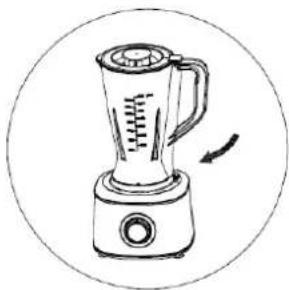
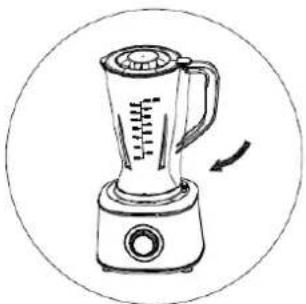
• After assembly and add ingredients, connect the power plug to the power supply. Rotate the control knob clockwise to choose your desired speed setting.
Pulse speed: rotate the control knob anti-clockwise and hold to get the pulse speed - a faster speed. Release the knob to turn off the appliance.
• Unplug the appliance after use.
NOTE: This appliance is equipped with a built-in safety lock. You can only switch on the appliance after you correctly assemble the one of the following parts on the main unit: the food processor jar and its lid; the grinder; the blender jar and its lid; the food processor jar and juicer.
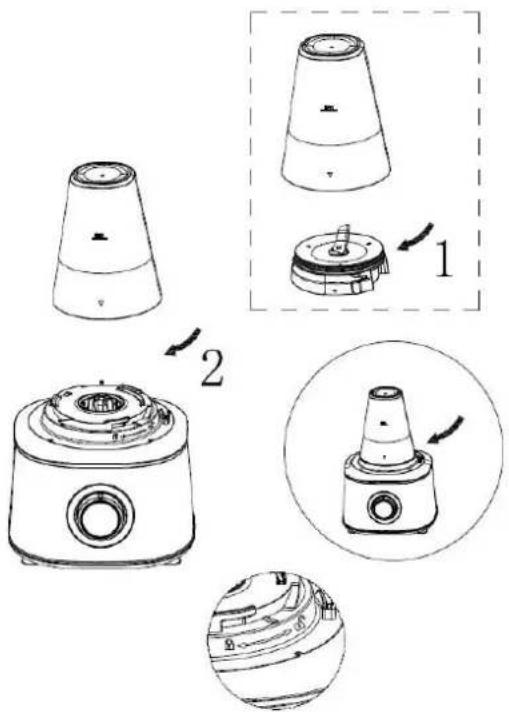
USING THE KNIFE BLADE
There are two knife blades (stainless steel knife blade and plastic knife blade).
-
Assemble the appliance by the following order.
-
Ensure the food processor jar in step 2 and the lid in step 5 are locked well, or the appliance will not work.
-
In step 3, you can choose your desired knife blade: stainless steel knife blade or plastic knife blade. Be sure to fix it well on the shaft.
-
After operation, you can disassemble the appliance by opposite flow and direction.
-
Only open the lid when the blade is completely stopped.
flowchart
graph TD
    A["Step 1: Initial blender"] --> B["Step 2: Stabilizer with brush and spoon"]
    B --> C["Step 3: Stabilizer with two cup holders"]
    C --> D["Step 4: Stabilizer with one cup holder"]
    D --> E["Step 5: Stabilizer with one cup holder"]
    E --> F["Step 6: Stabilizer with one cup holder"]
Stainless steel knife blade:
- Before processing, cut the food into small size such as 2cm*2cm*6cm for beef. Place the prepared chopping food into the jar.
- During chopping, you can add food through the feeding tube with the pusher, never using food or finger to push the food down.
• To keep the best processing result: use pulse speed
- Hard substance: dried fruits, and vegetables like carrots, celery, etc.
- Soft substance: vegetables like onions, spinach, etc.
- Raw and cooked meat (boned and sliced)
Caution: the total operating time should not be more than 90 seconds. The maximum quantity of foodstuff is 400g.
- The maximum operation time per cycle shall not exceed 30 seconds and minimum of 2 minutes rest time must be maintained between two consecutive cycles. At least 30 minutes rest time must be maintained to let the appliance cool down after three operation cycles.
Plastic knife blade:
- Put flour into the jar. The maximum quantity of flour is 375g.
- Add one tablespoon oil into the appliance from the feeding tube. Turn the control knob to position "2". Then add water through the feeding tube slowly within 20s. The maximum quantity of water is 225g.
● Note: The proportion of the flour and water is 5:3; flour and water shall not exceed 600g.
- Add some more water if the processing speed slows down during operating so as to make the motor run smoothly, otherwise the motor may be damaged. During kneading/mixing, to avoid shaking, press the lid with one hand, and the other hand to hold the handle.
- Switch off the appliance as soon as the pastry starts to form a ball.
● Unplug the appliance, detach the lid, firstly remove the plastic knife blade, and then remove the dough. - The maximum operation time per cycle shall not exceed 90 seconds and minimum of 2 minutes rest time must be maintained between two consecutive cycles. At least 30 minutes rest time must be maintained to let the appliance cool down after three operation cycles.
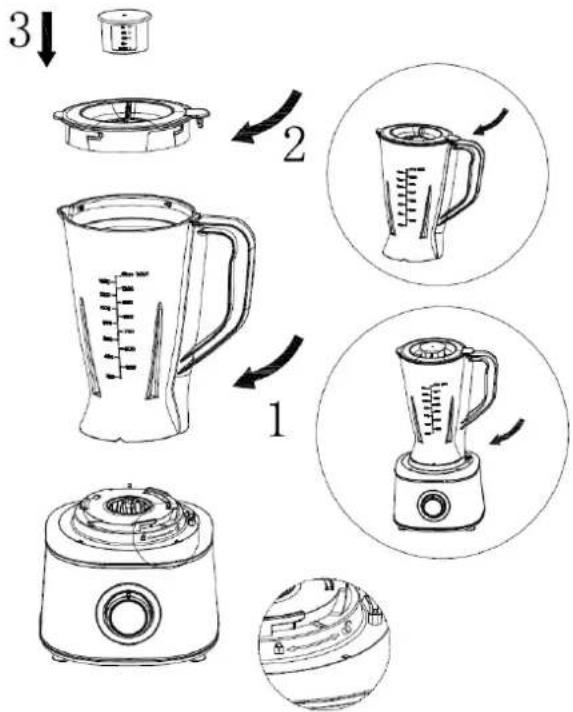
USING THE DISC TO HOLD BLADE
- Assemble the appliance by the following order.
- Ensure the food processor jar in step 2 and the lid in step 4 are locked well, or the appliance will not work.
- In step 3, you can choose your desired blade: slicing blade, chipping blade or shredding blade. Be sure to fix it well into the disc.
- After operation, you can disassemble the appliance by opposite flow and direction.
- Always be careful when handling the blades as they are very sharp.
- Only open the lid when the blade is completely stopped.

flowchart
graph TD
    A["1: Cooker with blender"] --> B["2: Stirrer with measuring cup"]
    B --> C["3: Cooker with brush, brush inside fan"]
    C --> D["4: Stover with brush, brush inside bowl"]
    D --> E["5: Paper editor with brush, brush inside bowl"]
    style A fill:#f9f,stroke:#333
    style E fill:#bbf,stroke:#333
To remove the blade from the disc, press the part (a) inward slowly to push down the blade. To insert the blade into the disc, attach the part (b) first onto the disc and then push in the blade.
Always be careful when handling the blades as they are very sharp.
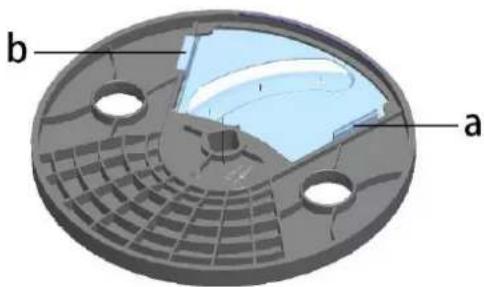
natural_image
3D diagram of a circular mechanical component with labeled parts (a and b), showing internal structure and mounting holes (no text or symbols beyond labels)- Please pay attention to the capacity line of the container. Once the food approaches the max line on the container, please stop operation and pour out food.
- Switch on and push down evenly with the pusher - never put your fingers in the feeding tube. You can slice/chip/shred up to 500g of food like thickly-potatoes, onions, thinly-cucumbers, apples, carrots, etc.
• To keep the best processing result: use low speed or high speed - The maximum operation time per cycle shall not exceed 60 seconds and minimum of 2 minutes rest time must be maintained between two consecutive cycles. At least 30 minutes rest time must be maintained to let the appliance cool down after three operation cycles.
USING THE GRINDER
- Assemble the appliance by the following order.
- Ensure the grinder cup is locked well in step 2, if not the appliance will not work.
- After operation, you can disassemble the appliance by opposite flow and direction.
- Only take the grinder from the appliance when the blade is completely stopped.
- Use for milling coffee beans, almond and similar food. Be sure not to fill ingredients exceed the MAX level marked on the grinder; the max capacity is 100g. Note: do not use for blending meat.
• To keep the best processing result: use pulse speed - The maximum operation time per cycle shall not exceed 60 seconds and minimum of 2 minutes rest time must be maintained between two consecutive cycles. At least 30 minutes rest time must be maintained to let the appliance cool down after three operation cycles.
USING THE BLENDER
- Assemble the appliance by the following order.
- Ensure the blender jar and lid in step 1 and step 2 are locked well, or the appliance will not work.
- After operation, you can disassemble the appliance by opposite flow and direction.
- Always be careful when handling the stainless-steel blade as it is very sharp.
- Only open the lid when the blade is completely stopped.
- Peel or core the fruit or vegetables and then cut them into small dices; put the food pieces into the jar. Usually, certain amount of purified water has to be added to facilitate the smooth running of appliance. The amount of mixture should not exceed the max level as indicated on the blender jar.
Note: never use boiling liquids or run the appliance empty. The blender jar cannot be used for blending meat.
- Never open the lid when the blade is still rotating. For extra caution, you can unplug the appliance before removing the lid.
- To add liquid ingredients during processing, remove the measuring cup of the lid and pour liquid through the opening in the lid.
- Cut solid ingredients into smaller pieces before you process them.
- For a large quantity, pour small batches of ingredients instead of a large quantity at one time.
- Use cooked ingredients for a soup preparation.
- If a liquid is hot or tends to foam (e.g. milk), do not put more than 1 liter in the blender jar to avoid spillage.
- If the result is not satisfactory, switch the appliance off and stir the ingredients with a spatula.
• To keep the best processing result: use high speed or pulse speed - The maximum operation time per cycle shall not exceed 120 seconds and minimum of 2 minutes rest time must be maintained between two consecutive cycles. At least 30 minutes rest time must be maintained to let the appliance cool down after three operation cycles.
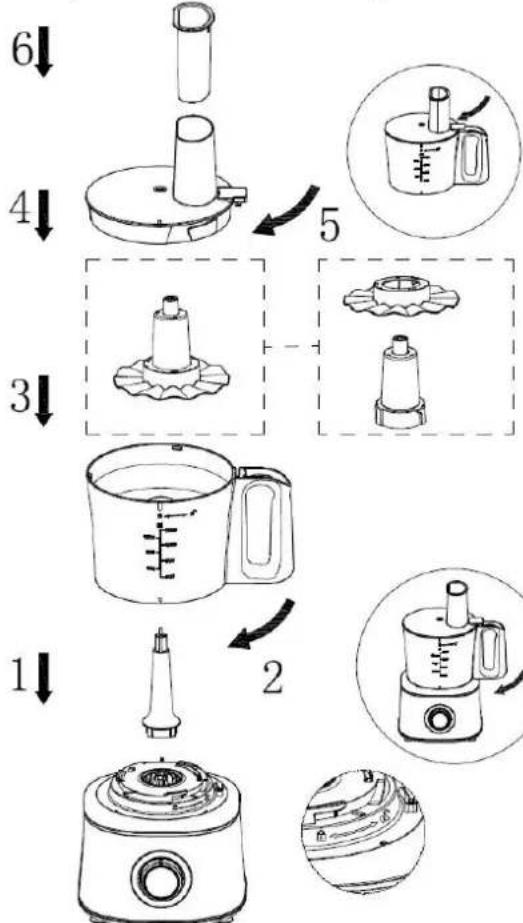
USING THE WHISKING DISC
- Assemble the appliance by the following order.
- Ensure the food processor jar in step 2 and the lid in step 5 are locked well, or the machine will not work.
- After operation, you can disassemble the appliance by opposite flow and direction.
- Only take the disc from the appliance when the disc is completely stopped.
flowchart
graph TD
    A["Step 1: Initial blender"] --> B["Step 2: Stabilizer with measuring cup"]
    B --> C["Step 3: Stabilizer with baseplate"]
    C --> D["Step 4: Stabilizer with side panel"]
    D --> E["Step 5: Stabilizer with brush and fan"]
    E --> F["Step 6: Final blender with handle"]
- For egg white whisking only (up to 3 egg whites); please use room temperature eggs. Please ensure the jar and whisking disc are dry and free from grease.
• To keep the best processing result: use high speed
- Never use this disc to knead dough or mix cake mixtures.
- The maximum operation time per cycle shall not exceed 120 seconds and minimum of 2 minutes rest time must be maintained between two consecutive cycles. At least 30 minutes rest time must be maintained to let the appliance cool down after three operation cycles.
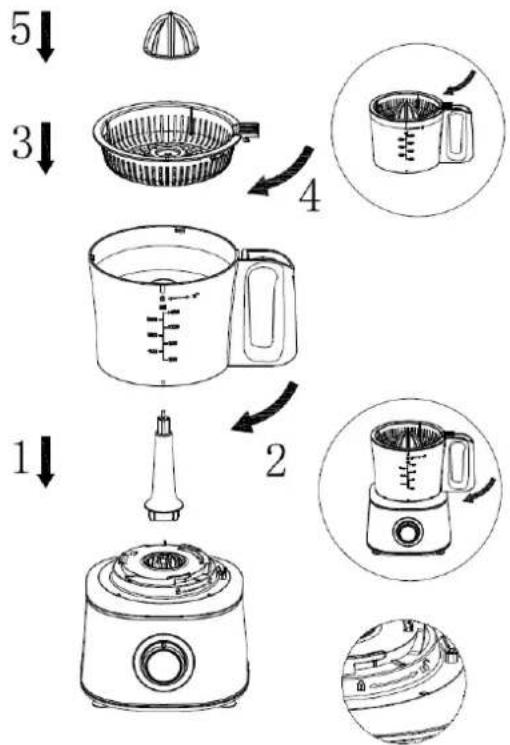
USING THE CITRUS JUICER
- Assemble the appliance by the following order.
- Ensure the food processor jar in step 2 and the juicer in step 4 are locked well, or the appliance will not work.
- After operation, you can disassemble the appliance by opposite flow and direction.
- Only take the juicer from the appliance when it is completely stopped.
flowchart
graph TD
    A["1: Cooker with blender"] --> B["2: Stirrer"]
    B --> C["3: Oven with blender"]
    C --> D["4: St Dish with blender"]
    D --> E["5: Mutter"]
    style A fill:#f9f,stroke:#333
    style E fill:#bbf,stroke:#333
- Use this citrus juicer to squeeze the juice from citrus fruits (e.g. oranges).
- To get the best performance, press the orange not only vertical but also on left or right side.
• To keep the best processing result: use low speed - The maximum operation time per cycle shall not exceed 120 seconds and minimum of 2 minutes rest time must be maintained between two consecutive cycles. At least 30 minutes rest time must be maintained to let the appliance cool down after three operation cycles.
CLEANING AND MAINTENANCE
• Before you clean the appliance, unplug it.
- Disassemble the appliance. Make sure that the cutting edges of the blades do not come into contact with hard objects. This may cause the blade to get blunt. The cutting blades are sharp. Be careful when you do the cleaning.
- Clean the main unit with a moist cloth. Never immerse it in water as electric shock is possible to occur. Then dry thoroughly. Ensure the interlock area is free of food particles.
- Clean the other parts in soapy water (<60°C). Rinse and dry.
- Except the main unit, all the other parts can be cleaned in dishwasher with water temperature less than 60^ C and wash time no more than 45 minutes.
• Store the product in a dry place.
Note:
- Some food may discolor the disc (for slicing/chipping/shredding). This is normal and will not harm the plastic or effect the flavor of food. Rub with cloth dipped with vegetable oil to remove discoloration.
- For quick cleaning after processing tasks of chopping / blending, you can pour some water into the food processor jar / blender jar, and then turn and hold the control knob to position "P" for a few seconds.
 |  |  |  |  |  |  | |
 | √ | √ | × | √ | √ | √ | |
 |  |  |  |  |  |  |  |
| [ZYTS] |  |  |  |  |  |  |  |
 |  |  |  |  |  |  |  |
 |  |  |  |  |  |  |  |
 |  |  |  |  |  |  |  |
TECHNICAL DATA
Operating voltage: 220-240V \~ 50-60Hz
Power consumption: 1000W
GUARANTEE AND CUSTOMER SERVICE
Before delivery our devices are subjected to rigorous quality control. If, despite all care, damage has occurred during production or transportation, please return the device to your dealer.
For the purchased device we provide 2 years guarantee, commencing from the day of sale. If you have a defective product, you can directly go back to the point of purchase.
Defects which arise due to improper handling of the device and malfunctions due to interventions and repairs by third parties or the fitting of non-original parts are not covered by this guarantee. Always keep your receipt, without the receipt you can't claim any form of warranty. Damage caused by not following the instruction manual, will lead to a void of warranty, if this results in consequential damages then we will not be liable.
Neither can we hold responsible for material damage or personal injury caused by improper use if the instruction manual is not properly executed. Damage to accessories does not mean free replacement of the whole appliance. In such case please contact our service department. Broken glass or breakage of plastic parts is always subject to a charge. Defects to consumables or parts subjected to wearing, as well as cleaning, maintenance or the replacement of said parts are not covered by the warranty and are to be paid.
ENVIRONMENT FRIENDLY DISPOSAL

Recycling – European Directive 2012/19/EU
This marking indicates that this product should not be disposed with other household wastes. To prevent possible harm to the environment or human health from uncontrolled waste disposal, recycle it responsibly to promote the sustainable reuse of material resources. To return your used
device, please use the return and collection systems or contact the retailer where the product was purchased.
They can take this product for environmental safe recycling.
Manufactured by: Emerio B.V.
Oudeweg 115, 2031 CC Haarlem, The Netherlands
Bedienknopf
flowchart
graph TD
    A["Step 1: Initial blender"] --> B["Step 2: Stabilizer with brush and pencil"]
    B --> C["Step 3: Stabilizer with two or three inverters"]
    C --> D["Step 4: Stabilizer with one or two inverters"]
    D --> E["Step 5: Stabilizer with one or two inverters"]
    E --> F["Step 6: Final blender with one or two inverters"]
flowchart
graph TD
    A["1: Cooker with microwave oven"] --> B["2: Stirrer with measuring cup"]
    B --> C["3: Dishwasher with lid"]
    C --> D["4: Cover with brush, top handle"]
    D --> E["5: Paper feeding into blender"]
    style A fill:#f9f,stroke:#333
    style E fill:#bbf,stroke:#333
natural_image
3D diagram of a circular mechanical component with labeled parts (a and b), showing internal structure and mounting holes (no text or symbols beyond labels)flowchart
graph TD
    A["Step 1: Initial blender"] --> B["Step 2: Stabilizer with lid"]
    B --> C["Step 3: Stabilizer with lid and base"]
    C --> D["Step 4: Stabilizer with lid and base"]
    D --> E["Step 5: Stabilizer with lid and base"]
    E --> F["Step 6: Final blender with lid and base"]
flowchart
graph TD
    A["1: Cooker with blender"] --> B["2: Stirrer"]
    B --> C["3: Stirpan with cloth"]
    C --> D["4: Cooker with blender"]
    D --> E["5: Finisher with cloth"]
    style A fill:#f9f,stroke:#333
    style E fill:#bbf,stroke:#333
Bouton de contrôle

P = Vitesse d'impulsion
0 = Arrêt
1 = Faible vitesse
2 = Vitesse élevée
AVANT LA PREMIÈRE UTILISATION
flowchart
graph TD
    A["Step 1: Initial blender"] --> B["Step 2: Stabilizer with brush and pencil"]
    B --> C["Step 3: Stabilizer with two roters"]
    C --> D["Step 4: Stabilizer with one brush and pencil"]
    D --> E["Step 5: Stabilizer with one brush and pencil"]
    E --> F["Step 6: Stabilizer with one brush and pencil"]
flowchart
graph TD
    A["1: Cooker with blender"] --> B["2: Stirrer"]
    B --> C["3: Plate with keyboard"]
    C --> D["4: Stamped kitchen with brush, then presser"]
    D --> E["5: Cover in kitchen with pencil"]
    style A fill:#f9f,stroke:#333
    style E fill:#bbf,stroke:#333
natural_image
3D diagram of a circular mechanical component with labeled parts (a, b), showing internal structure and mounting holes (no text or symbols beyond labels)natural_image
Line drawing of a blender with a curved arrow indicating rotation (no text or symbols)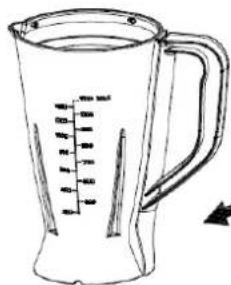
1
natural_image
Line drawing of a blender with a circular arrow indicating rotation (no text or symbols)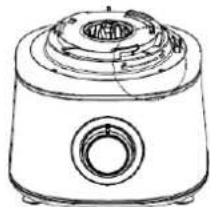
natural_image
Technical line drawing of a mechanical component with concentric rings and a central hole (no text or symbols)
flowchart
graph TD
    A["1: Shoe"] --> B["2: Washer"]
    B --> C["3: Washer with lid"]
    C --> D["4: Washer with handle"]
    D --> E["5: Cover with brush"]
    E --> F["6: Down arrow"]
flowchart
graph TD
    A["1: Cooker with blender"] --> B["2: Stirrer"]
    B --> C["3: Stirpan with cloth"]
    C --> D["4: Cooker with blender"]
    D --> E["5: Finisher with cloth"]
Bedieningsknop
P = Pulssnelheid
0 = Uit
1 = Lage snelheid
2 = Hoge snelheid
VOOR INGEBRUIKNAME
flowchart
graph TD
    A["Step 1: Initial blender"] --> B["Step 2: Stabilizer with brush and lid"]
    B --> C["Step 3: Stabilizer with two roters"]
    C --> D["Step 4: Stabilizer with one brush and lid"]
    D --> E["Step 5: Stabilizer with one brush and lid"]
    E --> F["Step 6: Stabilizer with one brush and lid"]
flowchart
graph TD
    A["1: Oven with brush"] --> B["2: Stirrer with measuring cup"]
    B --> C["3: Cooker with brush"]
    C --> D["4: Stover with brush and lid"]
    D --> E["5: Cover with brush and lid"]
    style A fill:#f9f,stroke:#333
    style E fill:#bbf,stroke:#333
natural_image
3D diagram of a circular mechanical component with labeled parts (a and b), showing internal structure and mounting holes (no text or symbols beyond labels)natural_image
Line drawing of a blender with a circular arrow indicating rotation (no text or symbols)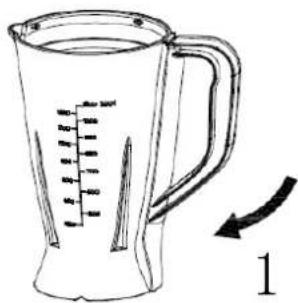
natural_image
Line drawing of a blender with a circular arrow indicating rotation (no text or symbols)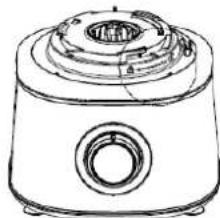
natural_image
Technical line drawing of a mechanical component with concentric rings and a central hole (no text or symbols)
flowchart
graph TD
    A["1: Shoe"] --> B["2: Washer"]
    B --> C["3: Washer with lid"]
    C --> D["4: Washer with brush"]
    D --> E["5: Cover with brush"]
    E --> F["6: Down arrow"]
Pokrętło sterujące

P = Praca impulsowa
0 = Wyłączenie
1 = Mała prędkość
2 = Duża prędkość
PRZED PIERWSZYM UŻYCIEM
flowchart
graph TD
    A["Step 1: Initial blender"] --> B["Step 2: Stabilizer with brush and lid"]
    B --> C["Step 3: Stabilizer with two roters"]
    C --> D["Step 4: Stabilizer with one brush and lid"]
    D --> E["Step 5: Stabilizer with one brush and lid"]
    E --> F["Step 6: Final blender with brush and lid"]
flowchart
graph TD
    A["1: Cooker with blender"] --> B["2: Stirrer with brush, no text or symbols"]
    B --> C["3: Oven with filter, no text or symbols"]
    C --> D["4: Stover with brush, no text or symbols"]
    D --> E["5: Top kitchen with brush, no text or symbols"]
    style A fill:#f9f,stroke:#333
    style E fill:#bbf,stroke:#333
natural_image
3D diagram of a circular mechanical component with labeled parts (a and b), showing internal structure and mounting holes (no text or symbols beyond labels)flowchart
graph TD
    A["1: Shoe"] --> B["2: Washer"]
    B --> C["3: Washer with lid"]
    C --> D["4: Cover with brush"]
    D --> E["5: Cover with brush"]
    E --> F["6: Down arrow"]