
NI-W750 - Iron PANASONIC - Free user manual and instructions
Find the device manual for free NI-W750 PANASONIC in PDF.

| Product Type | Cordless Iron |
| Brand | Panasonic |
| Model | NI-W750 |
| Power Supply | 120 V ~ 60 Hz |
| Power | 1500 W |
| Net Weight | 2.0 kg (4.4 lb) |
| Water Tank Capacity | Approx. 250 ml (approx.) |
| Temperature Setting | Electronic: LOW, MED, HIGH, OFF |
| Ironing Types | Steam, Dry, Steam Shot, Vertical Steam, Spray |
| Steam Shot | Yes, by pumping |
| Vertical Steam | Yes |
| Spray | Yes, adjustable |
| Anti-drip System | Yes |
| Auto Shut-off | Yes, after 10 minutes on base |
| Anti-calc | Built-in system in tank |
| Soleplate | Smooth soleplate (material not specified) |
| Power Base | Included, for cordless use |
| Storage Case | Included |
| Maintenance | Clean the soleplate with a damp cloth; do not use abrasive cleaners |
| Safety | Auto shut-off, overheat protection, anti-drip system |
| Warranty | 1 year (Canada) |
Frequently Asked Questions - NI-W750 PANASONIC
User questions about NI-W750 PANASONIC
0 question about this device. Answer the ones you know or ask your own.
Ask a new question about this device
Download the instructions for your Iron in PDF format for free! Find your manual NI-W750 - PANASONIC and take your electronic device back in hand. On this page are published all the documents necessary for the use of your device. NI-W750 by PANASONIC.
USER MANUAL NI-W750 PANASONIC
natural_image
Line drawing of a pair of hard hats, one open and one closed, with no text or symbols present.CONFORMS TO UL STD. 1005 CERTIFIED TO CSA STD. C22.2 NO.81
English
Safety Information
SAFE USE OF THE IRON----2
IMPORTANT SAFETY INSTRUCTIONS ----2-3
Operation
COMPONENTS IDENTIFICATION ----4
BECOMING FAMILIAR WITH YOUR
CORDLESS IRON----5
TIPS AND HINTS BEFORE USING
YOUR IRON 5
HOW TO REMOVE THE COVER CASE----5-6
HOW TO FILL WITH WATER----6
HOW TO ENERGIZE THE IRON----7
HOW TO CONTROL TEMPERATURE----7
HOW TO USE AS A STEAM IRON ----7-8
HOW TO USE AS A DRY IRON 8
SPECIAL FUNCTIONS 8-10
Maintenance
HOW TO CARE FOR YOUR IRON----10
General Information
SPECIFICATIONS 11
FABRIC IRONING CHART 11
LIMITED WARRANTY(U.S.A./Puerto Rico)----12-13
LIMITED WARRANTY(Canada)----14
Panasonic®
Electric Cordless Steam Iron
Operating Instructions
or visit us at http://www.panasonic.com/help
Please register via the Internet at: www.panasonic.com/register
For assistance, please call : 905-624-5505 or visit us at http://www.panasonic.ca (Canada)
Your safety and the safety of others are very important
We have provided important safety messages in this manual and on your appliance. Always read and obey all safety messages.

This is the safety alert symbol. It is used to alert you to potential hazards that can kill or injure you and others. The safety messages will follow the safety alert symbol and either the word "WARNING" or "CAUTION".
These words mean:

WARNING
CAUTION
This describes issues which could cause death or serious injury.
This describes issues which could cause injury or damage your belongings.
The safety messages will tell you what the potential hazard is, how to reduce the chance of injury, and what can happen if the instructions are not followed.
Thank you for buying a Panasonic Iron
Your iron is an appliance to be used only for ironing fabrics on an ironing board.
IMPORTANT SAFETY INSTRUCTIONS
When using your iron, basic safety precautions should always be followed, including the following:
READ ALL INSTRUCTIONS BEFORE USING THE IRON

WARNING
To reduce the risk of burns, electric shock, fire, or injury to persons:
- Use the iron only for its intended purpose, for ironing fabrics on ironing board. To protect against burns or injury to persons, do not iron or steam fabrics while being worn on the body.
- To protect against the risk of electric shock, do not immerse the iron or cord in water or other liquids.
- The iron should always be turned to "OFF" before plugging or unplugging AC Power Cord from outlet. Never yank Cord to disconnect from outlet; instead, grasp Plug and pull to disconnect.
- Do not allow Cord to touch hot surfaces. Let iron cool completely before putting away. Bundle AC Power Cord when storing.
- Always disconnect AC Power Cord from electrical outlet when filling iron with water or emptying and when not in use. Do not spill water over iron when filling.
-
Do not operate iron with a damaged Cord or if the iron or Power Base has been dropped or damaged. To avoid a risk of electric shock, do not disassemble the iron or Power Base, take it to an authorized service depot for examination and repair. Incorrect reassembly can cause a risk of electric shock when the iron is used.
-
Close supervision is necessary for this appliance when used by or near children. Do not leave iron unattended while connected to an electrical outlet or on an ironing board. Always position iron carefully to prevent it from falling if ironing board is accidentally bumped or if Cord is pulled. Always place iron securely into Power Base when not in use.
-
Burns can occur from touching hot metal parts, the hot surface of the Power Base, hot water, or steam. Use caution when you turn a steam iron upside down—there may be hot water in the Water Tank.
-
To protect against burns or injury to persons, do not direct steam toward the body when ironing or self-cleaning.
-
The iron must be used and rested on a stable surface. When placing the iron into Power Base, ensure that the surface on which the Power Base is placed is stable.
-
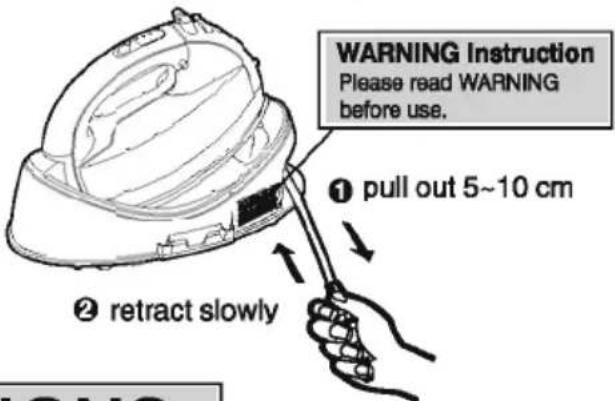
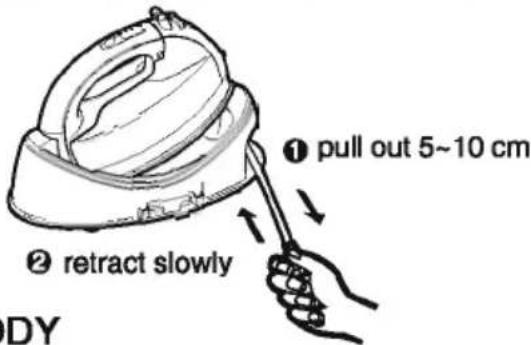
The AC Power Cord and Plug may present a risk of personal injury when the cord is allowed to retract freely. Always hold the plug and cord with one hand while it is retracting, and retract the cord slowly to reduce the risk of the cord "WHIPPING", which has the potential risk of causing injury to the face, eyes, etc..
SPECIAL INSTRUCTIONS
WARNING
To reduce the risk of electric shock or fire:
-
To avoid a circuit overload, do not operate another high wattage appliance on the same circuit.
-
If an extension cord is absolutely necessary, use a cord rated a minimum of 13 amperes. Cords rated for less amperage may overheat and should not be used. Care should be taken to arrange the cord so that it cannot be accidentally pulled or tripped over.

CAUTION
To reduce the risk of personal injury and damage to your iron:
-
Never use steam iron cleaning products in the iron, as they may damage working parts of the iron.
-
Do not use water additives or substitute water such as linen or scented water in the steam iron. They can stain fabrics.
-
If the Steam/Dry Selector is not in the Dry position after using, remaining water will move into the Soleplate and can result in burns, the next time the iron is used.
-
Do not use the Steam or Jet of Steam, while AC Cord is unplugged, water will remain inside the Soleplate which will cause staining.
Do not use Steam or Jet of Steam while Temperature Selector Dial is set to "OFF".
SAVE THESE INSTRUCTIONS
For proper use of your iron, read remaining safety cautions and operating instructions.
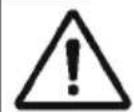
COMPONENTS IDENTIFICATION
IDENTIFICATION DES COMPOSANTS
A cordless iron is NOT a rechargeable device. You can not continuously use this iron without placing it in the Power Base: the device that provides the energy required to heat-up the soleplate. The iron will re-heat quickly every time it is placed on the Power Base.
TIPS AND HINTS BEFORE USING YOUR IRON
- Most ordinary tap water can be used in this iron. However, in extremely hard water areas, distilled or demineralized water should be used. Do not use water processed through home water softening systems, since this water contains minerals that may be harmful to the iron.
- It is best to start ironing with garments which require lower temperature settings. Wrong temperature setting may damage the fabric. If you are not sure of the fabric content, try the temperature of the iron on a hidden area of the garment.
- Before ironing, sort the garments according to the different heat settings required.
Do not touch plastic buttons with a hot iron, as this may damage the buttons.
Caution is also required when ironing around zippers and similar items which might scratch the Soleplate.
As a guide to the international Textile Care Labeling code, the following symbols are noted for your information.
INTERNATIONAL TEXTILE CARE & LABELING CODES
Washing

Bleaching
Ironing
Dry Cleaning
A symbol crossed out indicates that the article of clothing must not be subjected to the particular treatment.
EXAMPLE: (DO NOT BLEACH)
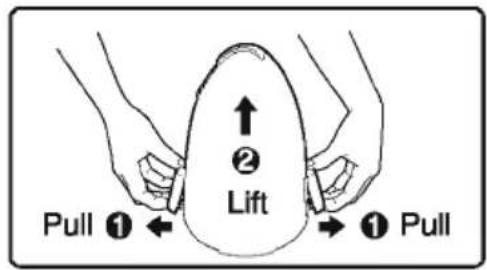
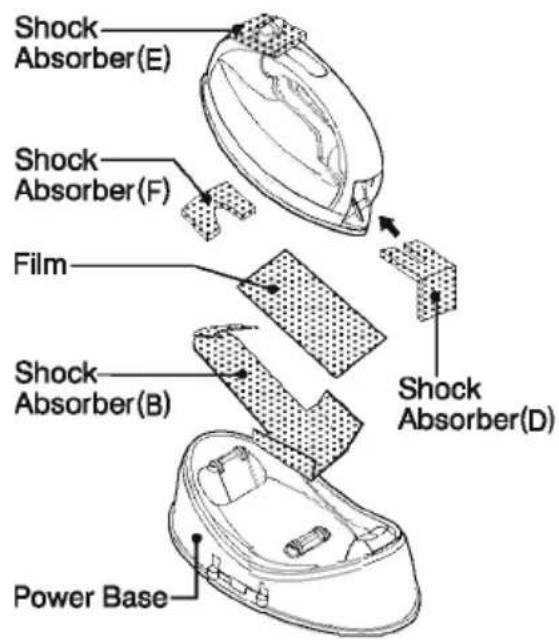
HOW TO REMOVE THE COVER CASE
- Place the unit on a firm and stable surface.
- While pulling the Case Lock to the outside position, lift the Cover Case to open.
NOTE:
- The Cover Case cannot be unlocked when you lift the Cover Case with the Power Base.
- Please detach the Shock Absorber and Film before ironing.
HOW TO FILL WITH WATER
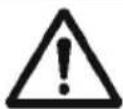
WARNING
Be sure the iron is unplugged from the electrical outlet before filling with water.
The iron can be filled with the Water Tank in place or removed. Confirm that the Steam/Dry Selector is in the Dry ironing position when installing or removing the Tank.
- Remove the Water Tank by pressing the Water Tank Release Button.
- Open the Water Fill Cover.
- Fill the Water Tank up to the "MAX" line.
DO NOT OVERFILL. Check the water level with the Water Tank held in its vertical position. - Close the Water Fill Cover.
- Re-install the Water Tank into the main unit. Push it until a click sound is heard.
Note:
Most tap water can be used in this iron. If water is very hard, distilled or demineralized water should be used. Do not use water processed through home water softening systems because this water contains minerals that may be harmful to the iron. Do not use water additives or substitute water such as linen or scented water in the steam iron. They can stain fabrics or damage the iron.
HOW TO ENERGIZE THE IRON
To maintain the temperature at the selected level, the iron must be energized while it rests securely on the Power Base. The Power Base is also the intended rest place for the iron.

WARNING
When you need to set the iron down, the iron must be placed only on the Power Base. Placing it on fabrics while hot can cause the fabric to scorch or burn, which can cause a fire.
■ Use only electric iron model NI-WL600 with this power base.
■ Hot surface/hot support rollers. Do not touch after iron is energized.
HOW TO CONTROL TEMPERATURE
→ How to operate the Temperature Control Pad("SET "Pad)
- Every time you push the "SET" Pad, the Temperature Indicator Light moves to the next position, a higher temperature.
- Desired temperature can be chosen by pushing the "SET" Pad until it lights at the appropriate position.
(Steam/Temp.)
HIGH
MED
- LOW
OFF
SET
TEMPERATURE INDICATOR LIGHT (RED):
* Continuously blinks until the iron reaches its selected temperature.
* Turn on continuously when the iron has reached its selected temperature to let you know that you can start ironing.
"OFF" LIGHT (GREEN):
This light turns on when:
* The cord is plugged into the outlet.
* The iron has automatically shut itself off.
* The iron has been manually turned off.
NOTE: All the lights will turn off once the iron leaves the Power Base. They will turn on again when the iron is re-placed.
HOW TO USE AS A STEAM IRON
- Fill iron with water. See section "HOW TO FILL WITH WATER".
- Plug the cord into a standard 120V-60Hz electrical outlet.
- Set the iron on the Power Base securely. The green "OFF" light will turn on.
NOTE: If the green light does not turn on, replace the iron on the Power Base again, otherwise the Temperature Control Pad cannot function.
- Push the "SET" Pad to the corresponding temperature level. The red light starts blinking.
See section "HOW TO CONTROL TEMPERATURE" and the following charts:
| Temperature Level | Steam/Dry Selector Position |
| LOW |  |
| MED | |
| HIGH |  |
 |
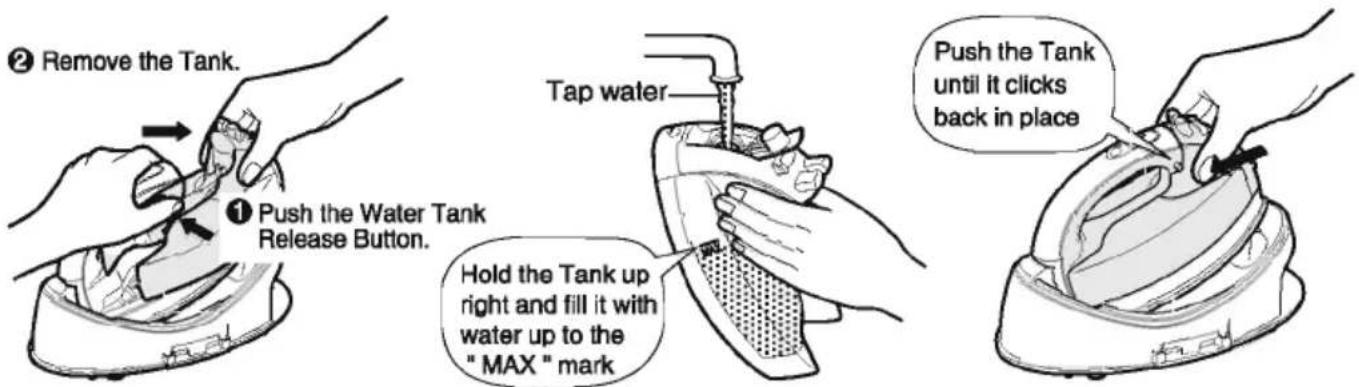
natural_image
Diagram of a mechanical component with curved arrows indicating motion or force direction (no text or symbols)Dry
(Non-Steam)
Light Steam
Regular Steam
- Hold the iron horizontally and move the Steam/Dry Selector into the desired steam position after the Temperature Control light turns on continuously. You can then start ironing.
Note: Anti-Drip System will activate when the temperature of the Soleplate's surface drops. At the same time, the steam will stop; it is not a sign of malfunction when you hear a clicking sound. In this situation, you have to put your iron back on the Power Base to reheat.
HOW TO USE AS A DRY IRON
- Move the Steam/Dry Selector to the Dry position.
- Plug the cord into a standard 120V-60Hz electrical outlet.
- Set the iron on the Power Base securely. The green "OFF" light will turn on.
NOTE: If the green light does not turn on, replace the iron on the Power Base again, or the Temperature Control Pad cannot function. - Push the "SET" Pad until the red blinking light reaches your desired temperature level. Wait until the Temperature Control light turns on continuously. You can then start ironing.
SPECIAL FUNCTIONS
1. Jet of Steam
The "Jet of Steam" feature provides extra steam which goes deep into the garment and is helpful for removing stubborn wrinkles. The "Jet of Steam" feature operates properly only in the "HIGH" indication area of the "SET" Pad when steam or dry ironing (If used at lower setting, water spotting will occur because the iron is not hot enough to change water to steam). If you have not used the "Jet of Steam" feature for a long time, it is necessary to clean the inside of the iron before using this feature on any clothes to be ironed. Simply test the "Jet of Steam" feature several times away from the ironing board and clothes to be ironed. This will prevent brown spotting or water spotting on the clothes.

WARNING
Do not aim the soleplate toward hands or body while steam ejects. Exposure to steam can cause skin burns.
- Fill iron with water. See section "HOW TO FILL WITH WATER".
- Plug the cord into a standard 120V-60Hz electrical outlet.
- Set the iron on the Power Base securely. The green "OFF" light will turn on.
- Push the "SET" Pad to the "HIGH" temperature level. The red light starts blinking.
- Preheat the iron until the light turns on continuously, usually about 1-2 minutes.
- Simply pump the "Jet of Steam Button" when steam is desired. Pump the "Jet of Steam Button" several times at the beginning of each ironing session.
- Allow at least 5 seconds between uses of "Jet of Steam Button" to prevent water spotting. Use a press cloth if necessary.
NOTE: Do not touch the fabric with the iron. Keep the iron slightly over the fabric to prevent burns or disfiguring.
Jet of Steam can be provided by pumping the "Jet of Steam Button".
Set temperature at "HIGH" level.
To avoid hot water from dripping out of the Soleplate, please give 5 seconds of interval time before re-pumping
2. Vertical Steam
To get better results when using vertical steam, hang the garment on a clothes hanger. Curtains and drapes may also be steamed once they're hung. Hold the iron away from your body, close to but not touching the fabric. Pull the fabric tight with your free hand and pump the Vertical Steam Button (Jet of Steam Button) at 5 seconds intervals as you pass the iron over the wrinkled fabric.

Never iron clothes on the body or point your iron at anyone when steaming. Hot steam can cause skin burns. Keep hands and body away from steam areas while using vertical steam feature.
3. Anti-Drip System (Automatic Water Seal)
This model has an Anti-Drip System. When the temperature of the Soleplate's surface drops below 250^ F(121°C), the valve for the vaporizing chamber in the iron automatically closes and stops the water from going in further. This prevents hot unvaporized water from ejecting out of the soleplate when the iron has cooled down. With this System, it is unnecessary for you to wait until the inside of the vaporizing chamber dries completely when you store the iron.
NOTE: It is not a sign of malfunction when you hear a clicking sound.
This sound can be heard whenever this System is activated.
4. Automatic Shut-Off
The Automatic Shut-Off System provides you with a visible warning signal before the iron automatically shuts off. The iron will automatically shut itself off if it has been left on the Power Base longer than 10 minutes. Ten seconds before the actual shut-off, the "OFF" indicator will start blinking rapidly.
If the iron is not moved during the warning, the heater in the iron's Soleplate will automatically shut off.
The Automatic Shut-Off System activates only after the temperature reaches its selected level. To reheat your iron after it automatically shuts off, simply push "SET" Pad until the red light appears at the desired temperature indicator.
" OFF " light(green) remains on after your iron automatically shuts off .
This light indicates that the iron is still plugged into the electrical outlet and voltage is being supplied to the Power Base.
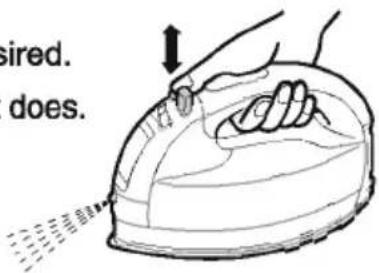
5. Spray
Note: Before using the spray feature, check the fabric label for ironing instructions because some fabrics may be spotted or stained with moisture.
The spray feature is particularly helpful for removing stubborn wrinkles and where extra dampening is needed.
The spray may be used with steam or dry ironing.
-
Simply pump the Spray Mist Button whenever spray is desired. If the spray doesn't come out immediately, keep pumping until it does.
-
To get a finer spray, pump the Button vigorously. To get a more powerful spray, pump the Button more slowly. For best results, use a quick, full stroke.
6. Stay Clean Vents
The built-in Anti Calcium System (Calc Cut) in the Water Reservoir continuously reduces scale buildup in the vaporizing chamber of the iron.
This system makes it possible to use the steam function for a long period of time and prevents steam vents from clogging.
HOW TO CARE FOR YOUR IRON
AFTER EACH USE
- Press the "SET" Pad until the "OFF" light turns on.
- Move the Steam/Dry Selector to Dry Position.
- Unplug the iron, retract the cord slowly. Always hold the plug and cord with one hand while it is retracting.
- Empty the water from the Water Tank. DO NOT store the iron with water inside.
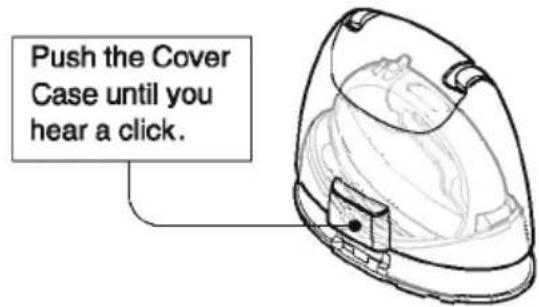
- Push the Cover Case until it clicks to lock.
MAIN BODY
- When cleaning the main body of the iron, make sure the iron has cooled down.
- Wipe the iron with a damp cloth If necessary, use a mild detergent.
NEVER USE ANY HARSH CLEANERS.
SOLEPLATE
* Starch and other residue can be easily removed from the Soleplate with a damp cloth.
* To avoid scratching the finish, never use a metallic pad to clean the Soleplate, and never place the iron on a rough surface.
* If synthetics are being ironed on a higher temperature level than instructed, not only will the fabric be ruined, but the Soleplate will often be covered with the melted remains of the synthetic fabric.
* The best way to remove synthetic residue from the Soleplate is to iron over an old cotton rag after heating the iron.

CAUTION
1) Never use steam iron cleaners in the iron. Such cleaners may cause damage to the inside of the iron.
2) If the Power Cord is damaged, it must be replaced with the proper replacement cord, by a qualified technician. Do not replace it yourself.
3) Use only the specified Power Base. Do not use others.
SPECIFICATIONS
| Model | NI-WL600 |
| Power Source | 120V ~ 60Hz |
| Power Consumption | 12.5A, 1500W |
| Net Weight | 4.4 lb (2.0 kg) |
FABRIC IRONING CHART
NOTES: 1. Check garment for specific ironing instructions. Always follow manufacturer's instructions.
2. Iron blended fabrics at setting for lower-temperature fiber.
3. Use caution, some synthetics may melt at high temperature.
| Temperature Control Pad Setting | Fabric | Ironing Recommendations |
| LOW | ACRYLIC* ACRILAN* CRESLAN* ORLON ACETATE METALLICS SUEDE | Dry iron on reverse side, or use a press cloth on top of fabric. Don't sprinkle water directly on fabric to avoid spots.To iron suede, cover ironing board with brown paper and use it as a press cloth. |
| NYLON* ANTORON* CAPROLAN SILK | Dry iron on reverse side. | |
| MED | PERM. PRESS RAYONS POLYESTER* DACRON* FORTREL* KODEL TRIACETATE* ARNEL W'n W COTTON | Dry iron on reverse side. To touch-up collars, cuffs, pockets, etc..., lightly iron the surface. |
| WOOL VELVET | Steam ironing is suggested. Never iron until completely dry, but leave it with a little moisture. To iron velvet, use steam but do not let the iron touch the fabric. Hold it slightly above the surface. | |
| HIGH | COTTON | Steam ironing is suggested. Sprinkle water on the fabric, depending on its thickness. Iron dark fabrics on reverse side to avoid unwanted sheen. |
| LINEN | Steam ironing is suggested. Iron dark fabrics on reverse side to avoid unwanted sheen. |
* Trademarks of Fiber Manufacturers.
PANASONIC CONSUMER ELECTRONICS COMPANY
DIVISION OF PANASONIC CORPORATION OF
NORTH AMERICA
One Panasonic Way
Secaucus, New Jersey 07094
Panasonic Electric Iron One Year Limited Warranty
This warranty is valid only for the U.S.A. and Puerto Rico.
Limited Warranty Coverage
Panasonic Consumer Electronics Company (referred to as "the warrantor") will repair or replace this product with a new or a refurbished product, free of charge, in the U.S.A. and Puerto Rico for one (1) year from the date of the original purchase in the event of a defect in materials or workmanship.
For assistance in the continental U.S.A. and Puerto Rico in obtaining repairs please ship the product to:
Panasonic Service and Technology Company
Exchange Center
4900 George McVay Drive
Suite B Door #12
McAllen, TX 78503
panacare@us.panasonic.com
If repair is needed, during the warranty period, the purchaser will be required to furnish a sales receipt/ proof of the original purchase date, amount paid and place of purchase.
Also, the purchaser will be responsible for shipping the unit to the above address. This warranty is extended only to the original purchaser.
When shipping the unit, carefully pack and send it prepaid, adequately insured and preferably in the original carton. Include a letter detailing the complaint and provide a daytime phone number where you can be reached.
Limited Warranty Limits and Exclusions
This Limited Warranty ONLY COVERS failures due to defects in materials or workmanship, and DOES NOT COVER normal wear and tear or cosmetic damage. The Limited Warranty ALSO DOES NOT COVER damages which occurred in shipment, or failures which are caused by products not supplied by the warrantor, or failures which result from accidents, misuse, abuse, neglect, mishandling, misapplication, alteration, faulty installation, set-up adjustments, misadjustment of consumer controls, improper maintenance, power line surge, lightning damage, modification, introduction of sand, humidity or liquids, commercial use such as hotel, office, restaurant, or other business or rental use of the product, or serviced by anyone other than an authorized service center, or damage that is attributable to acts of God.
THERE ARE NO EXPRESS WARRANTIES EXCEPT AS LISTED UNDER "LIMITED WARRANTY COVERAGE". THE WARRANTYOR IS NOT LIABLE FOR INCIDENTAL OR CONSEQUENTIAL DAMAGES RESULTING FROM THE USE OF THIS PRODUCT, OR ARISING OUT OF ANY BREACH OF THIS LIMITED WARRANTY. (As examples, this excludes damages for lost time, cost of having someone remove or re-install an installed unit if applicable, travel to and from the servicer, loss of or damage to media or images, data or other memory or recorded content. The items listed are not exclusive, but are for illustration only.) ALL EXPRESS AND IMPLIED WARRANTIES, INCLUDING THE LIMITED WARRANTY OF MERCHANTABILITY, ARE LIMITED TO THE PERIOD OF THE LIMITED WARRANTY.
Some states do not allow the exclusion or limitation of incidental or consequential damages, or limitations on how long an implied Limited Warranty lasts, so the exclusions may not apply to you.
This Limited Warranty gives you specific legal rights and you may also have other rights which vary from state to state. If a problem with this product develops during or after the Limited Warranty period, you may contact your dealer or an authorized service center. If the problem is not handled to your satisfaction, then write to the warrantor's Consumer Affairs Department at the addresses listed for the warrantor.
PARTS AND SERVICE, WHICH ARE NOT COVERED BY THIS LIMITED WARRANTY, ARE YOUR RESPONSIBILITY.
If you ship the product
Carefully pack and send it prepaid, adequately insured and preferably in the original carton. Attach a postage-affixed letter, detailing the complaint, to the outside of the carton.
DO NOT send the product to the Executive or Regional Sales offices. They are NOT equipped to make repairs.
Customer's Record
Retain this warranty card along with a copy of your purchase receipt for future reference.
Model
No.
Serial
No.
Data of
Purchase
Dealer's
Name
Dealer's
Address
Customer Services Directory (United States and Puerto Rico)
Obtain Product Information and Operating Assistance; locate your nearest Dealer or Service Center; purchase Parts and Accessories; or make Customer Service and Literature requests by visiting our Web Site at:
http://www.panasonic.com/help
or, contact us via the web at:
http://www.panasonic.com/contactinfo
You may also contact us directly at: 1-800-211-PANA (1-800-211-7262), Monday-Friday 9am to 9pm: Saturday- Sunday 10am to 7pm. EST.
TTY users (hearing or speech impaired users) can call 1-877-833-8855.
Accessory Purchases (United States and Puerto Rico)
Purchase Parts, Accessories and Instruction Books online for all Panasonic Products by visiting our Web Site at:
http://www.pstc.panasonic.com
or, send your request by E-mail to:
npcparts@panasonic.com
You may also contact us directly at:
1-800-332-5368 (Phone) 1-800-237-9080 (Fax Only)
(Monday-Friday 9am to 9pm, EST.)
Panasonic Service and Technology Company
20421 84 ^th Avenue South, Kent, WA 98032
(We Accept Visa, MasterCard, Discover Card, American Express, and Personal Checks.)
TTY users (hearing or speech impaired users) can call 1-866-605-1277.
Panasonic Canada Inc.
5770 Ambler Drive, Mississauga, Ontario L4W 2T3
PANASONIC PRODUCT - LIMITED WARRANTY
EXCHANGE PROGRAM
Panasonic Canada Inc. warrants this product to be free from defects in material and workmanship under normal use and for a period as stated below from the date of original purchase agrees to, at its option either (a) repair your product with new or refurbished parts, (b) replace it with a new or a refurbished equivalent value product, or (c) refund your purchase price. The decision to repair, replace or refund will be made by Panasonic Canada Inc.
Electric Iron
One (1) year
This warranty is given only to the original purchaser, or the person for whom it was purchased as a gift, of a Panasonic brand product mentioned above sold by an authorized Panasonic dealer in Canada and purchased and used in Canada, which product was not sold "as is", and which product was delivered to you in new condition in the original packaging.
IN ORDER TO BE ELIGIBLE TO RECEIVE WARRANTY SERVICE HEREUNDER, A PURCHASE RECEIPT OR OTHER PROOF OF DATE OF ORIGINAL PURCHASE, SHOWING AMOUNT PAID AND PLACE OF PURCHASE IS REQUIRED
LIMITATIONS AND EXCLUSIONS
This warranty ONLY COVERS failures due to defects in materials or workmanship, and DOES NOT COVER normal wear and tear or cosmetic damage. The warranty ALSO DOES NOT COVER damages which occurred in shipment, or failures which are caused by products not supplied by Panasonic Canada Inc., or failures which result from accidents, misuse, abuse, neglect, mishandling, misapplication, alteration, faulty installation, set-up adjustments, misadjustment of consumer controls, improper maintenance, power line surge, lightning damage, modification, introduction of sand, humidity or liquids, commercial use such as hotel, office, restaurant, or other business or rental use of the product, or service by anyone other than a Authorized Servicer, or damage that is attributable to acts of God.
THIS EXPRESS, LIMITED WARRANTY IS IN LIEU OF ALL OTHER WARRANTIES, EXPRESS OR IMPLIED, INCLUDING ANY IMPLIED WARRANTIES OF MERCHANTABILITY AND FITNESS FOR A PARTICULAR PURPOSE. IN NO EVENT WILL PANASONIC CANADA INC. BE LIABLE FOR ANY SPECIAL, INDIRECT OR CONSEQUENTIAL DAMAGES RESULTING FROM THE USE OF THIS PRODUCT OR ARISING OUT OF ANY BREACH OF ANY EXPRESS OR IMPLIED WARRANTY. (As examples, this warranty excludes damages for lost time, travel to and from the Authorized Servicer, loss of or damage to media or images, data or other memory or recorded content. This list of items is not exhaustive, but for illustration only.)
In certain instances, some jurisdictions do not allow the exclusion or limitation of incidental or consequential damages, or the exclusion of implied warranties, so the above limitations and exclusions may not be applicable. This warranty gives you specific legal rights and you may have other rights which vary depending on your province or territory.
CONTACT INFORMATION
For product information and operation assistance, please contact:
Our Customer Care Centre:
Telephone #: 1-800-561-5505
Fax #: (905) 238-2360
Email link: "Support → contact us → email" on www.panasonic.ca
For defective product exchange within the warranty period, please contact the original dealer or our Customer Care Centre.
natural_image
Line drawing of a hand using a power tool to lift a surface, with no text or symbols present.Panasonic Canada Inc.
5770, Ambler Drive, Mississauga (Ontario) L4W 2T3
PRODUIT PANASONIC - GARANTIE LIMITÉE
PROGRAMME DE REMPLACEMENT
Panasonic Corporation of North America
One Panasonic Way, Secaucus, New Jersey 07094
http://www.panasonic.com/contactinfo
http://www.panasonic.com/help
(Canada)
Panasonic Canada Inc.
5770 Ambler Drive
Mississauga ON L4W 2T3
http://www.panasonic.ca

- English
- Safety Information
- Operation
- Maintenance
- General Information
- Panasonic®
- WARNING
- CAUTION
- IMPORTANT SAFETY INSTRUCTIONS
- SPECIAL INSTRUCTIONS
- SAVE THESE INSTRUCTIONS
- TIPS AND HINTS BEFORE USING YOUR IRON
- INTERNATIONAL TEXTILE CARE & LABELING CODES
- HOW TO REMOVE THE COVER CASE
- NOTE:
- HOW TO FILL WITH WATER
- HOW TO ENERGIZE THE IRON
- HOW TO CONTROL TEMPERATURE
- → How to operate the Temperature Control Pad("SET "Pad)
- TEMPERATURE INDICATOR LIGHT (RED):
- "OFF" LIGHT (GREEN):
- HOW TO USE AS A STEAM IRON
- HOW TO USE AS A DRY IRON
- SPECIAL FUNCTIONS
- Jet of Steam
- Vertical Steam
- Anti-Drip System (Automatic Water Seal)
- Automatic Shut-Off
- Spray
- The spray may be used with steam or dry ironing.
- Stay Clean Vents
- HOW TO CARE FOR YOUR IRON
- AFTER EACH USE
- MAIN BODY
- SOLEPLATE
- PANASONIC CONSUMER ELECTRONICS COMPANY
- DIVISION OF PANASONIC CORPORATION OF
- NORTH AMERICA
- Panasonic Electric Iron One Year Limited Warranty
- Limited Warranty Limits and Exclusions
- If you ship the product
- Customer's Record
- Customer Services Directory (United States and Puerto Rico)
- Accessory Purchases (United States and Puerto Rico)
- Panasonic Canada Inc.
- PANASONIC PRODUCT - LIMITED WARRANTY
- EXCHANGE PROGRAM
- Electric Iron
- One (1) year
- IN ORDER TO BE ELIGIBLE TO RECEIVE WARRANTY SERVICE HEREUNDER, A PURCHASE RECEIPT OR OTHER PROOF OF DATE OF ORIGINAL PURCHASE, SHOWING AMOUNT PAID AND PLACE OF PURCHASE IS REQUIRED
- LIMITATIONS AND EXCLUSIONS
- CONTACT INFORMATION
- PRODUIT PANASONIC - GARANTIE LIMITÉE
- PROGRAMME DE REMPLACEMENT
Brand : PANASONIC
Model : NI-W750
Category : Iron