HIDD07471EX - Cooker Atag - Free user manual and instructions
Find the device manual for free HIDD07471EX Atag in PDF.

User questions about HIDD07471EX Atag
0 question about this device. Answer the ones you know or ask your own.
Ask a new question about this device
Download the instructions for your Cooker in PDF format for free! Find your manual HIDD07471EX - Atag and take your electronic device back in hand. On this page are published all the documents necessary for the use of your device. HIDD07471EX by Atag.
USER MANUAL HIDD07471EX Atag
Information according to regulation (EU) 66/2014 ........................................................ 39Environmental aspects .............................. 39Disposal of the appliance and packaging .... 40Your notes .................................................. ContentsThe following symbols are used throughout the manual, and they have the following meanings: INFORMATION! Information, advice, tip, or recommendation WARNING! Warning – general danger ELECTRIC SHOCK! Warning – danger of electric shock HOT SURFACE! Warning – danger of hot surface DANGER OF FIRE! Warning – danger of fire RIGHT! WRONG! It is important that you carefully read the instructions.
- The hob is fitted with a cooling fan which cools the electronic components during cooking. The fan may operate for a while, even after the end of the cooking process.
- The induction cooking hob is also fitted with an overheating protector which protects the electronic components from damage. The protector operates in several ways. When the cooking zone temperature gets very high, the cooking power is automatically reduced. If this does not suffice, the cooking zone power continues to decrease, until the safety mechanisms switch off the cooking zone completely. When the cooking hob is cooled down, its total power will be available again. Cooking time limiter WARNING! The cooking-time limiter is a safety function of your cooking appliance. It will operate if you forget to switch off your hob. Depending on the setting you have chosen, the cooking time will be limited as follows: The cooking zone switches off automatically after:Setting 8 hours, 36 min.1 6 hours, 42 min.2 5 hours, 18 min.3 4 hours, 18 min.4 3 hours, 30 min.5 2 hours, 18 min.6 2 hours, 18 min.7 1 hour, 48 min.8 1 hour, 30 min.9 5 min (then switches back to level 9)P (boost) Power Management Two cooking zones one in front of the other effect each other. When both of these cooking zones are switched on at the same time, the power is automatically shared between them. When the Boost function is selected, the other cooking zone will be set to a somewhat lower setting. If a cooking zone is set at boost and you want to set the other one to setting 9, the cooking zone with boost will automatically go to a lower setting. Automatic heat-up function is deactivated.
SafetyDear customer! Please read the operating instructions before use. They include general tips, information about the settings and adjustments you can make, and the best way to take care of your appliance. The manual also serves as reference material for service technicians. Please, therefore, stick the appliance identification card in the space provided at the back of the manual. The appliance identification card contains all the information that the service technician will need in order to respond appropriately to your needs and questions. TIP! You can find the most recent version of the instructions for use on our website. Enjoy your cooking!
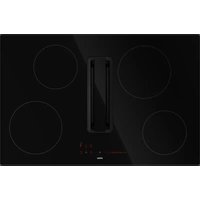
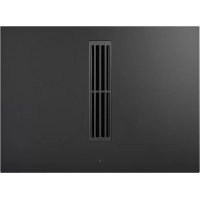
Your hob with extractorDescription Since the appliances for which these instructions were drawn up may have different equipment, some functions or equipment may be described in the manual that may not be present in your appliance.
1. Bridge Induction cooking zones 210 x 190 mm / 2.1 kW (boost 3.0 kW)
2. Connected Bridge Induction cooking zones 210 x 390 mm / 3.7 kW
4. Control panel (visible only when the hob is turned on)
Your hob with extractorControl panel
8. Cooking zone key rear left (cooking zone display) and timer symbol
9. Extraction key (extractor unit display) and timer symbol
10. Cooking zone key rear right (cooking zone display) and timer symbol
11. Cooking zone key front right (cooking zone display) and timer symbol
12. Key ‘Automatic extraction mode’
- By default the automatic mode is active. When a cooking zone is selected and a power level (>2) is set, the extractor automatically switches on and sets the necessary extraction level.
13. Cooking zone key front left (cooking zone display) and timer symbol
16. Boost key for a cooking zone and for the extraction
17. Slide control (from position 0 to position 9) for:
- setting a value for a cooking zone and for the extraction
Your hob with extractorIndications in the display DescriptionCooking zone display Power level: 1 = low level / 9 = high level. Boost level active. No (suitable) pan on cooking zone (pan detection symbol). Residual heat indicator: The hob has a residual heat indicator for each cooking zone to show which cooking zones are hot after the cooking zone is turned off. Although the hob is switched off, the indicator will remain on as long as the cooking zone is hot! Avoid touching those cooking zones when this indicator is lit. HOT SURFACE! Danger! Risk of burns. Child safety lock is activated. Automatic heat-up function active. Keep warm function active. Pause function active. Connected Bridge Induction zones active. DescriptionExtractor unit display Extractor speed level: 1 = low level / 9 = high level. Boost level active. Odour filter saturation indication. DescriptionTimer display Timer has not been set. Timer has been set (1 hour and 25 minutes).
Your hob with extractorInduction cooking Induction cooking is fast To start with, you will be surprised by the speed of induction cooking. Especially at higher settings, foods and liquids will come to a boil very rapidly. It is best not to leave pans unattended to avoid them boiling over or boiling dry. With induction cooking, there is no heat loss, and the handles stay cool. The power level adjusts itself In induction cooking, only the zone on which the pan is placed is used. If you use a small pan on a large zone, the zone will adjust the power to the pan's diameter. The power will thus be lower, and it will take longer before the food comes to a boil. right wrong INFORMATION!
- Grains of sand may cause scratches that you cannot remove. Therefore, only put pans with a clean base on the cooking surface and always pick pans up to move them.
- Do not use the hob as a worktop.
- Always keep the lid on the pan when cooking, in order to avoid energy loss. Operation of the touch keys and sliders
- The touch controls may take some getting used to if you are used to other (rotary) controls. Place the tip of your finger flat on the control to achieve the best results.
- The touch sensors only react to the light pressure of a fingertip. Do not operate the controls with any other objects.
- To set the cooking zone power level, touch the desired spot on the slider. As you touch the slider, the selected power level will appear on the cooking zone display unit.
- The selected part of the slider will be fully lit.
- Do not use any objects to operate the slider. How induction works The coil (1) in the hob (2) generates a magnetic field (3). By placing a pan with an iron base (4) on the coil, a current is induced in the base of the pan.
Before first useEasy The electronic controls are accurate and easy to set. On the lowest setting, you can melt chocolate directly in the pan, for example, or cook ingredients that you would normally heat in au bain-marie. Fast Thanks to the induction hob high power levels, bringing food to a boil is very quick. Clean The hob is easy to clean. Because the cooking zones do not get any hotter than the pans themselves, food spills are unlikely to burn into the glass. Safe The heat is generated in the pan itself. The glass top does not get any hotter than the pan. This means that the cooking zone is considerably cooler than a ceramic hob, for example. Once a pan has been removed, the cooking zone cools down quickly. Induction sounds
- Ticking sound This sound can be caused at lower power level settings or by the automatic pot detection.
- Pan makes sounds Pans can make some noise during cooking. This is caused by the energy flowing from the hob to the pan. At high settings, this is perfectly normal for some pans. It will not damage either the pans or the hob.
- Ventilator makes sounds To increase the lifespan and performance of the electronics, the appliance is equipped with fans. During intense appliance use, the fan is activated to cool down the appliance, and you will hear a buzzing sound. The fan still runs for several minutes after the hob has been switched off.
Before first usePans for induction cooking Induction cooking requires a particular type of pan in terms of quality. Pans that have already been used for cooking on a gas hob are no longer suitable for use on an induction hob. Only use pans that are suitable for electric and induction cooking with:
- a thick base of a minimum of 2.25 mm;
- a flat base. TIP! You can check for yourself whether your pans are suitable using a magnet. A pan is suitable if the base of the pan is sufficiently attracted by the magnet. UnsuitableSuitable EarthenwareSpecial stainless steel pans Stainless steelClass Induction PorcelainSolid enamelled pans CopperEnamelled cast-iron pans Plastic Aluminium WARNING! Be careful with enamelled sheet-steel pans:
- the enamel may chip (the enamel comes loose from the steel) if you switch the hob on at a high setting when the pan is (too) dry;
- the base of the pan may warp - for example: Due to overheating;
- heat enamelled pans slowly. Never use pans with a misshapen base. A hollow or rounded base can interfere with the operation of the overheating protection, causing the appliance to become too hot. This may lead to the glass top cracking and the pan base melting. Damage caused by using unsuitable pans or boiling dry is excluded from the guarantee.
Before first usePan diameter
- The minimum pan diameter per zone is as follows: - Ø 145 mm / Ø 160 mm: minimum pan diameter 120 mm. - Ø210 mm: minimum pan diameter 140 mm. - Bridge Induction zone: minimum pan diameter 140 mm.
- You will achieve the best results by using a pan with the same diameter as the zone. If a pan is too small, the zone will not work.
- A pan used on connected Bridge Induction cooking zones must have a diameter of at least 220 mm. Pressure cookers Induction cooking is very suitable for pressure cookers. The fast-reacting cooking zone brings the pressure cooker to pressure quickly. As soon as you switch off a cooking zone, the dish stops cooking immediately. Pan detection
- The pan detection system automatically detects a pan that is put on a cooking zone. The display of this cooking zone lights up more intensely and the dot stops flashing.
- If the hob does not detect a (ferrous) pan after a pan is put on a cooking zone, the pan detection symbol flashes in the display. After 20 seconds, the cooking zone switches off. Cooking levels The cooking zones have 9 levels and a ‘boost’ level (P). Set the cooking level by touch and slide over the slide control. By slide over the slide control, the cooking setting is changed. By move to the right, the level increasing, while moving to the left decreases the level. When you move your finger away from the slide control, the cooking zone starts to operate at the level set. Boost function
- You can use the ‘boost’ function to cook at the highest cooking level during a short period of time (max. 5 minutes). After the maximum boost time the power will be reduced to setting 9.
- The Boost function is not available when Bridge Induction cooking zones are connected!
Before first useCooking settings Because the settings depend on the quantity and composition of the pan and its contents, the table below is intended as a guideline only. PurposeLevel Use level 1-3 to:
- melt cheese. Use level 4-6 to:
- complete the cooking of large quantities,
- defrost hard vegetables,
- fry thick slices of breaded meat. Use level 7 and 8 to:
- fry thin slices of breaded meat. Use level 9 to:
- fry boiled potatoes,
- deep fry foods. Use setting boost to:
- bring liquids to a boil quickly,
Before first useUse of the downdraft Placing pans and lids TIP! Preferably cook with a lid on the pan; this reduces cooking odors and energy consumption. If desired, place the lid on the pan at an angle with the opening to the exhaust side. This ensures optimal extraction.
Before first useStart Preparing WARNING! Please read the chapter ‘Before first use’ very carefully before you start cooking. This prevents incorrect use of the hob.
1. Touch and hold the on/off key until you hear an audio signal.
- All displays light up; the induction hob is in standby mode.
- The cooking zones and the exraction unit have power level zero. TIP! the hob is not used for 20 seconds, it will shut off automatically.
2. Place a suitable pan on the cooking zone.
- The cooking zone automatically detects the pan; the display of this cooking zone lights up more intensely and the dot stops flashing. TIP! As long as the dot is not flashing, the cooking zone is selected and the power level can be set.
3. When the response time has elapsed, or during cooking, you can activate the cooking zone by
manually selecting the display of the desired cooking zone.
4. Within 10 seconds, set the power level by touching the slide control.
- The cooking zone starts at the level that has been set.
- The extraction unit switches on automatically from position 3. The extraction unit can be switched on manually at position 1 and 2.
- The extractor unit automatically switches on with the necessary extraction speed. By default the automatic extraction mode is active.
- Set a higher or lower level with the slide control.
Operation of the hob• Touch the key ‘Automatic extraction mode’ to deactivate the automatic extraction mode. The extraction can now be set manually, if desired. See ‘Operating the extractor unit’.
- After 10 seconds the slide control will switch off and the cooking time counter is hidden. Boost You can use the boost function to cook for max. 5 minutes at the highest cooking level. You can use the Boost function for a maximum of two cooking zones alongside each other at the same time.
1. Touch power level P to select the Boost function.
- ‘P’ shows on the display.
- After the maximum boost time the power will be reduced to power level 9. Pan detection symbol When the pan detection symbol appears in the display:
- you have not placed a pan on the correct cooking zone;
- the pan you’re using is not suitable for induction cooking;
- the pan is too small or not properly centred on the cooking zone. The cooking zone will not work unless there is a suitable pan on the cooking zone. Finish cooking
1. Set the power level to ‘0’ to switch off the cooking zone.
2. Switch off the induction hob by touching the on/off key.
HOT SURFACE! Symbol H will appear in the display of the cooking zone which is too hot to touch. The symbol disappears when the surface has cooled down to a safe temperature. It can also be used as an energy saving function; if you want to heat other pans, use the cooking zone that is still hot.
Operation of the hobSwitch on the automatic heat-up function This function sets the cooking zone at the highest level in order to bring your pan rapidly up to the required temperature. After a given time interval, the power level returns to the established level. This function is available for power level 1 to 8. Heat-up time (seconds)Power level
1. Switch on the hob and select the desired cooking zone.
2. Touch and hold the slide control for at least 3 seconds at the desired level (from 1 to 8).
- An ‘A’ appears in the display alternating with the selected power level. When the automatic heat-up time has expired, the cooking zone will switch automatically to the selected level which will show permanently on the display.
3. To stop the automatic heat-up function, select the cooking zone and touch the slide control.
Switch on the keep warm function
1. Switch on the hob and put a suitable pan on a cooking zone.
2. Touch the cooking zone key of the desired cooking zone.
- The ‘0’ of the selected cooking zone will light up clearly and a single beep sounds.
3. Touch the keep warm key.
- The keep warm symbol ‘u’ appears in the display. The keep warm function is selected.
4. Set the power level to ‘0’ or touch the keep warm key to switch off the keep warm function.
Connecting the Bridge Induction cooking zones Two Bridge Induction cooking zones can be connected to each other. This creates one large zone that can be used, for example, with a grill plate or a fish pan on the same power level. The pan must be large enough to cover the centres of the front and rear cooking zone (at least 22 cm).
Operation of the hobConnection of Bridge Induction cooking zones
1. Switch on the hob.
2. Simultaneously touch the left-hand side cooking zone keys.
- The rear cooking zone display shows a connection symbol to indicate that the two cooking zones are connected.
3. Set the power level by touching the slide control.
- The front cooking zone display shows the power level. Disconnection of Bridge Induction cooking zones
1. Simultaneously touch the cooking zone keys of the connected cooking zones.
- The connection symbol will disappear on the rear cooking zone display. Pause cooking This function stops the cooking activity temporarily (max. 10 minutes); timers are also paused.
1. Touch the pause key for at least 1 second.
- All the displays show the pause symbol.
2. To continue cooking, touch the pause key for at least 1 second until it flashes.
3. Touch any other key within 10 seconds and the cooking process will continue.
- The hob will automatically switch off after 10 minutes if the pause function is not switched off in the meantime.
Operation of the hobRecovery function If the hob was switched off accidentally with the On/off key, all settings can be restored using the recall function.
1. Touch the on/off key again within 5 seconds.
- The pause key is flashing.
2. Touch the pause key within 6 seconds.
- The previous settings are active again. Using the minute minder TIP! The minute minder is not connected to a cooking zone. The minute minder does not switch off a cooking zone. The hob is switched on and no power level has been set for any cooking zone.
2. Use the ‘+’ or ‘-’ key to set the desired time (from 1 minute to 9 hours and 59 minutes).
- The left position of the timer display shows the hours, the other positions the minutes.
- When the time is set, it will begin to countdown.
- The timer display will show the remaining time.
- The last 10 minutes will be displayed in minutes and seconds.
- The timer flashes and the alarm beeps after the set time has passed.
3. Touch the timer display to stop the alarm.
- The alarm stops automatically after 2 minutes. TIP!
- Touch the timer display and then touch the ‘-’ key to set the time to ‘0.00’ to switch off the minute minder before the time has passed.
- When the hob is switched off; touch the on/off key twice to switch off the minute minder before the time has passed.
Operation of the hobUsing the cooking timer TIP! The cooking timer is connected to a cooking zone. After the set time has elapsed, the cooking zone will switch off automatically. The hob is switched on and for at least one cooking zone a power level has been set.
1. Touch the cooking zone key of the desired cooking zone.
2. Touch the timer display.
- The timer symbol of the active cooking timer lights up brightly.
3. Use the ‘+’ or ‘-’ key to set the desired time (from 1 minute to 9 hours and 59 minutes).
- The left position of the timer display shows the hours, the other positions the minutes.
- When the time is set, it will begin to countdown and the timer symbol flashes slowly.
- The timer display will show the remaining time.
- The last 10 minutes will be displayed in minutes and seconds.
- The selected cooking zone will switch off automatically once the set time has elapsed.
- The timer flashes and the alarm beeps after the set time has passed.
4. Touch the timer display to stop the alarm.
- The alarm stops automatically after 2 minutes. TIP! All the cooking zones can have a cooking timer that has been set. The display will always show the time of the cooking zone with the shortest time remaining. Changing the pre-set cooking time The cooking time can be changed anytime during the operation.
1. Touch the relevant cooking zone key.
2. Touch the timer display.
3. Use the ‘+’ or ‘-’ key to change the time.
Checking the remaining cooking time
1. Touch the cooking zone key to select the zone of which you want to see the remaining time.
- A zone connected to the cooking timer is identified by a flashing timer symbol above the cooking zone display.
Operation of the hob• The timer will display the remaining time of the selected cooking zone.
- During the last 10 minutes of countdown, the remaining time will be displayed in minutes and seconds. Switching off the cooking timer If you want to switch off the cooking timer before the end of pre-set time:
1. Touch the cooking zone key to select the zone of which you want to switch off the cooking timer.
- A zone connected to the cooking timer is identified by a flashing timer symbol above the cooking zone display.
2. Touch the ‘-’ key(s) to set the time to ‘0.00’.
- The timer symbol is no longer brightly lit. Child lock To activate the child safety lock, the steps described must be completed within 10 seconds.
1. Switch on the hob.
2. Touch and hold any of the cooking zone keys for 3 seconds.
3. Release and slide your finger from 0 to 9 along the slide control.
- All displays show the symbol ‘L’. The hob is now locked. It prevents unintended switching on. After 20 seconds, the hob will witch off automatically. To deactivate the child safety lock, the steps described must be completed within 10 seconds.
1. Switch on the hob.
2. Touch and hold any of the cooking zone keys for 3 seconds.
3. Release and slide your finger from 9 to 0 along the slide control.
- The symbol L disappears in all displays; the child safety lock is now deactivated.
Operation of the hob3 sec. Locking function for rapid cleaning during cooking
1. Touch the lock key.
- The lock key lights up brightly; the settings of the hob are locked to allow rapid cleaning.
2. Touch the lock key again after the rapid cleaning to switch off the function.
Operation of the hobWARNING! By default, the automatic extraction mode is active; the key lights up more intensely. In automatic extraction mode the extraction level adjusts automatically to the use of the cooking zones. TIP! If the hob is switched off and is still hot (symbol H is visible), the extractor unit will operate in follow-up mode for another 15 minutes. Switch off the automatic extraction mode
1. Touch and hold the on/off key until you hear an audio signal.
- All displays light up; the induction hob is in standby mode.
- The cooking zones and the exraction unit have power level zero.
2. Touch the ‘Automatic extraction mode’ key.
- The ‘Automatic extraction mode’ key is now less brightly lit; the automatic extraction mode is switched off. Switch off the automatic extraction mode during cooking A cooking zone is operating (in this example level 8) and the automatic extraction mode is active (level 5).
1. Touch the ‘Automatic extraction mode’ key.
- The ‘Automatic extraction mode’ key is now less brightly lit. The extractor unit can now be set manually. Manually switch on the extractor unit
1. Switch on the hob.
2. Touch the extraction key.
- The display of the extractor unit lights up.
3. Set the extractor speed level within 3 seconds by touching the slide control (1 to 9).
Operating the extraction module• The extractor unit switches on with the extraction speed that is set.
- Set a higher or lower level with the slide control. Boost
1. Switch on the hob and set a power level (>2).
2. Touch the ‘Automatic extraction mode’ key to switch off the automatic extraction mode.
3. Touch the extraction key.
- The display of the extractor unit lights up.
4. Touch level P to select ‘Boost’.
- The extractor unit switches on at speed level P (Boost).
- ‘P’ shows on the display. Set a number of minutes delay time Use this function to switch off the extractor unit with a delay of a number of minutes. WARNING! The automatic extraction mode must be switched off.
1. Switch on the hob.
2. Touch the extraction key and set an extractor speed level.
- The timer symbol of the extractor unit lights up brightly.
4. Use the ‘+’ or ‘-’ key to set the desired delay time.
- Countdown starts automatically.
- The extractor unit switches off after the time that has been set. Saturation of the odour filter After 100 operating hours, the grease filter symbol is illuminated; it is necessary to perform maintenance of the grease filter (see ‘Maintenance/Cleaning the filters'). The grease filter saturation indication is always enabled. Saturation of the odour filter By default the odour filter saturation indication is deactivated (when the extraction is operating in ducted mode). Activate the odour filter saturation indication if the extraction unit is installed as a recirculation application. After 200 operating hours, a flashing ‘C’ will appear in the extractor unit display; it is necessary to perform maintenance of the odour filter (see ‘Maintenance/Cleaning the grid and filters'). Activation of the odour filter saturation indication
1. Touch the extraction key.
2. Again, touch and hold the extraction key for 5 seconds.
- The odour filter symbol ‘C’ lights up intensely for 1 second.
- Now the symbol ‘C’ is iluminated in the display when it is necessary to perform maintenance of the odour filter. Deactivation of the odour filter saturation indication
1. Touch the extraction key.
2. Again, touch and hold the extraction key for 5 seconds.
- The odour filter symbol ‘C’ blinks twices.
Operating the extraction moduleReset the memory of the filter saturation indication Reset the memory after replacing the grease filter and/or the odour filter.
1. Switch on the hob.
2. Touch and hold the key ‘Automatic extraction mode’ for 5 seconds.
- The grease filter symbol or the odour filter symbol will go off, and the memory starts counting over again.
Operating the extraction moduleTIP! The user menu enables the user to set the signals on the hob as desired. This concerns both audio (tone and volume) and visual signals.
1. Touch the on/off key twice within three seconds.
- The pause key is flashing.
2. Touch and hold the pause key.
3. Then, touch each cooking zone key clockwise (start with the cooking zone key on the front left).
4. Release pause key.
- 'U' is flashing alternately with a number between 2 and 7 on the cooking zone display on the rear left.
- The configuration value appears in the cooking zone display on the front left.
5. Touch the cooking zone key on the rear left and choose the correct number of the menu code
6. Touch the cooking zone key on the front left and select the correct value (see table).
7. Confirm the setting; touch and hold the on/off key until you hear an audio signal.
0 - 1Countdown animation (on or
0 - 1Pan detection (on or off)U6
User menuWARNING! Setting the power limiter should only be carried out by a registered and qualified installer. Please read the safety regulations and the installation instructions carefully. The hob is equipped with a power limiter. If the total power of operating cooking zones exceeds the maximum available amount of power, the power is automatically reduced. The display of the cooking zone who is being reduced in its power is first flashing; the level is then automatically reduced to the highest available power. The limiter is set at 7400 W by the factory, but it is possible to change it to 2800 W, 3500 W or 4500 W. Power limiter configuration Make sure there are no pots or pans on the hob before you start.
1. Disconnect the appliance from the main power supply by removing the power connector from
the socket, by removing the fuse or turning the circuit breaker off.
2. Reconnect the appliance to the power supply.
- The keep warm key is flashing.
- Perform, within 2 minutes after reconnecting the hob to the power supply, the following steps.
- Make sure all cooking zones are switched off.
3. Touch and hold the keep warm key.
4. Then, touch each cooking zone key counterclockwise (start with the cooking zone key on the
5. Release the keep warm key.
- 'C' is flashing alternately with '0' on the cooking zone display on the rear left.
- The configuration value appears in the cooking zone display on the front left.
6. Touch the cooking zone key on the rear left and choose '8' by using the slide control.
- 'C' is flashing alternately with '8' on the cooking zone display on the rear left.
Power limiter7. Touch the cooking zone key on the front left and select the power limitation wanted with the slide control (see table).
8. Then, touch and hold the On/off key until all the display segments disappear.
- The hob is now ready for use with the selected power limiter active. Setting of the power limiterSetting slide control 7400 W0 4500 W1 3500 W2 2800 W3
Power limiterCleaning glass top TIP! Activate the child lock before cleaning the hob. Daily cleaning
- Although food spills cannot burn into the glass, we nevertheless recommend you clean the hob immediately after use.
- For daily cleaning, a damp cloth with a mild cleaning agent is best.
- Dry off with kitchen paper or a dry tea towel. Stubborn stains
- Stubborn stains can also be removed with a mild cleaning agent, washing-up liquid, for example.
- Remove water circles and limescale with cleaning vinegar.
- Traces of metals (caused by sliding pans) can be difficult to remove. Special products are available for this.
- Use a glass scraper to remove food spills. Melted plastic and sugar are also best removed with a glass scraper. NOTE!
- Never use abrasives. These leave scratches in which dirt and limescale can accumulate.
- Never use anything sharp such as steel wool or scourers. Water tank It is recommended to check and empty the water collector every two weeks.
MaintenanceCleaning the grid and filters
1. Remove the grid with the filter from the extraction inlet.
2. Carefully slide the grease filter off the grid.
- Clean the grid with hot water and neutral soap; without using abrasive sponges (do not use detergents!). Do not wash the cast iron grid in a dishwasher.
- Clean the grease filter, when in use, at least every week (or when the filter saturation indication system indicates this necessity). This will maintain good performance of the extractor and prevent a potential fire hazard, caused by excessive grease build-up.
- Clean the grease filter with a non-aggressive detergents, preferably by hand or els in the dishwasher, which must be set to a low temperature and a short cycle.
MaintenanceCarbon filters (recirculation use) The carbon filters are located on both sides of the grease filter and on the underside of the grease filter. These filters are regenerable by washing and drying them well. To do this, follow the next procedure. The regenerable active carbon filter must be washed by hand with neutral cleaning products, or in the dishwasher at a maximum temperature of 65 °C (the washing should be done without any plates, dishes, cups, etc. in the machine). Do not use washing detergent. Remove excess water. Be careful to avoid damaging the filter. Place the filter in the oven to dry for at least 1 hour at a maximum temperature of 80 °C. After up to 3 years (or if the filtres are damaged), the filters will need to be replaced. WARNING! It is important that the grease filter and the regenerable active carbon filters are properly dried before installation.
MaintenanceGeneral NOTE! If you notice a crack in the glass top (however small), switch off the hob immediately and disconnect the power supply (remove the plug from the socket). Then contact the Service Department. Troubleshooting table If your hob does not work properly, it does not always mean that it is defective. Make sure to check the points mentioned below in the table, or visit our website for more information. SolutionPossible causeProblem Normal operation.This is the standard set-up routine. The display lights up when the hob is activated for the first time. Normal operation.The hob is cooling down.The fan runs on for several minutes after the hob has been switched off. This is normal and disappears after the hob has been used a few times. Ventilate the kitchen. The new appliance is heating up. A slight smell is noticeable the first few times the hob is used. Normal operation.This is caused by the capacity limiter on the front and back zones. A soft ticking sound can also occur at lower settings. You can hear a ticking sound in your hob. This is normal for certain pans, particularly at high settings. This is not harmful to the pans or the hob. This is caused by the energy flowing from the hob to the saucepan. The pans make noise while cooking. Use appropriate pans.The time that has been set for the timer has ended. You have switched on a cooking zone, but the display shows 'u'. Touch the left or right timer key to stop the alarm. The preset time has ended.A cooking zone suddenly stops working and you hear a signal. Check the fuses or the electric switch (if there is no plug). There is no power supply due to a defective cable or a faulty connection. The hob is not working and nothing appears in the display. After the hob has cooled down, cooking can be continued. Zone is overheated.Zone stops unintended and residual heat indicator is shown Check the electrical connections. The hob has been wrongly connected. A fuse blows as soon as the hob is switched on.
TroubleshootingSolutionPossible causeProblem Pull the plug out of the socket. Contact your installer. The ceramic glass plate broke. Please note! Do not throw a broken ceramic glass plate in the glass recycling bin but take this to the Municipality's waste recycling centre. SolutionPossible causeSymptomError code See chapter ‘Operation of the hob/Child safety lock’. Child safety lock is activated.L shows on the display.
It is necessary to perform maintenance of the odour filter (see ‘Maintenance/Cleaning the grid and filters). Saturation of the odour filter.C shows on the display of the extractor unit.
Clean the control panel.The control panel is dirty or has water on it. Er03 appears on display. Er03 Do not operate more than one key at the same time. You have pressed two or more keys at the same time. Let the hob cool down.Overheating.Er21 appears on display. ER21 Do not heat empty cookware.Excess temperature of the induction element. Empty cookware might have been used. E2 appears on display.
Remove any blockages and clean the extractor unit. Malfunction of the extractor unit. The extractor unit may be blocked. E8 appears on display.
In case of other error codes: please write down the error code and contact the service department. Table continued from last page
- Maximum speed (boost excluded) Information according to regulation (EU) 66/2014 Measurements according EN60350-2 / EN 30-2-1 HIDD074__EXModel identification ATAGTrademark Induction hob with integrated extractorType of hob 4Number of electric cooking zones and/or areas Induction cooking zones and cooking areas Heating technology For circular electric cooking zones: diameter of useful surface area per electric heated cooking zone in mm
Technical dataHIDD074__EXModel identification Energy consumption per cooking zone or area calculated per kg (EC electric cooking ) in Wh/kg 183.3Energy consumption of the hob, calculated per kg (EC electric hob ) in Wh/kg HIDD084__EXModel identification ATAGTrademark Induction hob with integrated extractorType of hob 4Number of electric cooking zones and/or areas Induction cooking zones and cooking areas Heating technology For circular electric cooking zones: diameter of useful surface area per electric heated cooking zone in mm Energy consumption per cooking zone or area calculated per kg (EC electric cooking ) in Wh/kg 183Energy consumption of the hob, calculated per kg (EC electric hob ) in Wh/kg Table continued from last page
Technical dataHIDD084__EVXModel identification ATAGTrademark Induction hob with integrated extractorType of hob 4Number of electric cooking zones and/or areas Induction cooking zones and cooking areas Heating technology For non-circular cooking zones or areas: length and width of useful surface area per electric heated cooking zone or area in mm Energy consumption per cooking zone or area calculated per kg (EC electric cooking ) in Wh/kg 192Energy consumption of the hob, calculated per kg (EC electric hob ) in Wh/kg
Technical dataDisposal of the appliance and packaging Sustainable materials have been used during the manufacture of this appliance. This appliance must be disposed of responsibly at the end of its service life. Ask your local authorities for more information about how to do this. The appliance packaging is recyclable. The following may have been used:
- CFC-free polystyrene (PS rigid foam). Dispose of these materials in a responsible manner and in accordance with government regulations. The product has been marked with a crossed-out dustbin symbol to remind you of the obligation to dispose of electrical household appliances separately. This means that the appliance may not be included with normal domestic refuse at the end of its service life. The appliance must be taken to a special municipal centre for separated waste collection or to a dealer providing this service. A separate collection of household appliances helps to prevent any potential negative impact on the environment and on human health caused by improper disposal. It ensures that the materials of which the appliance is composed can be recovered to obtain significant savings in energy and raw materials. NOTE! Please note! Do not throw a broken ceramic glass plate in the glass recycling bin but take this to the Municipality's waste recycling centre. Declaration of conformity We hereby declare that our products satisfy the applicable European directives, orders and regulations, as well as the requirements stated in the referenced standards.
Environmental aspects905384 The appliance identification card is located on the bottom of the appliance. Stick the appliance identification card here. www.atag.nl www.atag.be We reserve the right to make changes. -a1