DOM473 - Air Conditioning LIVOO - Free user manual and instructions
Find the device manual for free DOM473 LIVOO in PDF.

User questions about DOM473 LIVOO
0 question about this device. Answer the ones you know or ask your own.
Ask a new question about this device
Download the instructions for your Air Conditioning in PDF format for free! Find your manual DOM473 - LIVOO and take your electronic device back in hand. On this page are published all the documents necessary for the use of your device. DOM473 by LIVOO.
USER MANUAL DOM473 LIVOO
natural_image
White and black air conditioner unit with grid-patterned ventilation slots, labeled 'Livoo' (no additional text or symbols visible)Livoo
óeësòoõõ:ôv.â.0ôôôôô
natural_image
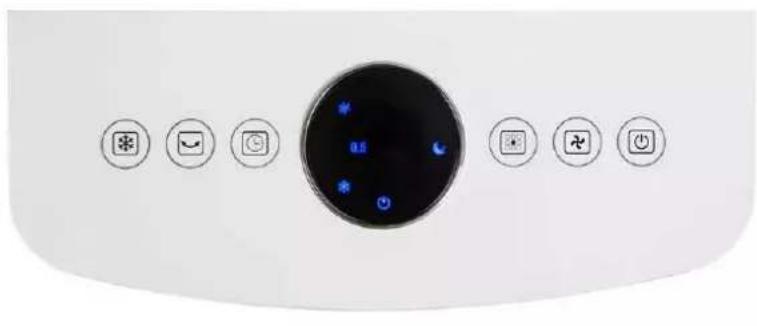
Front panel of a white appliance with eight circular buttons and a central display (no text or symbols visible)Figure 1
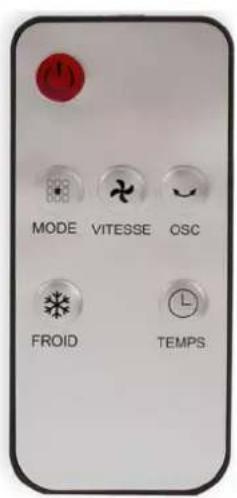
Figure 2
natural_image
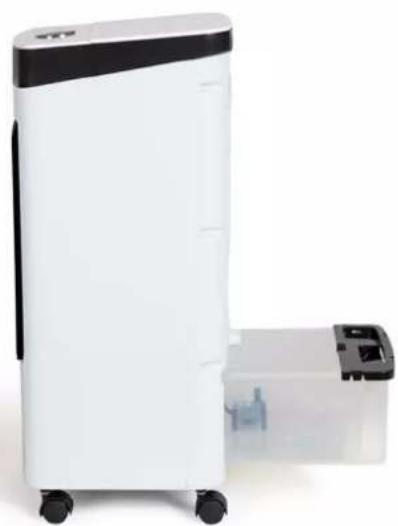
White and black portable air purifier with a smaller transparent container nearby (no visible text or symbols)Figure 3
natural_image
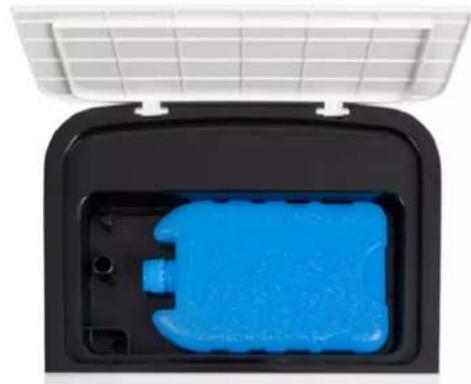
Interior view of a black plastic enclosure with a blue plastic housing, mounted on a white grid panel (no text or symbols visible)Figure 4

natural_image
Front view of a white industrial air purifier with hexagonal vented pattern and wheels (no text or symbols visible)Figure 5
natural_image
Symbol of a trash bin crossed with a diagonal line and a horizontal bar below (no text or labels)Thank you for choosing a Livoo product!
E' Ô
Livoo, your daily companion till social networks

@Lòvooô

@lòvoo_offòcd

@Lòvocô
Safety Instructions
Technical âpecifications
Voltage : 220-240V\~50Hz
Puissance : 80W
3 speeds : autonomy 6 to 8 „ours
Remote control: battery CR2025 included
65 dB max
Maximum air flow rate: 6m3/min
áse of the device
AãÃEBßBLY
Remove t,,e packaging carefully.
Place 4 w„eels to t„e „oles located at t„e base of t„e air cooler. Insert t„e w„eels tig„tly to t„e air cooler's body.
ÁÚLL TÓE TANÜ "ÚTÓ "ATEÕ (ÁÚÍáðE è)
"urn t„e water tank lock to t„e „horizontal position and remove t„e tank by 1/3 to fill it wit„ water t„en replace it and turn t„e lock to t„e vertical position.
Be careful of water level, it must be less than A'' level. Never go below the ÚN level.
ÁÕOZEN ÚCE BO" (ÁúÍáðE 4)
Use frozen ice box to get colder air. Fill t,em wit, water and put t,em in t,e freezer first. Once frozen, put one ice box in t,e top tank. You can add t,e second to t,e bottom tank or keep it in t,e freezer to replace t,e one in t,e top tank once it is no longer frozen.
"arningy
Please note that the water level in the lower tank must remain below the A'' level even after adding the ice box.
áãE (Áigure 1 and 2).
Note: you can use eit,er t,e control panel or t,e remote control.

ON/OÁÁ Button Plug in t„e appliance, you will „ear a sound, t„e indicator lig„t will lig„t up, press t„e ON/OFF button, t„e appliance will start at t„e lowest speed. Press t„e button again to switc„t„e device to standby.

peed Button t_n is button allows you to c_n ange t_ne speed of t_ne ventilation by linking t_ne 3 possible speeds: Low-Medium-Hig.

"ind button (BODE): sleep (nuit) and nature
Press t,,e button once.
T_ne nig, t mode is activated, t_ne corresponding indicator lig, t on, a gentle fan speed starts and stops successively. Press t_ne button a second time to activate t_ne nature mode. t_ne fan speed c, anges randomly to simulate t_ne wind. Press a t_nird time to stop t_ne nig, t & nature mode.

Cooler/humidifier button
W, en you press t, is button, t, e corresponding indicator lig, t on t, e display lig, ts up and t, e unit emits ,umidified air. T, e temperature of t, e diffused air will be cooled according to t, e temperature of t, e water in t, e unit. Press a second time to stop t, e function. T, is function does not work if t, e water level is under "MIN".

ãwing Button (OãC)
W, en you press t, is button, t, e oscillation function starts and t, e corresponding indicator lig, t on t, e display lig, ts up. Only t, e outer grill of t, e appliance oscillates. T, e two grids below t, e oscillating grid can be adjusted manually. Press a second time to stop t, e oscillation.

Timer button
W, en you press t, is button, t, e appliance starts and t, e "0.5H" indicator lig, t comes on. Press t, is button to select t, e desired operating time (maximum time: 8H).
T,,e display s,,ows times t,,at must be added up to obtain t,,e total operating time before t,,e device goes into standby.
Cleaning and maintenance
Cut off the power and unplug appliance before cleaning
1. Clean the paper filter block (Áigure 5) :
Pull out t,,e plug, unscrew back part and pull t,,e ,older of air filter, t,,en clean air filter wit,, soft brus,, or water.
úmportant:
ún order to avoid leak, filter must be installed smoothly.
2. Clean water tank(Áigure è):
Turn t_e water tank lock to t_e horizontal position and take out t_e tank to t_e maximum (about 1/3). Wipe t_e tank t_e en replace it and turn t_e lock to t_e vertical position.
4. Clean the housing:
Wipe off t,,e ,,ousing by neutral cleaner and soft clot,.

natural_image
Symbol of a trash bin crossed with no visible text or labelsCorrect disposal of the unit vElectrical and Electronic Equipment).
(Applicable in the European Union and the rest of Europe that have adopted separate collection systems countries). The European Directive 2012/19/EU on Waste Electrical and Electronic Equipment (WEEE), requires that old household electrical appliances must not be disposed of in the normal household waste stream. Old appliances must be collected separately in order to optimize the recovery and recycling of the materials they contain and reduce the impact on human health and the environment. The symbol of the crossed out dustbin is marked on all products to remind the obligations of separate collection. Consumers should contact their local authority or retailer for information concerning the correct disposal of their product.
• 'on contrüctuül illustrütion
- Product informütion is subject to c„ün–e wit„out prior notice.