X-Strike - Remote control toy Overmax - Free user manual and instructions
Find the device manual for free X-Strike Overmax in PDF.

User questions about X-Strike Overmax
0 question about this device. Answer the ones you know or ask your own.
Ask a new question about this device
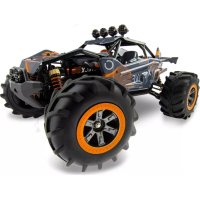
Download the instructions for your Remote control toy in PDF format for free! Find your manual X-Strike - Overmax and take your electronic device back in hand. On this page are published all the documents necessary for the use of your device. X-Strike by Overmax.
USER MANUAL X-Strike Overmax
natural_image
Orange and red X-STRIKE electric vehicle with large tires, no visible text or symbols on bodyCE
EN: The product complies with requirements of EU directives.
Pursuant to the Directive 2012/19/EU, this product is subject to selective collection. The product must not be disposed of along with domestic waste as it may pose a threat to the environment and human health. The worn-out product must be handed over to the electrics and electronics recycling center.
natural_image
Top-down view of a black and red toy car with four large tires (no visible text or symbols)1
natural_image
Close-up of a black USB connector with a cable, no visible text or symbols3
natural_image
Black handheld electronic device with control panel and ports (no visible text or symbols)2

natural_image
Close-up of a black-and-white checkered battery pack with a red and black cable attached (no text or symbols visible)4
A
5

B
natural_image
White power strip with black plug and cable, connected to a textured fabric item (no visible text or symbols)1
A
natural_image
Close-up of a black toy vehicle's internal components, including a red sensor and gear assembly (no visible text or symbols)B
natural_image
Close-up of a hand inserting wires into a device with visible circuitry and components (no text or symbols)2
3
4
5
natural_image
Illustration of a black remote control device and a red-and-white electric vehicle chassis, showing motion arrows (no text or symbols)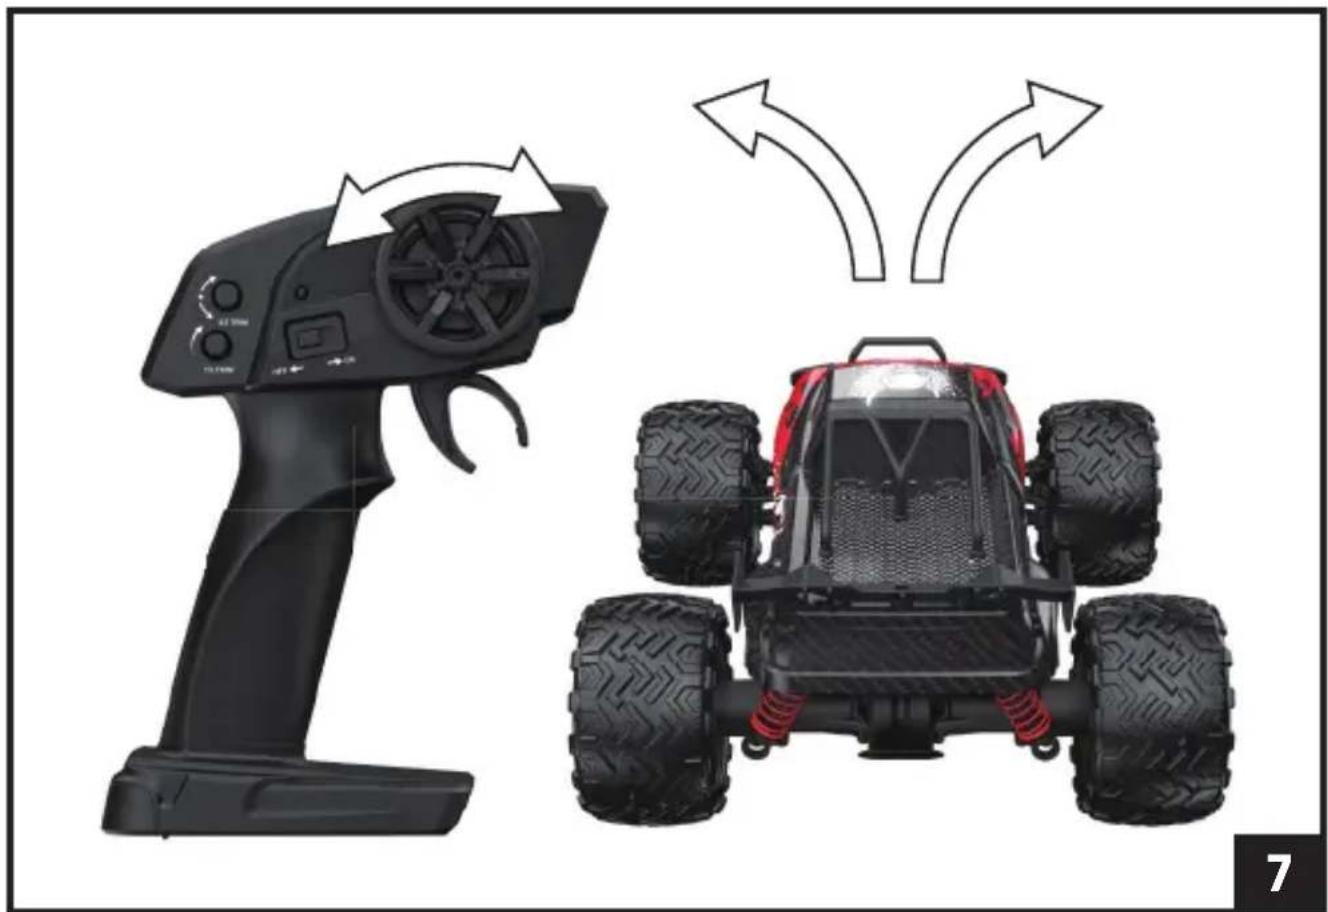
natural_image
Two black remote-controlled toy cars, one with control panel and two with red suspension rings, shown side by side (no text or symbols)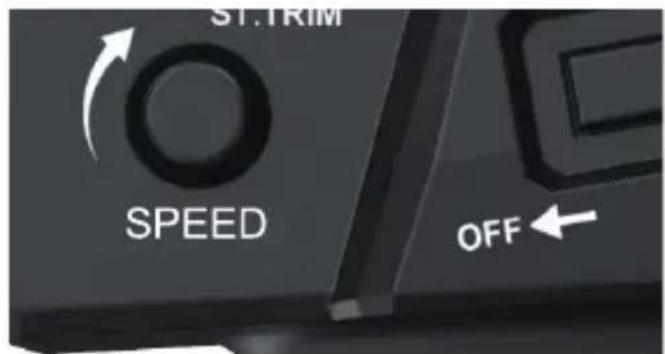
8
natural_image
Top-down view of a heavy-duty vehicle chassis showing front and rear tires with red brake pads (no text or symbols)9
PL
Wprowadzenie
Drogi Kliencie!
Thank you for placing trust in us and choosing Overmax.
Thanks to the use of high-quality materials and modern solutions, we provide you with a product perfect for everyday use. We are convinced that the product will satisfy your requirements as it has been manufactured with utmost care. Before you use the product, please read this manual carefully.
Should you have any remarks or questions concerning the product, please do not hesitate to contact us:
Please read this manual before operating the device to familiarise yourself with its functions and use it as intended.
- The device is intended for people over 14 years of age. Do not allow younger children to play with the device. Keep the device out of the reach of children.
- Children over 14 years of age may use the device under adult supervision.
- Only use the device on flat and hard surfaces. Avoid driving on sand, grass or other surfaces that may cause damage to the device. Do not allow contact with water.
- The device is not suitable for driving in traffic, in congested spaces, or in spaces where it is easy to cause a collision with pedestrians or other vehicles.
- As the device is controlled wirelessly, it is important to watch out for signal interference caused by other nearby devices.
- Do not touch the car engine after use, as the device heats up during driving and can reach high temperatures.
- Avoid using the device at night and in areas with limited visibility.
EN
-
Do not use the device in bad weather conditions such as thunderstorms or heavy rainfall.
-
Do not repair or modify the device. These operations can only be performed by an authorised service centre.
-
Do not use the device if you notice any damage.
-
Do not use the device if it starts to malfunction, gets excessively hot, has been in contact with water, has discolouration, bulges, makes unnatural sounds, smells or if other abnormal phenomena occur. In such situations, contact an authorised service centre.
-
Use the device away from heat sources, high temperatures, hot surfaces, direct sunlight, sources of spark, open flames, oils and sharp edges.
-
Do not use the device in an environment containing flammable, explosive or toxic substances.
-
Do not use chemicals to clean the device.
-
After each use, switch off the device and disconnect the battery.
-
If the device is not used for a long time, remove all batteries.
-
Use only the power cord provided to charge the rechargeable battery.
-
The rechargeable battery and power cable should be checked regularly for damage. Do not use damaged parts.
-
The device must not be connected to more than the recommended number of power sources.
-
Disposable batteries cannot be recharged.
-
The rechargeable batteries should only be charged under adult supervision.
-
The rechargeable battery must be removed from the device before charging.
-
Do not insert different types of batteries or new and used batteries.
-
The batteries must be inserted with the correct polarity.
-
The batteries that are dead should be removed from the device.
-
The power supply terminals should not be short-circuited.
-
Do not change the engine's electrical circuits yourself.
-
Before cleaning, switch off the device and remove the battery.
-
Do not misuse the device.
-
Do not place other objects on the device during use.
-
Store in a dry, cool and dark place.
- Keep the batteries and rechargeable batteries away from children.
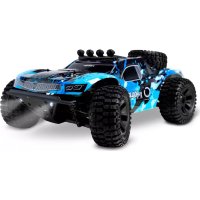
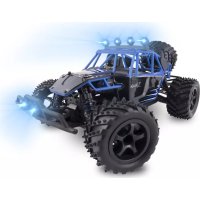
THE SET (FIG. A)
- The car
- The controller
- Power cable
- Rechargeable battery x 2
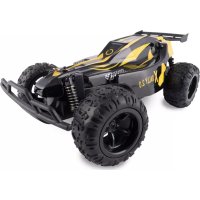
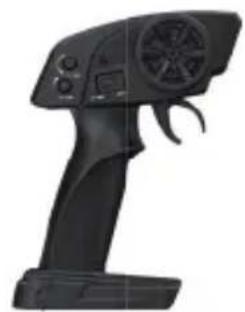
DIAGRAM OF THE DEVICE (FIG. B)
- Engine
- Battery compartment
- Indicator lights
- Throttle
- Control knob
- Steering controller
- Speed controller
- Controller on/off switch
- Indicator light
- On/off switch of the car
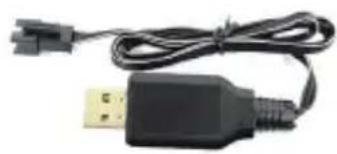
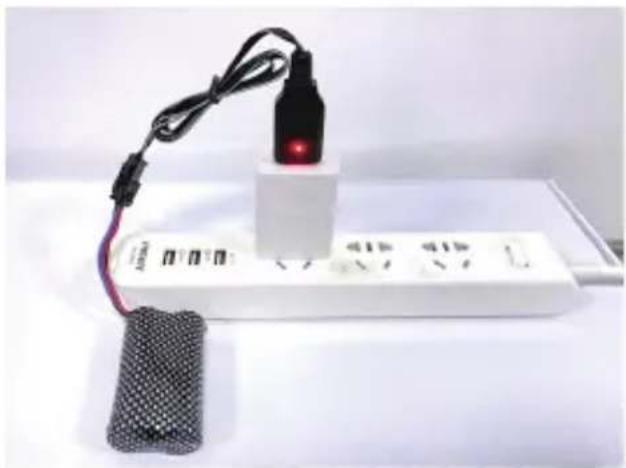
CHARGING THE CAR BATTERY
The rechargeable battery must be charged before using the car for the first time. To charge the rechargeable battery:
- Make sure the car is switched off. Remove the rechargeable battery. To remove the rechargeable battery, push in the connector and pull gently.
- Connect the charging cable to the USB socket on the computer or to the USB power adapter.
- Connect the rechargeable battery to the power cable. During charging, the green indicator light of the power cable will flash.
- When the rechargeable battery is fully charged, the green and red LEDs will be on continuously (fig. 1). Disconnect the battery from the power cable.
Note! After using the car, wait 10 - 15 minutes before charging the rechargeable
EN
battery. Do not leave the battery connected to the charge unattended. Recommended charger parameters: 5V 2A. Charging time is around 120 minutes. If the battery charge is low, the LVC (Low Voltage Cutoff) protection mode will be activated, preventing forward and reverse movement.
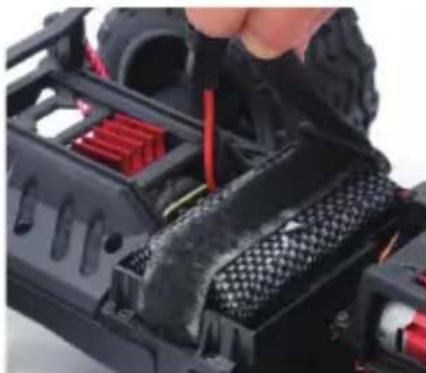
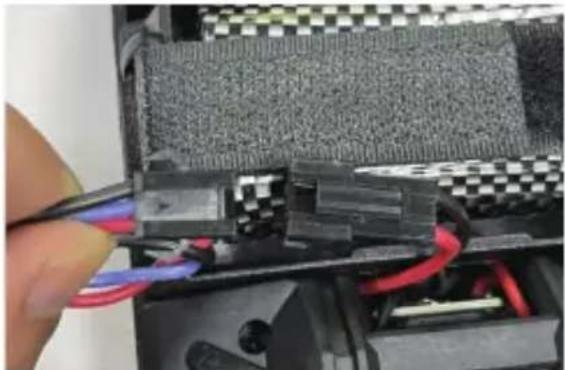
INSTALLATION OF THE BATTERY IN THE CAR
Place the charged battery in the battery compartment (2, Fig. B) in the car. Secure the battery using hook-and-loop fasteners (A, fig. 2). Connect the connectors (B, fig. 2).
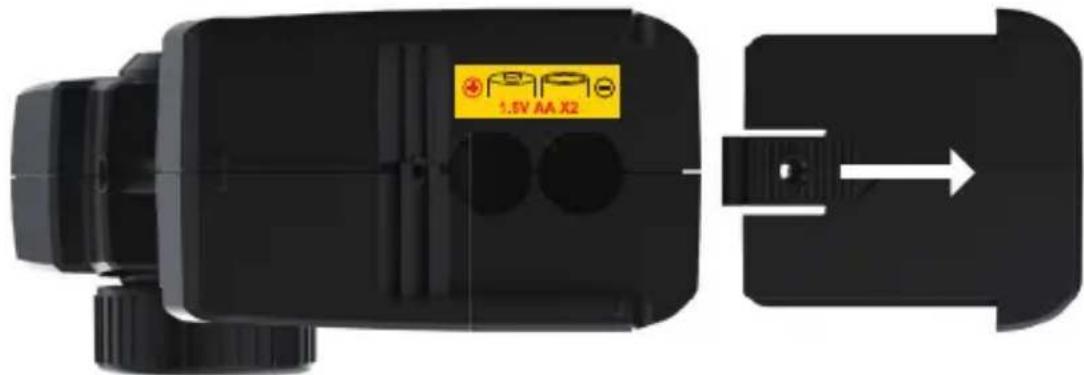
BATTERY INSTALLATION IN THE CONTROLLER
- Unscrew the battery cover screw with a screwdriver. Slide off the battery cover (fig. 3).
- Insert two AA 1.5 V batteries. Pay special attention to the polarity of the batteries.
- Place the cover back on. Tighten the screw with a screwdriver.
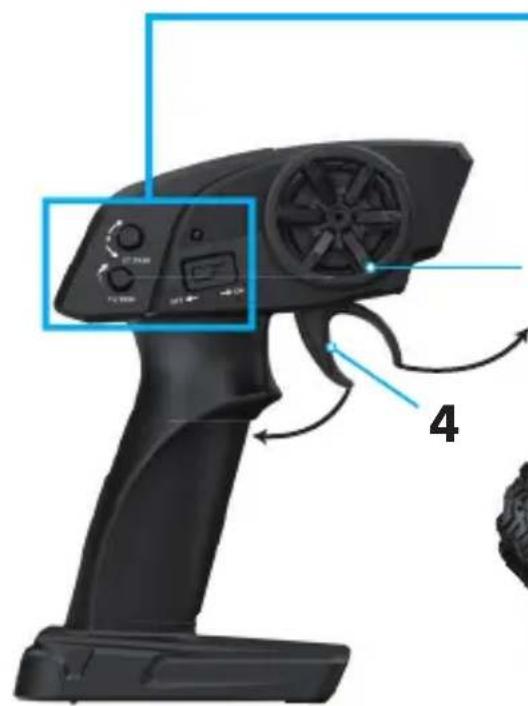
INSTRUCTION FOR USE
- Remove the protective film from the car before use.
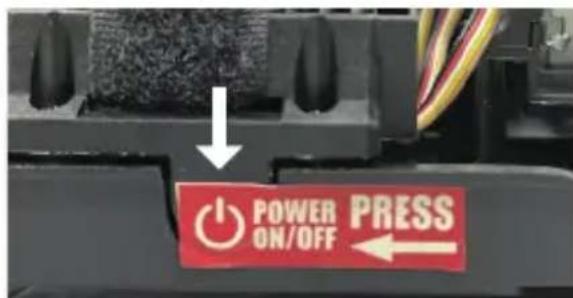
- Press the switch on the car (fig. 4).
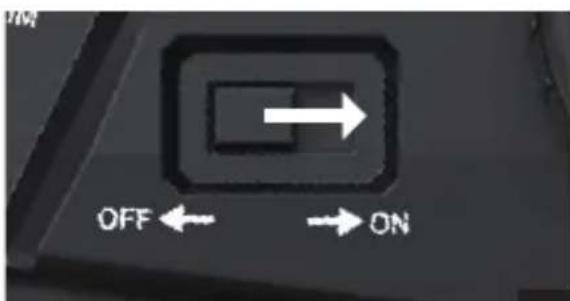
- Slide the controller switch to the ON position (fig. 5). The indicator lights on the controller and the car will start flashing. Wait about 15 seconds for the controller to connect to the car. The indicator lights will start to illuminate continuously. NOTE! Always switch on the car first, otherwise the controller may have trouble establishing a connection with the car.
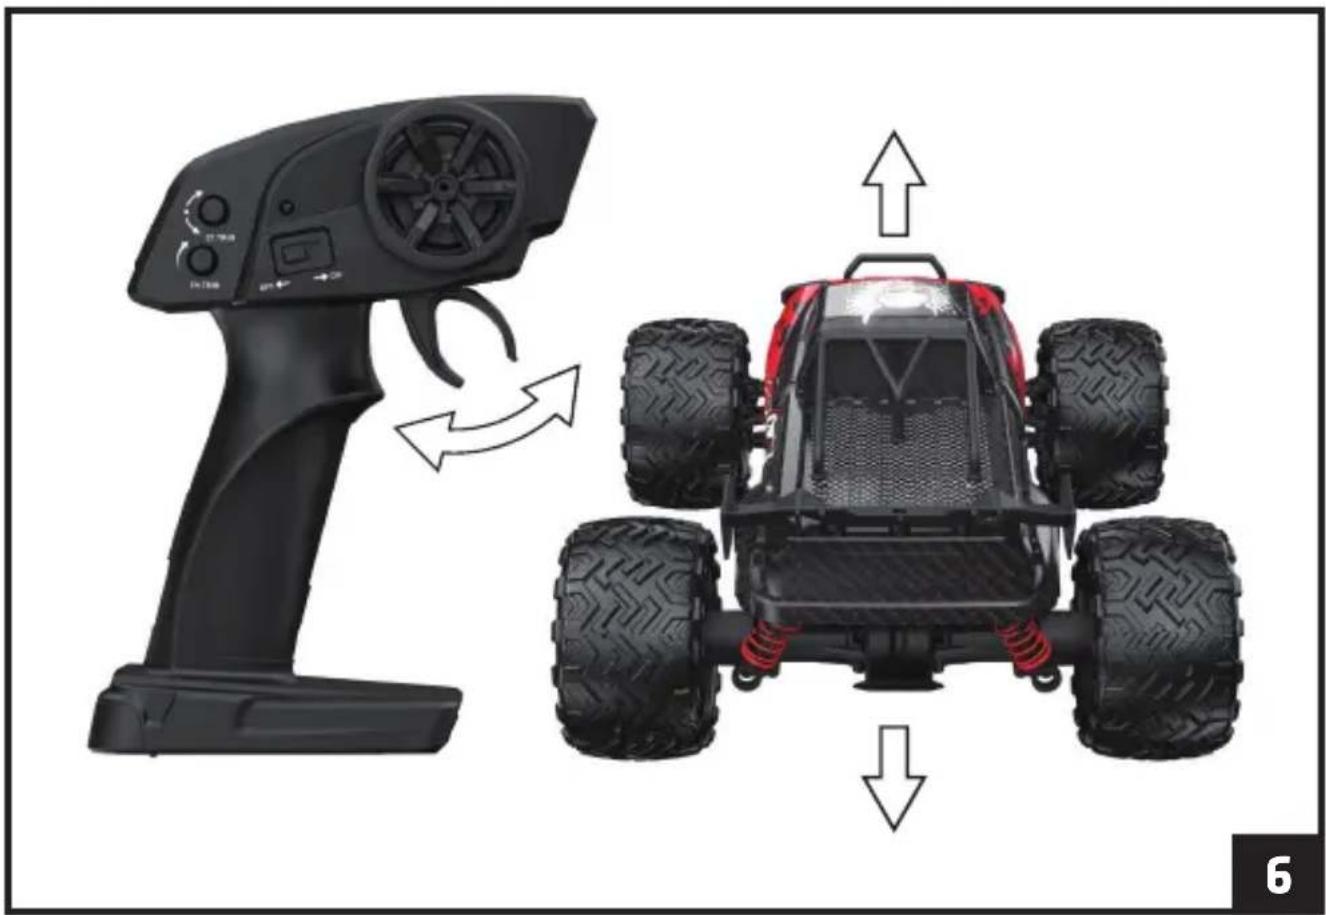
- To drive forward, move the throttle backwards. To brake and drive backwards, move the throttle forward (fig. 6).
- To change the direction of the car (left-right), use the control knob (fig. 7).
SPEED CONTROLLER
Use the speed controller to increase or decrease the speed of the car (fig. 8).
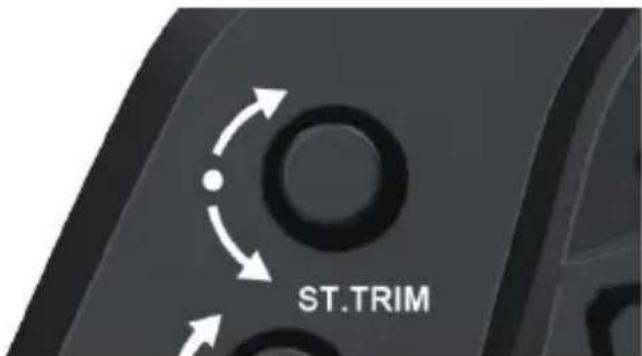
STEERING CONTROLLER
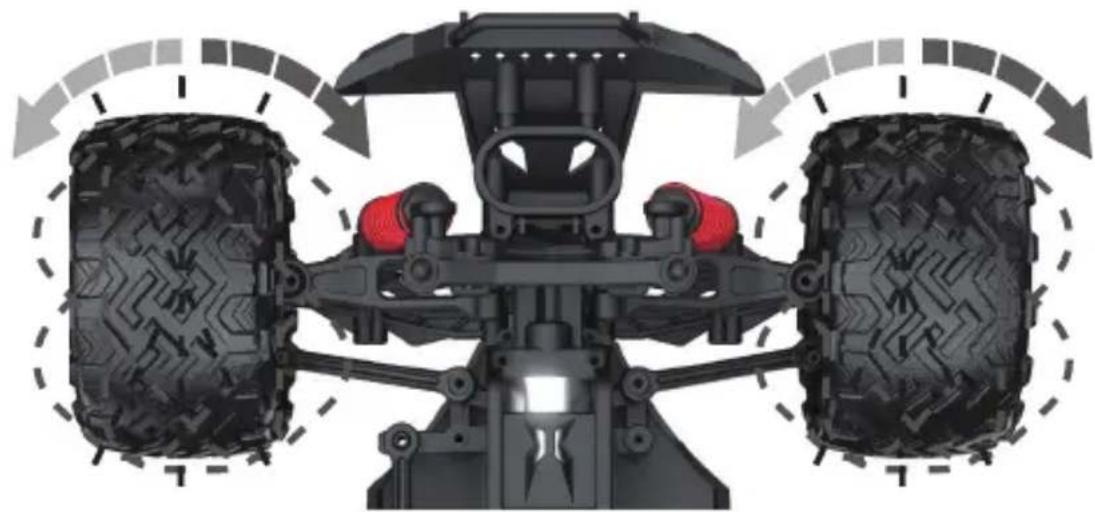
Use the steering controller to adjust the front wheel alignment (fig. 9). This adjustment should be made so that the front wheels are not in contact with the ground.
TROUBLESHOOTING
| Problem Cause Solution | ||
| The car does not connect to the controller / no control. | Low battery. Charge the car battery. Replace the batteries in the controller. | |
| Too much distance. Make sure the car and the controller are not too far apart. | ||
| Inability to drive straight/reverse or turn right/left. | Low battery charge. Charge the rechargeable battery (see: Charging the car battery). | |
| There was a short circuit as a result of being submerged in water. | Leave the car to dry completely. | |
| Incorrectly connected wires. | Make sure the cables are connected correctly. | |
| The rechargeable battery does not charge. | The output voltage of the charger is too high. | Ensure that the electrical parameters indicated on the device label match the electrical parameters of the charger. |
| The power supply cable is damaged. | Make sure the power cord is not damaged or contact the manufacturer to replace the cord. | |
EN
| Wheels turn spontaneously. | Using the steering controller when connecting the car to the controller. | Adjust the wheel alignment using the steering controller. |
| The indicator light of the controller flashes rapidly. | Problem connecting the car to the controller. | Make sure that the car and controller are not too far apart and that the batteries in the controller and car are changed/ charged. Switch the devices off and on, then try again. |
| The indicator light of the controller flashes slowly. | Low battery. Replace the batteries in the controller. |
CLEANING AND MAINTENANCE
- Before cleaning, switch off the device and remove the rechargeable battery and batteries.
- Clean the car and the controller with a damp cloth.
- Do not use strong chemicals to clean the device.
• After each use, clean the car of sand and dust and apply oil to all moving parts.
The photos are for illustrative purposes only, the actual appearance of the products may differ from those shown in the photos.
Einführung
| 2017 | 2016 | |
| Cost of sales | 3,459 | 3,380 |
| Gross margin | 1.9% | 1.8% |
| Net sales | 3,459 | 3,380 |

natural_image
Solid yellow background with no text, symbols, or discernible featuresOVERMAX
You • unlimited