
Classic II - Sewing machine Carina - Free user manual and instructions
Find the device manual for free Classic II Carina in PDF.

| Product type | Sewing machine |
| Brand | Carina |
| Model | Classic II |
| Power supply | 220-240 V, double insulation (models FC-2902C, FC-2902D) |
| Lighting | Integrated LED (class 1M, do not look directly with optical instruments) |
| Sewing speed | Variable, controlled by foot pedal |
| Stitch length | Adjustable from 0 to 4 mm (approximately, depending on button) |
| Stitch width (zigzag) | Adjustable from 0 to 5 mm (approximately) |
| Stitch types | Straight stitch, zigzag stitch, 4-step and 1-step buttonholes, overlock, button sewing, zipper foot, blind hem, patchwork, appliqué, embroidery/monogramming, darning, utility stitches (shell hem, gather, etc.) |
| Use | Household (not intended for professional or commercial use) |
| Included accessories | Zigzag foot, zipper foot, buttonhole foot, button sewing foot, overlock foot, blind hem foot, walking foot, darning plate, guide, needle set, bobbins, screwdriver, lubricant, protective cover, etc. |
| Foot pedal | Models FC-2902C, FC-2902D (220-240 V), with non-replaceable power cord |
| After-sales service | Crown Service Center c/o Teknihall GmbH, Breitefeld 15, DE-64839 Münster, Germany. Toll-free number: 00800 333 00 777, Email: carina-service-fr@teknihall.com |
| Spare parts | Use only original spare parts for double insulation |
| Cleaning and maintenance | Regularly clean the feed dogs with the provided brush. Lubricate the hook with special sewing machine oil (1-2 drops). Disconnect before any maintenance. |
| Safety | Double insulation; do not allow children under 8 to use without supervision; unplug when not in use; do not use with damaged cord; keep fingers away from moving parts. |
| Sound level | Less than 75 dB(A) during normal use |
| Country of origin | Germany (after-sales service) |
Frequently Asked Questions - Classic II Carina
User questions about Classic II Carina
0 question about this device. Answer the ones you know or ask your own.
Ask a new question about this device
Download the instructions for your Sewing machine in PDF format for free! Find your manual Classic II - Carina and take your electronic device back in hand. On this page are published all the documents necessary for the use of your device. Classic II by Carina.
USER MANUAL Classic II Carina
natural_image
Line drawing of a sewing machine with no text or symbolsCrown Service Center
c/o Teknihall GmbH
Breitefeld 15
DE-64839 Münster
DEUTSCHLAND
We congratulate you on your purchase of your sewing machiner. You have bought a quality product which has been made with great care and, if serviced right, will serve you well for many years.
Before using it for the first time, we ask you to read the manual at hand carefully, paying special attention to the safety instructions. Persons who are not familiar with this manual must not use the appliance.
In this manual, you will find everything there is to know about possible applications of your sewing machine. Should any questions remain unanswered, we kindly ask you to turn to your dealer.
We wish you much pleasure and great sewing successes!
Questions concerning machine, service and customer care
Toll-free
customer service number: 00800 333 00 777 carina-service-uk@teknihall.com
Service address: Crown Service Center c/o Teknihall GmbH Breitefeld 15 DE-64839 Münster GERMANY
EN IMPORTANT SAFETY INSTRUCTIONS
IMPORTANT
When using an electrical machine, basic safety precautions should always be followed, including the following:
Please read the instruction manual carefully before using this machine.
Keep the instruction manual at a suitable place with the machine and hand it over if you give the machine to a third party.
When the machine is not in use or left unattended, always disconnect the machine from the power supply system. Unplug it from the outlet.
DANGER!
To reduce the risk of electric shock:
- Never leave the machine unattended when it is plugged in.
- Always unplug this machine from the electric outlet immediately after using and before cleaning.
- LED RADIATION: Do not view directly with optical instruments Class.
WARNING!
To reduce the risk of burns, fire, electric shock or injury to persons:
- The machine mustn't be used by children under 8 or by people with reduced physical, sensory or mental capabilities or if there is a lack of experience and knowledge how to operate the machine. Unless they have been given instruction concerning the use of the machine and the involved risks by a person who is responsible for their safety.
- Do not use this machine as a toy. Close attention is necessary when this machine is used by children, near children or people with reduced sensation.
- Use this machine only for its intended use as described in this manual. Use only accessories recommended by the manufacturer.
- Children should be supervised to ensure that they do not play with the machine.
- Never operate this machine if it has a damaged cord or plug, if it is not working properly, if it has been dropped or damaged, or dropped into water. Return the machine to the nearest authorized dealer or service centre for examination, repair, electrical or mechanical adjustment.
- Never operate the machine with any air openings blocked. Keep ventilation openings of the machine and the foot control free from accumulation of lint, dust, and loose cloth.
-
Keep fingers away from all moving parts. Special care is required around the machine needle.
-
Always use the proper stitch plate. The wrong plate can cause needle breakage.
- Do not use bent needles.
- Do not pull or push the fabric while sewing. This can result in needle breakage.
- Switch the machine off ("O") when making any adjustments in the needle area, such as threading or changing the needle, threading the bobbin, or changing the presser foot, and the like.
- Always unplug the machine when performing cleaning or maintenance work such as replacing the sewing light or when making any other user maintenance adjustments mentioned in the instruction manual (disconnect the power plug). Cleaning and maintenance work must not be carried out by children without supervision.
- Never drop or insert any object into any openings.
- Use this machine only in dry and protected areas. Never operate the machine in a damp or wet environment.
- Do not operate the machine where aerosol spray products are being used or where oxygen is being administered.
- To disconnect, turn the power switch to ("O")(off), then remove the plug from the outlet. Do not unplug by pulling the cord, instead grasp the plug to pull it from the outlet.
- If the supply cord of the foot control is damaged, the foot control must be replaced by manufacturer or service support.
- Never place anything on the foot control.
- The machine may only be used in combination with a foot control of the type KD-1902, FC-1902 (110-120V area) / KD-2902, FC-2902A, FC-2902C, FC-2902D (220-240V area) / 4C-316B (110-125V area) / 4C-316C (127V area) / 4C-326C (220V area) / 4C-326G (230V area) / 4C-336G (220-240V area).
- The sound pressure level during normal operation is lower than 75dB(A).
- This machine is provided with double insulation (except U.S.A/Canada). Use only identical replacement parts. See instructions for Servicing of double-insulated products.
SERVICING OF DOUBLEINSULATED PRODUCTS
In a double-insulated product, two systems of insulation are provided instead of grounding. No grounding means is provided on a double-insulated product nor should a means for grounding be added to the product. Servicing a double-insulated product requires extreme care and knowledge of the system and should only be done by qualified.
service personnel. Replacement parts for a double-insulated product must be identical to those parts in the product. A double insulated product is marked with the words "DOUBLE INSULATION" or "DOUBLE INSULATED".
The symbol □ may also be marked on the product.
SAVE THESE INSTRUCTIONS!

Attention!
- This machine is intended for household use only. If used intensively or commercially, regular cleaning and especially attentive care is required.
- Signs of wear and tear owing to intensive or commercial use are not covered automatically, even if they occur within the warranty period. The decision on how to deal with any such cases rests with the local authorised servicing staff.

Note:
If the machine is stored in a cold room, it should be brought to a warm room about one hour before use.
SAVE THESE INSTRUCTIONS!
All rights reserved
For technical and product improvement reasons, the machine's features, parts and accessory are subject to unannounced changes and alterations at any time. The accessory included can differ from country to country.
CORRECT USE
Danger! Electric shock due to humidity The sewing machine must only be stored and used in dry rooms.
- Humidity and dampness may cause an electric shock.
Danger! Eye injuries due to a broken needle
- Only soft, flexible textiles may be sewn.
- The machine is not designed for sewing materials such as thick, hard or inflexible leather, tarpaulins, canvas, etc.; the needle may break.
- The needle can break if the material is not transported by the motor and is instead pushed or held back by the user.
Danger! Needle-prick injuries if operated accidentally
- The machine may only be used by careful adults.
- Children from 8 years and persons with restricted abilities may only use the machine after thorough instruction and under constant supervision. They must have understood dangers with regard of the use of the machine.
- Children from 8 years and persons with restricted abilities may only do the maintenance and cleaning of the machine after thorough instruction and under constant supervision.
- Never leave an operational machine in areas to which children have access. It must be avoided that children play with the machine.
- The main switch must be turned off or power plug must be disconnected for all preparation or configuration tasks.
Danger! Risk of injury due to defects or modifications.
- The machine must not be modified.
- Repairs must be carried out by the technical service. Damage, modifications, or the use of non-original accessories can lead to injuries.
- Defective machines must no longer be used.
- Defective power cords must be replaced by original spare part.
Danger! Unsuitable installation sites (workplaces) can result in accidents.
- The machine must only be operated on a stable surface.
- Shaky, unstable or untidy workplaces can cause the machine to fall down or cause needle-prick injuries.
Danger! Persons without knowledge of these operating instructions may injure themselves or damage the sewing machine.
- Only use this sewing machine if you have a basic knowledge of how to use sewing machines.
Danger! Needle-prick injuries may occur if you do not pay attention.
- Take time, ensure the workplace is tidy and guide the material calmly through the machine without using force.
Caution! This machine is designed for use in a private home. The machine is not approved for professional or commercial use.
DE Inhaltsliste
Machine preparation....30
Sewing table 30
Connecting machine to power source 32
Adjusting presser foot pressure 34
Presser foot lifter....36
Changing the presser foot 38
Winding the bobbin 40
Inserting bobbin 42
Inserting the needle 44
Threading the upper thread 46
Automatic needle threader....48
Thread tension....50
Raising the bobbin thread....52
Stitch selection....54
Stitch width dial & stitch length dial....56
Sewing....58
Sewing straight stitch....58
Securing a seam (beginning and ending the seam) .....60
Blind hem / lingerie stitch....62
Overlock stitches 64
Sewing on buttons 66
Sew 4-step buttonholes 70
Sew 1-step buttonholes 72
Buttonhole on stretch fabrics 74
Jeans support 76
Zippers....78
Sewing with the hemmer foot 80
3-step zig-zag 82
Triple straight / zigzag....84
Smocking stitch....86
Darning 88
Practical stitches....90
Quilting....92
Patch work 94
Applique....96
Walking foot 98
Monogramming and embroidery....100
Maintenance 104
Matching needle/fabric/thread....108
Trouble shooting guide 112
FR Résumé Machine
- Thread tension dial
- Thread take-up lever
- Presser foot pressure adjustment
- Thread cutter
- Presser foot
- Stitch plate
- Sewing table and accessory box
- Reverse sewing lever
- Bobbin winder stopper
- Stitch width dial (Carina Classic II)
- Stitch length dial
- Stitch selector dial
- One step buttonhole lever (Carina Classic II)
- Automatic threader
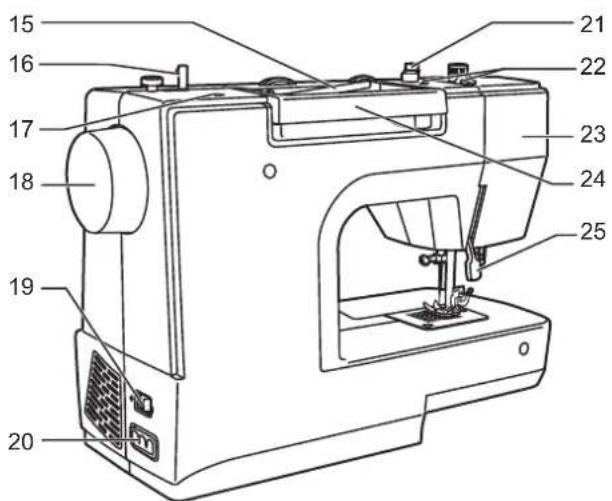
- Horizontal spool pin
- Bobbin winder spindle
- Hole for second spool pin
- Handwheel
- Power switch
- Main plug socket
- Bobbin thread guide
- Upper thread guide
- Face plate
- Handle
- Presser foot lifter
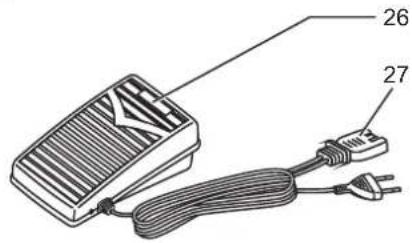
- Foot control
- Power cord
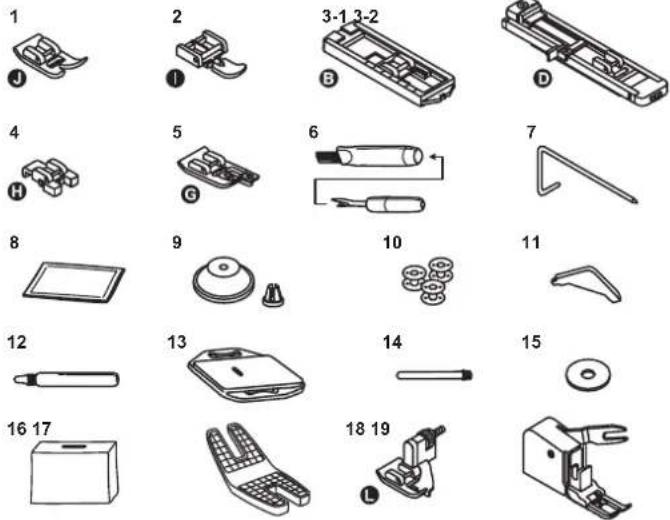


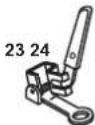


DE Zubehör
Accessories are stored inside the accessory box.
Standard
-
Zig zag foot
-
Zipper foot
3-1. Buttonhole foot (Carina Power & Stretch II)
3-2.Buttonhole foot with slide (Carina Classic II)
-
Button-sew-on foot
-
Overlock foot (Carina Power & Stretch II)
-
Brush & seam ripper
-
Right seam guide
-
Needle set
-
Spool holder small & large
-
Bobbins
-
L Screwdriver
-
Oiler
-
Darning plate
-
Spool pin long V
-
Spool pin felt
-
Dust cover
-
Jeans support(Carina Power & Stretch II)
-
Blindstitch foot (Carina Classic II)
-
Walking foot (Carina Classic II)
Optional
-
Embroidery foot
-
Hemmer foot
-
Cording foot
-
Darning- / Embroidery foot
-
Gathering foot
-
Quilting foot
* Optional accessories are not supplied with this machine; they are however available as special accessories from your local dealer.
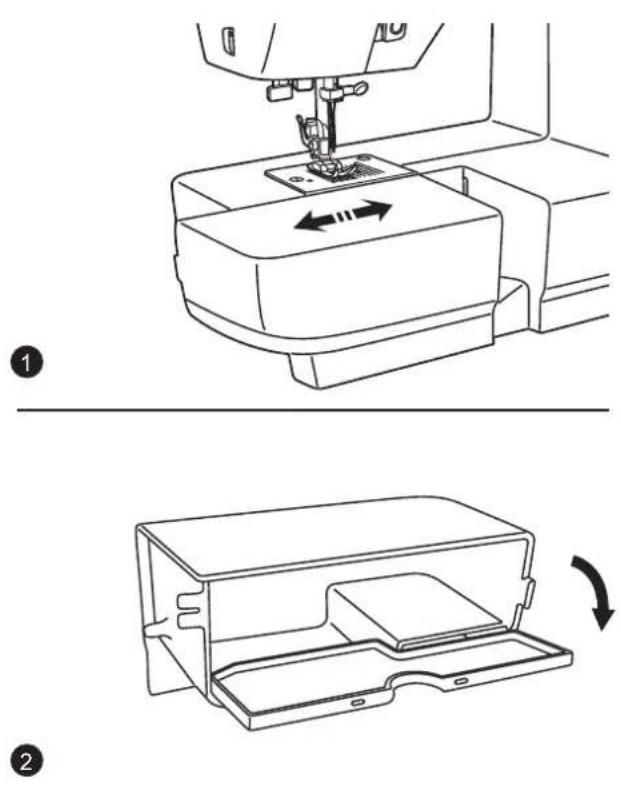
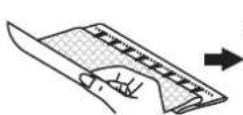
DE Nähtisch
-
Keep the snap-in sewing table horizontal, and push it in the direction of the arrow.
-
The inside of the snap-in sewing table can be utilized as an accessory box.
natural_image
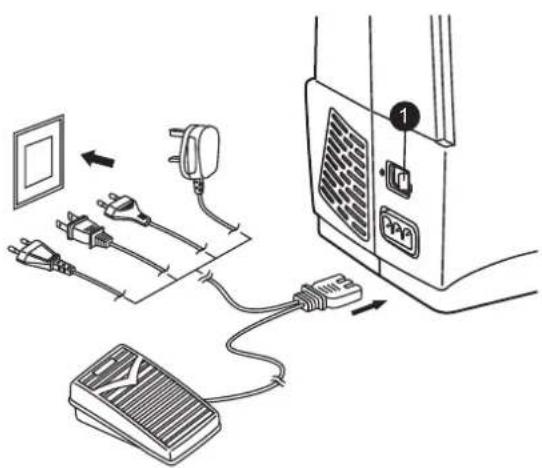
Line drawing of a shoe being adjusted for size, showing the sole and side view (no text or symbols)EN Connecting machine to power source
Attention:
Unplug power cord when machine is not in use.
Consult a qualified electrician if in doubt of how to connect machine to power source.
Connect the machine to a power source as illustrated.
Sewing light
- Press main switch to "I" for power and light.
Foot control
- Foot control pedal regulates the sewing speed.
natural_image
Line drawing of a hand pressing down on a battery with directional arrows indicating rotation (no text or symbols)
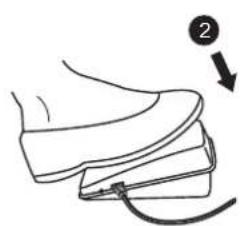
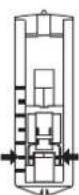
EN Adjusting presser foot pressure
Standard presser foot pressure set at "2".
The presser foot pressure of the machine has been pre-set and no need for change is required unless sewing particular type of fabric (light-or-heavy weight).
If you do need to adjust the presser foot pressure, turn the presser adjusting screw by ones finger.
For sewing very thin fabric, loosen the pressure by turning the screw counterclockwise to move the screw upward and the pressure decreases. If you keep turning the screw, it could be taken out. By that time, just turn the screw clockwise, it can be locked back and readjust the pressure.
For heavy fabric, tighten the pressure by turning the screw clockwise to move the screw downward and the pressure increases.
Once the screw cannot be turned any further, it has reached the bottom, please do not turn any more.
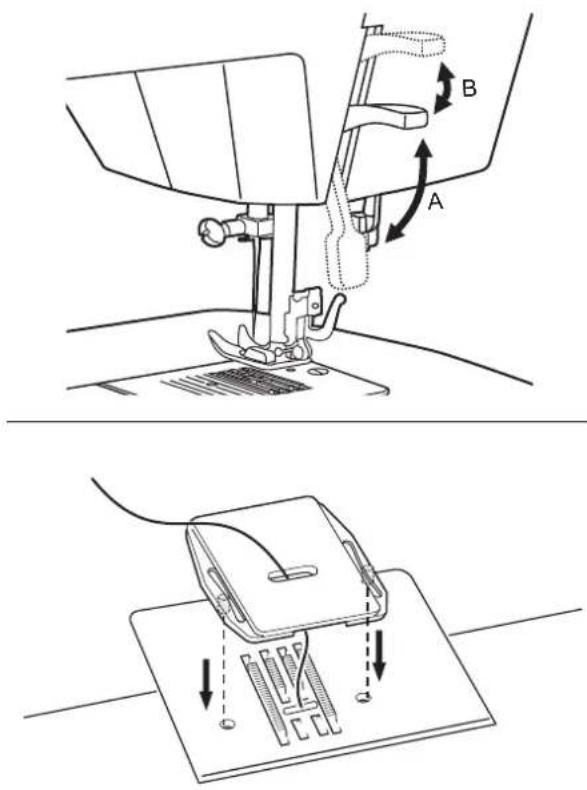

Nähfu hebelß
The presser foot lifter raises and lowers your presser foot. (A)
When sewing several layers or thick fabrics, the presser foot can be raised a second stage for easy positioning of the work. (B)
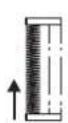
For certain types of work, (e.g. darning or free-hand embroidery), the darning plate must be used.
Install the darning plate as illustrated.
For normal sewing, remove the darning plate.
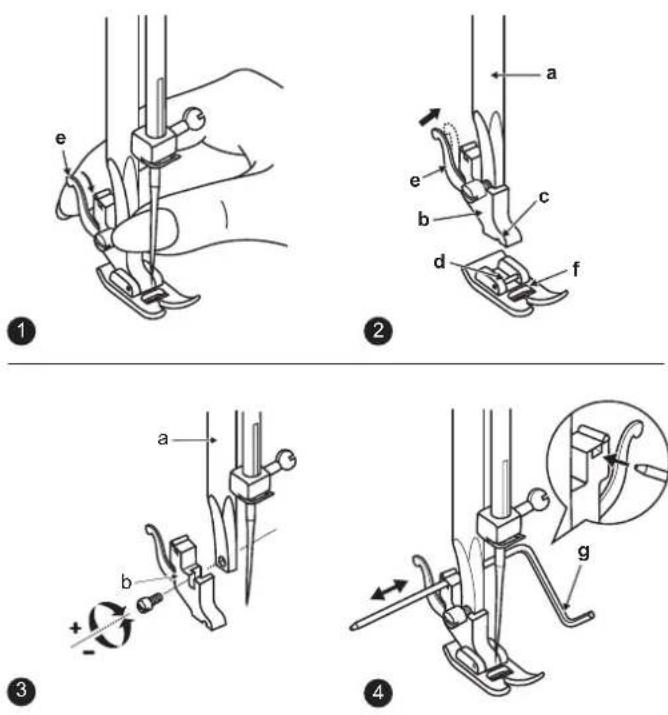

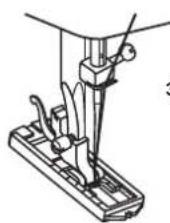
EN Changing the presser foot
Attention:
Turn power switch to off ("O")!
1. Removing the presser foot
Raise the presser foot using the presser foot lifter.
Raise the lever (e) and the foot disengages.
2. Attaching the presser foot
Lower the presser foot holder (b) using the presser foot lifter, until the cut-out (c) is directly above the pin (d).
The presser foot (f) will engage automatically.
3. Removing and Attaching the presser foot shank
Raise the presser clamp (a) with the presser foot lifter.
Removing and Attaching the presser foot shank (b) as illustrated.
4. Attaching the Seam guide right
Attach the seam guide right (g) in the slot as illustrated. Adjust as needed for hems, pleats, quilting, etc.
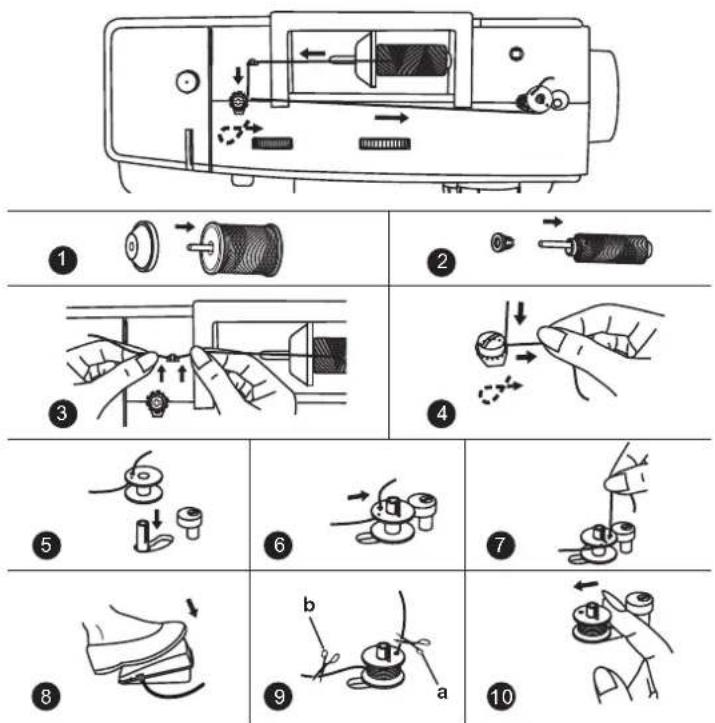
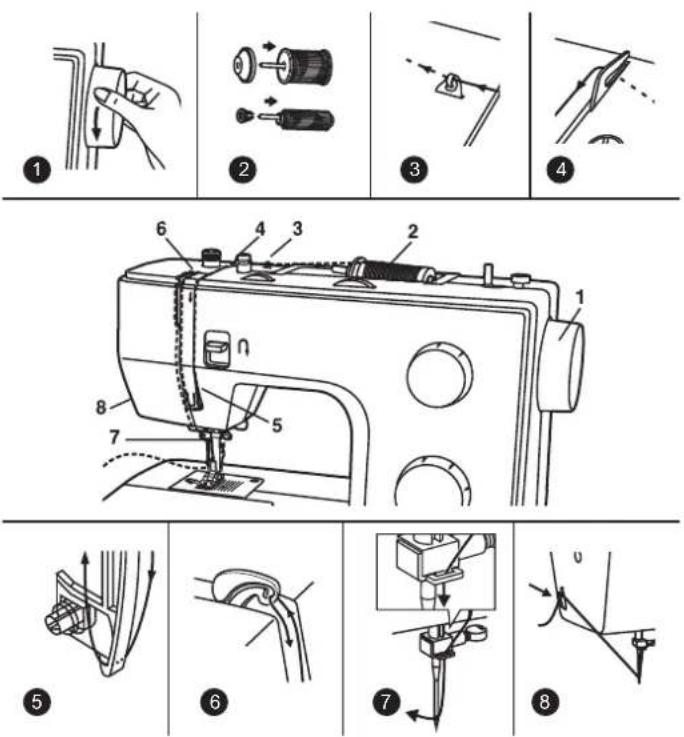
EN Winding the bobbin
1/2. Place thread and corresponding spool holder onto spool pin.
3. Snap thread into thread guide.
4. Wind thread clockwise around bobbin winder tension discs.
5. Thread bobbin as illustrated and place on spindle.
6. Push bobbin winder spindle to right.
7. Hold thread end.
8. Step on foot control.
9. Release the pedal after a few turns. Release the thread and cut as close as possible to the bobbin (a). Press the pedal again. Once the spool is full, it rotates slowly. Release the pedal and cut thread (b).
10. Push bobbin winder spindle to left and remove.
Please Note:
When the bobbin winder spindle is in "bobbin winding" position, the machine will not sew and the hand wheel will not turn. To start sewing, push the bobbin winder spindle to the left (sewing position).
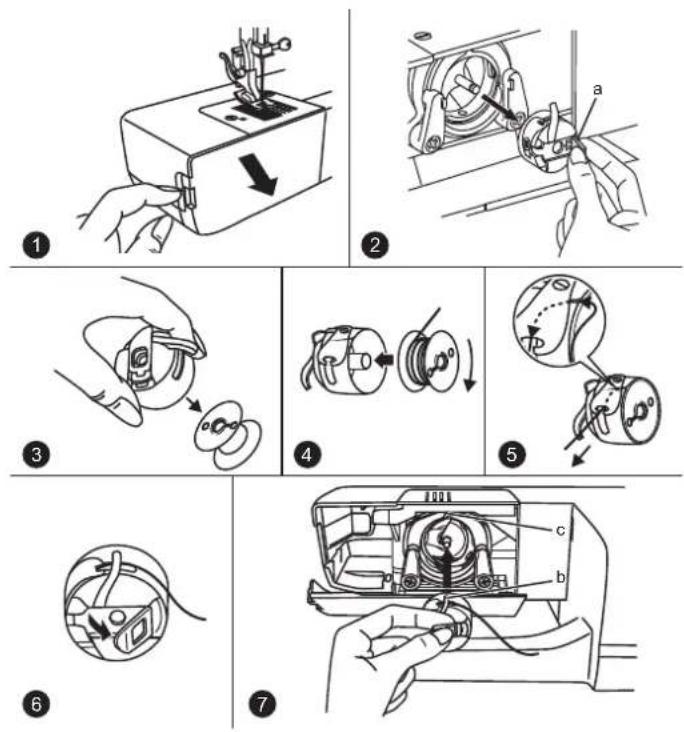

Spule einlegen
Achtung:
Turn power switch to off ("O") before inserting or removing the bobbin.
When inserting or removing the bobbin, the needle must be fully raised.
- Remove the sewing table, then open the hinged cover.
- Byththaibgedin case latch (a).
- Remove the bobbin of the bobbin case.
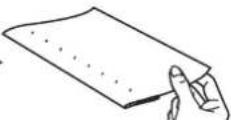
- Hold the bobbin case with one hand. Insert the bobbin so that the thread runs in a clockwise direction (arrow).
- Pull the thread through the slit and under the finger. Leave a 6 inch tail of thread.
- Hold the bobbin case by the hinged latch.
- Make sure the bobbin case finger (b) fits into the notch (c) at the top of the race as shown.
Note:
If the bobbin case is not properly placed back into the machine, it will fall out of the shuttle immediately after starting to sew.
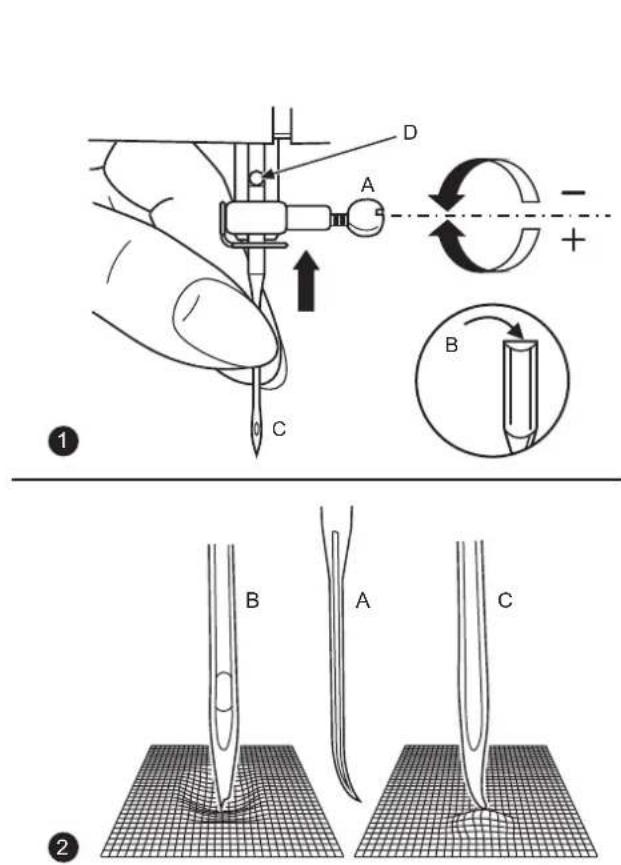

Nadel einsetzen
Achtung:
Inserting the needle
Attention:
Turn power switch to off ("O") before inserting or removing the needle.
- Change the needle regularly, especially if it is showing signs of wear and causing problems.
Insert the needle as illustrated as follows:
A. Loosen the needle clamp screw and tighten again after inserting the new needle.
B. The flat side of the shaft should be towards the back.
C/D. Insert the needle as far up as it will go.
- Needles must be in perfect condition.
Problems can occur with:
A. Bent needles
B. Damaged points
C. Blunt needles
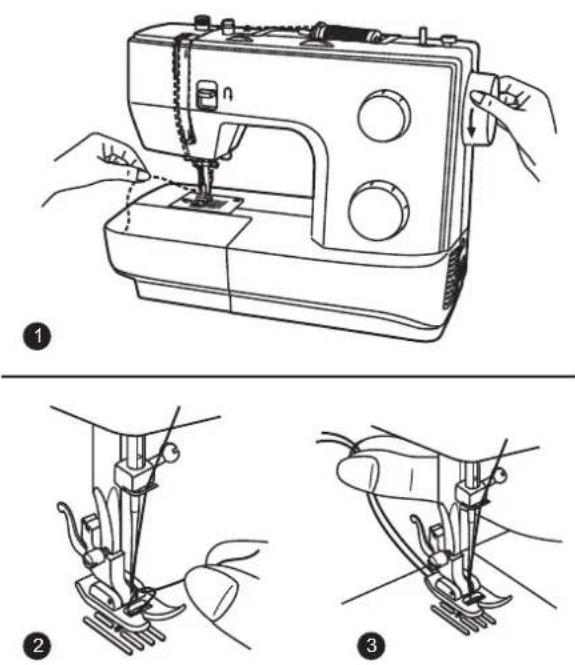
EN Threading the upper thread
This is a simple operation but it is important to carry out correctly as by not doing so several sewing problems could result.
- Start by raising the needle to its highest point, and continue turning the handwheel counterclockwise until the needle just slightly begins to descend. Raise the presser foot to release the tension discs.
Note: For safety, it is strongly suggested you turn off the power before threading.
-
Lift up the spool pin. Place the spool of thread on the holder with the thread coming off the spool as shown. For small thread spools, place small side of spool holder next to spool.
-
Draw thread from spool through the upper thread guide.
-
Pulling thread through pre-tension spring as illustrated.
-
Thread tension module by leading thread down right channel and up left channel. During this process it is helpful to hold the thread between the spool and thread guide
-
At the top of this movement pass thread from right to left through the slotted eye of the take-up lever and then downwards again.
-
Now pass thread behind the thin wire needle clamp guide and then down to the needle which should be threaded from front to back.
-
Pull about 6-8 inches of thread to the rear beyond the needle eye. Trim thread to length with built-in thread cutter.
Note:
If your sewing machine is equipped with the factory installed optional automatic needle threader, instructions for use can be found on page 47
DE Nadeleinfädler
Achtung:
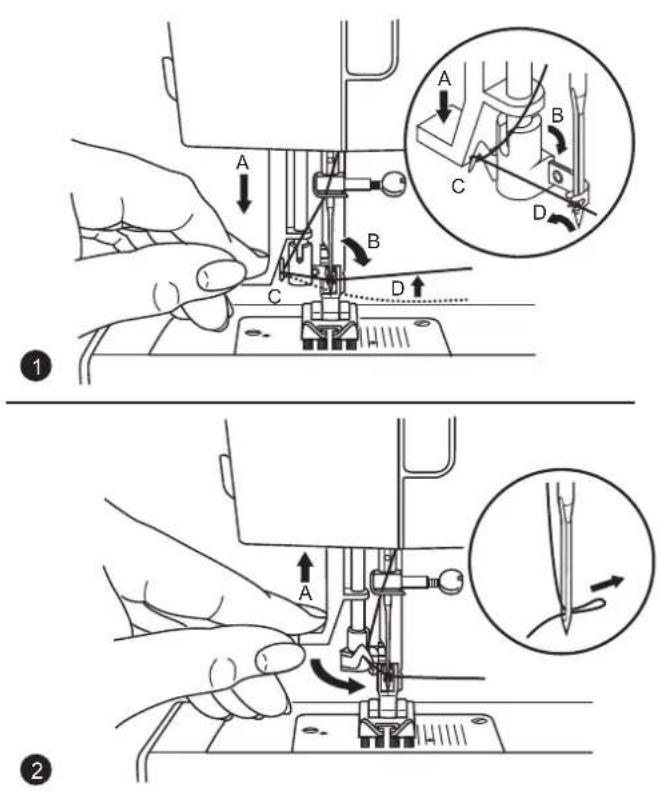
EN Automatic needle threader
Attention:
Turn power switch to off ("O")!
- Raise the needle to its highest position.
- Press lever (A) down as far as it will go.
- The threader automatically swings to the threading position (B).
- Pass thread around thread guide (C).
- Pass the thread in front of the needle around the hook (D) from bottom to top.
- Release lever (A).
- Pull the thread through the needle eye.
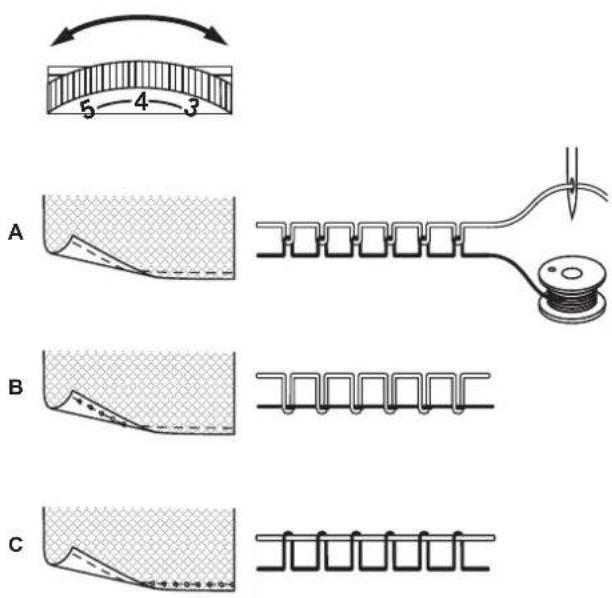
Basic upper thread tension setting: "4".
To increase the tension, turn the dial to the next higher number. To reduce the tension, turn the dial to the next lower number.
A. Normal thread tension
B. Upper thread tension too loose
C. Upper thread tension too tight

EN Raising the bobbin thread
- Hold the upper thread with the left hand.
Turn the handwheel towards you (counterclockwise) lowering, and then raising the needle.
Note:
If it is difficult to raise the bobbin thread, check to make sure the thread is not trapped by the hinged cover or the sewing table.
-
Gently pull on the upper thread to bring the bobbin thread up through the stitch plate hole.
-
Lay both threads to the back under the presser foot.
Carina Power & Stretch II
natural_image
Line drawing of a sewing machine (no text or symbols)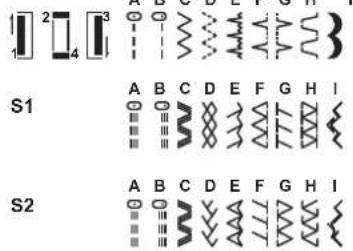
Carina Classic II
natural_image
Line drawing of a sewing machine (no text or symbols)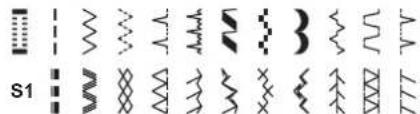
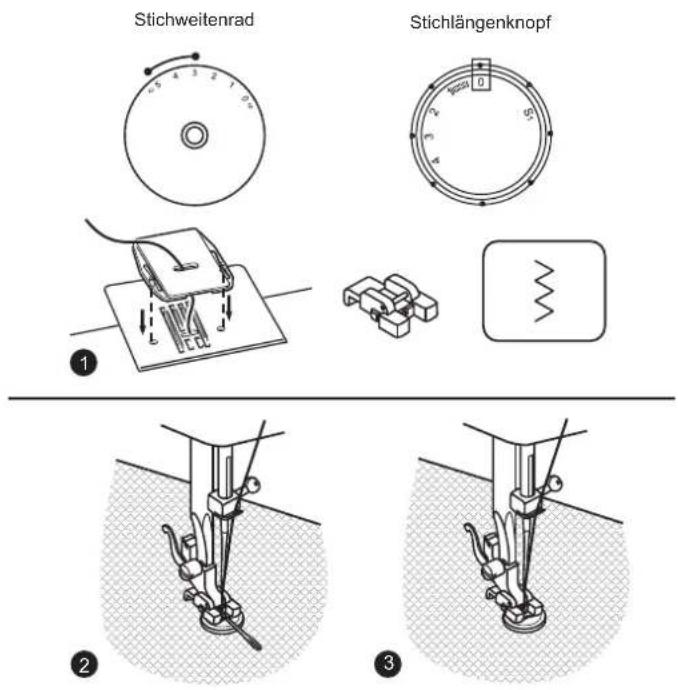
Raise the needle to its highest position.
Then turn the stitch selector dial to set the desired stitch pattern at the setting mark.
For straightpostitch " "
1
or " | " with the stitch selector dial.
Adjust the stitch length with the stitch length dial.
For zigzlegt stitteln " "
\~
with the stitch selector dial. Adjust the stitch length and stitch width according to the fabric being used.
To obtain the other patterns, turn the stitch length dial to "S1" or "S2"
depending on your model, select the pattern desired with stitch selector dial, and adjust the stitch width with the stitch width dial.
Please consult the following stitch patterns chart on the left side.
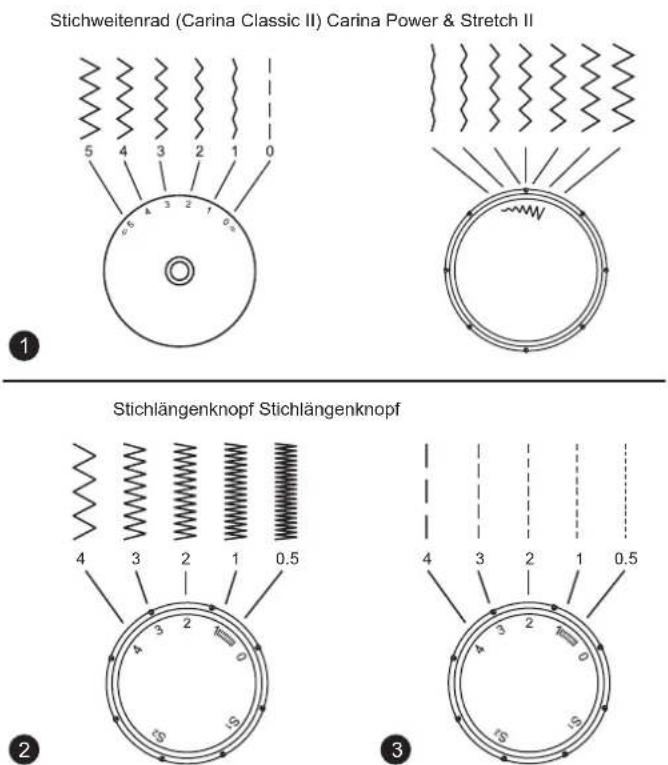

EN Stitch width dial & stitch length dial
- Function of stitch width dial Use the pattern selector dial to adjust the stitch width. (Carina Classic II)
- Function of stitch length dial while zig-zag stitching Set the stitch selector dial to zig-zag. The density of zig-zag stitches increase as the setting of stitch length dial approaches "0". Neat zig-zag stitches are usually achieved at "2.5" or below.
- Function of stitch length dial for straight stitching For straight stitch sewing, turn the stitch selector dial to the straight stitch setting. Turn the stitch length dial, and the length of the individual stitches will decrease as the dial approaches "0". The length of the individual stitches will increase as the dial approaches "4". Generally speaking, use a longer stitch length when sewing heavier weight fabrics or when using a thicker needle or thread. Use a shorter stitch length when sewing lighter weight fabrics or when using a finer needle or thread.
1
natural_image
Line drawing of a sewing machine needle stitching fabric (no text or symbols)3
natural_image
Line drawing of a sewing machine needle stitching fabric (no text or symbols)
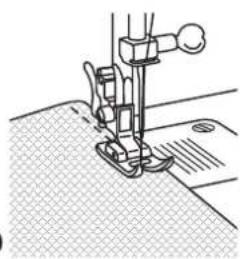
EN Sewing straight stitch
- To begin sewing, set the machine for straight stitch.
- Place the fabric under the presser foot with the fabric edge lined up with the desired seam guide line on the stitch plate.
- Lower the presser foot lifter, and then step on the foot controller to start sewing.
DE Nähte fixieren
Anfang der Naht
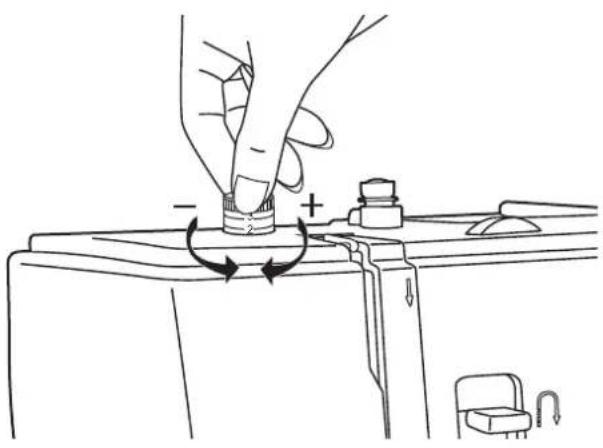
EN Securing a seam (beginning and ending the seam)
Beginning the seam
Place fabric approximately 1cm (1/2") inward from the outer edge under the presser foot. Press the reverse sewing lever (A) while sewing backwards up to the fabric edge.
1. End of seam
At the end of seam, press down the reverse sewing lever (A). Sew a few reverse stitches. Release the lever and the machine will sew forwards again.
2. Removing the work
Turn the handwheel towards to bring the thread take up lever to its highest position, raise the presser foot and remove the work towards the back.
3. Cutting the thread
Cut both threads with the thread cutter (B) located on the left rear side of the face plate.
natural_image
Mechanical assembly diagram showing a lever mechanism with a numbered label (2), no readable text or symbols present.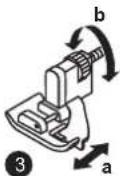

Blindsaum / Lingeriestich
For hems, curtains, trousers, skirts, etc. Blind hem for stretch fabrics. Blind hem/ lingerie for firm fabrics. Set the machine as illustrated.
Note:
It takes practice to sew blind hems. Always make a sewing test first.
- Fold the fabric as illustrated with the wrong side uppermost.
- Place the fabric under the foot. Turn the handwheel forwards by hand until the needle swings fully to the left. It should just pierce the fold of the fabric. If it does not, adjust the stitch width accordingly.
- Adjust the guide (a) by turning the knob (b) so that the guide just rests against the fold.
Sew slowly, by pressing the foot control lightly guiding the fabric along the edge of the guide.
Please Note:
You will find "S2" marking on the stitch length dial of model Carina Power & Stretch II additional.
natural_image
Line drawing of a sewing machine needle stitching fabric (no text or symbols)
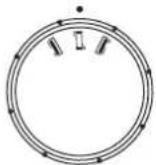
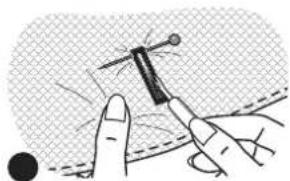
Overlockstich
Seams, neatening, visible hems. Turn stitch length dial to "S1" or "S2" depending on the model. The stitch width can be adjusted to suit the fabric.
Stretch overlock!"
For fine knits, jerseys, neck edges, ribbing. (1)
Double overlock stitch "
For fine knits, handknits, seams. (2)
All overlock stitches are suitable for sewing and neatening edges and visible seams in one operation. When neatening, the needle should just go over the edge of the fabric.
ttention:A
Use new needles or ball point needles or stretch needle!
Carina Power & Stretch II

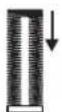
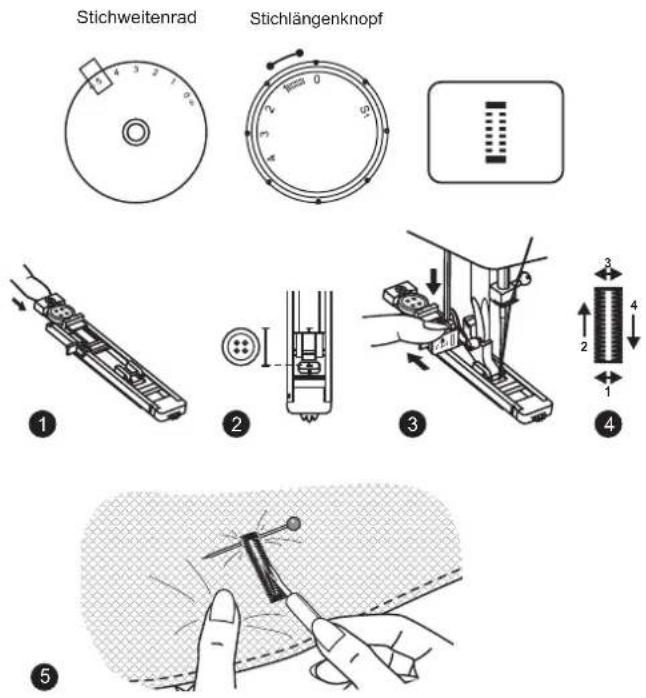
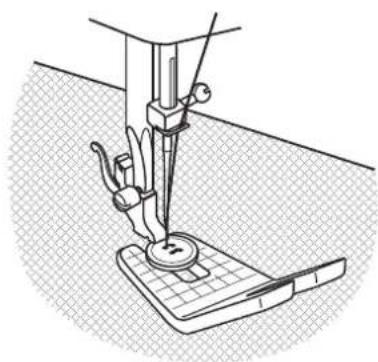
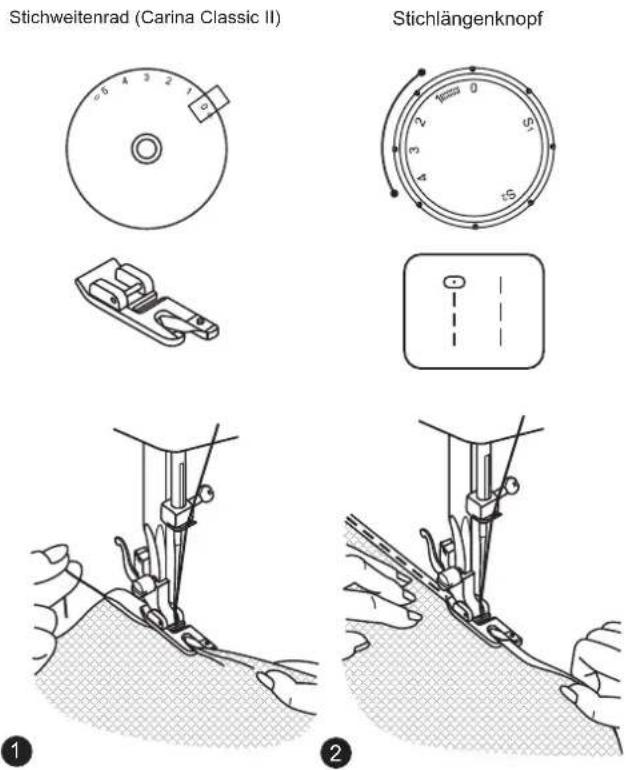
EN Sewing on buttons
- Install the darning plate.
Change presser foot to button-sew-on foot.
Position the work under the foot. Place the button on the marked position and lower the foot.
- Set the stitch selector dial on " " and sew a few securing stitches.
- Select zig-zag stitch with a stitch width according to the distance between the two holes of the button. Turn the handwheel to check if the needle goes into the right and left hole of the button without any obstruction. Slowly sew on the button with about 10 stitches.
-
Select stitch " " and finish the sewing on button by sewing a few securing stitches.
-
If a shank is required, place a darning needle on top of the button and sew.
- For buttons with 4 holes, sew through the front two holes first, push work forward and then sew through the back two holes as described.
Please note:
You will find "S2" marking on the stitch length dial of model Carina Power & Stretch II additional.
Carina Classic II
EN Sewing on buttons
- Install the darning plate.
Change presser foot to button-sew-on foot.
Position the work under the foot. Place the button on the marked position and lower the foot. - Set the stitch selector dial on " | " and sew a few securing stitches.
- Set the stitch selector dial on zig-zag stitch " 35 " and adjust the stitch width to 3 - 5 according to the distance between the two holes of the button. Turn the handwheel to check if the needle goes into the right and left hole of the button without any obstruction. Slowly sew on the button with about 10 stitches.
-
Select stitch " | " and finish the sewing on button with sewing a few securing stitches.
-
If a shank is required, place a darning needle on top of the button and sew.
-
For buttons with 4 holes, sew through the front two holes first, push work forward and then sew through the back two holes as described.
Carina Power & Stretch II
Carina Power & Stretch II
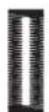
Stichlängenknopf
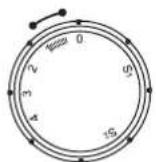
3mm

(a)
(b)
1

5
●
●
natural_image
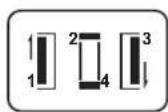
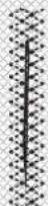
Illustration of a hand holding a small mechanical component, with no visible text or symbols- Take off the zig zag foot and attach the buttonhole foot.
- Measure diameter and thickness of button and add 3 mm (1/8") for bar tacks; mark buttonhole size on fabric. (a)
- Place fabric under the foot, so that mark on the buttonhole foot lines up with the marking on the fabric. Lower the foot, so that the center line of the fabric buttonhole comes to the center of the foot hole. (b)
Adjust the stitch length dial in the "###" range to set stitch density.
Note: density varies according to the fabric. Always sew a test buttonhole.
- Select "☐" and sew the left side of the buttonhole.
- Select " ", " on stitch selector dial and sew a few bar tacks.
- Select " [ ] " and sew the right side of the buttonhole.
- Select the same pattern as in "☐" and sew the back bar tack.
- Use seam ripper and cut buttonhole open from both ends towards the middle.
Tips :
- Slightly reduce upper thread tension to produce better results.
- Use a stabilizer for fine or stretchy fabrics.
Please note:
You will find "S2" marking on the stitch length dial of model Carina Power & Stretch II additional.
Carina Classic II
It is suggested that you always sew a test buttonhole on a sample of your fabric. The fabric should be stabilized especially when sewing thin and stretch fabrics.
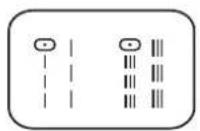
Making a Buttonhole
Using tailor's chalk, mark the position of the buttonhole on the fabric.
Attach the buttonhole foot and set the stitch selector dial to "☐".
Set stitch length dial to "==". Set the stitch width at "5". The width however may need to be adjusted according to the project, sew a test first to determine this.
- Open the button plate and insert the button.
- Lower the presser foot aligning the marks on foot with the marks on the fabric. (The front bar tack will be sewn first.)
- Lower the buttonhole lever and gently push it back. While lightly holding the upper thread, start the machine.
- Buttonhole stitching is done in the order. Stop the machine when the buttonhole cycle has completed.
- Use seam ripper and cut buttonhole open from both ends towards the middle.
Carina Power & Stretch II Carina Classic II
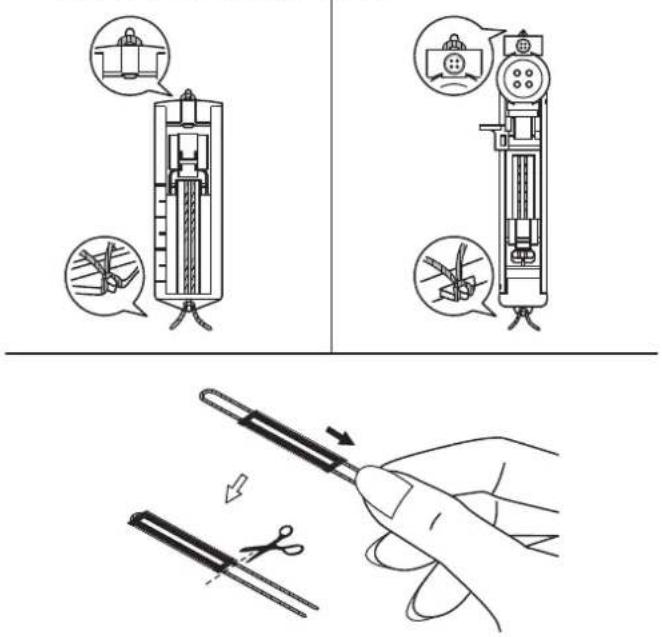
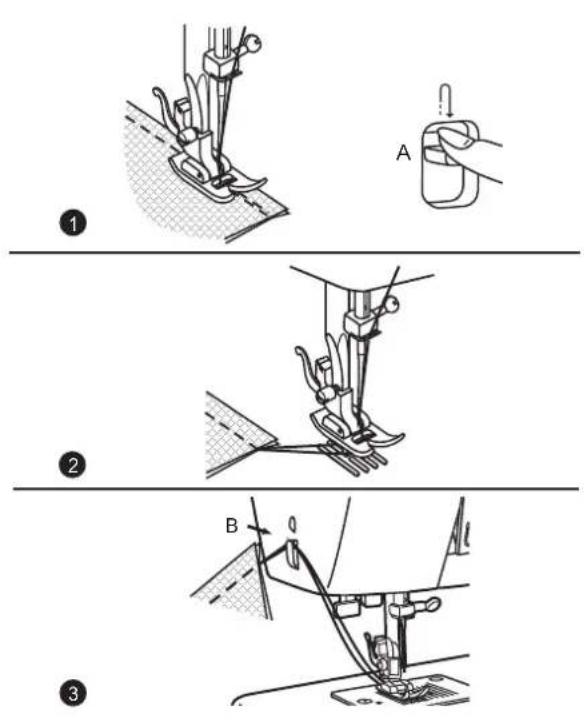
When sewing buttonholes on stretch fabric, hook heavy thread or cord under the buttonhole foot as shown.
- Attach the buttonhole foot and hook the gimp thread onto the back of the presser foot.
- Bring the two gimp thread ends to the front of the foot and insert them into the grooves, then temporarily tie them there.
- Lower the presser foot and start sewing.
- Set the stitch width to match the diameter of the gimp thread.
- Once sewing is completed, pull the gimp thread gently to remove any slack, then trim off any excess.
natural_image
Line drawing of a sewing machine needle stitching fabric (no text or symbols)1
natural_image
Line drawing of a sewing machine needle stitching fabric (no text or symbols)2

Kappnahtplatte
- For overstitching thick seams. Sew up until the thick area and then leave the needle in the fabric. Next, raise the sewing foot and lay the Jeans support under the sewing foot. Once you have reached the end of the thick area, the removable foot will be pulled. The Jeans support has two different possible sizes. We recommend you use the appropriate side of the foot which corresponds to the desired seam size.
- In addition, you can sew buttons with a shank with the help of the compensating foot.
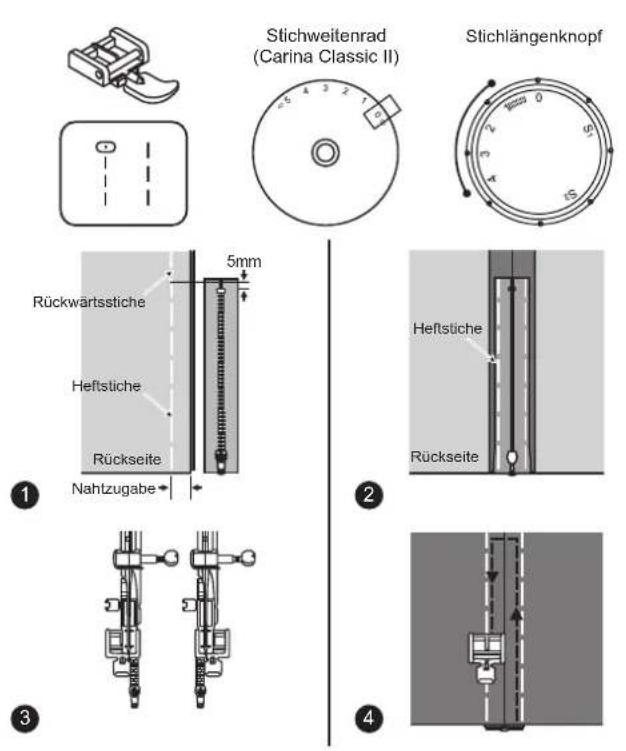
DE Reißverschlüsse
Set the machine as illustrated.
- Place the right sides of the fabric together.
Sew a seam in the width of the seam allowance from the right edge to the zipper bottom stop position. Sew a few stitches in reverse to lock. Increase the stitch length to maximum, set the tension below 2, and baste the remaining length of the fabric. - Press open the seam allowance. Place the zipper face down on the seam allowance with the teeth against the seam line. Baste the zipper tape in place.
- The zipper foot can be inserted right or left, depending on which side of the foot you are going to sew.
- Stitch around the zipper on the right side of the fabric, then remove the basting.
Please Note:
You will find "S2" marking on the stitch length dial of model Carina Power & Stretch II additional.
EN Sewing with the hemmer foot
* The hemmer foot is an optional accessory and is not supplied with your machine.
For hems in fine or sheer fabrics.
Set the machine as illustrated.
- Neaten the edge of the fabric. At the beginning of the hem, turn under the edge twice by about 3mm (1/8") and sew 4-5 stitches to secure. Pull the thread slightly towards the back. Insert the needle into the fabric, raise the presser foot and guide the fold into the scroll on the foot.
- Gently pull the fabric edge towards you and lower the presser foot. Begin sewing, guiding the fabric into the scroll by holding it upright and slightly to the left.
Please Note:
You will find "S2" marking on the stitch length dial of model Carina Power & Stretch II additional.
natural_image
Simple geometric diagram with a dashed circle and diagonal lines inside a square frame (no text or symbols)1
2

Sewing on lace and elastic, darning, mending, reinforcing edges.
Set the machine as illustrated.
Place patch in position.
- The stitch length can be shortened to produce very close stitches.
- When mending tears, it is advisable to use a piece of backing fabric to reinforce. The stitch density can be varied by adjusting the stitch length. First sew over the center and then overlap on both sides. Depending on the type of fabric and damage, sew between 3 and 5 rows.
Please Note:
You will find "S2" marking on the stitch length dial of model Carina Power & Stretch II additional.


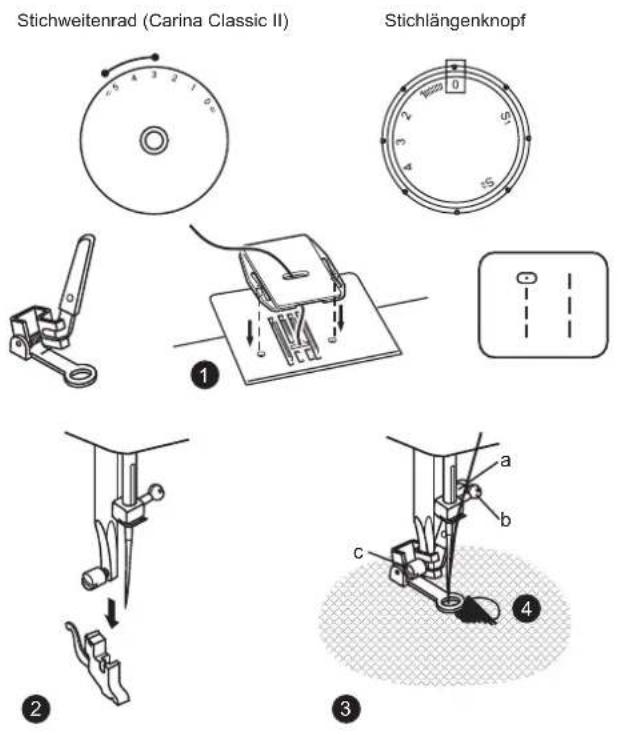
For hardwearing seams. Turn the stitch length dial to "S1". The machine sews two stitches forwards and one stitch backwards. This gives triple reinforcement.
2. miple zig-zag
For hardwearing seams, hems and decorative seams.
Turn the stitch length dial to "S1".
Adjust the stitch width dial to between "3" and "5".
Triple zig-zag is suitable for firm fabrics like denim, corduroy, etc.
natural_image
Line drawing of a hand holding a string with a woven texture, no text or symbols present1
2
DE Wabenstich
Seams, hems, T-shirts, underwear, etc.
Set the machine as illustrated.
This stitch can be used for all types of jersey as well as for woven fabrics. (1)
Sew at 1cm (1/4") from the fabric edge and trim the surplus fabric. (2)
* The daming- / embroidery foot optional accessory and is not supplied with your machine.
Set the machine as illustrated.
- Install the darning plate.
- Remove the presser foot clamp.
- Attach the darning foot to the presser foot holder. The lever (a) should be behind the needle clamp screw (b). Press the darning foot on firmly from behind with your index finger and tighten the screw (c).
- First sew round the edge of the hole (to secure the threads). First row: Always work from left to right. Turn work by 1/4 and oversew.
A darning ring is recommended for easier sewing and better results.
Please Note:
You will find "S2" marking on the stitch length dial of model Carina Power & Stretch II additional.
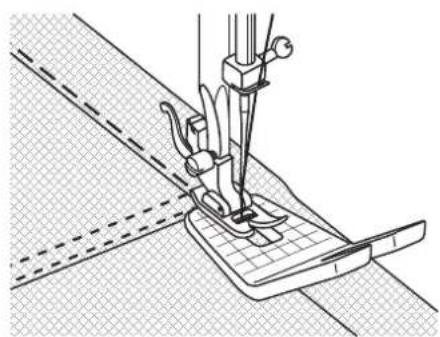
EN Practical stitches
Set the machine as illustrated.
1. Shell hem
For decorative edges.
Suitable for edges on sheer, fine and stretch fabrics. The larger stitch should go just over the edge of the fabric to create the shell effect.
- This stitch requires a tighter thread tension than normal.
- Place the fabric under the presser foot so that it will be sewn along the bias with the straight stitches sewn on the seamline and the zigzag stitches sewn slightly over the folded edge.
- Sew at a slow speed.
2. Rampart
For flat joining seams, sewing on elastic, visible hems.
This stitch can be used for firm, thicker fabrics.
3. Bridging (Carina Classic II)
For seams, place mats, tablecloths. Decorative joining seam for a fagoted effect. Gathering with cord or shirring elastic.
Please Note:
You will find "S2" marking on the stitch length dial of model Carina Power & Stretch II additional.
* The quilting foot is an optional accessory and is not supplied with your machine.
Set the machine as illustrated.
Insert the seam guide right in presser foot holder and set the space as you desired.
Move the fabric over and sew successive rows with the guide riding along on the previous row of stitching.
Please Note:
You will find "S2" marking on the stitch length dial of model Carina Power & Stretch II additional.
natural_image
Technical illustration of a sewing machine needle stitching fabric strips on a grid-patterned surface (no text or symbols)DE Patchwork
These stitches are used to join two pieces of fabric while leaving a space between their edges.
- Fold over the edges of the two pieces of fabric for the hem and baste the edges to a thin piece of paper leaving a small space between them.
- Set the Pattern selector as illustrated. Turn the stitch length dial to "S1".
- Stitch along the edge, pulling both threads slightly when beginning to sew.
* Use thicker than normal threads for sewing.
- After sewing, remove the basting and the paper. Finish by tying knots on the reverse side at the beginning and the end of the seams.
Please Note:
You will find "S2" marking on the stitch length dial of model Carina Power & Stretch II additional.
natural_image
Illustration of a bird being lifted by strings into a wing (no text or symbols)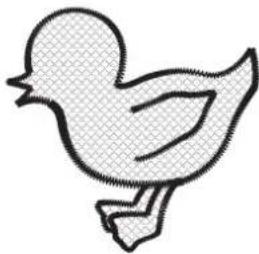
natural_image
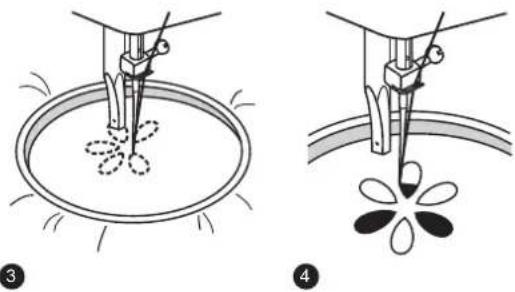
Simple line drawing of a duck in flight (no text or symbols)DE Applikation
- Turn stitch length dial to the desired length.
- Turn stitch selector dial to small zig zag width.
- Cut out the applique design and baste it to the fabric.
- Sew slowly around the edge of the design.
- Trim excess material outside the stitching. Make sure not to cut any stitches.
- Remove the basting thread.
- Tie top and bottom thread under the applique to avoid unraveling.
Please Note:
You will find "S2" marking on the stitch length dial of model Carina Power & Stretch II additional.
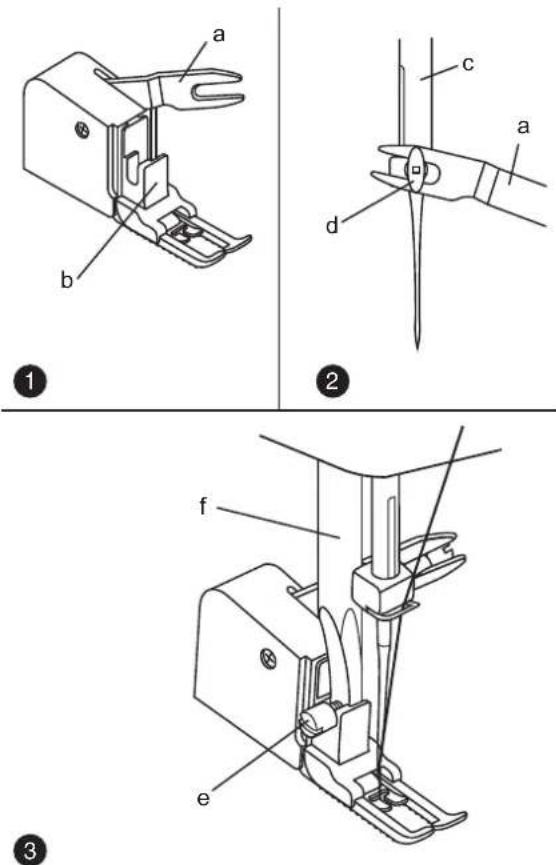

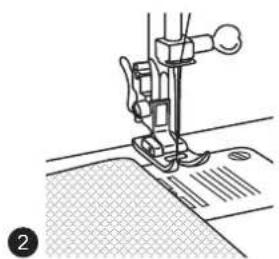
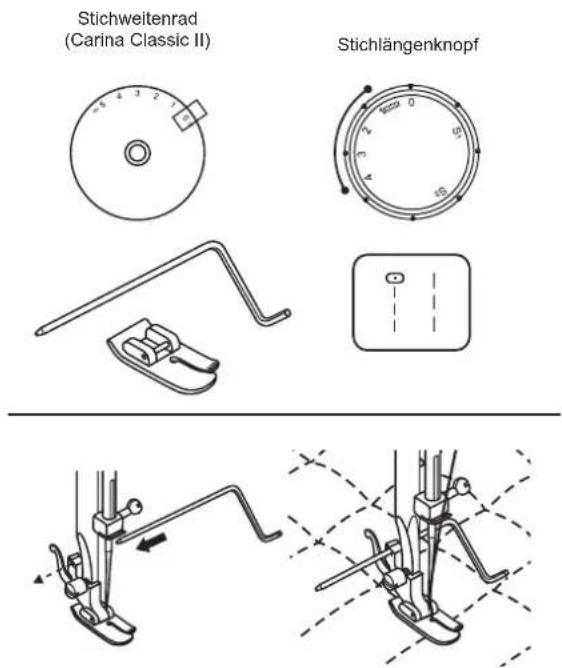
Obertransportfuß
Always try to sew first without the walking foot accessory which should be used only when necessary.
The "Walking foot" accessory equalizes the feeding of the upper and lower layers of fabric and improves the matching of plaids, stripes and patterns. This foot helps to prevent uneven feeding of very difficult fabrics.
- Lift the presser foot bar.
- Remove the "presser foot holder".
- Attach the "walking foot" to the machine in the following way.
i) The fork arm should fit into the needle screw and clamp. (2)
ii) Slide the plastic "attaching head" from your left to right so that it is fitted on the "presser foot bar".
iii) Lower the "presser foot bar".
iv) Tighten the fixation screw - Make sure both the "needle screw" and the "fixation screw" are tight.
- Draw the bobbin thread up. Lay both threads to the back under the foot.
a. Fork arm
b. Attaching head
c. Needle bar
d. Needle screw & clamp
e. Presser bar attaching screw
f. Presser foot bar
- Set the machine as illustrated.
- Remove the presser foot and the presser foot holder.
- Attach the darning plate.
- Lower presser foot lever before starting to sew.
- Adjust the stitch width according to the size of lettering or design.
Preparation for Monogramming and Embroidering\*
- Draw the desired lettering or design on the right side of the fabric.
- Stretch the fabric between embroidery hoop as firmly as possible.
- Place the fabric under the needle. Make sure the presser foot bar is down in its lowest position.
- Turn the hawakshedu to bring up the lower thread through the fabric. Sew a few securing stitches at the starting point.
- Hold the hoop with thumb and forefingers of both hands and guide the embroidery hoop.
* Embroidery hoop not included with machine.
Please Note:
You will find "S2" marking on the stitch length dial of model Carina Power & Stretch II additional.
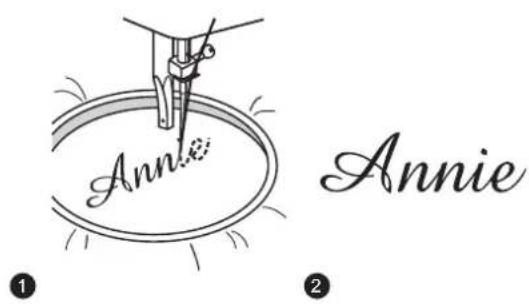
- Sew, moving the hoop slowly along the lettering at a constant speed.
- Secure with a few straight stitches at the end of the last letter.
Embroidering
- Stitch the outline of the design by moving the embroidery hoop.
- Fill in the design working from the outline of the design to the inside and from the inside to the edge of the outline until the design is completely filled in. Keep the stitching close together.
* A long stitch is made by moving the hoop rapidly and a short stitch is made by moving it slowly.
Secure with a few straight stitches at the end of the design.
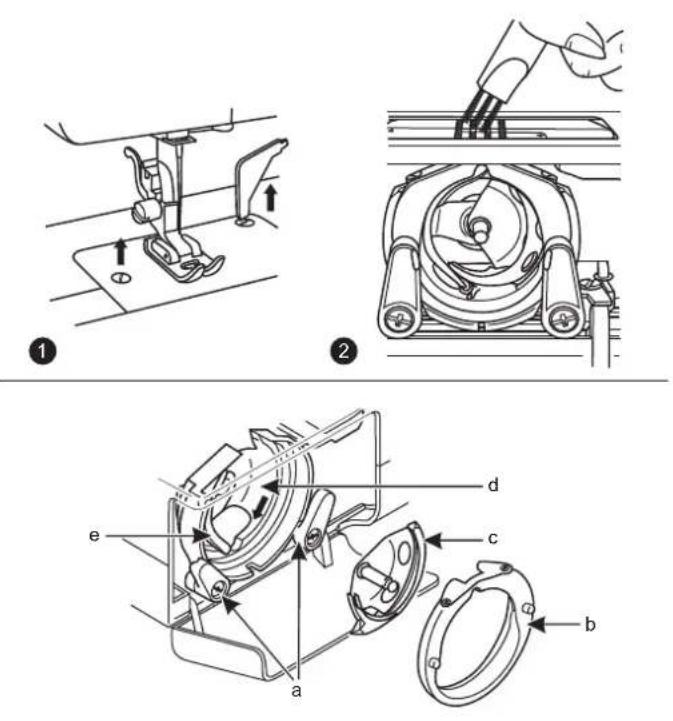

Pflege
Achtung:
Disconnect the machine from the electricity supply by removing the plug from the mains socket. When cleaning the machine, it must always be disconnected from the electricity supply.
Remove the needle plate:
Turn the handwheel until the needle is fully raised. Open the hinged front cover and unscrew the stitch plate screws with the screw driver. (1)
Cleaning the feed dog:
Remove the bobbin case and use the brush supplied to clean the whole area. (2)
Cleaning and lubricating the hook:
Remove the bobbin case. Snap the two hook retaining arms (a) outwards. Remove the hook race cover (b) and the hook (c) and clean with a soft cloth. Lubricate at the points (d) (1-2 drops) with sewing machine oil. Turn the handwheel until the hook race (e) is in the left position. Replace the hook (c). Replace the hook race cover and snap back the two hook retaining arms. Insert the bobbin case and bobbin and replace the stitch plate.
Important:
Fabric fluff and threads must be removed regularly. Your machine should be serviced at regular intervals at one of our service agencies beginning and the end of the seams.
DE Nadel/Stoff/Faden Tabelle
NADEL-, STOFF- UND FADENWAHL
EN Matching needle/fabric/thread
NEEDLE, FABRIC, THREAD SELECTION GUIDE NEEDLE SIZE FABRICS THREAD
| 9-11(65-75) | Lightweight fabrics: thin cottons, voile, serge, silk, muslin, interlocks, cotton knits, jerseys, crepes, woven polyester, shirt & blouse fabrics. | Light-duty thread in cotton, nylon or polyester. |
| 12(80) | Medium weight fabrics: cotton, satin, heavy muslin, sailcloth, double knits, light woollens. | Most threads sold are medium size and suitable for these fabrics and needle sizes. Use polyester threads on synthetic materials and cotton on natural woven fabrics for best results. |
| 14(90) | Medium weight fabrics: cotton duck, woollens, heavier knits, terrycloth, denims. | |
| 16(100) | Heavyweight fabrics: canvas, woollens, canvas and quilted fabrics, denims, upholstery material (light and medium). | Always use the same thread on top and bottom. |
IMPORTANT: Match needle size to thread size and weight of fabric.
Please Note:
- In general, fine threads and needles are used for sewing fine fabrics, and thicker threads are used for sewing heavy fabrics.
- Always test thread and needle size on a small piece of fabric which will be used for actual sewing.
- Use the same thread for needle and bobbin.
- Use the stabilizer material for fine or stretchy fabrics, and select the correct presser foot.
- The upper thread tension must be set at 2-3 when sewing the lightweight fabrics, like silk and jersey etc.

Fehlersuchanleitung
| Problem | Cause | Correction |
| Upper thread breaks | 1. The machine is not threaded correctly.2. The thread tension is too tight.3. The thread is too thick for the needle.4. The needle is not inserted correctly.5. The thread is round wound the spool holder pin.6. The needle is damaged. | 1. Rethread the machine.2. Reduce the thread tension (lower number).3. Select a larger needle.4. Remove and reinsert the needle (flat side towards the back).5. Remove the reel and wind thread onto reel.6. Replace the needle. |
| Lower thread breaks | 1. The bobbin case is not inserted correctly.2. The bobbin case is threaded wrongly. | 1. Remove and reinsert the bobbin case and pull on the thread.The thread should pull easily.2. Check both bobbin and bobbin case. |
| Skipped stitches | 1. The needle is not inserted correctly.2. The needle is damaged.3. The wrong size needle has been used.4. The foot is not attached correctly. | 1. Remove and reinsert needle(flat side towards the back).2. Insert a new needle.3. Choose a needle to suit the thread and fabric.4. Check and attach correctly. |
| Needle breaks | 1. The needle is damaged.2. The needle is not correctly inserted.3. Wrong needle size for the fabric.4. The wrong foot is attached. | 1. Insert a new needle.2. Insert the needle correctly (flat side towards the back).3. Choose a needle to suit the thread and fabric.4. Select the correct foot. |
| Loose stitches | 1. The machine is not correctly threaded.2. The bobbin case is not correctly threaded.3. Needle/ fabric/ thread combination is wrong.4. Thread tension wrong. | 1. Check the threading.2. Thread the bobbin case as illustrated.3. The needle size must suit the fabric and thread.4. Correct the thread tension. |
| Seams gather or pucker | 1. The needle is too thick for the fabric.2. The stitch length is wrongly adjusted.3. The thread tension is too tight.4. Fabric puckers. | 1. Select a finer needle.2. Readjust the stitch length.3. Loosen the thread tension.4. Use a stabilizer for fine or stretchy fabrics. |
| Uneven stitches, uneven feed | 1. Poor quality thread.2. The bobbin case is wrongly threaded.3. Fabric has been pulled. | 1. Select a better quality thread.2. Remove bobbin case, retreat and insert correctly.3. Do not pull on the fabric while sewing, let it be taken up by the machine. |
| The machine is noisy | 1. The machine must be lubricated.2. Fluff or oil have collected on the hook or needle bar.3. Poor quality oil has been used.4. The needle is damaged. | 1. Lubricate as described.2. Clean the hook and feed dog as described.3. Only use good quality sewing machine oil.4. Replace the needle. |
| The machine jams | Thread is caught in the hook. | Remove the upper thread and bobbin case, turn the handwheel backwards and forwards by hand and remove the thread remains.Lubricate as described. |
DE
EN Do not dispose of electrical appliances as unsorted municipal waste, use separate collection facilities.
Contact your local government for information regarding the collection systems available. If electrical appliances are disposed of in landfills or dumps, hazardous substances can leak into the groundwater and get into the food chain, damaging your health and well-being.