Airpulse A80 - Speaker EDIFIER - Free user manual and instructions
Find the device manual for free Airpulse A80 EDIFIER in PDF.
| Product type | Active/passive speaker |
| Brand | EDIFIER |
| Model | Airpulse A80 |
| Tweeter | Horn-loaded ribbon tweeter |
| Midrange driver | 4.5-inch aluminum cone |
| Amplification system | Digital amplifier with XMOS processor |
| Output power | Treble: 10W+10W; Bass: 40W+40W |
| Frequency range | 52 Hz - 40 kHz |
| Signal-to-noise ratio | ≥90 dB(A) |
| Source modes | AUX, PC, USB, Optical, Bluetooth |
| Input sensitivity | AUX: 450±50 mV; PC: 550±50 mV; USB: 400±50 mFFs; Optical: 400±50 mFFs; Bluetooth: 500±50 mFFs |
| Subwoofer output | Max 1200 mV (variable with volume) |
| Power supply | 100-240V AC, 50/60Hz |
| Dimensions (W x H x D) | 140 x 250 x 220 mm |
| Net weight (set) | 9.3 kg |
| Connectivity | Bluetooth (range 10 m), USB Type B, optical, RCA, PC input (3.5mm) |
| Box contents | Active speaker, passive speaker, remote control, cables (RCA 3.5mm, RCA, speaker connection, USB, optical, power), manual, cleaning cloth |
| Care and cleaning | Use a soft dry cloth; do not use chemical solvents |
| Safety | Do not open the device; do not expose to water or heat sources; minimum distance of 20 cm from pacemakers |
| Spare parts and repairability | No user-replaceable parts; contact qualified technician for any repairs |
| General information | Main volume control and source selection, independent bass and treble adjustments, LED indicator, infrared remote control with button cell |
Frequently Asked Questions - Airpulse A80 EDIFIER
User questions about Airpulse A80 EDIFIER
0 question about this device. Answer the ones you know or ask your own.
Ask a new question about this device
Download the instructions for your Speaker in PDF format for free! Find your manual Airpulse A80 - EDIFIER and take your electronic device back in hand. On this page are published all the documents necessary for the use of your device. Airpulse A80 by EDIFIER.
USER MANUAL Airpulse A80 EDIFIER
natural_image
Line drawing of two identical audio/video speakers with front speakers and a remote control unit (no text or symbols)Dongguan Platinum Audio Systems Co., LTD
No. 2 East Industry Road, Songshan Lake National High-tech Industrial Development Zone, Dongguan 523808 China
www.airpulseaudio.com
Printed in China
A80
Active Speaker System
Important safety instruction
Please read the following contents carefully before turning on your equipment; and follow the instructions below. Keep this information around for future reference.
- Please read the instructions carefully. Keep it in safe place for future reference.
- Heed all warnings.
- Follow all instructions.
- Do not install near any heat sources such as radiators, heat registers, stoves, or other apparatus (including amplifiers) that produce heat.
- Do not defeat the safety purpose of the polarized or grounding-type plug. A polarized plug has two blades with one wider than the other. A grounding type plug has two blades and a third grounding prong. The wide blade or the third prong are provided for your safety. If the provided plug does not fit into your outlet, consult an electrician for replacement of the obsolete outlet.
-
Protect the power cord from being walked on or pinched particularly at plugs, convenience receptacles, and the point where they exit from the speaker.
-
Only use attachments/accessories specified by the manufacturer.
-
Unplug this speaker during lightning storms or when unused for long periods of time.
-
Before connecting speakers to power source, please turn off the power switch and make sure the volume is set at minimum level.
-
Please do not place power cable and signal cable near heat source (such as electric heater and radiator).
Do not leave cables where they can easily be stepped on or compressed.
-
Use electric outlets that allow power cable be pulled out easily. When speakers are not being used for an extended period of time, please turn off power switch and disconnect power plug.
-
In order to avoid damage from thunder and lightning, turn off power switch and disconnect speaker from power source during a rain storm.
-
Please do not drag power cable when disconnecting from wall socket. Hold power cord firmly at the top to unplug from the wall socket.
-
Use the speakers only within voltage specifications. Using the speakers with voltage higher than specifications is dangerous and can cause equipment damage, fire damage or bodily injury.
-
These speakers do not include any self serviceable parts. Do not attempt to open the speaker to uninstall any parts or do any type of modifications. If problems occur during use please contact professional technicians only for repair.
-
Please refer to the trouble shooting section in owner's manual for common operation errors and to determine possible malfunction.
-
Please do not place speakers in places where they can be easily hit by falling objects or dropping and splashing liquid. Do not place any lit fire (such as candle) on top of speaker as this may lead to fire hazard.
Do not place any liquid containers on top of speaker as this may fall on speakers and causing electric shock and damage to speaker.
-
Place speakers in a stable position so they will not easily fall off causing damage and injury.
-
Place speakers in a well ventilated and dry position, far from direct sunlight, heat source, vibration, dust, moist or extremely cold condition. For optimal performance, please leave at least 20 cm distance space around the speaker.
-
Please do not use speaker at maximum volume for an extended period of time, This may cause damage to your hearing.
-
Before moving the speakers, please first turn off power switch and disconnect from power source.
-
When the following symptoms occur, please turn off power switch and disconnect from power source:
- Power cable or plug is worn or damaged.
- Abnormal odor or smoke is detected.
– Small objects falling inside the speaker.
– Sudden break off while playing music.
Consult a professional repair technician to diagnose and repair the speaker.
-
Do not use chemical solvent to clean the surface of speaker. To avoid surface damage, use a clean and soft cloth only.
-
Do not use the speakers in proximity closer than 22 cm to individuals wearing cardiac pacemaker or defibrillator.
1
English English
Important safety instruction
Warning:
- Use the same type of battery only to replace battery in remote control.
- Never disassemble, smash, or compress battery inside remote control; or toss it into a fire.
- Please stop using the remote control if it has the appearance of bulging, leaking, discoloring or any other abnormal symptoms. Improper use of battery can cause explosion or leaking which leads to burn or other bodily injury. Please dispose battery by referring to local legislation.

Excessively loud music may lead to hearing loss. Please keep the volume in a safe range.

Correct Disposal of this product. This marking indicates that this product should not be disposed with other household wastes throughout the EU. To prevent possible harm to the environment or human health from uncontrolled waste disposal, recycle it responsibly to promote the sustainable reuse of material resources. To return your used device, please use the return and collection systems or contact the retailer where the product was purchased. They can take this product for environmental safe recycling.

Use only with the cart, stand, tripod, bracket, or table specified by the manufacturer, or sold with the speakers. When a cart is used, use caution when moving the cart/speakers combination to avoid injury from tip-over.
Power warning:
- Place the product near the power outlet for easy use.
- Before use, make sure that the operating voltage is the same as your local power supply. Correct operating voltage can be found on the product plate.
- For safety purpose, unplug the product during lightning storms or when unused for extended periods of time.
- Under normal conditions, the power supply may get hot. Please keep good ventilation in the area and exercise caution.
- Safety warning labels on the housing or bottom of the product or power adaptor.

This symbol is to alert the user to the presence of un-insulated dangerous voltage within the product's enclosure that may be of sufficient magnitude to constitute a risk of electric shock to persons.

This symbol is to warn the user not to disassemble the enclosure of the product and there is no user-replaceable part inside. Take the product to an authorized service center for repair.

This symbol indicates that the product is for indoor use only.

This symbol indicates that the product is a CLASS II or double insulated electrical device with no earth requirement.
The MAINS plug is used as the disconnect device, the disconnect device shall remain readily operable.
For wireless product:
-
Wireless product may generate shortwave radio frequencies and interfere with the normal use of other electronic devices or medical equipment.
-
Turn off the product when it's disallowed. Do not use the product in medical facilities, on airplane, at gas stations, near automatic gates, automatic fire alarm system or other automated devices.
-
Do not use the product in the vicinity of a pacemaker within a 20cm range. The radio waves may affect the normal operation of the pacemaker or other medical devices.
Important safety instruction
FCC Regulatory Compliance
Warning: changes or modifications not expressly approved by the party responsible for compliance could void the user's authority to operate the equipment.
Note: This equipment has been tested and found to comply with the limits for a Class B digital device, pursuant to Part 1.5 of the FCC Rules. These limits are designed to provide reasonable protection against harmful interference in a residential installation. This equipment generates, uses and can radiate are designed to provide reasonable protection against harmful interference in a residential installation. However, there is no guarantee that interference will not occur in a particular installation.
If this equipment does cause harmful interference to radio or television reception, which can be determined by turning the equipment off and on, the user is encouraged to try to correct the interference by one or more of the following measures:
- Reorient or relocate the receiving antenna.
- Increase the separation between the equipment and receiver.
- Connect the equipment into an outlet on a circuit different from that to which the receiver is connected.
- Consult the dealer or an experienced radio/TV technician for help.
RF Exposure Compliance
This equipment complies with FCC radiation exposure limits set forth for an uncontrolled environment. This equipment should be installed and operated with minimum distance 20cm between the radiator and your body. This transmitter must not be co-located or operating in conjunction with any other with minimum distance 20cm between the radiator and your body. This transmitter must not be co-located or operating in conjunction with any other antenna or transmitter.
ISED Regulatory compliance
This device contains licence-exempt transmitters that comply with innovation, Science and Economic Development Canada's licence-exempt RSS(s).
Operation is subject to the following two conditions:
This device may not cause interference.
This device must accept any interference, including interference that may cause undesired operation of the device.
This equipment complies with IC RSS-102 radiation exposure limits set forth for an uncontrolled environment. This equipment should be installed and operated with minimum distance 20cm between the radiator and your body.
Speaker Illustration 5
Remote Control Illustration 6
Installing Battery in Remote Control 7
Preparations
Connect speakers 8
Connect to playback devices 8
Connect to power source 9
Speaker Placement 9
Turn on main power 9
Playing
AUX input mode 10
PC input mode 11
USB input mode
-
Install the special driver 12
-
Connect PC to speakers.... 12
-
Set this product as the audio output device of PC 13-14
-
Play music on the PC 14
Optical input mode 15
Bluetooth input mode 16
Specifications/statement 17
Troubleshooting 18
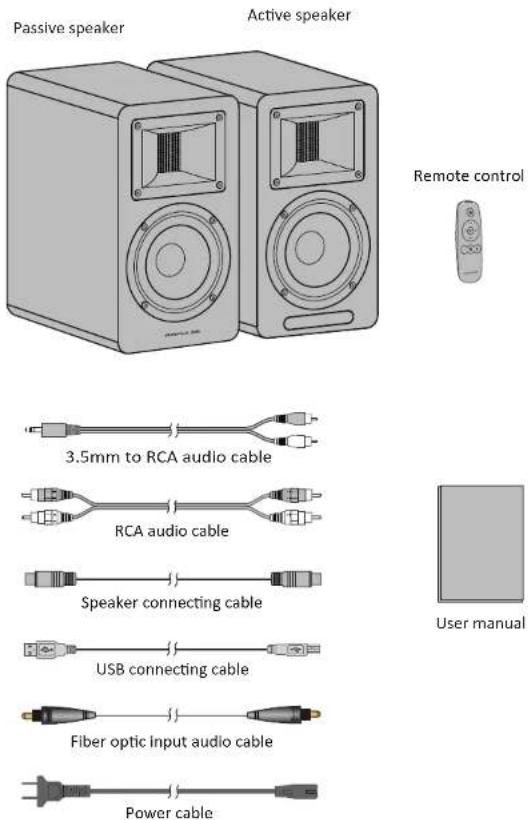
Box Contents
text_image
Passive speaker Active speaker Remote control 3.5mm to RCA audio cable RCA audio cable Speaker connecting cable USB connecting cable Fiber optic input audio cable Power cable User manual
English English
Speaker Illustration
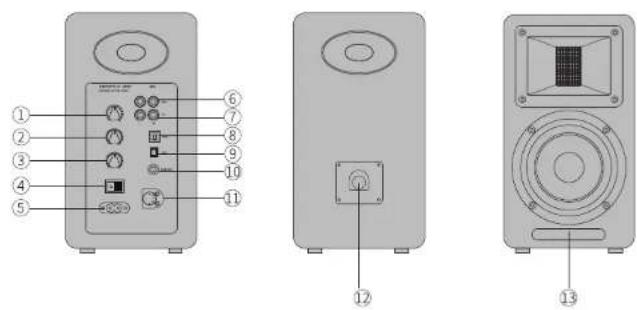
1. Volume control/input selection Volume control
Rotate clockwise to increase volume; rotate counter clockwise to reduce volume. When reaching maximum volume level, continue to rotate volume control will not change volume.
Input selection Press to switch between PC-AUX-USB- Optical-Bluetooth modes.
(As DSP will be reconfigured when input mode is switched, it is recommended to press after the current mode indicator flashes once.)
Standby control
Press and hold to alternate between Power on and Stand by mode.
- Bass level adjustment
Room acoustics may dictate which type of adjustment you need to make to retain the proper frequency response from the speaker. Turn from "0" to left to reduce low frequencies; Turn from "0" to right to increase low frequencies.
3. Treble level adjustment
Room acoustics may dictate which type of adjustment you need to make to retain the proper frequency response from the speaker. Turn from "0" to left to reduce high frequencies; Turn from "0" to right to increase high frequencies.
4. Power switch
Turn on/off speaker power.
- AC input socket
Connect to plug of power cord.
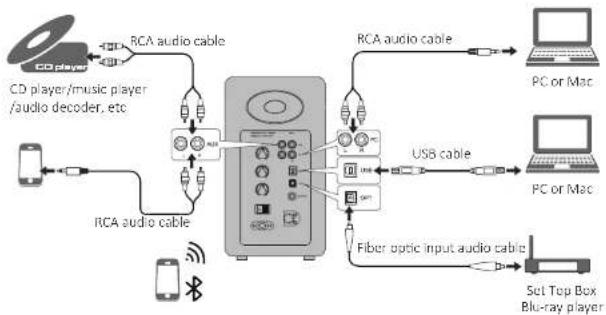
6. Auxiliary input port
Connect to audio source devices with RCA output port using RCA audio cable.
7. PC input port
Connect to PC using 3.5mm to RCA audio cable, or connect to audio source devices with RCA output port using RCA audio cable.
8. USB B type port
Connect to audio source devices with USB output port using USB connecting cable.
9. Optical input port
Connect to audio source devices with optical output port using fiber optic input audio cable.
10. Subwoofer output port
Connect to audio input port of subwoofer using RCA audio cable.
11. Passive speaker connector
Connect to passive speaker using speaker connecting cable.
12. Active speaker connector
Connect to active speaker using speaker connecting cable.
13. LED indicator/remote control receiving window
Indicates current input mode based on audio sources and input selection.
Remote Control Illustration
text_image
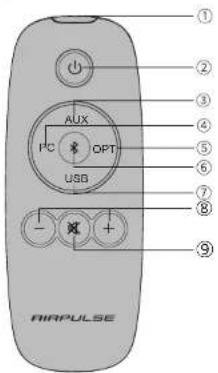
AIRPULSE ① ② ③ ④ ⑤ ⑥ ⑦ ⑧ ⑨ AUX I²C OPT USB -① Infrared emission window
② Standby button
When powered on, press the "☐" button to let the speaker enter standby mode. Displayed value of remote control receiving window on the active speaker will disappear but internal power is still being connected. Re-press the "☐" button or press the "VOLUME/INPUT" knob on the rear panel of the active speaker to power on the speaker again.
Press the "☐" button on the rear panel to turn on/off the main power.
Input source selection buttons
| 3 AUX | AUX input mode |
| 4 PC | PC input mode |
| 5 OPT | Optical input mode |
| 6 (Bluetooth) | Bluetooth input mode |
| 7 USB | USB input mode |
Volume control buttons
| 8 +/- Volume up/down | Adjust playing volume |
| 9 ✗ Mute | Mute off speaker output |

* When playing music in Bluetooth mode and switching to other modes, Bluetooth connection will automatically return if selecting Bluetooth mode again.
* When playing music in USB mode and switching to other modes, PC needs to be reset for USB mode to be selected again.
Please refer to "Set this product as the audio output device of PC".
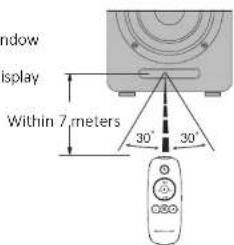
How to operate remote control
Aim remote control at the remote control receiving window The optimum operational distance is within 7 meters.
When the system receives remote control commands, display value of display window will alert or flash.
text_image
Window display Within 7 meters 30° 30°7
English English
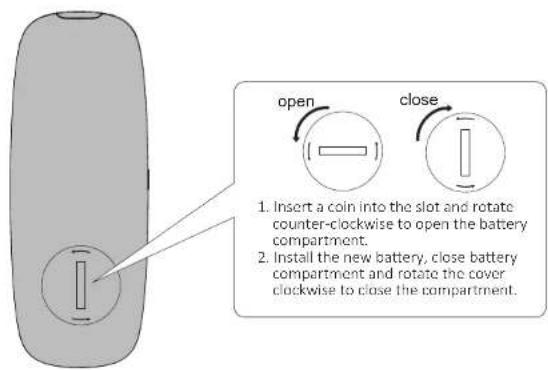
Installing Battery in Remote Control
text_image
open close 1. Insert a coin into the slot and rotate counter-clockwise to open the battery compartment. 2. Install the new battery, close battery compartment and rotate the cover clockwise to close the compartment.Note
- The battery life is normally about 6 months; please replace it when the remote control is not sensitive or the control distance to be shortened.
- Remove the battery immediately when exhausted to avoid explosion or acid leaks.
- Discard the battery immediately in the event of battery leakage, paying attention not to touch the leaking materials.
If leaking is in contact with skin or gets in eyes/mouth, rinse immediately and seek emergency treatment immediately. Please clean the battery compartment thoroughly prior to installing new battery.
- Never use the remote control in conditions below:
— Places with high humidity, e.g. a bathroom
- Places with high temperature, e.g. near a heater or stove
- Places with extremely low temperature
- In dusty places
- Remove the battery when unused for a long period of time to avoid battery leakage.
- Do not use this product when battery compartment is not securely closed, and keep the remote control away from children.
- There is a cell battery inside this product, if swallowed it will cause serious bodily injury; possibly death in 2 hours. Never let children touch the battery.
- If the battery is accidentally swallowed, rush to hospital immediately.
- Danger of explosion if battery is incorrectly replaced.
Replace only with the same or equivalent - The battery should not be exposed to excessive heat such as direct sun, fire or similar.
Preparations
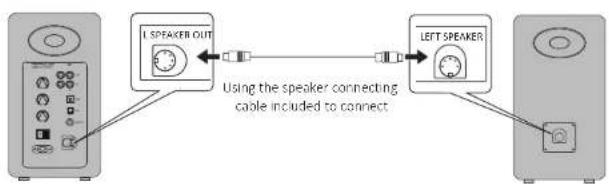
- Connect speakers
flowchart
graph LR
    A["Left Speaker OUT"] -->|Using the speaker connecting cable included to connect| B["Left Speaker"]
    B --> C["Right Speaker"]
- Connect to subwoofer (cable not included)
Connecting the A80 to subwoofer will improve low frequency effect from the system
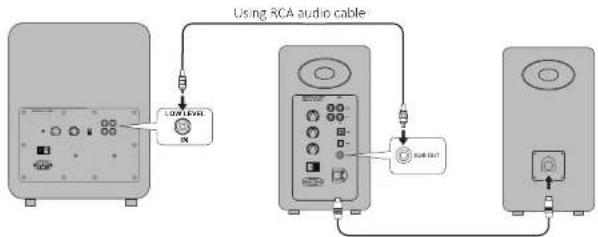
flowchart
graph TD
    A["Low Level Monitor"] --> B["Switch"]
    B --> C["Output Switch"]
    D["Switch"] --> E["Switch"]
    style A fill:#f9f,stroke:#333
    style B fill:#ccf,stroke:#333
    style C fill:#cfc,stroke:#333
- Connect to playback devices
flowchart
graph TD
    A["CD player"] -->|RCA audio cable| B["Radio"]
    C["Mobile Device"] -->|RCA audio cable| B
    B --> D["PC/Mac"]
    D --> E["PC or Mac"]
    F["Fiber optic input audio cable"] --> G["USB cable"]
    G --> H["Set Top Box Blu-ray player"]
    I["CD player/music player /audio decoder, etc"] --> B
    J["USB cable"] --> G
9 English
Preparations
4. Connect to power source
Connect the power cable included to power input port on the rear panel, and then insert power plug into wall outlet.
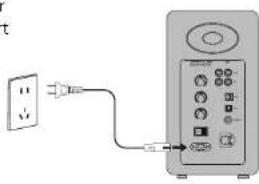
text_image
Diagram showing a power outlet connected to an electronic device with labeled ports and connections5.Speaker placement
* Place the passive and active speaker on a solid, leveled and steady surface.
* For the optimum stereo sound effect, the listener can slightly adjust speaker angel.
* The treble has certain directivity, and for more direct sound the speaker's tweeter should be at ear level of the listener.
6.Turn on main power
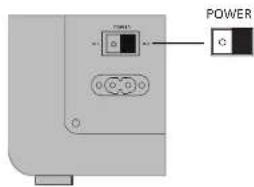
text_image
POWER C* After all cables are connected securely, press power switch on the rear panel to turn on main power;
* Press the “⏻” on the remote control to let the speaker enter standby state;
* LED indicator will be lit to show current audio mode, please select the correct audio source with the corresponding connection.
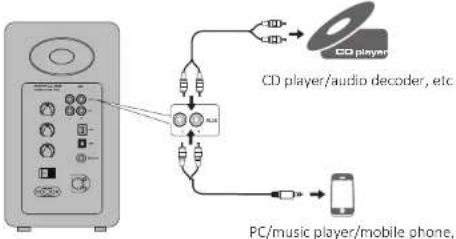
AUX Input Mode
- Insert RCA audio cable into AUX input port on the rear panel of the active speaker (pay attention to L/R connector matching); then connect RCA audio cable to audio source devices with RCA output port (CD player/audio decoder/PC/music player/mobile phone).
flowchart
graph TD
    A["CD player"] --> B["CD player/audio decoder, etc."]
    B --> C["PC/music player/mobile phone,"]
    C --> D["Mobile Phone"]
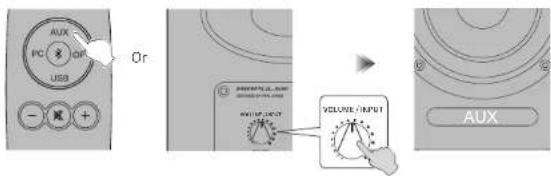
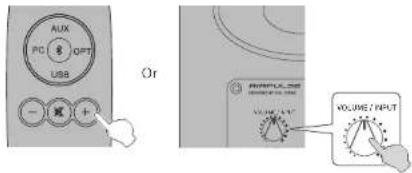
- Press the "AUX" button on the remote control or press the "VOLUME / INPUT" button on the rear panel of the active speaker to select AUX input mode, LED indicator on the active speaker will display "AUX".
text_image
AUX PC USB Gr VOLUME INPUT AUX- Play music on the connected device, press the "+/-" button on the remote control or press the "VOLUME / INPUT" button on the rear panel of the active speaker to adjust volume to a desired level.

text_image
PC CPT USB Or WOLUPE / INPUT11
English English
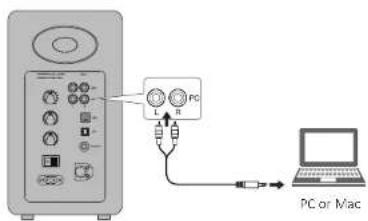
PC Input Mode
- Insert RCA audio cable into PC input port on the rear panel of the active speaker (pay attention to L/R port matching); then connect RCA audio cable to audio source devices with 3.5mm audio output jack or RCA output port (PC/music player/mobile phone).
text_image
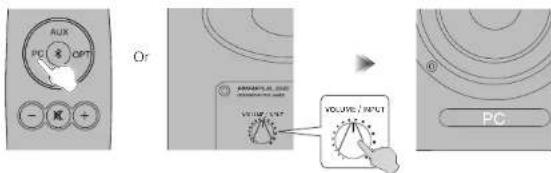
PC PC or Mac- Press the "PC" button on the remote control or press the "VOLUME / INPUT" button on the rear panel of the active speaker to select PC input mode, LED indicator on the active speaker will display "PC".
text_image
AUX PC OPT - - Or POWER/UL (OUT) VOLUME / INPUT VOLUME / INPUT PC- Play music on the connected device, press the "+/-" button on the remote control or press the "VOLUME / INPUT" button on the rear panel of the active speaker to adjust volume to a desired level.
text_image
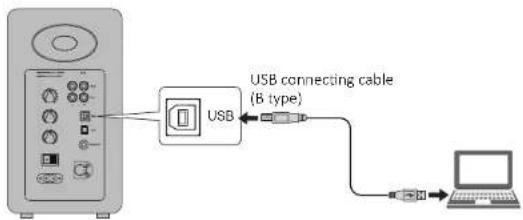
AUX PD 8 OPT USB - [R] + Or VOLUME / INPUT VOLUME / INPUTUSB Input Mode
USB interface chip in the A80 is a XMOS chip commonly used by high-end audio equipments. After being connected to PC, USB interface will directly extract and play back digital audio signal in a manner similar to the "USB external sound card", to avoid sound degradation and dynamic range compression caused by digital-to-analog conversion of PC sound card, and to ensure the restoration of original sound quality.
flowchart
graph LR
    A["USB"] --> B["USB connecting cable (B type)"]
    B --> C["Laptop"]

* PCM audio signals (44.1KHz/48KHz/96KHz/192KHz) only functions in USB mode.
* If connecting the speakers to a PC, driver program must be installed first for system to perform properly.
USB driver in Mac operating system supports USB Audio Class 1 and Class 2 audio transmission by default, therefore driver program installation is not needed.
Install the special driver program (only for Windows)
Please install the special driver program on the PC before connecting the PC to this product.
- Download and extract the special driver program "A80 USB Driver" in the following website:
http://www.airpulseaudio.com
- After installation is complete, exit from all applications.
13 14
English English
USB Input Mode
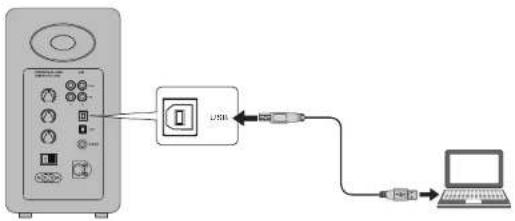
Connect PC to speakers
Connect Windows PC already installed with USB driver or Apple Mac to the speakers using USB connecting cable.
text_image
Diagram showing connection between a device with USB and connected to a laptop via USB cableSet this product as the audio output device of PC
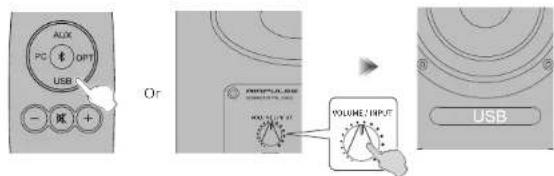
- Press the "USB" button on the remote control or press the "VOLUME / INPUT" button on the rear panel of the active speaker to select USB input mode, LED indicator on the active speaker will display "USB".
text_image
ALIX PC OPT USB - ② + - Or VOLUME/INPUT MAX.12V 4V USB- Set this product as the audio output device of PC
For Windows users, please open "Control panel" → "Sound" → "Play" → "Set as Default" Tab to set "XMOS USB Audio" as the current audio output device.

text_image
File Edit View Tools Help File Edit View Tools Help File Edit View Tools Help File Edit View Tools Help File Edit View Tools Help File Edit View Tools Help File Edit View Tools Help File Edit View Tools Help File Edit View Tools Help File Edit View Tools Help File Edit View Tools Help File Edit View Tools Help File Edit View Tools Help File Edit View Tools Help File Edit View Tools Help File Edit View Tools Help File Edit View Tools Help File Edit View Tasks Help File Edit View Tasks Help File Edit View Tasks Help File Edit View Tasks Help File Edit View Tasks Help File Edit View Tasks Help File Edit View Tasks Help File Edit View Tasks Help File Edit View Tasks Help File Edit View Tasks Help File Edit View Tasks Help File Edit View Tasks Help File Edit View Tasks Help File Edit View Tasks Help File Edit View Tasks Help File Edit View Tasks Help File Edit View Tasks Help File Error File Error File Error File Error File Error File Error File Error File Error File Error File Error File Error File Error File Error File Error File Error File Error File Error File Error File Error File Error File Error File Error File Error File Error File Error File Error File Error File Error File Error File Error File Error File Error File Error File Error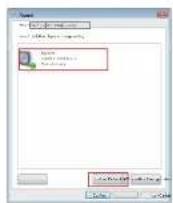
USB Input Mode
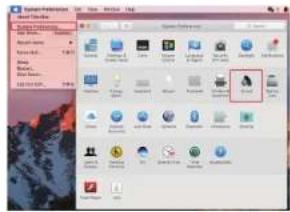
For Mac users, please open "System Preferences" → "Sound" → "Output" Tab to select "AIRPULSE A80" as the current audio output device.
text_image
Screenshot of a desktop computer interface showing file explorer with icons and a highlighted folder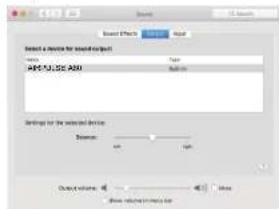
text_image
Select a device for sound output AFCJ,JC,ASU Settings for the selected device Description: 100% output volume: 500 Show related audio filePlay music on the PC
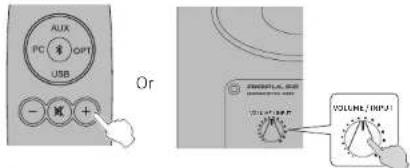
Play music on the connected device, press the "+/-" button on the remote control or press the "VOLUME / INPUT" button on the rear panel of the active speaker to adjust volume to a desired level.
text_image
AUX PC OPT USB Or ENGLISH WORK VOLUME / INPUT
* The play control under USB input belongs to USB HID control. This control needs support of player software, and so there may be compatibility differences for different audio player software.
* USB driver in Mac operating system supports USB Audio Class 1 and Class 2 audio transmission by default, therefore driver program installation is not needed.
Windows 7/windows 10 operating system have self USB driver, only support USB Audio Class 1 type USB audio transmission (only support 2 channel audio signal, the highest sampling rate is 96KHz), The USB connecting chip of A80 uses USB Audio Class 2 type audio transmission to support 192KHz audio signal, so for Windows 7/windows 10 operating system users, using the A80 speaker needs to download the special driver program.
* When USB input is disconnected or in other modes, please reset on the PC to re-select USB input. Please see "Set this device as the audio output device of PC" for details.
* As Microsoft Company had stopped maintaining the XP system, we can't provide the driver program with Microsoft digital signed.
* If you need to buy USB A type to B type connecting cable, you can search and buy it on the various e-commerce platforms.
15 16
English English
Optical Input Mode
- Connect this product to audio source device with optical digital output port using fiber optic input audio cable.
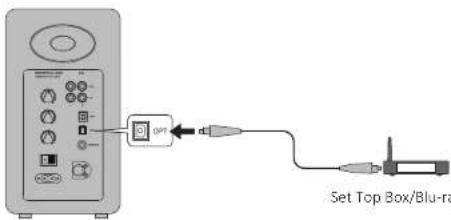
text_image
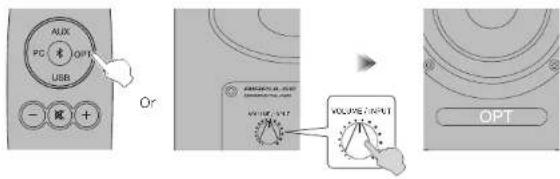
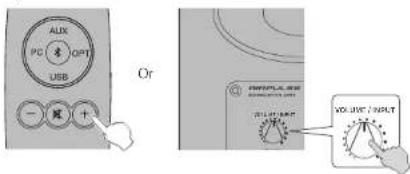
Set Top Box/Blu-ra- Press the "OPT" button on the remote control or press the "VOLUME / INPUT" button on the rear panel of the active speaker to select optical input mode, LED indicator on the active speaker will display "OPT".
text_image
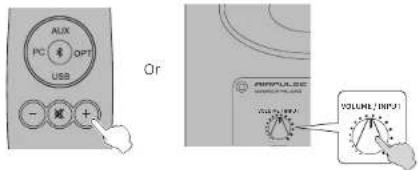
AUX PC 1 OPT USB - 光 + Or VOLUME INPUT VOLUME OUTPUT OPT- Play music on the connected device, press the "+/-" button on the remote control or press the "VOLUME / INPUT" button on the rear panel of the active speaker to adjust volume to a desired level.
text_image
ALUX PC 10 OPT USB 一 额 + Or INTUPLA.REF VOL.UNIT / INPUT
* Only the standard PCM audio signals (44.1KHz/48KHz/96KHz/192KHz) function in optical mode.
* If the optical digital output of playing device is ACC, such as on a TV, please switch it to PCM.
Bluetooth Input Mode
- Press the “\” button on the remote control or press the “VOLUME / INPUT” button on the rear panel of the active speaker to select Bluetooth input mode, LED indicator on the active speaker will display “\”.

text_image
AUX PC 素 OPT USB - 顺 + Or VOLUME INPUT VOLUME OUTPUT- Set your Bluetooth device to search for and connect to "AIRPULSE A80"; pin code for connection is "0000" if needed. Operations may be different between different devices, please refer to the operational instructions attached with the devices.

- Play music on the connected Bluetooth device, press the "+/-" button on the remote control or press the "VOLUME / INPUT" button on the rear panel of the active speaker to adjust volume to a desired level.
text_image
AUX PC OPT USB Or AMPULSE VOLUME / INPUT
* Effective Bluetooth connection distance is within 10 meters.
* The Bluetooth of A80 can only be searched and connected in Bluetooth input.
The existing Bluetooth connection will be disconnected once the speaker is switched into other audio inputs. When switched to Bluetooth input, the speaker will try to connect to the Bluetooth device connected last time.
* To disconnect Bluetooth, press and hold the “\$” button on the remote control for above 2 seconds.
* To enjoy all Bluetooth functions please ensure your audio device has A2DP and AVRCP profiles.
* When connected to this product, Bluetooth connectivity and functions may be different between different Bluetooth devices, depending on software settings of Bluetooth devices.

English English
Specifications/statement
| Tweeter: | Horn Loaded Ribbon Tweeter |
| Mid-Woofer: | 4.5 inch Aluminum Cone Mid-Woofer |
| Amplifier System: | Digital Amplifier with Xmos Processor |
| Power Output: | L/R (Treble): 10W+10W,L/R (Woofer): 40W+40W |
| Frequency Range: | 52Hz-40KHz |
| Signal-Noise Ratio: | L/R: ≥90dB(A) |
| Input Mode: | AUX, PC, USB, Optical, Bluetooth.The USB, Optical inputs support up to 192KHz input sample rate |
| Input Sensitivity: | AUX: 450±50mVPC: 550±50mVUSB: 400±50mFFsOptical: 400±50mFFsBluetooth: 500±50mFFs |
| Sub Out : | 1200mV Max(Changes with the master volume changes) |
| Mains Voltage: | 100-240V AC 50/60Hz |
| Cabinet Size (WxHxD): | 140x250x220mm |
| Net Weight: | 9.3Kg (20.5 Pounds) / Set |
NOTICE: For the need of technical improvement and system upgrade, information contained herein may be subject to change from time to time without prior notice.
Troubleshooting
| Problem Solution | |
| No sound | Check if the power indicator light is ONTry to turn up the volume using either the master volume control or remote control.Ensure the audio cables are firmly connected and the input is set correctly on the speakers.Check if there is signal output from the audio source. |
| Cannot connect via Bluetooth | Make sure the speaker is switched to Bluetooth input, in other audio input mode Bluetooth can not be paired or connected.Disconnect from any Bluetooth device by pressing and holding the Bluetooth button in Bluetooth mode, and then try again.Effective Bluetooth transmission range is 10 meters, please make sure operation is within the range.Try another Bluetooth device for connection. |
| The A80 does not turn on | Check if mains power is connected, or if the wall outlet is switched on. |
If you want to find out more about AIRPULSE, please visit our website at www.airpulseaudio.com
text_image
Diagram of a device control panel with numbered labels pointing to various function buttons and indicators.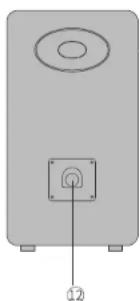
natural_image
Simple diagram of a speaker with an antenna and base, no text or symbols present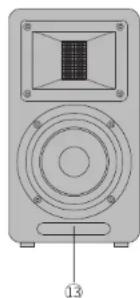
natural_image
Diagram of a speaker with a central screen and circular base, labeled with number 13 (no text or symbols on the device itself)text_image
AIRPULSE ① ② ③ ④ ⑤ ⑥ ⑦ ⑧ ⑨ AUX PC OPT USB AIRPULSEHow to operate remote control
text_image
Diagram showing a power outlet connected to an electronic device with labeled ports and connectionstext_image
Aux PC USB Cr VOLUME INPUT AUXtext_image
Aux PC 8 OPT USB - 减 + Or VOLUME OUTPUT VOLUME OUTPUTMode source PC
text_image
Diagram showing connection between a computer control panel and a laptop via an oscilloscope, labeled 'PC or Mac'text_image
AUX PC OPT USB - + Or VOLUME INPUT VOLUME OUTPUT31 Français
Mode source USB
text_image
ALUX PC & OPT USB - + - Cr OUTPUT VOLUME / INPUT VOLUME / OUTPUT USBtext_image
Add to create a new application Create Center Add to New Object Add to New Object Edit Manager Edit Manager Edit Process Edit Policy Edit Policy Edit Policy Manager Edit Policy Manager Edit Policy Manager Edit Policy Manager Edit Policy Manager Edit Policy Manager Edit Policy Manager Edit Policy Manager Edit Policy Manager Edit Policy Manager Edit Policy Manager Edit Policy Manager Edit Policy Manager Edit Policy Manager Edit Policy Manager Edit Policy Manager Edit Policy Manager Edit Policy Manager Edit Policy Manager Edit Policy Manager Edit Policy Manager Edit Policy Manager Edit Policy Manager Edit Policy Manager Edit Policy Manager Edit Policy Director Edit Policy Director Edit Policy Director Edit Policy Director Edit Policy Director Edit Policy Director Edit Policy Director Edit Policy Director Edit Policy Director Edit Policy Director Edit Policy Director Edit Policy Director Edit Policy Director Edit Policy Director Edit Policy Director Edit Policy Director Edit Policy Director Edit Policy Director Edit Policy Director Edit Policy Director Edit Policy Director Edit Policy Director Edit Policy Director Edit Policy Director Edit Policy Director Edit Policy Editor Edit Policy Editor Edit Policy Editor Edit Policy Editor Edit Policy Editor Edit Policy Editor Edit Policy Editor Edit Policy Editor Edit Policy Editor Edit Policy Editor Edit Policy Editor Edit Policy Editor Edit Policy Editor Edit Policy Editor Edit Policy Editor Edit Policy Editor Edit Policy Editor Edit Policy Editor Edit Policy Editor Edit Policy Editor Edit Policy Editor Edit Policy Editor Edit Policy Editor Edit Policy Editor Edit Policy Editor Edit Policy Administrator Edit Policy Administrator Edit Policy Administrator Edit Policy Administrator Edit Policy Administrator Edit Policy Administrator Edit Policy Administrator Edit Policy Administrator Edit Policy Administrator Edit Policy Administrator Edit Policy Administrator Edit Policy Administrator Edit Policy Administrator Edit Policy Administrator Edit Policy Administrator Edit Policy Administrator Edit Policy Administrator Edit Policy Administrator Edit Policy Administrator Edit Policy Administrator Edit Policy Administrator Edit Policy Administrator Edit Policy Administrator Edit Policy Administrator Edit Policy Administrator Edit Policy Assistant Edit Policy Assistant Edit Policy Assistant Edit Policy Assistant Edit Policy Assistant Edit Policy Assistant Edit Policy Assistant Edit Policy Assistant Edit Policy Assistant Edit Policy Assistant Edit Policy Assistant Edit Policy Assistant Edit Policy Assistant Edit Policy Assistant Edit Policy Assistant Edit Policy Assistant Edit Policy Assistant Edit Policy Assistant Edit Policy Assistant Edit Policy Assistant Edit Policy Assistant
33
Français
Mode source USB
text_image
Select a device for audio/aircraft ARPU-SE A50 Settings for the selected devices Parameters: 100% Output volume: Show: setting a software file OKtext_image
AUX PC 8 OPT USB - + - Or VOLUME INPUT OPTtext_image
ALIX PC USB Or VOLUME/INPUTtext_image
ALUX PC 8 OPT USB -减+ Or VOLUME INPUT