Safe Light Solar Pro - Surveillance Camera Panta - Free user manual and instructions
Find the device manual for free Safe Light Solar Pro Panta in PDF.

| Product Type | Solar surveillance camera with LED lighting |
| Brand | Panta |
| Model | Safe Light Solar Pro |
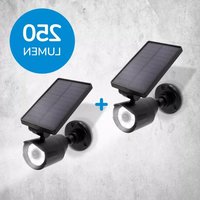
| Power Supply | Solar panel 5.5V / 300mA + lithium-ion battery 3.7V x2, 1800mAh (6.66Wh) |
| Number of LEDs | 8 LEDs |
| Motion sensor range | Up to 7.5 meters |
| Lighting time after detection | 30 seconds |
| Protection rating | IPX4 (weather-resistant) |
| Recommended charging time | 6 to 10 hours of direct sunlight |
| Main functions | Automatic motion activation, camera simulation (flashing red LED), standby/day mode |
| Mounting | Wall mount (rotating bracket) or on spike (provided in 2 parts) |
| Included accessories | Mounting bracket, spike, screws and wall plugs (3x) |
| Solar panel orientation | Must be oriented towards the sun, adjustable swivel arm |
| Maintenance | Clean the solar panel with a soft cloth if dirty |
| Safety instructions | Keep out of reach of children, do not replace LEDs, avoid contact with battery liquid |
| Country of manufacture | China |
Frequently Asked Questions - Safe Light Solar Pro Panta
User questions about Safe Light Solar Pro Panta
0 question about this device. Answer the ones you know or ask your own.
Ask a new question about this device
Download the instructions for your Surveillance Camera in PDF format for free! Find your manual Safe Light Solar Pro - Panta and take your electronic device back in hand. On this page are published all the documents necessary for the use of your device. Safe Light Solar Pro by Panta.
USER MANUAL Safe Light Solar Pro Panta
text_image
AS SEEN ON TV ORIGINAL M MEDIASHOP
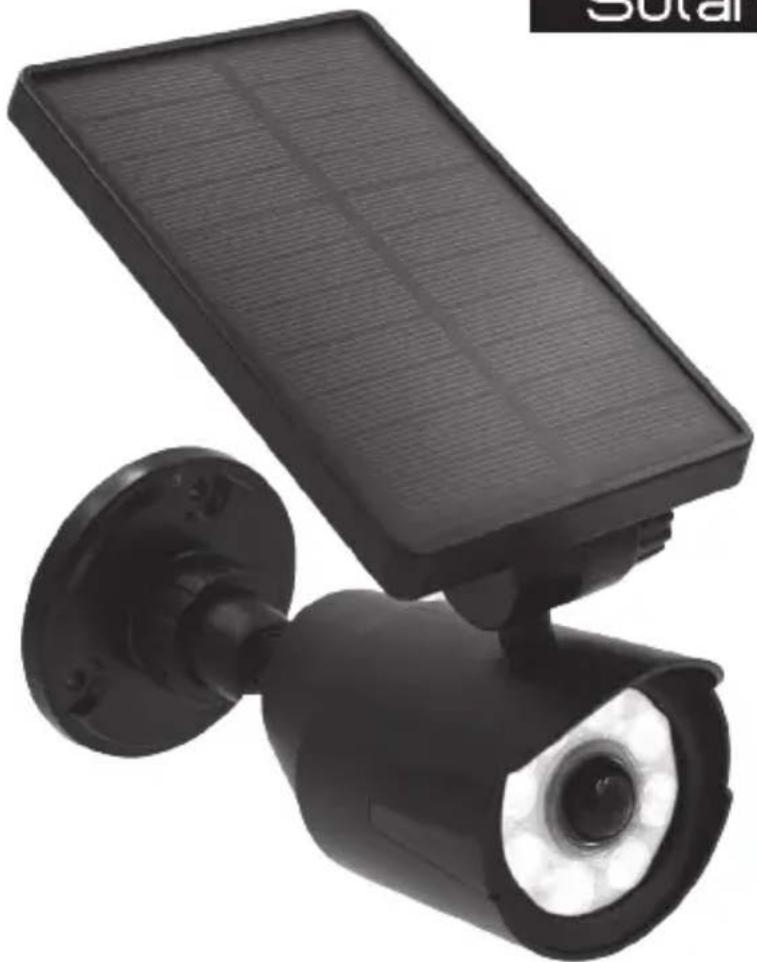
PANCA® Safe Light
Solar PRO
natural_image
Black-and-white photo of a solar-powered security camera with mounted sensor array and head-mounted lens (no text or symbols visible)Instructions for Use....09
Mode d'emploi....12
NOTE: Before installation, make sure the switch is switched to motion mode.
Delivery contents: 1 x Panta Safe Light Solar PRO, 1 x ground stake, 3 x dowels, 3 x screws
- Solar panel
- Adjustable swivel arm
- Mounting plate
- Motion sensor
- Motion mode/On/Off switch
- Ground stake (consisting of 2 parts)
- 3 x screws, 3 x dowels
A: Ground stake tip
B: Ground stake upper part
FR
CONTENU ET DÉSIGNATION DES PIÈCES
Contenu : 1 x Panta Safe Light Solar PRO, 1 x piquet, 3 x vis, 3 x chevilles
natural_image
Close-up of a black mechanical component with flange and threaded shaft (no text or symbols visible)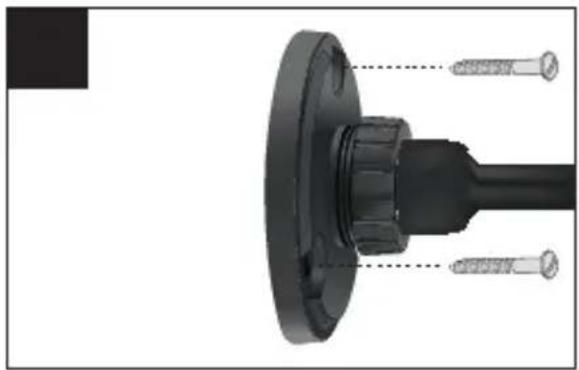
natural_image
Close-up of a black mechanical component with threaded pins, no visible text or symbols
natural_image
Close-up of a black mechanical component with a flanged shaft and bolted end (no text or symbols visible)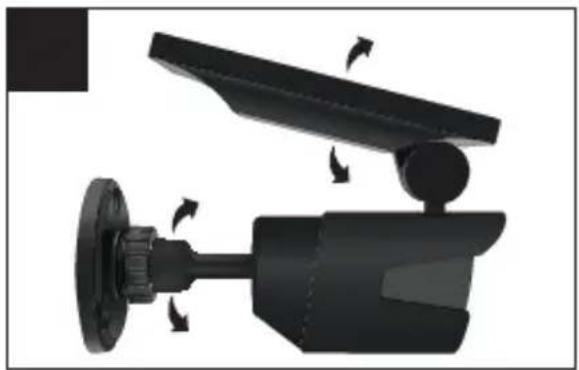
natural_image
Mechanical device with rotating components and directional arrows indicating motion (no text or symbols)
text_image
#E# ↓ ↓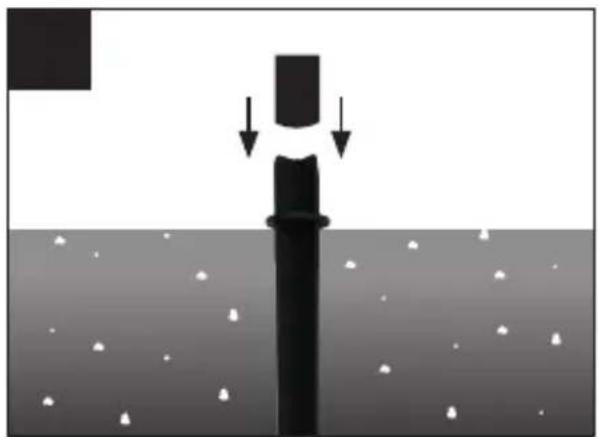
natural_image
Diagram showing a vertical structure with downward arrows indicating force or displacement, above a surface with scattered white particles (no text or symbols)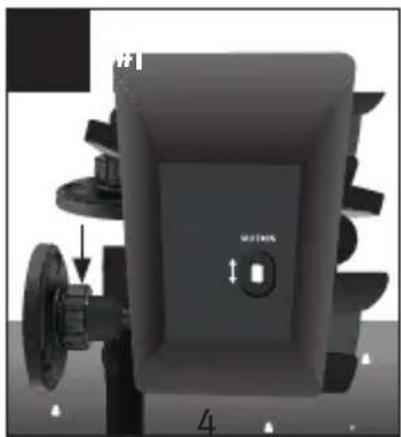
natural_image
3D mechanical component diagram showing a housing with mounting holes and a central button (no text or symbols)
text_image
#J #JDE
IMPORTANT SAFETY INSTRUCTIONS
- Read this instruction manual carefully before using the lamp! Observe the safety instructions during installation. Retain this instruction manual for future reference. If the device is passed on to third parties, these operating instructions must also be passed on.
- Cease use of the device if it is damaged in any way.
- Do not swallow any small parts. Keep small parts out of the reach of children. This product is not suitable for children. This product is not a toy! Keep the device out of the reach of children.
- Never attempt to replace the LED. The LED cannot be replaced.
- Make sure that the skin, eyes and mucous membranes never come into contact with the battery fluid/acid. In the event of contact with battery fluid, immediately rinse the affected areas with plenty of clean water and seek medical advice.
INSTALLATION + TIPS
- Choose a location for the device that receives as much direct sunshine as possible during the day. Avoid areas under trees or bushes, as these will prevent the device from charging properly.
- Do not install the device in the vicinity of an existing outdoor light. The built-in sensor will prevent the solar light from being switched on.
- If you use the light in autumn and winter, please note that the batteries may not fully charge due to reduced daylight hours. This can affect the duration of time that the lights stay on.
- The device is weatherproof and robust.
- When using the ground stake, first put the ground stake tip in the ground.
WALL INSTALLATION
- Remove the mounting plate (3) from the device by turning it anti-clockwise (#A).
- Hold the mounting plate (3) against the desired surface, and mark the holes with a pencil. When you are sure, drill the holes in the desired positions
- Fasten the mounting plate (3) with the supplied screws + dowels (#B).
- Align the arm of the device with the opening on the mounting plate. Turn the rotary knob clockwise again to tighten and fix in place (#C).
- Important: Make sure that you always align the solar panel toward the source of solar radiation! Swing the swivel arm (2) to receive the light as needed (#D).
- The mounting plate (3) must be attached to the device.
- First insert the ground stake tip into the ground. Pay attention to the type of ground. If the ground is too hard, this can damage the ground stake (#E).
- Now attach the top part (upper part of the ground stake) to the top of the ground stake (#F).
- Place the mounting plate (3) on the ground stake and carefully attach it (#G).
- Now align the solar panel. Important: Make sure that you always align the solar panel toward the source of solar radiation! Swing the swivel arm (2) to receive the light as needed (#H).
USE
- Important: Before using the device for the first time, expose it to direct sunlight for at least 6-10 hours to charge it. If there is insufficient sunlight, the battery may take longer to charge.
- As soon as it gets dark, the light switches on automatically when movement is detected. The light stays on for 30 seconds, and turns off when motion is no longer detected.
- The solar light does not turn on in daylight. The battery will be charged during this time.
- Similarity to a surveillance camera (#1): Once the switch is in the MOTION
(ON) position, the red LED light on the front will flash, simulating a surveillance camera.
CHARGE RHYTHM (#J)
5:00 Uhr, Morning - The device starts charging.
11:00 Uhr, Midday – The device charges automatically during the day.
19:00 Uhr, Evening/Night – The device turns on automatically as soon as motion is detected.
5:00 Uhr, Morning - The device starts charging.
IMPORTANT: These times may vary depending on the season.
| TROUBLESHOOTING | ||
| PROBLEM POSSIBLE CAUSE POSSIBLE SOLUTION | ||
| The light does not turn on. | The device is not sufficiently charged. | Choose a place with optimal sun exposure - the device needs to be charged for at least 6-10 hours. |
| The device is in the OFF position. | Switch the device to the motion mode position. | |
| The device has been placed next to another strong light. | Do not install the device in the vicinity of an existing outdoor light. The built-in sensor will prevent the solar light from being switched on. | |
| The device has been placed under a tree or vegetation. | Avoid areas under trees or bushes, as these will prevent the device from charging properly. | |
| The solar panel is dirty. Clean | the solar panel with a soft cloth. | |
TECHNICAL DATA
- LED: 8 x
• Solar panel: 5.5 V, 300 mA - Sensor range: up to 7.5 m
• Lighting duration: 30s - Battery: 2 x Lithium ion battery 3.7V ==1800mAh 6,66Wh IPX4
- Charging time: min. 6-10 hrs
Made in China
FR
CONSIGNES DE SÉCURITÉ IMPORTANTES
DÔLEŽITÉ BEZPEČNOSTNÉ POKYNY
natural_image
Two identical line drawings of a trash bin with no text or symbols, each marked with a crossed-out symbol (no text or labels present)EN: This symbol means that such electrical equipment or batteries must not be disposed of with normal household waste. You are legally obliged to hand in such items - free of charge - to a public collection point or distributor-created collection point for the recycling of electrical devices and expired bulbs and batteries within the scope of the Electrical and Electronic Equipment Act that are not encapsulated by or fixed into the appliance, and can be removed or separated from the appliance non-destructively, for disposal at the end of their service life. Use rechargeable batteries instead of single-use batteries wherever possible. The recovery and recycling of old appliances makes an important contribution
to protecting our environment. Improper disposal can result in toxic substances being released into the environment, which can have harmful effects upon people, animals and plants. Batteries with an increased pollutant content are also marked with the following symbols: Cd = cadmium, Hg = mercury, Pb = lead. Consumers are themselves responsible for deleting any personal data from appliances.
office@mediashop-group.com | www.mediashop.tv