TS18S - Subwoofer ALTO - Free user manual and instructions
Find the device manual for free TS18S ALTO in PDF.
| Brand | Alto Professional |
| Model | TS18S |
| Category | Subwoofer |
| Subwoofer Type | Powered (active) |
| Power | Power input with fuse, on/off switch |
| Audio Inputs | 2 combo XLR/TRS/TS inputs (left and right) |
| Audio Outputs | 2 XLR Thru outputs (left and right) |
| Volume Control | Volume knob (from -∞ to full) |
| Clipping Indicator | Green LED (signal present) / red LED (limiter/protection active) |
| Speaker Use Button | Live, DJ, or EQ Off (preset EQ) |
| Phase Alignment Button | 0°, 90°, 180°, 270° (phase compensation) |
| Replaceable Fuse | Yes, rating indicated under the power input |
| Pole Mount | Pole socket (threaded base) for speaker mounting |
| Optional Casters | M6 threaded bases at the rear for casters (not included) |
| Box Contents | Subwoofer, power cable, registration card, user guide, safety instructions |
| Safety Instructions | Do not expose to rain, use on stable surface, keep cables away, hearing protection |
| Warranty | Refer to the included safety instructions and warranty information guide |
Frequently Asked Questions - TS18S ALTO
User questions about TS18S ALTO
0 question about this device. Answer the ones you know or ask your own.
Ask a new question about this device
Download the instructions for your Subwoofer in PDF format for free! Find your manual TS18S - ALTO and take your electronic device back in hand. On this page are published all the documents necessary for the use of your device. TS18S by ALTO.
USER MANUAL TS18S ALTO
text_image
ALTO PROFESSIONALTS12S TS15S TS18S
User Guide
English (2 - 5)
Guía del usuario
Español (6 - 9)
Guide d'utilisation
Français (10 - 13)
Guida per l'uso
Italiano (14 - 17)
Benutzerhandbuch
Deutsch (18 - 21)
Appendix
English (22 - 23)
User Guide (English)
Introduction
Box Contents
TS Series Subwoofer
Power Cable
Registration Card
User Guide
Safety & Warranty Manual
Support
For this User Guide, the latest information about the product (system requirements, compatibility information, etc.), or product registration, visit altoprofessional.com.
For additional product support, visit altoprofessional.com/support.
Important Safety Precautions
Please note: Alto Professional and inMusic are not responsible for the use of its products or the misuse of this information for any purpose. Alto Professional and inMusic are not responsible for the misuse of its products caused by avoiding compliance with inspection and maintenance procedures. If choosing to install and use casters, you are responsible for the safe and proper installation. Alto Professional and inMusic take no responsibility if casters are used. Please also refer to the included safety and warranty manual for more information.

Caution: To reduce the risk of electric shock, do not connect the subwoofer to a power outlet while the grille is removed.
Loudspeaker Mounting
• Always install subwoofers in accordance with applicable electrical and building codes.
- When using a pole in the pole cup on top of the subwoofer cabinet to mount a loudspeaker, ensure the pole is rated to support the loudspeaker's weight. Also, observe all safety precautions specified by the manufacturer.
- Do not mount multiple loudspeakers on the same pole.
- Always verify that the subwoofer is on a flat, level, and stable surface that can support the weight of the subwoofer and any mounted loudspeaker and mounting equipment.
- Inspect the subwoofer, pole, and associated hardware before each use and do not use equipment with worn, damaged, or missing parts.
- Always be cautious in windy, outdoor conditions. Do not attach banners or similar items to any part of a loudspeaker system. Such attachments could act as a sail and topple the system.
- Unless you are confident that you can handle the subwoofer's weight, ask another person to help you with any setup needs related to the subwoofer and any mounted speakers and related accessories.
- Make sure your cables are out of the way of performers, production crew, and audience so they will not trip over them, pulling the loudspeaker off the stand or pole.
(Optional) Attaching Casters
In order to improve the experience of transporting our subwoofers, the TS15S and TS18S come with inserts (M6 x 1.0 mm) for easily attaching casters to the rear of the cabinet. If casters are desired, please purchase 3-inch, 76 mm x 44 mm (3.00" x 1.73") mounting pattern, 150 lbs.-rated, swivel or non-swivel casters. Please follow all installation instructions from the caster manufacturer when installing.
Note: Do not reuse the screws provided with the TS Sub to install the casters. Please see the caster manufacturer's guidelines for selecting appropriate screws for M6 x 1.0 mm inserts.
Sound Level
Permanent hearing loss may be caused by exposure to extremely high noise levels. The U.S. Occupational Safety and Health Administration (OSHA) has specified permissible exposures to certain noise levels. According to OSHA, exposure to high sound pressure levels (SPL) in excess of these limits may result in hearing loss. When using equipment capable of generating high SPL, use hearing protection while such equipment is under operation.
| Hours per day | SPL (dB) | Example |
| 8 | 90 | Small |
| 6 | 92 | Train |
| 4 | 95 | Subway |
| 3 97 High level desktop monitors | ||
| 2 100 Classical music concert | ||
| 1.5 | 102 | Riveting |
| 1 | 105 | Machine |
| 0.5 | 110 | Airport |
| 0.25 or less 115 Rock concert | ||
Quick Start
Items not listed under Introduction > Box Contents are sold separately.
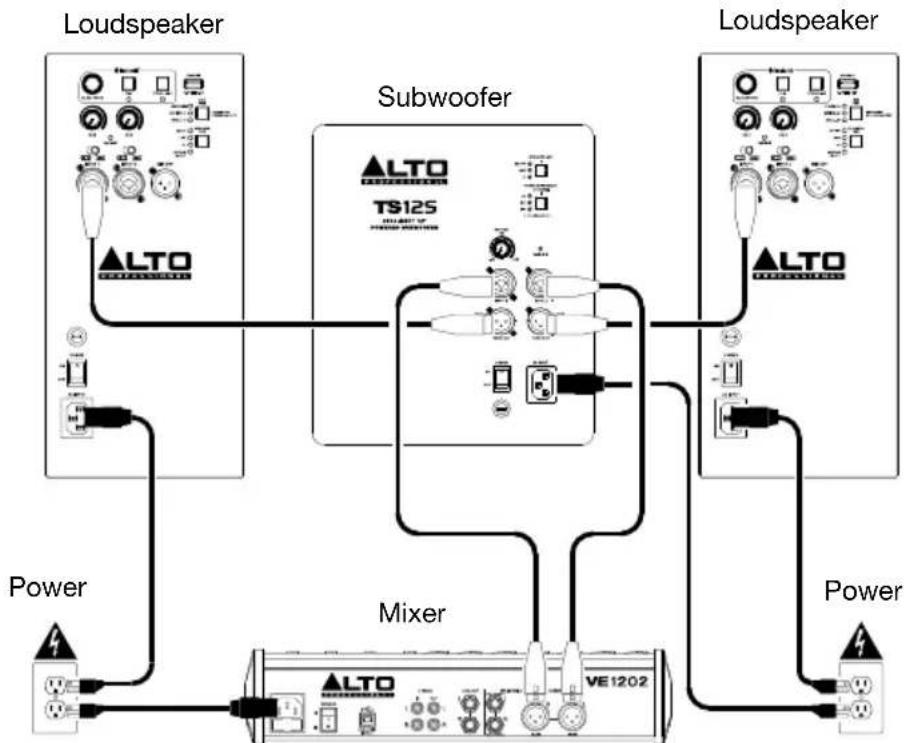
Example A: 1 subwoofer & 2 loudspeakers
Using XLR cables, connect the left and right outputs of your mixer to the inputs of your subwoofer, and then connect the Thru Outputs of the subwoofer to the input of each loudspeaker.
flowchart
graph TD
    A["Loudspeaker"] --> B["Subwoofer"]
    B --> C["Mixer"]
    C --> D["Power"]
    B --> E["ALTO"]
    E --> F["TS125"]
    F --> G["Power"]
    B --> H["ALTO"]
    H --> I["WE1202"]
    I --> J["Power"]
    style A fill:#f9f,stroke:#333
    style B fill:#ccf,stroke:#333
    style C fill:#cfc,stroke:#333
    style D fill:#fcc,stroke:#333
    style E fill:#ffc,stroke:#333
    style F fill:#cfc,stroke:#333
    style G fill:#fcc,stroke:#333
    style H fill:#ffc,stroke:#333
    style I fill:#cfc,stroke:#333
    style J fill:#fcc,stroke:#333
Example B: 2 subwoofers & 2 loudspeakers
Using XLR cables, connect the left and right outputs of your mixer to Input 1 of each subwoofer, and then connect the left Thru Output of each subwoofer to the input of each loudspeaker.

- Power Input: Connect the included power cable to this input and connect the other end of the cable to a power source. Make sure the Power Switch is set to off when plugging and unplugging the cable.
- Fuse: If the unit's fuse is broken, power off the subwoofer and disconnect it from the power outlet, and then lift this tab to replace the fuse. Replace it with a fuse that has the appropriate rating (printed under the unit's power cable input). Using a fuse with an incorrect rating can damage the unit and/or fuse.
- Power Switch: Turns the subwoofer on/off. Make sure the Volume knob is set to “ - ” before turning it on.
- Thru Output: Use standard XLR cables to connect these outputs to a loudspeaker. Input 1's signal is sent to the left Thru Out and Input 2's signal is sent to the right Thru Out.
- Inputs: Use a standard XLR, TS, or TRS cable (not included) to connect your sound source to these inputs. 1 is the left input, and 2 is the right input.
- Volume: Turn this knob to adjust the subwoofer's output volume.
- Signal/Limit LED: This LED lights up green when an audio signal is sent to the subwoofer—it flashes at lower levels and lights solidly at higher levels. The LED lights up red when output limit/protection is active—if the LED is lit red continuously, reduce the volume of your audio source.
- Speaker Use Button: Press this button to select the front-end EQ applied to the signal using these options: Live (slightly less extreme low-frequency with enhanced 60 Hz – 80 Hz for kick drum and bass guitar emphasis), DJ (enhanced low-frequency bump) or EQ Off (flat response).
Note: If you are using TS4 mains, please match the Speaker Use settings between the TS4 top and TS4 Sub for optimal performance. If you are using TS4 mains with a custom EQ, please choose whichever TS Subs Speaker Use setting sounds best with the custom EQ that you are using.
- Phase Alignment Button: Press this button to adjust the phase of the output by 90, 180, or 270 degrees to compensate for low-frequency cancellation.

text_image
ALTO PROFESSIONAL TS125 2500-WATT 12" POWERED SUBWOOPER 8 9 6 7 5 4 3 2 1 2 ON ON ON ON ON ON ON ON ON ON ON ON ON ON ON ON ON ON ON ON ON ON ON ON ON ON ON ONTechnical Specifications
TS12S
| Output Power | 2500 W peak @ 4 Ω |
| Transducer Low | 12" (305 mm) woofer; 3" (76.2 mm) high-temperature voice coil |
| Frequency Response | 44 Hz – 140 Hz (- 3 dB) |
| Frequency Range | 38 Hz – 152 Hz (-10 dB) |
| Maximum SPL | 130 dB (@ 1 m) |
| Connections | (2) XLR+1/4" (6.35 mm) inputs; (2) XLR outputs; (1) IEC power cable input |
| External Controls | Volume control, signal/clip limiter with LED, speaker use button, proximity button, power switch with LED |
| Electronic Protections | Electronic clip, thermal and transducer overdrive protection |
| Enclosure | Internally braced MDF cabinet; 36 mm mounting pole socket on top panel |
| Power | Connection: Standard IEC cableInput Voltage: 100-120, 50/60 Hz; 220-240 VAC 50/60 HzConsumption: 1600WFuse: 100-120V, T15AL AC250V; 220-240V, T8AL AC250V |
| Dimensions (height x width x depth) | 17.9" x 18.1" x 19.9" / 454.7 x 459.7 x 505.5 mm |
| Weight | 57.1 lbs. / 25.9 kg |
TS15S
| Output Power | 2500 W peak @ 4 Ω |
| Transducer Low | 15" (381 mm) woofer; 3" (76.2 mm) high-temperature voice coil |
| Frequency Response | 36 Hz – 110 Hz (- 3 dB) |
| Frequency Range | 31 Hz – 123 Hz (-10 dB) |
| Maximum SPL | 132 dB (@ 1 m) |
| Connections | (2) XLR+1/4" (6.35 mm) inputs; (2) XLR outputs; (1) IEC power cable input |
| External Controls | Volume control, signal/clip limiter with LED, speaker use button, proximity button, power switch with LED |
| Electronic Protections | Electronic clip, thermal and transducer overdrive protection |
| Enclosure | Internally braced MDF cabinet; 36 mm mounting pole socket on top panelCaster Insert Thread Gauge: M6 x 1.00 mm |
| Power | Connection: Standard IEC cableInput Voltage: 100-120, 50/60 Hz; 220-240 VAC 50/60 HzConsumption: 1600WFuse: 100-120V, T15AL AC250V; 220-240V, T8AL AC250V |
| Dimensions (height x width x depth) | 21.3" x 20.6" x 24.7" / 541 x 523 x 627 mm |
| Weight | 87.1 lbs. / 39.51 kg |
TS18S
| Output Power | 2500 W peak @ 4 Ω |
| Transducer Low | 18" (457 mm) woofer; 3" (76.2 mm) high-temperature voice coil |
| Frequency Response | 29 Hz – 100 Hz (- 3 dB) |
| Frequency Range | 27 Hz – 111 Hz (-10 dB) |
| Maximum SPL | 137 dB (@ 1 m) |
| Connections | (2) XLR+1/4" (6.35 mm) inputs; (2) XLR outputs; (1) IEC power cable input |
| External Controls | Volume control, signal/clip limiter with LED, speaker use button, proximity button, power switch with LED |
| Electronic Protections | Electronic clip, thermal and transducer overdrive protection |
| Enclosure | Internally braced MDF cabinet; 36 mm mounting pole socket on top panelCaster Insert Thread Gauge: M6 x 1.00 mm |
| Power | Connection: Standard IEC cableInput Voltage: 100-120, 50/60 Hz; 220-240 VAC 50/60 HzConsumption: 1600WFuse: 100-120V, T15AL AC250V; 220-240V, T8AL AC250V |
| Dimensions (height x width x depth) | 26.7" x 20.9" x 24.7" / 678.2 x 530.9 x 627.4 mm |
| Weight | 93.0 lbs. / 42.2 kg |
Trademarks & Licenses
Alto Professional is a trademark of inMusic Brands, Inc., registered in the U.S. and other countries. All other product or company names are trademarks or registered trademarks of their respective owners.