
RA-F321B - Alarm Clock JVC - Free user manual and instructions
Find the device manual for free RA-F321B JVC in PDF.
| Product type | Clock radio |
| Brand | JVC |
| Model | RA-F321B |
| Mains power | AC 230 V~ 50 Hz, power consumption 4 W |
| Backup batteries | 2 AAA batteries (not included) |
| FM frequency band | 87.5 MHz - 108 MHz |
| Station memory | Up to 20 FM stations |
| Number of alarms | 2 independent alarms |
| Wake-up sounds | Bird chirps, waves, rainforest, waves with seagulls, FM |
| Alarm snooze function | Yes (9 minutes) |
| Sleep function | 10 to 90 minutes in 10-minute intervals |
| Time projection | Yes, maximum distance 3 m |
| Screen brightness adjustment | Yes (according to ambient brightness) |
| Use | Household use only |
| Electrical class | II |
| Safety | Do not open, do not expose to water or flames, keep 10 cm clearance around |
| Maintenance | Unplug before cleaning, do not block ventilation openings |
| Repairability | No user-serviceable parts; contact customer service |
| Included accessories | Power adapter, user manual |
| Certification | Complies with directive 2014/53/EU, CE marking |
Frequently Asked Questions - RA-F321B JVC
User questions about RA-F321B JVC
0 question about this device. Answer the ones you know or ask your own.
Ask a new question about this device
Download the instructions for your Alarm Clock in PDF format for free! Find your manual RA-F321B - JVC and take your electronic device back in hand. On this page are published all the documents necessary for the use of your device. RA-F321B by JVC.
USER MANUAL RA-F321B JVC
MANUEL D'INSTRUCTIONS
GEBRUIKSAANWIJZING
MANUAL DE INSTURCCIONES
MANUAL DE INSTRUÇÕES
INSTRUCTION MANUAL


natural_image
Abstract pattern of diagonal black and white stripes on white background (no text or symbols)Hotline Darty France
WERKING VAN HET DUBBELE ALARM
natural_image
Symbol of a waste bin with crossed x- and circular wheels, no text or numbers presentWeekend 1 2 3 4 5 = Lunes a domingo
- Pulse / para confirmar. VOL+/AL2
Cómo detener la(s) alarma(s)
natural_image
Circular logo with green and dark green swirl design, registered trademark symbol (no text or numbers)Solo para España
This product is manufactured, distributed, serviced and warranted exclusively by Etablissements DARTY et Fils. “JVC” is the trademark of JVCKENWOOD Corporation, used by Etablissements DARTY et Fils under license.
WARNINGS
This appliance is intended for domestic household use only and should not be used for any other purpose or in any other application, such as for non-domestic use or in a commercial environment.
Prior to cleaning or other maintenance, the appliance must be disconnected from the supply mains.
The ventilation should not be impeded by covering the ventilation openings with items, such as newspapers, table-cloths, curtains, etc.
✿ no naked flame sources, such as lighted candles, should be placed on the apparatus.
The apparatus shall not be exposed to dripping or splashing and that no objects filled with liquids, such as vases, shall be placed on the apparatus.
Ventilation Allow at least a 10 cm gap all around the product.
This apparatus is not suitable for use in a tropical climate.
Batteries (battery pack or batteries installed) shall not be exposed to excessive heat such as sunshine, fire o h ike.t e l
To protect the environment, use local recycling facilities for battery disposal.
Where the MAINS plug or an appliance coupler is used as the disconnect device, the disconnect device shall remain readily operable.
Under the environment with electrical fast transient/ burst immunity field, the product may malfunction and need user reset to recover sometimes.
Avoid battery subjected to extremely low air pressure.
IMPORTANT SAFETY INSTRUCTIONS
- Disconnect your clock radio from the mains power supply during thunderstorms.
- Always check that you have completely switched off your clock radio before you unplug the clock radio from the mains socket.
- Do not leave the clock radio in low temperatures and moisture can form inside the product, which may damage the circuit board.
- Do not leave the clock radio in high temperatures as electronic devices and plastic parts may warp in heat.
- Do not block or cover slots, holes or openings on the product by placing on soft furnishings such as carpets, rugs or beds as these are provided for functionality and/or ventilation to ensure safe operation of the product.
- Do not attempt to open the product. This product does not contain any user serviceable parts.
- Do not use your clock radio near emergency/intensive care medical equipment or If you have a pacemaker fitted or during the electrical storm.
- For household use only. Do not use outdoors.
- The marking plate is located on the bottom of the apparatus.
Symbol

This mark is applied to show the equipment conforms to European radio equipment directive.
The letters ‘CE’ signify that products sold in the EEA have been assessed to meet high safety, health, and environmental protection requirements.
Battery handling and usage
Only adults should handle the batteries (not included). Do not allow a child to use this unit unless the battery cover is securely attached to the unit.
The battery type used in the unit is two AAA size batteries which are accessible and can be replaced.
Remove the battery cover from the unit and then remove the batteries.
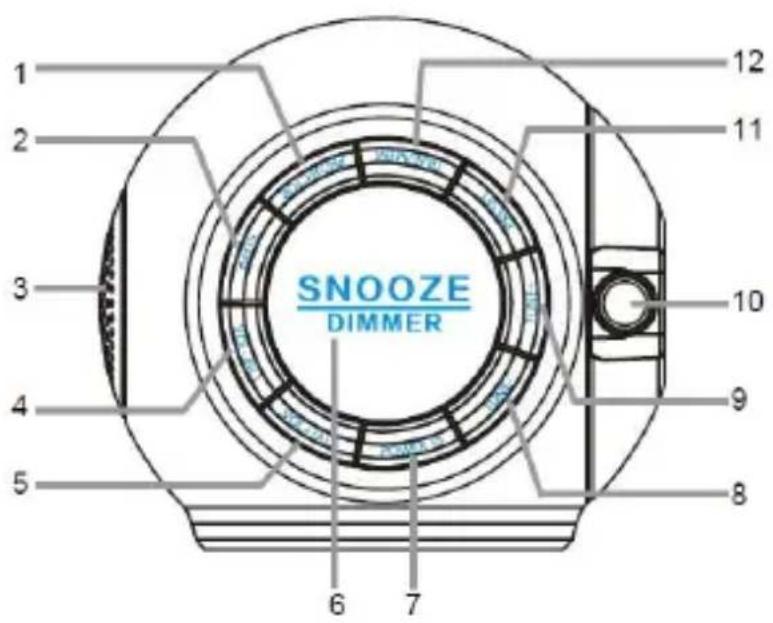
LOCATION OF CONTROL
-
button
-
button
-
Speaker
-
button/AL1
-
button+/AL2
SNOOZE DIMMER 6. button
-
button
-
button-
-
button+
-
Projection lens
-
button
-
button TIME/MEM
BACKUP BATTERY INSTALLATION
We recommend that you use the backup batteries for your clock radio. With the backup batteries (2xA not supplied), your clock radio will retain your clock and alarm settings during power outages.
- Remove the battery cover on the bottom of the unit.
- Install two batteries into the battery compartment observing the correct polarities.
- Attach the battery cover back to the unit.
IMPORTANT:
- Be sure that the batteries are installed correctly. Wrong polarity may damage the unit.
- Use only the specified size and type of battery.
- Do not mix old and new batteries.
- If the unit is not to be used for an extended period of time, remove the batteries. Old or leaking batteries can cause damage to the unit.
- Do not dispose of batteries in fire as they may explode.
SETTING THE CLOCK
-
Place the unit on a flat stable surface.
-
Plug the power adapter into the mains socket.
- "0:00" will be displayed and the unit will go to standby state.
-
Press and hold TIME/MEM until the hour digit flashes.
-
While the hour digit is flashing, repeatedly press or press & hold to set the correct hour. Press to confirm
•The minute digits will flash on the display.
- While the minute digits are flashing, repeatedly press or press & hold to set the correct minutes. Press to confirm
- “1” will flash on the display.
- While the day of the week if flashing, repeatedly press or press & hold 7- to set the correct day of the week. Press to confirm TIME/MEM
• The day of the week displayed:
1 = Monday
2 = Tuesday
3 = Wednesday
4 = Thursday
5 = Friday
weekend = Saturday & Sunday
-
To turn on the radio, press.
-
Tune in to the desired station by repeatedly pressing TUNE-TUNE+
- The wire aerial located on the rear of the unit is for FM reception. The wire should be fully extended and positioned for optimum reception.
- Press and hold 1/for about 2 seconds and then release the button, the unit will scan the frequencies until a broadcasting station strong enough for good reception is found.
- Automatic search: Press TIME/MEM. Your clock radio will auto scan for FM radio stations and automatically store them to the radio preset locations.
-
Repeatedly press to adjust the volume VOL/AL1 VOL/AL2
-
To turn off the radio, press
PRESETTING YOUR FAVOURITE RADIO STATION
Up to 20 FM radio stations can be preset.
-
Follow steps in "LISTENING TO THE RADIO" and tune in to the station that you wish to preset.
-
Press and hold until "P" with a flashing number "01" is shown on the display.
-
Repeatedly press TUNE- TUNE+ to select the desired memory slot.
-
Press again to store the station.
-
Repeat steps above to store desired stations.
To listen to preset radio stations, repeatedly press to select the desired radio station.
Before setting the alarm time, make sure the Clock has been set.
Setting Alarm 1 and/or Alarm 2
- In standby state, press and hold / VOL-/AL1 VOL+/AL2 until the hour digit flashes.
- The alarm symbol / AL1/ AL2 will appear on the display.
-
While the hour digit is flashing, repeatedly press or press & hold / TUNE+ to set the hour.
-
Press VOL-/AL1/ to confirm.
- The minute digits will flash on the display.
-
While the minute digits are flashing, repeatedly press or press & hold / TUNE+ to set the minutes.
-
Press to confirm. VOL+/AL1 VOL+/AL2
- A wake-up sound symbol will flash on the display.
- While this symbol is flashing, you can press it to select the desired wake-up sound.

Bird chirps Ocean waves Rainforest ambience


Waves with seagulls FM radio

- Press to confirm. VOL+/AL1 VOL+/AL2
- The alarm day symbol will flash on the display.
- While this symbol is flashing, repeatedly press to select the desired alarm day.
The alarm days are:
1 2 3 4 5 = Monday to Friday
weekend = Saturday and Sunday
weekend 1 2 3 4 5 = Monday to Sunday
- Press / to confirm. VOL+/AL2
To Stop Alarm(s)
When alarm 1 or 2 is sounding, the alarm symbol or 📄 will flash on the display.
Press POWER to stop the alarm. The alarm will sound again at the same time on the following da
Snooze Function
SNOOZE
When the alarm sounds, press DIMMER . The alarm will be turned off and come on again after ab 9 minutes.
To Cancel Alarm(s)
If you want to cancel the alarm 1 and/or 2, in standby state press VOL/AL1 and/or VOL+/AL2.
The alarm symbol (s) and/or will disappear from the display whilst the symbols will be displayed.
SLEEP TIMER
The sleep timer lets you decide how long you want to listen to a radio station of your choice before asleep.
- In FM radio mode, repeatedly press to set the desired sleep time from 10 to 90 minutes in 10-minute increments.
- The display will show the set sleep time and symbol.
- The radio will be turned off after the set sleep time has elapsed.
To check remaining sleep time, press SLEEP
To turn off the radio before the sleep time has elapsed, repeatedly press until the symbol disappears from the display.
SETTING THE BRIGHTNESS OF THE DISPLAY
Repeatedly press to change the brightness of the display according to your ambient light conditions.
USING THE PROJECTOR
The projector function allows you to display the time on a nearby wall or ceiling. The projected time of be best viewed at a dark room at a maximum distance of 3 metres.
-
Press to turn on the projector.
-
Adjust the projector to change the angle of rotation at which the time appears.
- Do not stare into the lens directly.
- To turn off the projector, press
TROUBLESHOOTING
No sound / power.
- Increase the volume by repeatedly pres VOL+/AL2.
- Check that the unit is plugged in.
- Check that the unit is not in standby state. Press to turn on the unit.
Radio reception is poor.
- Fully extend the wire aerial to get the best reception and sound quality.
- Retune for radio stations, refer to Listening to the Radio.
- Try moving your clock radio to another location to see if reception improves.
- Check that you do not have other electrical equipment too close to your clock radio, causing interference.
SPECIFICATIONS
| Power input: AC 230V~, 50Hz | |
| Power consumption: | 4W |
| FM Frequency range: | 87.5 MHz to 108 MHz |
\~ Alternating Current

Class II equipment
To identify equipment meeting the safety requirements specified for Class II equipment according to IEC 61140.
DISPOSAL

As a responsible retailer we care about the environment.
As such we urge you to follow the correct disposal procedure for the product, packaging materials and if applicable, accessories and batteries. This will help conserve natural resources and ensure that the materials are recycled in a manner that protects health and the environment.
You must follow laws and regulations about disposal. Waste electrical products and
batteries must be disposed of separately from household waste when the product reaches the end of it life.
Contact the store where you bought the product and your local authority to learn about disposal and recycling.
The batteries must be disposed of at your local recycling point.
We apologise for any inconvenience caused by minor inconsistencies in these instructions, which may occur as a result of product improvement and development.
EU Declaration of Conformity
The object of the declaration described above is in conformity with the relevant Union harmonisation legislation:
This declaration of conformity is drawn up under the sole responsibility of the manufacturer.
The person responsible for this declaration is:
Place, Date / Lieu :
JVC


- Hotline Darty France
- WERKING VAN HET DUBBELE ALARM
- Cómo detener la(s) alarma(s)
- WARNINGS
- IMPORTANT SAFETY INSTRUCTIONS
- Symbol
- Battery handling and usage
- LOCATION OF CONTROL
- BACKUP BATTERY INSTALLATION
- IMPORTANT:
- SETTING THE CLOCK
- PRESETTING YOUR FAVOURITE RADIO STATION
- Setting Alarm 1 and/or Alarm 2
- To Stop Alarm(s)
- Snooze Function
- SNOOZE
- To Cancel Alarm(s)
- SLEEP TIMER
- SETTING THE BRIGHTNESS OF THE DISPLAY
- USING THE PROJECTOR
- TROUBLESHOOTING
- No sound / power.
- Radio reception is poor.
- DISPOSAL
- JVC
Brand : JVC
Model : RA-F321B
Category : Alarm Clock