
Wet Clean Smart T0613 - Vacuum Cleaner TRISA - Free user manual and instructions
Find the device manual for free Wet Clean Smart T0613 TRISA in PDF.
| Product type | Floor cleaner (wet-dry vacuum) |
| Brand | TRISA |
| Model | Wet Clean Smart T0613 |
| Dimensions (L × W × H) | 354 mm × 343 mm × 1,182 mm |
| Power supply | Li-ion battery 28.8 V / 3,000 mAh; AC adapter 100-240 V ~ 50/60 Hz |
| Rated power | 300 W |
| Main motor | 250 W |
| Brush roller motor | 50 W |
| Noise level | 84 dBA |
| Charging time | 3 to 4 hours |
| Protection | IPX4 |
| Filter | HEPA (ref. 9506.9803) |
| Brush roller | Removable (ref. 9506.9802) |
| Battery | Li-ion (ref. 9506.9801) |
| Cleaning modes | Auto and Max |
| Special features | Self-cleaning, self-drying, spray, multilingual voice prompts |
| Maintenance | Regular cleaning of brush roller, HEPA filter, wastewater tank, and recovery pot |
| Warranty | 5 years (battery: 1 year or 500 cycles) |
| Operating temperature | 5 °C to 45 °C |
| Charging temperature | 40 °C max |
Frequently Asked Questions - Wet Clean Smart T0613 TRISA
User questions about Wet Clean Smart T0613 TRISA
0 question about this device. Answer the ones you know or ask your own.
Ask a new question about this device
Download the instructions for your Vacuum Cleaner in PDF format for free! Find your manual Wet Clean Smart T0613 - TRISA and take your electronic device back in hand. On this page are published all the documents necessary for the use of your device. Wet Clean Smart T0613 by TRISA.
USER MANUAL Wet Clean Smart T0613 TRISA
text_image
Trisa® ELECTRONICS 5 YEARS GUARANTEE 2018 TRISA EQUA PERFORMANCEINSTRUCTIONS FOR USE
DE - Hartbodenreiniger 17
EN - Hard floor cleaner 68
text_image
A B C D E F G H I J K L M N O P Q R S YAAZ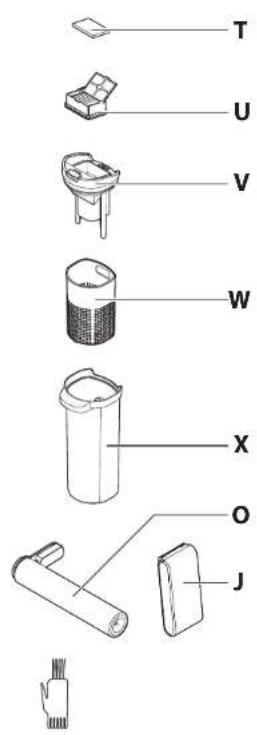
text_image
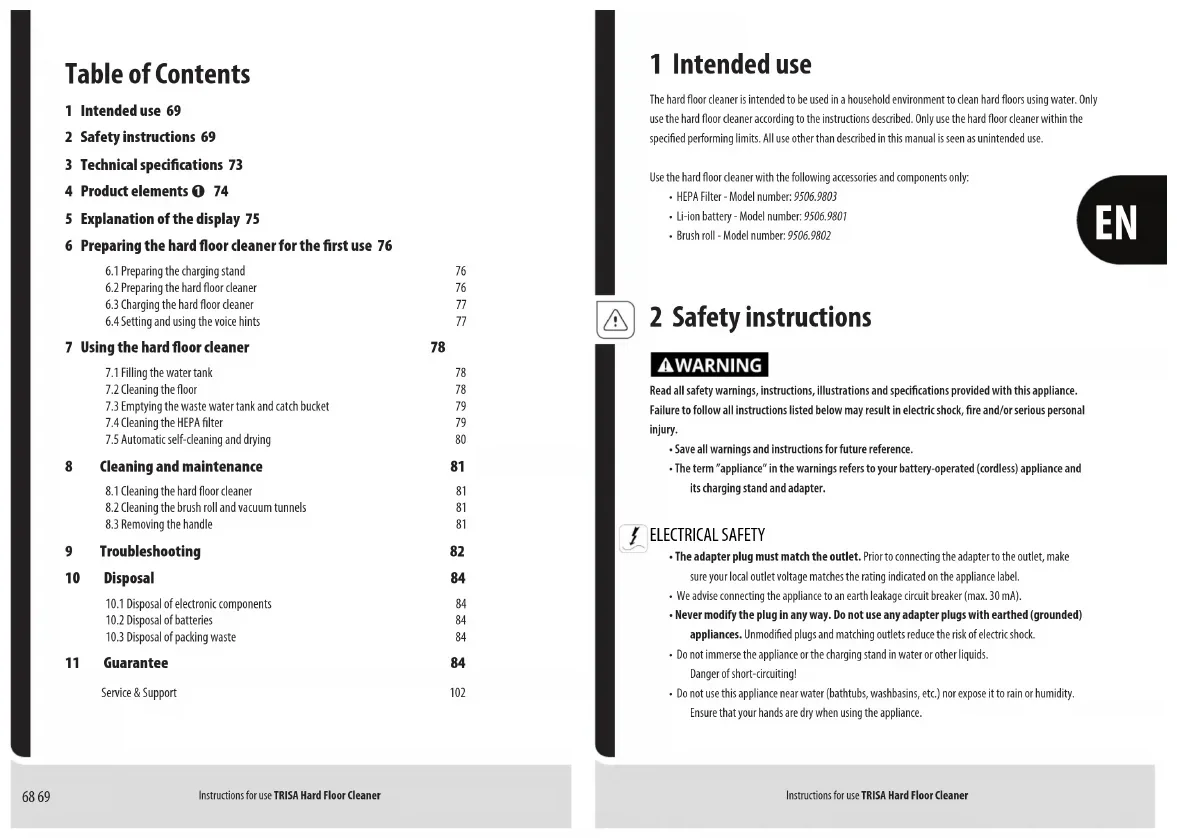
T U V W X O J
2
natural_image
Technical line drawing of a mechanical component with an arrow indicating assembly or insertion (no text or symbols present)3
natural_image
Diagram of an electronic device connected to a power outlet, showing wiring and components (no text or symbols)4
natural_image
Illustration of a hand holding a vertical tool with a downward arrow indicating motion (no text or symbols)5
natural_image
Three-step diagram showing mechanical assembly with a tool and curved arrows indicating motion (no text or symbols)6
text_image
Diagram showing a vacuum cleaner next to two digital display screens displaying blood glucose levels at 32% and 100%.7
text_image
1" 3" English Deutsch Italiano Français Español
text_image
8 9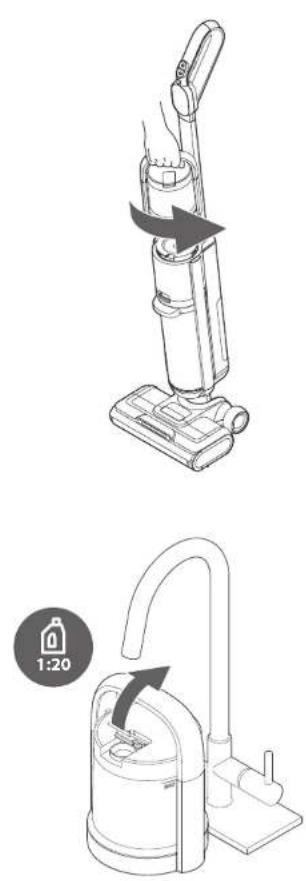
natural_image
Line drawings of a vacuum cleaner with a 1:20 ratio indicator (no text or symbols on the device itself)Instructions for use TRISA Hard Floor Cleaner
10
text_image
Diagram showing a vacuum cleaner with a hand operating the air gap and its max/aux position labeled 'Auto' and 'Max'Instructions for use TRISA Hard Floor Cleaner
12
text_image
Technical diagram showing two mechanical components with numbered annotations indicating assembly or identification.13
natural_image
Line drawing of a vacuum cleaner with a downward arrow indicating motion (no text or symbols)14
text_image
Diagram illustrating three types of waste management symbols: no litter, hand washing, and clean waste.15
natural_image
Line drawing of a vacuum cleaner with a handle and base, no text or symbols present16
text_image
Diagram illustrating a process with labeled icons and directional arrows, including hand gestures and a drop symbol.17
text_image
3"18

natural_image
Line drawing of a vacuum cleaner with hand gesture and circular refresh symbol (no text or labels)
●
natural_image
Technical line drawing of a mechanical component with an arrow indicating direction (no text or symbols)20
natural_image
Illustration of a hand holding a tool interacting with a mechanical device, with a large downward arrow indicating motion (no text or symbols present)21
natural_image
Technical line drawing of a cylindrical mechanical component with internal gear-like structure (no text or symbols)22
natural_image
Line drawing of a hand using a tool to adjust or install a mechanical component (no text or symbols present)23
natural_image
Technical line drawing of a vacuum cleaner assembly with tool handle (no text or symbols)24
natural_image
Diagram of a mechanical device with a downward arrow indicating force or movement (no text or symbols present)25
natural_image
Illustration of a hand using a vacuum cleaner to lift a device, with arrows indicating motion direction (no text or symbols)Inhaltsverzeichnis
Service & Support 102
Service & Support 102
Service & Support 102
1 Intended use 69
2 Safety instructions 69
3 Technical specifications 73
4 Product elements ① 74
5 Explanation of the display 75
6 Preparing the hard floor cleaner for the first use 76
6.1 Preparing the charging stand 76
6.2 Preparing the hard floor cleaner 76
6.3 Charging the hard floor cleaner 77
6.4 Setting and using the voice hints 77
7 Using the hard floor cleaner 78
7.1 Filling the water tank 78
7.2 Cleaning the floor 78
7.3 Emptying the waste water tank and catch bucket 79
7.4 Cleaning the HEPA filter 79
7.5 Automatic self-cleaning and drying 80
8 Cleaning and maintenance 81
8.1 Cleaning the hard floor cleaner 81
8.2 Cleaning the brush roll and vacuum tunnels 81
8.3 Removing the handle 81
9 Troubleshooting 82
10 Disposal 84
10.1 Disposal of electronic components 84
10.2 Disposal of batteries 84
10.3 Disposal of packing waste 84
11 Guarantee 84
Service & Support 102
1 Intended use
The hard floor cleaner is intended to be used in a household environment to clean hard floors using water. Only use the hard floor cleaner according to the instructions described. Only use the hard floor cleaner within the specified performing limits. All use other than described in this manual is seen as unintended use.
Use the hard floor cleaner with the following accessories and components only:
• HEPA Filter - Model number: 9506.9803
- Li-ion battery - Model number: 9506.9801
• Brush roll - Model number: 9506.9802

2 Safety instructions
WARNING
Read all safety warnings, instructions, illustrations and specifications provided with this appliance. Failure to follow all instructions listed below may result in electric shock, fire and/or serious personal injury.
- Save all warnings and instructions for future reference.
- The term "appliance" in the warnings refers to your battery-operated (cordless) appliance and its charging stand and adapter.
ELECTRICAL SAFETY
- The adapter plug must match the outlet. Prior to connecting the adapter to the outlet, make sure your local outlet voltage matches the rating indicated on the appliance label.
• We advise connecting the appliance to an earth leakage circuit breaker (max. 30 mA). - Never modify the plug in any way. Do not use any adapter plugs with earthed (grounded) appliances. Unmodified plugs and matching outlets reduce the risk of electric shock.
- Do not immerse the appliance or the charging stand in water or other liquids. Danger of short-circuiting!
-
Do not use this appliance near water (bathtubs, washbasins, etc.) nor expose it to rain or humidity. Ensure that your hands are dry when using the appliance.
-
If the appliance falls into water, have it checked by an electrician before using it again.
- The appliance is designed for household use and not for industrial operation or commercial use. Do not operate the appliance outdoors.
PERSONAL SAFETY
- This appliance can be used by children aged 8 years and above and persons with reduced physical, sensory or mental capabilities, or lack of experience and knowledge, if they have been given supervision or instruction concerning use of the appliance in a safe way and understand the hazards involved. Children shall not play with the appliance. Cleaning and user maintenance shall not be done by children without supervision.
- Keep packaging (e.g. plastic bags) away from children.
- Keep children and bystanders away while operating the appliance. Distractions can cause you to lose control.
- Stay alert, watch what you are doing and use common sense when operating the appliance. Do not use the appliance while you are tired or under the influence of drugs, alcohol or medication. A moment of inattention while operating appliances may result in serious personal injury.
- Keep the appliance away from animals. Animals shall not play with the battery or charger.
- The appliance contains rotating brushes. A hazard may occur if the appliance runs over power supply cords.
- Never place fingers or objects into appliance openings. Do not cover appliance openings. Remove objects (hair, lint, etc.) that block the brushes.
- When operating the appliance. Do not wear loose clothing or jewellery. Keep your hair, hands, and feet away from the rotating brush. Loose clothes, jewellery, long hair or body parts can be caught in moving parts.
- The appliance uses a liquid dispensing system. Only fill the liquid dispensing system with water or non-foaming liquid detergent and do not exceed the maximum amount of liquid as indicated by the max fill line.
- Do not touch or swallow leaking liquids. In case of contact with skin or clothing, lather immediately with soap and rinse with plenty of water. If swallowed or in case of contact with the eyes, contact a toxicological institute immediately.

APPLIANCE USE AND CARE
- Use the appliance only on suitable floors.
- Do not pull the power cable over sharp edges. Do not wedge or bend it. A short circuit can occur if the cable breaks. Never touch the power cable and plug with damp hands.
- Always switch off the appliance and unplug the power cable whenever you leave the appliance unattended; before assembling, disassembling, or cleaning it; when it fails to work properly; and after use.
- Opening the appliance is only allowed through the openings provided for this purpose (e.g. for changing the HEPA filter, etc.).
- Only operate the appliance at an ambient temperature of 5^ to 45^ .
- Do not use accessories that are not recommended or sold by the manufacturer.
- Never place the appliance or cable on hot surfaces or near open flames. Do not store the appliance in or expose it to intense heat (from radiators, prolonged sunshine, etc). Only extinguish a burning appliance using a fire blanket.
- Remove the plug from the outlet and remove the battery from the appliance before cleaning or maintaining the appliance.
- Store the appliance out of the reach of children and do not allow persons unfamiliar with the appliance or these instructions to operate the appliance.
- Store the unit with damp floor brushes exclusively in the charging stand to prevent damage to the floor.
- Maintain the appliance. Before each use, check for misalignment or blockage of moving parts, breakage of parts or any other condition that may affect the appliance's operation. Never switch on a damaged appliance (including a damaged power cable). Have repairs carried out by, or obtain replacement parts from, the manufacturer, the manufacturer's service point or qualified experts. If damaged, have the appliance repaired before use.
- If smoke comes from the appliance, switch it off immediately. In case of abnormal noises, odours, overheating, or leaking liquid, switch off the appliance immediately or remove it from the adapter and take it into the open air.
- Risk of injury! Never open the appliance yourself. Only trained experts shall repair electrical appliances. Unskilled repairs can cause considerable danger to the user.
- Use the appliance in accordance with these instructions, taking into account the working conditions and the work to be performed. Use of the appliance for operations different from those intended could result in a hazardous situation.

BATTERY USE AND CARE
- If batteries are not used appropriately, liquid may be ejected from them. Avoid contact with the liquid and the leaking battery. If contact accidentally occurs, flush with water. If liquid contacts eyes, seek medical help. Liquid ejected from the battery may cause irritation or burns.
- Do not expose a battery to fire or excessive temperature. Exposure to fire or temperature above 130°C / 265°F may cause an explosion.
- Follow all charging instructions and do not charge the battery or appliance outside the temperature range specified in the instructions. Charging improperly or at temperatures outside the specified range may damage the battery and increase the risk of fire.
- Keep batteries out of reach of children. Do not allow children to replace batteries without adult supervision. Leaking batteries can lead to chemical burns, perforation of soft tissue, and death.
-
Always insert batteries correctly, with regard to the polarity (+ and -) marked on the battery and the equipment. Do not short-circuit batteries. Do not force discharge batteries. Do not heat batteries. Do not weld or solder directly onto batteries. Do not dismantle batteries. Do not deform batteries. Do not dispose of batteries in fire. Do not encapsulate and/or modify batteries. When batteries are not operated safely or are damaged, they may present a fire and/or explosion hazard.
-
Risk of short-circuit! Do not bend or short-circuit the battery contacts.
- Avoid deep discharge. Recharge the batteries immediately.
- Exhausted batteries shall be immediately removed from the appliance and properly disposed of.
• The battery should not be exposed to water. - Store unused batteries in their original packaging away from metal objects. If already unpacked, do not mix or jumble batteries.
- Remove the battery from the appliance if it will not be used for an extended period of time.

SERVICE
- Have your appliance serviced by the manufacturer, the manufacturer's service point or qualified experts using only identical replacement parts. This will ensure that the safety of the appliance is maintained.

3 Technical specifications
| PARAMETER | UNIT |
| Model 9506.13 / Wet Clean Smart T0613 | |
| IP protection | IPX4 |
| Rated power | 300 W |
| Adapter input | AC 100~240 V / 50~60 Hz / 0.8 A |
| Adapter output | DC 34.2 V / 1000 mA |
| Battery voltage | 28.8 V |
| Battery capacity | 3000 mAh |
| Main motor power | 250 W |
| Brush roll motor power | 50 W |
| Noise level | 84 dBA |
| Charging time | 3 to 4 hours |
| Charging temperature | 40°C |
| Dimensions | 354 mm × 343 mm × 1182 mm |
4 Product elements ①
A. Mode button
B. Power button
C. Self-cleaning button
D. Spray button
E. Display
F. Voice button
G. Handle
H. Water tank
I. Waste release button
J. Battery
K. Battery cover
L. Cover release tab
M. Brush roll release buttons
N. Water nozzle
O. Brush roll
P. Brush roll cover
Q. Accessory holder
R. Charging stand
S. Battery holder
T. Sponge
U. HEPA filter
V. Filter holder
W. Catch bucket
X. Waste water tank
Y. Adapter
Z. Pipe cleaning brush
AA. Cleaning brush
5 Explanation of the display
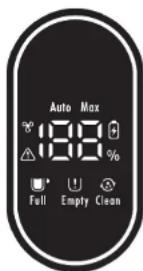
text_image
Auto Max 188 % Full Empty Clean| SYMBOL | EXPLANATION |
| Self-drying mode active. | |
| Self-cleaning mode active. | |
| Auto | Automatic cleaning mode active. |
| Max | Maximum power cleaning mode active. |
| Brush roll blocked.Brush tunnel clogged.Battery overheated or defective. | |
| Water tank is empty. | |
| Waste water tank is full.Sensor is dirty. | |
| Battery capacity below 20%. |

6 Preparing the hard floor cleaner for the first use
6.1 Preparing the charging stand
The hard floor cleaner comes with a charging stand intended to house the hard floor cleaner for charging and holding the brush roll, pipe cleaning brush and a detergent bottle (not provided).
To prepare the charging stand:
- Attach the accessory holder Ⓞ and battery holder ⑤ to the charging stand Ⓡ.
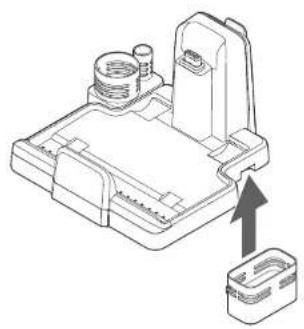
- Connect the adapter ⑦ to the base. ③

WARNING! Use only the supplied AC adapter with the appliance. Other AC adapters may damage the hard floor cleaner. Do not use the supplied AC adapter with other appliances.
- Connect the adapter Ⓨ to a suitable socket.
- Put the charging stand Ⓡ on the floor.
6.2 Preparing the hard floor cleaner
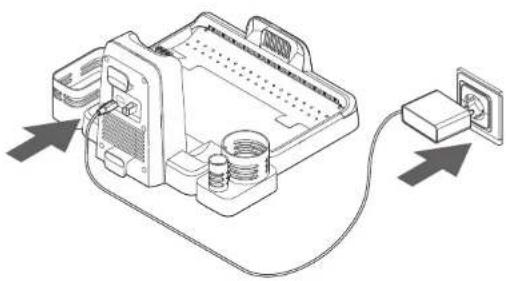
To prepare the hard floor cleaner:
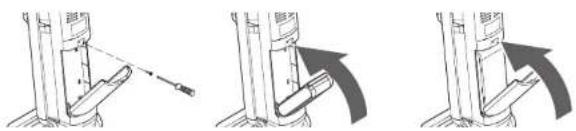
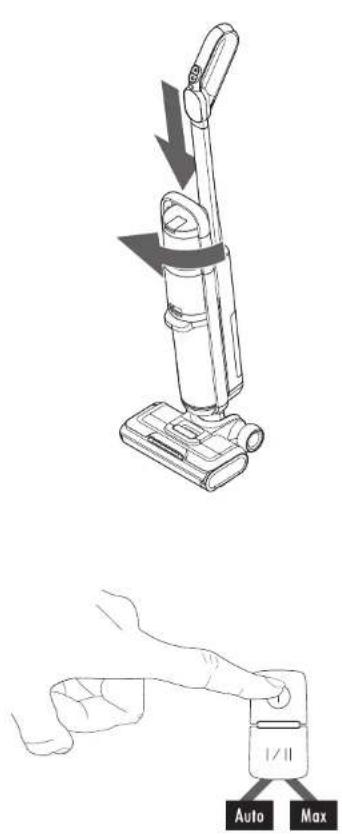
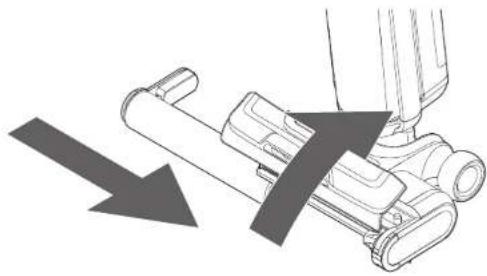
- Hold the handle Ⓐ tightly and push it into the main body until you hear a click. 4
- Remove the screw and remove the battery cover Ⓚ. ⑤
- Put the battery ① in the hard floor cleaner.

WARNING! Do not use a battery that is damaged or modified. Damaged or modified batteries may exhibit unpredictable behaviour resulting in fire, explosion or risk of injury.
- Attach the battery cover Ⓚ and screw.
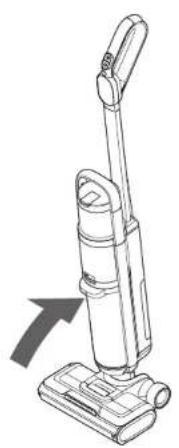
6.3 Charging the hard floor cleaner
To charge the hard floor cleaner:
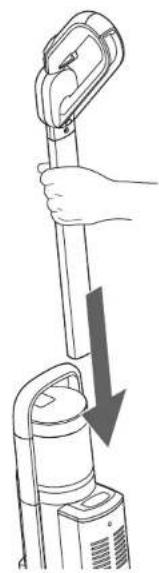
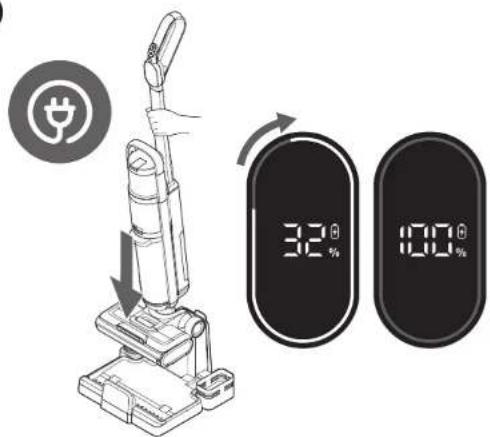
- Lift the hard floor cleaner. ⑥
- Put the hard floor cleaner on the charging stand Ⓡ.
While charging, the display shows the current battery percentage and a spinning blue light. If the battery is full, the display shows a solid blue light.
If the battery is below 20% capacity, the display shows a red battery symbol.
6.4 Setting and using the voice hints
The hard floor cleaner is equipped with voice hints to tell you, for example, that:
- An automatic self-cleaning is due.
• The water tank needs to be refilled. - The waste water tank needs to be emptied or cleaned.
• The brush roll needs to be cleaned.
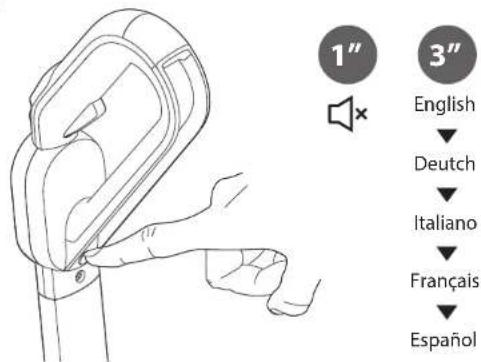
To set the voice language:
- Press and hold the voice button Ⓔ for 3 seconds to switch between the languages: English, German, Italian, French, and Spanish.
To mute the voice hints:
- Press the voice button Ⓔ briefly. ⑦

7 Using the hard floor cleaner
7.1 Filling the water tank
- Twist the water tank Ⓗ counterclockwise. ⑧
- Pull the water tank Ⓗ off the hard floor cleaner.
- Open the cap of the water tank Ⓗ
- Fill the water tank Ⓗ with water up to the MAX line. ⑨
NOTICE!
To avoid damaging the hard floor cleaner, make sure the water is not more than - If necessary, add a suitable non-foaming liquid detergent in a 1:20 ratio.
- Close the water tank Ⓗ.
- Push the water tank Ⓗ into the hard floor cleaner.
- Twist the water tank Ⓗ clockwise. Ⓛ
7.2 Cleaning the floor
- Lift the hard floor cleaner off the charging stand Ⓡ.
- Press the power button Ⓗ.
The hard floor cleaner is on and the brush roll Ⓞ starts spinning.
WARNING! Hold the handle tightly. The hard floor cleaner can move by itself if not held tightly. - Select the Auto or Max intensity modes by pressing the mode button Ⓐ. 11
- Make the floor wet by pushing the hard floor cleaner forward and pressing the spray button Ⓓ. 2
- Dry the floor by pulling the hard floor cleaner back.

In Auto mode, the hard floor cleaner senses the amount of dust and automatically adjusts the suction accordingly. When the suction intensity is high, the display will show a red colour. When the suction intensity is low, the display will show a blue colour.
In Max mode, the maximum suction intensity is set.
The hard floor cleaner switches to standby mode when it is placed upright. To remove excess water, the brush roll is spun out for 3 seconds. After 5 minutes of non-use, the device switches off.
7.3 Emptying the waste water tank and catch bucket
The hard floor cleaner's waste water system consists of a HEPA filter, filter holder, catch bucket and waste water tank. Clean the catch bucket and waste water tank after each use.
To empty the waste water tank and catch bucket:
- Press the power button Ⓑ to switch the hard floor cleaner off.
- Remove the waste water tank Ⓧ by pressing the waste release button Ⓐ.
- Disassemble the waste water tank Ⓕ, catch bucket Ⓦ, filter holder Ⓧ and HEPA filter Ⓤ.
NOTICE! Make sure the HEPA filter stays dry. - Empty the waste water tank Ⓕ and catch bucket Ⓦ.
- Clean and dry the waste water tank Ⓕ and catch bucket Ⓦ.
- Assemble the waste water tank Ⓕ, catch bucket Ⓦ, filter holder Ⓥ and HEPA filter Ⓤ again.
- Put the waste water tank Ⓧ back into the hard floor cleaner. 15
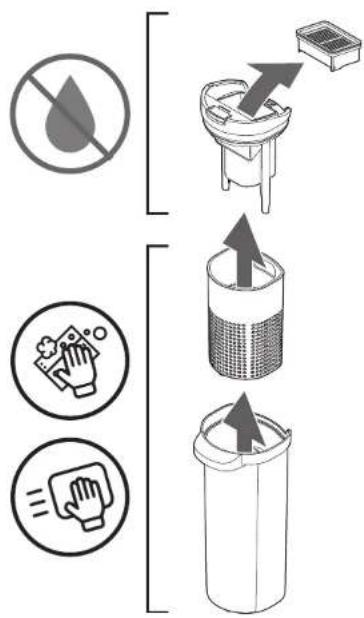
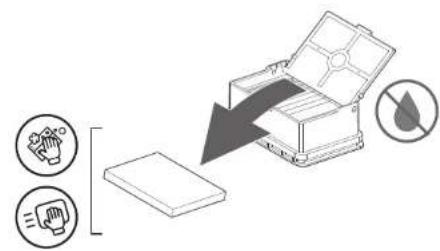
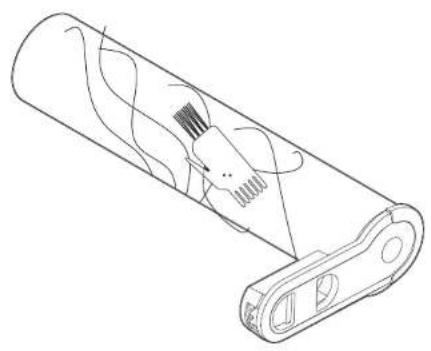
7.4 Cleaning the HEPA filter
The hard floor cleaner has a HEPA filter containing a sponge. Clean the sponge after each use. Replace the HEPA filter every 6-12 months.
- Press the power button Ⓑ to switch the hard floor cleaner off.
- Remove the waste water tank Ⓕ by pressing the waste release button Ⓔ.
- Remove the HEPA filter Ⓗ.
- Open the HEPA filter Ⓗ and remove the sponge Ⓣ. 16
- Shake any dirt off the sponge Ⓣ, or wash the sponge Ⓣ with water.
WARNING! Make sure the sponge is completely dry and clean before putting it back in the filter.

-
Shake the dust out of the HEPA filter Ⓗ.
-
Put the sponge Ⓣ back in the HEPA filter ⏻, and put the HEPA filter ⏱ back in the hard floor cleaner.
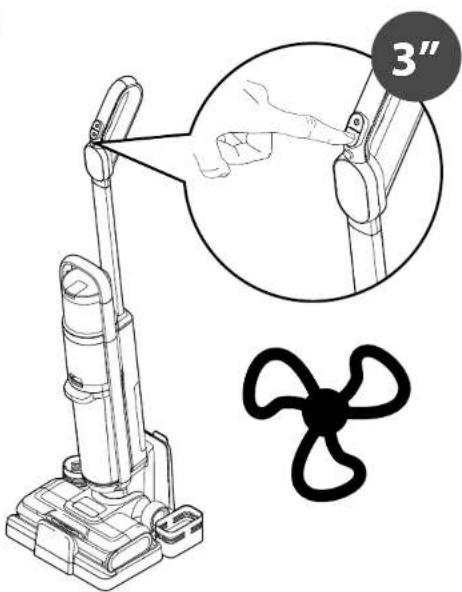
7.5 Automatic self-cleaning and drying
Entering the self-drying mode 17
The hard floor cleaner is equipped with a self-drying mode, capable of drying the brush roll.
To enter the self-drying mode:
- Put the hard floor cleaner on the charging stand Ⓡ.
- Press and hold the mode button Ⓐ for three seconds.
A symbol shows on the display Ⓔ.
Alternatively, to avoid using self-drying mode:
- Pinch the brush roll Ⓞ release buttons Ⓜ and remove the brush roll Ⓥ.
- Put the brush roll Ⓞ in the accessory holder Ⓞ and let the brush roll Ⓞ dry completely.
Entering the self-cleaning mode 18
The hard floor cleaner is equipped with a self-cleaning mode, capable of cleaning the brush roll.
To enter the self-cleaning mode:
- Put the hard floor cleaner on the charging stand Ⓡ.
- Make sure the water tank Ⓗ is filled, and the battery Ⓙ capacity is above 10%.
- Press the self-cleaning button ©.
A ⚙ symbol shows on the display Ⓔ. The hard floor cleaner dispenses water and turns the brush roll to clean itself.
After the self-cleaning is completed, the hard floor cleaner starts the self-drying mode automatically.

8 Cleaning and maintenance
8.1 Cleaning the hard floor cleaner
- Clean the hard floor cleaner using a damp cloth.
- Dry the hard floor cleaner using a cloth.
WARNING! Do not use any solvent based cleaners.

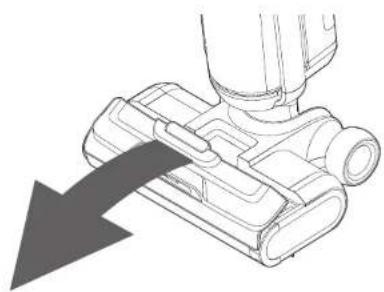
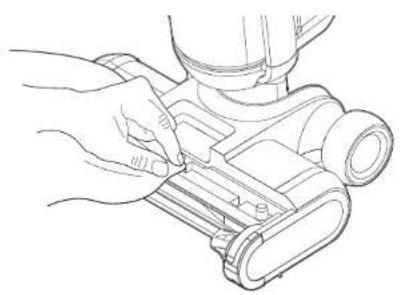
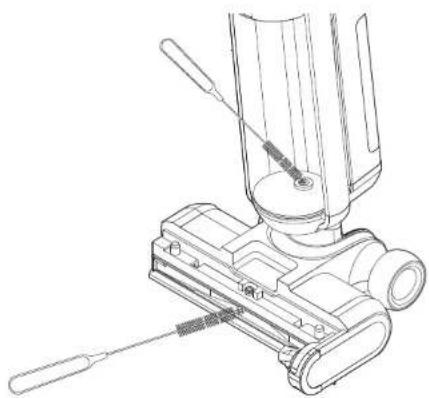
8.2 Cleaning the brush roll and vacuum tunnels
A pipe cleaner is provided with the hard floor cleaner. Use it to clean out any debris from the vacuum tunnel.
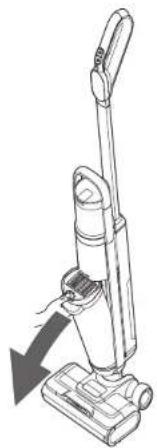
- Remove the waste water tank Ⓧ by pressing the waste release button Ⓐ.
- Pull on the cover release tab ① and remove the brush roll cover ②.
- Pinch the brush roll release buttons Ⓜ and remove the brush roll Ⓐ.
- Clean the ball bearings and cut away any tangled hair using the provided cleaning brush AA.
- Clean the floor nozzle using a cloth.
- Clean the floor nozzle and vacuum tunnel with the provided pipe cleaning brush ⑦.
- Push the brush roll @ back into the hard floor cleaner until you hear a click.
- Put the brush roll cover Ⓟ back onto the hard floor cleaner. 24
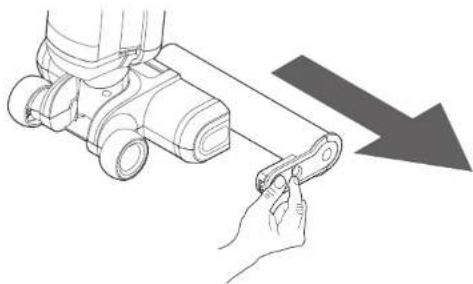
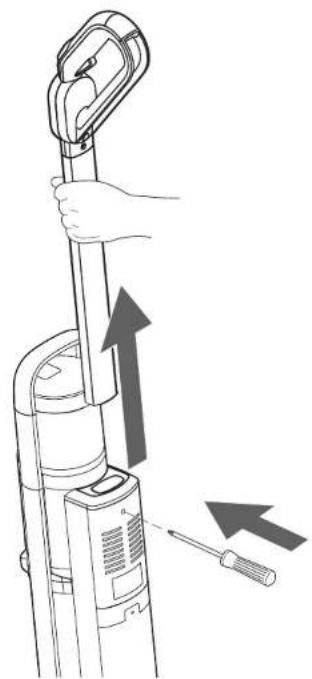
8.3 Removing the handle
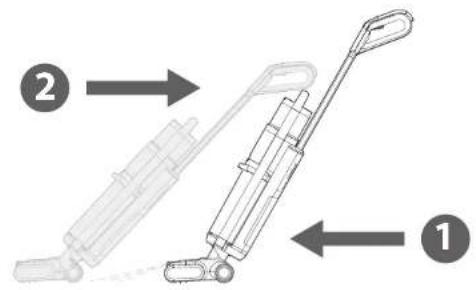
To remove the handle: 25
- Hold the handle Ⓖ tightly.
- Pull the handle ⑤ up while pushing a screwdriver into the hole below the handle ⑥.
9 Troubleshooting
| PROBLEM | SOLUTION |
| Brush roll not turning. | Make sure the battery is charged. See 'Charging the hard floor cleaner'.Check if the brush roll is jammed. See 'Cleaning the brush roll and vacuum tunnels'. |
| Water is not being dispensed. | Make sure that the water tank is filled. See 'Filling the water tank'.Check if the water nozzle is blocked. |
| Reduced suction power. | Make sure the battery is charged. See 'Charging the hard floor cleaner'.Check if the waste water tank is full. See 'Emptying the waste water tank and catch bucket'.Make sure that the brush roll is correctly installed.Make sure the pipe tunnel is not clogged. |
| Water on the air outlet | Check if the HEPA filter is mounted or damp.Check if the waste water tank is full. See 'Emptying the waste water tank and catch bucket'. |
| Unusual noises during use. | Check if the vacuum tunnel is clogged. See 'Cleaning the brush roll and vacuum tunnels'.Unusual noise can occur if the waste water tank is empty. |
| Hard floor cleaner not working. | Make sure that the battery is charged and correctly installed. See 'Preparing the hard floor cleaner'.Make sure that the hard floor cleaner is turned on.Check if the brush roll is clean and correctly installed. |
| Can't switch to Max mode. | Check if the battery capacity is below 20%.NOTICE Max mode is unavailable if the battery capacity is below 20%. |
| PROBLEM | SOLUTION |
| Does not clean well. | Clean the brush roll.Clean the HEPA filter and waste water tank.Replace the HEPA filter if it has been in use for a long time.Replace the brush roll. |
10 Disposal
10.1 Disposal of electronic components

This symbol indicates that this device must not be treated as unsorted municipal waste, but must be collected separately! Dispose of the device via a collection point for the recycling of waste electrical and electronic equipment within the EU and in other European countries that operate separate collection systems for waste electrical and electronic equipment. By disposing of the device in the proper manner, you help to avoid possible hazards to the environment and public health that could otherwise be caused by improper treatment of
waste equipment. The recycling of materials contributes to the conservation of natural resources.
10.2 Disposal of batteries
Batteries shall not be disposed of with the usual domestic waste. They may contain toxic heavy metals and are subject to hazardous waste regulations. For this reason, dispose of used rechargeable batteries at a local collection point.
10.3 Disposal of packing waste
The packaging is made of environmentally friendly materials, which should be disposed of through your local recycling facilities. By disposing of the packaging and packaging waste in the proper manner, you help to avoid possible hazards to the environment or to public health. The symbol on the packaging indicates that the packaging is made of PAP.
11 Guarantee
This appliance comes with a 5-year guarantee starting from the date of purchase (the battery comes with a 1-year or 500 charging cycles warranty). Under the guarantee, in the case of material or manufacturing defects, the appliance will be replaced or repaired. Replacement with a new appliance or money back return is not possible. Excluded from the guarantee are normal wear and tear, commercial use, alterations to the appliance as purchased, cleaning activities, consequences of improper use or damage by the purchaser or a third person, damage that can be attributed to external circumstances or caused by the batteries. The guarantee requires that the faulty appliance be returned at the purchaser's expense along with the retail outlet's dated and signed guarantee card or a sales receipt.
Índice
Service & Support | Service & Support | Servizio & supporto | Service & support | Servicio y soporte
CH: Trisa Electronics AG
Kantonsstrasse 121
CH-6234 Triengen
info@trisaelectronics.ch
DE: HKS
service@trisaelectronics.at
+43 (2647) 4304070
BG: Trisa GmbH
43A, Gorski Patnik Strasse
BG- 1421 Sofia