BK 1202 S - Heating DIMPLEX - Free user manual and instructions
Find the device manual for free BK 1202 S DIMPLEX in PDF.



| Product Type | Infrared Heater |
| Brand | Dimplex |
| Model | BK 1202 S |
| Dimensions (L x H x D) | 768 x 100 x 92 mm |
| Weight | 1.7 kg |
| Rated Voltage | 230-240 V ~, 1/N/PE |
| Protection Rating | IP24 (protection against water splashes) |
| Rated Thermal Power | 1.2 kW |
| Minimum Power | 0.6 kW |
| Power Settings | 3 positions: Off, 600 W, 1200 W |
| Control Type | Manual two-step (pull cord switch) |
| Tilt Angle | Up to 40° downward (cold appliance) |
| Minimum Mounting Height | 1.8 m |
| Minimum Front Distance | 65 cm to objects |
| Installation | Horizontal wall mounting only (not on ceiling) |
| Maintenance and Cleaning | Damp cloth, no abrasive products; dusting with a brush |
| Safety | Child supervision (under 3 years not allowed without supervision); do not cover; avoid flammable materials |
| Spare Parts | Orderable online (heating elements, etc.) |
| Warranty | 2 years |
| Disposal | Do not dispose of with household waste, take to a recycling center |
Frequently Asked Questions - BK 1202 S DIMPLEX
User questions about BK 1202 S DIMPLEX
0 question about this device. Answer the ones you know or ask your own.
Ask a new question about this device
Download the instructions for your Heating in PDF format for free! Find your manual BK 1202 S - DIMPLEX and take your electronic device back in hand. On this page are published all the documents necessary for the use of your device. BK 1202 S by DIMPLEX.
USER MANUAL BK 1202 S DIMPLEX
natural_image
Technical line drawing of a cylindrical device with internal components and labeled parts A and B (no text or symbols beyond labels)10. Garantie
1. Please observe before use
NOTE
Dear customer,
keep these instructions in a safe place and pass them on to any new owner.
ATTENTION!
This appliance can be used by children aged from 8 years and above and persons with reduced physical, sensory or mental capabilities or lack of experience or knowledge if they have been given super-vision or instruction concerning the use of the appliance in a safe way and understand the hazards involved. Children shall not play with the appliance. Cleaning and user maintenance shall not be made by children without supervision!
ATTENTION!
Children of less than 3 years should be kept away unless continuously supervised. Children aged from 3 years and less than 8 years shall only switch on/off the appliance provided that it has been placed or installed in its intended normal operating position and they have been given supervision or instruction concerning the use of the appliance in a safe way and understand the hazards involved!
ATTENTION!
Children aged from 3 years and less than 8 years shall not switch on or clean the appliance or perform user maintenance!
ATTENTION!
Do not operate the appliance near curtains, draperies and other flammable materials!
ATTENTION!
Do not use the device as a changing table heater!
ATTENTION!
This device is not fitted with equipment for regulating room temperature. The heater must not be used in small rooms occupied by people who cannot leave the room without assistance unless continuous monitoring is guaranteed!
ATTENTION!
Some parts of this product can become very hot and cause burns! Particular attention has to be given where children and vulnerable people are present!
ATTENTION!
Do not use the heating device in areas where flammable gases or liquids are stored or used.
ATTENTION!
Install the device in such a way to ensure that a person taking a shower or a bath can not touch the appliance.
NOTE
Do not operate the heater outside
2. Minimum clearances, notes on Installation
ATTENTION!
The device must not be located beneath a socket outlet!
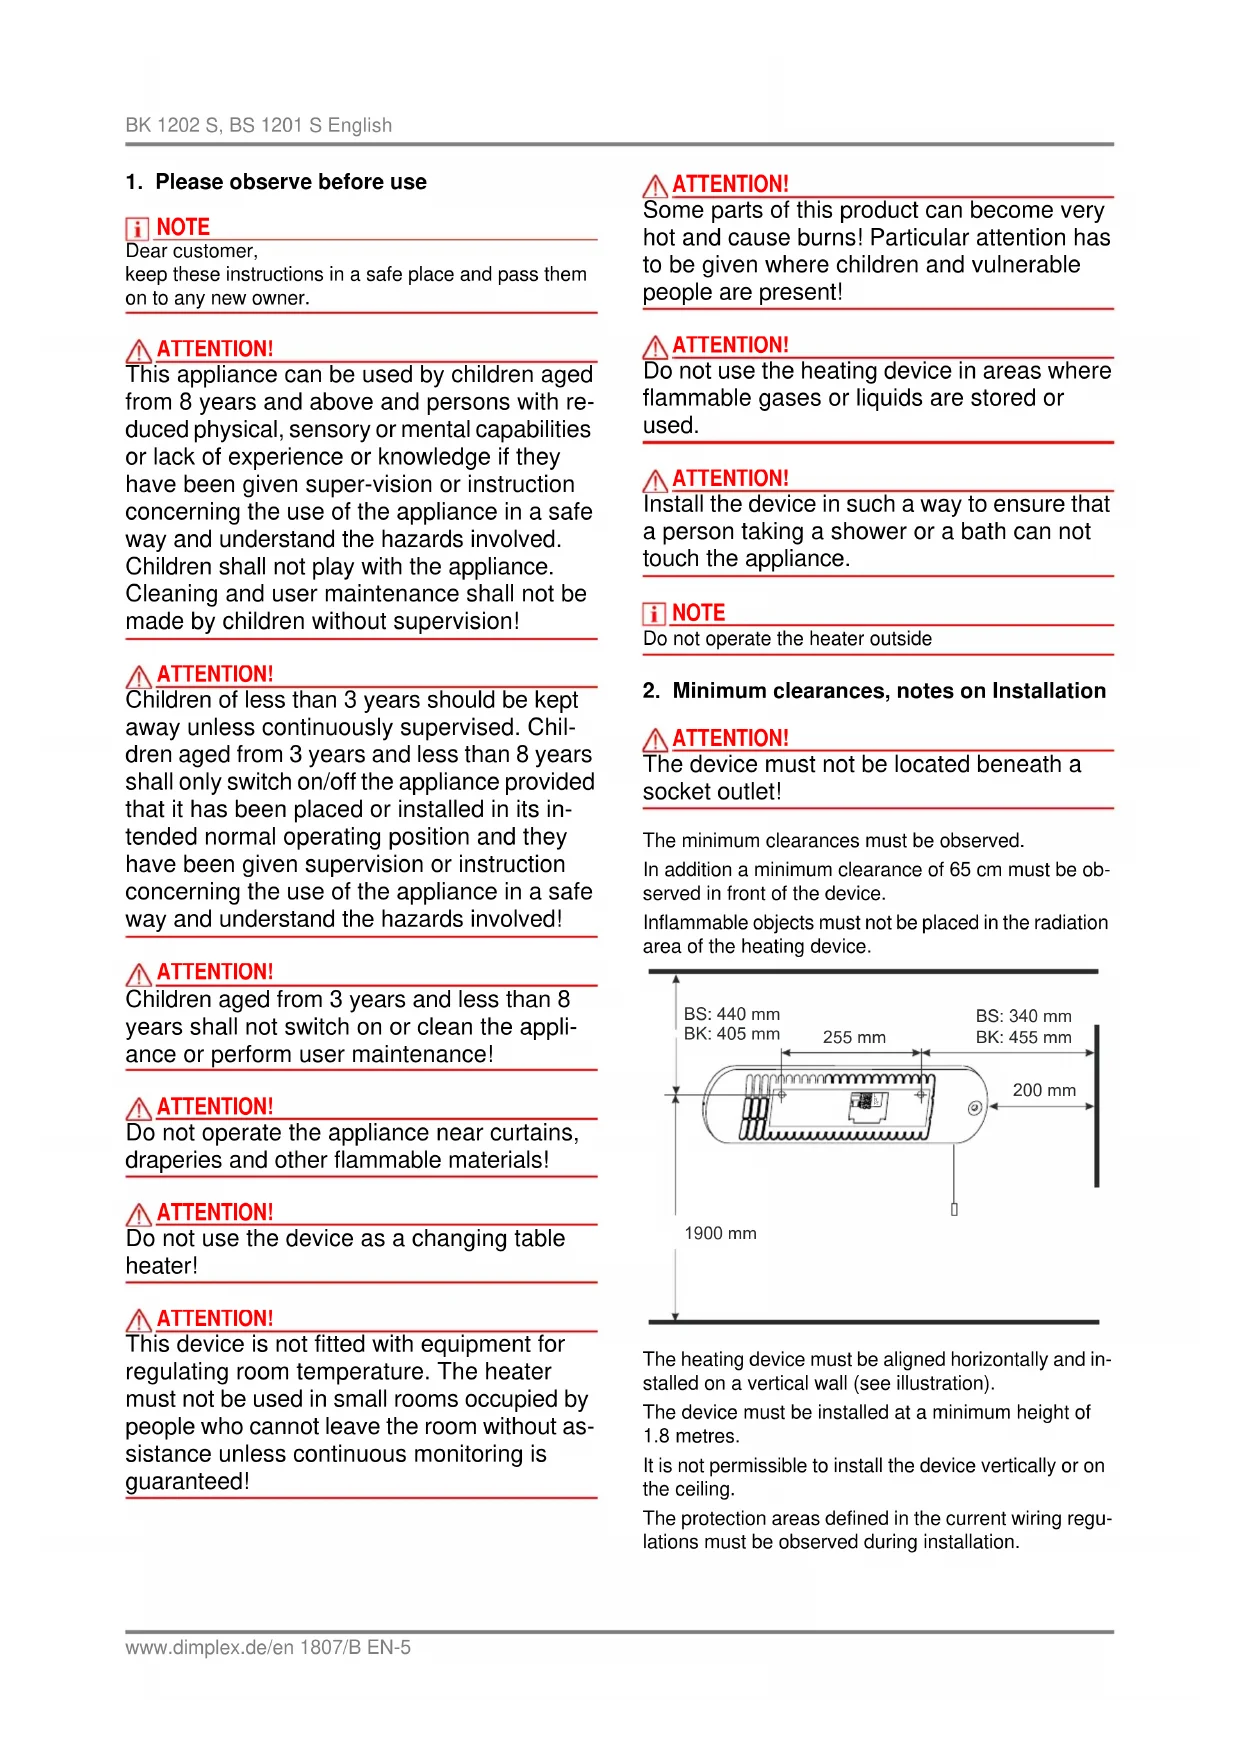
The minimum clearances must be observed.
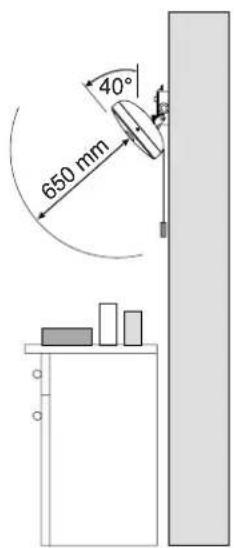
In addition a minimum clearance of 65~cm must be observed in front of the device.
Inflammable objects must not be placed in the radiation area of the heating device.
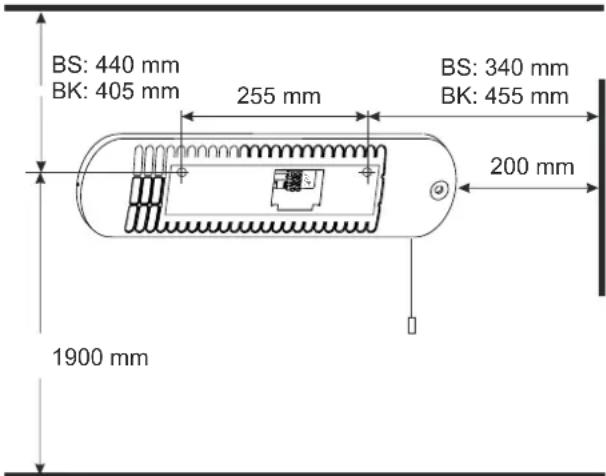
The heating device must be aligned horizontally and installed on a vertical wall (see illustration).
The device must be installed at a minimum height of 1.8 metres.
It is not permissible to install the device vertically or on the ceiling.
The protection areas defined in the current wiring regulations must be observed during installation.
The supply connection socket must be accessible after installation.
Due to the heat radiation of the device, the surface on which the device is installed can darken in colour.
i NOTE
Installation on wooden walls is permissible.
Remove transport fastening
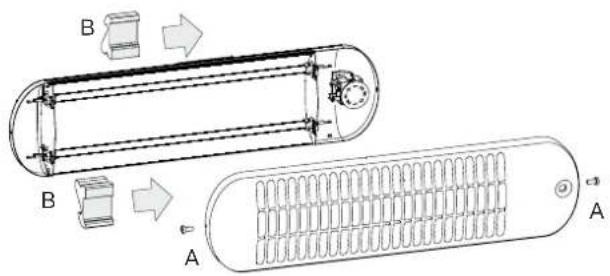
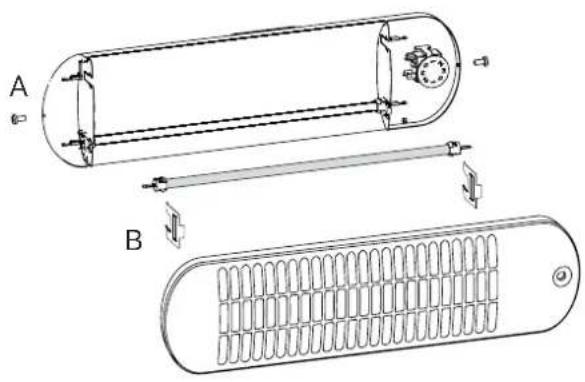
■ Loosen the front grill screws (A) and remove the front grill.
■ Remove the transport fastenings (B) from the heating elements.
■ Re-attach the front grill.
3. Wall mounting
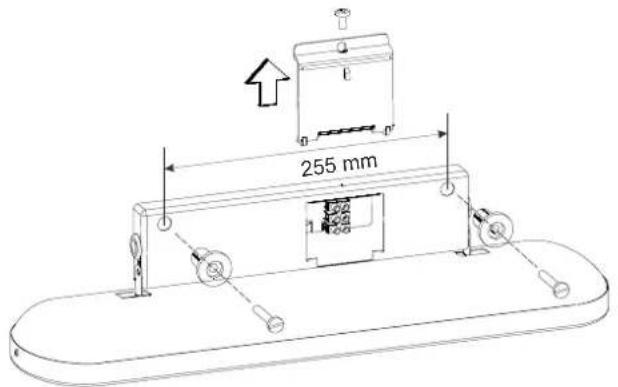
To achieve the stipulated minimum installation height of 1.8 metres, the mounting holes for the wall holder must be drilled at a height of 1.9 metres.
■ Loosen the screw on the connection compartment cover and remove the cover.
■ Fold the radiator forward.
■ Mark and drill the mounting holes on a vertical wall and insert dowels.
■ Insert spacers with screws into the openings of the wall holder and screw the device into place.
4. Electrical connection
The voltage specified on the type plate must match the mains voltage.
The installation of this heater must be carried out by a competent electrician in accordance with the current safety regulations. Heating device must be earthed!
Connection only to fixed installed cables!
The connecting wires of the power lines must be fitted with a heat-resistant protective hose.
A separator with a minimum contact opening of 3mm must be provided on each pole in the permanently connected electrical installation (e.g. a circuit breaker).
It is recommended that a separate circuit be provided for the power supply.
5. Operation
The desired heating level can be set by pulling the cord switch once or repeatedly.
The set heating level can be read in the display window.
In position 0, the heating device is switched off.
The radiator heats the objects or persons upon which/whom it is directed without also directly heating the indoor air.
The radiator can be tilted downwards by a maximum of 40^ .
ATTENTION!
Adjustments may only be made when the device is fully cooled. Danger of burns!
Power output in switch position
| Display 0 | Display 1 | Display 1 | Display 2 | |
| BK 1202 S | Off 600 | W 600 W | 1200 W | |
| BS 1201 S | Off 600 | W 600 W | 1200 W |
W = output power in watts.
6. Cleaning
Switch off the device and let it cool down before cleaning it.
Caution! Do not touch the reflector or heating element with bare hands.
The outer surfaces of the device can be cleaned with a damp cloth and then dried thoroughly.
No scouring agents or polishes should be used.
Dust which gathers inside the device can be removed using a brush with soft, long bristles.
If the device is heavily soiled, it should be cleaned by a specialist.
7. Faults
In the event of a fault, disconnect the device from the power supply
If the heating device does not give off heat, check the following points:
Is the display at "0"?
■ Is the fuse in the fuse box switched on?
If the fault cannot be corrected, please contact your electrical retailer.
If necessary, you can also call the Glen Dimplex Thermal Solutions Service Hotline.
Telephone: +49 (0) 9221 709-545
Facsimile: +49 (0) 9221 709-924545
Mail: service@gdts.one
To process your order, the device type and the device's production date (FD number) are required. These specifications can be found on the device's type plate.
i NOTE
Repairs and corrective measures must only be carried out by a qualified electrician or the after-sales service.
8. Spare parts
Ordering spare parts at Glen Dimplex Germany GmbH on the Internet at:
9. Changing the heating element
A heating element may only be changed by a specialist. Disconnect the device from the power supply and allow it to cool.
Do not touch the heating element or reflector with bare hands. Use a cloth to protect the surface.
■ Loosen the front grill screws (A) and remove the front grill.
■ Remove push-on connections using a suitable tool.
■ Pull out the two fixing brackets (B).
■ Remove the heating element.
■ Insert new heating element.
- Carry out assembly in reverse order.
natural_image
Technical line drawing of a cylindrical device with internal components and labeled parts A and B (no text or symbols beyond labels)10. Warranty
This product is supplied with a two-year warranty according to our warranty terms and conditions.
11. Note on disposal
Do not dispose of the unit with general household waste. The unit must be taken to a local waste disposal plant.
12. Technical data
| Model reference BK 1202 S | BS 1201 S | ||
| Nominal voltage 1/N/PE, 230 | - 240 V~ | ||
| Degree of protection IP24, splashproof | |||
| Dimensions (W x H x D) 768 | x 100 x 92 mm | 526 x 140 x 92 mm | |
| Weight 1.6 kg 1.6 kg | |||
| Heat output | |||
| Nominal heat output | P_nom | 1.2 kW 1.2 kW | |
| Minimum heat output (indicative) | P_min | 0.6 kW 0.6 kW | |
| Maximum continuous heat output | P_max,C | 1.2 kW 1.2 kW | |
| Intrinsic consumption | |||
| At nominal heat output | eI_max | 0.0 W | 0.0 W |
| At minimum heat output | eI_min | 0.0 W | 0.0 W |
| In standby mode | eI_SB | 0.0 W | 0.0 W |
| Control for heat output | |||
| Two manual stages, no room temperature control | |||
natural_image
Technical line drawing of a cylindrical device with internal components and labeled parts A and B (no text or symbols beyond labels)natural_image
Technical line drawing of a cylindrical device with internal components and labeled parts A and B (no text or symbols present)10. Garanzia
natural_image
Technical line drawing of a cylindrical device with internal components and labeled parts A and B (no text or symbols present)10. Garantie
Brand : DIMPLEX
Model : BK 1202 S
Category : Heating