EC3050CM/B - Coffee machine WOLF - Free user manual and instructions
Find the device manual for free EC3050CM/B WOLF in PDF.

| Product Type | Super-automatic espresso machine with built-in grinder |
| Display | Color touchscreen |
| Main Functions | Espresso, Double Espresso, Doppio+, Coffee, Long Coffee, Coffee Pot, Americano, Latte, Macchiato, Cappuccino, Cappuccino Mix, Cappuccino+, Flat White, Hot Milk, Hot Water, Steam |
| Water Tank | Removable, with integrated water filter |
| Bean Hopper | Integrated, for whole beans |
| Hot Water Spout | Yes, removable |
| Milk Container | With froth adjustment dial (from zero to maximum) and removable dishwasher-safe liner |
| Auto-Off | Adjustable: 15 min, 30 min, 1 h, 2 h, or 3 h |
| Programmable Start | Yes, with time setting |
| Water Filter | Yes, replace every 2 months |
| Descaling | Automatic cycle with EcoDecalk solution |
| Automatic Rinse | Yes, at start-up and shut-down |
| Grind Adjustment | Rotary dial (finer = slower dispensing) |
| LED Lighting | Yes, with on/off option |
| Drip Tray and Grounds Container | Removable, with water level indicator |
| Cleaning | Regular cleaning: drip tray, grounds container, water tank, infusion unit (soak in water), milk container (dishwasher-safe liner) |
| Safety | Unplug before maintenance; do not immerse cord or plug; hot surfaces; do not use mineral water or flavored beans |
| Residential Warranty | 2 years parts and labor (comprehensive); 5 years limited (selected parts) |
| After-Sales Service | Wolf Factory Certified Service centers |
Frequently Asked Questions - EC3050CM/B WOLF
User questions about EC3050CM/B WOLF
0 question about this device. Answer the ones you know or ask your own.
Ask a new question about this device
Download the instructions for your Coffee machine in PDF format for free! Find your manual EC3050CM/B - WOLF and take your electronic device back in hand. On this page are published all the documents necessary for the use of your device. EC3050CM/B by WOLF.
USER MANUAL EC3050CM/B WOLF
Coffee System Use and Care Guide
CLEANING, MAINTENANCE, AND MORE

Contents
3 Coffee System
4 Safety Precautions
7 Quick Start Guide
12 Coffee System Operation
18 Care Recommendations
22 Troubleshooting
23 Wolf Warranty
Customer Care
The model and serial number are printed on the enclosed product registration card. Both numbers are also listed on the product rating plate. Refer to page 7 for rating plate location. For warranty purposes, you will also need the date of installation and name of your authorized Wolf dealer. Record this information below for future reference.
SERVICE INFORMATION
Model Number
Serial Number
Date of Installation
Certified Service Name
Certified Service Number
Authorized Dealer
Dealer Number
If your product ever needs attention, be sure to use a Wolf Factory Certified Service provider recommended by our Customer Care Center, or select one from our list of providers available at wolfappliance.com/locator. All Factory Certified Service providers are carefully selected and thoroughly trained by us.
Important Note
To ensure this product is installed and operated as safely and efficiently as possible, take note of the following types of highlighted information throughout this guide:
IMPORTANT NOTE highlights information that is especially important.
CAUTION
Indicates a situation where minor injury or product damage may occur if instructions are not followed.
WARNING
States a hazard that may cause serious injury or death if precautions are not followed.
IMPORTANT NOTE: Throughout this guide, dimensions in parentheses are millimeters unless otherwise specified.
IMPORTANT INSTRUCTIONS
READ ALL INSTRUCTIONS
When using electrical appliances, basic safety precautions should always be followed including the following:
- Make sure the voltage of your electrical system corresponds to the voltage shown on the machine.
- Persons that lack physical, sensory, or mental abilities or experience with the machine should not use it without supervision or instruction by a responsible person.
- Before service or maintenance, disconnect power at the main button and unplug the unit.
- Do not touch hot surfaces. Use handles or knobs.
- To protect against electrical shock, do not immerse cord or plug in water or other liquid.
- Close supervision is necessary when any appliance is used by or near children.
-
Do not open the outer casing of the appliance.
-
Unplug from outlet when not in use and prior to cleaning. Allow to cool before putting on or taking off parts.
- Do not operate any appliance with a damaged cord or plug or after the appliance malfunctions or has been damaged in any manner. Return appliance to the nearest authorized service facility for examination, repair, or adjustment.
- Do not place on or near a hot gas or electric burner or in a heated oven.
The use of accessory attachments not recommended by the appliance manufacturer may cause injuries. - Do not allow the cord to hang over the edge of a table or counter or touch hot surfaces.
- Do not submerge the cord or plug in water or other liquids.
- Use extreme caution when moving an appliance containing hot oil or other hot liquids.
- To disconnect, turn any control to "off," then remove plug from wall outlet.
IMPORTANT INSTRUCTIONS
GENERAL SAFETY PRECAUTIONS
- Do not use appliance for anything other than intended use.
- The appliance must be properly installed prior to operation to make sure no electrical components are accessible. Make sure power is not supplied to the appliance while installation work, repairs, or maintenance is done.
- A short power cord is provided to reduce risks of becoming entangled or tripping over the cord.
- Verify the appliance is properly installed and grounded by a qualified technician. To guarantee the electrical safety of this appliance, continuity must exist between the appliance and effective grounding system. It is imperative this basic safety requirement be met. If there is any doubt, have the electrical system of the house checked by a qualified electrician. The manufacturer cannot be held responsible for damages caused by the lack, or inadequacy, of an effective grounding system.
-
Do not use an extension cord to connect the appliance to electricity. Extension cord does not guarantee the required safety of the appliance (danger of overheating).
-
Installation work and repairs must be done by a trained technician in accordance with national and local safety regulations. Repairs and other work by unauthorized persons could be dangerous and may void the warranty.
- Use only original spare parts. Only then can the manufacturer guarantee the safety of this machine.
- Never open the outer casing of the appliance. Tampering with electrical connections or components and mechanical parts is dangerous and may cause machine damage.
- Do not install or use outdoors.
- Never use a steam cleaner to clean the appliance.
- Fill the water tank only with cold, fresh tap water. Warm or hot water or any other liquids may damage the machine.
- The appliance must be maintained daily. Change the water daily to prevent bacteria or mold growth.
IMPORTANT INSTRUCTIONS
GENERAL SAFETY PRECAUTIONS
- Do not use mineral water. Do not fill anything but coffee beans into the beans container. Do not fill ground coffee in the beans container.
- Caramelized or otherwise pretreated coffee beans or other beverages containing sugar must not be put in the appliance.
- Never place a cup with an alcohol-coffee mixture underneath the coffee dispenser.
- The hot water and steam dispensed could cause scalding. These functions must be used carefully. Never hold any parts of the body under the steam nozzle or the hot water dispenser. Never use the machine to clean objects.
- Descale the appliance regularly with descending solution. In areas with very hard water, the machine may need to be descaled more often. The manufacturer cannot be held responsible for damages resulting from insufficient descending.
- Never make coffee, hot water, or steam when the appliance is removed from the opening. Always make sure the appliance is inactive before removing it. The only exception is adjusting the coffee mill, which must be done with the machine out.
WARNING
Do not look directly or with an optical instrument into the lighting.
WARNING
Risk of burns when dispensing hot beverages.
WARNING
PROPOSITION 65 FOR CALIFORNIA RESIDENTS
Cancer and Reproductive Harm—www.P65Warnings.ca.gov
SAVE THESE INSTRUCTIONS
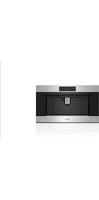
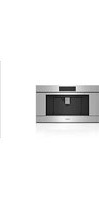
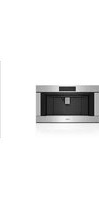
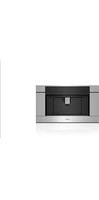
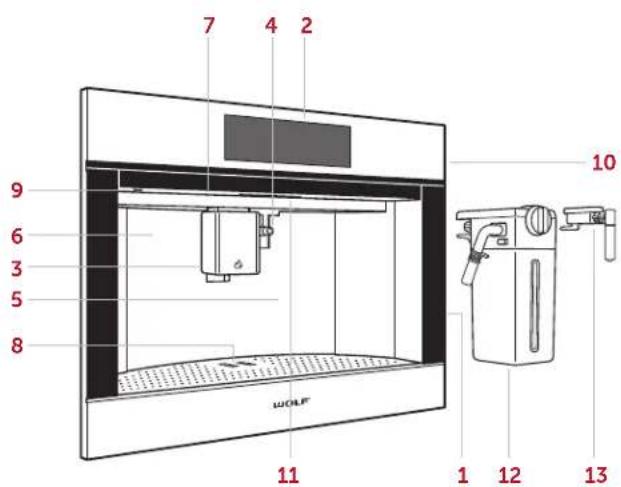
Coffee System Features
FEATURES
1 Product Rating Plate
2 Touchscreen
3 Coffee Spout
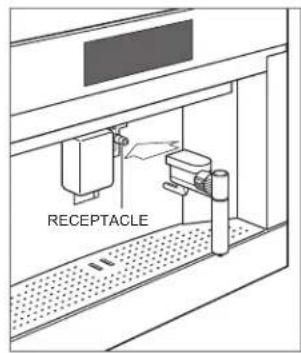
4 Water/Milk Spout Receptacle
5 Water Tank (behind service door)
6 Service Door
7 LED Lighting
8 Drip Tray
9 Standby Power Button
10 Main Power Button (behind control panel)
11 Handle (to slide unit forward)
12 Milk Container
13 Water Spout
Controls
The Wolf Coffee System uses touchscreen technology to select preferences and other options.
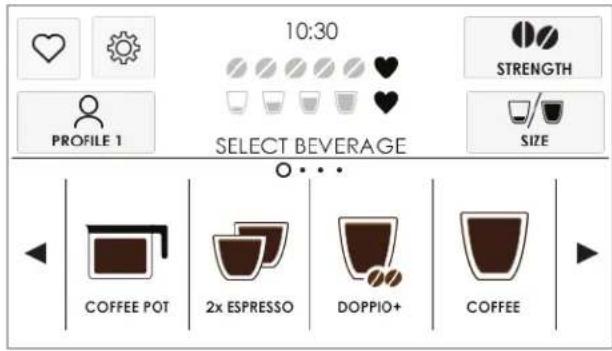
Touchscreen
Coffee System (EC2450TE shown)
Prior to Use
1 Slide the unit forward, press the main power button, then slide the unit back. Refer to the illustration below.
2 Touch the stand-by power button. Refer to the illustration below.
3 Use the test strip provided to determine water hardness. Refer to User Options on page 14 to adjust the hardness setting.
4 Clean the unit thoroughly with hot water and a mild detergent.
5 Rinse and dry with a soft cloth.
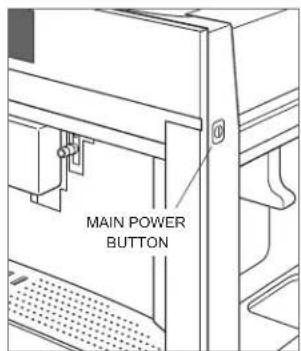
Main power button
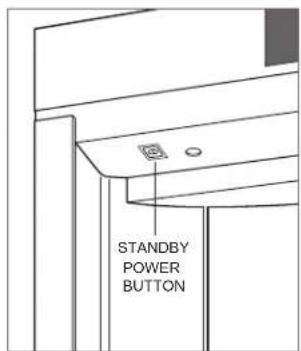
Standby power button
6 Open the service door, then remove the water tank. Refer to the illustration below. NOTE: If installed, the water spout must be removed to open the service door.
7 Fill the water tank with water.
8 Insert the water spout into the receptacle. Two beeps indicate the water spout is installed correctly. Refer to the illustration below.
9 Place the rinse container below the water spout.
10Select the desired language. To select, scroll through the languages until the desired language appears, then touch the corresponding icon.
11 Touch water is dispensed from the water spout.

Water tank
Water spout
Auto-Off
The unit turns off automatically after 30 minutes of inactivity. The duration is adjustable to 15 min, 30 min, 1 hr, 2 hr, or 3 hr. Touch the standby power button to turn on the control panel touchscreen before use. Refer to the illustration below.
NOTE: Due to the rinsing process, place the rinse container below the coffee spout before each use. Refer to the illustration below.
To adjust Auto-Off duration:
1 Touch

2 Touch

touchscreen.
Auto-Off appears on the


3 Touch Auto-Off until the desired duration appears.
4 Touch
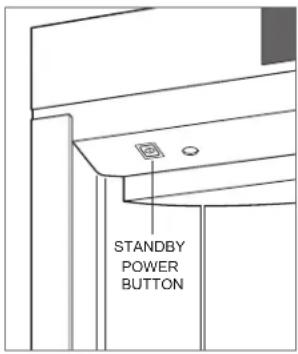
Standby power button
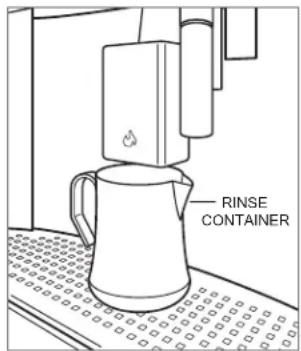
Rinse container
Milk Container
To froth milk:
1 Turn the knob on the milk container to Insert.
2 Place the milk container into the receptacle. A beep indicates the container is installed correctly.
3 Turn the knob to the desired froth setting. Refer to the chart below.
4 Turn the knob to Clean when dispensing is complete. appears on the touchscreen as a reminder to clean the spout, if the process was not completed. The reminder goes away when cleaned or when the milk container is removed.
5 Follow the instructions on the touchscreen.
6 Remove the milk container and store in the refrigerator.
FROTH SETTING
The milk container dial is adjustable for optimum froth production.
SETTING AMOUNT
| No Froth |
| Minimum Froth |
| Maximum Froth |
Coffee Drinks
IMPORTANT NOTE: Do not use oily, caramelized, or flavored beans.
To make coffee drinks:
1 Touch multiple times to select the desired strength.
2 Touch multiple times to select the desired size.
3 Touch the desired drink type to start the cycle.
4 Adjust the height of the coffee spout to be as close to the cup as possible.
NOTE: Near the end of the cycle, +Extra appears on the touchscreen. If desired, touch +Extra to continue dispensing water over the grounds to increase the drink volume. Touch × STOP once the desired volume is dispensed.
Beverage Options
BEVERAGE % COFFEE % MILK % WATER FROTH SMALL MEDIUM* LARGE X-LARGE
| Espresso | 100 | 1.0 oz (30 mL) | 1.4 oz (41 mL) | 1.6 oz (47 mL) | 4.1 oz (121 mL) | ||
| Espresso x2† | 100 | 2.0 oz (59 mL) | 2.7 oz (80 mL) | 3.2 oz (95 mL) | 8.1 oz (240 mL) | ||
| Doppio+ | 100 | 3.2 oz (95 mL) | 4.1 oz (121 mL) | 4.9 oz (145 mL) | 6.1 oz (180 mL) | ||
| Coffee | 100 | 4.9 oz (145 mL) | 6.1 oz (180 mL) | 7.3 oz (216 mL) | 8.1 oz (240 mL) | ||
| Long Coffee‡ | 100 | 4.3 oz (127 mL) | 5.4 oz (160 mL) | 6.5 oz (192 mL) | 8.1 oz (240 mL) | ||
| Coffee Pot | 100 | 10.1 oz (299 mL) | 15.2 oz (450 mL) | 20.3 oz (600 mL) | 25.4 oz (751 mL) | ||
| Americano | 25 | 75 | 4.1 oz (121 mL) | 5.1 oz (151 mL) | 6.1 oz (180 mL) | 7.6 oz (225 mL) | |
| Latte | 20 | 80 | None | 8.1 oz (240 mL) | 10.1 oz (299 mL) | 12.2 oz (361 mL) | 15.2 oz (450 mL) |
| Macchiato | 60 | 40 | Max | 1.4 oz (41 mL) | 1.7 oz (50 mL) | 2.0 oz (59 mL) | 2.5 oz (74 mL) |
| Latte Macchiato | 20 | 80 | Min | 4.1 oz (121 mL) | 5.1 oz (151 mL) | 6.1 oz (180 mL) | 7.6 oz (225 mL) |
| Cappuccino** | 55 | 45 | Max | 4.1 oz (121 mL) | 5.1 oz (151 mL) | 6.1 oz (180 mL) | 7.6 oz (225 mL) |
| Cappuccino Mix† | 55 | 45 | Max | 4.1 oz (121 mL) | 5.1 oz (151 mL) | 6.1 oz (180 mL) | 7.6 oz (225 mL) |
| Cappuccino+ | 65 | 35 | Max | 4.1 oz (121 mL) | 6.4 oz (189 mL) | 7.7 oz (228 mL) | 9.6 oz (284 mL) |
| Flat White | 25 | 75 | Min | 7.0 oz (207 mL) | 8.8 oz (260 mL) | 10.5 oz (311 mL) | 13.2 oz (390 mL) |
| Hot Milk | 100 | Any | 6.5 oz (192 mL) | 8.1 oz (240 mL) | 9.7 oz (287 mL) | 12.2 oz (361 mL) | |
| Hot Water | 100 | 8.5 oz (251 mL)‡ | |||||
| Steam | 100 | 3.0 oz (89 mL)‡ | |||||
Default quantity. Touch to customize. Intended for two separate cups. Double strength. *Milk dispensed, then coffee. Milk and coffee dispensed simultaneously. Touch stop at any time for smaller quantity.
NOTE: All quantities are estimates. Actual results ± 20%.
Water Filter
The water filter contains ion exchange resins and active carbons, which reduce limescale and absorb chlorine and other contaminants. Replace the filter every two months.
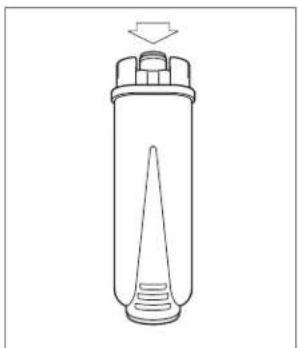
To install the water filter:
1 Remove the new filter from the package.
2 Touch
3 Touch until Water Filter appears on the touch-screen.
4 Touch Water Filter.
5 Turn the dial on the filter until the following two months numbers appear. "Turn the dial indicator until the next 2 months are displayed" appears on the touchscreen.
6 Touch NEXT
7 Turn the filter upside down and place it under a running faucet for one minute. "Run water into filter hole until it comes out from openings" appears on the touchscreen. Refer to the illustration below.
8 Touch NEXT
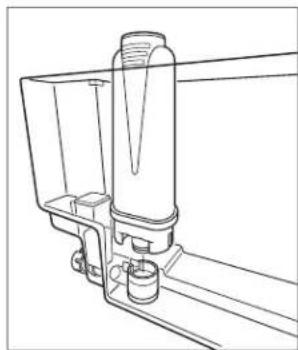
9 Insert the filter into the (full) water tank for 10 seconds to allow bubbles to escape. "Immerse filter in the water tank letting air bubbles escape" appears on the touch-screen.
10 Touch NEXT
Flush water filter
11Align the filter with the housing at the bottom of the tank. "Insert filter into its housing and push it down to bottom" appears on the touchscreen. Refer to the illustration below.
12 Press to secure the filter to the housing. "Insert water tank" appears on the touchscreen.
13Close the tank lid, then install the water tank on the machine. "Place 0.5 L container under outlets, press OK to fill filter" appears on the touchscreen.
14 "Insert water spout until product chimes" appears on the touchscreen.
15 Insert the water spout, and place a container under the water spout, then touch OK.
NOTE: appears on the touchscreen when the water filter replacement reminder is turned on. appears on the touchscreen when the water filter must be replaced.
Water filter installation
Water Filter
To replace the filter or remove the filter reminder:
1 Touch
2 Touch or unit Water Filter appears on the touch-screen.
3 Touch Water Filter.
4 Turn the dial on the filter until the following two months numbers appear. "Turn the dial indicator until the next 2 months are displayed" appears on the touchscreen.
5 Touch Replace Filter or Remove Filter, then follow the instructions on the touchscreen.
User Setup
The User Setup feature allows the user to select from the preferences listed below.
USER OPTIONS
Rinsing Start rinse cycle.
Descale Turn descale cycle on.
Water Filter Turn water filter reminder on or off.
Drink Settings View drink settings (Strength, Milk, Coffee).
Set Time Adjust time of day. Required for Auto-Start.
Auto-Start Turns unit on, rinses, and heats at preset time.
Auto-Off Turn unit off after 15 min, 30 min, 1 hr, 2 hr, or 3 hr.
Energy Saving Turns energy saving mode on or off.
| Coffee | Adjust coffee temperature (Low, Medium, |
| Temperature | High, Max). |
Water Adjust water hardness (1 softest, 4 hardest). Hardness
Set Language Select language (English, Spanish, French, Italian, German, Dutch, or Chinese).
Beep Turn audible tone on or off.
Cup Lighting Turn lights on or off.
Background Adjust touchscreen background color (Black, White).
Demo Mode Provides a guided tour for common functions.
Factory Settings Reset to factory default settings.
Statistics View beverage production quantities.
USER OPTIONS
To set user options:
1 Touch
2 Touch or to scroll through options.
3 Touch the desired option.
4 Touch BACK to exit.
AUTO-START
Auto-Start turns the unit on, rinses, and preheats at a specified time to decrease the time to prepare a drink.
The clock must be set to the correct time to work properly.
appears on the touchscreen when Auto-Start is turned on.
To set Auto-Start:
1 Touch
2 Touch or, then touch Auto-Start.
3 Touch or until the desired start time appears.
4 The unit defaults to Off. Touch Off to toggle On.
5 Touch OK
Coffee
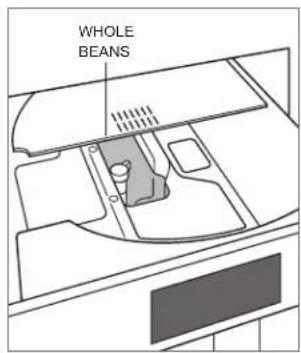
To use whole beans:
1 Pull the unit forward.
2 Open the whole bean compartment lid. Refer to the illustration below.
3 Fill the compartment, then slide the unit back in.
4 Place a minimum 4 oz (120 mL) container below the coffee spout.
5 Adjust the height of the coffee spout to be as close to the cup(s) as possible. Refer to the illustration below.
6 The unit automatically rinses upon initial start-up and before turning off. A small amount of liquid dispenses from the coffee spout during the rinse cycle. Place the rinse container under the spout, if desired.
Whole bean compartment
Adjust coffee spout
Favorite
To save favorite drink settings:
1 Touch to select the desired user profile.
2 Touch
3 Select the desired drink option.
4 Touch + or - to select the desired strength.
5 Touch OK
6 For milk drinks, insert the milk container and adjust the dial to the desired setting.
7 Milk is dispensed. Touch where the desired amount of milk is dispensed and to save the setting.
8 Coffee is dispensed. Touch where the desired amount of coffee is dispensed and to save the setting.
Coffee Pot
CAUTION
Do not use pre-ground coffee. Use whole beans only.
The Coffee Pot option produces larger amounts of coffee.
The coffee strength and size are adjustable, or touch to customize. Refer to Beverage Options on page 11. Make sure the water tank is full and the grounds container is empty before starting the cycle.
Pre-Ground Coffee
CAUTION
More than one scoop causes the unit to clog.
To use pre-ground coffee:
1 Touch multiple times until appears
2 Slide the unit forward and open the pre-ground coffee lid. Refer to the illustration below.
3 Use the provided scoop to place one scoop of pre-ground coffee into the compartment, then close the lid.
4 Slide the unit back into position.
5 Touch multiple times to select the desired size.
6 Touch the desired drink type to start dispensing.
7 Adjust the height of the coffee spout as close to the cup as possible.
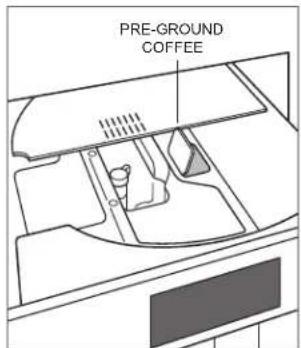
Pre-ground compartment
Hot Water
Dispense hot water to make tea or preheat cups. Preheating cups allow beverages to stay hot longer.
To dispense hot water:
1 Insert the water spout into the receptacle. Two beeps indicate the water spout is installed correctly. Refer to the illustration below.
2 Place a cup under the water spout.
3 Touch to start dispensing water.
4 Touch where the desired amount is dispensed.
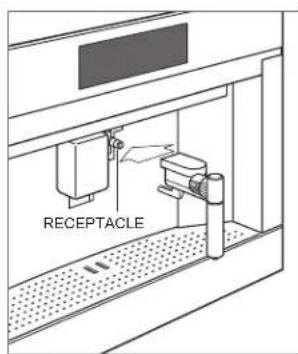
Water spout
Grind Adjustment
CAUTION
Adjustment must be made while the mill is operating. The grind adjustment can take up to three drinks to become noticeable. Do not adjust more than one setting per grind.
Adjust the grind if coffee delivery is too fast or too slow. Turn the dial clockwise for faster delivery (coarser grind) or counterclockwise for slower delivery (finer grind). Refer to the illustration below.
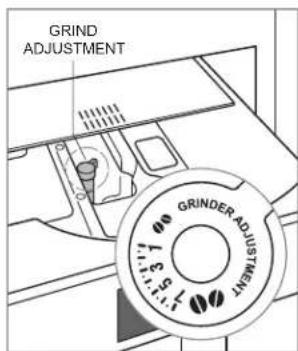
Grind adjustment dial
Milk Container
CAUTION
Only the milk container liner is dishwasher safe. Do not place any other milk container parts in the dishwasher. Do not submerge the lid or the milk container in water.
Use hot water and a mild detergent to wash the lid and milk container.
To clean the milk container:
1 Press the tabs on both sides of the milk container lid, then remove the lid.
2 Pull the intake tube down to remove.
3 Pull the milk spout back to remove. Refer to the illustration below.
4 Rotate the froth adjustment knob to Insert, then pull the knob to remove.
5 Use a toothpick to remove any debris from the channel on the knob. Refer to the illustration below.
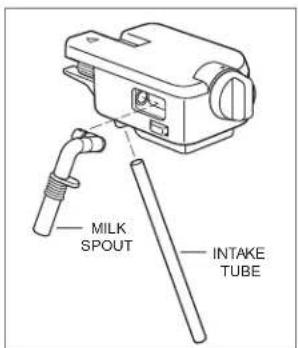
Milk container lid
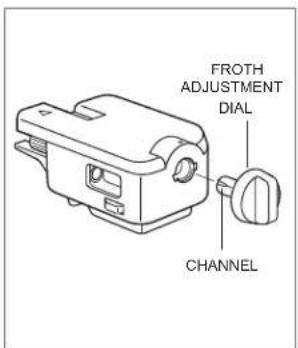
Froth adjustment knob
6 Remove the liner from the milk container. Refer to the illustration below.
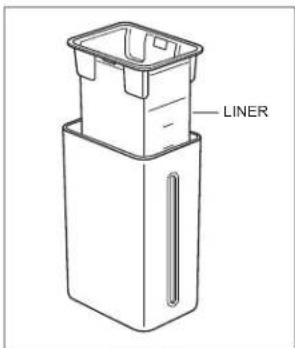
Milk container liner
Descale
CAUTION
Only use EcoDecalk descending solution.
"Descending needed. Press ok to start" appears on the touchscreen when the unit needs to be descaled. Touch OK to begin grayscale or touch to delay the grayscale process. appears on the touchscreen as a reminder to grayscale, if the process is delayed.
To descale the unit:
1 Remove the water tank and empty completely. Refer to the illustration below.
2 Pour descending solution into the tank to line A, then add water until it reaches line B.
3 Install the water tank.
4 Insert the water spout into the receptacle, then place a large, minimum 85 oz (2.5 L), container under the coffee and water spouts.
5 Touch
6 Touch or until "Descale" appears on the touch-screen.
7 Touch
8 "Descaling" and a progress bar appear on the touch-screen.
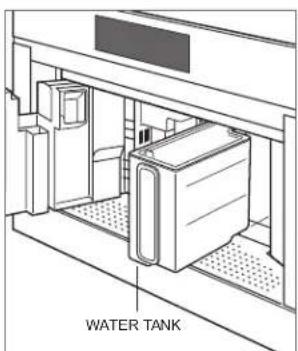
Water tank
9 After approximately 25 minutes, "Rinse and fill water tank up to max level" appears. Rinse and fill the water tank with water and empty the container.
10 Install the water tank and place the container under the spouts.
11 Touch NEXT. "Rinsing please wait" appears on the touchscreen. The water tank may need to be filled multiple times to complete the descale process.
12 When "Descale complete press OK" appears, fill the water tank, and touch OK.
Cleaning
Use the following information for simple cleaning recommendations.
STAINLESS STEEL
1 Use a non-abrasive stainless steel cleaner and apply with a soft lint-free cloth.
2 Lightly wipe the surface with a water-dampened microfiber cloth followed by a dry polishing chamois.
3 Always follow the grain of the stainless steel.
TOUCHSCREEN
1 Use a spray degreaser to remove fingerprints and food soil. Spray on a cloth before wiping the touchscreen.
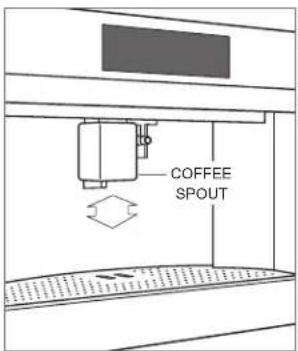
COFFEE SPOUT
1 Clean periodically using a sponge.
2 Remove any coffee deposits in the holes with a toothpick.
WATER TANK
1 Clean periodically (about once a month) with a damp cloth and mild dish soap.
2 Rinse and towel dry.
DRIP TRAY AND GROUNDS CONTAINER
1 Empty and clean the drip tray before the water level indicator protrudes from the cup tray.
2 Empty and clean the grounds container when "Empty grounds container" appears.
3 Rotate the drip tray access door downward, then open the service door.
4 Remove and empty the drip tray and grounds container. Refer to the illustration below.
5 Wash with warm water and mild dish soap.
6 Rinse and towel dry.
PRE-GROUND COMPARTMENT
1 Check periodically to verify the pre-ground coffee funnel is not blocked.
INTERIOR
1 Open the service door.
2 Vacuum residue and remove coffee deposits with a sponge.
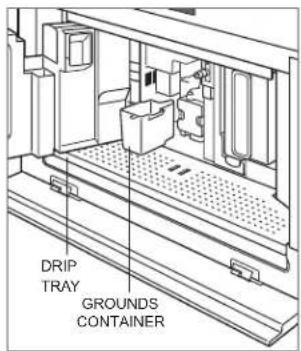
Drip tray and grounds container
Cleaning
INFUSER
1 Clean the infuser at least once a month.
2 Turn the unit off.
3 Open the service door and remove the drip tray and grounds container.
4 Press the two red buttons inward and remove the infuser. Refer to the illustration below.
5 Soak in water approximately five minutes, then rinse and towel dry. NOTE: Do not use detergent to clean the infuser. It will remove the lubricant on interior parts.
6 Slide the infuser onto the internal support and bottom pin, then press Push until it clicks.
7 Verify the red buttons are pushed out.
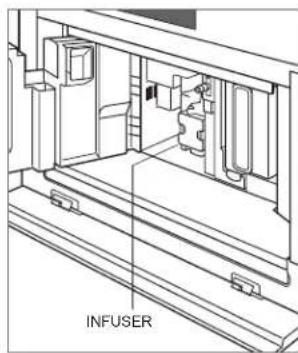
Infuser
Troubleshooting
Before contacting Wolf Factory Certified Service, use these helpful tips to prevent the need for a service visit.
Coffee dispensed too slow.
1 Adjust to a courser grind. Refer to Grind Adjustment on page 17.
Infuser cannot be removed.
1 Touch the standby power button to reset the infuser position.
Milk contains bubbles or little froth.
1 Use fully skimmed or semi-skimmed milk.
2 Adjust the froth setting.
3 Clean the milk container and lid.
SERVICE
- Maintain the quality built into your product by contacting Wolf Factory Certified Service. For the name of the nearest Wolf Factory Certified Service, check the Product Support section of our website, wolfappliance.com, or call Wolf Customer Care at 800-222-7820.
- When contacting service, you will need the model and serial number of your product. Both numbers are listed on the product rating plate. Refer to page 7 for rating plate location.
- For warranty purposes, you will also need the date of installation and name of your authorized Wolf dealer. This information should be recorded on page 3 of this guide.
Sub-Zero, Sub-Zero & Design, Sub-Zero & Snowflake Design, Dual Refrigeration, The Living Kitchen, Great American Kitchens The Fine Art of Kitchen Design, Wolf, Wolf & Design, Wolf Gourmet, W & Design, red colored knobs, Cove, and Cove & Design are registered trademarks and service marks of Sub-Zero Group, Inc. and its subsidiaries. All other trademarks are property of their respective owners in the United States and other countries.
Wolf Appliance Residential Limited Warranty
FOR RESIDENTIAL USE
FULL TWO YEAR WARRANTY*
For two years from the date of original installation, this Wolf Appliance product warranty covers all parts and labor to repair or replace, under normal residential use, any part of the product that proves to be defective in materials or workmanship. All service provided by Wolf Appliance under the above warranty must be performed by Wolf Factory Certified Service, unless otherwise specified by Wolf Appliance, Inc. Service will be provided during normal business hours.
LIMITED FIVE YEAR WARRANTY
For five years from the date of original installation, Wolf Appliance will repair or replace the following parts that prove to be defective in materials or workmanship: gas burners (excludes appearance), electric heating elements, blower motors (ventilation hoods), electronic control boards, magnetron tubes and induction generators. If the owner uses Wolf Factory Certified Service, the service provider will repair or replace these parts with the owner paying for all other costs, including labor. If the owner uses non-certified service, the owner must contact Wolf Appliance, Inc. (using the information below) to receive repaired or replacement parts. Wolf Appliance will not reimburse the owner for parts purchased from non-certified service or other sources.
TERMS APPLICABLE TO EACH WARRANTY
The warranty applies only to products installed for normal residential use. The warranty applies only to products installed in any one of the fifty states of the United States, the District of Columbia or the ten provinces of Canada. This warranty does not cover any parts or labor to correct any defect caused by negligence, accident or improper use, maintenance, installation, service or repair.
THE REMEDIES DESCRIBED ABOVE FOR EACH WARRANTY ARE THE ONLY ONES THAT WOLF APPLIANCE, INC. WILL PROVIDE, EITHER UNDER THIS WARRANTY OR UNDER ANY WARRANTY ARISING BY OPERATION OF LAW. WOLF APPLIANCE, INC. WILL NOT BE RESPONSIBLE FOR ANY CONSEQUENTIAL OR INCIDENTAL DAMAGES ARISING FROM THE BREACH OF THIS WARRANTY OR ANY OTHER WARRANTY, WHETHER EXPRESS, IMplied OR STATUTORY.
Some states do not allow the exclusion or limitation of incidental or consequential damages, so the above limitation or exclusion may not apply to you. This warranty gives you specific legal rights and you may also have other legal rights that vary from state to state.
To receive parts and/or service and the name of Wolf Factory Certified Service nearest you, contact Wolf Appliance, Inc., P.O. Box 44848, Madison, WI 53744; check the Product Support section of our website, wolfappliance.com, email us at customerservice@ subzero.com or call 800-222-7820.
Stainless steel (doors, panels, handles, product frames and interior surfaces) are covered by a limited 60-day parts and labor warranty for cosmetic defects.
Replacement filters for ventilation hood recirculating kits are not covered by the product warranty.

Contenido
WOLF APPLIANCE, INC. P.O. BOX 44848 MADISON, WI 53744 WOLFAPPLIANCE.COM 800.222.7820