RH650V - Sander HITACHI - Free user manual and instructions
Find the device manual for free RH650V HITACHI in PDF.

| Product type | Heat gun (thermal stripper) |
| Brand | Hitachi |
| Model | RH650V |
| Power | 1500 W |
| Supply voltage | 120 V, 60 Hz, single-phase |
| Temperature range | 50 °C to 650 °C (120 °F to 1200 °F) in 10 °C (20 °F) increments |
| Air flow rate | 5 adjustable levels (0.25 to 0.5 m³/min) |
| Weight | 0.79 kg (1.7 lb) |
| Motor type | DC motor |
| Protection class | Double insulation (class II) |
| Main functions | Paint stripping, glue softening, heat shrink wrapping, pipe forming, defrosting, plastic welding, soldering, disinfection |
| Supplied accessories | Round nozzle, flat nozzle, curved surface nozzle, glass protection nozzle, scraper with handle, storage case |
| Temperature display | Digital, shows set temperature and output temperature |
| Switch | Positions [0] (off), [1] (fixed 50°C), [2] (variable 50-650°C) |
| Temperature adjustment | + and - buttons in 10°C (20°F) increments |
| Air flow adjustment | + and - buttons for 5 levels |
| Vertical use | Possible, with stand on stable surface (Fig. 4) |
| Cord length | Not specified, use appropriate extension cord |
| Maintenance and cleaning | Clean exterior with a soft cloth and soap; do not use solvents. Keep air vents clean. |
| Safety | Do not use in wet or flammable environments; wear gloves and goggles; avoid touching hot nozzle; double insulation; polarized plug. |
| Spare parts and repairability | Use only Hitachi genuine replacement parts; repairs by authorized center only. |
Frequently Asked Questions - RH650V HITACHI
User questions about RH650V HITACHI
0 question about this device. Answer the ones you know or ask your own.
Ask a new question about this device
Download the instructions for your Sander in PDF format for free! Find your manual RH650V - HITACHI and take your electronic device back in hand. On this page are published all the documents necessary for the use of your device. RH650V by HITACHI.
USER MANUAL RH650V HITACHI
INSTRUCTION MANUAL AND SAFETY INSTRUCTIONS
WARNING
Improper and unsafe use of this power tool can result in death or serious bodily injury! This manual contains important information about product safety. Please read and understand this manual before operating the power tool. Please keep this manual available for others before they use the power tool.
MODE D'EMPLOI ET INSTRUCTIONS DE SECURITE
A VERTISSEMENT
ACCESSIONS STANDARD 26
LISTA DES PIECES 40
Espanol
INDICE
Página Página
IMPORTANT SAFETY INSTRUCTIONS
Read and understand all of the safety precautions, warnings and operating instructions in the Instruction Manual before operating or maintaining this power tool.
Most accidents that result from power tool operation and maintenance are caused by the failure to observe basic safety rules or precautions. An accident can often be avoided by recognizing a potentially hazardous situation before it occurs, and by observing appropriate safety procedures.
Basic safety precautions are outlined in the "SAFETY" section of this Instruction Manual and in the sections which contain the operation and maintenance instructions.
Hazards that must be avoided to prevent bodily injury or machine damage are identified by WARNINGS on the power tool and in this Instruction Manual.
NEVER use this power tool in a manner that has not been specifically recommended by HITACHI.
MEANINGS OF SIGNAL WORDS
WARNING indicates a potentially hazardous situations which, if ignored, could result in death or serious injury.
CAUTION indicates a potentially hazardous situations which, if not avoided, may result in minor or moderate injury, or may cause machine damage.
NOTE emphasizes essential information.
SAFETY
GENERAL POWER TOOL SAFETY WARNINGS
WARNING:
Read all safety warnings and all instructions.
Failure to follow the warnings and instructions may result in electric shock, fire and/or serious injury.
Save all warnings and instructions for future reference.
The term "power tool" in the warnings refers to your mains-operated (corded) power tool or battery-operated (cordless) power tool.
1) Work area safety
a) Keep work area clean and well lit.
Cluttered or dark areas invite accidents.
b) Do not operate power tools in explosive atmospheres, such as in the presence of flammable liquids, gases or dust.
Power tools create sparks which may ignite the dust or fumes.
c) Keep children and bystanders away while operating a power tool.
Distractions can cause you to lose control.
2) Electrical safety
a) Power tool plugs must match the outlet. Never modify the plug in any way.
Do not use any adapter plugs with earthed (grounded) power tools.
Unmodified plugs and matching outlets will reduce risk of electric shock.
b) Avoid body contact with earthed or grounded surfaces such as pipes, radiators, ranges and refrigerators.
There is an increased risk of electric shock if your body is earthed or grounded.
c) Do not expose power tools to rain or wet conditions.
Water entering a power tool will increase the risk of electric shock.
d) Do not abuse the cord. Never use the cord for carrying, pulling or unplugging the power tool. Keep cord away from heat, oil, sharp edges or moving parts.
Damaged or entangled cords increase the risk of electric shock.
e) When operating a power tool outdoors, use an extension cord suitable for outdoor use. Use of a cord suitable for outdoor use reduces the risk of electric shock.
f) If operating a power tool in a damp location is unavoidable, use a residual current device (RCD) protected supply.
Use of an RCD reduces the risk of electric shock.
3) Personal safety
a) Stay alert, watch what you are doing and use common sense when operating a power tool. Do not use a power tool while you are tired or under the influence of drugs, alcohol or medication.
A moment of inattention while operating power tools may result in serious personal injury.
b) Use personal protective equipment. Always wear eye protection.
Protective equipment such as dust mask, nonskid safety shoes, hard hat, or hearing protection used for appropriate conditions will reduce personal injuries.
c) Prevent unintentional starting. Ensure the switch is in the off-position before connecting to power source and/or battery pack, picking up or carrying the tool.
Carrying power tools with your finger on the switch or energising power tools that have the switch on invites accidents.
d) Remove any adjusting key or wrench before turning the power tool on.
A wrench or a key left attached to a rotating part of the power tool may result in personal injury.
e) Do not overreach. Keep proper footing and balance at all times.
This enables better control of the power tool in unexpected situations.
f) Dress properly. Do not wear loose clothing or jewellery. Keep your hair, clothing and gloves away from moving parts.
Loose clothes, jewellery or long hair can be caught in moving parts.
g) If devices are provided for the connection of dust extraction and collection facilities, ensure these are connected and properly used.
Use of dust collection can reduce dust-related hazards.
4) Power tool use and care
a) Do not force the power tool. Use the correct power tool for your application.
The correct power tool will do the job better and safer at the rate for which it was designed.
b) Do not use the power tool if the switch does not turn it on and off.
Any power tool that cannot be controlled with the switch is dangerous and must be repaired.
c) Disconnect the plug from the power source and/or the battery pack from the power tool before making any adjustments, changing accessories, or storing power tools.
Such preventive safety measures reduce the risk of starting the power tool accidentally.
d) Store idle power tools out of the reach of children and do not allow persons unfamiliar with the power tool or these instructions to operate the power tool.
Power tools are dangerous in the hands of untrained users.
e) Maintain power tools. Check for misalignment or binding of moving parts, breakage of parts and any other condition that may affect the power tool's operation.
If damaged, have the power tool repaired before use.
Many accidents are caused by poorly maintained power tools.
f) Keep cutting tools sharp and clean.
Properly maintained cutting tools with sharp cutting edges are less likely to bind and are easier to control.
g) Use the power tool, accessories and tool bits etc. in accordance with these instructions, taking into account the working conditions and the work to be performed.
Use of the power tool for operations different from those intended could result in a hazardous situation.
5) Service
a) Have your power tool serviced by a qualified repair person using only identical replacement parts.
This will ensure that the safety of the power tool is maintained.
HEAT GUN SAFETY WARNINGS
WARNING:
- Do not use the tool or touch the power plug with wet hands.
Failure to observe this may result in electric shocks.
- Always check the work area prior to use, and do not use the tool if safety cannot be guaranteed.
Failure to observe this may result in inflammable articles concealed in or behind invisible areas (cases, ceilings, floors, hollow areas) being ignited.
- Do not use the tool in the vicinity of volatile substances (thinner, gasoline, etc.)
Failure to observe this may result in the outbreak of fire or explosions.
- Do not stand underneath when using the tool in elevated locations.
Also, do not catch the power cord on anything, or allow it to be pulled.
Failure to observe this may result in accidents.
- Do not point the hot wind directly at people or animals. Do not look into the nozzle. Do not use it as a hair dryer under any circumstances.
Failure to observe this may result in accidents or injury.
- There are cases in which highly toxic gas will be emitted if used on plastic, lacquer or similar materials.
Always ensure that the work area is fully ventilated, and wear a dust-protection mask.
- Apply heat gently while moving the Heat Gun up, down, left and right.
Aiming it constantly at a single location may result in the outbreak of smoke or fire.
- Check the tool for damage, cracks or malformation in the event of it being accidentally dropped or subject to impact.
Damage, cracks and malformation may result in injury.
- Cease operations immediately in the event of the tool not operating properly or if abnormal noises or vibrations are noticed, and contact Hitachi Authorized Service Center to request inspections and repairs.
Continued use may result in injury.
- Do not get away from the unit while it is switched on. Failure to observe this may result in accidents.
Important safety Warning:
The appliance for indoor use only
a) Hidden areas such as behind walls, ceilings, floors, soffit boards and other panels may contain flammable materials that could be ignited by the heat gun when working in these locations. The ignition of these materials may not be readily apparent and could result in property damage and injury to persons.
When working in these locations, keep the heat gun moving in a back-and-forth motion.
Lingering or pausing in one spot could ignite the panel or the material behind it.
b) IMPORTANT SAFETY INSTRUCTIONS. READ THESE INSTRUCTIONS
WARNING:
Extreme care should be taken when stripping paint. The peelings, residue and vapors of paint may contain lead, which is poisonous. Any pre-1977 paint may contain lead and paint applied to homes prior to 1950 is likely to contain lead. Once deposited on surfaces, hand to mouth contact can result in the ingestion of lead. Exposure to even low levels of lead can cause irreversible brain and nervous system damage; young and unborn children are particularly vulnerable.
Before beginning any paint removal process you should determine whether the paint you are removing contains lead. This can be done by your local health department or by a professional who uses a paint analyzer to check the lead content of the paint to be removed. LEAD-BASED PAINT SHOULD ONLY BE REMOVED BY A PROFESSIONAL AND SHOULD NOT BE REMOVED USING A HEAT GUN.
Persons removing paint should follow these guidelines:
1) Move the work piece outdoors. If this is not possible, keep the work area well ventilated. Open the windows and put an exhaust fan in one of them. Be sure the fan is moving the air from inside to outside.
2) Remove or cover any carpets, rugs, furniture, clothing, cooking utensils and air ducts.
3) Place drop cloths in the work area to catch any paint chips or peelings. Wear protective clothing such as extra work shirts, overalls and hats.
4) Work in one room at a time. Furnishings should be removed or placed in the center of the room and covered. Work areas should be sealed off from the rest of the dwelling by sealing doorways with drop cloths.
5) Children, pregnant or potentially pregnant women and nursing mothers should not be present in the work area until the work is done and all clean up is complete.
6) Wear a dust respirator mask or a dual filter (dust and fume) respirator mask which has been approved by the Occupational Safety and Health Administration (OSHA), the National Institute of Safety and Health (NIOSH), or the United States Bureau of Mines.
These masks and replaceable filters are readily available at major hardware stores. Be sure the mask fits. Beards and facial hair may keep masks from sealing properly.
Change filters often. DISPOSABLE PAPER MASKS ARE NOT ADEQUATE.
7) Use caution when operating the heat gun. Keep the heat gun moving as excessive heat will generate fumes which can be inhaled by the operator.
8) Keep food and drink out of the work area. Wash hands, arms and face and rinse mouth before eating or drinking. Do not smoke or chew gum or tobacco in the work area.
9) Clean up all removed paint and dust by wet mopping the floors. Use a wet cloth to clean all walls, sills and any other surface where paint or dust is clinging. DO NOT SWEEP, DRY DUST OR VACUUM. Use a high phosphate detergent or trisodium phosphate (TSP) to wash and mop areas.
10) At the end of each work session put the paint chips and debris in a double plastic bag, close it with tape or twist ties and dispose of properly.
11) Remove protective clothing and work shoes in the work area to avoid carrying dust into the rest of the dwelling. Wash work clothes separately. Wipe shoes off with a wet rag that is then washed with the work clothes. Wash hair and body thoroughly with soap and water.
SAVE THESE INSTRUCTIONS
This appliance has a polarized plug (one blade is wider than the other). To reduce the risk of electric shock, this plug is intended to fit in a polarized outlet only one way. If the plug does not fit fully in the outlet, reverse the plug. If it still does not fit, contact a qualified electrician. Do not modify the plug in any way.
WARNING:
To reduce the risk of fire or electric shock, do not expose this product to rain or moisture. Store indoors. Read instruction manual before using.
Double insulation - When servicing, use only identical replacement parts.

CAUTION:
- Parts of the nozzle supplied are sharp, so use gloves when removing them from the case and when attaching or detaching them.
- The hot wind release nozzle, the tip of the nozzle and the material that was heated are extremely hot during and immediately after using the tool, so use gloves and avoid touching them directly.
- Do not use inside boxes, drawers or other enclosed spaces. Aiming it constantly at a single location may result in the outbreak of smoke or fire.
- Make sure the nozzle is at least 2^ (5 cm) away from the item being heated when using the tool. Also, do not cover or otherwise block the nozzle. Failure to observe this may result in the Heat Gun overheating, leading to malfunctions.
- Do not switch the tool on and off repeatedly. Also, do not use the tool with the power cord folded or twisted. Failure to observe this may result in malfunctions.
- Do not point the heat-wind release nozzle downwards immediately after use. Failure to observe this may result in the tool overheating, leading to malfunctions.
- Make sure that the Heat Gun has cooled completely before storing it away. Failure to observe this may result in burns or malformation of the storage case.
8.Definitions for symbols used on this tool V volts Hz hertz A amperes W watt Class II Construction --/min revolutions or reciprocation per minute \~Alternating current
To ensure safer operation of this power tool, HITACHI has adopted a double insulation design. "Double insulation" means that two physically separated insulation systems have been used to insulate the electrically conductive materials connected to the power supply from the outer frame handled by the operator. Therefore, either the symbol "or the words "Double insulation" appear on the power tool or on the nameplate. Although this system has no external grounding, you must still follow the normal electrical safety precautions given in this Instruction Manual, including not using the power tool in wet environments.
To keep the double insulation system effective, follow these precautions:
- Only HITACHI AUTHORIZATION SERVICE CENTER should disassemble or assemble this power tool, and only genuine HITACHI replacement parts should be installed.
Clean the exterior of the power tool only with a soft cloth moistened with soapy water, and dry thoroughly. Never use solvents, gasoline or thinners on plastic components; otherwise the plastic may dissolve.
SAVE THESE INSTRUCTIONS
AND
MAKE THEM AVAILABLE TO OTHER USERS
AND
OWNERS OF THIS TOOL!
FUNCTIONAL DESCRIPTION
NOTE: The information contained in this Instruction Manual is designed to assist you in the safe operation and maintenance of the power tool.
NEVER operate, or attempt any maintenance on the tool unless you have first read and understood all safety instructions contained in this manual.
Some illustrations in this Instruction Manual may show details or attachments that differ from those on your own power tool
NAME OF PARTS
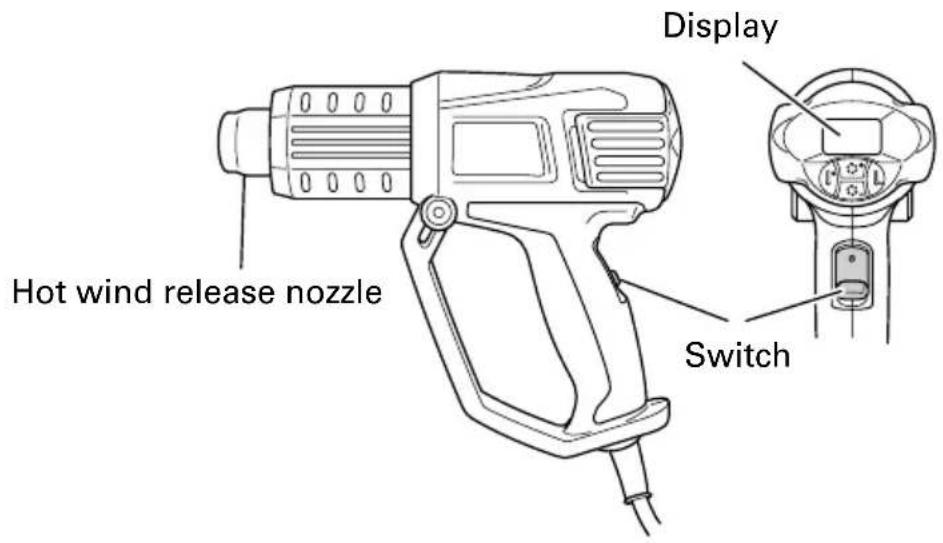
Fig. 1
SPECIFICATIONS
| Power supply | Type 60 Hz single-phase current. | |
| Voltage 120 V | ||
| Rated electrical current | 11.0 A | |
| Power input 1,500 W | ||
| Protection class II/ Double insulated | ||
| Capacity | Wind volume 0.25 m3/min to 0.5 m3/min (5-stage switch) | |
| Wind 120 – 1,200 °F (50 °C to 650 °C) temperature (In increments of 20 °F (10 °C)) | ||
| Motor type Direct current motor | ||
| Weight 1.7 lbs. (0.79 Kg) | ||
ASSEMBLY AND OPERATION
INTEND USE
When observing the safety rules and using the original accessories, this hot air tool is intended for all applications with hot air that are listed in these operating instruction.
Applications
Shrinking of shrink down tubing, solder connectors and solder terminals, packaging and electrical components.
Deforming of articles made from acrylic, PVC, and polystyrene, tubing, plates and profiles, as well as moist woods.
Welding of thermoplastic polymer, flooring materials of PVC and linoleum, PVC-coated fabric, tarpaulins and foils.
Soldering of tin, special silver solder, SMD elements, cable lugs, and for loosening soldered connections.
Paint removal -Removal of old and even thick coatings of oil paint, varnish and synthetic plaster.
Drying of colour shade samples, filter, adhesives, construction joints and stucco forms.
Joining adhesives-Large-surface gluing with contact adhesives, activation of pressure-sensitive adhesives, acceleration of bonding processes, releasing of bonding points as well as releasing or bonding of edge bond or veneer.
Defrosting of icy stairs and steps, door locks, trunk lids, car doors or water pipes, as well as for defrosting refrigerators and ice boxes.
Disinfection-With hot air of 1,110^ (600^) you can quickly rid animal sties/ stables of bacteria. Woodworm infestation can be controlled (Caution: Danger of fire! Do not heat up the wooden surface excessively).
PRIOR TO OPERATION
1. Power source
Ensure that the power source to be utilized conforms to the power source requirements specified on the product nameplate.
2. Power switch
Ensure that the switch is in the OFF position. If the plug is connected to a receptacle while the switch is in the ON position, the power tool will start operating immediately and can cause serious injury.
3. Extension cord
When the work area is remote from the power source, use an extension cord of sufficient thickness and rated capacity. The extension cord should be kept as short as practicable.

WARNING:
Damaged cord must be replaced or repaired.
4. Check the receptacle
If the receptacle only loosely accepts the plug, the receptacle must be repaired. Contact a licensed electrician to make appropriate repairs.
If such a faultly receptacle is used, it may cause overheating, resulting in a serious hazard.
BASIC FUNCTIONS
1. Switch Operations and Temperature Adjustments (Fig.1, 2)
Slide the knob upward to activate the switch and enable continual operations even when your finger is removed.
Slide the knob downward as far as it will go to set the switch at the [0] position and turn it off.
The position to which the switch is slid will alternate between modes.
Switch [1] position:
Fixes the wind temperature at 120^ (50^) and enables the wind power to be adjusted.
Switch [2] position:
Enables the wind temperature to be adjusted between 120^ (50^) and 1,200^ (650^) , and enables the wind power to be adjusted.
![HITACHI RH650V - Switch [2] position: - 1](/content/2026/04/645578/images/8ffa8eee4e1917d74299a0e27708ff21e36a82911256c50f15723c926fcd2af3.jpg)
Fig. 2
2. Adjusting the Temperature (Fig.1, Fig. 2, Fig. 3)
The temperature can be adjusted between 120^ (50^) and 1,200^ (650^) when the switch is at the [2] position.
The temperature will rise by 20^ (10^) each time the Increase Temperature button is pressed (to a maximum of 1,200 F (650^))
Press the button continuously to increase the temperature in increments of 20^ (10^)
The temperature will decrease by 20^ (10^) each time the Decrease Temperature button is pressed (to a minimum of 120^ (50^)) .
The set temperature will be indicated on the display when the Increase Temperature and Decrease Temperature buttons are pressed, but this will return to the hot wind temperature display after a few seconds.
The temperature will be fixed at 120^ (50^) when the switch is at the [1] position, and adjustment is not possible. This is used to quickly cool material that
is heat-warping and to cool the nozzle when it reaches high temperatures after using the tool.

Fig. 3
3. Wind Power Adjustment (Fig.1, Fig. 3)
The wind power can be adjusted in five stages between 1 and 5. (0.25m^3 to 0.5m^3) Press the [+ button to increase wind power, and the [-] button to decrease wind power.
The tool can be used with it stood pointing upward. (Fig. 4.)

Fig. 4

CAUTION:
Make sure the tool is placed on a stable surface so that it won't topple over when used pointing upward.
4. Attaching the Nozzle (Fig. 5)

CAUTION:
The nozzle is extremely hot immediately after use, so do not touch it.
NOTE
Make sure you do not drop the nozzle.
A falling down nozzle can set an object on fire.
Replace the nozzle for a type that is suited to the job in hand.
Insert the nozzle supplied firmly into the hot wind release nozzle until it can go no further.

CAUTION:
Before attaching or replacing a nozzle, allow the unit to cool down completely or use a suitable tool.
A hot nozzle can set a surface on fire. Place down hot nozzles only on fireproof surfaces.
An incorrect or defective nozzle can lead to heat accumulation and damage the unit. Use only original nozzles according to the table that are suitable for your unit.
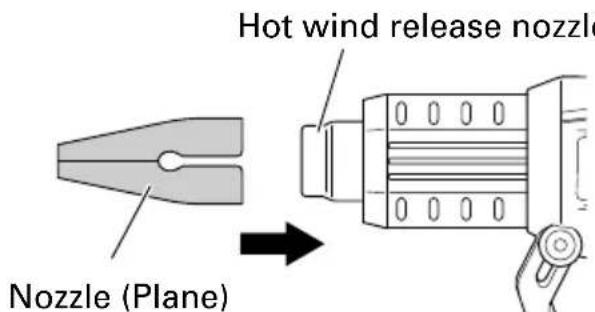
Fig. 5
5. Temperature Settings

WARNING:
Do not use the tool in the vicinity of volatile substances (thinner, gasoline, etc.)
Do not bring the hot wind release nozzle in close contact with your hands or face during use.
The nozzle is extremely hot immediately after use, so do not touch it.
Set the temperature in consideration of the article to be heated.
Also, pay attention to the surrounding material that will be heated at the same time. First of all, apply the hot wind from a distance while checking that there are no changes in the article being heated, and then move it closer until it reaches an appropriate distance.
Heating inflammable substances (paper, wood, plastic, etc.)
Set the switch to the [1] position and apply the heat with the nozzle at least 4^ (10 cm) away from the article being heated.
Gently move the tip of the nozzle up, down, left and right to apply the heat. Applying heat constantly to one location may result in malformation or the outbreak of smoke.
Heating non-flammable substances (metal, stone, concrete, etc.)
Set the switch to the [1] position, and if there are no problems, move it to the [2] position.
Apply the heat with the nozzle at least 2^ (5 cm) away from the article being heated.
Holding the nozzle too close may result in the tool overheating, leading to malfunctions.
WORK EXAMPLE

CAUTION:
Parts of the nozzles supplied are sharp, so use gloves when removing them from the case and when attaching or detaching them.
Select the nozzle in consideration of the shape of the article being heated and the area being heated.
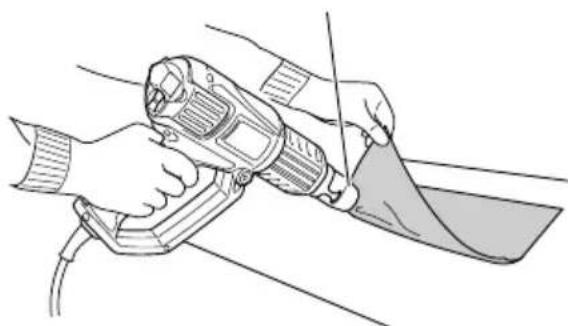
1. Peeling off paint (Fig. 6)
Use nozzle (flat) or nozzle (round) to soften the paint with the hot wind, and then remove it with the scraper supplied. Note that heating the paint too much may result in it scorching and becoming harder, making it difficult to scrape off.

Fig. 6
2. Softening adhesive (Fig. 7)
Use nozzle (flat) or nozzle (round) to soften the surface and make it easy to peel, and then pull up one of the edges, blow heat underneath it and gently peel it off so that none of the adhesive remains.
Nozzle (Round)
Fig. 7
3. Heat wrapping (Fig. 8)
Use nozzle (flat) to heat-wrap shrink film and tubes. The material will change color or crack if hot air is blown onto it from a close distance, so maintain an appropriate distance while monitoring progress.

Fig. 8
4. Forming resin pipes (Fig. 9)
Use nozzle (curved surface) to evenly heat the circumference of the resin pipe. To prevent the inside of the pipe from narrowing when bending it, etc., pour sand inside, block both ends and then gently bend it.
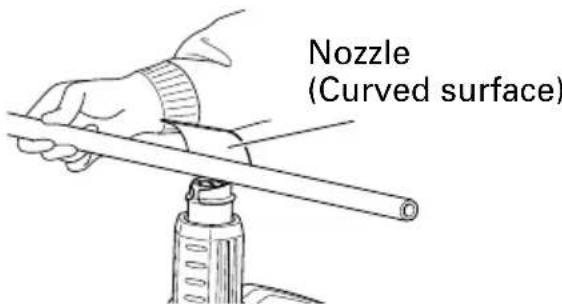
Fig. 9
5. Removing putty from window frames (Fig. 10)
Use nozzle (glass protector) to soften the putty with heat, and then remove the putty with the scraper supplied.
Note that glass may crack if heat is continually applied to it.

Nozzle (Glass protector)
Fig. 10
6. Defrosting water pipes (Fig. 11)
Use nozzle (curved surface) to heat the frozen area from the edge to the center. Do not mistake water pipes for glass pipes.
Take care to avoid damaging frozen resin areas on water pipes.
Nozzle
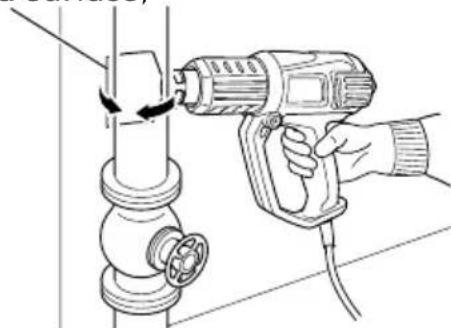
(Curved surface)
Fig. 11
MAINTENANCE AND INSPECTION
WARNING: Be sure to switch power OFF and disconnect the plug from the receptacle during maintenance and inspection.
- Inspecting the mounting screws Regularly inspect all mounting screws and ensure that they are properly tightened. Should any of the screws be loosened, retighten them immediately.
WARNING: Using this Heat Gun with loosen screws is extremely dangerous. - For safe and efficient working, always keep the unit and its ventilations slots clean.
- Maintenance of the motor The motor unit winding is the very "heart" of the power tool. Prevent any foreign objects, oil or water from getting inside the intake.
- Replacing supply cord If the supply cord of Tool is damaged, the Tool must be returned to Hitachi Authorized Service Center for the cord to be replaced.
-
Service and repairs All quality power tools will eventually require servicing or replacement of parts because of wear from normal use. To assure that only authorized replacement parts will be used, all service and repairs must be performed by a HITACHI AUTHORIZATION SERVICE CENTER, ONLY.
-
Service parts list
CAUTION:
Repair, modification and inspection of Hitachi Power Tools must be carried out by a Hitachi Authorized Service Center. This Parts List will be helpful if presented with the tool to the Hitachi Authorized Service Center when requesting repair or other maintenance. In the operation and maintenance of power tools, the safety regulations and standards prescribed in each country must be observed.
MODIFICATIONS:
Hitachi Power Tools are constantly being improved and modified to incorporate the latest technological advancements. Accordingly, some parts may be changed without prior notice.
Guarantee
For unit, we provide a guarantee in accordance with the contents of the enclosed warranty from the date of purchase (verified by invoice or delivery document). Damage that has occurred will be corrected by replacement or repair.
ACCESSIONS
WARNING:
ALWAYS use Only authorized HITACHI replacement parts and accessories. NEVER use replacement parts or accessories which are not intended for use with this tool. Contact HITACHI if you are not sure whether it is safe to use a particular replacement part or accessory with your tool.
The use of any other attachment or accessory can be dangerous and could cause injury or mechanical damage.
NOTE: Accessories are subject to change without any obligation on the part of the HITACHI.
STANDARD ACCESSORIES
(1) Nozzle (round) 1
(2) Nozzle (flat) 1
(3) Nozzle (curved surface) 1
(4) Nozzle (glass protector) 1
(5)Scraper(with grip) 1
(6) Case 1
CONSIGNES DE SECURITE IMPORTANTES
LISEZ CES INSTRUCTIONS
AVERTISSEMENT:
Minato-ku, Tokyo 108-6020, Japan
Distributed by

Hitachi Koki U.S.A., Ltd.
PO Box 970
Braselton, GA 30517

Hitachi Koki Canada Corp.
450 Export Blvd. Unit B,
Mississauga ON L5S 2A4