Xtorm XR202 - Power bank

XR202 - Power bank Xtorm - Free user manual and instructions

Find the device manual for free XR202 Xtorm in PDF.

📄 36 pages English EN Download 💬 AI Question 12 questions ⚙️ Specs
Notice Xtorm XR202 - page 3
View the manual : Français FR English EN
Pick your language and provide your email: we'll send you a specifically translated version.
Product type Portable battery
Brand Xtorm
Model XR202
Battery capacity 10,000 mAh
Charge input USB-C (PD)
Charge output USB-C (PD)
Number of ports 1 USB-C port (input/output)
Built-in flashlight Yes, LED
Charge indicator 4 LEDs (25% per LED)
Recommended charging adapter 35W wall charger
Charge time Approximately 3 hours
Dimensions 100 x 60 x 20 mm
Weight 200 g
Material ABS plastic
Safety Overcharge, short-circuit, and overheat protection
Included accessories USB-C cable
Recommended use Charging smartphones, tablets, and other USB-C devices
Care and cleaning Wipe with a soft, dry cloth. Do not use abrasive products.
Repairability Do not disassemble. Contact customer service for any repairs.

Frequently Asked Questions - XR202 Xtorm

How do I charge a device with the Xtorm XR202?
Connect the USB-C end of the included cable to the USB-C PD output of the battery, then the other end to your device. Charging starts automatically.
How do I recharge the XR202 battery itself?
Connect the USB-C end of the cable to the battery's input port and the USB-A end to a wall charger. For fast charging, use a 35W charger, which provides a full charge in about 3 hours.
What do the LED indicators mean?
Each lit LED represents 25% of remaining capacity. When all 4 LEDs are lit, the battery is fully charged.
How do I turn on the LED flashlight?
Press and hold (3 seconds) the power button to turn the built-in LED flashlight on or off.
Can I use a non-included cable?
Yes, if your device requires a different cable type (e.g., Lightning or Micro USB), you can use the appropriate cable with the battery.
What if the battery does not charge?
Check that the cable is properly connected and the wall charger is working. Try another cable or charger. If the problem persists, contact customer support.
Is it safe to leave the battery charging overnight?
Yes, the battery has overcharge protection. However, it is recommended to unplug once fully charged to preserve battery life.
Can I take the battery on a plane?
Portable batteries with a capacity of less than 20,000 mAh are generally allowed in carry-on luggage. Check with your airline for specific restrictions.
How do I clean the XR202 battery?
Use a soft, dry cloth to wipe the surface. Do not use liquid or abrasive cleaners.
What to do in case of malfunction?
Do not disassemble the battery. Contact customer service at support@tag.nl or call +31 (0)30 635 4800 for assistance.

User questions about XR202 Xtorm

2 questions about this device. Answer the ones you know or ask your own.

Ask a new question about this device

The email remains private: it is only used to notify you if someone responds to your question.

Why do the LED indicators on the Xtorm XR202 light up and then turn off when I plug it in?
Frequently Asked Questions - 13 d
Response Notice-Facile

This behavior is normal. The four LED indicators on the XR202 briefly light up when plugged in to indicate the current battery level (each indicator = 25%), then they automatically turn off after a few seconds to save energy during charging.

This is the intended operation of the product:

  • The LEDs do not stay on continuously during charging - they turn off to consume less energy
  • Charging continues in the background, even if the indicators are off
  • The full charging time is approximately 3 hours with a recommended 35 W charger

To check that charging is progressing: Briefly press the power button after a few hours. The LEDs will light up again and show you the new battery percentage. If more indicators light up, it means charging is working properly.

If after several hours of charging you find that the level has not increased, there may be a charging issue and you should contact support.

Respond (be the first)
Why do the LED indicators on the Xtorm XR202 not light up?
Frequently Asked Questions - 13 d
Response Notice-Facile

If the 4 LED indicators on the Xtorm XR202 do not light up, here are the checks to perform:

Step 1: Check the USB-C cable

  • Make sure the USB-C cable is fully inserted into the input port of the power bank (the one for charging the battery)
  • The output port (for charging your devices) only lights up the indicators if the battery has power

Important: According to the manual, each lit indicator represents 25% of remaining power. When the power bank is fully charged, all 4 indicators should be lit.

Step 2: Check the external power supply

  • The power bank must be connected to a wall adapter to charge
  • The manual recommends a 35W charger for a full charge in 3 hours
  • Check that the wall outlet works by testing another device

Step 3: Try another cable

  • Use a different USB-C cable to check if the problem is with the cable
  • If it works, your cable is defective

If after these checks the indicators remain off, contact Xtorm support:

  • Email: support@tag.nl
  • Phone: +31 (0)30 635 4800
Respond (be the first)

Download the instructions for your Power bank in PDF format for free! Find your manual XR202 - Xtorm and take your electronic device back in hand. On this page are published all the documents necessary for the use of your device. XR202 by Xtorm.

USER MANUAL XR202 Xtorm

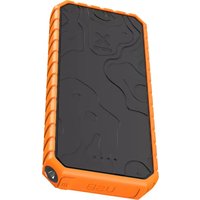
natural_image Topographic contour map of a building facade with snowflakes and marked locations (no text or labels)

SPECIFICATIONS PRODUCT OVERVIEW1 2

20.000 mAh Li-ion / 74Wh

1x USB-C PD 35W 1x USB-C 15W 2x USB-A QC 3.0 18W

188x89x25 mm

540 grams

+ 1x USB-C to USB-C PD cable 1x Manual

Technical diagram of a device layout with labeled components and contour lines, including numbered parts and a control panel.

Input/output USB-C PD 35W output USB-C PD 15W Output 2x USB-A QC 3.0 18W LED light indicator Built in flashlight

3 CHARGING YOUR DEVICE

Xtorm XR202 - CHARGING YOUR DEVICE - 1

natural_image Diagram showing a smartphone connected to a cable with labeled ports (no text or symbols present)

COMPATIBLE DEVICES

Xtorm XR202 - CHARGING YOUR DEVICE - 2

3A Connect the USB-C end of the charging cable to the USB-C PD output of the Power Bank and the other end to the input of your device. The charging will start automatically.
3B Charging some devices requires a charging cable other than the one supplied. E.g. an Apple Lightning or a Micro USB cable.

CHARGING THE POWER BANK 4

Xtorm XR202 - CHARGING THE POWER BANK 4 - 1

natural_image Three electronic components: a three-pin plug, a straight connector, and a mobile phone case (no text or symbols visible)

4A Connect the USB-C end of the charging cable to output 2 of the Power Bank and the USB end to a wall charger.
4B For the fastest charging possible use a 35W charger. This will fully recharge the Power Bank within 3 hours.

LED LIGHT INDICATOR5 IN THE BOX 6

Xtorm XR202 - LED LIGHT INDICATOR5 IN THE BOX 6 - 1

Xtorm XR202 - LED LIGHT INDICATOR5 IN THE BOX 6 - 2

natural_image Diagram of a mechanical or architectural component with labeled points A and B, showing internal structures without any readable text or symbols.

5A De button function is:

  1. Short press: Turn on the product/ Show battery capacity.
  2. Double press: Turn off the product
  3. Long press (3s): Turn on/off LED flashlight
    5B. Each lit LED light indicates 25% remaining energy in the Power Bank. At 4 lit lights, the Power Bank is fully charged.

Xtorm XR202 - LED LIGHT INDICATOR5 IN THE BOX 6 - 3
1

Xtorm XR202 - LED LIGHT INDICATOR5 IN THE BOX 6 - 4

Xtorm XR202 - LED LIGHT INDICATOR5 IN THE BOX 6 - 5

XR202 Rugged Pro

Power Bank

1

USB-C to USB-C PD

cable

Manual

XR202 Rugged Pro Power Bank USB-C to USB-C PD cable Manual

EN - ENGLISH

1 SPECIFICATIONS

2 PRODUCT OVERVIEW

3 CHARGING YOUR DEVICE

3A Connect the USB-C end of the charging cable to the USB-C PD output of the Power Bank and the other end to the input of your device. The charging will start automatically.

3B Charging some devices requires a charging cable other than the one supplied. E.g. an Apple Lightning ^® or a Micro USB cable.

4 RECHARGING THE POWER BANK

4.A Connect the USB-C end of the charging cable to output 2 of the Power Bank and the USB end to a wall charger.

4.B For the fastest charging possible use a 35W charger. This will fully recharge the Power Bank within 3 hours.

5 LED POWER INDICATOR

5.A De button function is:

  1. Short press: Turn on the product/ Show battery capacity.

  2. Double press: Turn off the product.

  3. Long press (3s): Turn on/off LED flashlight

5.B Each Ilt LED light indicates 25% remaining energy in the Power Bank. At 4 Ilt lights, the Power Bank is fully charged.

6 IN THE BOX

NL - NEDERLANDS

1 SPECIFICATIES

2 PRODUCTOVERZICHT

3 UW APPARAAT OPLADEN

5 LED STROOMINDICATOR

EN When recycling this product, please follow WEEE battery recycling procedures. Contact your local recycling organization for more information.

XTORM SAFETY CHECK WARNINGS

Xtorm XR202 - XTORM SAFETY CHECK WARNINGS - 1

Xtorm XR202 - XTORM SAFETY CHECK WARNINGS - 2

1. TEMPERATURE CONTROL

Provided with a temperature control chip that prevents overheating.

Xtorm XR202 - TEMPERATURE CONTROL - 1

2. OVERLOAD PROTECTION

Protects both the internal battery as well as the battery of the attached device from overcharging.

Xtorm XR202 - OVERLOAD PROTECTION - 1

3. SECURED POWER MANAGEMENT

Automatically picks the correct charging speed and efficiently devides power between attached devices.

Xtorm XR202 - SECURED POWER MANAGEMENT - 1

4. SHORT CIRCUIT PROTECTION

Breaks the circuit automatically when an overcurrent is detected. This protects the Xtorm charger and your device from short circuit damage.

Xtorm XR202 - SHORT CIRCUIT PROTECTION - 1

5. A-CLASS BATTERY CELLS

We only use the best battery cells that provide the fast charging you need and meet all safety requirements.

Xtorm XR202 - A-CLASS BATTERY CELLS - 1

6. HIGH EFFICIENCY

Our power products are built to power your device as efficient as possible. This ensures the least possible loss of energy during the charging process.

EN Warnings

Don't crop, disseme or attempt to repair the charger by yourself. Avoid exposure to water or high humidity. Don't expose to any heat source. Keep out of reach of children. Don't use in the presence of flamimabla gas. The warranty will lose in the event of limaroper use. Talco Accessories has tested the product in a test environment. All statements/declarations made by Talco Accessories about the operation of the product are based on the results obtained from such tests. These results/statements/declarations cannot be guaranteed, for example in cases of deviating or injudicious use and/or use in a different environment.

NL Waarschuwingen
Manual assistant
Powered by Anthropic
Waiting for your message
Product information

Brand : Xtorm

Model : XR202

Category : Power bank