AC001G - Compressor MAKITA - Free user manual and instructions
Find the device manual for free AC001G MAKITA in PDF.

User questions about AC001G MAKITA
0 question about this device. Answer the ones you know or ask your own.
Ask a new question about this device
Download the instructions for your Compressor in PDF format for free! Find your manual AC001G - MAKITA and take your electronic device back in hand. On this page are published all the documents necessary for the use of your device. AC001G by MAKITA.
USER MANUAL AC001G MAKITA
natural_image
Line drawing of a mechanical air compressor unit with no visible text or symbols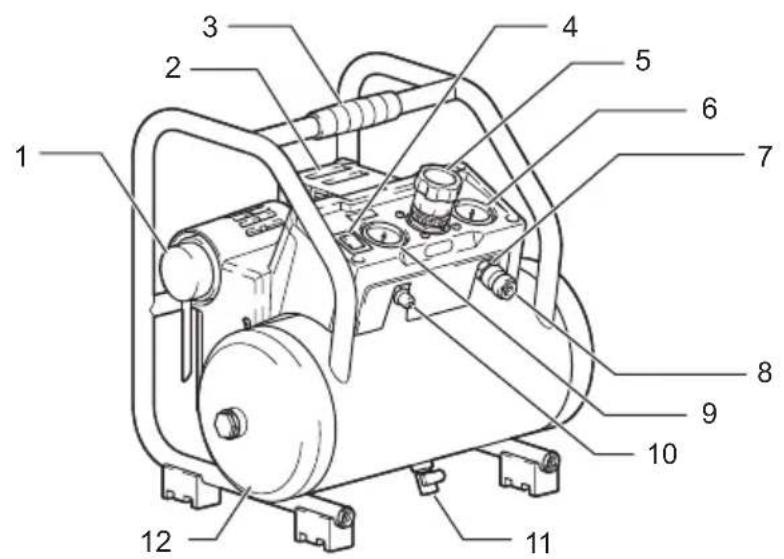
Fig.1

SPECIFICATIONS
| Model: AC001G | |
| L/min @ 0.62 MPa(L/min @ 6.2 bar) | 34 L/min |
| Cut-In Pressure 0.72 MPa (7.2 bar) | |
| Cut-Out Pressure 0.93 MPa (9.3 bar) | |
| Outlet Max Pressure 0.93 MPa (9.3 bar) | |
| Bore x Stroke x Qty 36 mm x | 30 mm x 1 |
| Motor RPM 6,000 min | -1 |
| Tank Size 7.6 L | |
| Lubrication Oil-Less | |
| Rated voltage D.C. 36 V - 40 | V max |
| Dimensions (L x W x H) 302 | mm x 434 mm x 382 mm |
| Net weight 11.6 - 12.2 kg | |
• Due to our continuing program of research and development, the specifications herein are subject to change without notice.
- Specifications and battery cartridge may differ from country to country.
Applicable battery cartridge and charger
| Battery cartridge BL4020 / BL4025 / BL4040* / BL4050F* | *: Recommended battery |
| Charger | DC40RA / DC40RB / DC40RC |
• Some of the battery cartridges and chargers listed above may not be available depending on your region of residence.
WARNING: Only use the Makita battery cartridges and chargers listed above. Use of any other battery cartridges and chargers may cause injury and/or fire.
NOTE: The battery cartridge and charger are not included.
Symbols
The followings show the symbols which may be used for the equipment. Be sure that you understand their meaning before use.


Read instruction manual.
Take particular care and attention.
Risk of electric shock. Caution: before doing any work on the compressor the battery cartridge must be removed.
Risk of high temperatures. Caution: the compressor contains some parts which might reach high temperatures.
Risk of accidental start-up. Attention, the compressor could start automatically in case of a black-out and subsequent reset.
Wear safety glasses.

Ni-MH Li-ion
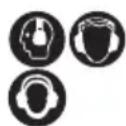
Wear ear protection.
For European countries only Due to the presence of hazardous components in the equipment, waste electrical and electronic equipment, accumulators and batteries may have a negative impact on the environment and human health. Do not dispose of electrical and electronic appliances or batteries with household waste!
In accordance with the European Directive on waste electrical and electronic equipment and on accumulators and batteries and waste accumulators and batteries, as well as their adaptation to national law, waste electrical equipment, batteries and accumulators should be stored separately and delivered to a separate collection point for municipal waste, operating in accordance with the regulations on environmental protection.
This is indicated by the symbol of the crossed-out wheeled bin placed on the equipment.

Guaranteed sound power level according to EU Outdoor Noise Directive. Guaranteed sound power level according to UKCA Outdoor Noise Directive.

Sound power level according to Australia NSW Noise Control Regulation.
Noise
The typical A-weighted noise level determined according to EN ISO 3744: 2010:
Sound pressure level ( L_pA ): 68 dB (A)
Uncertainty (K): 2.5 dB (A)
The noise level under working may exceed 80 dB (A).
NOTE: The declared noise emission value(s) has been measured in accordance with a standard test method and may be used for comparing one tool with another.
NOTE: The declared noise emission value(s) may also be used in a preliminary assessment of exposure.
WARNING: Wear ear protection.
WARNING: The noise emission during actual use of the power tool can differ from the declared value(s) depending on the ways in which the tool is used especially what kind of workpiece is processed.
WARNING: Be sure to identify safety measures to protect the operator that are based on an estimation of exposure in the actual conditions of use (taking account of all parts of the operating cycle such as the times when the tool is switched off and when it is running idle in addition to the trigger time).
Declaration of Conformity
For European countries only
The declaration of conformity is included as Annex A to this instruction manual.
IMPORTANT SAFETY INSTRUCTIONS
SAVE THESE INSTRUCTIONS.
WARNING:
• IMPROPER OPERATION OR MAINTENANCE OF THIS PRODUCT COULD RESULT IN SERIOUS INJURY AND PROPERTY DAMAGE.
- READ AND UNDERSTAND ALL WARNINGS AND OPERATING INSTRUCTIONS BEFORE USING THIS EQUIPMENT.
- Keep this instruction manual for your reference and instructions for others. When you lend the compressor and air tools, lend only to people who have proven to be experienced and also hand over the instruction manual together.
- First-time or inexperienced operators should be trained in the operations. Never allow children, or people unfamiliar with the instructions, to use the compressor and air tools.
WARNING:
Work Area Safety
- Keep your work area clean and well lit. Cluttered and dark areas invite accidents.
- Do not operate the compressor in explosive atmospheres, such as in the presence of flammable liquids, gases, or dust. The compressor creates sparks which may ignite the dust or fumes.
- Keep bystanders, children, and visitors away while operating an air tool. Distractions can cause you to lose control. Protect others in the work area from debris such as chips and sparks. Provide barriers or shields as needed. Children should never be allowed in the work area.
• The adequate room temperature is +5°C to +30°C. (0°C to +40°C at Maximum)
WARNING:
Risk of Unsafe Operation
WHAT CAN HAPPEN
Unsafe operation of your air compressor could lead to serious injury to you or others.
HOW TO PREVENT IT
- Review and understand all instructions and warnings in this manual.
- Become familiar with the operation and controls of the air compressor.
- Keep operating area clear of all persons, pets, and obstacles.
- Keep children away from the air compressor at all times.
- Do not operate the product when fatigued or under the influence of alcohol or drugs. Stay alert at all times. Distractions can cause you to lose control.
• Never defeat the safety features of this product.
• Equip area of operation with a fire extinguisher. - Do not operate machine with missing, broken, or unauthorized parts.
- Before use, always check that the compressor is safe for operation. If there is a misalignment or binding of moving parts, breakage of part, or other functional failure, have the compressor serviced before use. Many accidents are caused by poorly maintained products.
WARNING:
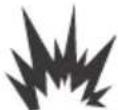
Risk of Air Tank Bursting
WHAT CAN HAPPEN
The following conditions could lead to a weakening of the tank, and RESULT IN A VIOLENT TANK EXPLOSION RESULTING IN SERIOUS INJURY TO YOU OR OTHERS:
- Failure to properly drain condensed water from the tank, causing rust and thinning of the tank wall.
- Modifications or attempted repairs to the tank.
- Unauthorized modifications to the pressure switch, safety valve, or any other components, which control tank pressure.
HOW TO PREVENT IT
- Drain air tank daily or after each use. If air tank develops a leak, replace it immediately with a new tank or replace the entire compressor.
- Do not drill into, weld or otherwise modify air tank or it will weaken. The tank can rupture or explode. Replace with a new air tank.
- Follow the equipment manufacturers recommendation and never exceed the maximum allowable pressure rating of attachments. Never use the compressor to inflate small low-pressure objects such as children's toys, footballs, basketballs, etc.
WARNING:
Risk of Attachments and Accessories Bursting
WHAT CAN HAPPEN
- Exceeding the pressure rating of air tools, spray guns, air operated accessories, tires AND other inflatables can cause them to explode or fly apart, and could result in serious injury to you and others.
• Always follow all safety rules recommended by the manufacturer of your air tool, in addition to all safety rules for the air compressor. Following this rule will reduce the risk of serious personal injury.
WARNING:
Risk when Inflating Tires
WHAT CAN HAPPEN
Over inflating tires can result in serious injury and property damage.
HOW TO PREVENT IT
- Check the tires pressure before each use with a tire pressure gauge. While inflating tires, confirm the correct tire pressure written on the tire's sidewall.
NOTE: Equipment used for inflating tires, such as air tanks and compressors can inflate small tires or similar very rapidly. Adjust the air supply so that it becomes equal or less than the rating of tire pressure. To prevent over inflation, supply air little by little and frequently check the tire's air pressure using a tire gauge.
WARNING:
Risk of Electric Shock

WHAT CAN HAPPEN
Your air compressor is powered by electricity. Like any other electrically powered device, if it is not used properly, it may cause electrical shock.
HOW TO PREVENT IT
- Any electrical wiring or repairs required to this product should be performed by qualified service personnel or a licensed electrician, in accordance with national and local electrical codes.
- Never operate the compressor outdoors when it is raining, or in a wet environment.
• Never operate the compressor with guards or covers which are damaged or removed.
• To reduce the risk of electric shock, do not expose to rain. Store indoors. - Do not expose compressor to rain or wet conditions. Water entering the compressor will increase the risk of electric shock.
- Avoid body contact with earthed or grounded surfaces, such as pipes, radiators, ranges and refrigerators. There is an increased risk of electric shock if your body is earthed or grounded.
WARNING:
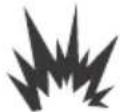
Risk of Explosion or Fire
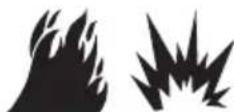
WHAT CAN HAPPEN
It is normal for electrical contacts within the motor and pressure switch to spark, whenever the compressor starts or stops. Never operate the compressor in an atmosphere where flammable vapors are present. Doing so can result in serious injury to you or others.
HOW TO PREVENT IT
• Always operate the compressor in a well-ventilated area, free of gasoline or solvent vapors.
• Do not use flammable liquid in a confined area.
• Always ventilate the spraying area.
- Do not smoke during spraying and spray toward a location where spark or flame is generated.
- Keep compressors away from the spraying area as possible, leave a distance at least 6.1 m from the spraying area and all flammable materials.
• Store flammable materials in a secure location away from compressor.
WARNING:
Risk to Breathing

WHAT CAN HAPPEN
- The compressed air from your compressor is not safe for breathing.
The air stream may contain carbon monoxide or other vapors, or particles from the tank or other components. - Sprayed materials such as paint, paint solvents, paint remover, insecticides, weed killers, etc., contain harmful vapors and poisons.
• Breathing compressor or sprayed materials vapor can result in serious injury.
HOW TO PREVENT IT
- Never inhale air from the compressor, either directly or from a breathing device connected to the compressor.
• Work in an area equipped with good cross ventilation. - Read and follow the safety instructions provided on the label or safety data sheet for the material you are spraying.
Use an approved respirator designed for use with your specific application.
• Do not carry the compressor while painting.
WARNING:
Risk from Noise
- Wear hearing protection to protect your ears against exhaust noise and noise during operation.
WARNING:
Risk from Compressed Air

WHAT CAN HAPPEN
The compressed air stream can cause soft tissue damage, and can propel dirt, chips, loose particles and small objects at high speed, resulting in property damage or personal injury.
HOW TO PREVENT IT
• Always wear approved safety glasses with side shields when using or maintaining the compressor.
- Never point any nozzle or sprayer toward any part of the body or at other people or animals.
• Always turn the compressor off and bleed pressure from the air line before attempting maintenance, attaching tools or accessories.
WARNING:
Risk from Moving Parts

WHAT CAN HAPPEN
The compressor cycles automatically when the On/Auto-Off switch is in the On/Auto position. If you attempt repair or maintenance while the compressor is operating or plugged in, you can expose yourself to moving parts.
These moving parts can cause serious injury.
HOW TO PREVENT IT
• Always turn off the On/Auto-Off switch and remove the battery cartridge. After that, release air pressure from the tank and any attachments before attempting any maintenance or repair.
- Never operate the compressor with guards or covers which are damaged or removed.
- Keep your hair, clothing, and gloves away from moving parts. Loose clothes, jewelry, or long hair can be caught in moving parts.
• Air vents may cover moving parts and should be avoided as well.
WARNING:
Risk of Burn
- Do not operate the portable compressor with the doors or enclosures open!
- Do not open the cock before the air hose is attached!

WHAT CAN HAPPEN
Contact with hot parts such as the compressor head or outlet tubes could result in a serious skin burn.
HOW TO PREVENT IT
- Never touch hot components during or immediately after operation of the compressor. Do not reach around protective shrouds or attempt maintenance until the compressor has been allowed to cool.
• Always hold the handle when move or transport the compressor. - During using the compressor and within one hour after use, do not touch the heated parts such as cylinder, cylinder head, and exhaust hose. These parts become hot and can cause burn injury.
WARNING:
Transport
• Always hold the handle when handling, lifting, moving, or transporting the compressor. Do not attempt to pull or carry the air compressor by the hose. Doing so may damage the compressor and/or hose.
• Always carry the compressor in the correct way. Transporting and lifting in wrong way may cause the compressor damaged.
• The maximum bevel during traction is at least 30^ .
• Do not apply vehicles for traction.
- Do not place compressor under inflammable, explosive or erosive service.
• To prevent unintentional start-up;
— do not carry the compressor over a long distance;
— do not carry with the compressor with its air tank filled with compressed air, and;
— do not bring into a potentially dangerous situations, such as in a vehicle or on a ladder or scaffold.
Electrical and battery safety
- Avoid dangerous environment. Don't use the tool in damp or wet locations or expose it to rain. Water entering the tool will increase the risk of electric shock.
- Prevent unintentional starting. Ensure the switch is in the off-position before connecting to battery pack, picking up or carrying the machine. Carrying the machine with your finger on the switch or energizing machine that have the switch on invites accidents.
- Disconnect the battery pack from the machine before making any adjustments, changing accessories, or storing machine. Such preventive safety measures reduce the risk of starting the machine accidentally.
- Recharge only with the charger specified by the manufacturer. A charger that is suitable for one type of battery pack may create a risk of fire when used with another battery pack.
- Use machines only with specifically designated battery packs. Use of any other battery packs may create a risk of injury and fire.
- When battery pack is not in use, keep it away from other metal objects, like paper clips, coins, keys, nails, screws or other small metal objects, that can make a connection from one terminal to another. Shorting the battery terminals together may cause burns or a fire.
- Under abusive conditions, liquid may be ejected from the battery; avoid contact. If contact accidentally occurs, flush with water. If liquid contacts eyes, seek medical help. Liquid ejected from the battery may cause irritation or burns.
- Do not use a battery pack or machine that is damaged or modified. Damaged or modified batteries may exhibit unpredictable behaviour resulting in fire, explosion or risk of injury.
-
Do not expose a battery pack or machine to fire or excessive temperature. Exposure to fire or temperature above 130^ C ( 265^ F) may cause explosion.
-
Follow all charging instructions and do not charge the battery pack or machine outside of the temperature range specified in the instructions. Charging improperly or at temperatures outside of the specified range may damage the battery and increase the risk of fire.
- Have servicing performed by a qualified repair person using only identical replacement parts. This will ensure that the safety of the product is maintained.
- Do not modify or attempt to repair the machine or the battery pack except as indicated in the instructions for use and care.
Important safety instructions for battery cartridge
- Before using battery cartridge, read all instructions and cautionary markings on (1) battery charger, (2) battery, and (3) product using battery.
- Do not disassemble or tamper with the battery cartridge. It may result in a fire, excessive heat, or explosion.
- If operating time has become excessively shorter, stop operating immediately. It may result in a risk of overheating, possible burns and even an explosion.
-
If electrolyte gets into your eyes, rinse them out with clear water and seek medical attention right away. It may result in loss of your eyesight.
-
Do not short the battery cartridge:
(1) Do not touch the terminals with any conductive material.
(2) Avoid storing battery cartridge in a container with other metal objects such as nails, coins, etc.
(3) Do not expose battery cartridge to water or rain.
A battery short can cause a large current flow, overheating, possible burns and even a breakdown.
-
The operating temperature of this battery cartridge is between 0^ C and 40^ C ( 32^ F and 104^ F).
-
Do not store the battery cartridge in locations where the temperature may go -20 °C (-4 °F) or less, or, 40 °C (104 °F) or more.
-
Do not store and use the tool and battery cartridge in locations where the temperature may reach or exceed 50 °C (122 °F).
-
Do not incinerate the battery cartridge even if it is severely damaged or is completely worn out. The battery cartridge can explode in a fire.
-
Do not nail, cut, crush, throw, drop the battery cartridge, or hit against a hard object to the battery cartridge. Such conduct may result in a fire, excessive heat, or explosion.
-
Do not use a damaged battery.
-
The contained lithium-ion batteries are subject to the Dangerous Goods Legislation requirements.
For commercial transports e.g. by third parties, forwarding agents, special requirement on packaging and labeling must be observed.
For preparation of the item being shipped, consulting an expert for hazardous material is required. Please also observe possibly more detailed national regulations.
Tape or mask off open contacts and pack up the battery in such a manner that it cannot move around in the packaging. - When disposing the battery cartridge, remove it from the tool and dispose of it in a safe place. Follow your local regulations relating to disposal of battery.
- Use the batteries only with the products specified by Makita. Installing the batteries to non-compliant products may result in a fire, excessive heat, explosion, or leak of electrolyte.
- If the tool is not used for a long period of time, the battery must be removed from the tool.
- During and after use, the battery cartridge may take on heat which can cause burns or low temperature burns. Pay attention to the handling of hot battery cartridges.
- Do not touch the terminal of the tool immediately after use as it may get hot enough to cause burns.
- Do not allow chips, dust, or soil stuck into the terminals, holes, and grooves of the battery cartridge. It may cause heating, catching fire, burst and malfunction of the tool or battery cartridge, resulting in burns or personal injury.
-
Unless the tool supports the use near high-voltage electrical power lines, do not use the battery cartridge near a high-voltage electrical power lines. It may result in a malfunction or breakdown of the tool or battery cartridge.
-
Keep the battery away from children.
SAVE THESE INSTRUCTIONS.
⚠️CAUTION: Only use genuine Makita batteries. Use of non-genuine Makita batteries, or batteries that have been altered, may result in the battery bursting causing fires, personal injury and damage. It will also void the Makita warranty for the Makita tool and charger.
Tips for maintaining maximum battery life
- Charge the battery cartridge before completely discharged. Always stop tool operation and charge the battery cartridge when you notice less tool power.
- Never recharge a fully charged battery cartridge. Overcharging shortens the battery service life.
- Charge the battery cartridge with room temperature at 10 °C - 40 °C ( 50 °F - 104 °F ). Let a hot battery cartridge cool down before charging it.
- When not using the battery cartridge, remove it from the tool or the charger.
- Charge the battery cartridge if you do not use it for a long period (more than six months).
INTRODUCTION
General information
This air compressor is equipped with an Oil-Less pump designed for durability and no maintenance. The compressor can be used for properly rated pneumatic nailers and staplers. An air pressure regulator is supplied for these applications.
Intended use
This air compressor is designed for professional finish nailing and stapling applications.
WARNING: Never use compressor for applications other than to operate a properly rated nailer or stapler. Use of the compressor for other applications could result in property damage and personal injury.
Separate air transformers which combine the functions of air regulation and/or moisture and dirt removal should be used where applicable.
⚠ WARNING: Use the pressure gauge only for a reference. Check the air pressure using calibrated measuring equipment during and after inflating objects.
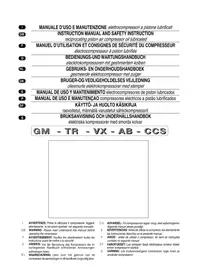
Parts description
▶ Fig.1
| 1 | Air filter (air intake) | 2 | Battery cartridge | 3 | Carrying handle | 4 | On/Auto-Off switch |
| 5 | Regulator | 6 | Outlet pressure gauge | 7 | Air outlet (Rc 1/4) | 8 | Quick coupler (country specific) |
| 9 | Tank pressure gauge | 10 | Safety valve | 11 | Drain valve | 12 | Air tank |
⚠️CAUTION: Always use accessories and attachments recommended for use with Makita product. Not doing so may cause personal injury. Accessories and attachments must be used for its original purpose. If you need any assistance, ask your local Makita Service Center.
Glossary
MPa (megapascal): Metric pressure measurement. 1 megapascal equals to 10 bar.
Cut-in pressure: While the motor is off, air tank pressure drops as you continue to use your accessory or air tool. When the tank pressure drops to a certain level the motor will restart automatically re-started is called "cut-in pressure".
Cut-out pressure: When you turn on your air compressor, it begins to run, air pressure in the air tank begins to build. It builds to a certain pressure before the motor automatically shuts off - protecting your air tank from pressure higher than its design rating. The pressure at which the motor shuts off is called "cut-out pressure".
On-receipt inspection
DAMAGE: Each air compressor outfit is carefully tested and checked before shipment. With improper handling, damage may result in transit and cause problems with compressor operation.
Immediately upon arrival, check equipment for both concealed and visible damages to avoid expenses being incurred to correct such problems. This should be done regardless of any visible signs of damage to the shipping container. If this product was shipped directly to you, report any damages to the carrier and arrange for inspection of goods immediately.
Installation and break-in procedures
Location of the air compressor
Locate the air compressor in a clean, dry and well-ventilated area. The air filter must be kept clear of obstructions, which could reduce air delivery of the air compressor. The air compressor should be located at least 305 mm away from the wall or other obstructions that will interfere with the flow of air. The air compressor head and shroud are designed to allow for proper cooling.
If humidity is high, an air filter can be installed on the air outlet adapter to remove excessive moisture. Follow the instructions packaged with the air filter for proper installation.
Place the air compressor on a flat surface so that it is resting securely on the rubber feet.

WARNING: Risk of Falling
WHAT CAN HAPPEN
The air compressor can fall from a table, workbench, or roof causing damage to the compressor and could result in serious injury or death to the operator.
HOW TO PREVENT IT
Always operate compressor in a stable secure position to prevent accidental movement of the compressor. Never operate compressor on a roof or other elevated position. Use additional air hose to reach high locations.
Operating temperature
The operating temperature of this compressor is between 0^ C and 40^ C.

CAUTION: Never operate the compressor in the temperatures below 0°C and above 40°C.
Duty cycle
All Makita manufactured air compressors are recommended to be operated on not more than a 50% duty cycle. This means an air compressor that pumps air more than 50% in one hour is considered misuse because the air compressor is undersized for the required air demand.
Piping
Plastic or PVC pipe is not designed for use with compressed air. Regardless of its indicated pressure rating, plastic pipe can burst from air pressure. Use only metal pipe for air distribution lines. If a pipe line is necessary, use pipe that is the same size, or larger than, the air tank outlet. Piping that is too small will restrict the flow of air. If piping is over 30.5 m long, use the next larger size. Bury underground lines below the frost line and avoid pockets where condensation can gather and freeze. Apply pressure before underground lines are covered to make sure all pipe joints are free of leaks.
Battery protection system
This compressor is equipped with a battery protection system. This system automatically cuts off power to the motor to extend compressor and battery life. The compressor will automatically stop during operation if the compressor/battery is placed under one of the following conditions:
Overloaded
The compressor/battery is operated in a manner that causes it to draw an abnormally high current. In this situation, turn the compressor off and stop the application that caused the compressor to become overloaded.
Then turn the compressor on to restart.
If the compressor does not start, the battery is overheated. In this situation, let the battery cool before turning the compressor on again.
Low battery voltage
The remaining battery capacity is too low and the compressor will not operate. If you turn the tool on, the motor runs again but stops soon. In this situation, remove and recharge the battery cartridge.
Protections against other causes
Protection system is also designed for other causes that could damage the compressor and allows the tool to stop automatically. Take all the following steps to clear the causes, when the compressor has been brought to a temporary halt or stop in operation.
- Turn the compressor off, and then turn it on again to restart.
- Charge the battery or replace it/them with recharged battery.
- Let the compressor and battery cool down.
If no improvement can be found by restoring protection system, then contact your local Makita Service Center.
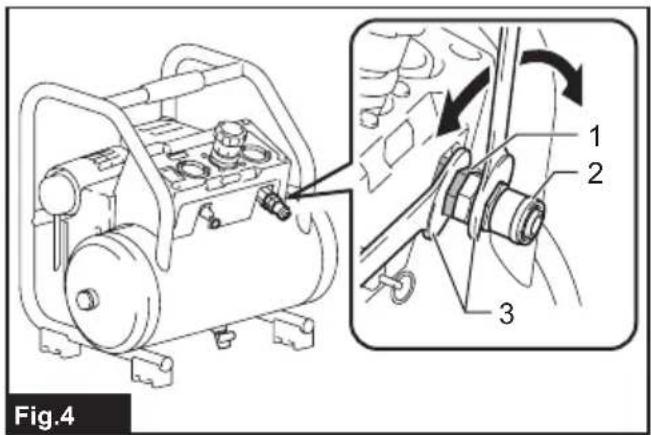
NOTE: Depending on the conditions of use and the ambient temperature, the indication may differ slightly from the actual capacity.
NOTE: The rst (far left) indicator lamp will blink when the battery protection system works.
CAUTION: Always switch off the tool before installing or removing of the battery cartridge.
CAUTION: Hold the tool and the battery cartridge firmly when installing or removing battery cartridge. Failure to hold the tool and the battery
cartridge rmly may cause them to slip o your hands and result in damage to the tool and battery cartridge and a personal injury.
▶ Fig.2: 1. Red indicator 2. Button 3. Battery cartridge
To remove the battery cartridge, slide it from the tool while sliding the button on the front of the cartridge.
To install the battery cartridge, align the tongue on the battery cartridge with the groove in the housing and it into place. Insert it all the way until it locks in with a little click. If you can see the red indicator shown in the gure, it is not locked completely.
CAUTION: Always install the battery cartridge fully until the red indicator cannot be seen. If not, it may accidentally fall out of the tool, causing injury you or someone around you.
CAUTION: Do not install the battery cartridge forcibly. If the cartridge does not slide in easily, it not being inserted correctly.
WARNING: Risk of Noise
- Wear hearing protection to protect your ears against exhaust noise and noise during operation.
Drain valve:
The drain valve is located at the bottom of the air tank and is used to drain condensation at the end of each use.
Automatic shut off system:
If the compressor automatically shuts o before reaching its normal cuto pressure :
slip Place Turn the On/Auto-O switch to "O" position.
place as 2. Remove the battery cartridge.
- Wait until the compressor cools down. (about 10 min.)
- Install the battery cartridge.
- Turn the On/Auto-O switch to "On/Auto" position.
ON/AUTO - OFF switch:
Turn this switch to on (I) position to provide automatic power to the pressure switch and to o (0) position to remove power when nished using the compressor or when compressor will be left unattended.
WARNING: Always turn off (0) the On/Auto-Off switch when not in use.
Press the check button on the battery cartridge to indicate the remaining battery capacity. The indicator lamps light up for a few seconds.
▶ Fig.3: 1. Indicator lamps 2. Check button
Indicator lamps Remaining
| capacity | |
| Lighted Off Blinking | |
| 75% to 100% | |
| 50% to 75% | |
| 25% to 50% | |
| 0% to 25% | |
| Charge the battery. | |
| The battery may have malfunctioned. | |
CAUTION: When carrying the tool, turn off (0) the On/Auto-Off switch.
Air filter (Air intake):
Keep the air liter clean at all times. Do not operate the compressor with the air liter removed. The compressor does not operate at full capacity if the air liter is dirty. Before using the compressor, always check the air liter if it is clean. If not, clean the air liter or replace the element.
Air compressor pump:
To compress air, the piston moves up and down in the cylinder. On the down stroke, air is drawn in through the air intake valve. The exhaust valve remains closed. On the upstroke of the piston, air is compressed. The intake valve closes and compressed air is forced out through the exhaust valve, through the outlet tube, through the check valve and into the air tank. Useable air is not available until the compressor has raised the air tank pressure above that required at the air outlet.
Check valve:
When the air compressor is operating, the check valve is “open”, allowing compressed air to enter the air tank. When the air compressor reaches “cut-out” pressure, the check valve “closes”, allowing air pressure to remain inside the air tank.
Pressure switch:
The pressure switch automatically starts the motor when the air tank pressure drops to the factory set "cut-in" pressure. It stops the motor when the air tank pressure reaches the factory set "cut-out" pressure.
Safety valve:
If the pressure switch does not shut off the air compressor at its "cut-out" pressure setting, the safety valve will protect against high pressure by "popping out" at its factory set pressure which is slightly higher than the pressure switch "cut-out" setting.
Outlet pressure gauge:
The outlet pressure gauge indicates the air pressure available at the outlet side of the regulator. This pressure is controlled by the regulator and is always less or equal to the tank pressure.
Tank pressure gauge:
The tank pressure gauge indicates the air pressure in the tank.
Regulator:
The air pressure coming from the air tank is controlled by the regulator knob. Turn the knob clockwise to increase pressure and counter-clockwise to decrease pressure. To avoid minor re-adjustment after making a change in pressure setting, always approach the desired pressure from a lower pressure. When reducing from a higher to a lower setting, first reduce to some pressure less than desired pressure. Depending on the air requirements of each particular accessory, the outlet regulated air pressure may have to be adjusted while you are operating the accessory.
Air outlet:
For regular pressure pneumatic tool, use outlet max pressure; 0.93 MPa (9.3 bar).
When using a quick coupler in the market, install it to the air outlet using the two wrenches as shown in the figure.
▶ Fig.4: 1. Air outlet 2. Quick coupler 3. Wrench
NOTE: If the quick coupler does not have any air sealing method, we recommend applying an adequate measure such as a sealing tape.
Daily Start-up Checklist
WARNING: Do not use the power tool if the switch does not turn it on and off. Any power tool that cannot be controlled with the switch is dangerous and must be repaired.
Connecting hoses
WARNING: Risk of Unsafe Operation
-
Firmly grasp hose in hand when installing to prevent hose whip. Losing control of the hose may result in personal injury and property damage.
• Always follow all safety rules recommended by the manufacturer of hoses, connectors, air tools, and accessories in addition to all safety rules for the air compressor. Following this rule will reduce the risk of serious personal injury. -
Before attaching air hose or accessories, make sure On/Auto-Off switch lever is set to "Off", the battery is removed, and the air regulator or shut-off valve is closed.
- Attach hose and accessories. Too much air pressure causes a hazardous risk of bursting. Check the manufacturer's maximum pressure rating for air tools and accessories. The regulator outlet pressure must never exceed the maximum pressure rating.
NOTICE: Air pressures above 0.7 MPa (7 bar) is recommended. The delivery hoses should be fitted with a safety cord such as wire rope.
- Install the battery cartridge and turn the On/Auto - Off switch to "On/Auto" and allow tank pressure to build. Motor will stop when tank pressure reaches "cut-out" pressure.
- Open the regulator by turning it clockwise. Adjust the regulator to the correct pressure setting. Your compressor is ready for use.
- Always operate the air compressor in well-ventilated areas; free of gasoline or other solvent vapors. Do not operate the compressor near the spray area.
When you are finished:
Disconnecting hoses
WARNING: Risk of Unsafe Operation
- Firmly grasp hose in hand when disconnecting to prevent hose whip. Losing control of the hose may result in personal injury and property damage.
-
Air tanks contain high pressure air. Keep face and other body parts away from outlet of drain. Always wear approved safety glasses with side shields when draining as debris can be kicked up into face.
-
Set the On/Auto - Off switch to "Off" and remove the battery cartridge.
- Turn the regulator counterclockwise to set the outlet pressure to zero.
- Remove the air tool or accessory.
- Open the drain valve located at the lower part of the air tank. Tank pressure should be below 0.14 MPa (1.4 bar) when drain the air tank.
- Tilt the tank so that the drain valve is directly below and drain.
WARNING: Risk of bursting
Tilt tank to drain.
⚠ WARNING: To drain tank, open the drain valve slowly and tilt compressor to empty accumulated water. Keep face and eyes away from the drain valve.
WARNING: WATER WILL CONDENSE IN THE AIR TANK. IF NOT DRAINED, WATER WILL CORRODE AND WEAKEN THE AIR TANK CAUSING A RISK OF AIR TANK RUPTURE.
NOTICE: Risk of Property Damage Always drain water from the air tank. The water may contain oil and rust which can cause stains.
NOTE: If drain valve is plugged, release all air pressure. The valve can then be removed, cleaned, then reinstalled.
NOTE: Compressed air generates condensate which accumulates in the tank, filter, or other parts. The condensate contains lubricating oil and/or substances which may be regulated. Follow the regulations in your region when disposing of the condensate.
- After the water has been drained, close the drain valve. The air compressor can now be stored.
WARNING: Drain Air Tank Properly. Improper draining of the air tank can result in corrosion and possible bursting of the tank. Tank bursting could lead to personal injury and property damage.
MAINTENANCE
WARNING: Never use the air compressor which is operating abnormally.
If the air compressor appears to be operating unusually, making strange noises or vibration, stop using it immediately and arrange for repairs by a Makita authorized service center.
WARNING: Use only genuine Makita replacement parts.
Replacement parts not manufactured by Makita may void your warranty and can lead to malfunction and result in injuries. Genuine Makita parts are available from an authorized dealer.
WARNING: UNIT CYCLES AUTOMATICALLY WHEN POWER IS ON. WHEN DOING MAINTENANCE, YOU MAY BE EXPOSED TO VOLTAGE SOURCES, COMPRESSED AIR OR MOVING PARTS. PERSONAL INJURIES CAN OCCUR. BEFORE PERFORMING ANY MAINTENANCE OR REPAIR, THE TOOL IS SWITCHED OFF AND THE BATTERY CARTRIDGE IS REMOVED AND BLEED OFF ALL AIR PRESSURE.
⚠️CAUTION: Always be sure that the tool is switched off and the battery cartridge is removed before attempting to perform inspection or maintenance.
NOTICE: Never use gasoline, benzine, thinner, alcohol or the like. Discoloration, deformation or cracks may result.
To maintain product SAFETY and RELIABILITY, repairs, any other maintenance or adjustment should be performed by Makita Authorized or Factory Service Centers, always using Makita replacement parts.
To ensure efficient operation and longer life of the air compressor unit, a routine maintenance schedule should be prepared and followed. The following procedure is geared to a unit in a normal working environment operating on a daily basis. If necessary, the schedule should be modified to suit the conditions under which your compressor is used. The modifications will depend upon the hours of operation and the working environment. Compressor units in an extremely dirty and/or hostile environment will require a greater frequency of all maintenance checks.
Maintenance routine
- Drain water from the air tank, any moisture separators or air filter regulators.
- Check for any unusual noise and/or vibration.
- Inspect air filter, replace if necessary.
- Inspect air lines and fittings for leaks and correct as necessary. Each year of operation or if a problem is suspected, check condition of check valve. Replace if damaged or worn out.
- Keep all screws, bolts, and covers tightly mounted. Check their conditions periodically.
WARNING: Keep all screws, bolts and covers properly tightened. If screws plates or covers become loose personal injury or property damage may occur.
Recommended interval of inspection and maintenance
Inspect and maintain the compressor within the period as described in the following table.
| Part Action Daily | (before/after use) | Weekly Monthly | Quarterly | |||
| Overall Inspect for unusual noise and vibration | √ | --- | ||||
| Clean o dirt and dust with dry air. | - | √ | - | - | ||
| Air lines and ttings | Inspect for leakage | √ | --- | |||
| Air tank Exhaust all air and drain condensation in the air tank. (open the drain valve.) | √ | --- | ||||
| Inspect for scratches, dents, or leakage. | √ | --- | ||||
| Inspect rust, pin holes, or other imperfections that could cause it to become unsafe. | --- | √ | ||||
| Bolts and nuts Inspect for tightness. | --- | √ | ||||
| Handle Wipe o oil | and grease. | - | √ | - | - | |
| Cut-out pressure Check and adjust. - | √ | - | - | |||
| Air Iter Clean or replace if necessary. | - | - | √ | - | ||
Lubrication
This air compressor is equipped with an Oil-Less pump designed for durability and no maintenance.
Storage
Before you store the air compressor, make sure you do the following:
- Review the “MAINTENANCE” and “OPEATION” sections and perform maintenance as necessary. Be sure to drain water from the air tank.
- Protect the air hose from damage (such as being stepped on or run over).
Store the air compressor in a clean and dry location.
TROUBLESHOOTING
Before asking for repairs, conduct your own inspection first. If you find a problem that is not explained in the manual, do not attempt to dismantle the tool.
| State of abnormality Probable cause | (malfunction) Remedy | ||
| Compressor will not run. The remaining battery capacity is too low. | Recharge the battery cartridge. | ||
| Defective pressure switch. Ask your local authorized service center for repair. | |||
| Tank pressure exceeds pressure switch cut-in pressure. | Compressor will turn on when tank pressure drops to cut-in pressure. | ||
| Automatic shut off system has worked. | Turn off the compressor remove the battery cartridge. Install the battery cartridge after cooling the compressor down. | ||
| Defective motor. Ask your local authorized service center for repair. | |||
| Safety valve releasing Pressure switch cut-out pressure too high. | Ask your local authorized service center for repair. | ||
| Defective safety valve. Ask your local authorized service center for repair. | |||
| Automatic shut off system works repeatedly. | Poor ventilation.Room temperature is too high. | Move compressor to a well-ventilated area. | |
| Electrical overload. Turn off the compressor and allow to cool; remove and reinstall battery cartridge. | |||
| Defective motor. Ask your local authorized service center for repair. | |||
| There is a continuous air leak after the compressor has stopped. | Loose air lines and fittings. Check all connections with soap and water solution and tighten. | ||
| Loose or open drain valve. Tighten/close the drain valve. | |||
| Air leakage from the check valve. Ask your local authorized service center for repair. | |||
| Compressor runs continuously Air filter is dirty. Clean the air filter or replace the filter element. | |||
OPTIONAL ACCESSORIES
WARNING: These Makita accessories or attachments are recommended for use with your Makita tool specified in this manual. The use of any other accessories or attachments may result in serious personal injury.
WARNING: Only use the Makita accessory or attachment for its stated purpose. Misuse of an accessory or attachment may result in serious personal injury.
If you need any assistance for more details regarding these accessories, ask your local Makita Service Center.
- Air hose
• Makita genuine battery and charger
NOTE: Some items in the list may be included in the tool package as standard accessories. They may differ from country to country.
SPÉCIFICATIONS
Luftfilter (Lufteinlass):
⚠ WAARSCHUWING: Draag gehoorbescherming.
⚠ WAARSCHUWING: Risico van geluid