
MON 8 A G3 - Loudspeaker LD Systems - Free user manual and instructions
Find the device manual for free MON 8 A G3 LD Systems in PDF.

| Product type | Coaxial active stage monitor |
| Brand | LD Systems |
| Model | MON 8 A G3 |
| Dimensions (W x D x H) | 340 × 347 × 278 mm |
| Weight | 13.2 kg |
| System power (RMS / peak) | 300 W RMS / 1200 W peak |
| Max SPL (peak) | 121 dB SPL (fullspace @1m, 10% THD) |
| Frequency response (-3 dB) | 68 Hz – 18 kHz |
| Dispersion angle (H x V) | 50° × 90° (constant directivity horn) |
| Amplifier | Class D with DynX® Gen.2 DSP processing |
| Speaker driver | Coaxial: 8" woofer (2.5" voice coil) + 1.75" titanium diaphragm tweeter |
| Audio inputs | 2 × balanced Combo XLR/6.35 mm jack |
| Audio outputs | 2 × male XLR (THRU) |
| Power supply | 100-240 V, 50-60 Hz (SMPS); power consumption 150 W |
| Mains connectors | PowerCON compatible (IN and OUT) |
| DSP functions | 4 presets (FULLRANGE, FLAT, MONITOR, MON HPF), 3-band EQ, notch filter, delay up to 10 m |
| Cabinet material | 15 mm birch plywood / 15 mm MDF, polyurea coating |
| Front grille | Solid steel grille |
| Feet | 4 anti-slip rubber feet (base) + 3 for vertical storage |
| Pole mount | 35 mm for use as front-of-house |
| Maintenance and cleaning | Clean with a damp cloth; do not use harsh chemicals. Dust air intakes regularly. |
| Safety | Overload, overheating, overvoltage protection; multiband limiter |
| Spare parts and repairability | Repair only by qualified personnel. No user-serviceable parts. |
| General information | Temporary professional indoor use. Temperature 0-40°C, humidity <80%. |
Frequently Asked Questions - MON 8 A G3 LD Systems
User questions about MON 8 A G3 LD Systems
0 question about this device. Answer the ones you know or ask your own.
Ask a new question about this device
Download the instructions for your Loudspeaker in PDF format for free! Find your manual MON 8 A G3 - LD Systems and take your electronic device back in hand. On this page are published all the documents necessary for the use of your device. MON 8 A G3 by LD Systems.
USER MANUAL MON 8 A G3 LD Systems
natural_image
Four black plastic electronic enclosures arranged in a row, no visible text or symbols on the surfaces.MON G3 SERIES
POWERD COAXIAL STAGE MONITOR
LDMON8AG3 / LDMON10AG3 / LDMON12AG3 / LDMON15AG3
ENGLISH
ABOUT THIS MANUAL 4
INTENDED USE 4
DEFINITIONS AND SYMBOL EXPLANATION EXPPLICATIONS DES TERMES ET DES SYMBO
SAFETY INSTRUCTIONS 5
PACKAGING CONTENT 7
INTRODUCTION
ASSEMBLY
DEVICE COMPONENTS 9
WIRING EXAMPLES 11
CONNECTIONS, OPERATING AND DISPLAY ELEXEMNESIDE CÂBLAGE 47
OPERATION
CARE, MAINTENANCE AND REPAIR 15
OPTIONAL ACCESSORIES 16
DIMENSIONS
TECHNICAL DATA 18
DISPOSAL 20
MANUFACTURER'S DECLARATIONS 20
DEUTSCH
INFORMATIONEN ZU DIESER
BEDIENUNGSANLEITUNG
VERWENDUNGSZWECK 22
This device has been developed and manufactured to the highest quality standards to ensure many years of problem-free operation. This is what LD Systems stands for with its name and many years of experience as a manufacturer of high-quality audio products. Please read these operating instructions carefully so that you can quickly get the most out of your new LD Systems product.
You can find more information about LD Systems on our website WWW.LD-SYSTEMS.COM
ABOUT THIS MANUAL
- Read the safety instructions and the entire manual carefully before commissioning.
- Observe the warnings on the unit and in the operating instructions.
• Always keep the operating instructions within reach. - If you sell or pass on the appliance, be sure to hand over these operating instructions as well, as they are an essential part of the product.
INTENDED USE
The product is a device for event technology! This product has been developed for professional use in the field of event technology and is not suitable for use as domestic lighting! Furthermore, this product is only intended for qualified users with specialist knowledge of event technology! Use of the product outside the specified technical data and operating conditions is considered inappropriate! Liability for damage and third-party damage to persons and property due to inappropriate use is excluded! The product is not suitable for:
- Use by persons (including children) with limited physical, sensory or mental abilities or lack of experience and knowledge.
- Children (children must be instructed not to play with the device).
DEFINITIONS AND SYMBOL EXPLANATIONS
- DANGER: The word DANGER, possibly in combination with a symbol, indicates immediately dangerous situations or conditions for life and limb.
- WARNING: The word WARNING, possibly in combination with a symbol, indicates potentially dangerous situations or conditions for life and limb.
- CAUTION: The word CAUTION, possibly in combination with a symbol, is used to indicate situations or conditions that may lead to injury.
- ATTENTION: The word ATTENTION, possibly in combination with a symbol, refers to situations or states that can lead to damage to property and/or the environment.
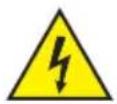
This symbol identifies hazards that can cause electric shock.

This symbol identifies hazardous areas or hazardous situations.
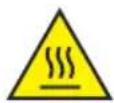
This symbol indicates hazards caused by hot surfaces.
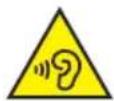
This symbol indicates dangers due to high volume levels.

This symbol indicates additional information on the operation of the product.

This symbol denotes a device that does not contain any user-serviceable parts.
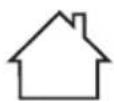
This symbol indicates electrical equipment designed primarily for indoor use.
SAFETY INSTRUCTIONS
DANGER:
- Do not open the device and do not perform any modifications.
- If your device no longer functions properly, if liquids or objects get inside it or if it has been damaged in any other way, switch it off immediately and disconnect it from the mains. The device may be repaired only by authorised repair technicians.
- For devices of protection class 1, the protective conductor must be connected correctly. Never disconnect the protective conductor. Devices of protection class 2 do not have a protective conductor.
- Ensure that live cables are not kinked or otherwise mechanically damaged.
- Never bypass the device fuse.
WARNING:
- The device must not be put into operation if it shows obvious signs of damage.
- The device may only be installed in a voltage-free state.
- If the mains cable of the device is damaged, do not operate the device.
- Permanently connected power cables may only be replaced by a qualified person.
ATTENTION:
- Do not operate the unit if it has been exposed to large temperature fluctuations (for example, after transport). Moisture and condensation can damage the device. Switch on the device only when it has reached room temperature.
- Make sure that the voltage and frequency of the mains supply correspond to the values indicated on the unit. If the device has a voltage selector switch, do not connect the device until it has been set correctly. Use only suitable power cables.
- To disconnect the unit from the mains at all poles, it is not sufficient to press the on/off switch on the unit.
- Make sure that the fuse used corresponds to the type printed on the unit.
- Make sure that appropriate measures have been taken against overvoltage (e.g. lightning strike).
- Observe the specified maximum output current on units with Power Out connection. Ensure that the total current consumption of all connected devices does not exceed the specified value.
- Replace pluggable mains cables only with original cables.

DANGER:
- Danger of suffocation! Plastic bags and small parts must be kept out of reach of persons (including children) with reduced physical, sensory or mental capabilities.
- Danger from falling down! Make sure that the device is securely installed and will not fall down. Only use suitable stands or mounts (particularly for fixed installations). Ensure that accessories are properly installed and secured. Ensure that applicable safety regulations are observed.

WARNING:
- Use the device only in the manner intended.
- Operate the appliance only with the accessories recommended and intended by the manufacturer.
- During installation, observe the safety regulations applicable in your country.
- After connecting the unit, check all cable routes to avoid damage or accidents, e.g. due to tripping hazards.
- Always observe the specified minimum distance to normally flammable materials! Unless explicitly stated, the minimum distance is 0.3 m.

CAUTION:
- In the case of moving components such as mounting brackets or other moving components, there is a possibility of jamming.

ATTENTION:
- Do not install or use the device in the vicinity of radiators, accumulators, stoves, or other heat sources. Ensure that the device is always installed in such a way that it is sufficiently cooled and cannot overheat.
- Do not place ignition sources such as burning candles near the device.
- Ventilation openings must not be covered and fans must not be blocked.
- Use the original packaging or packaging provided by the manufacturer for transport.
- Avoid shock or impact to the unit.
- Observe the IP protection class as well as the ambient conditions such as temperature and humidity according to the specification.
- Devices can be constantly further developed. In the event of deviating information on operating conditions, performance or other device properties between the user manual and the device labelling, the information on the device always takes priority.
- The unit is not suitable for tropical climates and for operation above 2000 m above sea level.

CAUTION:
Connecting signal cables can cause a lot of noise. Make sure that devices connected to the output are muted when plugged in. Otherwise, noise levels may cause damage.

CAUTION: HIGH VOLUME AUDIO PRODUCTS!
This device is designed for professional use.
The commercial operation of this device is subject to the applicable national regulations and guidelines for accident prevention.
Hearing damage due to high volume and continuous exposure: Use of this product may produce high sound pressure levels (SPL) which may cause hearing damage. Avoid exposure to high volumes.

NOTES FOR MOBILE INDOOR DEVICES
- Temporary operation! Event equipment is generally designed for temporary use only.
- Continuous operation or permanent installation can impair the functioning of the device and cause premature ageing.
PACKAGING CONTENT
Remove the product from the packaging and remove all packaging material.
Please check the completeness and integrity of the delivery and notify your distribution partner immediately after purchase if the delivery is not complete or if it is damaged.
The packaging content of the product MON 8 A G3 includes:
1x MON 8 A G3 powered coaxial stage monitor
1x Power cord
User manual
The packaging content of the product MON 10 A G3 includes:
1x MON 10 A G3 powered coaxial stage monitor
1x Power cord
User manual
The packaging content of the product MON 12 A G3 includes:
1 x MON 12 A G3 powered coaxial stage monitor
1x Power cord
User manual
The packaging content of the product MON 15 A G3 includes:
1 x MON 15 A G3 powered coaxial stage monitor
1x Power cord
User manual
INTRODUCTION
Unlocking the potential of advanced stage monitoring for musicians, DJs and audio engineers.
This thought guided our developers as they completely reimagined the concept of our MON stage
monitor series to create the perfect package. A harmonious blend of advanced acoustics, clever
features, intuitive operation, durable materials and the elegant LD Systems design propels the new MON G3 Series one step beyond.
FEATURES
MON 8 A G3
- Compact high-performance stage monitor with top-of-the-range technologies
- Class-D power amplifier with 300 W RMS/1200 W peak and 121 dB max. SPL
- Coaxial design for true point source with a 1.75" titanium-diaphragm HF driver
- 8" woofer with 2.5" voice coil
- Optimised, practical radiation pattern due to 50^ × 90^ CD horn
- DynX® DSP (Gen.2) for distortion-free sound even at maximum volume
- 3-band EQ, Notch filter, 4 application presets and delay function
• PowerCON compatible loop-through professional power connection
- 35 mm speaker stand flange for FOH applications
• Durable Polyurea coating and heavy-duty front grille
MON 10 A G3
- Compact high-performance stage monitor with top of the range technologies
- Class-D power amplifier with 300 W RMS/1200 W peak and 126 dB max. SPL
- Coaxial design for true point source with a 1.75" titanium-diaphragm HF driver
- 10" woofer with 2.5" voice coll
- Optimised, practical radiation pattern due to 50^ × 90^ CD horn
- DynX ^ DSP (Gen.2) for distortion-free sound even at maximum volume
- 3-band EQ, Notch filter, 4 application presets and delay function
• PowerCON compatible loop-through professional power connection
35 mm supply stand flange for 501 applications
MON 12 A G3
- Compact high-performance stage monitor with top-of-the-range technologies
- Class-D power amplifier with 300 W RMS/1200 W peak and 127 dB max. SPL
- Coaxial design for true point source with a 1.75" titanium-diaphragm HF driver
- 12" woofer with 2.5" voice coil
- Optimised, practical radiation pattern due to 50^ × 90^ CD horn
- DynX® DSP (Gen.2) for distortion-free sound even at maximum volume
- 3-band EQ, Notch filter, 4 application presets and delay function
- PowerCON compatible loop-through professional power connection
- 35 mm speaker stand flange for FOH applications
- Durable Polyurea coating and heavy-duty front grille
MON 15 A G3
- Compact high-performance stage monitor with top-of-the-range technologies
- Class-D power amplifier with 300 W RMS/1200 W peak and 129 dB max. SPL
- Coaxial design for true point source with a 1.75" titanium-diaphragm HF driver
- 15" woofer with 3" voice coil
- Optimised, practical radiation pattern due to 50^ × 90^ CD horn
- DynX® DSP (Gen.2) for distortion-free sound even at maximum volume
- 3-band EQ, Notch filter, 4 application presets and delay function
- PowerCON compatible loop-through professional power connection
- 35 mm speaker stand flange for FOH applications
• Durable Polyurea coating and heavy-duty front grille
ASSEMBLY

DANGER: Always place the active monitor in a suitable location on a sufficiently stable, level and horizontal surface. Make sure that the monitor cannot fall off the edge of a stage (e.g. due to vibration). There is a risk that units that have not been set up and positioned correctly will fall over or down. This can cause serious injury or death.
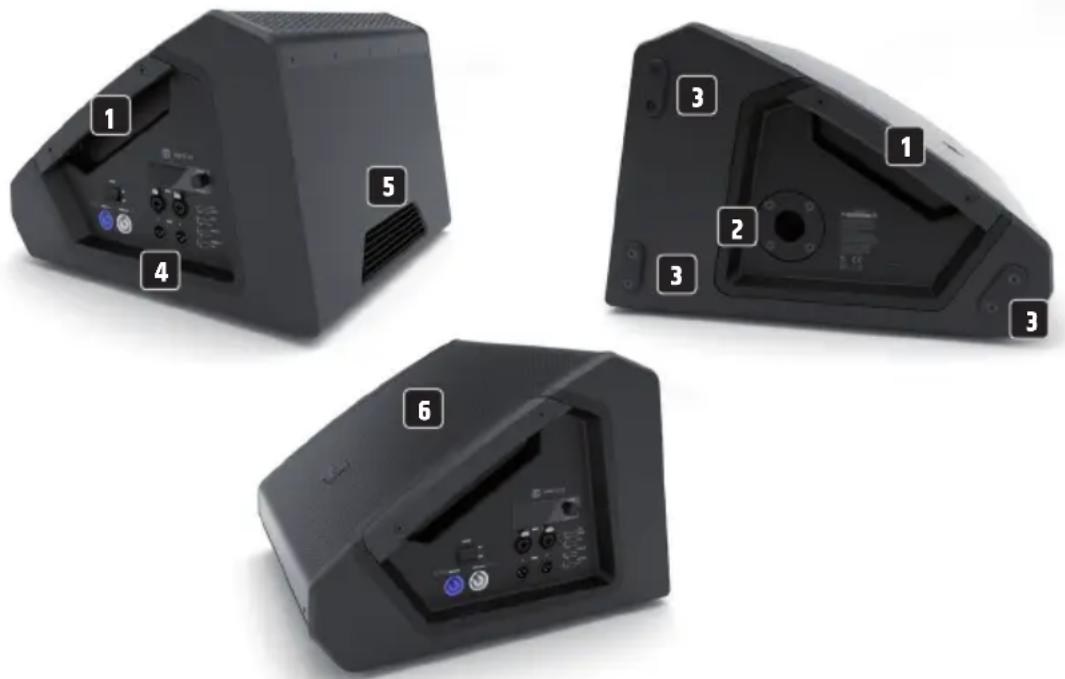
DEVICE COMPONENTS
1 RECESSED GRIP
One ergonomically shaped recessed grip each is located on the left and right below the front grille.
2 STAND FLANGE
A 35 mm flange is located on the left side of the housing. Only use suitable speaker stands!
3 RUBBER FEET
Four non-slip rubber feet are located on the underside of the cabinet. Three non-slip rubber feet are located on the left-hand side of the cabinet for safe parking and for upright assembly.
4 CONNECTION PANEL
The recessed connection and operating panel with display is located on the right-hand side of the housing.
5 HEAT SINK
A heat sink is located on the back of the housing. Do not cover the heat sink during operation and ensure that air can circulate freely.
6 FRONT GRILLE
For a homogeneous appearance and to protect the speakers, there is a sturdy protective grille on the front of the enclosure.
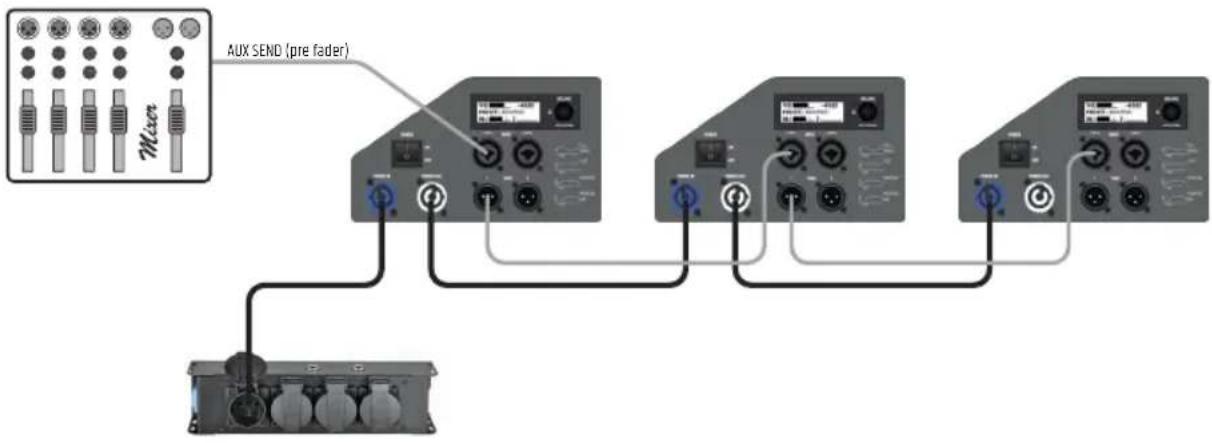
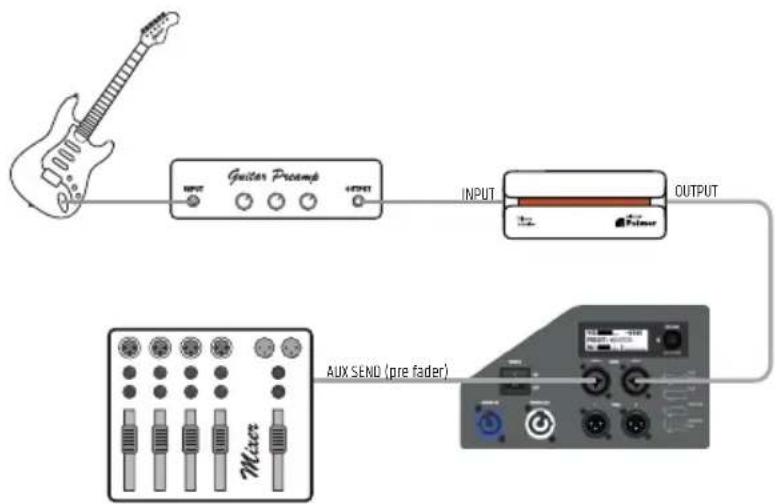
WIRING EXAMPLES
1
flowchart
graph TD
    A["Main Module 1"] -->|Aux SEND (pre fader)| B["Module 1"]
    A -->|Aux SEND (pre fader)| C["Module 2"]
    A -->|Aux SEND (pre fader)| D["Module 3"]
    A -->|Aux SEND (pre fader)| E["Terminal Device"]
    B --> F["Control Panel"]
    C --> G["Control Panel"]
    D --> H["Control Panel"]
    E --> I["Control Panel"]
2

flowchart
graph LR
    A["Music: Guitar Preamp"] --> B["Input"]
    B --> C["Adder"]
    C --> D["Output"]
    D --> E["AUX SEND (pre fader)"]
CONNECTIONS, OPERATING AND DISPLAY ELEMENTS
The connection and control panels of the MON 8 A G3 to MON 15 A G3 active monitors are identical and are located on the right-hand side of the corresponding enclosure.
1 POWER IN
Blue Power Twist mains input socket for the power supply of the active monitor (PowerCON compatible). A suitable power cable is included.
2 POWER ON/OFF
On/off switch. Always switch on the monitor as the last unit in the signal chain and switch it off again as the first unit.
3 POWER OUT
White Power Twist mains output socket for supplying power to additional active monitors (PowerCON compatible). Ensure that the total power consumption of all devices connected to the device does not exceed the given ampere (A) value.
4 INPUT 1 / 2
Balanced audio inputs of channels 1 and 2 with XLR/jack combo sockets. The signals of the two channels are internally summed mono.
5 THRU 1 / 2
Line outputs 1 and 2 with male 3-pin XLR sockets (output signal = input signal).
6 LC DISPLAY
Multifunctional graphic LC display for showing the overall volume, the DSP preset and the input levels for channels 1 and 2 in the main display. The menu items, sub-menu items and corresponding editing options are displayed in the editing menu.
7 VOLUME / PUSH FOR MENU
Starting from the main display, the overall volume can be adjusted directly by turning the rotary-push encoder. Press the rotary-push encoder to enter the editing menu. Navigate the edit menu using the rotary-push encoder, adjust system settings and change values in the corresponding menu items.
8 LOCK
To protect the active monitor from unauthorised or accidental operation, the operation can be locked by encoder. Press the encoder for about two seconds to activate the lock, after which a lock symbol and "LOCKED" will appear in the display for a short time, as will an attempt to enter the menu using the encoder. To unlock, press the encoder again for about two seconds (UNLOCKED).
9 PRESET
Designation of the presets with graphic representation of the corresponding frequency curve.
OPERATION
NOTES
As soon as the monitor is correctly connected to the mains and switched on, the LD Systems logo appears on the display for a short time. All settings, such as preset, EQ and delay are loaded as they were before the monitor was switched off. After this process, which only takes about one second, the monitor is ready for operation.
MAIN DISPLAY
In normal operation, the main display is activated and the display shows the set overall volume, the activated speaker preset and the input levels of channels 1 and 2 (see illustration).
Input level with peak display Channel 1 Level Peak
VOLUME
Starting from the main display, the overall volume can be adjusted directly by turning the rotary-push encoder VOLUME / PUSH FOR MENU. The indication in the display changes automatically to the corresponding representation when the encoder is turned (see illustration below). After about 12 seconds of inactivity, the main display is automatically shown again; pressing the encoder immediately changes the display to the main display.
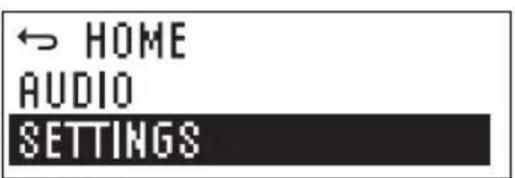
AUDIO SETTINGS (AUDIO)
Press the rotary-push encoder to enter the main menu and then select the AUDIO menu item by turning the encoder (dark background). Press the encoder again to enter the sub-menu and select the desired sub-menu item by turning the encoder. Confirm your entry by pressing the encoder. Change a value or status by turning the encoder, confirm the value or status change by pressing the encoder. The sub-menu items and the corresponding information can be found in the following table. Select MAIN MENU in the submenu ⇔ and press the encoder to return to the main menu, select ⇔ HOME in the main menu, confirm by pressing the encoder, then return to the main display. The main display will automatically appear after approximately 12 seconds of inactivity.
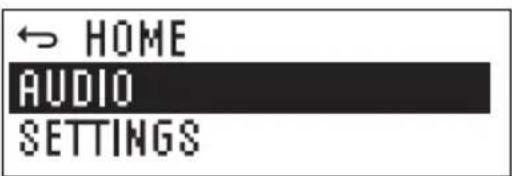
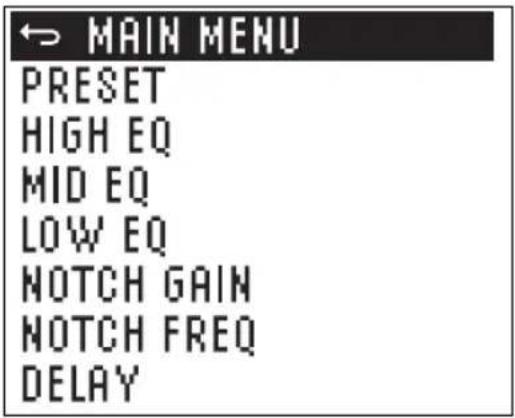
| AUDIO (change value or status = turn encoder, confirm value change or request information = press encoder) | |||
| MAIN MENU Back to the main menu | |||
| PRESET Selection of the loudspeaker preset FULLRANGE | 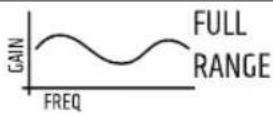 | ||
| FLAT | 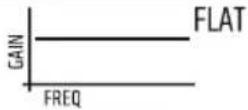 | ||
| MONITOR | 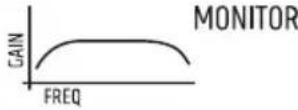 | ||
| MON HPF | 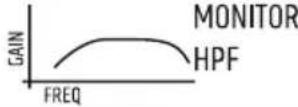 | ||
| HIGH EQ Setting the treble frequencies from -10 dB to +10 dB | |||
| MID EQ Adjusting the centre frequencies from -10 dB to +10 dB | |||
| LOW EQ Adjusting the bass frequencies from -10 dB to +10 dB | |||
| NOTCH GAIN Narrow band reduction of a feedback frequency 0 to -12 dB | |||
| NOTCH FREQ Setting the feedback frequency from 500 Hz to 10 kHz | |||
| DELAY | Time delay of the audio signal in 0.1 m steps up to 10 m (0m = OFF, display in metres and feet) | ||
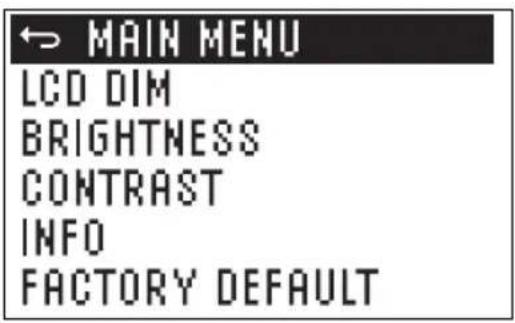
SYSTEM SETTINGS (SETTINGS)
Press the rotary-push encoder to enter the main menu and then select the SETTINGS menu item by turning the encoder (dark background). Press the encoder again to enter the sub-menu and select the desired sub-menu item by turning the encoder. Confirm your entry by pressing the encoder. Change a value or status by turning the encoder, confirm the value or status change by pressing the encoder. The sub-menu items and the corresponding information can be found in the following table. Select MAIN MENU in the submenu ↩ and press the encoder to return to the main menu, select HOME in the main menu ↩, confirm by pressing the encoder, then return to the main display. The main display will automatically appear after approximately 12 seconds of inactivity.
| SETTINGS (change value or status = turn encoder, confirm value change or request information = press encoder) | |||||
| MAIN MENU Back to the main menu | |||||
| LCD DIM | Automatic display dimming | ON | Display illumination is automatically switched off after approx. 10 seconds of inactivity | ||
| OFF Display lighting permanently on | |||||
| BRIGHTNESS Setting the display brightness (0 - 100%) | |||||
| CONTRAST Setting the display contrast (0 - 100%) | |||||
| INFO Display of model number and software version | |||||
| FACTORY DEFAULT Reset to factory settings CANCEL Cancel reset | |||||
| RESET → | SURE? YES Perform reset | ||||
| CANCEL Cancel reset | |||||
CARE, MAINTENANCE AND REPAIR
In order to ensure the long-term, proper functioning of the device, it must be regularly cleaned and if necessary, maintained. The maintenance requirement depends on the intensity of use and the environment in which it is used.
We generally recommend a visual inspection before each operation. Furthermore, we recommend carrying out all the applicable maintenance measures specified below once every 500 operating hours or, in the case of a lower intensity of use, at the latest after one year. Warranty claims may be limited in the event of defects resulting from inadequate maintenance.
CARE (CARRIED OUT BY USER)
WARNING! Before carrying out any maintenance work the power supply and if possible all device connections must be unplugged.

NOTE! Improper care can lead to impairment or even destruction of the unit.
- Housing surfaces must be cleaned with a clean, damp cloth. Make sure that no moisture can penetrate the device.
- Air inlets and outlets must be regularly cleaned of dust and dirt. If compressed air is used, make sure that damage to the device is prevented (e.g. fans must be blocked in this case).
- Lines and plug contacts must be cleaned regularly and dust and dirt must be removed.
- In general, no cleaning agents or abrasive agents may be used, otherwise the surface finish may be damaged. Especially solvents, such as alcohol, can impair the function of housing seals.
- Devices must generally be stored dry and protected from dust and dirt.
MAINTENANCE AND REPAIR (BY QUALIFIED PERSONNEL ONLY)
DANGER! There are live components in the unit. Even after disconnecting the mains connection, there may still be residual voltage in the device, for example, due to charged capacitors.

PLEASE NOTE! There are no user-serviceable assemblies in the device.

NOTE! Maintenance and repair work may only be carried out by specialist personnel authorised by the manufacturer. If in doubt, consult the manufacturer.

PLEASE NOTE! Improperly performed maintenance work may affect warranty claims.
OPTIONAL ACCESSORIES
Padded protective cover for MON 8 A G3 LDMON8G3PC
Padded protective cover for MON 10 A G3 LDMON10G3PC
Padded protective cover for MON 12 A G3 LDMON12G3PC
Padded protective cover for MON 15 A G3 LDMON15G3PC
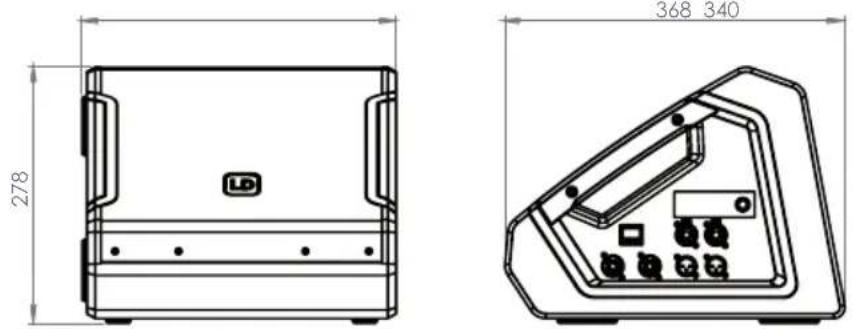
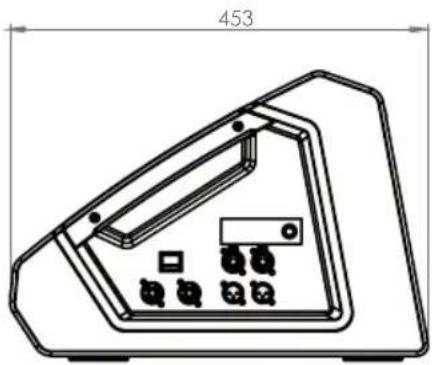
DIMENSIONS
MON 8 A G3
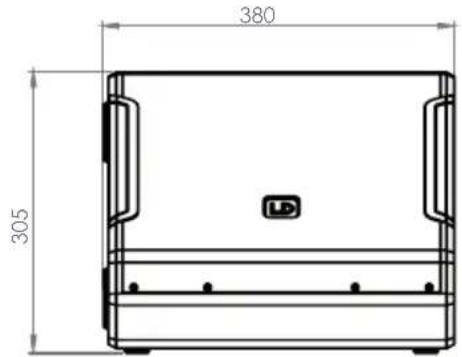
MON 10 A G3

natural_image
Technical line drawing of a device casing with internal components and a dimension label (426), no readable text or symbols present.MON 12 A G3

natural_image
Technical line drawing of a device casing with internal components and mounting holes (no text or symbols)MON 15 A G3
natural_image
Technical line drawing of a device casing with internal components and mounting holes (no text or symbols)TECHNICAL DATA
Item number LDMON8AG3 LDMON10AG3 LDMON12AG3 LDMON15AG3
Product type Stage monitor Stage monitor Stage monitor Stage monitor
Type Powered Powered Powered Powered
Color Black Black Black Black
System output (RMS) 300 W 300 W 300 W 300 W
System output (Peak) 1200 W 1200 W 1200 W 1200 W
| Max. SPL Avarage (Sine burst) | 116 dB (100 Hz - 12 kHz, fullspace @1m, 10% THD) | 118 dB (100 Hz - 12 kHz, fullspace @1m, 10% THD) | 120 dB (100 Hz - 12 kHz, fullspace @1m, 10% THD) | 122 dB (100 Hz - 12 kHz, fullspace @1m, 10% THD) |
| Max. SPL Peak (Sine burst) | 121 dB (fullspace @1m, 10% THD) | 126 dB (fullspace @1m, 10% THD) | 127 dB (fullspace @1m, 10% THD) | 129 dB (fullspace @1m, 10% THD) |
| Frequency response [-3dB] | 68 Hz - 18 kHz | 72 Hz - 18 kHz | 68 Hz - 18 kHz | 58 Hz - 18 kHz |
| Frequency response [-10dB] | 59 Hz - 20 kHz | 58 Hz - 20 kHz | 55 Hz - 20 kHz | 48 Hz - 20 kHz |
| Crossover frequency | 2500 Hz | 1700 Hz | 1400 Hz | 1300 Hz |
| Monitor angle | 33° | 33° | 33° | 33° |
| Dispersion (H x V) | 50° x 90° | 50° x 90° | 50° x 90° | 50° x 90° |
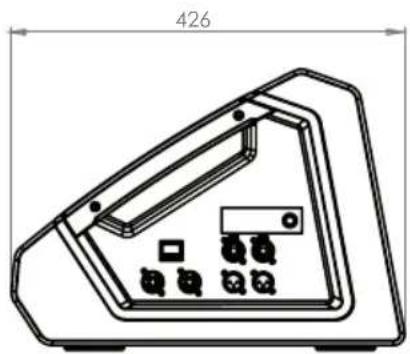
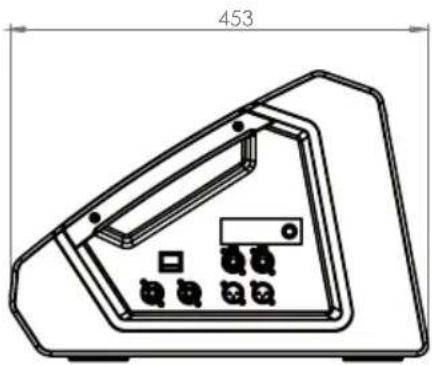
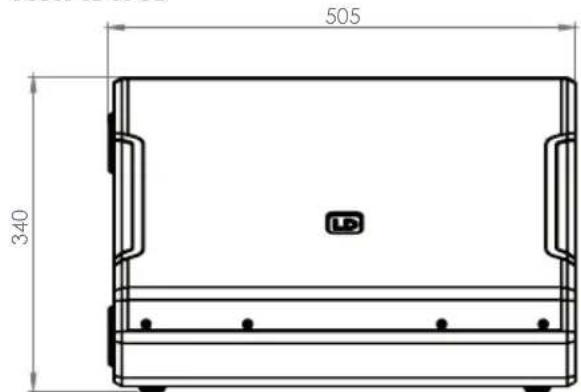
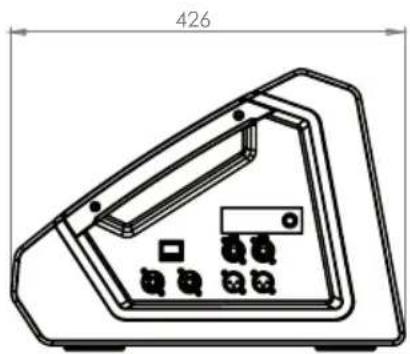
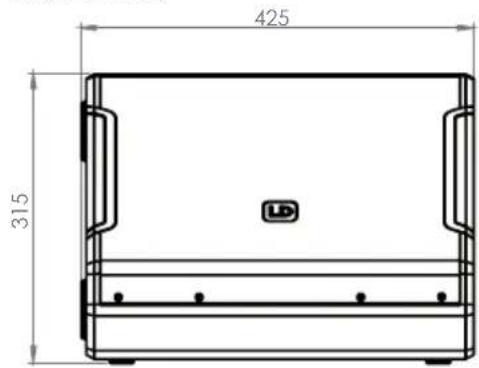
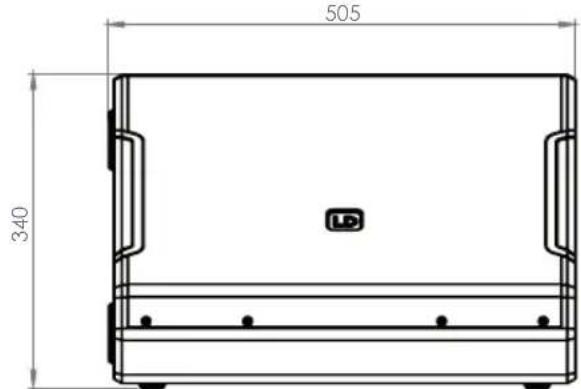
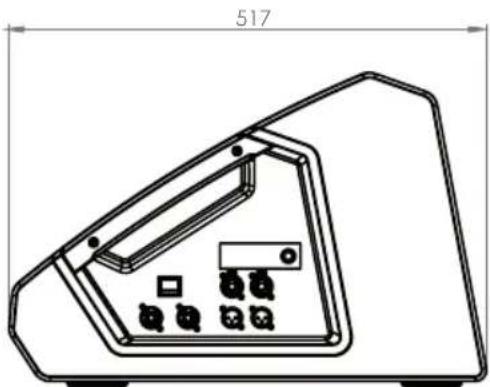
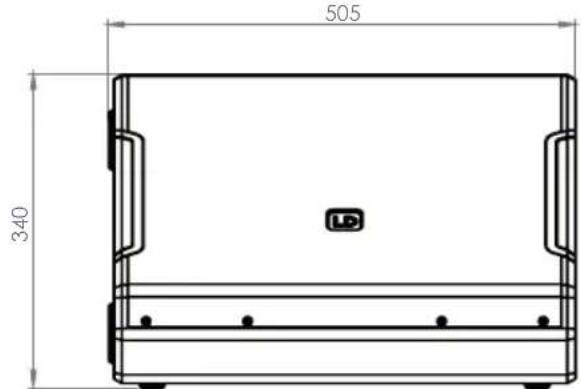
| Width | 340 mm | 380 mm | 425 mm | 505 mm |
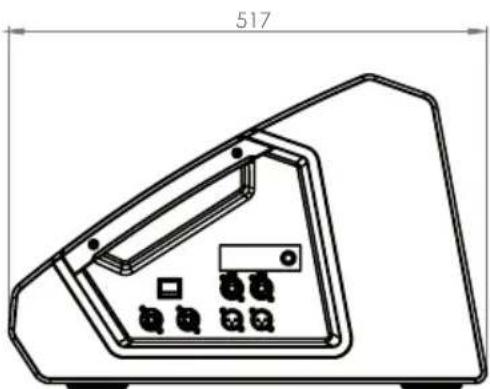
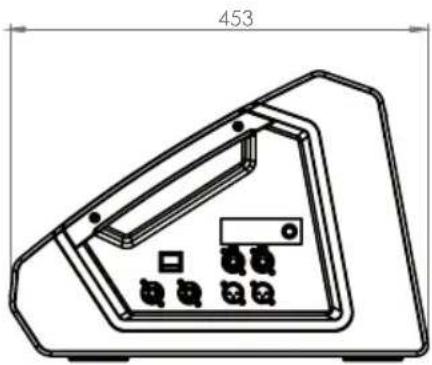
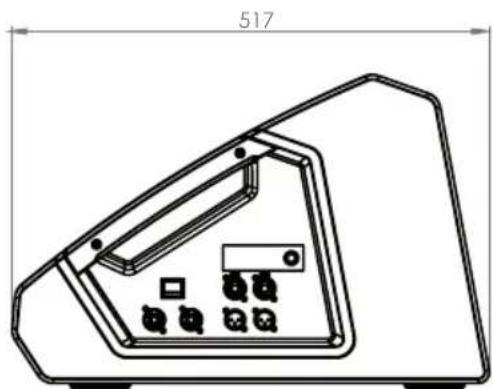
| Depth | 368 mm | 426 mm | 453 mm | 517 mm |
| Height | 278 mm | 305 mm | 315 mm | 340 mm |
| Features 3-band EQ (High, Mid, Low), Delay line, Notch filter | 3-band EQ (High, Mid, Low), Delay line, Notch filter | 3-band EQ (High, Mid, Low), Delay line, Notch filter | 3-band EQ (High, Mid, Low), Delay line, Notch filter | |
| Weight | 13.2 kg | 15.21 kg | 17.4 kg | 23.15 kg |
Low/mid woofer
| Low/mid Woofer dimensions | 8" 10" | 12" | 15" | |
| Woofer dimensions (mm) | 203.2 mm | 254 mm | 304.8 mm | 381 mm |
| Woofer magnet | Ferrite | Ferrite | Ferrite | Ferrite |
| Woofer brand | Custom-made | Custom-made | Custom-made | Custom-made |
| Woofer type | Coaxial loudspeaker | Coaxial loudspeaker | Coaxial loudspeaker | Coaxial loudspeaker |
| Woofer voice coil | 2.5" | 2,5" | 2,5" | 3" |
| Woofer voice coil (mm) | 65 mm | 65 mm | 65 mm | 75 mm |
| Cabinet construction | Bass Reflex | Bass Reflex | Bass Reflex | Bass Reflex |
| Cabinet material | 15 mm Birch Plywood / 15 mm MDF | 15 mm Birch Plywood / 15 mm MDF | 15 mm Birch Plywood / 15 mm MDF | 15 mm Birch Plywood / 15 mm MDF |
Item number LDMON8AG3 LDMON10AG3 LDMON12AG3 LDMON15AG3
HF
| Horn CD Horn CD Horn CD Horn CD Horn |
| Tweeter dimensions 1" 1" 1" 1" |
| Tweeter dimensions 25.4 mm 25.4 mm 25.4 mm 25.4 mm (mm) |
| Tweeter magnet Ferrite Ferrite Ferrite Ferrite |
| Tweeter brand Custom-made Custom-made Custom-made Custom-made |
| Tweeter voice coil 1.75" 1.75" 1.75" 1.75" |
| Tweeter voice coil 44.45 mm 44.45 mm 44.45 mm 44.45 mm (mm) |
Amplifier module (integrated)
| Amplifier | Class D | Class D | Class D | Class D |
| Protection circuits | Multiband limiter, over voltage, over-current, thermal overload | Multiband limiter, over voltage, over-current, thermal overload | Multiband limiter, over voltage, over-current, thermal overload | Multiband limiter, over voltage, over-current, thermal overload |
| Operating Temperature | 0 - 40 °C | 0 - 40 °C | 0 - 40 °C | 0 - 40 °C |
| Humidity Range | < 80 % (non-condensing) | < 80 % (non-condensing) | < 80 % (non-condensing) | < 80 % (non-condensing) |
| Fuse | T4AL 250 V | T4AL 250 V | T4AL 250 V | T4AL 250 V |
| Controls | On/off switch, Rotary/push encoder | On/off switch, Rotary/push encoder | On/off switch, Rotary/push encoder | On/off switch, Rotary/push encoder |
| Indicators | LC display | LC display | LC display | LC display |
| Operating voltage SMPS, | 100 V AC - 240 V AC, 50 - 60 Hz | SMPS, 100 V AC - 240 V AC, 50 - 60 Hz | SMPS, 100 V AC - 240 V AC, 50 - 60 Hz | SMPS, 100 V AC - 240 V AC, 50 - 60 Hz |
| Power consumption | 150 W | 150 W | 150 W | 150 W |
| Power in / out | PowerCON compatible | PowerCON compatible | PowerCON compatible | PowerCON compatible |
| Line inputs | 2 | 2 | 2 | 2 |
| Line input connectors | 6.3 mm jack, XLR-combo | 6.3 mm jack, XLR-combo | 6.3 mm jack, XLR-combo | 6.3 mm jack, XLR-combo |
| Line thru | 2 | 2 | 2 | 2 |
| Line through connector | XLR | XLR | XLR | XLR |
DISPOSAL

Packaging:
- Packaging can be fed into the reusable material cycle using the usual disposal methods.
- Please separate the packaging in accordance with the disposal laws and recycling regulations in your country.

Device:
- This device is subject to the European Directive on Waste Electrical and Electronic Equipment, as amended. WEEE Directive Waste Electrical and Electronic Equipment. Old devices and batteries do not belong in household waste. The old device or batteries must be disposed of via an authorised waste disposal company or a municipal waste disposal facility. Please observe the applicable regulations in your country!
- Observe all disposal laws applicable in your country.
- As a private customer, you can obtain information on environmentally-friendly disposal options from the seller of the product or the appropriate regional authorities.
MANUFACTURER'S DECLARATIONS
MANUFACTURER'S WARRANTY & LIMITATION OF LIABILITY
Adam Hall GmbH, Adam-Hall-Str. 1, D-61267 Neu Anspach / E-Mail Info@adamhall.com / +49 (0)6081 / 9419-0. Our current warranty conditions and limitation of liability can be found at: https://cdn-shop.adamhall.com/media/pdf/MANUFACTURERS-DECLARATIONS_LD_SYSTEMS.pdf. In case of service, please contact your sales partner.
UKCA-CONFORMITY
Hereby, Adam Hall Ltd. declares that this product meets the following guidelines (where applicable) Electrical Equipment (Safety) Regulations 2016 Electromagnetic Compatibility Regulations 2016 (SI 2016/1091) The Restriction of the Use of Certain Hazardous Substances in Electrical and Electronic Equipment Regulation 2012 (SI 2012/3032) Radio Equipment Regulations 2017(SI 2016/2015)
UKCA-DECLARATION OF CONFORMITY
Products that are subject to Electrical Equipment(Safety)Regulation 2016, EMC Regulation 2016 or RoHS Regulation can be requested at info@adamhall.com. Products that are subject to the Radio Equipments Regulations 2017 (SI2017/1206) can be downloaded from www.adamhall.com/compliance/
CE CONFORMITY
Adam Hall GmbH hereby confirm that this product meets the following guidelines (where applicable):
R&TTE (1999/5/EC) or RED (2014/53/EU) from June 2017
Low-Voltage Directive (2014/35/EU)
EMC Directive (2014/30/EU)
RoHS (2011/65/EU)
The full declaration of conformity can be found at: www.adamhall.com.
You can also request it via info@adamhall.com.
EU DECLARATION OF CONFORMITY
Declarations of conformity for products covered by the LVD, EMC and RoHS directives
can be requested at info@adamhall.com.
Declarations of conformity for products subject to the RED Directive,
can be found at www.adamhall.com/compliance/.
FCC STATEMENT
- This device complies with Part 15 of the FCC Rules. Operation is subject to the following two conditions:
(1) This device may not cause harmful interference, and
(2) This device must accept any interference received, including interference that may cause undesired operation.
- Changes or modifications not expressly approved by the party responsible for compliance could void the user's authority to operate the equipment.
NOTE: This equipment has been tested and found to comply with the limits for a Class B digital device, pursuant to Part 15 of the FCC Rules. These limits are designed to provide reasonable protection against harmful interference in a residential installation. This equipment generates, uses and can radiate radio frequency energy and, if not installed and used in accordance with the instructions, may cause harmful interference to radio communications. However, there is no guarantee that interference will not occur in a particular installation. If this equipment does cause harmful interference to radio or television reception, which can be determined by turning the equipment off and on, the user is encouraged to try to correct the interference by one or more of the following measures:
- Reorient or relocate the receiving antenna.
- Increase the separation between the equipment and receiver.
- Connect the equipment into an outlet on a circuit different from that to which the receiver is connected.
- Consult the dealer or an experienced radio/TV technician for help.
Subject to misprints and errors, as well as technical or other modifications!
DEUTSCH
natural_image
Technical line drawing of a mechanical component with dimension annotations (278 and 300 mm), no readable text or symbols beyond measurement lines.
MON 10 A G3
natural_image
Technical line drawing of a device casing with internal components and mounting holes (no text or symbols)MON 12 A G3

natural_image
Technical line drawing of a device casing with internal components and mounting holes (no text or symbols)MON 15 A G3
natural_image
Technical line drawing of a device casing with internal components and mounting holes (no text or symbols)TECHNISCHE DATEN
Item number LDMON8AG3 LDMON10AG3 LDMON12AG3 LDMON15AG3
EXEMPLES DE CÂBLAGE
1
flowchart
graph TD
    A["Main Module 1"] -->|Aux SEND (pre fader)| B["Main Module 2"]
    B --> C["Main Module 3"]
    C --> D["Terminal Device"]
    style A fill:#f9f,stroke:#333
    style B fill:#bbf,stroke:#333
    style C fill:#bfb,stroke:#333
    style D fill:#ffb,stroke:#333
2
flowchart
graph LR
    A["Guitar Preamp"] -->|INPUT| B["Speaker"]
    B --> C["OUTPUT"]
    C --> D["AUX SEND (pre fader)"]
    D --> E["Signal Panel"]
BRANCHEMENTS, UTILISATION ET INDICATEURS
RÉGLAGES AUDIO (AUDIO)
natural_image
Technical line drawing of a mechanical component with dimension annotations (278 and 300 mm), no readable text or symbols beyond measurement lines.
MON 10 A G3


natural_image
Technical line drawing of a device casing with internal components and mounting holes (no text or symbols)MON 12 A G3

natural_image
Technical line drawing of a device casing with internal components and mounting holes (no text or symbols)MON 15 A G3


natural_image
Technical line drawing of a device casing with internal components and mounting holes (no text or symbols)CARACTÉRISTIQUES TECHNIQUES
DÉCLARATION DE CONFORMITÉ EU
AJUSTES DE AUDIO (AUDIO)
natural_image
Technical line drawing of a rectangular enclosure with dimensions labeled (278 and 100), no readable text or symbols beyond measurement lines.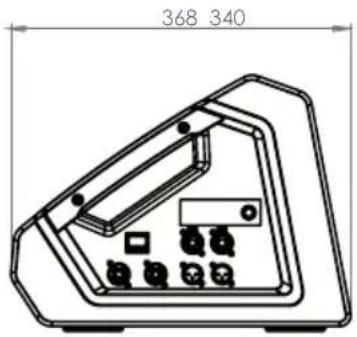
MON 10 A G3

natural_image
Technical line drawing of a device casing with internal components and mounting holes (no text or symbols)MON 12 A G3

natural_image
Technical line drawing of a device casing with internal components and mounting holes (no text or symbols)MON 15 A G3
natural_image
Technical line drawing of a device casing with internal components and mounting holes (no text or symbols)CARACTERÉSTICAS TÉCNICAS
USTAWIENIA AUDIO (AUDIO)
natural_image
Technical line drawing of a mechanical component with dimension annotations (278 and 300 mm), no readable text or symbols beyond measurement lines.
MON 10 A G3


natural_image
Technical line drawing of a device casing with internal components and mounting holes (no text or symbols)MON 12 A G3


natural_image
Technical line drawing of a device casing with internal components and mounting holes (no text or symbols)MON 15 A G3

natural_image
Technical line drawing of a device casing with internal components and mounting holes (no text or symbols)DANE TECHNICZNE
1 IMPUGNATURA A INCASSO
ESEMPI DI CABLAGGIO
1

flowchart
graph TD
    A["Main Module 1"] -->|Aux SEND (pre fader)| B["Module 1"]
    A -->|Aux SEND (pre fader)| C["Module 2"]
    A -->|Aux SEND (pre fader)| D["Module 3"]
    A -->|Aux SEND (pre fader)| E["Terminal Device"]
    B --> F["Control Panel"]
    C --> G["Control Panel"]
    D --> H["Control Panel"]
    E --> I["Control Panel"]
2

flowchart
graph LR
    A["Music"] --> B["Amplifier"]
    B --> C["Speaker"]
    C --> D[" Mixer "]
    D --> E["Output"]
    style A fill:#f9f,stroke:#333
    style B fill:#ccf,stroke:#333
    style C fill:#cfc,stroke:#333
    style D fill:#fcc,stroke:#333
    style E fill:#cff,stroke:#333
CONNESSIONI, ELEMENTI DI COMANDO E DI VISUALIZZAZIONE
natural_image
Technical line drawing of a mechanical component with dimension annotations (278 and 300 mm), no readable text or symbols beyond measurement lines.
MON 10 A G3

natural_image
Technical line drawing of a device casing with internal components and mounting holes (no text or symbols)MON 12 A G3
natural_image
Technical line drawing of a device casing with internal components and a dimension label (453), no readable text or symbols present.MON 15 A G3
natural_image
Technical line drawing of a device casing with internal components and mounting holes (no text or symbols)DATI TECNICI
| Codice articolo LDMON8AG3 LDMON10AG3 LDMON12AG3 LDMON15AG3 | ||||
| Tipo di prodotto Monitor da palco Monitor da palco Monitor da palco Monitor da palco | ||||
| Tipo Attivo Attivo Attivo Attivo | ||||
| Colore Nero Nero Nero Nero | ||||
| Potenza di sistema (RMS) | 300 W 300 W 300 W 300 W | |||
| Potenza di sistema (Peak) | 1200 W 1200 W 1200 W 1200 W | |||
| Max. SPL Average (Sine burst) | 116 dB (100Hz - 12 kHz, fullspace @1m, 10% THD) | 118 dB (100 Hz - 12 kHz, fullspace @1m, 10% THD) | 120 dB (100 Hz - 12 kHz, fullspace @1m, 10% THD) | 122 dB (100 Hz - 12 kHz, fullspace @1m, 10% THD) |
| Max. SPL Peak (Sine burst) | 121 dB (fullspace @1m, 10% THD) | 126 dB (fullspace @1m, 10% THD) | 127 dB (fullspace @1m, 10% THD) | 129 dB (fullspace @1m, 10% THD) |
| Risposta di frequenza (-3 dB) | 68 Hz - 18 kHz | 72 Hz - 18 kHz | 68 Hz - 18 kHz | 58 Hz - 18 kHz |
| Risposta di frequenza (-10 dB) | 59 Hz - 20 kHz | 58 Hz - 20 kHz | 55 Hz - 20 kHz | 48 Hz - 20 kHz |
| Frequenza di transizione | 2500 Hz 1700 Hz | 1400 Hz | 1300 Hz | |
| Angolo del monitor | 33° | 33° | 33° | 33° |
| Angolo di dispersione (H x V) | 50° x 90° | 50° x 90° | 50° x 90° | 50° x 90° |
| Larghezza | 340 mm | 380 mm | 425 mm | 505 mm |
| Profondità | 368 mm | 426 mm | 453 mm | 517 mm |
| Altezza | 278 mm | 305 mm | 315 mm | 340 mm |
| Caratteristiche | 4 preimpostazioni di applicazione, Delay Line, Eq. a 3 bande (High, Mid, Low), Notch filter | Delay Line, Eq. a 3 bande (High, Mid, Low), Notch filter | Delay Line, Eq. a 3 bande (High, Mid, Low), Notch filter | Delay Line, Eq. a 3 bande (High, Mid, Low), Notch filter |
| Peso | 13,2 kg | 15,21 kg | 17,4 kg | 23,15 kg |
Woofer
| Dimensioni woofer | 8 " | 10 " | 12 " | 15 " |
| Dimensioni woofer | 203,2 mm | 254 mm | 304,8 mm | 381 mm |
| Magnete woofer | Ferrite | Ferrite | Ferrite | Ferrite |
| Marca woofer | Custom Made | Custom Made | Custom Made | Custom Made |
| Tipo di woofer | Altoparlante coassiale | Altoparlante coassiale | Altoparlante coassiale | Altoparlante coassiale |
Codice articolo LDMON8AG3 LDMON10AG3 LDMON12AG3 LDMON15AG3


- MON G3 SERIES
- ENGLISH
- DEUTSCH
- ABOUT THIS MANUAL
- INTENDED USE
- DEFINITIONS AND SYMBOL EXPLANATIONS
- SAFETY INSTRUCTIONS
- DANGER:
- WARNING:
- ATTENTION:
- CAUTION:
- CAUTION: HIGH VOLUME AUDIO PRODUCTS!
- NOTES FOR MOBILE INDOOR DEVICES
- PACKAGING CONTENT
- INTRODUCTION
- FEATURES
- MON 10 A G3
- MON 12 A G3
- MON 15 A G3
- ASSEMBLY
- DEVICE COMPONENTS
- RECESSED GRIP
- STAND FLANGE
- RUBBER FEET
- CONNECTION PANEL
- HEAT SINK
- FRONT GRILLE
- WIRING EXAMPLES
- CONNECTIONS, OPERATING AND DISPLAY ELEMENTS
- POWER IN
- POWER ON/OFF
- POWER OUT
- INPUT 1 / 2
- THRU 1 / 2
- LC DISPLAY
- VOLUME / PUSH FOR MENU
- LOCK
- PRESET
- OPERATION
- NOTES
- MAIN DISPLAY
- VOLUME
- AUDIO SETTINGS (AUDIO)
- SYSTEM SETTINGS (SETTINGS)
- CARE, MAINTENANCE AND REPAIR
- CARE (CARRIED OUT BY USER)
- MAINTENANCE AND REPAIR (BY QUALIFIED PERSONNEL ONLY)
- OPTIONAL ACCESSORIES
- DIMENSIONS
- TECHNICAL DATA
- Item number LDMON8AG3 LDMON10AG3 LDMON12AG3 LDMON15AG3
- DISPOSAL
- Packaging:
- Device:
- MANUFACTURER'S DECLARATIONS
- MANUFACTURER'S WARRANTY & LIMITATION OF LIABILITY
- UKCA-CONFORMITY
- UKCA-DECLARATION OF CONFORMITY
- CE CONFORMITY
- EU DECLARATION OF CONFORMITY
- FCC STATEMENT
- TECHNISCHE DATEN
- EXEMPLES DE CÂBLAGE
- BRANCHEMENTS, UTILISATION ET INDICATEURS
- RÉGLAGES AUDIO (AUDIO)
- CARACTÉRISTIQUES TECHNIQUES
- DÉCLARATION DE CONFORMITÉ EU
- AJUSTES DE AUDIO (AUDIO)
- USTAWIENIA AUDIO (AUDIO)
- IMPUGNATURA A INCASSO
- ESEMPI DI CABLAGGIO
- CONNESSIONI, ELEMENTI DI COMANDO E DI VISUALIZZAZIONE
Brand : LD Systems
Model : MON 8 A G3
Category : Loudspeaker