
DV-12S1 - Blu-ray player MARANTZ - Free user manual and instructions
Find the device manual for free DV-12S1 MARANTZ in PDF.
| Product Type | Blu-ray player (compatible with DVD Audio, DVD Video, CD, CD Video) |
| Brand | Marantz |
| Model | DV-12S1 |
| Dimensions (W x H x D) | 458 x 110 x 392 mm |
| Weight | 13.2 kg |
| Power Supply | AC 230 V, 50 Hz |
| Power Consumption | 31 W |
| Operating Temperature | +5 to +35 °C |
| Operating Humidity | 5 to 85% (non-condensing) |
| Supported Audio Formats | DVD Audio (2-channel 192 kHz/24 bit, multi-channel 96 kHz/24 bit), Dolby Digital, DTS, MPEG, Linear PCM |
| Video Outputs | Composite (2), S-Video, Component (Y/Cb/Cr), SCART (TV and AUX) |
| Analog Audio Outputs | Stereo (2 pairs), multi-channel 5.1 (front, center, surround, subwoofer) |
| Digital Audio Outputs | Optical (Toslink), Coaxial (RCA) |
| Audio Features | DAC 192 kHz/24 bit, digital noise reduction (DNR), gain adjustment |
| Video Features | Progressive scan 525 lines (NTSC), PureCinema mode, video quality adjustment (sharpness, color, etc.) |
| Navigation and Setup | Graphical installation navigator, FL menu for system settings (TV SYSTEM, COMP VIDEO, AUTO P OFF, REMOT CODE) |
| Control | Remote control with DVD1/DVD2 codes, Marantz system control via REMOTE CONTROL IN/OUT |
| Disc Playback | DVD Video/RW+R, DVD Audio, CD, CD-R/RW, CD Video |
| Maintenance and Cleaning | Clean with a soft, dry cloth; for stubborn stains, use a diluted neutral detergent solution (1/5 to 1/6). Do not use benzene or thinner. |
| Safety | Do not expose to rain or moisture; do not block ventilation openings; unplug during lightning storms or long periods of non-use; do not insert objects into the slots. |
| Spare Parts and Repairability | Contact an authorized Marantz service center for any repairs or part replacements. Keep the purchase receipt for warranty. |
| Included Accessories | Audio/video cable, power cable, system control cable, remote control (RC-12DVS1), AAA batteries (2), instruction manual |
Frequently Asked Questions - DV-12S1 MARANTZ
User questions about DV-12S1 MARANTZ
0 question about this device. Answer the ones you know or ask your own.
Ask a new question about this device
Download the instructions for your Blu-ray player in PDF format for free! Find your manual DV-12S1 - MARANTZ and take your electronic device back in hand. On this page are published all the documents necessary for the use of your device. DV-12S1 by MARANTZ.
USER MANUAL DV-12S1 MARANTZ
For warranty information, contact your local Marantz distributor.
RETAIN YOUR PURCHASE RECEIPT
Your purchase receipt is your permanent record of a valuable purchase. It should be kept in a safe place to be referred to as necessary for insurance purposes of when corresponding with Marantz.
IMPORTANT
When seeking warranty service, it is the responsibility of the consumer to establish proof and date of purchase. Your purchase receipt or invoice is adequate for such proof.
FOR U.K. ONLY
This undertaking is in addition to a consumer's statutory rights and does not affect those rights in any way.
FRANÇAIS
GARANTIE
This unit employs a laser. Only a qualified service person should remove the cover or attempt to service this device, due to possible eye injury.
USE OF CONTROLS OR ADJUSTMENTS OR PERFORMANCE OF PROCEDURES OTHER THAN THOSE SPECIFIED HEREIN MAY RESULT IN HAZARDOUS RADIATION EXPOSURE.
CAUTION VISIBLE AND INVISIBLE LASER RADIATION WHEN
OPEN AVOID EXPOSURE TO BEAM (WARNING
LOCATION: INSIDE ON LASER COVERSHEILD)
THX

With their experience in movie making and DVD mastering, Lucasfilm engineers researched the capabilities of the DVD format. They have identified many key areas of importance that are necessary to ensure the highest quality possible for video and audio playback.
The Home THX DVD specification was created to realize the full potential of the format.
The THX DVD program is a number of technical and performance specifications developed to make certain that the audio and video quality of every DVD recording is reproduced as accurately as possible.
Thus exploiting the medium's maximum potential.
MARANTZ and THX have engineered this product to give maximum performance and quality.
"At the time of THX Certification of the DV-12S1, widely accepted industry performance standards for the features "Progressive Scan Video" and "DVD Audio" did not exist. While THX sees that these features are present in the MARANTZ DV-12S1, THX engineers did not certify their technical performance."
Lucasfilm and THX are trademarks of Lucasfilm Ltd.
FOREWORD
This section must be read carefully before any connection is made to the mains supply.
WARNINGS
Do not expose the equipment to rain or moisture.
Do not remove the cover from the equipment.
Do not insert anything into the equipment through the ventilation holes.
Do not handle the mains lead with wet hands.
Make a space of about 0.1 meter around the unit.
CE marking

This product is in conformity with the EMC directive and low-voltage directive.
EQUIPMENT MAINS WORKING SETTING
Your Marantz product complies with the household power and safety requirements in your area.
IMPORTANT: (FOR UK version only)
This apparatus is fitted with an approved moulded 13 Amp plug. To change a fuse in this type of plug proceed as follows:
- Remove fuse cover and fuse.
- Fix new fuse which should be a BS1362 5A, A.S.T.A. or BSI approved type.
- Refit the fuse cover.
If the fitted plug is not suitable for your socket outlets, it should be cut off and an appropriate plug fitted in its place.
If the mains plug contains a fuse, this should have a value of 5A. If a plug without a fuse is used, the fuse at the distribution board should not be greater than 5A.
NOTE : The severed plug must be destroyed to avoid a possible shock hazard should it be inserted into a 13A socket elsewhere.
HOW TO CONNECT A PLUG
The wires in the mains lead are coloured in accordance with the following code:
BLUE—"NEUTRAL" ("N")
BROWN—"LIVE" ("L")
- The BLUE wire must be connected to the terminal which is marked with the letter "N" or coloured BLACK.
- The BROWN wire must be connected to the terminal which is marked with the letter "L" or coloured RED.
- Do not connect either wires to the earth terminal in the plug which is marked by the letter "E" or by the safety earth symbol or coloured green or green-and-yellow.
Before replacing the plug cover, make certain that the cord grip is clamped over the sheath of the lead — not simply over the two wires.
PRECAUTIONS
The following precautions should be taken when operating the equipment.
GENERAL PRECAUTIONS
When installing the equipment ensure that:
– the ventilation holes are not covered.
– air is allowed to circulate freely around the equipment.
- it is placed on a vibration-free surface.
- it will not be exposed to excessive heat, cold, moisture or dust.
– it will not be exposed to direct sunlight.
- it will not be exposed to electrostatic discharges.
In addition, never place heavy objects on the equipment.
If a foreign object or water does enter the equipment, contact your nearest dealer or service center.
Do not pull out the plug by pulling on the mains lead; grasp the plug. It is advisable when leaving the house, or during a thunderstorm, to disconnect the equipment from the mains supply.
This product incorporates copyright protection technology that is protected by method claims of certain U. S. patents and other intellectual property rights owned by Macrovision Corporation and other rights owners. Use of this copyright protection technology must be Authorized by Macrovision Corporation, and is intended for home and other limited viewing uses only unless otherwise authorized by Macrovision corporation. Reverse engineering or disassembly is prohibited.
AVANT-PROPOS
CONGRATULATIONS ON YOUR PURCHASE OF THIS FINE MARANTZ PRODUCT.
MARANTZ is on the leading edge of DVD research for consumer products and this unit incorporates the latest technological developments.
We are sure you will be fully satisfied with the DVD player.
Thank you for your support.
Please read through these operating instructions so you will know how to operate your model properly. After you have finished reading the instructions, put them away in a safe place for future reference.
- This player is not suitable for commercial use.
Table of contents
1 Before You Start
Features....5
Checking what's in the box 6
Using this manual 6
Putting the batteries in the remote 6
Using the remote control....7
Hints on installation....7
Avoiding problems with condensation 8
Maintaining your DVD player 8
When moving the unit 8
Power cord caution....8
Discs compatible with this player....9
DVD Video regions 9
2 Connecting Up
Easy Setup ....10
System Control connections 10
Home theater video connections 12
Home theater audio connections ....14
3 Controls and Displays
Front panel 16
Display window 17
Remote control ....18
4 Getting Started
Introduction 20
Using the Setup Navigator....20
Using the FL menu 24
Playing DVD Audio & Video discs.... 28
Playing CDs ....31
Playing Video CDs 33
5 More Playback Functions
Introduction ....36
Accessing discs 36
Still Frame/Slow Play/Frame Advance Playback ....38
Switching camera angles (DVD only) 40
Switching subtitles (DVD only) 40
Switching audio language (DVD-Video) 41
Switching audio channel(DVD-Audio)....41
Switching audio channel(Video CD/CD)....41
Programming a program list.... 42
More programming options 44
Using repeat play 45
Using random play 46
Bookmarking a place in a DVD-Video disc (LAST MEMORY)...... 47
Memorizing DVD-Video disc settings (CONDITION MEMORY) .....48
Displaying disc information....49
6 OSD Settings
Using the Setup menu ....50
Setup Menu Mode 50
OSD language 50
On Screen Display (Expert menu) 51
7 Video Settings
TV Screen Size....52
Video Out....52
S-Video Out (Expert menu) 53
Still Picture (Expert menu) 54
Angle Indicator (Expert menu) 54
Frame Search (Expert menu) 54
Adjusting the video quality....55
8 Audio Settings
Dolby Digital Out 58
DTS Out 58
Linear PCM Out 59
MPEG Out 59
Digital Out (Expert menu) 60
Audio DRC 60
Audio Out 61
Speaker Setting 62
Gain Settings (Expert menu) 64
CD Digital Direct (Expert menu) 65
9 Language Settings
Audio Language....66
Subtitle Language 67
Auto Language....68
DVD Language (Expert menu) 68
Subtitle Display (Expert menu) 69
Subtitle Off (Expert menu) 70
10 Miscellaneous Settings
Parental Lock....71
Screen Saver (Expert menu) 73
Background Color (Expert menu)....73
Bonus Group 74
Auto Disc Menu....74
Using setup menu shortcuts (FUNCTION MEMORY) .....75
11 Additional Information
Handling discs 76
Storing discs....76
Discs to avoid 77
Cleaning the pickup lens....77
Glossary....78
Language Code List 81
Troubleshooting 82
Resetting the player 86
Screen sizes and disc formats 87
Specifications 88
FELICITATIONS POUR L'ACHAT DE CET EXCELLENT PRODUIT MARANTZ.
MARANTZ EST A LA POINTE DE LA RECHERCHE DANS LE DOMAINE DES DVD DESTINES AU GRAND PUBLIC ET CET APPAREIL INTEGRE LES DERNIERS PROGRES TECHNOLOGIQUES EN DATE. NOUS SOMMES PERSUADES QUE CE LECTEUR DE DVD VOUS OFFRIRA PLEINE SATISFACTION. MERCI POUR VOTRE SOUTIEN.
Table des matières
Superlative audio performance from built in DVD-Audio, Dolby Digital\*, DTS\*\* and MPEG decoders
The 192kHz/24bit-compatible DAC inside the DV-12S1 delivers breath-taking sound quality with DVD-Audio, Dolby Digital and DTS discs.
The DV-12S1 is compatible with both 2-channel (192kHz/24bit) and multi-channel (96kHz/24bit) DVD-Audio discs thanks to its 5.1-channel audio outputs.
In addition, Dolby Digital, DTS and MPEG decoders are built-in so you can connect the DV-12S1 directly to an AV amplifier with 5.1 channel inputs to enjoy cinema-like surround sound.
525 line progressive-scan component video output (NTSC output only)
Compared to standard interlaced video, progressive scan effectively doubles the amount of video information fed to your TV or monitor. The result is a rock-steady, flicker-free image. (Check your TV/monitor for compatibility with this feature.)
For the very highest picture quality, try watching a movie on DVD-Video in PureCinema mode on a progressive-scan compatible TV.
The DV-12S1 offers complete flexibility and compatibility with all types of AV equipment with dual composite video, S-Video and AV connector outputs, as well as component video outs.
Digital Noise Reduction PRO (Video Quality Enhancer)
This new type of DNR (Digital Noise Reduction) for encoding video enables you to adjust the video settings on a more detailed and exact level. There are three possible settings to choose from. These include: TV (CRT), Projector, and Professional. This technology can remember which setting you've chosen and employ it at the proper time.
New graphical Setup Navigator
Setting up the DV-12S1 is made as easy as possible using a graphical Setup Navigator. Answer the questions that appear on-screen and the Setup Navigator makes all the necessary audio, video and language settings for you.
* Manufactured under license from Dolby Laboratories.
“Dolby,” “Pro Logic,” “MLP Lossless,” and the double-D symbol are trademarks of Dolby Laboratories.
Confidential unpublished works. Copyrights 1992-1998 Dolby Laboratories. All rights reserved.
** “DTS” and “DTS Digital Surround” are trademarks of Digital Theater Systems, Inc. Manufactured under license from Digital Theater Systems, Inc.
Caractéristiques
Checking what's in the box
Thank you for buying this MARANTZ product. Before starting to set up your new DVD player, please check that you have received the following supplied accessories:
- Audio/Video cable • Operating instructions
- Power Cord • System Control cable
- Remote control unit • Two 'AAA' size R03P batteries
Using this manual
This manual is for the DV-12S1 DVD Player. It is divided into several sections: setting up (chapters 1 and 2); using the player (chapters 4 and 5); player settings and preferences (chapters 6 through 10). Chapter 11 provides information on discs, a glossary of terms used in throughout this manual, and a troubleshooting section.
To get up and running as quickly as possible, follow the Easy setup instructions on page 10, then turn to Getting started (page 20).
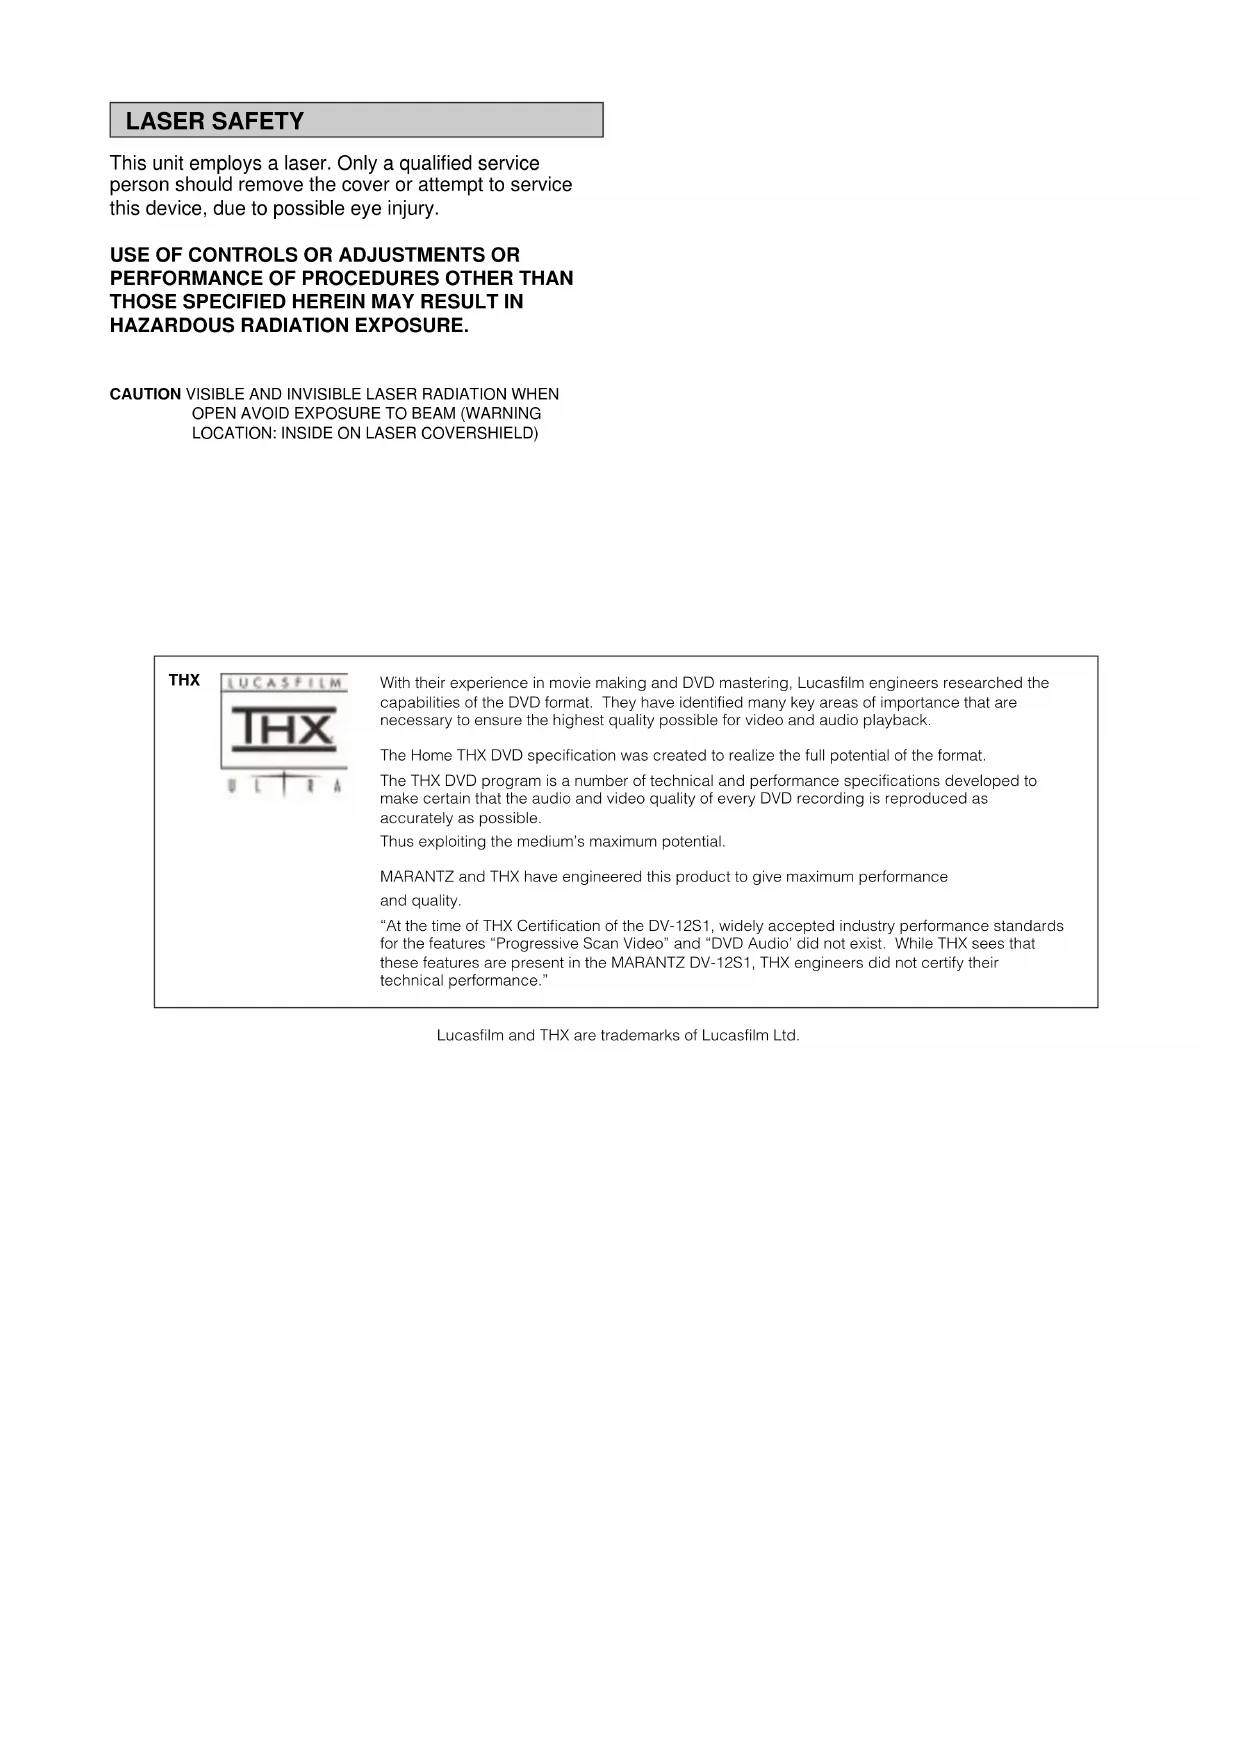
Putting the batteries in the remote
1 While pushing the tab on the battery compartment cover toward the center of the remote, pull out in the direction indicated by the arrow.
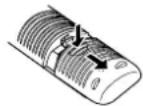
2 Insert batteries.
Make sure to match the plus (+) and minus
(−) polarity guides on the batteries with the marks inside the battery compartment.
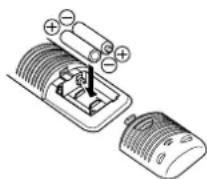
3 Close the cover.
Caution!
Incorrect use of batteries can result in hazards such as leakage and bursting. Please observe the following:
- Don't mix new and old batteries together.
- Don't use different kinds of battery together—although they may look similar, different batteries may have different voltages.
- Make sure that the plus and minus ends of each battery match the indications in the battery compartment.
- Remove batteries from equipment that isn't going to be used for a month or more.
When disposing of used batteries, please comply with governmental regulations or environmental public instruction's rules that apply in your country or area.
Using the remote control
Keep in mind the following when using the remote control:
- Make sure that there are no obstacles between the remote and the remote sensor on the unit.
- Use within the operating range and angle, as shown.
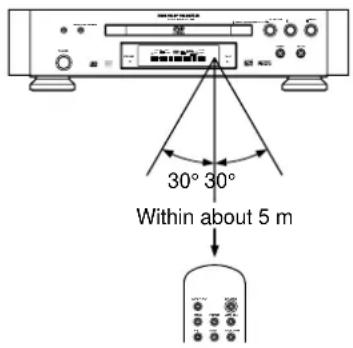
- Remote operation may become unreliable if strong sunlight or fluorescent light is shining on the unit's remote sensor.
- Remote controllers for different devices can interfere with each other. Avoid using remotes for other equipment located close to this unit.
- Replace the batteries when you notice a fall off in the operating range of the remote.
Hints on installation
We want you to enjoy using this unit for years to come, so please bear in mind the following points when choosing a suitable location for it:
Do...
√ Use in a well-ventilated room.
√ Place on a solid, flat, level surface, such as a table, shelf or stereo rack.
Don't...
✗ Use in a place exposed to high temperatures or humidity, including near radiators and other heat-generating appliances.
✗ Place on a window sill or other place where the player will be exposed to direct sunlight.
✗ Use in an excessively dusty or damp environment.
✗ Place directly on top of an amplifier, or other component in your stereo system that becomes hot in use.
✗ Use near a television or monitor as you may experience interference—especially if the television uses an indoor antenna.
✗ Use in a kitchen or other room where the player may be exposed to smoke or steam.
✗ Use on a thick rug or carpet, or cover with cloth—this may prevent proper cooling of the unit.
✗ Place on an unstable surface, or one that is not large enough to support all four of the unit's feet.
Avoiding problems with condensation
Condensation may form inside the player if it is brought into a warm room from outside, or if the temperature of the room rises quickly. Although the condensation won't damage the player, it may temporarily impair its performance. For this reason you should leave it to adjust to the warmer temperature for about an hour before switching on and using.
Moving the player
When changing places of installation or packing the unit for moving, be sure to remove the disc and return the disc table to its original position in the player. Then, press Power switch to turn off, then disconnect the power cord. Moving this unit with the disc loaded may result in damage to this unit.
When moving the unit
When changing places of installation or packing the unit for moving, be sure to remove the disc and return the disc table to its original position in the player. Then, press Power switch to turn off, then disconnect the power cord. Moving this unit with the disc loaded may result in damage to this unit.
Power cord caution
Handle the power cord by the plug part. Do not pull out the plug by tugging the cord, and never touch the power cord when your hands are wet, as this could cause a short circuit or electric shock. Do not place the unit, a piece of furniture, or other object on the power cord or pinch the cord in any other way. Never make a knot in the cord or tie it with other cords. The power cords should be routed so that they are not likely to be stepped on. A damaged power cord can cause a fire or give you an electric shock. Check the power cord once in a while. If you find it damaged, ask your nearest MARANIZ service center or your dealer for a replacement.
A proscrire...
Discs compatible with this player
Any disc that displays one of the following logos should play in this player. Other formats, including DVD-RAM, DVD-ROM, CD-ROM, SACD and Photo CD will not play.

Single or double sided / Single or double layer. Dolby Digital, DTS, MPEG or Linear PCM digital audio. MPEG-2 digital video.
Discs are generally divided into one or more ‘titles’. Titles are further subdivided into ‘chapters’.

Single sided / Single or double layer. Linear or packed PCM audio. Some discs also contain MPEG-2 video, and Dolby Digital, DTS or MPEG digital audio.
Discs are generally divided into one or more 'groups'. Groups are further subdivided into 'tracks'.


Single sided / Single layer. 12cm or 8cm discs. Linear PCM digital audio. (Also compatible with finalized CD-R/CD-RW discs.) Discs are divided into 'tracks'.

Single sided / Single layer. 12cm or 8cm discs. MPEG-1 digital audio. MPEG-1 digital video. Discs are divided into 'tracks'.
DVD Video regions


All DVD Video .discs carry a region mark on the case somewhere that indicates which region(s) of the world the disc is compatible with. Your DVD player also has a region mark, which you can find on the rear panel. Discs from incompatible regions will not play in this player. Discs marked ALL will play in any player.
\* Playing recordable CDs
- Note that this unit cannot record onto recordable discs.
- This unit can play music-use CD-R and CD-RW discs. However, depending on the condition of the CD recorder and the disc, you may find that not all discs will play successfully. (For example, if the disc is scratched or dirty, or if the player's pickup lens is dirty.)
2 Conncting Up/Raccordement
Easy Setup
Important: Before making or changing any rear panel connections, make sure that all components are switched off and unplugged from the wall outlet.
This easy setup is the minimum set of connections you need to start watching DVD video discs. Both sound and picture are fed directly to your TV using the supplied audio/video cables. For other possible connections, see pages 12 and 14.
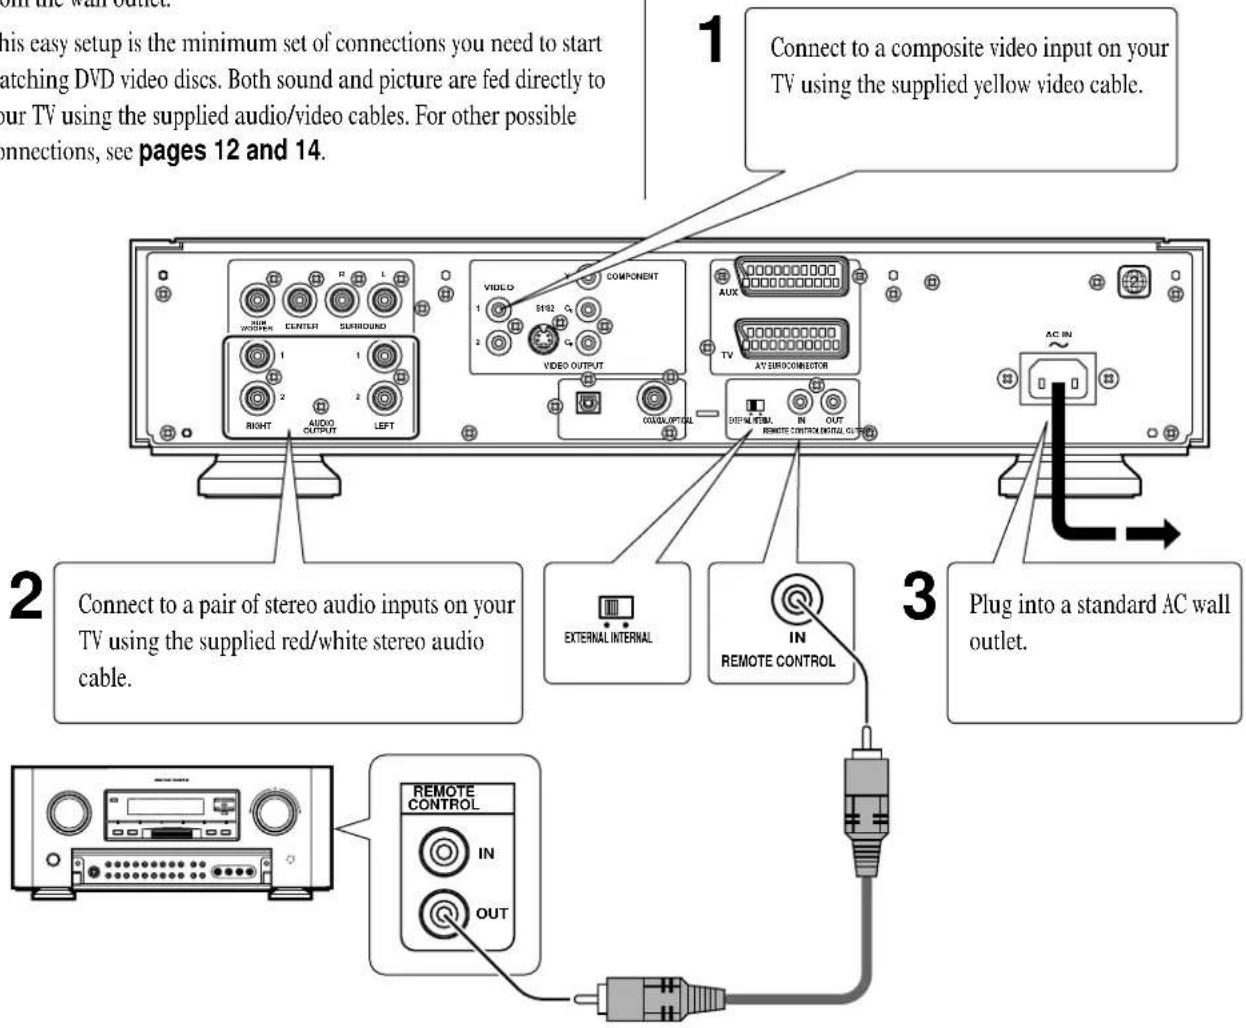
Connecting audio and video cables
Be sure to insert each plug fully for the best connection. The plugs and jacks are colour-coded to make connection easier.

natural_image
Line drawing of a cable with a connector and a separate cylindrical component (no text or symbols)System Control Connections
REMOTE CONTROL IN/OUT jacks
By connecting this DVD player to another Marantz audio component using a supplied System Control cable, you can remotely operate the components as a single system.
- When connecting to component with a remote sensor (such as the SR-14, SR-18, SR-19), be sure to connect the "REMOTE CONTROL IN" jack of this DVD player to the "REMOTE CONTROL OUT" jack of the component with the remote sensor.
- When connecting to component which is not equipped with a remote sensor, be sure to connect the component to the “REMOTE CONTROL OUT” jack of this DVD player.
Synchronized power on and off
- Connect with the remote control output jack of a component (such as the SR-14, SR-18, SR-19) which is compatible with Marantz remote control system. The remote control allows to switch the power of this DVD player to "POWER ON and Standby mode".
Note
be sure to leave power switch on the Front panel in the power mode.
Remote switch
- When using this DVD player independently, set this switch to "INTERNAL". When using this DVD player in a system with a Marantz tuner or timer equipped with a remote sensor, set the switch to "EXTERNAL.
2 Conncting Up/Raccordement
natural_image
Line drawing of a cable with a connector and a separate cylindrical component (no text or symbols)Prises REMOTE CONTROL IN/OUT
2 Conncting Up/Raccordement
Home theater video connections
Important: Before making or changing any rear panel connections, make sure that all components are switched off and unplugged from the wall outlet.
This player outputs video in a number of different ways. Choose the one most suitable for your system using the guide below.
1
If your TV/monitor has component video inputs instead of a SCART input, connect them to the COMPONENT VIDEO OUT jacks on this player.
2
If your TV has a SCART input, we recommend using it to connect directly to the TV output on this player.

3
If neither SCART nor component inputs are available to you, connect this player to your TV or AV receiver using either the VIDEO OUT or S1/S2-VIDEO OUT jacks.
Connecting SCART and S-Video cables
SCART and S-Video cables will only plug in one way, so make sure the plug is correctly lined up with the jack before inserting. Be sure to fully insert for a good connection.
Note: The TV connector can output composite, S-Video or RGB component video; the AUX SCART connector only outputs composite video. If you connect just one TV, use the TV connector. You can select the type of video output by changing the Video Out setting in the Setup Menu (page 52, 53).
S-Video or composite video?
S-Video should give a better picture, so if you have an S-Video input, use it. S-Video cables are available from any good audio/visual dealer.
2 Conncting Up/Raccordement
2 Conncting Up/Raccordement
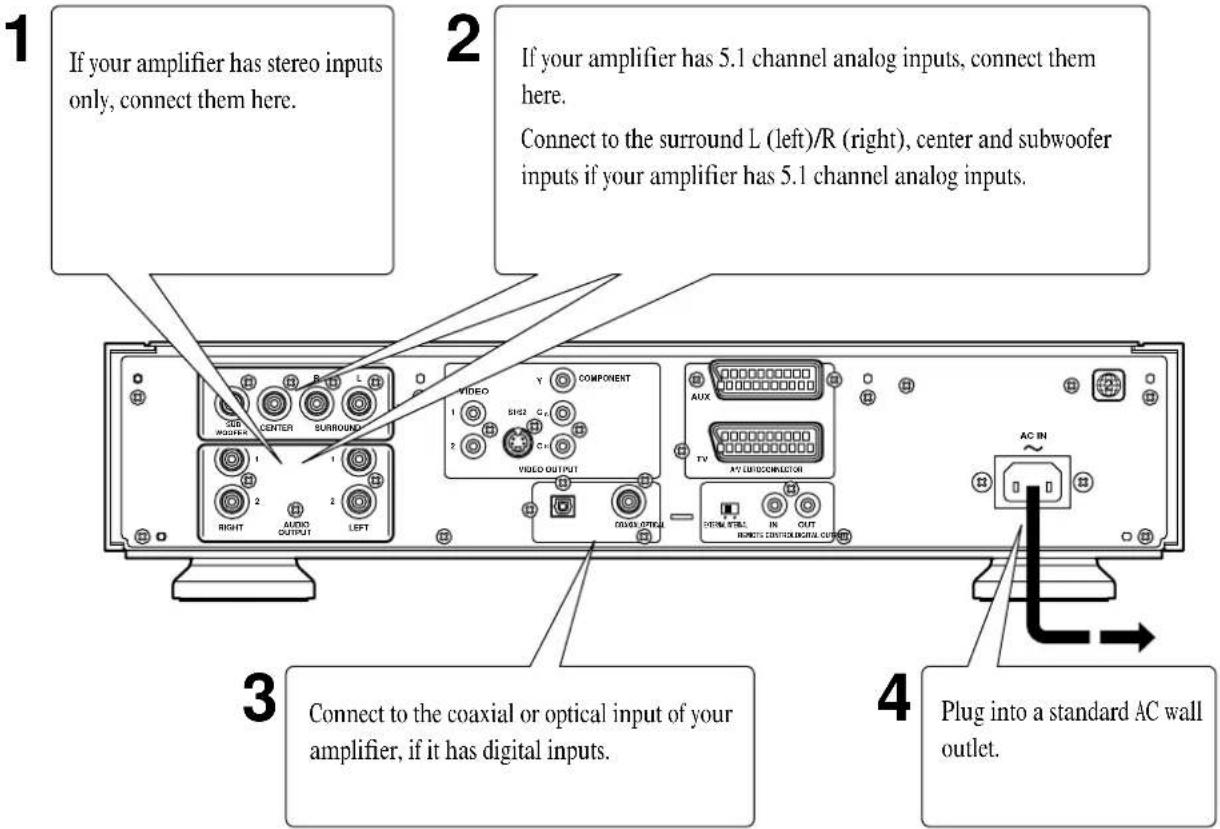
Home theater audio connections
Important: Before making or changing any rear panel connections, make sure that all components are switched off and unplugged from the wall outlet.
This player outputs multi-channel audio in both analog and digital form. Check the manual for your amplifier/receiver to see what equipment it is compatible with (especially which digital formats—Dolby Digital, DTS, etc.—it can decode).
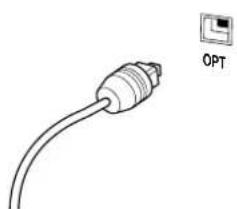
Connecting optical cables
Before plugging in an optical cord, pull out the protective cover from the optical jack.
Optical interconnects only plug in one way, so make sure the plug is correctly lined up with the jack before inserting. You should hear it click into position when fully inserted.
natural_image
Simple line drawing of a USB cable with an icon labeled 'OPT' pointing to it (no text or symbols on the cable itself)Connecting coaxial cables
Use an interconnect with a pin-type (also called RCA or phono) plug on each end to connect up digital coaxial-type jacks. Make sure that the plug is pushed fully home.
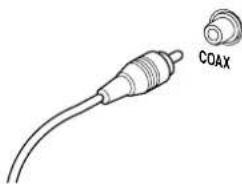
natural_image
Line drawing of a coaxial cable with a connector labeled COAX (no additional text or symbols)Connecting analog audio cables
Be sure to fully insert each plug for the best connection. The plugs and jacks are colour-coded to make connection easier.
2 Conncting Up/Raccordement
natural_image
Simple line drawing of a cable with an attached connector, labeled 'OPT' (no text or symbols on the diagram itself)natural_image
Line drawing of a coaxial cable with a labeled component (COAX), no text or symbols present.1 DIMMER – change the brightness of FL display.
2 RANDOM - Set the random playback mode.
3 VIDEO ON/OFF – turn Video Output off and on.
4 Disc tray
5 ▲ OPEN/CLOSE
6 ▶ - play.
7 ■ - stop.
8 II – pause.
9 POWER
10 STANDBY indicator – lights when unit is in standby.
11 Display window (FL) — see page 17.
12 Remote control sensor
13 FL OFF indicator – lights when the fluorescent (FL) display is switched off.
14 |◀◀/◀◀ – press to skip reverse title/group, chapter, or track.
You can also press and hold this button to scan the above.
15 ▶▶/▶▶I – press to skip forward title/group, chapter, or track.
You can also press and hold this button to scan the above.
5 ▲ OPEN/CLOSE (Ouverture/fermeture)
6 ▶ - lecture.
7 ■ - arrêt
8 II – pause.
9 POWER
1 Remote Control indicator – Lights when Remote Control Signal is received.
2 GRP/TITLE – indicates that the character display is showing the current or total number of groups/titles on a disc.
3 V PART – lights during playback of the video part of DVD discs.
4 DVD AUDIO – lights when a DVD-Audio disc is loaded.
5 DIG OFF – lights when unit is set to Digital Out Off.
6 96kHz/192kHz – lights when a DVD disc containing high-sampling rate (96kHz/192kHz) audio is playing.
7 TRK/CHP—indicates that the character display is showing the current or total number of tracks/chapters on a disc.
8 DVD indicator – lights when a DVD disc is loaded.
9 DOLBY D(IGITAL) – lights if the disc playing contains Dolby Digital-encoded audio.
10 DTS indicator - lights if the disc playing contains DTS-encoded audio.
11 REMAIN - indicates that the character display is showing the remaining playback time of the disc loaded.
12 TOTAL - indicates that the character display is showing the total playing time of the disc loaded.
13 PROGRESSIVE SCAN indicator – lights when unit is outputting 525 line progressive scan (non-interlaced) video.
14 VIDEO OFF – lights if the video output is turned off.
15 REPEAT – lights in repeat play mode (see page 45).
16 ANGLE - lights during multi-angle scenes on DVD discs.
17 LAST MEMO(RY) – lights when a position on a DVD video disc has been memorized (see page 47).
18 CONDITION (MEMORY) — lights if the disc loaded has player settings associated with it (see page 48).
19 DOWN MIX – lights when multi-channel DVD-Audio, Dolby Digital, DTS or MPEG audio is downmixed, for example to two channel stereo.
20 Character display - shows disc times and other information.
21 Program format indicators – show which channels are recorded on the disc playing.
1 OPEN/LOSESE open/close the disciraytray.
2FURONON MEMORY (F.MEMO) button – displays the function memory menu (p.75).
3 DISPLAY — shows on-screen disc information (p.49).
4/19 REPEAT A-B – sets the repeat mode and loop points (p.45).
5 SUBTITLE — switches the subtitle display on multi-lingual DVD discs (p.40).
6 ANGLE - switches camera angle on DVDs that have multi-angle scenes (p.40).
7 TOP MENU – displays the top menu of a DVD disc (p.30).
8 Joystick / ENTER button – move the joystick up/down/left/right to navigate on-screen menus and displays; press to select menu items from the Setup menu and DVD disc menus.
9 RETURN – returns to the previously displayed menu screen. Also displays Video CD menu.
10 Number buttons – use to select titles/groups/tracks/chapters/time when searching, programming, etc.
11 SEARCH – changes the disc search mode (p.36).
12 ▶ (PLAY) – starts/resumes playback (p.28–33).
13/24 |◀◀▶▶| (PREVIOUS/NEXT) – skips to the previous/next title/group/chapter/track (p.28–34). Also used to navigate Video CD menus (p.35).
14/26 ◀◀▶▶ (REV/FWD) – press and hold for fast reverse/forward scanning (p.28–34).
15 ■ (STOP) – stops playback/scanning, etc. (p.28–33).
16 CLEAR – clears a playlist entry; cancels repeat (p.44–48).
17 Power – switches player on or into standby.
18 VIDEO ADJUST (VIDEO ADJ.) – press to adjust picture quality settings such as sharpness, colour balance, etc. (p.55).
20 PROGRAM — enters program list programming mode (p.42).
21 AUDIO – switches audio language/channels (p.41).
22 MENU – displays DVD disc menu.
23 SETUP – enters Setup menu (p.20, 50).
25 II (PAUSE) – pauses/restarts playback.
27 LAST MEMO/CONDITION MEMO – You can resume DVD-Video or Video CD playback from the point you last watched even if the disc is removed from the player. Press LAST MEMO(RY) rapidly during playback to set a Last Memory point. When you want to resume playback of that disc, press LAST MEMO(RY) rapidly in the stop mode and playback starts from the memorized point. Last Memory locations can be stored for up to 5 DVDs and 1 Video CD (p.47).
And also you can store in memory the settings for up to 15 DVD-videos.
Press CONDITION MEMO(RY) for longer than 1 sec during DVD-Video playback to memorize the settings (p.48).
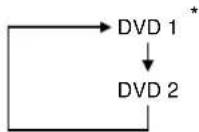
- This remote control supports two remote control codes: DVD1 and DVD2.
- When the unit is shipped from the factory, the remote control is set to DVD1.
- To set the remote control to DVD2, hold down both the "■ (Stop)" button and the "2" number button on the remote control for at least five seconds. (If the batteries in the remote control are replaced while the remote control is set to DVD2, the setting will revert to DVD1.)
- To set the remote control back to DVD1, hold down both the “■ (Stop)” button and the “1” number button on the remote control for at least five seconds.
- To check which remote control code is set at any time, hold down both the Stop and Pause direction buttons; the current setting (either "DVD1" or "DVD2") will be displayed in the display window on the main unit.
- Also set the REMOT CODE on the FL menu to the same setting as the remote control. (This setting is set to DVD1 when the unit is shipped from the factory.) (page 24-27)
This chapter covers setting up your player using the Setup Navigator and using all the basic playback controls.
Using the Setup Navigator
Before playing any discs in the player, we strongly recommend using The Setup Navigator. This makes all the basic player settings for you.
1 Press the POWER button on the front panel to switch on.
Also turn on your TV, and amplifier/receiver (if you connected one). Make sure that your TV is set to the correct video input.
- If a disc already loaded starts playing, press ■ to stop it.
- The POWER button on the remote control switches the unit between standby and on.
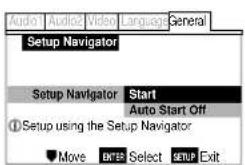
2 Press SETUP.
The Setup Navigator on-screen display (OSD) appears:
Navigate all of the following OSDs using these controls:
Joystick up/down – cursor up/down
ENTER – select the highlighted menu option
Joystick left – go back to the previous question
The control possibilities for the current OSD are shown at the bottom of each screen.
Introduction
- If you decide you don't want to use the Setup Navigator, select Auto Start Off here instead.
4 Choose an OSD menu language.
5 Select the type of TV you have.
- See Aspect ratio in the glossary on page 78 if you're unsure of the difference between widescreen and standard TVs.
6 Select the type of analog audio connections you made to your amplifier/receiver.
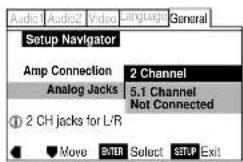
- If you connected the audio output directly to your TV following the Easy setup on page 10, choose 2 Channel.
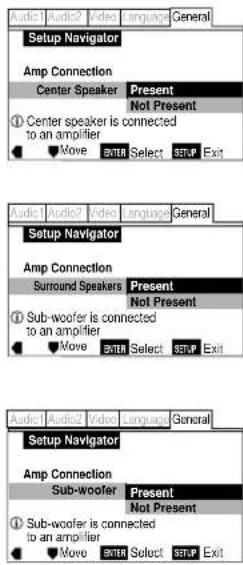
7 If you selected 5.1 Channel audio connections in step 6, confirm which speakers are connected to your amplifier.
8 Confirm the digital audio formats your amplifier is compatible with (if you made a digital connection).
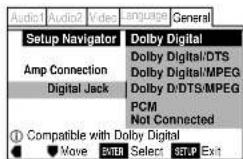
- All options (except Not Connected) assume PCM compatibility. The PCM option means only compatible with PCM.
- More information on these audio formats is available in the glossary on page 78.
- Consult the manual that came with your amplifier if you're unsure about compatibility with any of the formats mentioned.
9 Confirm whether your amplifier is compatible with 96kHz audio.
- You won't see this screen if you selected Not Connected in step 8.
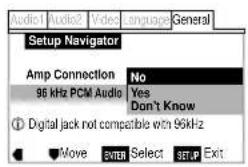
- Selecting Don't Know has the same effect as selecting No: any 96kHz audio will be downsampled to 48kHz. This is a more compatible sampling frequency. See Sampling frequency in the glossary on page 80 for more on this.
10 Confirm all the settings.
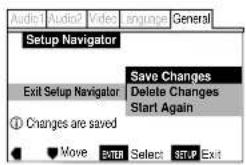
11 Press SETUP to exit.
Congratulations, you've set up your player! If you want to use the Setup Navigator again at any time, it is available from the General menu. Also, each individual setting can be changed using the appropriate menu option—chapters 6 to 10 explain all menu options in detail.
* Press the joystick for ENTER
The FL menu has been designed to set "TVSYSTEM", "COMP VIDEO", "AUTO P OFF" and "REMOT CODE".
The FL menu can not be used if a disc is playing.
It is recommended to set the FL menu before loading a DVD.
If a DVD has been loaded, be sure to press STOP ■ twice before proceeding.
(If "RESUME" is displayed in the FL display, press STOP ■.)
Selecting the FL menu
Press SETUP for longer than 1 sec.
The FL OFF indicator on the player turn on and off.
FL menu is displayed in the FL display.
Move the cursor control joystick down to select the FL menu you want as follows.
(Example)
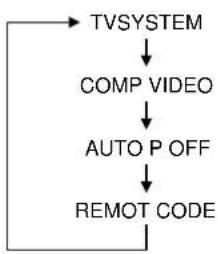
flowchart
graph TD
    A["TVSYSTEM"] --> B["COMP VIDEO"]
    B --> C["AUTO P OFF"]
    C --> D["REMOT CODE"]
    D --> A
To exit the FL menu
When you have completed setting up the FL menu or if you want exit the FL menu. Press SETUP to close the FL menu.
Move the cursor control joistick down to select the type of TVSYSTEM you want to set as follows.
(Example)

flowchart
graph TD
    A["TVSYS PAL"] --> B["TVSYS NTSC"]
    B --> C["TVSYS AUTO"]
* Factory setting
Press ENTER you want to set.
The menu select is set.
Note
TV SYSTEM
Video output changes as follows according to the playback disc's recorded format.
NTSC → PAL, PAL → NTSC conversion is possible on Video CDs. PAL → NTSC conversion is not possible on DVDs. When the TV
SYSTEM is set to the TVSYS AUTO position, the disc's format will be output as is. When a CD or disc is not loaded, the previous video output format will be selected.
| Disc Output format | ||||
| Type | Format | Position of TV SYSTEM | ||
| TVSYS NTSC | TVSYS PAL TV | SYS AUTO | ||
| DVD | NTSC | NTSC MCD. PAL NTSC | ||
| PAL | —— | PAL PAL | ||
| Video CD | NTSC | NTSC MCD. PAL NTSC | ||
| PAL | NTSC PAL PAL | |||
| CD, No disc | NTSC PAL NTSC or PAL | |||
About MOD. (Modulation) PAL
- SHRINK
Most models of the newly developed countdown PAL TV system detect 50 Hz (PAL)/60 Hz (NTSC) and automatically switch vertical amplitude, resulting in a display without vertical shrinkage.
- If your PAL TV does not have a V-Hold control, you may not be able to view NTSC disc because the picture may roll. If the TV has a V-Hold control, adjust it until the picture stops rolling. On some TVs, the picture may shrink vertically, leaving black bands at the top and bottom of the screen. This is not a malfunction; it is caused by the NTSC → PAL conversion.
Note
When playing Video CDs, the TV SYSTEM setting has no effect with playback stops.
Réglage de TV SYSTEM
flowchart
graph TD
    A["TVSYS PAL"] --> B["TVSYS NTSC"]
    B --> C["TVSYS AUTO"]
* Réglage d'usine
Move the cursor control joystick down to select the type of COMP
VIDEO you want to set as follows.
(Example)
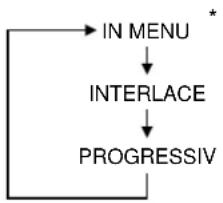
flowchart
graph TD
    A["IN MENU"] --> B["INTERLACE"]
    B --> C["PROGRESSIV"]
* Factory setting
Press ENTER you want to set.
The menu select is set.
• See page 53 for more information.
Note
COMP VIDEO setting
You only need to set this FL menu if you're using an NTSC TV/monitor connected via the component video outputs of this player. This player can output NTSC video as a standard interlaced signal (the INTERLACE setting), or as a non-interlaced, or progressive scan signal (the PROGRESSIV setting).
If your TV/monitor is compatible with progressive scan video, set this setting to either PROGRESSIV or IN MENU. When set to IN MENU, you can use the on-screen Setup menu to switch between progressive [Component (Prog.)] and interlaced [Component] video output.
If your TV/monitor is not progressive scan compatible, you will not be able to see any picture if this player is set to output progressive scan video. In this case, set the setting to INTERLACE to restore the picture (page 52, 53).
Réglage de COMP VIDEO
flowchart
graph TD
    A["IN MENU"] --> B["INTERLACE"]
    B --> C["PROGRESSIV"]
* Réglage d'usine
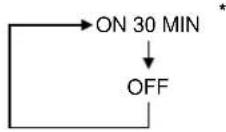
Move the cursor control joystick down to select the type of AUTO P OFF you want to set as follows.
(Example)
* Factory setting
Press ENTER you want to set.
The menu select is set.
- The standby mode is automatically selected to save power if the player is left in the stop mode for about 30 minutes.
REMOT CODE setting
Select REMOT CODE, then press ENTER.
Move the cursor control joystick down to select the type of REMOT CODE you want to set as follows
(Example)
* Factory setting
Press ENTER you want to set.
The menu select is set.
- The DVD player support two remote control codes: DVD 1 and DVD 2.
- Set the remote control code of the Remote Control to the same setting.
• See page 18 for more information.
Réglage de AUTO P OFF
Only the basic controls for playback of DVD discs are covered here. Further functions are detailed in the next chapter.
1 Switch on.
2 Load a DVD disc.
- Press OPEN/CLOSE to eject the disc tray.
- Place a disc in the tray, label side face up, making sure it is seated properly in the disc guide.
- Press OPEN/CLOSE to close the disc tray. Many DVD-Video discs start playing automatically.
3 Basic playback controls\*
Button What it does
▶Starts/resumes playback. (Resume only works with DVD-Video)
■Pauses a disc that's playing.
■Stops playback.
Display shows RESUME (press ▶ to start playback again from the last place stopped).
◀◀Press & hold for fast reverse scanning. (After 5 seconds, scanning continues even after releasing the button: press ▶ to resume normal playback.) During Pause, press for longer then one second to perform reverse slow playback.
▶▶Press & hold for fast forward scanning (After 5 seconds, scanning continues even after releasing the button: press ▶ to resume normal playback.) During Pause, press for longer then one second to perform slow playback.
◀◀◀ Skips to the start of the current chapter/track, then to previous chapters/tracks.
▶▶▶ISkips to the next chapter/track.
Numbers If the disc is stopped, playback starts from the selected title/group number. If the disc is playing, playback jumps to the start of the selected chapter/track number.
+10 Selects titles/groups/chapters/tracks 10 and over. (For example, for 10, press +10 then 0. For 24, press +10 , +10, 4.)
* While using the player, you may see the or mark displayed on-screen.
means that the operation is not allowed by the player.
means that the operation is not allowed by the disc.
Some DVD discs contain menus. Sometimes these are displayed automatically when you start playback; others only appear when you press MENU or TOP MENU.
- For DVD-Audio discs, use TOP MENU.
Control What it does
TOP Displays the 'top menu' of a DVD
MENU disc—this varies with the disc.
MENU Displays a DVD disc menu—this varies with the disc and may be the same as the 'top menu'.
RETURN Returns to the previously displayed menu screen. On some DVD-Audio discs featuring browsable pictures, press to display the browser screen.
Joystick Moves the cursor around the screen.
ENTER Selects the current menu option.
Numbers Selects a numbered menu option (some discs only.)
+10 Selects a numbered 10 menu option or grater. (To select number 10, press +10 then 0. For 24, press +10, +10, 4.)
5 Eject and remove the disc from the player before switching off.
Note: Some DVD-Audio discs contain a 'bonus group'. To access this group you'll need to input a 4-digit code, which can be found printed on the disc packaging. See page 74 for more information on playing discs with bonus groups.
Only the basic controls for playback of CDs are covered here. Further functions are detailed in the next chapter.
1 Switch on.
2 Load a CD.
- Press OPEN/CLOSE to eject the disc tray.
- Place a disc in the tray, label side face up, making sure it is seated properly in the disc guide.
- Press OPEN/CLOSE to close the disc tray.
3 Basic playback controls:
Button What it does
▶Starts playback.
■Pauses a disc that's playing.
■Stops playback.
◀◀Press & hold for fast reverse scanning. (After 5 seconds, scanning continues even after releasing the button: press ▶ to resume normal playback.)
▶▶Press & hold for fast forward scanning (After 5 seconds, scanning continues even after releasing the button: press ▶ to resume normal playback.)
Lecture de CD
◀◀◀ Skips to the start of the current track, then to previous tracks.
▶▶▶Skips to the next track.
Numbers Starts playback from the selected track number.
+10 Selects tracks 10 and over. (To select track 10, press +10 then 0. For 24, press +10, +10, 4.)
4 Eject and remove the disc from the player before switching off.
Playing Video CDs
Only the basic controls for playback of Video CDs are covered here. Further functions are detailed in the next chapter.
1 Switch on.
2 Load a Video CD.
- Press OPEN/CLOSE to eject the disc tray.
- Place a disc in the tray, label side face up, making sure it is seated properly in the disc guide.
- Press OPEN/CLOSE to close the disc tray.
3 Basic playback controls
Many Video CDs contain menus, from which you control playback. This is called PlayBack Control, or PBC, and if the disc features it, the PBC menu will be the first thing you see when you start playback (see Basic PBC menu controls on page 35 for how to navigate these).
Button What it does
▶ Starts/resumes playback
■Pauses a disc that's playing
■Stops playback. Display shows
RESUME (press ▶ to start playback again from the last place stopped).
Lecture de CD vidéo
◀◀Press & hold for fast reverse scanning. (After 5 seconds, scanning continues even after releasing the button: press ▶ to resume normal playback.) During Pause, press for longer then one second to perform reverse slow playback.
▶▶Press & hold for fast forward scanning (After 5 seconds, scanning continues even after releasing the button: press ▶ to resume normal playback.) During Pause, press for longer then one second to perform slow playback.
|◀◀Skips to the start of the current track, then to previous tracks.
▶▶▶|Skips to the next track.
Numbers Starts playback from the selected track number.
+10 Selects tracks 10 and over. (To select track 10, press +10 then 0. For 24, press +10, +10, 4.)
If the Video CD features PBC menus, navigate them using the following controls. To switch off PBC, press ■ then restart playback using a number button to select a track directly.
Button What it does
RETURN Displays the PBC menu.
Numbers Selects a numbered menu option.
+10 Selects a numbered 10 menu option or grater. (To select number 10, press +10 then 0. For 24, press +10, +10, 4.)
◀◀◀Displays the previous menu page (if there is one.)
▶▶IDisplays the next menu page (if there is one.)
5 Eject and remove the disc from the player before switching off.
4 Commandes de base de menu de PBC
- Most of the functions covered in this chapter apply to DVD discs, Video CDs and CDs, although the exact operation of some varies slightly with the kind of disc loaded.
- When playing DVD discs, if the 📄 or 🌐 icon appears on-screen when you try and use a particular function, either the player or the disc doesn't allow the use of that function.
- When playing Video CDs, some of the functions are not available in PBC mode. If you want to use them, stop the disc first and restart by inputting a track number on the remote control.
Accessing discs
You can directly access any point on a disc using one of the search modes. Use these search modes while a disc is playing, or when it's stopped—playback immediately starts from the point specified.
1 Press SEARCH to choose between:
• Title/Group search (DVD only)
- Chapter/Track search
• Page search (DVD-Audio discs with browsable pictures only)
• Time search (DVD-Video and Video CD only)
• Time & frame search (DVD-Video only)
(The Frame Search option in the Video menu must be On to use this) (page 54)
- Off
Title/Group Chapter/Track Off (Time & frame) Time

Introduction
2 Enter the title/group/chapter/ track number or time (minutes & seconds)/frame.
For example, for title 4, press 4.
For chapter/track 12, press 1, 2.
For 45 minutes into the disc, press 4, 5, 0, 0.
For 45 minutes and 16 frames into the disc, press 4, 5, 0, 0, 1, 6.
3 Press ▶ to start/restart play-back.
Note: PAL displays 25 frames per second, numbered 0-24. NTSC displays 30 frames per second, numbered 0-29. The Frame Search option in the Video menu must be On to use this. Press DISPLAY while a still picture is displayed to see the frame number.
Depending on the disc, it may not be possible to search for a specific frame. Also, when using frame advance, forward step or reverse step. Each frame may not be appear in exact order when stepping through them. The number assigned to a specific frame may be different when stepping through the frames in forward or reverse mode.
The video images on DVD and Video CD can be viewed as a still frame, played back at slow speeds and even advanced frame by frame.
Viewing a still frame Press PAUSE II.
When viewing a DVD, if the paused picture shakes, select the [Field] setting in the Setup screen Video menu [Still Picture] setting as described on page 54.
To return to normal playback
When viewing a still frame playback, pressing PLAY ▶ restores normal playback operation.
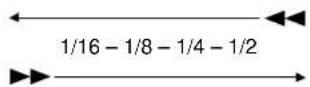
Viewing slow playback
Press FWD ▶▶ for longer than one second during Pause.
- Slow playback is engaged.
- During slow playback, the speed of playback can be adjusted from 1/16 normal playback speed to 1/2 normal playback speed in four steps using REV ◀◀ and FWD ▶▶.
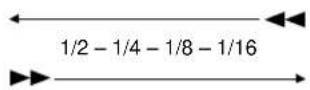
Press REV ◀◀ for longer than one second during Pause.
- Slow playback in the reverse direction is engaged.
- During slow playback, the speed of playback can be adjusted from 1/16 normal playback speed to 1/2 normal playback speed in four steps using REV ◀◀ and FWD ▶▶.
To return to normal playback
When viewing still frames or slow playback, pressing PLAY ▶ restores normal playback operation.
Frame by frame advance playback: Viewing one frame at a time
With this function, DVDs can be viewed in both forward and reverse directions. Video CDs can only be moved in the forward direction.
1 Press PAUSE II.
2 Press FWD ▶▶ or REV ◀◀ rapidly.
FWD ▶▶ : The picture advances one frame each time the button is pressed.
REV ◀◀: The picture backs up a DVD a few frames each time the button is pressed.
To return to normal playback
When viewing frame by frame playback, pressing PLAY ▶ restores normal playback operation.
Notes
- There is no sound when viewing still frames or slow playback, or when advancing one frame at a time.
- Still frame, slow play, or frame advance playback may not be possible with certain titles. In this case, the 🔒 mark is displayed.
- If a Browsable picture (page 78) is recorded on a DVD-Audio disc, frame advance playback is possible.
Switching camera angles (DVD only)
Some DVD discs feature scenes shot from two or more angles—check the box for details: it should be marked with a 📁 icon if it contains multi-angle scenes. When these scenes are playing, a camera icon appears on-screen and the 📁 icon lights in the front panel display.
To switch the camera angle, press ANGLE.
To hide the TV angle indicator, choose Angle Indicator > Off from the Video menu (see page 54).
Switching subtitles (DVD only)
Many DVD discs have subtitles in one or more languages—the box will usually tell you which subtitle languages are available. You can switch subtitle language anytime during playback.
To display/switch the subtitle language, press SUBTITLE repeatedly.
To switch off subtitles, press SUBTITLE then CLEAR.
To set subtitle preferences, see page 67.
When playing a DVD disc recorded with dialog in two or more languages, you can switch audio language anytime during playback.
Note: during a slideshow section of a disc, it can take up to 30 seconds for the audio to switch. See the glossary on page 80 for more on slideshows.
To display the current audio language, press AUDIO.
To switch the audio language, press AUDIO repeatedly.
To set audio language preferences, see page 66.
Switching audio channel (DVD-Audio)
Depending on the disc, you may be able to switch channels, when playing DVD-Audio discs—see the disc box for details.
To switch the audio channel, press AUDIO repeatedly.
Switching audio channel (Video CD/CD)
When playing a CD or Video CD, you can switch between normal stereo playback, left channel only, and right channel only. This is useful mainly for karaoke discs that have the vocal recorded in one channel and the backing in the other—see the disc box for details.
To switch the audio channel, press AUDIO repeatedly.
Programming a program list
Programming a program list means telling the player which tracks, and in what order, you want played. You can program a sequence of up to 24 tracks, playing tracks more than once if you like. Input the program list via an on-screen display, using the joystick and number buttons to navigate the screen and enter title/chapter numbers.
Note: If a DVD-Audio disc is loaded, Program Track and Program Group options are displayed. Operation is the same for DVD-Video.
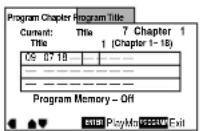
To program a DVD program list:
1 Press PROGRAM.
2 Move the joystick left or right to select Program Chapter or Program Title.
If you select Program Chapter, move the cursor down to select the title from which all the chapters will come.

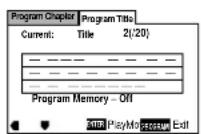
3 Move down to the tracklist window and start entering chapter/title numbers.
For titles/chapters 1 to 9, use the corresponding number button. For 10 and over, use the +10 button (+10, 0 for 10, +10, +10, 4 for 24, etc.)

4 DVD-Video only: If you want to memorize the program list, move the cursor down to Program Memory and set it to On.
The player can memorize program lists for up to 24 DVD discs.
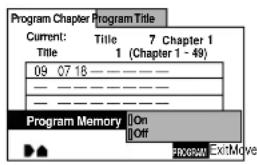
5 Press ENTER to start playback immediately, or PROGRAM to exit if you want to start playback later.
To program a CD/Video CD program list:
1 Press PROGRAM.

2 Start entering track numbers.
For tracks 1 to 9, use the corresponding number button. For 10 and over, use the +10 button (+10, 0 for 10, +10, +10, 4 for 24, etc.)
3 Press ENTER to start playback immediately, or PROGRAM to exit if you want to start playback later*.
* You cannot program a Video CD. When the menu is showing you must plays stop first.
There are several other options available when programming/using program lists.
To view the program list, press PRO-
GRAM.
To put a pause in the program list, press ■ instead of a number button. (You can't program two pauses in succession, or start/end a program list with a pause.)
To delete an entry from the program list, position the cursor on the title/group/chapter/track number and press CLEAR.
To insert an entry into the program list, position the cursor where you want the title/group/chapter/track to appear, then enter its number. All the following entries move up one.
To add an entry to the end of the program list, press PROGRAM, enter the title/group/chapter/track number, then press PROGRAM again.
To add the currently playing title/ group/chapter/track to the program list, press and hold PROGRAM for about 2 seconds. If there is no current program list, a new one is created. (For DVD: if the last program list programmed was for titles, then a title program list is created; otherwise a chapter program list is created.)
To delete the program list, press ■ to stop playback, then press CLEAR.
To delete a memorized DVD program list, load the DVD-Video, press PROGRAM, then change the Program Memory option to Off. Press ENTER to confirm.
Use the repeat function to repeat the current track/chapter/group/title, the whole disc, or loop between two points anywhere on the disc. You can set the repeat mode in normal or program play modes. Set or change the repeat mode while the disc is already playing.
Note: you can't use repeat and random play at the same time.
To set or change the repeat mode, press REPEAT. The repeat mode is shown on-screen. Just stop on the one you want.
To cancel repeat play, press CLEAR, or set the repeat mode to OFF.
To loop a section of a disc, press A-B to mark the start point, then again to mark the end point and start looping.
To cancel looping, press A-B again.
To repeat a section of a disc once, press A-B to mark the start point, then press ▶ to mark the end point and loop.
Button What it does
REPEAT Sets the repeat mode. For DVD-Video the repeat modes are title or chapter; for DVD-Audio, group or track; for CDs or Video CDs, track or all tracks.
A-B Sets the start point of a loop to repeat. Press again to mark the end point and start the loop repeating. • To play the loop just once, mark the end point by pressing ▶.
CLEAR Cancels repeat mode ( playback continues).
■ Cancels repeat mode (playback stops).
To have the player play titles/groups/chapters/tracks in a different order each time you play a disc, use the random play mode. Each title/group/chapter/track plays just once, but in a random order. Set the random play mode while the disc is playing or stopped.
Note: you can't use random play together with program or repeat play.
DVD
To start playing chapters at random, press RANDOM, then play.
To start playing titles/groups at random, press RANDOM twice, then play.
CD/Video CD
To start playing tracks at random, press RANDOM.
To stop random play
Press PLAY. This returns you to normal playback of chapters/tracks in order from the chapter/track currently playing.
Button What it does
RANDOM CD/Video CD: Starts random playback of tracks. DVD: Sets random mode (chapter/track or title/group). Press PLAY to start.
PLAY DVD only: Starts random playback.
▶▶/▶▶Starts a new random title/group/chapter/track.
|◀◀/◀◀Returns to the start of the current title/group/chapter/track (you can't go further back than this).
■Cancels random mode (playback stops).
If you watch only part of a DVD Video disc with the intention of picking up later where you left off, you can bookmark the place then resume playback at a later date without having to manually search for the right place.
You can use this feature for up to five discs (after that the oldest bookmark is deleted to make space for a new one).
Important: Switching off the player using the front panel power button will erase the memory. Use the POWER button on the remote control instead.
At the point from which you want to resume playback next time, press LAST MEMO(RY) rapidly, then stop the disc (■).
To resume playback, load the disc and press LAST MEMO(RY) rapidly. (If the disc started auto playback, stop it first.)
To clear the last memo position of the disc loaded, press LAST MEMO(RY) rapidly then CLEAR while Last Memory is displayed on-screen.
Note: This feature also works with Video CD, but for one disc only, and you must leave the disc in the player—opening the disc tray erases the memory. Last Memory may not work reliably with some PBC Video CDs.
Last Memory does not work with DVD-Audio discs.
If you have a particular set of preferences for a disc, you can memorize them using the Condition Memory function. Once memorized, your settings will be recalled automatically whenever you load that disc. The player can store settings for 15 discs; after this, memorizing another replaces the oldest one stored.
The settings memorized are:
- Camera-angle (page 40)
- On Screen Display (page 51)
• Video quality (page 55)
• Audio language (page 66) - Subtitle language (page 67)
- Parental lock level (page 71)
To memorize settings for the current disc, press CONDITION MEMO(RY) for longer than 1 sec during playback.
To recall memorized settings, just load the disc: the display shows CONDITION and CONDITION MEMO(RY) appears on-screen.
To clear memorized settings, load the disc and press CLEAR while Condition Memory is displayed on-screen.
Note: Condition Memory does not work with DVD-Audio discs.
Various track, chapter, group and title information, as well as the data transmission rate for DVD discs, can be displayed on-screen while a disc is playing, or while it's stopped.
To show/switch the information displayed, press DISPLAY.
- When a disc is playing, the information appears at the top of the screen. Press DISPLAY repeatedly to change the displayed information.

DVD-Audio display

DVD display showing the data transmission rate
- When a disc is stopped, all title/group, chapter/track or track information for the disc loaded appears on-screen. Press DISPLAY again to exit the screen.
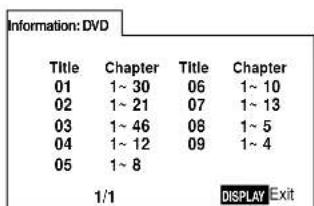
DVD-Video
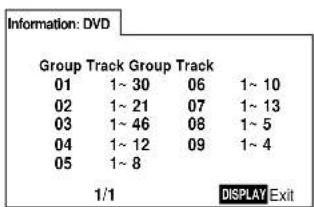
DVD-Audio
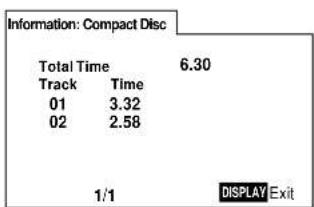
CD/Video CD
CD/Video CD
6 OSD Settings / Réglages de menu
Using the Setup menu
The Setup menu gives you access to all the player's setting SETUP to display/leave the menu and the joystick/ENTER to navigate and select options. The controls for each menu at the bottom of the screen.
If an option is greyed out it means that it cannot be change current time. This is usually because a disc is playing. Sto then change the setting.
The current setting for any option is marked with a colour. The colour of the box indicates what kind of disc the setti applicable to: blue for DVD only; orange for CD; green for disc.
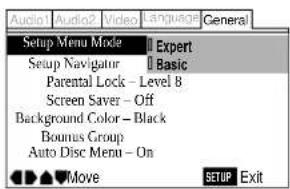
Setup Menu Mode
- Default setting: Expert
The Expert setup menu gives you access to all the player's Switch to Basic for a reduced set of more commonly used. The Basic menu also features an information bar which te more about what the currently highlighted option means.
General > Setup Menu Mode > Expert Basic
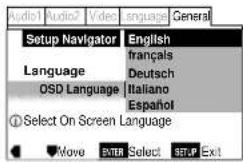
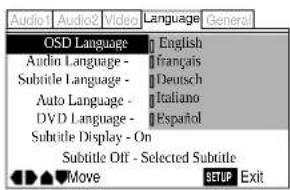
OSD language
- Default setting: English
Choose between OSD menus in the languages offered.
Language > OSD Language > English français Deutsch Italiano Español
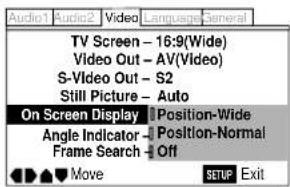
When watching DVD discs recorded in 4:3 format ('regular' TV size) on a widescreen TV, it can be difficult to see the operation displays (Play, Stop, Resume, etc.) at the top of the screen. If you find them hard to read, set the On Screen Display (Expert mode) to Position-Wide.
If you prefer not to have the operation displays (Play, Stop, Resume, etc.) shown on-screen, change the On Screen Display setting to Off.
Video > On Screen Display > Position-Wide Position-Normal Off
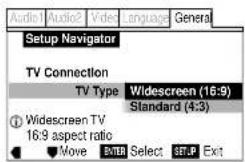
If you have a widescreen TV, select the 16:9 (Wide) setting—widescreen DVD software is then shown using the full screen area. When playing software recorded in conventional (4:3) format, the settings on your TV will determine how the material is presented—see the manual that came with your TV for details on what options are available.
If you have a conventional TV, choose either 4:3 (Letter Box) or 4:3 (Pan & Scan). In Letter Box mode, widescreen software is shown with black bars at the top and bottom of the screen. Pan & Scan chops the sides off widescreen material to make it fit the 4:3 screen (so even though the picture looks larger on the screen, you're actually seeing less of the movie). See page 87 for more information.

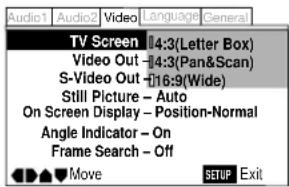
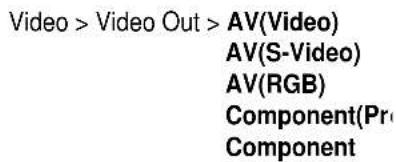
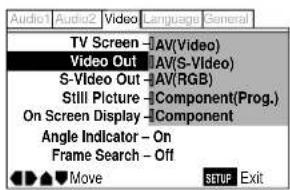
Video Out
- Default setting: AV(Video)
These settings are only applicable if you're using the TV A/V EURO connector or the COMPONENT VIDEO OUT jacks.
Important: if you make a setting here that is incompatible with your TV, the TV may not display any picture at all. If this happens either switch everything off and reconnect to the TV using either the supplied composite video cable, or an S-Video cable (see page 12 for more on this), or reset the unit (see page 86 for how to do this). If you're using the component video outs, you can also set the video out to INTERLACE using the FL menu setting (see page 24-26).
AV(Video) – Compatible with all TVs, but lowest quality of the three AV settings.
AV(S-Video) - Almost the same quality as AV(RGB), but can give better results if you are using a long SCART cable.
AV(RGB) – If your TV is compatible, this setting gives the best picture quality.
Component (Prog.) — Select if your TV/monitor accepts 525 line (NTSC) progressive scan (non-interlace) component video—check the manual that came with your TV/monitor. (This setting only applies to NTSC discs; the player always outputs an interlaced signal when playing PAL discs.)
Component – Select if you're using a TV/monitor with component video inputs.
Note: when AV(RGB) is selected, no signal is output from the component video jacks. When either Component option is selected, an AV(Video) signal is output from the A/V EUROCONNECTOR outputs.
Depending on the position of the FL menu COMP VIDEO setting (see page 24-26), not all options will be available:
If the FL menu COMP VIDEO is set to INTERLACE, you can't select Component (prog.).
If the FL menu COMP VIDEO is set to PROGRESSIVE, you can't select Component.
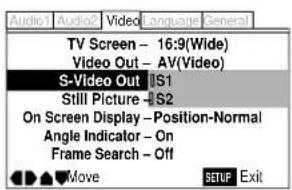
S-Video Out (Expert menu)
- Default setting: S2
You only need to make this setting if you connected this player to your TV using an S-Video cord.
If you find that the picture is stretched or distorted on the default S2 setting, try changing it to S1.
$$ \begin{array}{c} \text {Video > On Screen Display > S1} \ \text {S2} \end{array} $$
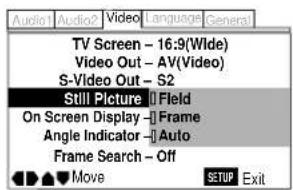
The player uses one of two processes when displaying a still frame from a DVD disc. The default Auto setting lets the player decide which to use.
Field - produces a stable, generally shake-free image.
Frame – produces a sharper image, but more prone to shake than field stills.

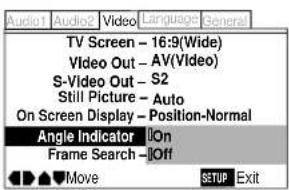
Angle Indicator (Expert menu)
- Default setting: On
If you prefer not to see the camera icon on-screen during multi-angle scenes on DVD discs, change the Angle Indicator setting to Off.

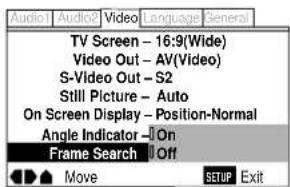
Frame Search (Expert menu)
- Default setting: Off
Set this to On if you want to be able to do frame-accurate searching of DVD discs (see page 36 for how to do a time & frame search). On the default setting, the time & frame search is not available.

Adjusting the video quality
There are several preset picture quality settings that suit various program types. Alternatively, set up your own and save them in the player's memory.
There are three presets and three user memories.
TV(CRT) - (default setting) optimized settings for a standard television set.
Projector - optimized for a projector or projection TV.
Professional – optimized for a professional monitor.
Memory 1-3 - user setups (see page 57 for more on these).
1 Press VIDEO ADJ, then ENTER (to select Video Memory Select).
TV(CRT)
Memory 1
Projector
Memory 2
Professional
Memory 3
2 Use the joystick to highlight the setting you want, then press ENTER.
The highlighted setting takes effect immediately, even before pressing ENTER, so it's easy to compare the various settings.
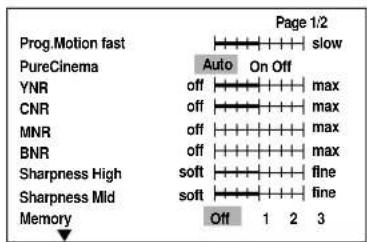
To create your own setting (1):
You can adjust any or all of the following picture quality factors:
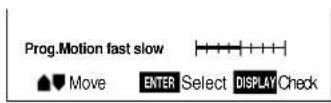
Prog. Motion - When using progressive scan, this adjusts the motion and still picture quality.
PureCinema – When watching DVD movies, PureCinema optimizes the picture quality. The default setting is Auto, but if the picture appears unnatural, then set to On or Off as desired and adjust the Prog. Motion setting (see above). See PureCinema in the glossary starting on page 80.
YNR - Adjusts the amount of noise reduction (NR) applied to the Y (brightness) component.
CNR – Adjusts the amount of noise reduction (NR) applied to the C (colour) component.
MNR (Mosquito Noise Reduction) – Adjusts the amount of noise reduction applied to the mosquito noise (video artifacts on the edge of the image resulting from MPEG compression).
BNR (Block Noise Reduction) — Adjusts the amount of noise reduction applied to the block noise.
Sharpness High - Adjusts the sharpness of the high-frequency (finely detailed) elements in the picture.
Sharpness Mid - Adjusts the sharpness of the mid-frequency (less detailed) elements in the picture.
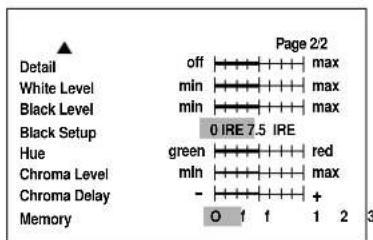
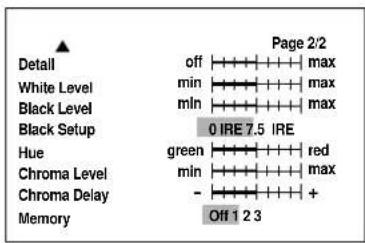
Detail - Adjusts how sharp edges appear in the picture.
White Level - Adjusts the intensity of white in the picture.
Black Level - Adjusts the intensity of black in the picture.
Black Setup – For correction of floating black colour.
Hue — Adjusts the overall colour balance between red and green. (This is only effective with NTSC video when the player is connected using the VIDEO OUT or S-VIDEO OUT signals.)
Chroma Level – Adjusts how saturated colours appear.
Chroma Delay - Compensates for misalignment of the Y (brightness) and the C (colour) components.
Compatibility of this unit with progressive-scan TVs.
'CONSUMERS SHOULD NOTE THAT NOT ALL HIGH DEFINITION TELEVISION SETS ARE FULLY COMPATIBLE WITH THIS PRODUCT AND MAY CAUSE ARTIFACTS TO BE DISPLAYED IN THE PICTURE. IN CASE OF 525 PROGRESSIVE SCAN PICTURE PROBLEMS, IT IS RECOMMENDED THAT THE USER SWITCH THE CONNECTION TO THE "STANDARD DEFINITION" OUTPUT.
1 Press VIDEO ADJ.
2 Use the joystick to select Video Setup, then press ENTER.
3 Move the cursor up or down to select a setting; move it left or right to adjust that setting.
Adjust these while a disc is playing to see the effect of changes immediately.
To memorize these settings:
1 Move the cursor up or down until you see the Memory screen.
2 Select memory 1, 2 or 3, then press ENTER.
The previous setting will be erased.
To create your own setting (2):
1 Press VIDEO ADJ.
2 Select Video Setup, then press ENTER.
3 Press DISPLAY.
4 Move the cursor up or down to select a setting; move it left or right to adjust that setting.
Adjust these while a disc is playing to see the effect of changes immediately.
5 To memorize the setting, select memory 1, 2 or 3, then press ENTER.
The previous setting will be erased.
You only need to make this setting if you connected the player to another component (amplifier, etc.) using one of the digital outs. If the other component has a built-in Dolby Digital decoder, set this to Dolby Digital, otherwise set to Dolby Digital ▶ PCM (Dolby Digital audio is converted to more compatible PCM audio). Check the manual that came with the other component if you're unsure whether it is Dolby Digital compatible.
Audio 1 > Dolby Digital Out > Dolby Digital Dolby Digital ▶ PCM
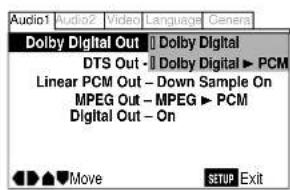
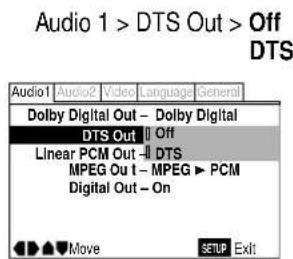
DTS Out
- Default setting: Off
You only need to make this setting if you connected the player to another component (amplifier, etc.) using one of the digital outs. If your amplifier has a built-in DTS decoder, set this to DTS, otherwise set to Off. Check the manual that came with the other component if you're unsure whether it is DTS compatible.
Sortie Dolby Digital
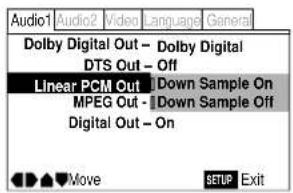
You only need to make this setting if you connected the player to another component (amplifier, etc.) using one of the digital outs. If your amplifier is compatible with high sampling rates (96 kHz), set this to Down Sample Off, otherwise set it to Down Sample On (96 kHz audio is converted to a more compatible 48 kHz). Check the manual that came with the other component if you're unsure whether it is 96 kHz compatible.
- If Digital Out is set to On and Linear PCM Out is set to Down Sample On, you'll see the message Digital Out Converted appear on-screen when either the AUDIO button is pressed or when playing 192 kHz source material.
Audio 1 > Linear PCM Out > Down Sample On Down Sample Off
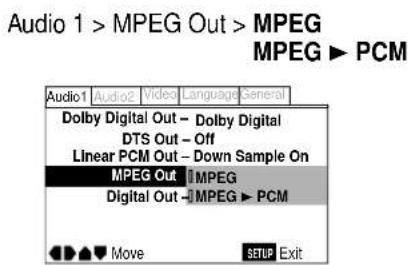
MPEG Out
- Default setting: MPEG ▶ PCM
You only need to make this setting if you connected the player to another component (amplifier, etc.) using one of the digital outs. If your amplifier is compatible with MPEG audio, set this to MPEG, otherwise set it to MPEG ▶ PCM (MPEG audio is converted to more compatible PCM audio). Check the manual that came with the other component if you're unsure whether it is MPEG audio compatible.
Sortie PCM linéaire
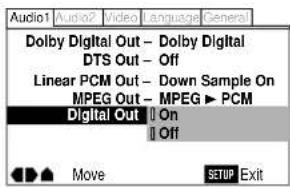
If at any time you need to switch off the digital audio output, set this to Off, otherwise leave it On. Note that you can't switch on/off the optical and coaxial outputs individually.
Audio 1 > Digital Out > On Off
Audio DRC
- Default setting: Off
When watching Dolby Digital DVDs at low volume, it's easy to lose the low level sounds completely—including some of the dialog. Switching on the Audio DRC (Dynamic Range Compression) setting can help things by bringing up the low level sounds, while keeping the lid on high level peaks.
The Off setting leaves the original dynamics intact; High 'squashes' the dynamics the most, but exactly how much difference you can hear between the settings will depend on the material you're watching.
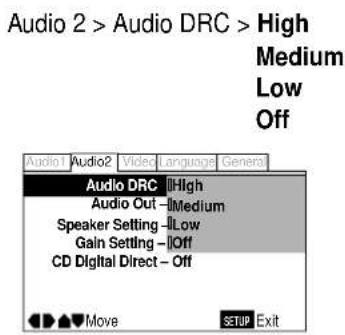
Remember: Audio DRC is only effective with Dolby Digital audio sources.
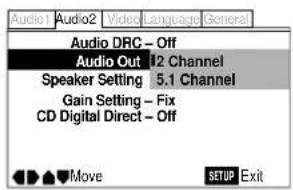
If you connected this player to your amplifier using the 5.1 channel analog outputs (front, surround, center and subwoofer outs), set this to 5.1 Channel; if you connected only the stereo outs, set to 2 Channel.
- Even if you set Audio Out to 5.1 Channel, you'll only get sound from all speakers when playing a multi-channel DVD-Audio disc, or Dolby Digital, DTS or MPEG encoded DVD disc.
- If you set to 2 Channel, Dolby Digital, DTS and MPEG audio is mixed down to two channels so you still hear all the audio recorded on the disc.
- During the slideshow section of a DVD-Video disc it can take up to 30 seconds for the Audio Out setting to take effect.
- Some DVD-Audio discs don't allow down-mixing of audio. These discs always output multi-channel audio regardless of the setting made here.
Audio 2 > Audio Out > 2Channel
5.1Channel
Sortie audio
* When the Setup screen Audio 1 menu [DTS Out] setting is set to [Off], DTS digital output is muted.
** Discs that prohibit downmixing will be output as 5.1 channel even if [2 Channel] is selected.
*** Discs that prohibit downmixing also mute the digital output.
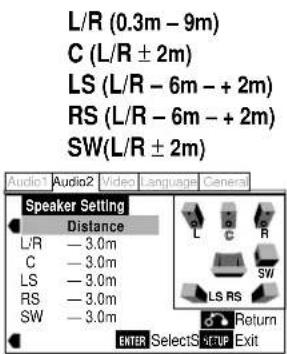
- Set in Setup Navigator (default: Center: Large | Sub: On | Surround: Large | Distance: all 3.0m)
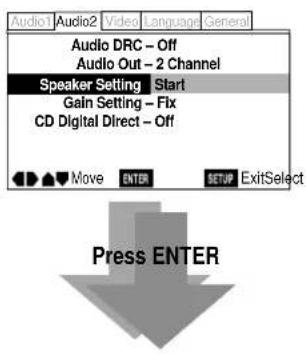
You only need to make this setting if you connected this player to your amplifier using the 5.1 channel analog outputs.
Follow the on-screen displays to describe which speakers are in your system and their sizes and positions.
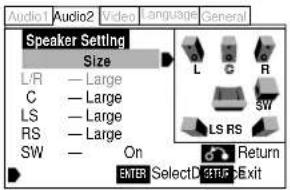
Set the size of your speakers in the Size screen. The front left/right (L/R) speakers have a fixed setting of Large. The center (C), left surround (LS) and right surround (RS) speakers can each be set to Large, Small or Off. Set a speaker to Large if the main speaker cone is 12cm or more; set to Small if the it's less than 12cm. Note that the LS and RS speakers cannot be set independently.
The subwoofer (SW) can only be set to On or Off.
The graphic on the right of the screen represents your speaker setup, with the currently selected speaker's name highlighted in blue, and the speakers set to On highlighted in yellow.
Audio 2 > Speaker Setting > Start
L/R (Large)
C (Large/Small/Off)
LS (Large/Small/Off)
RS (Large/Small/Off)
Sub-woofer (On/Off)
LS (Large/Small/Off)
RS (Large/Small/Off)
Sub-woofer (On/Off)

8 Audio Settings / Paramètres audio
Set the distance from your main listening position to each speaker in the Distance screen. The distance setting for any speaker that was set to Off in the Size screen will be grayed out. For the other speakers, enter the distance to the nearest 0.1m (10cm). You can set the distance for the L/R speakers between 0.3m and 9m. Note that you must set the C and SW speakers within 2m of the L/R setting. The LS and RS speakers must be set within -6m and +2m of the L/R setting.
The graphic on the right of the screen represents your speaker setup, with the currently selected speaker's name highlighted in blue, and the speakers set to On highlighted in yellow.
Note: If your subwoofer is placed beyond the adjustment range (L/R±2m), set to the nearest setting possible. Surround sound cohesion should not be affected very much.
You may want to make this setting if you connected this player to your amplifier using the 5.1 channel analog outputs.
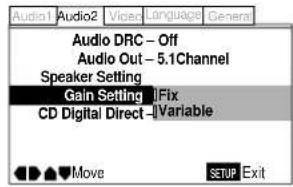
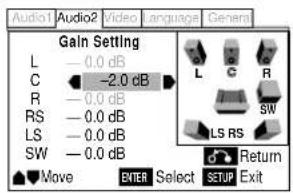
Under the default setting, all channels are output at the relative volumes they were recorded at. Change the setting to Variable if you want to adjust the center, subwoofer and surround channel volume levels relative to the front left/right channels. Adjustment is in the range of -6dB to +6dB, in steps of 0.5dB.
- The Gain Setting has no effect on CD and Video CD playback.
- When set to Variable, the overall output level may sound quieter than when set to Fix. This is not a malfunction.
Audio 2 > Gain Setting > Fix Variable

L (Fix)
C(±6.0dB)
R(Fix)
RS (±6.0dB)
LS (±6.0dB)
SW(±6.0dB)
Réglage du gain (menu Expert)
8 Audio Settings / Paramètres audio
To help you gauge the correct gain levels, set the Test Tone to On (test tone from just that speaker) or Auto (test tone from each speaker in turn) then adjust the gain so that all speakers appear to be the same volume from your listening position.
Follow the on-screen displays to select speakers and set the channel levels.
- You can adjust the Test Tone setting only when the player is stopped.
- Many AV amplifiers allow you to make similar settings at the amplifier stage. In this case, set the channel levels at the player or the amplifier, not both.
- As the test tone plays through a speaker, its name is highlighted in yellow on-screen.
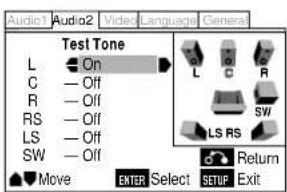
Remember: You can't use the test tone function when the Audio Out setting is 2 Channel (see page 112). The test tone will not work with the disc tray open, or while a disc is playing.
CD Digital Direct (Expert menu)
- Default setting: Off
Setting this to On noticeably increases CD audio quality by bypassing certain audio circuits in the player that audio signal would otherwise pass through. However, this must be set to Off for proper playback of DTS encoded CDs.
Audio 2 > CD Digital Direct > On Off
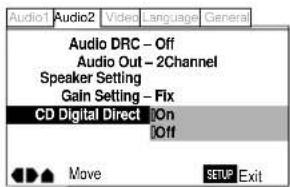
Remember: If this setting is set to On when a DTS CD is playback, noise is produced.
- Default Setting: English
This setting is your preferred audio language for DVD discs. If the language you specify here is recorded on a disc, the player automatically plays the disc in that language (although this depends on the Auto Language setting—see Auto Language on page 68).

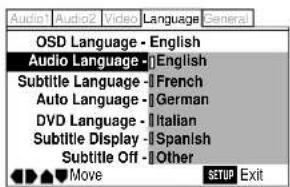
The DVD format recognizes 136 different languages. Choose Other if you want to specify a language other than those listed, then follow the on-screen display to select a language. For languages which are only shown as a code, refer to the language code list on page 81.
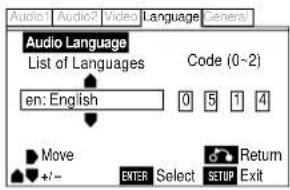
Remember: You can switch between the languages recorded on a DVD disc any time during playback using the AUDIO button. (This does not affect this setting.)
French German Italian Spanish Other
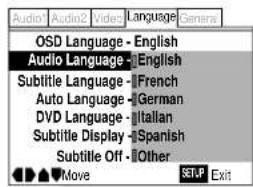
- Default Setting: English
This setting is your preferred subtitle language for DVD discs. If the language you specify here is recorded on a disc, the player automatically plays the disc with those subtitles (although this depends on the Auto Language setting—see Auto Language on page 68).
Language > Subtitle Language > English
French
German
Italian
Spanish
Other
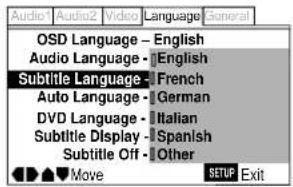
The DVD format recognizes 136 different languages. Choose Other if you want to specify a language other than those listed, then follow the on-screen display to select a language. For languages which are only shown as a code, refer to the language code list on page 81.
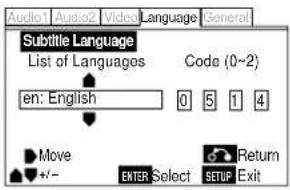
Remember: You can change or switch off the subtitles on a DVD disc any time during playback using the SUBTITLE button. (This does not affect this setting.)
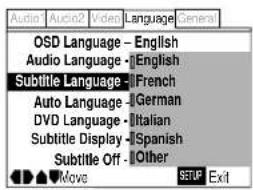
When set to On, the player always selects the default audio language on a DVD disc (French dialog for a French movie, for example), and displays subtitles in your preferred subtitle language only if that is set to something different. Set to Off to have the player play discs strictly according to your Audio Language and Subtitle Language settings.
For Auto Language to work, the Audio Language and Subtitle Language settings must be the same—see pages 66,67.
Language > Auto Language > On
Off
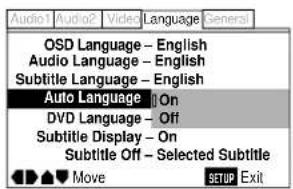
Remember: You can still switch audio and subtitle languages on playback using the AUDIO and SUBTITLE buttons.
DVD Language (Expert menu)
- Default Setting: w/Subtitle Language
Some multi-lingual discs have disc menus in several languages. This setting specifies in which language the disc menus should appear. Leave on the default setting for menus to appear in the same language as your subtitle preference—see page 67.
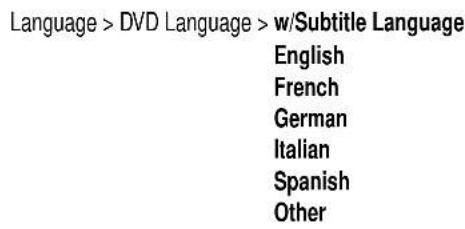
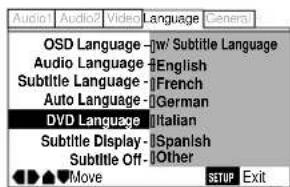
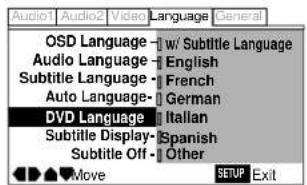
The DVD format recognizes 136 different languages. Choose Other if you want to specify a language other than those listed, then follow the on-screen display to select a language. For languages which are only shown as a code, refer to the language code list on page 81.
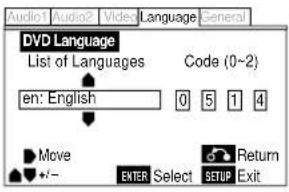
Subtitle Display (Expert menu)
- Default Setting: On
Set to On, the player displays subtitles according to the Subtitle Language and Auto Language settings above. Set to Off to switch subtitles off altogether (although see Subtitle Off on page 70). Set to Assist Subtitle to have the player display the extra assistive subtitles recorded on to some DVD discs.
Language > Subtitle Display > On
Off
Assist Subtitle
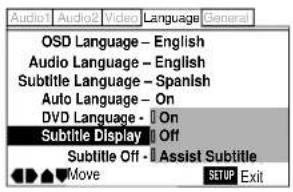
- Default Setting: Selected Subtitle
Some discs display subtitles even if the Subtitle Display setting (page 69) is set to off. In this case, you can either have the subtitles displayed in the same language as your preferred audio language (With Audio), or in your preferred subtitle language (Selected Subtitle). If the Audio Language and Subtitle Language settings are the same then both of these choices will give the same result.
Language > Subtitle Off > With Audio Selected Subtitle
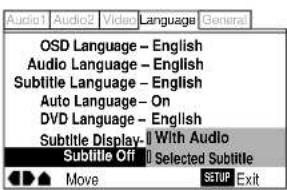
Language > Subtitle Off > With Audio Selected Subtitle
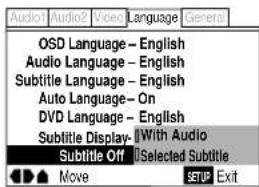
You can restrict access to certain discs using this feature. Once set, the player will ask for a four-digit password if a restricted disc is loaded, giving you a degree of control over what your children watch.
The player can be set to one of eight levels. Setting the level at 1 means that any disc that has any level of restriction will need the password in order to watch it, while setting it at level 8 gives unlimited access.
DVD discs are also rated from 1 to 8. Discs rated 1 (or with no rating) generally contain little or no offensive material; discs rated 2, may contain material that some parents may feel is unsuitable for children. Discs rated 8 will almost certainly be unsuitable for children.
Since a disc's rating is up to the manufacturer, it is not possible to give a definitive guide to each level—check the disc box for parental lock details.
Be careful: not all discs that you may consider inappropriate for your children are rated. Unrated discs will always play without requiring the password first.
Blocage parental
General > Parental Lock > Level Change Password Change
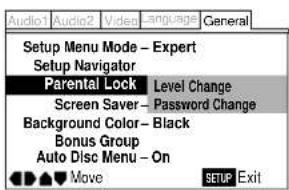
General > Parental Lock > Level Change Password Change
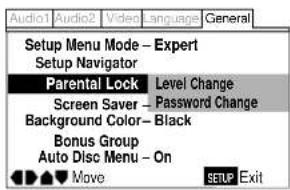
To change the parental lock level:
1 Select Level Change.
2 Input your password, then press ENTER.
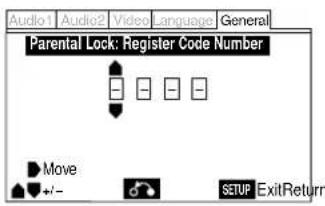
If the password hasn't been set yet, anything input becomes your new password.
3 Select a new level.
Move leftward to lock more levels (more discs will require the password); rightward to unlock levels. You can't lock level 1.
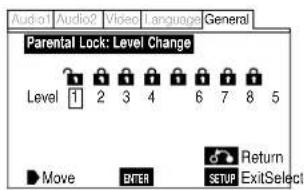
4 Press ENTER to set the new level.
To set a new password:
1 Input your existing password, then press ENTER.
2 Input a new password, then press ENTER.
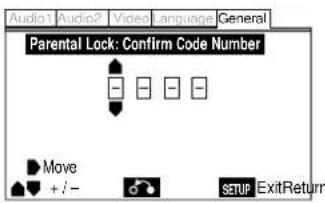
If you forget your password, resetting the player will clear the password. See page 86 for more on this.
If a constant image is displayed on a conventional CRT-type TV, it can "burn in" leaving a ghost image on the screen. Switch On the screen saver to make sure that a constant image is not displayed for a dangerously long time.
Note: if the screen saver comes on when the speaker setup test tone is playing, the test tone will stop (see page 65).
General > Screen Saver > On Off
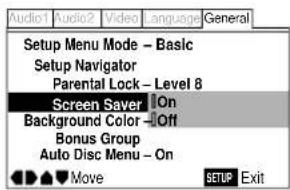
Background Color (Expert menu)
- Default setting: Black
This specifies the color of the screen when the player is stopped (or playing an audio disc).
General > Background Color > Black
Blue
Other
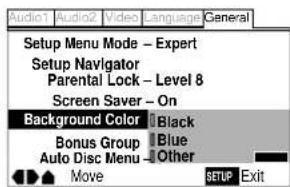
Select Other if you want to make your own background color—follow the on-screen display to create a color from the red, green and blue bars.
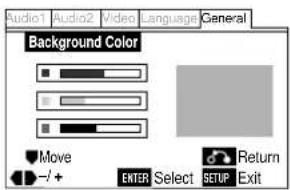
General > Background Color > Black
Blue
Other
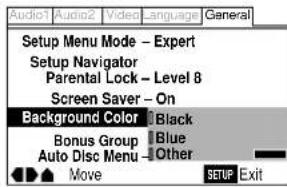
To delete an item from the shortcut menu:
1 Press SETUP.
2 Select the menu item you want to delete from the shortcut menu.
It should be marked FM.
3 Press F.MEMO to clear the FM mark.
4 Press SETUP to exit.
Bonus Group
Some DVD-Audio discs have an extra 'bonus' group that requires a 4-digit key number to access. See the disc packaging for details and the key number. When you try and play the bonus group, the key number input screen will automatically appear, although it is also available from the General menu. Input the number and press ENTER.
General > Bonus Group > Start
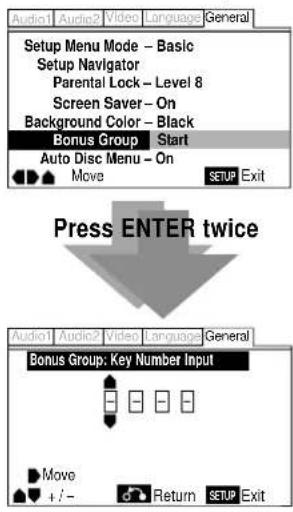
Auto Disc Menu
- Default setting: On
This specifies whether the menu (Top menu) is automatically displayed after loading a disc. Set to On if you want the menu displayed automatically, or Off if you don't want it displayed.
Note: Some DVD discs display a menu automatically regardless of this setting. If you press PLAY ▶ while a disc is loading, this setting is ignored.
General > Screen Saver > On Off
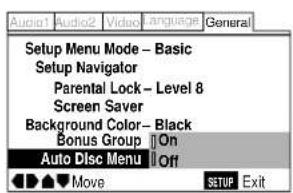
You can create a shortcut menu of up to 5 setup menu items that you often access. Rather than navigate through the whole setup menu each time you want to alter a setting, you can access the setting straight from the shortcut.
1 Press SETUP.
2 Select the menu item you want to add.
3 Press F.MEMO.
The item is marked FM. (Some items in the Setup menu cannot be added to the shortcut menu. In this case, the mark is displayed on-screen.)
4 Repeat steps 2 and 3 to add up to five items to the shortcut menu.
5 Press SETUP to exit.
To use the shortcut menu:
1 Press F.MEMO.
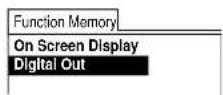
2 Select the item you want using the joystick and press ENTER.
3 The Setup menu opens on the item you selected.
Select from the options in the normal way.
4 Press SETUP to exit.
natural_image
Illustration of two hands holding a circular object, one with a pointed tip and the other with a ring (no text or symbols)natural_image
Illustration of hands cleaning a CD or DVD disc with a cloth (no text or symbols)natural_image
CD or DVD icon with a prohibition symbol overlay (no text or symbols present)natural_image
Illustration showing two hands holding a circular object, one with a finger inserted and the other with a ring (no text or symbols)natural_image
Illustration of hands cleaning a CD or DVD disc (no text or symbols visible)natural_image
Illustration of a hand holding a circular object with a prohibition symbol, no text or labels presentnatural_image
CD/DVD icon with a prohibition symbol overlay (no text or symbols present)natural_image
Two circular objects with a crossed-out circle containing a diagonal line, no text or symbols present.natural_image
Two identical heart-shaped objects with a crossed-out circle and a diagonal line, no text or symbols present.natural_image
Two circular objects with a diagonal line and a prohibition symbol, no text or labels present.natural_image
Two identical heart-shaped objects with a crossed-out circle and a diagonal line, no text or symbols present.PureCinema adjusts the picture so that it matches more closely the picture quality of a cinema screen.
Incorrect operation is often mistaken for trouble or malfunction. If you think that there is something wrong with this component, check the points below. Sometimes the trouble may lie in another component. Inspect the other components and electrical appliances being used. If the trouble cannot be rectified after checking the items below, ask your nearest MARANTZ authorized service center or your dealer to carry out repair work.
The disc is ejected automatically after loading.
- Dirty or damaged disc.
See pages 76,77 for disc care information. - Disc not seated properly in the disc guide. Align the disc properly.
- Incompatible region number.
If the region number on a DVD-video disc does not match the number on the player, the disc cannot be used (page 9). - Condensation inside the player.
Allow time for condensation to evaporate. Avoid using the player near an air-conditioning unit.
Playback is not possible.
- Disc is loaded upside down.
Reload the disc with the label side face up.
DVD-Audio playback stops.
- The disc may have been illegally copied.

mark appears on screen.
• The operation is prohibited by the player.

mark appears on screen.
- The selected function does not operate for that disc.
When making changes in the Setup OSD menus, BSD displayed.
- There is a CD or Video CD loaded and the setting that was changed applies only to DVD discs. The settings will take effect next time a DVD is loaded.
Dépannage
Picture playback stops and the operation buttons cannot be used.
Press ■, then start playback again (▶).
Switch the power off once, then on again using the front panel POWER switch.
New settings made in the Setup screen menus while a disc is playing are ineffective.
- Some settings can be changed while a disc is playing, but are not effective until the disc is stopped then restarted. This is not a malfunction.
Make the same setting when the player is stopped.
Press ■, then restart playback (▶). Note that making settings in the Setup screen menus may cancel the RESUME function.
Settings are canceled.
- When the power is cut due to power failure or by unplugging the power cord, settings will be canceled.
POWER button on the Remote Control and checking that STANDBY indicator light in the display, then press POWER on the front panel to turn the player off.
No picture/No colour.
- Incorrect video connections.
Check that connections are correct and that plugs are inserted fully.
- Internal player settings are incorrect.
If using the A/V EUROCONNECTOR or component connections, make sure that the Video Out setting in the Setup menu corresponds to the capabilities of the TV or monitor being used (page 52).
• TV/monitor or AV amplifier settings are incorrect.
Check the instruction manual of the connected equipment.
- FL menu setting set incorrectly.
If using the component connections, set the FL menu setting to INTERLACE (page 24-26).
- Check that VIDEO ON/OFF switch is set to the correct position.
Screen is stretched or aspect does not change.
- The TV Screen setting in the Setup menu is incorrect.
Set the TV Screen option to match the TV/monitor you're using (pages 52 and 87).
Screen is suddenly stretched when the Setup screen is opened.
- If the Setup screen is opened during playback of a DVD being viewed in the letter box format, the screen may switch to the wide screen format.
This is not a malfunction. The screen will return to normal when the Setup screen is closed.
Picture disturbance during playback or dark.
- This player is compatible with Macro-Vision System copy guard. Some discs include a copy prevention signal, and when this type of disc is played back, stripes etc., may appear on some sections of the picture depending on the TV. This is not a malfunction.
- FL menu TV SYSTEM setting was changed while using the player.
Setting the TV SYSTEM should be set to the correct position in the stop playback.
- Discs respond differently to particular player functions. This may result in the screen becoming black for a brief instant or shaking slightly when the function is executed.
These problems are largely due to differences between discs and disc content and are not malfunctions of this player.
When recorded on a VCR or passed through an AV selector, there is disturbance in the playback picture.
- Due to the player's copy protection circuits, connection of this device through a VCR or an AV selector may prevent recording or cause picture problems.
This is not a malfunction.
The remote control doesn't seem to work.
- The Control jack on the rear panel is connected.
Use the remote control of the connected component to control this player.
Check that REMOTE CONTROL SW is set to the External position.
- The remote control is too far from the player, or the angle with the remote sensor is too wide.
Use the remote within its operating range (page 7).
• The batteries are exhausted.
Put in new batteries (page 6).
- Check that REMOTE CODE setting is set to the correct position (page 18, 27).
Cannot listen to high-sampling rate audio through the digital output.
- Linear PCM Out is set to Down Sample On. Set to Down Sample Off.
- As a copy-protection measure, some DVDs do not output 96kHz audio.
In this case, even if Down Sample Off is selected, the player automatically outputs the audio at 48 kHz. This is not a malfunction.
No audio, or audio is distorted.
- Some DVD discs do not output digital audio. Switch your amplifier to the player's analog outputs.
- Dirt, dust, etc. on the disc. Clean the disc (page 76).
- Interconnects are not fully inserted into the terminals (or are not connected). Check that all interconnects are firmly inserted.
- Dirty or oxidized plugs/terminals. Clean the plugs/terminals.
- Incorrect audio cable connection. Check the audio connections (page 10).
- Player's output is connected to the amplifier's phono (turntable) inputs. Connect to any set of inputs except phono.
- The disc is paused. Press to exit the pause mode.
- Incorrect amplifier settings. Check that the volume is turned up, that the speakers are on, the input function set correctly, etc.
- The Audio Out setting is incorrect. If there is no dialog from the front L/R speakers, set Audio Out to 2 Channel. If there is no output from the rear, center and subwoofer speakers, set Audio out to 5.1 Channel.
The analog audio is OK, but there appears to be no digital audio signal.
- Incorrect Audio 1 menu settings. Make sure that the Digital Out setting is set to On (page 60). Check that the Dolby Digital and DTS settings are suitable for your amplifier—check the amp's instruction manual.
Noticeable difference in DVD and CD volume.
• DVDs and CDs use different recording methods.
This is not a malfunction.
The volume level of DVD discs will be relatively low if the Gain
Setting is set to Variable.
Audio mix does not sound right or sounds incomplete (for example, inaudible dialog).
- Incorrect Setup menu settings.
Make sure that 2 Channel output is selected for the Audio Out menu option if you've connected to the stereo inputs on your amplifier or TV (page 61)
Settings made in the Setup menu are not retained when the unit is switched off.
- If the power is switched off before exiting the Setup menu, the settings are not stored.
Make sure that you exit the Setup menu after changing any settings before switching off.
Note: Static electricity or other external influences may cause malfunctioning of this unit. In this case, unplug the power cord and then plug back in. This will usually reset the unit for proper operation. If this does not correct the problem, please consult your nearest MARANTZ service center.
Resetting the player
Resetting the player returns all menu, picture and password settings to their factory defaults.
Switch off the player using the front panel power switch. Next, hold down the front panel ■ (STOP) button and switch back on. All settings will have been cleared.
Screen sizes and disc formats
The table below shows the effect of various TV Screen settings on the different kinds of disc available.
When viewing a wide screen TV or monitor
Setting and Appearance Screen format of disc

16:9 (Wide)
Widescreen (movies, etc.)
Note that some extra-wide formats (such as CinemaScope) will appear with black bars at the top and bottom of the screen.


16:9 (Wide)
Standard (TV programs, etc.)
Your TV will determine how the picture is presented—check the manual that came with the TV for details. Typical options are black bars either side, some form of stretched or zoomed presentation.
When viewing a standard size TV or monitor
Setting and Appearance Screen format of disc

Any setting
Standard (TV programs, etc.)
The program is presented correctly, regardless of the setting.

4:3 (Letter Box)
Widescreen (movies, etc.)
The program is shown in widescreen with black bars at the top and bottom of the screen.

4:3 (Pan & Scan)
Widescreen (movies, etc.)
The sides of the program are cropped so that the picture fills the whole screen.

16:9 (Wide)
Widescreen (movies, etc.)
The program appears squashed: set to either 4:3 (Letter Box) or 4:3 (Pan & Scan).
Ecran large (films, etc.)
Ecran large (films, etc.)
Ecran large (films, etc.)
Ecran large (films, etc.)
System DVD system and Compact Disc digital audio system
Power requirements AC230 V, 50 Hz
Power consumption....31 W
Weight 13.2 kg
Dimensions 458 (W) x 392 (D) x 110 (H) mm
Operating temperature ....+5°C to +35°C
Operating humidity 5% to 85% (no condensation)
S-Video output
Y (luminance) - Output level 1 Vp-p (75 Ω)
C (color) - Output level 286 mVp-p (75 Ω)
Jacks S-VIDEO jack
Video output (2 individual outputs)
Output level 1 Vp-p (75 Ω)
Jacks RCA jack
21-pin connector assignment
AV connector input/output 21-pin connector
This connector provides the video and audio signals for connection to a compatible color TV or monitor.
20 18 16 14 12 10 8 6 4 2
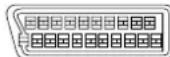
21 19 17 15 13 11 9 7 5 3 1
PIN no.
1 ...... Audio 2/R out 3 ...... Audio 1/L out
4 GND 7 B* out
8 ...... Status 11 ...... G' out
15 R ^ or C ^ out 17 GND
19 ...... Video out or Y* out 21 ...... GND
A/V connector-TV is output
A/V connector-AUX is not output
Component video output
Output level Y 1 Vp-p (75Ω)
Output CB, CR 0.7 Vp-p (75Ω)
Audio output (2 pairs)
Output level
During audio output.... 200 mVrms (1 kHz, -20 dB)
Number of channels 2
Jacks RCA jack
Audio output (multi-channel / C, SW, LS, RS)
Output level
During audio output.... 200 mVrms (1 kHz, -20 dB)
Number of channels 4
Jacks RCA jack
Digital audio characteristics
Frequency response 4 Hz to 44 kHz (DVD fs: 96 kHz)
4 Hz to 88 kHz (DVD-Audio fs: 192 kHz)
S/N ratio 115 dB
Dynamic range more than 102 dB
Total harmonic distortion 0.001 %
Wow and flutter .... Limit of measurement (±0.001% W. PEAK) or lower
Digital output
Optical digital output ...... Optical digital jack
Coaxial digital output RCA jack
Accessories
Audio/Video cord 1
System Control cord 1
Power Cord 1
Remote control unit 1
AAA (R03P) dry cell batteries 2
Operating Instructions 1
Note: The specifications and design of this product are subject to change without notice, due to improvement.
Spécifications
COUNTRY COMPANY ADDRESS
| ALGERIE Azur 2000 8, Lotissement Ben Hatadi, Alger, Algerie | ||
| ARMENIA NGYIG Ltd. 47 A/75 St. Lalaiants, 375000 Yerevan, Armenia | ||
| AUSTRALIA Jamo Australia Pty. Ltd., 24 Lionel Road, Mt. Waverley, VIC 3149, Australia | ||
| AUSTRIA | Huber & Prohaska GmbH | Taborstraße 95 / Ladestraße 1, Gebäude Hangartner, A-1200 Wien, Austria |
| BAHREIN Ambassador Stores P.O. Box 237,141, Government Avenue, Manama,Bahrein | ||
| BANGLADESH Target 1078, Ramjoy Mohanja Lane Asadgonj, Chittagong 4000, Bangladesh | ||
| BELGIUM Van der Heyden Audio N.V. Brusselbaan 278, 9320 Erembodegem, Belgium | ||
| BULGARIA | Ariescommerce GmbH | Makedonia Blvd. 16, 1606 Sofia, Bulgaria |
| CANADA | Lenbrook Industries Limited | 633 Granite Court, Pickering, Ontario |
| CHINA | Guang Chang Audio International Co., Ltd. | No.38 Yushan Road, ShiQiao, Pan Yu, Guang Dong, China |
| CYPRUS | Empire Hifi systems Ltd. | P.O. Box 5604, Nicosia, Cyprus |
| CZECH REPUBLIC | Audio International | Sokolska 41, 67902 Rajecko, OKR,Blansko, Czech Republic |
| DENMARK | Audio Nord | Dali Allé 1, 9610 Noerager, Denmark |
| DUBAI | V.V.& SONS | P.O. Box 105, Dubai, U.A.E. |
| EGYPT | Solimco | 9, El Attibaa St. Doki, Cairo, Egypt |
| ESTONIA HiFi Club Estonia | Ehte 4, 90503 Haapsalu, Estonia | |
| F.Y.R.O.M. | T.P. KODI | ul.Cedomir Kantargiev 21a, Skopje, Former Yugoslavian Republic of Macedonija |
| FINLAND | Audio Nord | Uudenmaankatu 4-6, Helsinki SF-00120, Finland |
| FRANCE | Marantz France | A division of Marantz Europe B.V., P.O. Box 301, 92 156 Suresnes Cedex, France |
| GERMANY | Marantz Deutschland | Hakenbusch 3, 49078 Osnabrück, Germany |
| GREECE | Adamco S.A. | 188, Hippocratous Street, 11471 Athens, Greece |
| HEADQUARTERS EUROPE: | Marantz Europe B.V. | Building SFF-2, P.O. Box 80002, 5600 JB Eindhoven, The Netherlands |
| HONG KONG | Marantz Asia Ltd. | Unit 1706, Metroplaza II, 223 Hing Fong Road, Kwai Fong, N.T., Kowloon, Hong Kong |
| HUNGARY | Infovox Ltd. Terez Krt.31, 1067 Budapest, Hungary | |
| ICELAND ID Electronics Ltd. Armula 38, 108 Reykjavik, Iceland | ||
| INDIA | NOVA Audio Private | 8,Punam Co-op.Society 29/30 Road#5, Union Park MUMBAI 400052, India |
| IRAN | Home Co. | 5th floor no 878 Philips Building Enghelab ave, P.O. 11365/7844 Tehran, Iran |
| IRELAND Marantz Ireland | Clonskeagh, Dublin 14, Ireland | |
| ISRAEL | Elmor Ltd. | 52 Heh Beiyar Street, Kikar Hamedina, Tel Aviv, Israel |
| ITALY | Marantz Italy | Via Casati 23, 20052 Monza (Milano), Italy, Servizio Consumatori 1678-20026, Numero Verde |
| IVORY COAST | Hifivoir | B.P. 2428, Abidjan 01, Ivory Coast |
| JAPAN | Marantz Japan Inc. | 35-1 Sagami Ohno 7-Chome, Sagamihara-shi, Kanagawa 228-8505, Japan |
| KOREA | Mk Enterprises Ltd. | 121-210, 2F Shinhan Bldg., 247-17 Seokyo-dong, Mapo-ku, Seoul, Korea |
| KUWAIT | alAlamiah Electronics Intl. | P.O. Box 8196, Salmiah 22052, Kuwait |
| LATVIA | Ace Ltd. | 61, LacPlesa Str., Riga LV 1011, Latvia |
| LEBANON | AZ Electronics S.A., 1, | P.O. Box 11 2833, Beirut, Lebanon |
| LITHUANIA | Accapella Ltd. | Ausros, Vartu G/5, Pasazo SKG., 2001 Vilnius, Lithuania |
| MALAYSIA | Wo Kee Hong Electronics Sdn. Bhd. | Suite 8.1, Level 8, Menara Genesis, No. 33, Jalan Sultan Ismail, 50250 Kuala Lumpur, Malaysia |
| MALTA | Doneo Co Ltd. | 78 The Strand, Sliema SLM07, Malta |
| MAURITIUS | SKR Electronics Ltd. | P.O. Box 685, Bell Village, Port Louis, Mauritius |
| MILITARY MARKET EUROPE | PASCO GmbH | PO BOX 1280, Sandhausen 69200, Germany |
| NETHERLANDS | Marantz Domestic Sales | A division of Marantz Europe B.V., Building SFF2, P.O. Box 80002, 5600 JB Eindhoven, The Netherlands |
| NEW ZEALAND | Wildash Audio Systems | 14 Malvern Road, Mt. Albert, Auckland, New Zealand |
| NORWAY Audio Nord | Sandkerveien 64, Oslo 0483, Norway | |
| OMAN | Mustafa & Jawad Trading CO. | P.O. Box 1918, Ruwi, Oman |
| POLAND | Philips Polska Sp. z.o.o. | Al.Jerozolimskie 195b, 02 222 Warszawa, Poland |
| PORTUGAL | Corel2 | Comércio de Electrónica Lda., Av. Luis Bivar, No 85 A, 1050 Lisboa, Portugal |
| PROFESSIONAL EUROPE | Marantz Professional Products | Kingsbridge House, Padbury Oaks, 575-583 Bath Road, Longford, Middlesex UB7 0EH, U.K. |
| PROFESSIONAL U.S.A. | Marantz Professional Products | Distributed by: Superscope Technologies Inc., 1000 Corporate Blvd. Ste.D, Aurora, Illinois |
| QATAR | Almana & Partners W.W.L. | P.O. Box 49, Doha, Qatar |
| REUNION | Vision + | 180 Rue du Marechal Leclerc, 97400 Saint Denis, Ile de la Reunion |
| ROMANIA | Nova Music Entertainment | 5, Zagazului Str. Bl.1G,apt.18, sector 1,Bucharest, Romania |
| RUSSIA | Absolute Audio | 7/2, Montazhnaya Street, 107497 Moscow, Russia |
| SAUDI ARABIA | Adawlia Univ. Electr. Apl | P.O. Box 2154, Alkhobar 31952, Saudi Arabia |
| SINGAPORE | Wo Kee Hong Distribution PTE Ltd. | 130 Joo Seng Road, #03-02 Olivine Building, Singapore 368357 |
| SLOVAKIA | Bis Audio s.r.o. | Nam. SNP 10, 96001 Zvolem, Slovakia |
| SLOVENIA | Bofex | Smartinska 152, HALA V/3, 61000 Ljubljana, Slovenia |
| SOUTH AFRICA | Coherent Imports (PTY) Ltd. | P.O. Box 1614, Alberton, 1450, South Africa |
| SPAIN | Marantz Spain | Martinez Villergas 2, Apartado 2065, Madrid 28027, Spain |
| SRI LANKA | The listening Room | Mezzanine Floor, The Landmark 385, Galle Road, Colombo - 3, Sri Lanka |
| SWEDEN | Audio Nord | Almedalsvagen 4, Gotenborg 402-23, Sweden |
| SWITZERLAND | Sound Company AG | Postfach, 8010 Zürich, Switzerland |
| SYRIA | Hamzeh & Partners | Hafez Ibrahim Str. No 117, Damascus Shalan, Syria |
| TAHITI | Covecolor | Av. Prince Hinoi, Cours de l'union sacré, P.O. Box 2334, Papeete, Tahiti |
| TAIWAN | Pai-Yuing Co. Ltd. | 6th No 148 Sung Kiang Road, Taipei 10429, Taiwan R.O.C. |
| THAILAND | MRZ Standard Co. Ltd. | 746-750 Mahachai Road, Wangburapa, Bangkok 10200, Thailand |
| TUNESIA | Societe EDEVIG | 40, Avenue du Golfe Arabe, El Menzah, 1004, Tunisia |
| TURKEY | Türk Philips Ticaret A.S. | Yukari Dudullu Organize sanayi Bolgesi, 2.Cadde no.28, 81260 Umraniye-Istanbul, Turkey |
| U.K. | Marantz Hifi UK Ltd. | Kingsbridge House, Padbury Oaks, 575-583 Bath Road, Longford, Middlesex UB7 0EH, U.K. |
| U.S.A. | Marantz America Inc. | 1100 Maplewood Drive Itasca, IL 60143, U.S.A. |
| YUGOSLAVIA | ITM Company | Omladinskih Brigada 86, 11070 Belgrade, Yugoslavia |
| EXPORT | Marantz Domestic Sales | A division of Marantz Europe BV,Building SFF2, P.O. Box 80002, 5600 JB Eindhoven, The Netherlands |
www.marantz.com

- RETAIN YOUR PURCHASE RECEIPT
- IMPORTANT
- FOR U.K. ONLY
- FRANÇAIS
- GARANTIE
- THX
- FOREWORD
- WARNINGS
- CE marking
- EQUIPMENT MAINS WORKING SETTING
- IMPORTANT: (FOR UK version only)
- HOW TO CONNECT A PLUG
- PRECAUTIONS
- GENERAL PRECAUTIONS
- AVANT-PROPOS
- CONGRATULATIONS ON YOUR PURCHASE OF THIS FINE MARANTZ PRODUCT.
- Table of contents
- Before You Start
- Connecting Up
- Controls and Displays
- Getting Started
- More Playback Functions
- OSD Settings
- Video Settings
- Audio Settings
- Language Settings
- Miscellaneous Settings
- Additional Information
- FELICITATIONS POUR L'ACHAT DE CET EXCELLENT PRODUIT MARANTZ.
- Table des matières
- Superlative audio performance from built in DVD-Audio, Dolby Digital\*, DTS\*\* and MPEG decoders
- line progressive-scan component video output (NTSC output only)
- Digital Noise Reduction PRO (Video Quality Enhancer)
- New graphical Setup Navigator
- Caractéristiques
- Checking what's in the box
- Using this manual
- Putting the batteries in the remote
- Caution!
- Using the remote control
- Hints on installation
- Do...
- Don't...
- Avoiding problems with condensation
- Moving the player
- When moving the unit
- Power cord caution
- A proscrire...
- Discs compatible with this player
- DVD Video regions
- \* Playing recordable CDs
- Conncting Up/Raccordement
- Easy Setup
- Connecting audio and video cables
- System Control Connections
- REMOTE CONTROL IN/OUT jacks
- Synchronized power on and off
- Note
- Remote switch
- Prises REMOTE CONTROL IN/OUT
- Home theater video connections
- 1
- 2
- 3
- Connecting SCART and S-Video cables
- S-Video or composite video?
- Home theater audio connections
- Connecting optical cables
- Connecting coaxial cables
- Connecting analog audio cables
- Using the Setup Navigator
- Press the POWER button on the front panel to switch on.
- Press SETUP.
- Introduction
- Choose an OSD menu language.
- Select the type of TV you have.
- Select the type of analog audio connections you made to your amplifier/receiver.
- Confirm whether your amplifier is compatible with 96kHz audio.
- Confirm all the settings.
- Press SETUP to exit.
- Selecting the FL menu
- To exit the FL menu
- TV SYSTEM
- About MOD. (Modulation) PAL
- Réglage de TV SYSTEM
- COMP VIDEO setting
- Réglage de COMP VIDEO
- REMOT CODE setting
- Réglage de AUTO P OFF
- Switch on.
- Load a DVD disc.
- Basic playback controls\*
- Button What it does
- Control What it does
- Eject and remove the disc from the player before switching off.
- Load a CD.
- Basic playback controls:
- Lecture de CD
- Playing Video CDs
- Load a Video CD.
- Basic playback controls
- Lecture de CD vidéo
- Commandes de base de menu de PBC
- Accessing discs
- Press SEARCH to choose between:
- Enter the title/group/chapter/ track number or time (minutes & seconds)/frame.
- Press ▶ to start/restart play-back.
- Viewing a still frame Press PAUSE II.
- To return to normal playback
- Viewing slow playback
- Press REV ◀◀ for longer than one second during Pause.
- Frame by frame advance playback: Viewing one frame at a time
- Press PAUSE II.
- Notes
- Switching camera angles (DVD only)
- Switching subtitles (DVD only)
- Switching audio channel (DVD-Audio)
- Switching audio channel (Video CD/CD)
- Programming a program list
- To program a DVD program list:
- Press PROGRAM.
- Move the joystick left or right to select Program Chapter or Program Title.
- Move down to the tracklist window and start entering chapter/title numbers.
- DVD
- CD/Video CD
- To stop random play
- To show/switch the information displayed, press DISPLAY.
- OSD Settings / Réglages de menu
- Using the Setup menu
- Setup Menu Mode
- - Default setting: Expert
- OSD language
- - Default setting: English
- Video Out
- - Default setting: AV(Video)
- S-Video Out (Expert menu)
- Angle Indicator (Expert menu)
- - Default setting: On
- Frame Search (Expert menu)
- - Default setting: Off
- Adjusting the video quality
- To create your own setting (1):
- Compatibility of this unit with progressive-scan TVs.
- To memorize these settings:
- DTS Out
- Sortie Dolby Digital
- MPEG Out
- - Default setting: MPEG ▶ PCM
- Sortie PCM linéaire
- Audio DRC
- Sortie audio
- Audio Settings / Paramètres audio
- Réglage du gain (menu Expert)
- CD Digital Direct (Expert menu)
- DVD Language (Expert menu)
- - Default Setting: w/Subtitle Language
- Subtitle Display (Expert menu)
- - Default Setting: Selected Subtitle
- Blocage parental
- To change the parental lock level:
- Select a new level.
- To set a new password:
- Background Color (Expert menu)
- - Default setting: Black
- Bonus Group
- Auto Disc Menu
- To use the shortcut menu:
- The disc is ejected automatically after loading.
- Playback is not possible.
- DVD-Audio playback stops.
- mark appears on screen.
- When making changes in the Setup OSD menus, BSD displayed.
- Dépannage
- Picture playback stops and the operation buttons cannot be used.
- New settings made in the Setup screen menus while a disc is playing are ineffective.
- Settings are canceled.
- No picture/No colour.
- Screen is stretched or aspect does not change.
- Screen is suddenly stretched when the Setup screen is opened.
- Picture disturbance during playback or dark.
- When recorded on a VCR or passed through an AV selector, there is disturbance in the playback picture.
- The remote control doesn't seem to work.
- Cannot listen to high-sampling rate audio through the digital output.
- No audio, or audio is distorted.
- The analog audio is OK, but there appears to be no digital audio signal.
- Noticeable difference in DVD and CD volume.
- Audio mix does not sound right or sounds incomplete (for example, inaudible dialog).
- Settings made in the Setup menu are not retained when the unit is switched off.
- Resetting the player
- Screen sizes and disc formats
- When viewing a wide screen TV or monitor
- When viewing a standard size TV or monitor
- S-Video output
- Video output (2 individual outputs)
- 21-pin connector assignment
- PIN no.
- Component video output
- Audio output (2 pairs)
- Output level
- Audio output (multi-channel / C, SW, LS, RS)
- Digital audio characteristics
- Digital output
- Accessories
- Spécifications
Brand : MARANTZ
Model : DV-12S1
Category : Blu-ray player