AA12V1 - Vacuum Cleaner Armor All - Free user manual and instructions
Find the device manual for free AA12V1 Armor All in PDF.


User questions about AA12V1 Armor All
0 question about this device. Answer the ones you know or ask your own.
Ask a new question about this device
Download the instructions for your Vacuum Cleaner in PDF format for free! Find your manual AA12V1 - Armor All and take your electronic device back in hand. On this page are published all the documents necessary for the use of your device. AA12V1 by Armor All.
USER MANUAL AA12V1 Armor All
natural_image
Black and white photo of an Armorall handheld device with a coiled cord and power plug (no visible text or symbols on the device body)FOR YOUR SAFETY Read and understand this manual before use. Keep this manual for future reference.
ARMOR ALL and the ARMOR ALL logo are registered trademarks of The Armor All/STP Products Company and are used under license by Cleva North America Inc. All Rights Reserved.
Safety Instructions and Warnings....2
Getting To Know Your Vacuum....4
Vacuum Operation....4
Cleaning And Maintenance....6
Troubleshooting....7
Thank you for purchasing this Armor All™ 12 volt wet/dry vacuum cleaner. Feel confident that with our wet/dry vac you are obtaining a high quality product engineered for optimal performance. This vacuum is capable of picking up liquids and dry materials.
FOR YOUR SAFETY CAREFULLY READ AND UNDERSTAND ALL INSTRUCTIONS
WARRANTY
We take pride in producing a high quality, durable product. This Armor All™ 12V hand vac carries a limited one (1) year warranty against defects in workmanship and materials from date of purchase under normal household use. Warranty does not apply to defects due to direct or indirect abuse, negligence, misuse, accidents, repairs or alterations and lack of maintenance. Please keep your receipt as proof of purchase. This warranty gives you specific legal rights, and you may have other rights, which vary from state to state. For product service call Cleva Customer Service at (866) 384-8432.
SAFETY INSTRUCTIONS & WARNINGS
FOR YOUR SAFETY CAREFULLY READ AND UNDERSTAND ALL INSTRUCTIONS
When using an electrical appliance, basic precautions should always be followed including the following:
IMPORTANT SAFETY INSTRUCTIONS
Read and understand all instructions before using this vacuum.
Read and understand this owner's manual and all labels on the Wet/Dry Vacuum cleaner before operating. Safety is a combination of common sense, staying alert and knowing how your vacuum works. Use this Wet/Dry Vac only as described in this manual.
This appliance is intended for household use only and not for commercial or industrial.
SAVE THIS MANUAL FOR FUTURE REFERENCE.
WARNING: TO REDUCE THE RISK OF FIRE, ELECTRIC SHOCK OR INJURY:
- Do not run vac unattended.
- Do not vacuum, or use this Wet/Dry Vac near flammable liquids, gases, or explosive vapors like gasoline or other fuels, lighter fluids, cleaners, oil-based paints, natural gas, hydrogen, or explosive dusts like coal dust, magnesium dust, grain dust, or gun power. Sparks inside the motor can ignite flammable vapors or dust.
- The intended use is described in this manual. The use of any accessory or attachment or the performance of any operation with this appliance other than those recommended in this instruction manual may present a risk of personal injury.
- Do not allow to be used as a toy. Close attention is necessary when used by or near children.
- Keep children and animals at a safe distance when using this appliance.
- Do not unplug by pulling on the cord. To unplug, grasp the plug, not the cord.
- Keep the cord away from heat, oil and sharp edges.
- Be careful not to pinch the cord in the vehicles' doors, windows or levers.
- Do not use with damaged cord, plug or other parts.
- If appliance is not working as it should, has been dropped, damaged, left outdoors, or dropped into water, return it to a service center.
- Do not put any object into ventilation openings. Do not vacuum with any ventilation openings blocked.
Keep free of dust, lint, hair or anything that may reduce airflow. - Do not insert accessories when unit is running.
- Do not use this vacuum with a torn filter or without the filter installed. Replace a damaged filter promptly.
- Do not vacuum anything that is burning or smoking, such as cigarettes, matches, or hot ashes.
- Keep cord away from heated surfaces.
- Do not use or store near hazardous materials.
- Do not leave Wet/Dry Vac unattended when plugged in. Unplug from outlet when not in use and before servicing.
- Do not expose to rain. Store in a dry place when not in use.
- Before use, check the appliance for damaged or defective parts. Check for breakage of parts, damage to switches and any other conditions that may affect its operation.
- Have any damaged or defective parts repaired or replaced by an authorized repair agent.
- Regularly check the power cord for damage. Replace the cord if it is damaged or defective.
- Never attempt to remove or replace any parts other than those specified in this manual.
- The appliance is designed for use with 12V negative ground vehicle battery systems.
- Turn off the vacuum before unplugging.
- DO NOT handle plug or the vacuum with wet hands.
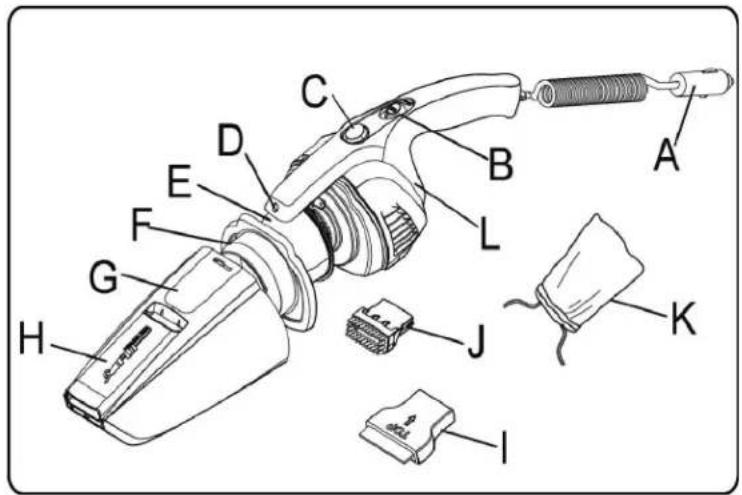
GETTING TO KNOW YOUR VACUUM
A. 12V power plug
B. On/Off slide switch
C. Container release button
D. LED light
E. Filter
F. Filter holder
G. Container
H. Retractable crevice tool
I. Rubber squeegee
J. Detail brush
K. Store bag
L. Detail brush storage
text_image
Labeled diagram of a handheld device with parts numbered A through K, showing internal components and wiring.TECHNICAL SPECIFICATIONS:
Voltage: 12V DC
VACUUM OPERATION
text_image
1 ON OFF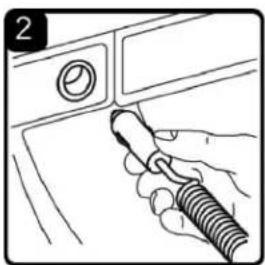
natural_image
Line drawing of a hand holding a tool near a control panel (no text or symbols)WARNING: Do not run the vehicle's engine while cleaning. This can shorten the life of the vacuum.
CONNECTING TO THE VEHICLE'S POWER SUPPLY
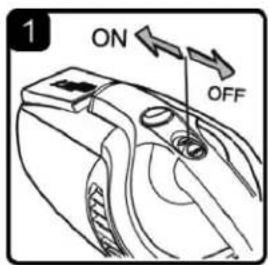
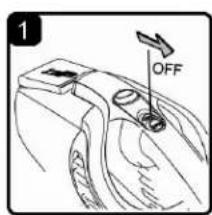
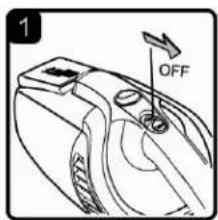
- Make sure that the vacuum is switched to the OFF position. (fig. 1)
- Remove the cigarette lighter from the socket.
- Insert the 12V power plug (A) into the 12V power socket. (fig. 2)
OPERATING THE APPLIANCE
- To power on the vacuum, slide the ON/OFF switch (B) forward to the ON position. (fig. 1)
- To power off the vacuum, slide the ON/OFF switch (B) back to the OFF position. (fig. 1)
NOTICE! The LED light (D) in the upper portion of the vacuum will be illuminated when the appliance is turned on. The light is useful to see in poorly illuminated areas.
NOTE: The vac can be used for periods of up to 30 minutes without noticeably affecting the power of a normally charged car battery in good condition.
WARNING: Extended use of the vacuum will drain the car battery power.
text_image
1 OFF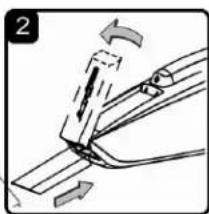
natural_image
Diagram of a mechanical joint or bracket with directional arrows indicating movement (no text or symbols present)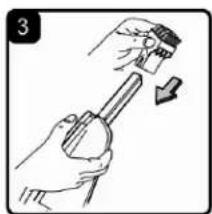
natural_image
Illustration of hands using a tool to adjust or install a component, with an arrow indicating motion (no text or symbols present)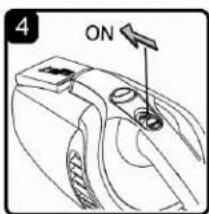
text_image
4 ON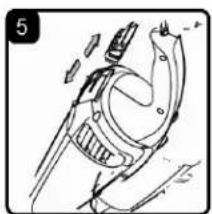
natural_image
Technical line drawing of a mechanical component with no visible text or symbols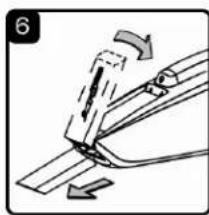
natural_image
Diagram of a mechanical assembly with arrows indicating motion direction (no text or symbols)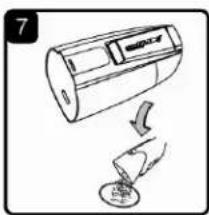
natural_image
Simple line drawing of a device emitting a plug into a container (no text or symbols)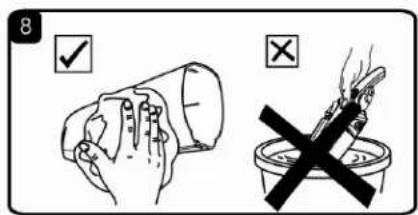
text_image
8 ✓ ×OPERATING INSTRUCTIONS - DRY VACUUMING
The vacuum can be used as assembled or with the crevice tool. For your convenience, the crevice tool is permanently built-in onto the top portion of the container.
- Verify that the switch is in the OFF position before plugging in. (fig. 1)
- Flip the crevice tool over to the fully extended position and push it into the container nozzle until secured in place. (fig. 2)
- Insert the detail brush into the front of the crevice tool. (fig. 3)
- Turn the motor on by sliding the switch to the ON position. (fig. 4)
- After use, turn the vacuum OFF by sliding the switch to the OFF position. (fig. 4)
- Remove detail brush from the crevice tool and store it. (fig. 5)
- Pull the crevice tool out of the container nozzle and flip it forward towards the front of the unit and lock into place. (fig. 6)
- Empty the container, clean and dry the inside and outside before storage. (fig. 7 & 8)
text_image
1 OFF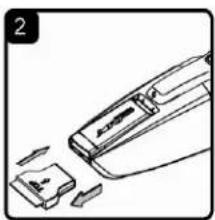
natural_image
Line drawing of a handheld device with a small component and two separate parts (no text or symbols)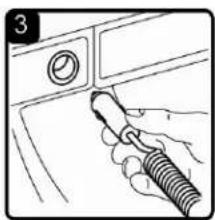
natural_image
Line drawing of a hand holding a tool near a control panel (no text or symbols)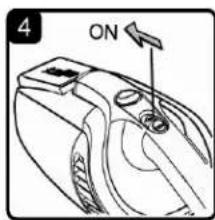
text_image
4 ON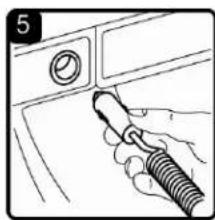
natural_image
Line drawing of a hand holding a tool near a control panel (no text or symbols)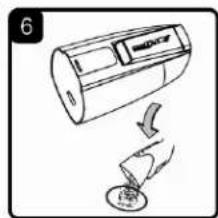
natural_image
Simple line drawing of a device emitting smoke or vapor (no text or symbols)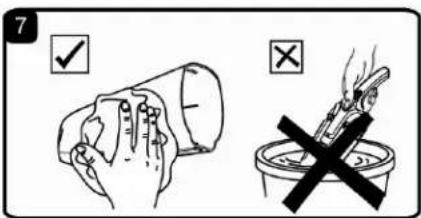
text_image
7 ✓ ×OPERATING INSTRUCTIONS – WET VACUUMING
The vacuum can be used for wet pick up with or with out the use of the squeegee nozzle (J). For use with the squeegee nozzle:
- Verify that the switch is in the OFF position before plugging in. (fig. 1)
- Fit the squeegee nozzle into the nozzle opening on the container. (fig. 2)
- Insert the plug into the 12V power socket. (fig. 3)
- Turn the motor on by sliding the switch to the ON position and vacuum. (fig. 4)
- When finished vacuuming, slide the power switch to the OFF position and disconnect the plug from the 12V power socket. (fig. 5)
- After use, empty the container, clean and dry the inside and outside before storage. (fig. 6 & 7)
text_image
8 MAXIMPORTANT:
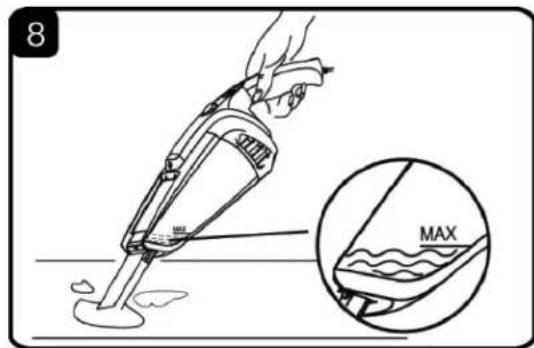
- The appliance is designed for vacuuming only small amounts of liquid.
- STOP vacuuming if the liquid in the container reach the "max" indicator lin on the container. (fig. 8)
- Empty it immediately before next use or storage.
CLEANING AND MAINTENANCE
natural_image
Illustration of a hand holding a tool near a door handle (no text or symbols visible)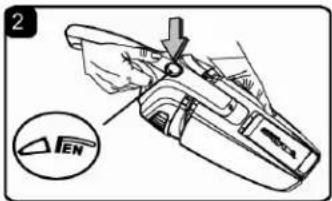
text_image
2 EN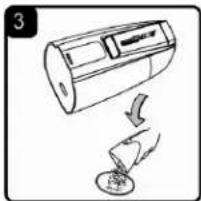
natural_image
Simple line drawing of a cylindrical device emitting smoke or vapor, with a drop falling into a container (no text or symbols)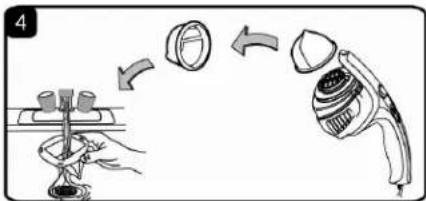
text_image
Diagram illustrating a mechanical device's assembly process, showing hand positioning and component rotation.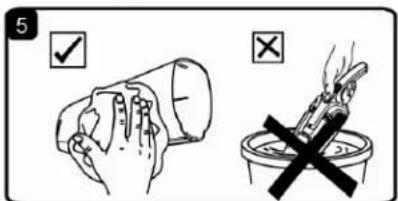
text_image
5 ✓ ×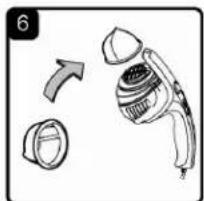
natural_image
Diagram of a hairdryer with a circular component and an arrow indicating rotation (no text or symbols)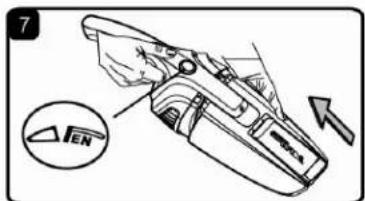
text_image
7 ENCLEANING AND MAINTENANCE
WARNING: ALWAYS DISCONNECT THE PLUG FROM THE SOCKET BEFORE REMOVING THE CONTAINER FROM THE APPLIANCE.
Regularly clean the filter. The filter is re-usable and should be cleaned regularly.
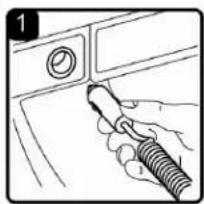
- Verify that the plug is disconnected from the power outlet. (fig. 1)
- Press the release button (C) and remove the container (G). (fig. 2)
- Empty all debris and any dust from the container. (fig. 3)
- Remove the filter (E) and clean any loose dust off the filter.
- Wash the filter in warm, soapy water. (fig. 4)
- Make sure the dust bowl and filter are clean and dry before using it again. DO NOT immerse the appliance in water. (fig. 5)
- Refit the filter (E) onto the appliance. (fig. 6)
- Refit the container onto the appliance. Make sure the container clicks into place. (fig. 7)
NOTE: Make sure the vacuum is completely dry before using it again.
IMPORTANT: To assure product SAFETY and RELIABILITY, repairs, maintenance and adjustments (other than those listed in this manual) should be performed by an authorized service centers or other qualified service organizations, always using identical replacement parts.
MAINTENANCE
Use only mild soap and damp cloth to clean the vac. Never let any liquid get inside the vacuum motor area; never immerse any part of the vacuum into liquids.
IMPORTANT! Clean or change the dust filter regularly for best performance. If the machine is used with out the dust filter, the motor will burn out and the warranty will be voided.
IMPORTANT! Optimum dust collection will only be achieved with clean filters and an empty container. If dust begins to fall out of the appliance after switching it off, this indicates that the dust bowl is full and must be emptied.
WARNING: Never use the appliance without the filters installed.
TROUBLESHOOTING
WARNING: TO REDUCE THE RISK OF ELECTRIC SHOCK-UNPLUG BEFORE TROUBLESHOOTING
| Symptom | Possible Causes Corrective Action | |
| Vacuum will not operate 1) No power supply. | 1) Check power supply –vehicle battery, 12V power socket, cord, breakers, and fuses. | |
| 2) Faulty power cord. 2) Unplug and check the power | cord. If damaged, have it repaired by a professional. | |
| 3) Container full. 3) Empty container. | ||
| Dust comes from motor cover. 1) The reusable cloth filter is missing or damaged. | 1) Attach or replace the reusable cloth filter. | |
| Reduced efficiency and motor/speed vibration. | 1) There is a blockage in the nozzle, or the vacuum inlets, or the dust filter is blocked by fine dust. | 1) Check nozzle, and inlets for blockage. Take off the filter and clean it, or install new filter. |
Table de matières
SECTION
Garantie....8
text_image
Labeled diagram of a handheld device with parts marked A through K, showing internal components and exploded view.natural_image
Hand holding a tool inside a washing machine (no text or symbols visible)natural_image
Diagram of a mechanical component with arrows indicating motion direction (no text or symbols)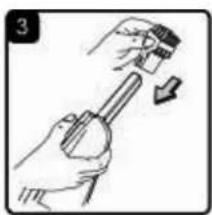
natural_image
Illustration of a hand holding a tool with a downward arrow indicating motion (no text or symbols)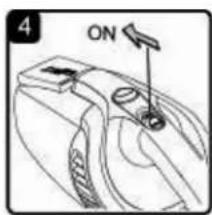
text_image
4 ON
natural_image
Illustration of a robotic arm with motion lines and joints (no text or symbols)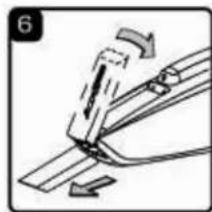
natural_image
Mechanical diagram showing a tool interacting with a bracket and rod (no text or symbols)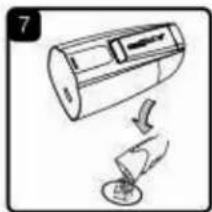
natural_image
Simple line drawing of a cylindrical device with a lightning bolt and a base, no text or symbols present.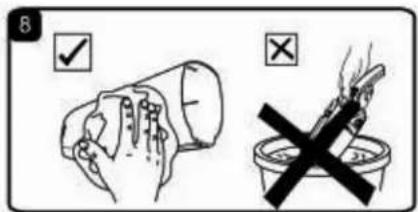
text_image
B ✓ ×INSTRUCTIONS D'UTILISATION – ASPIRATION DE DÉTRITUS SECS
natural_image
Line drawing of a handheld device with a small component and two separate parts (no text or symbols)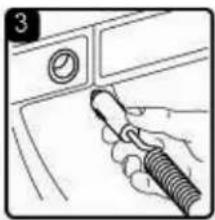
natural_image
Hand holding a tool interacting with a control panel (no text or symbols visible)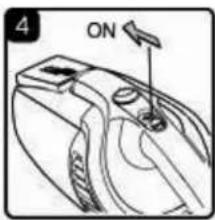
text_image
4 ON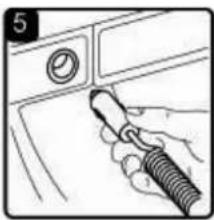
natural_image
Hand holding a tool interacting with a control panel (no text or symbols visible)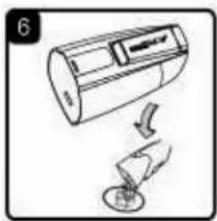
natural_image
Illustration of a cylindrical device with a plug and a base, showing a drop or compression process (no text or symbols)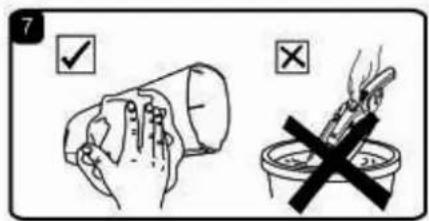
text_image
7 ✓ ×INSTRUCTIONS D'UTILISATION – ASPIRATION DE LIQUIDES
natural_image
Hand holding a tool interacting with a door panel (no text or symbols visible)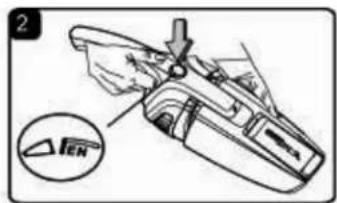
text_image
2 EN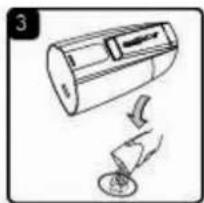
natural_image
Diagram of a cylindrical device with a lightning bolt striking a circular component (no text or symbols)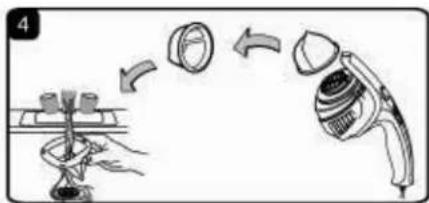
text_image
Diagram illustrating a mechanical assembly process with labeled parts and directional arrows indicating motion or transformation.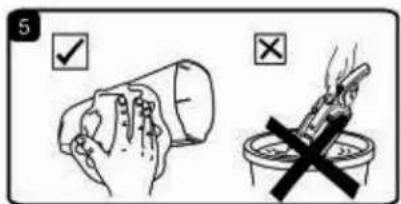
text_image
5 ✓ ×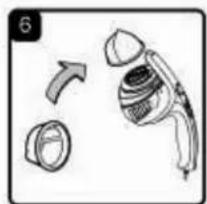
natural_image
Diagram showing a device with a cylindrical component and an arrow indicating rotation (no text or symbols)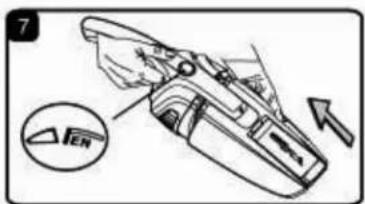
text_image
7 ENNETTOYAGE ET ENTRETIEN
AVERTISSEMENT : TOUJOURS DÉBRANCHER LA FICHE DE LA PRISE AVANT DE RETIRER LE RÉSERVOIR DE L'APPAREIL.
text_image
Labeled diagram of a handheld device with parts marked A through K, showing internal components and assembly.ESPECIFICACIONES TÉCNICAS:
Voltaje: 12 V CC
natural_image
Hand holding a tool interacting with a door panel (no text or symbols visible)natural_image
Diagram of a mechanical component with directional arrows indicating motion (no text or symbols)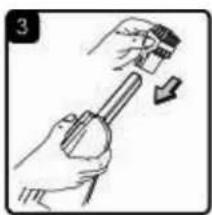
natural_image
Illustration of a hand holding a tool with a downward arrow indicating motion (no text or symbols)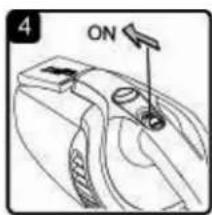
text_image
4 ON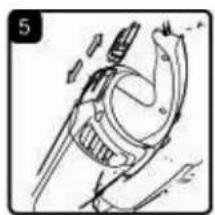
natural_image
Illustration of a robotic arm with motion lines and joints (no text or symbols)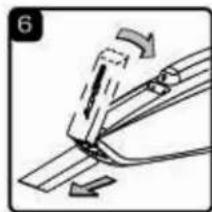
natural_image
Mechanical diagram showing a tool interacting with a bracket and rod (no text or symbols)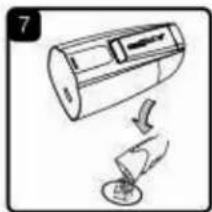
natural_image
Simple line drawing of a cylindrical device with a lightning bolt and a base, no text or symbols present.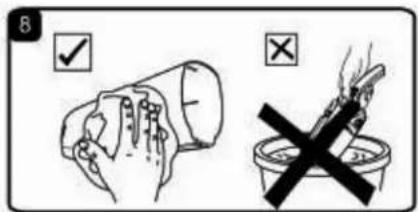
text_image
B ✓ ×natural_image
Line drawing of a device with a plug and connector, showing internal components (no text or symbols)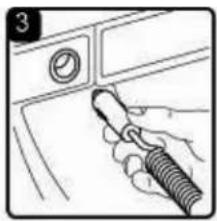
natural_image
Hand holding a tool interacting with a washing machine (no text or symbols visible)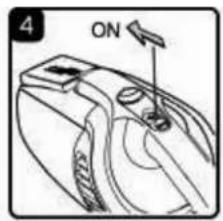
text_image
4 ON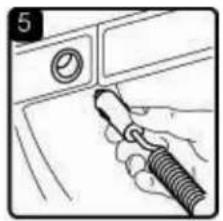
natural_image
Illustration of a hand holding a tool near a control panel (no text or symbols visible)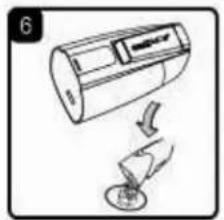
natural_image
Diagram of a battery with an arrow indicating discharging or discharging process (no text or symbols)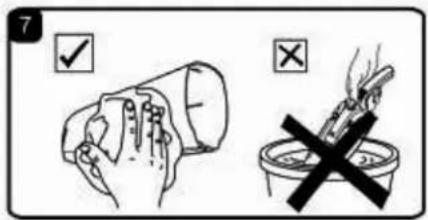
text_image
7 ✓ ×natural_image
Illustration of a hand holding a tool near a control panel (no text or symbols visible)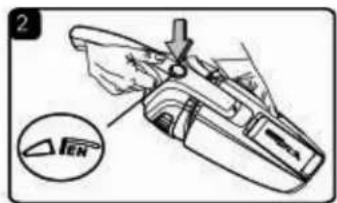
text_image
2 EN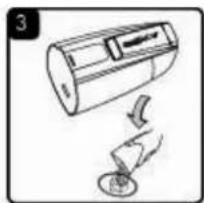
natural_image
Diagram showing a cylindrical device with a downward arrow and a small circular component, no text or symbols present.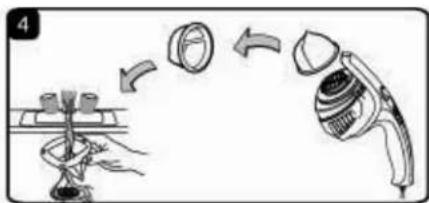
text_image
Diagram illustrating a mechanical assembly process with labeled parts and directional arrows indicating motion.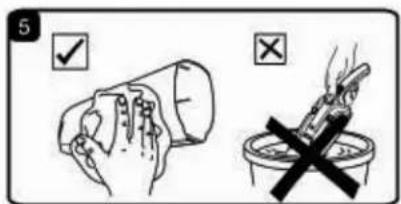
text_image
5 ✓ ×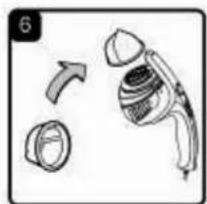
natural_image
Diagram showing a mechanical component with a rotating arrow and a separate view of a cylindrical component (no text or symbols)