MP1898 - Media player RIPTUNES - Free user manual and instructions
Find the device manual for free MP1898 RIPTUNES in PDF.

| Product Type | Portable Media Player |
| Brand | RIPTUNES |
| Model | MP1898 |
| Screen | Color 1.8-inch (128x610 pixels) |
| Internal Storage Capacity | 8 GB |
| Memory Expansion | MicroSD Card (not included) |
| Supported Audio Formats | MP3, WMA, WAV |
| Supported Video Formats | AMV |
| FM Radio | Yes, 87.5 - 108 MHz (normal band), 76 - 90 MHz (Japanese band) |
| Voice Recorder | Yes, with built-in microphone |
| Additional Functions | TXT text reader, photo album, lyrics display, equalizer, repeat modes |
| Connectivity | USB 2.0 |
| Battery | Rechargeable lithium-ion 3.7 V / 180 mAh |
| Operating Temperature | -5°C to 40°C |
| Included Accessories | User manual, earphones, USB cable |
| Maintenance | Clean with a soft, dry cloth. Do not use chemicals. |
| Safety | Do not disassemble the device. Avoid shocks and moisture. |
Frequently Asked Questions - MP1898 RIPTUNES
User questions about MP1898 RIPTUNES
0 question about this device. Answer the ones you know or ask your own.
Ask a new question about this device
Download the instructions for your Media player in PDF format for free! Find your manual MP1898 - RIPTUNES and take your electronic device back in hand. On this page are published all the documents necessary for the use of your device. MP1898 by RIPTUNES.
USER MANUAL MP1898 RIPTUNES
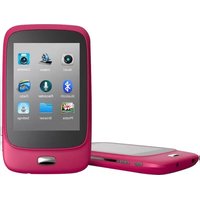
natural_image
Black and blue vertical object with a small circular mark on the left side (no text or symbols visible)
Digital Music Player (MP3/MP4)
User Manuel Manuel d'usuario Mode d'emploi
Model: MP1898
INTRODUCTION
Thank you for purchasing this quality RipTunes digital music player. Please read all the operating instructions before operating the unit and keep this manual in a safe place for later consultation.
UNIT SPECIFICATIONS
• 1.8" 128x160 color screen
- 8GB internal storage capacity
- MicroSD card expansion slot
- MP3/WMA/WAV audio format support
• AMV video format support
- ID3 tag support
- Lyric file support
- FM radio built-in
• EQ modes and repeat functions
- Integrated microphone for audio recordings
- TXT file reader
• Digital photo album
- Multi-lingual menus
UNIT OVERVIEW
- Power switch
- M: select button; press and hold to return to main menu
- ◀: select the previous menu or option; press & hold to rewind
- ▶: select the next menu or option; press & hold to fast forward
- ▶■: press to play or press to pause; press & hold to place unit in standby mode
- Vol +/-: Press to increase (+) or decrease (−) play-back volume
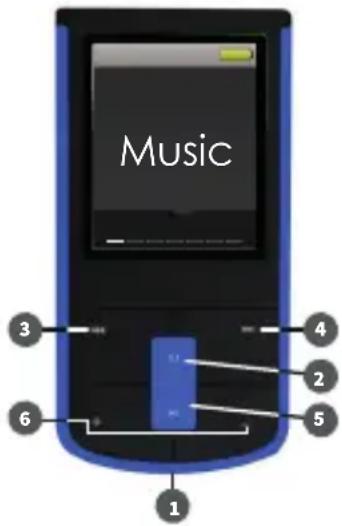
Note: press and hold implies keeping the button depressed for more than 1.2 seconds.
BASIC OPERATION
Power on/off
- Slide the power on/off button or press and hold the ▶■ button to turn the player on or off.
Note: The player standby time setting will automatically turn off your player after a certain lapse of inactivity. You can modify this setting. While the music player is connected to a computer, the standby function is temporarily disabled.
Low battery
- The player display will show a low battery alert.
- Plug in your player to recharge as soon as possible.
Note: If your digital music player has insufficient power it will automatically turn off to prevent damage to the electronics.
Expansion card
- Gently insert a MicroSD card by lightly pressing on the rear edge of the card.
- To remove the MicroSD card, lightly press on the card and the card will come out partially. Gently pinch the card and pull away from the player to remove it completely.
PLAYER FUNCTIONS
Main menu
- Press and hold the M button to access the main menu.
-
Use the ◀◀ & ▶▶ buttons to select between the following functions:
-
Music
- Videos
-
Recordings
-
Voice recorder
- FM radio
-
Photos
-
Settings
- Reader
MUSIC MODE
- Select MUSIC in the main menu.
- Use the ◀ and ▶ buttons to browse through song files.
- Use the M button to select a folder.
- Press the ▶■ button to begin or pause music playback with the selected song.
Playback settings
During music playback, press the M button to adjust the following playback settings:
- Repeat modes: Choose normal playback, repeating a single track, folder playback, repeat all songs in a folder, repeat all songs, shuffle, and intro (plays the first several seconds of every song). The chosen mode will be indicated on the top of the screen in a red icon during play.
- Equalizer: Choose between Natural, Rock, Pop, Classic, Soft, Jazz, & DBB (Dynamic Bass Boost) equalizer settings. You can hear the changes to the music as you scroll through the selections.
- Variable play speed: "0" is normal. You can slow the song down (up to "-8") or speed it up (up to "+8")
- Replay mode: This feature allows you to play just part of a song (from "point A" to "point B") in a loop. Begin by selecting the replay options, before you select the part of the song you want to replay. Select "Replay Times" to choose how many times you want that section of the song repeated (from 1 to 10). Select "Replay gap" to choose how many seconds to pause between each replay (from 1 to 10). Select "Replay." The letter "A" will begin flashing in the upper-left-hand corner of the screen. When you reach the point in the song that you want to begin from, press the ▶ button. The letter "B" will begin flashing in the upper-left-hand corner of
the screen. When you reach the point in the song that you want to end with, press the ▶ button.
- Exit: Exit the playback setting sub-menus
Lyric files
Your music player can display lyrics during MP3 playback. Ensure that the LRC lyric file and the MP3 file have the exact same name and are in the same folder. Example: "My Moon My Man.mp3" and "My Moon My Man.Irc".
To display the lyrics during playback, press and hold the M button.
Managing music files
While music playback is stopped, press the M button to manage your music files.
- Local folder: Displays the current music playback folder name & location. Use the ◀, ▶, and M buttons to navigate through the directory structure on the unit. This works in a similar manner
- Delete file/delete all: Delete one or all songs from the music directory
- Repeat modes: Choose normal playback, repeating a single track, folder playback, repeat all songs in a folder, repeat all songs, shuffle, and intro (plays the first several seconds of every song).
- Exit: Exit the file management sub-menu
VIDEO MODE
- Select VIDEOS in the main menu.
- Use the ◀ and ▶ buttons to browse through .AMV video files.
- Use the M button to change folders.
- Press the ▶■ button to begin or pause video playback with the selected video.
Managing video files
While video playback is stopped, press the M button to manage your videos.
- Local folder: Displays the current video playback folder name & location.
- Delete file: Delete one video from the video directory
- Delete all: Delete all videos
- Repeat modes: Choose normal playback, repeating a single video, folder playback, repeat all videos in a folder, repeat all videos, shuffle, and intro (plays the first several seconds of every video). The chosen mode will be indicated on the top of the screen in a red icon during play.
- Exit: Exit the file management sub-menu
VOICE RECORDER
- Select recorder in the main menu.
- Press ▶■■ to begin recording.
- To stop recording & save the recording file, press & hold the M button.
Recording options
Before recording, press the M button to enter the voice recorder configuration sub-menu.
- Local folder: Choose the folder where your recording will be stored.
- REC type: Choose the quality of the recording; higher bitrate numbers are better for music recordings while lower numbers are acceptable for voice recordings.
- Exit: Exit the voice recorder configuration sub-menu.
RECORDINGS
- Select recordings in the main menu to listen to your saved voice recordings.
- Use the ◀◀ & ▶▶ buttons to browse through the saved voice recordings.
- Press the ▶■ button to begin or pause audio playback of the selected recording.
Managing recording files
While recording playback is stopped, press the M button to manage your recordings.
- Local folder: Displays the current recording playback folder name and location.
- Delete file: Delete one recording from the directory of files
- Delete all: Delete all voice recordings
- Exit: Exit the file management sub-menu
FM RADIO
- Start the FM tuner by selecting FM RADIO in the main menu.
- Tune between stations either manually or automatically:
- Manual tuning: use the ◀ or ▶ button to scan frequencies one by one.
- Automatic tuning: press and hold the ◀ or ▶ button; the tuner will automatically scan frequencies, decreasing or increasing based on the button used. Once a station is detected, the tuner stops scanning.
Radio settings
Press the M button while in the FM Radio mode to access the following settings:
- Save: Save the current frequency for quick access
- Record: Record the current radio broadcast; press the red dot to start and stop recording. To stop recording and save the recording file, press and hold the M button.
- Delete: Delete the current frequency preset
- Delete all: Delete all saved frequencies
• Auto search: Scans all frequencies to detect broadcasts
• Normal band: Scans FM frequencies from 87.5 to 108.0 MHz - Japan band: Scans FM frequencies from 76.0 to 90.0 MHz
- Exit: Exit the FM radio settings sub-menu
PHOTOS
- Select PHOTOS in the main menu.
- Use the ◀ and ▶ buttons to browse through your photos.
- Use the M button to select a file or folder.
- Press the ▶■ button to begin or pause slideshow playback starting with the selected photo.
Managing photos
Press the M button to manage your photos.
- Local folder: Displays the current photo folder name and location
- Playback set(tings): Choose between manual playback (use the ◀ and ▶▶ buttons to browse through your photos) and automatic slideshow playback (1 to 10 second interval).
- Delete file: Delete one photo from the directory of photos
- Delete all: Delete all photos
- Exit: Exit the file management sub-menu
SETTINGS
-
Select SETTINGS in the main menu.
-
LCD set: Adjust the length of time before the unit enters "dark mode", where the backlight turns off, from 0 to 30 seconds. 0 second timeout means the screen will remain backlit constantly.
• Language: Choose between English, Spanish, and French - Power off: Set the player to automatically power-off after a certain period of inactivity in seconds, from 0 to 200. 0 second timeout means that the until will stay on indefinitely (not recommended).
• Memory info: Display the player memory storage size and available space. Note: it is normal to have less than 8000 MB due to overhead of the operating system.
- Firmware version: Display player firmware version
- Firmware upgrade: Only use this option if asked by RipTunes technical support to perform a firmware upgrade
READER
- Select the READER in the main menu.
- Browse plain text files (.txt)
- Press ▶■ to open a selected text file, use the ◀ and ▶ buttons to scroll through the pages.
CONNECTING YOUR PLAYER TO A COMPUTER
- Using the included mini-USB cable, plug the mini-USB end into the player and the standard (A) USB end into your computer.
- Use a file browser (Windows Explorer, Mac OS Finder) to move files to and from your portable music player.
Note: only supported file formats can be read by the portable music player, but you may copy any file to and from the device, if you wish to use your player as a storage device. Consult the technical specifications for readable formats.
TECHNICAL SPECIFICATIONS
Supported file formats: Music: MP3, WMA, WAV • Video: AMV Device connectivity: USB 2.0
PC compatibility: Windows 2000, XP, Vista, 7, 8, Mac OS X
FM tuner range: 87MHz - 108MHz
Signal-to-noise ratio: 85dB
Max output power: 10mW + (R) 10mW (32 Ω)
Internal storage capacity: 8GB
Battery rating: 3.7 volts/180 mAh
Operating temperature: -5°C to 40°C
Included accessories: User manual, earbuds, mini USB cable
TROUBLESHOOTING
The player does not work
- Check if the battery is charged
- Check that the power button is on
- Check the volume and that your headphones are properly connected
- Check the music file format
- Check the disk format (should be FAT32)
I can't transfer files to/from the player
- Check the USB cable connection
The player does not make voice recordings
- Check the available memory space
- Check if the battery is charged
Strange characters appear on the screen
- Check the display language in the device settings
FM radio plays static or distortion
- Adjust the position of the headphones; they are the antenna
CONTACT TECHNICAL SUPPORT
Phone: +1 888-217-7688
Email: service@rip-tunes.com