DB 751 - Guitar amp Aguilar - Free user manual and instructions
Find the device manual for free DB 751 Aguilar in PDF.

| Product Type | Bass Guitar Amplifier Head |
| Brand | Aguilar |
| Model | DB 751 |
| Output Power | 975 W @ 2 ohms, 750 W @ 4 ohms, 400 W @ 8 ohms |
| Preamp Section | Three 12AX7 Tubes |
| Power Section | 12 Complementary Lateral MOSFETs |
| Transformer | Custom Aguilar Toroidal |
| Equalizer | Bass ±12 dB @ 40 Hz, Mid ±12 dB @ 750 Hz, Treble +12/-7 dB @ 4 kHz |
| Switches | Deep (+5 dB @ 30 Hz), Bright (+5 dB @ 5-7 kHz) |
| Effects Loop | Send/Return with line/instrument selection and series/parallel mode |
| Inputs | 1/4" jack with active/passive switch |
| Outputs | 2 x Neutrik Speakon for speakers, 1 balanced XLR output (Jensen) with pre/post EQ and ground lift, 1 tuner output |
| Cooling | Silent thermally controlled fans |
| Dimensions (W x D x H) | 431 mm x 355 mm x 133 mm |
| Rack Size | 3U |
| Weight | 19 kg |
| Warranty | 10 years with limitations |
| Power Supply | Mains (3-pin plug) |
| Included Accessories | Detachable rack mount adapters |
| Special Features | Self-diagnostic, protection, status LED, mute via optional footswitch |
Frequently Asked Questions - DB 751 Aguilar
User questions about DB 751 Aguilar
0 question about this device. Answer the ones you know or ask your own.
Ask a new question about this device
Download the instructions for your Guitar amp in PDF format for free! Find your manual DB 751 - Aguilar and take your electronic device back in hand. On this page are published all the documents necessary for the use of your device. DB 751 by Aguilar.
USER MANUAL DB 751 Aguilar
The DB 751 Bass Head features a combination of raw power and rich tone that continues the legacy of the DB 750. The DB 751 is a groundbreaking hybrid with a discrete Mosfet output section and a 3-tube preamp. While maintaining the legendary sound of the DB 750, the DB 751 features improvements in the EQ section, a better control layout, detachable rack ears, and thermally controlled fans. This amp has the headroom to bring your tone to life no matter what kind of music you are playing. For sound clips and sample settings be sure to visit our website at: www.aguilaramp.com.
Table of Contents
I. Safety Instructions page 2.
II. Specifications page 3.
III. Diagnostics & Protection page 4.
IV. Warranty Information page 6.
I. Safety Instructions

WARNING: To reduce the risk of fire or electric shock, do not expose equipment to rain or moisture. Aguilar Amplification assumes no responsibility for any damage or injury that results from improper use or service.

CAUTION: RISK OF ELECTRIC SHOCK! DO NOT OPEN! There are no user serviceable parts inside of this product. This is a high voltage device, and internal voltages can be lethal. Any and all work should be performed by qualified personnel only.
In order to ensure safe operation of the device, please follow these guidelines:
- Read the instruction manual in its entirety before trying to operate the equipment. The manual should be kept for future reference.
- Observe all safety precautions, warnings and instructions noted in this manual.
- Always unplug the amplifier out of the wall socket, before cleaning. Use only dry cloth. Do not use aerosols or solvents.
- Keep the device away from sources of water such as pools, bathtubs, and sinks, and do not expose it to rain or splashes of water. Do not place objects filled with fluid on the device.
- Vents are provided for heat dissipation on the sides, and at the rear of the amplifier. Maintain at least a 2" (5cm) space around these vents to provide sufficient ventilation.
- Keep the amplifier away from sources of heat and open flame, such as heaters, radiators, stoves, lit candles, etc.
- Make sure that the power cord is intact before plugging it into the unit. Do not use cords with visible damage to its insulation, or connectors.
- This device is equipped with a safety feature that requires the use of the three-pin grounding power plug. Do not defeat the safety purpose of the grounding plug. If provided plug does not fit your outlet, consult an electrician about replacing an obsolete power outlet.
-
Use only accessories listed in this manual, or in other way specified by the manufacturer.
-
Do not install this amplifier on carts or other moving objects.
-
When amplifier is in use, route the power cable in such way that will prevent it from being stepped on, tripped on, pinched or damaged in any other way.
-
Do not use this device with wall/ceiling mounts not specified by the manufacturer.
-
To completely discontent the equipment from the AC mains, disconnect the power cord from the AC receptacle. For additional protection, unplug the device during light storms, or when not used for long periods of time.
-
No user serviceable parts inside. Refer service to qualified service personnel. If the unit was exposed to liquid, extensive heat or fire, or sustained a mechanical damage of any kind, do not attempt to operate it. Disconnect the unit from the wall outlet, and consult qualified service personnel.
Specifications:
Power Output: 975 watts @ 2 ohms, 750 watts @ 4 ohms, 400 watts @ 8 ohms
Preamp Section: Three 12AX7s
Power Section: 12 complimentary lateral MOSFETs
Transformer: Custom Aguilar toroidal power transformer.
EQ Section: passive tone stack with active midrange element, bass: +12 / -12 @ 40Hz; midrange: +12 / -12 @ 750Hz; treb: +12 / -7 @ 4kHz
Deep Switch: Adds 5 dB of broad-band boost at 30 Hz
Bright Switch: Adds 5 dB of broadband boost at 5-7 kHz
Effects Loop: Send is push/pull for line or instrument level; Return is push/pull for parallel or series operation
Inputs: One 1/4" input jack with an active/passive switch
Outputs: Two Neutrik Speakon speaker outputs, Jensen XLR balanced output (-32dB) with a pre/post EQ switch and a ground lift switch. Tuner out.
Cooling: High quality whisper fans with thermal speed control
Dimensions: 17" W x 14" D x 5.25" H
Rack Size: Three Spaces, Includes detachable rack ears
Weight: 42 lbs
Warranty: Ten Year Limited
Optional: Footswitch, Tolex Head cases in DB series colors, Rack bag
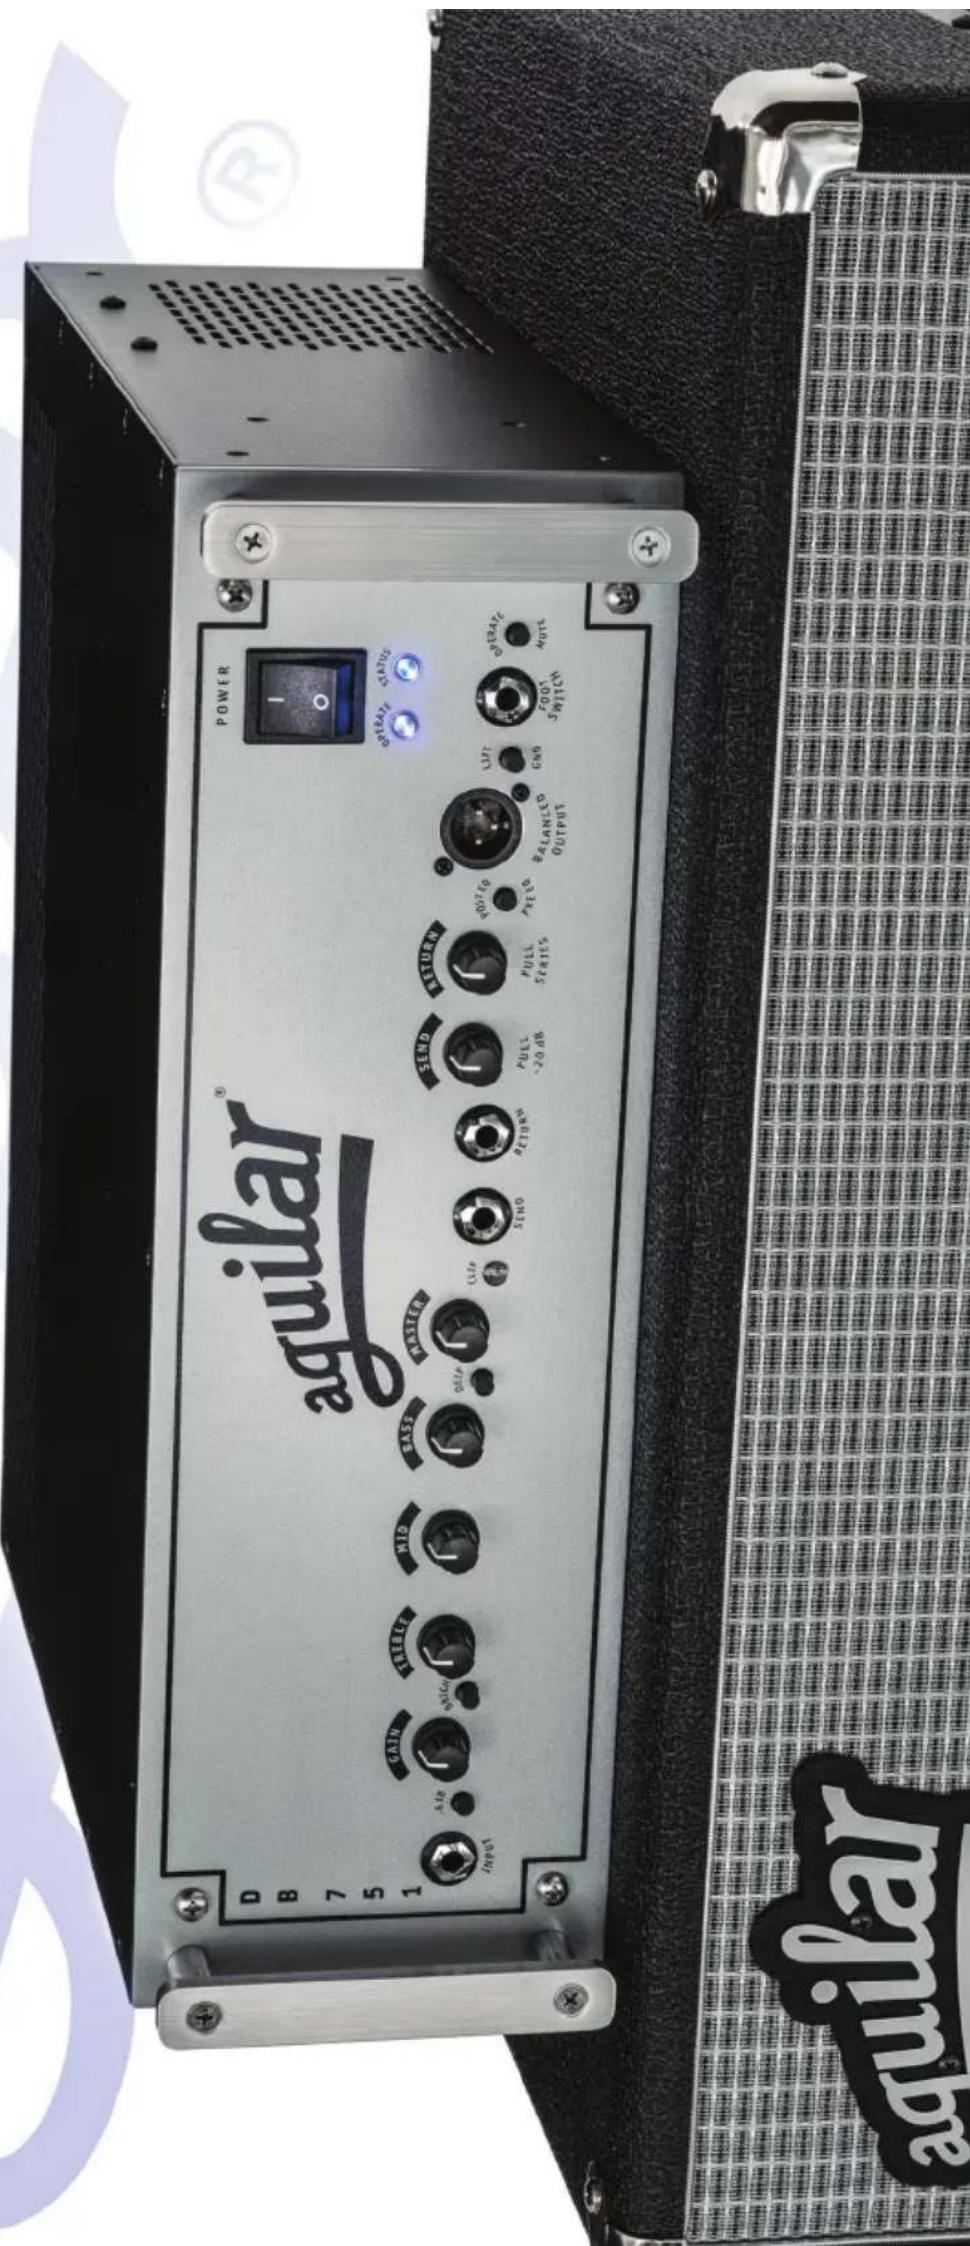
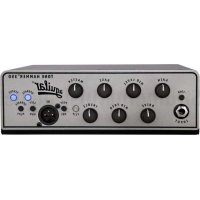
Front Panel Features:
Input:
-6 dB Switch: Inserts a -6dB pad in the signal path to allow flexibility when adjusting the gain for a bass with very high output
Gain Knob: Controls the gain of the preamp section
Bright Switch: Adds 5dB of broadband boost at 5-7 kHz
Treble Knob: +12 / -7 dB @ 4 kHz.
Midrange Knob:+12 / -12 @ 750Hz
Bass Knob: +12 / -12 @ 40 Hz
Deep Switch: Adds 5dB of broadband boost at 30 Hz
Master Knob: Controls volume
Clip Light: Flashes if the preamp is clipping. Turn down either the "Gain", the EQ, or "Master" volume.
FX Send: Sends the signal to your effects units. Connect the input of your effects unit to this jack
FX Return: Returns the signal from your effects units to the amplifier.
Connect the output of your effects unit to this jack.
Effects Loop: The "Send" knob is push/pull for selecting line or instrument level.
This allows you to use a studio effects unit (line level) or a stomp box (requires instrument level) in the FX loop. Adjust the amount of "Send" so as to get maximum performance from your effects unit and the "Return" to get the right amount of effected signal.
The “Return” knob is push/pull for parallel or series operation. In parallel mode, the effected signal is mixed to the dry sound. In series mode, the effects in the loop will process the entire signal. The amount of effects can be adjusted with the return knob. If you pull the return knob out for series operation without any effects plugged in the loop, the loop will be open and no sound will result.
XLR Balanced Output:
Use the Pre-EQ setting in a concert situation where the sound engineer is taking a signal into the house-mixing console. The engineer is now getting their feed before the preamp stage, which allows them to use appropriate EQ for the venue. The EQ on stage will still be controlled by your settings. If the engineer wants your EQ settings included in the mix, set the control to Post EQ and your settings on stage will be sent to the house.
The D.I. output is -32dB. This level is the correct output for a signal going into the preamp on a mixer. Our balanced output uses the highest quality Jensen output transformer. If you hear any ground noise, change the position of the ground lift switch under the output.
Footswitch: Use the optional Aguilar footswitch to mute the signal for silent tuning.
Rear Panel:
Speaker Outputs:
Two Neutrik Speakon connectors are provided. Use 12 gauge or larger speaker cable for proper connections.
Tuner out: This output sends the signal to your connected tuner. This output will still be active when you mute the DB 751.
Diagnostic and Protection
The DB751 is equipped with a self-diagnostic and status/protection circuit. Upon power-up, the unit's blue status LED will blink for approximately 45 seconds. During this time several circuit parameters are verified, or allowed to become self calibrated.
- The high B+ voltage to the preamp tubes is slowly ramped up, allowing the tube heaters to warm up before full current is drawn by the valves.
- DC offset at the amp's output is monitored. Only if none is present (normal condition), will the unit proceed with the self-check protocol.
- Temperature on the MOSFET heat sink is checked, and again only if normal temperature is detected, will the status check continue.
- If all the voltages, offsets, and temperature are in accordance with factory specifications, then the amp's input, and output relays will be energized. This will then cause the operate LED to illuminate and the status LED to stop blinking. The amp is now ready for normal operation.
- The circuit continues monitoring the above parameters to protect both the DB 751 and the speakers connected to the amp in the event of unit or user error. This will be indicated by the status LED's blinking.
- If the status LED continues blinking, or starts blinking during amplifier use, this indicates a system fault. The amplifier requires servicing in order for normal operation to resume.
Limited Warranty
Aguilar Amplification's DB 751 hybrid bass amp is warranted to the original owner for a period of ten years from the date of purchase against defects in materials and workmanship. * Tubes are covered by the warranty for a period of 90 days. Abuse, negligence, and normal wear and tear are not covered by the terms of this warranty.
The warranty period starts from the date of purchase from an authorized Aguilar dealer. Please register your DB 751 for warranty by going to www.aguilaramp.com and selecting “Online Registration” from the Support menu. It is important to save your original sales receipt. You will be asked to send a copy with your amplifier.
Before sending your unit to Aguilar for repair, you must receive a return authorization number from us. Contact us via phone, fax, or email (techsupport@aguilaramp.com) with a description of the problem. We will then issue to you a return authorization number.
You are responsible for all shipping charges. You must ship the unit to us freight prepaid. We will return the unit to you freight collect. For safe shipment, the product should be shipped in its original packaging. If you no longer have this, we can arrange to sell you replacement-packing materials.
Aguilar Amplification LLC is not responsible for shipping damage, either to or from our service center. Claims must be filed with the carrier.
The only company authorized to perform work under this warranty is Aguilar Amplification LLC of New York, NY.
*If you purchased your DB 751 outside the USA, please contact your local Dealer or Distributor for your country's specific warranty period and repair procedure.
Aguilar Amplification LLC 599 Broadway, 7th Fl. NY, NY 10012
Leistung: 975 Watt @ 2 Ohm, 750 Watt @ 4 Ohm, 400 Watt @ 8 Ohm
Aguilar Amplification LLC 599 Broadway, 7th Fl. NY, NY 10012
DB 751 user manual v. 3.0