
403 - Chopper Hobart - Free user manual and instructions
Find the device manual for free 403 Hobart in PDF.

| Brand | Hobart |
| Model | 403 |
| Appliance type | Meat tenderizer with star knife rollers |
| Main use | Tenderize and bind boneless meat pieces |
| Cutting options | Rollers for wide (9.5 mm) or narrow (4.8 mm) julienne cuts optional |
| Power supply | According to nameplate (cord with plug provided) |
| Main materials | Stainless steel (food contact components) |
| Safety | Transparent protective cover and motor housing with locking; power-on indicator light; automatic stop if opened |
| Operation | Insert meat from top, collect under the machine |
| Routine maintenance | Clean after each use or change of meat; disassemble rollers, combs and cover for washing with soapy water |
| Lubrication | Annual check of gear casing oil level via dipstick; maintenance-free motor |
| Knife cleaning | Use provided cleaning fork to remove particles without running the machine |
| Knife sharpening | Not necessary in normal use; contact Hobart service if needed |
| Spare parts | Knife rollers, combs, coupling shaft seals, protective cover |
| Repairability | Contact Hobart maintenance service for repairs and blade replacement |
| Warranty | Not specified in manual; refer to seller |
Frequently Asked Questions - 403 Hobart
User questions about 403 Hobart
0 question about this device. Answer the ones you know or ask your own.
Ask a new question about this device
Download the instructions for your Chopper in PDF format for free! Find your manual 403 - Hobart and take your electronic device back in hand. On this page are published all the documents necessary for the use of your device. 403 by Hobart.
USER MANUAL 403 Hobart
FORM 37023 Rev A. (August 2024)
Installation, Operation and Care of MODEL 403 TENDERIZER
SAVE THESE INSTRUCTIONS
GENERAL
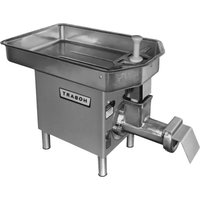
The model 403 Tenderizer is designed to tenderize a variety of meat products. The tenderizer consists of a set of roller units which contain knives that knit together and tenderize pieces of meat as they pass through the blades. Optional Wide ^3/8 " or Narrow ^3/16 " Julienne Knife Lift-out units are available. They are used to cut food products, such as meats and cheeses, into strips.
INSTALLATION
UNPACKING
Immediately after unpacking, check for possible shipping damage. If the tenderizer is found to be damaged, save the packaging material and contact the carrier within 5 days of delivery.
Remove machine from the shipping carton and place in the operating location. Remove transparent guard (4, Fig. 1), lift off motor housing (3, Fig. 1) and remove screw (1, Fig. 2) that plugs the vent hole (see label taped to machine). Insert dip stick (taped to machine) in vent hole. Replace housing and guard.
A cord with plug is furnished as standard equipment.
Before making electrical connections, check the specifications on the machine data plate to ensure they agree with those of your electrical service.
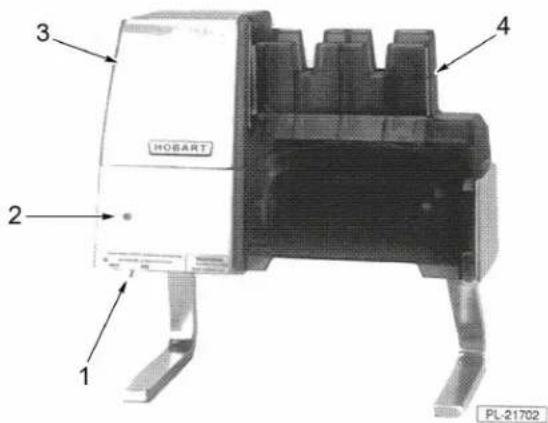
Fig. 1
This machine must be cleaned after installation and before being put into service. Refer to MAINTENANCE for instructions.
SAFETY
Safety devices incorporated in this machine MUST be in correct operating position anytime this machine is in service. Both the transparent guard and the motor housing must be in place. The pilot light (2, Fig. 1) will remain on when either the transparent guard or motor housing is removed and the switch is on. Motor will start when the guard and housing have been replaced. DO NOT defeat any of the safety features.
OPERATION
Turn the switch (1, Fig. 1) to ON. The pilot light (2, Fig. 1) will illuminate indicating power is supplied to the machine.
To tenderize meats, simply drop cuts into the top of transparent guard and receive them at the bottom.
Only boneless meats should be used. Choice or tender cuts should be run through several times at different angles. Less tender cuts should be run through several more times at different angles to increase tenderness. Pull out excess sinews to improve tenderness.
Various combinations of different meat types may be blended together. This is accomplished by running the meat types through separately to tenderize, then together creating a firmly knit cut. Large slices should be under 34 " thick.
MAINTENANCE
WARNING Unplug machine power cord before beginning any maintenance procedure.
CLEANING
Machine should be thoroughly cleaned after each daily use or when changing meat types.
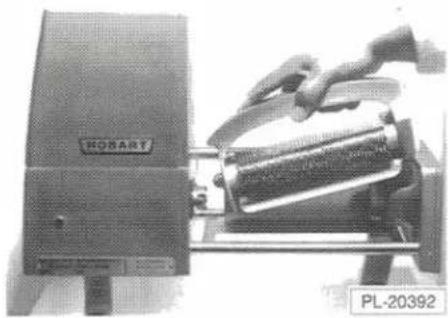
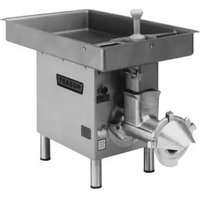
Remove the transparent guard. Release hanger lock (4, Fig. 2) and remove the lift-out unit as shown in Fig. 3.
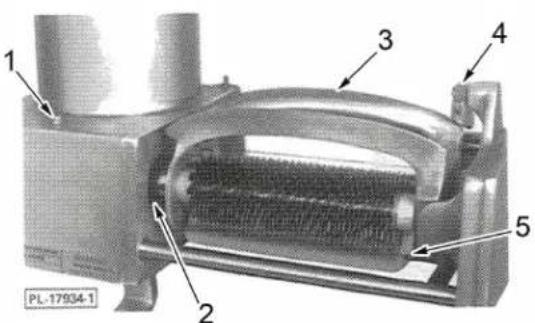
Fig. 2 Fig. 3
natural_image
Industrial machine with a control panel and roller, no visible text or symbols on the main componentsSeparate the front and rear hanger assemblies of the lift-out unit (3, Fig. 2) and remove the strippers (5, Fig. 2) by raising each and sliding out of hanger
WARNING Knives are sharp. Exercise extreme caution when handling knives.
Immerse the transparent guard and strippers (and when used, the optional Julienne Knife Lift-out units) in a mild soap and warm water solution. Use the cleaning fork (supplied) to remove any food particles from between the knives on each hanger assembly. DO NOT attempt to use the cleaning fork with machine running. Immerse the hanger assemblies in the warm soapy water and scrub them with a soft bristle brush. Rinse all components.
Wipe remainder of machine with a clean wet cloth.
All components can be sanitized using an iodophor (iodine-based) sanitizer solution.
NOTE: Prior to reassembly, inspect for bent or broken blades. If a bone or other hard object is run through the tenderizer, it may cause one or more of the blades to bend or break. If this occurs, DO NOT operate machine until blade(s) has been straightened or replaced.
Reassembly machine.
Occasionally remove, clean and replace the stub shaft seals (2, Fig. 2). Also, remove the motor housing and wipe motor area periodically.
LUBRICATION
Gear Case
Use the dipstick in the vent hole to check lubricant level annually. If lubricant level is not between the lines on dipstick, contact the local Hobart Service Office.
Motor
The motor is totally enclosed and requires no lubrication.
KNIVES
Knives do not need to be razor-sharp. However, if knives need to be sharpened or replaced, contact the local Hobart Service Office.
ATTENDRISSEUR - MODÈLE 403
ML-38763
403
M_O D E
natural_image
Industrial machine with control panel and mounting base (no visible text or symbols)D'EMPLOI
HOBART
701 S. RIDGE AVENUE
TROY, OHIO 45373
937 332-3000
www.hobartcorp.com
natural_image
Exterior view of a modern office building (no signage)


Brand : Hobart
Model : 403
Category : Chopper