USER MANUAL DV14DJL HiKOKI
natural_image
Line drawing of a handheld electric drill (DV18D) with no visible text or symbols on the device itself.
DV18DJL
Read through carefully and understand these instructions before use.
Diese Anleitung vor Benutzung des Werkzeugs sorgfältig durchlesen und verstehen.
Lire soigneusement et bien assimiler ces instructions avant usage.
Prima dell'uso leggere attentamente e comprendere queste instruzioni.
Deze gebruiksaanwijzing s.v.p. voor gebruik zorgvuldig doorlezen.
Leer cuidadosamente y comprender estas instrucciones antes del uso.
Antes de usar, leia com cuidado para assimilar estas instruções.
Handling instructions
Bedienungsanleitung
Mode d'emploi
Istruzioni per l'uso
Gebruiksaanwijzing
Instrucciones de manejo
Instruções de uso
1
2
3
5

6

7

8

9

10

natural_image
Technical line drawing of a handheld electric drill bit with labeled component (24), no text or symbols present


| English Deutsch Français Italiano | | |
| 1 | Rechargeable battery | Aufladbare Batterie | Batterie rechargeable | Batteria ricaricabile |
| 2 | Latch Verriegelung Taquet Fermo | | |
| 3 | Battery cover Akkuabdeckung Couvercle de la batterie Coperchio della batteria | | |
| 4 | Terminal Anschluss Borne Terminale | | |
| 5 | Ventilator Lüfter | Ventilateur | Ventola | |
| 6 | Push | Drücken Pousser | Premere | |
| 7 | Pull out | Herausziehen | Tirer vers l'extérieur | Estrarre |
| 8 | Handle | Handgriff | Poignée | Impugnatura |
| 9 | Charger | Ladegerät | Chargeur | Caricatore |
| 10 | Pilot lamp | Kontorollampe | Lampe témoin | Spia |
| 11 | Drill mark Bohrer-Zeichen | Indice de forage Simbolo di foratura | |
| 12 | Hammer mark | Hammermarkierung | Repère de percussion | Segno del martello |
| 13 | Clutch dial | Kupplungsskala | Sélecteur de débrayage | Ghiera frizione |
| 14 | Triangle mark | Dreiecksmarkierung | Triangle | Simbolo del triangolo |
| 15 | Weak | Schwach | Faible | Debol |
| 16 | Strong | Stark | Fort | Forte |
| 17 | Line | Linie | Ligne Linea | |
| 18 | Shift knob | Schaltknopf | Bouton de décalage | Manopola di comando |
| 19 | Low speed | Kleine Geschwindigkeit | Vitesse ralentie | Bassa velocità |
| 20 | High speed | Große Geschwindigkeit | Vitesse élevée | Alta velocità |
| 21 | Sleeve | Manschette | Manchon | Collare |
| 22 | Tighten | Anziehen | Serrer | Stringere |
| 23 | Loosen | Lösen | Desserrer | Allentare |
| 24 | Trigger switch | Trigger | Déclencheur | Interruttore |
| 25 | Selector button | Wählhebel | Sélecteur Selettore | |
| 26 | (R) and (L) marks | (R) und (L) Zeichen | Indices (R) et (L) | Segno (R), (L) |
| 27 | Screw | Schraube | Vis | Vite |
| 28 | Hook | Haken | Crochet Gancio | |
| 29 | Groove | Nut | Gorge | Scanalatura |
| Nederlands Español | Português | |
| 1 | Oplaadbare batterij Batería | recargable Bateria recarregável | |
| 2 | Vergrendeling Cierre Lingüeta | | |
| 3 | Batterijdeksel Tapa de la batería | Tampa da bateria | |
| 4 | Klem Terminal Terminal | | |
| 5 | Ventilator Ventilador Ventilador | | |
| 6 | Duwen Pulsador Premir | | |
| 7 | Uittrekken Sacar Retirar | | |
| 8 | Handgreep Asidero | Cabo | |
| 9 | Acculader Chargador | Recarregador | |
| 10 | Controlelampje | Lámpara piloto | Lâmpada piloto |
| 11 | Boor-markering | Marca del taladro | Símbolo da broca |
| 12 | Hammer markering Marca de martillo | Marca do martelo | |
| 13 | Koppelingsinstelling | Dial del embrague | Disco de engate |
| 14 | Driehoekje | Marca de triângulo | Marca de triângulo |
| 15 | Zwak | Débil Fraco | |
| 16 | Sterk | Fuerte | Forte |
| 17 | Streepje | Línea | Linha |
| 18 | Toerenschakelaar Mando de cambio Comutador | | |
| 19 | Laag toerental | Velocidad alta | Velocidade baixa |
| 20 | Hoog toerental | Velocidad baja | Velocidade alta |
| 21 | Klembus Manguito Manguito | | |
| 22 | Aandraaien | Apretar | Apertar |
| 23 | Losdraaien | Aflojar | Afrouxar |
| 24 | Trekkerschakelaar | Conmutador de gatillo | Interruptor de comando |
| 25 | Omzetschakelaar | Botón selector | Botão seletor |
| 26 | (R) en (L) merktekens | Marcas (R) y (L) | Marcas (R) e (L) |
| 27 | Schroef | Tornillo | Parafuso |
| 28 | Haak | Gancho | Gancho |
| 29 | Groef | Ranura | Ranhura |
| English Deutsch Français | | Italiano |
| Symbols⚠ WARNINGThe following show symbols used for the machine. Be sure that you understand their meaning before use. | Symbole⚠ WARNUNGDie folgenden Symbole werden für diese Maschine verwendet. Achten Sie darauf, diese vor der Verwendung zu verstehen. | Symboles⚠ AVERTISSEMENTLes symboles suivants sont utilisés pour l’outil. Bien se familiariser avec leur signifi cation avant d’utiliser l’outil. | Simboli⚠ AVVERTENZADi seguito mostriamo i simboli usati per la macchina. Assicurarsi di comprenderne il signifi cato prima dell’uso. |
 | Read all safety warnings and all instructions.Failure to follow the warnings and instructions may result in electric shock, fi re and/or serious injury. | Lesen Sie sämtliche Sicherheitshinweise und Anweisungen durch.Wenn die Warnungen und Anweisungen nicht befolgt werden, kann es zu Stromschlag, Brand und/oder ernsthaften Verletzungen kommen. | Lire tous les avertissements de sécurité et toutes les instructions.Tout manquement à observer ces avertissements et instructions peut engendrer des chocs électriques, des incendies et/ou des blessures graves. | Leggere tutti gli avvertimenti di sicurezza e tutte le istruzioni.La mancata osservanza degli avvertimenti e delle istruzioni potrebbe essere causa di scosse elettriche, incendi e/o gravi lesioni. |
 | Only for EU countriesDo not dispose of electric tools together with household waste material!In observance of European Directive 2002/96/EC on waste electrical and electronic equipment and its implementation in accordance with national law, electric tools that have reached the end of their life must be collected separately and returned to an environmentally compatible recycling facility. | Nur für EU-LänderWerfen Sie Elektrowerkzeuge nicht in den Hausmüll!Gemäss Europäischer Richtlinie 2002/96/EG über Elektro- und Elektronik-Altgeräte und Umsetzung in nationales Recht müssen verbrauchte Elektrowerkzeuge getrennt gesammelt und einer umweltgerechten Wiederververitung zugeführt werden. | Pour les pays européens uniquementNe pas jeter les appareils électriques dans les ordures ménagères!Conformément à la directive européenne 2002/96/EG relative aux déchets d’équipements électriques ou électroniques (DEEE), et à sa transposition dans la législation nationale, les appareils électriques doivent être collectés à part et être soumis à un recyclage respectueux de l’environnement. | Solo per Paesi UENon gettare le apparecchiature elettriche tra i rifi uti domestici.Secondo la Direttiva Europea 2002/96/CE sui rifi uti di apparecchiature elettriche ed elettroniche e la sua attuazione in conformità alle norme nazionali, le apparecchiature elettriche esauste devono essere raccolte separatamente, al fi ne di essere reimpiegate in modo eco-compatible. |
 | Nederlands Español | Português | | |
| Symbolen⚠ WAARSCHUWINGHieronder staan symbolen afgebeeld die van toepassing zijn op deze machine. Ú moet de betekenis hiervan begrijpen voor gebruik. | Símbolos⚠ ADVERTENCIAA continuación se muestran los símbolos usados para la máquina. Asegúrese de comprender su signifi cado antes del uso. | Símbolos⚠ AVISOA seguir aparecem os símbolos utilizados pela máquina. Assimile bem seus signifi cados antes do uso. |
 | Lees alle waarschuwingen en instructies aandachtig door.Nalating om de waarschuwingen en instructies op te volgen kan in een elektrische schok, brand en/of ernstig letsel resulteren. | Lea todas las instrucciones y advertencias de seguridad.Si no se siguen las advertencias e instrucciones, podría producirse una descarga eléctrica, un incendio y/o daños graves. | Leia todas as instruções e avisos de segurança.Se não seguir todas as instruções e os avisos, pode provocar um choque eléctrico, incêndio e/ou ferimentos graves. |
 | Alleen voor EU-landen Geef elektrisch gereedschap niet met het huisvuil mee!Volgens de Europese richtlijn 2002/96/EG inzake oude elektrische en elektronische apparaten en de toepassing daarvan binnen de nationale wetgeving, dient gebruikt elektrisch gereedschap gescheiden te worden ingezameld en te worden afgevoerd naar een recycle bedrijf dat voldoet aan de geldende milieu-eisen. | Sólo para países de la Unión Europea¡No deseche los aparatos eléctricos junto con los residuos domésticos!De conformidad con la Directiva Europea 2002/96/CE sobre residuos de aparatos eléctricos y electrónicos y su aplicación de acuerdo con la legislación nacional, las herramientas eléctricas cuya vida útil haya llegado a su fi n se deberán recoger por separado y trasladar a una planta de reciclaje que cumpla con las exigencias ecológicas. | Apenas para países da UENão deite ferramentas eléctricas no lixo doméstico!De acordo com a directiva europeia 2002/96/CE sobre ferramentas eléctricas e electrónicas usadas e a transposição para as leis nacionais, as ferramentas eléctricas usadas devem ser recolhidas em separado e encaminhadas a uma instalação de reciclagem dos materiais ecológica. |
WARNING
Read all safety warnings and all instructions.
Failure to follow the warnings and instructions may result in electric shock, fire and/or serious injury.
Save all warnings and instructions for future reference.
The term “power tool” in the warnings refers to your mains-operated (corded) power tool or battery-operated (cordless) power tool.
1) Work area safety
a) Keep work area clean and well lit.
Cluttered or dark areas invite accidents.
b) Do not operate power tools in explosive atmospheres, such as in the presence of fl ammable liquids, gases or dust.
Power tools create sparks which may ignite the dust or fumes.
c) Keep children and bystanders away while operating a power tool.
Distractions can cause you to lose control.
2) Electrical safety
a) Power tool plugs must match the outlet.
Never modify the plug in any way.
Do not use any adapter plugs with earthed (grounded) power tools.
Unmodifi ed plugs and matching outlets will reduce risk of electric shock.
b) Avoid body contact with earthed or grounded surfaces, such as pipes, radiators, ranges and refrigerators.
There is an increased risk of electric shock if your body is earthed or grounded.
c) Do not expose power tools to rain or wet conditions.
Water entering a power tool will increase the risk of electric shock.
d) Do not abuse the cord. Never use the cord for carrying, pulling or unplugging the power tool.
Keep cord away from heat, oil, sharp edges or moving parts.
Damaged or entangled cords increase the risk of electric shock.
e) When operating a power tool outdoors, use an extension cord suitable for outdoor use.
Use of a cord suitable for outdoor use reduces the risk of electric shock.
f) If operating a power tool in a damp location is unavoidable, use a residual current device (RCD) protected supply.
Use of an RCD reduces the risk of electric shock.
3) Personal safety
a) Stay alert, watch what you are doing and use common sense when operating a power tool. Do not use a power tool while you are tired or under the influence of drugs, alcohol or medication.
A moment of inattention while operating power tools may result in serious personal injury.
b) Use personal protective equipment. Always wear eye protection.
Protective equipment such as dust mask, non-skid safety shoes, hard hat, or hearing protection used for appropriate conditions will reduce personal injuries.
c) Prevent unintentional starting. Ensure the switch is in the off-position before connecting to power source and/or battery pack, picking up or carrying the tool.
Carrying power tools with your finger on the switch or energising power tools that have the switch on invites accidents.
d) Remove any adjusting key or wrench before turning the power tool on.
A wrench or a key left attached to a rotating part of the power tool may result in personal injury.
e) Do not overreach. Keep proper footing and balance at all times.
This enables better control of the power tool in unexpected situations.
f) Dress properly. Do not wear loose clothing or jewellery. Keep your hair, clothing and gloves away from moving parts.
Loose clothes, jewellery or long hair can be caught in moving parts.
g) If devices are provided for the connection of dust extraction and collection facilities, ensure these are connected and properly used.
Use of dust collection can reduce dust related hazards.
4) Power tool use and care
a) Do not force the power tool. Use the correct power tool for your application.
The correct power tool will do the job better and safer at the rate for which it was designed.
b) Do not use the power tool if the switch does not turn it on and off.
Any power tool that cannot be controlled with the switch is dangerous and must be repaired.
c) Disconnect the plug from the power source and/or the battery pack from the power tool before making any adjustments, changing accessories, or storing power tools.
Such preventive safety measures reduce the risk of starting the power tool accidentally.
d) Store idle power tools out of the reach of children and do not allow persons unfamiliar with the power tool or these instructions to operate the power tool.
Power tools are dangerous in the hands of untrained users.
e) Maintain power tools. Check for misalignment or binding of moving parts, breakage of parts and any other condition that may affect the power tools' operation.
If damaged, have the power tool repaired before use.
Many accidents are caused by poorly maintained power tools.
f) Keep cutting tools sharp and clean.
Properly maintained cutting tools with sharp cutting edges are less likely to bind and are easier to control.
g) Use the power tool, accessories and tool bits etc. in accordance with these instructions, taking into account the working conditions and the work to be performed.
Use of the power tool for operations different from those intended could result in a hazardous situation.
5) Battery tool use and care
a) Recharge only with the charger specified by the manufacturer.
A charger that is suitable for one type of battery pack may create a risk of fi re when used with another battery pack.
b) Use power tools only with specifically designated battery packs.
Use of any other battery packs may create a risk of injury and fire.
c) When battery pack is not in use, keep it away from other metal objects like paper clips, coins, keys, nails, screws, or other small metal objects that can make a connection from one terminal to another.
Shorting the battery terminals together may cause burns or a fire.
d) Under abusive conditions, liquid may be ejected from the battery; avoid contact. If contact accidentally occurs, fl ush with water. If liquid contacts eyes, additionally seek medical help.
Liquid ejected from the battery may cause irritation or burns.
6) Service
a) Have your power tool serviced by a qualified repair person using only identical replacement parts.
This will ensure that the safety of the power tool is maintained.
PRECAUTION
Keep children and infi rm persons away.
When not in use, tools should be stored out of reach of children and infi rm persons.
CORDLESS COMBI DRILL SAFETY WARNINGS
1. Wear ear protectors when impact drilling.
Exposure to noise can cause hearing loss.
2. Use auxiliary handle(s), if supplied with the tool.
Loss of control can cause personal injury.
3. Hold power tool by insulated gripping surfaces, when performing an operation where the cutting accessory or fastener may contact hidden wiring.
Cutting accessory or fasteners contacting a "live" wire may make exposed metal parts of the power tool "live" and could give the operator an electric shock.
4. Always charge the battery at a temperature of 0^ C – 40^ C. A temperature of less than 0^ C will result in over charging which is dangerous. The battery cannot be charged at a temperature higher than 40^ C.
The most suitable temperature for charging is that of 20^ C – 25^ C.
5. When one charging is completed, leave the charger for about 15 minutes before the next charging of battery.
Do not charge more than two batteries consecutively.
6. Do not allow foreign matter to enter the hole for connecting the rechargeable battery.
7. Never disassemble the rechargeable battery and charger.
8. Never short-circuit the rechargeable battery. Short-circuiting the battery will cause a great electric current and overheat. It results in burn or damage to the battery.
9. Do not dispose of the battery in fire.
If the battery is burnt, it may explode.
10. Bring the battery to the shop from which it was purchased as soon as the post-charging battery life becomes too short for practical use. Do not dispose of the exhausted battery.
11. Using an exhausted battery will damage the charger.
12. Do not insert object into the air ventilation slots of the charger.
Inserting metal objects or inflammables into the charger air ventilation slots will result in electrical shock hazard or damaged charger.
13. When mounting a bit into the keyless chuck, tighten the sleeve adequately. If the sleeve is not tight, the bit may slip or fall out, causing injury.
14. This product contains a strong permanent magnet in the motor.
Observe the following precautions regarding adhering of chips to the tool and the effect of the permanent magnet on electronic devices.
CAUTION
○ Do not place the tool on a workbench or work area where metal chips are present.
The chips may adhere to the tool, resulting in injury or malfunction.
○ If chips have adhered to the tool, do not touch it. Remove the chips with a brush.
Failure to do so may result in injury.


○ If you use a pacemaker or other electronic medical device, do not operate or approach the tool. Operation of the electronic device may be aff ected.
○ Do not use the tool in the vicinity of precision devices such as cell phones, magnetic cards or electronic memory media.
Doing so may lead to misoperation, malfunction or loss of data.
CAUTION ON LITHIUM-ION BATTERY
To extend the lifetime, the lithium-ion battery equips with the protection function to stop the output.
In the cases of 1 to 3 described below, when using this product, even if you are pulling the switch, the motor may stop. This is not the trouble but the result of protection function.
1. When the battery power remaining runs out, the motor stops.
In such case, charge it up immediately.
2. If the tool is overloaded, the motor may stop. In this case, release the switch of tool and eliminate causes of overloading. After that, you can use it again.
3. If the battery is overheated under overload work, the battery power may stop.
In this case, stop using the battery and let the battery cool. After that, you can use it again.
Furthermore, please heed the following warning and caution.
WARNING
In order to prevent any battery leakage, heat generation, smoke emission, explosion and ignition beforehand, please be sure to heed the following precautions.
1. Make sure that swarf and dust do not collect on the battery.
During work make sure that swarf and dust do not fall on the battery.
○ Make sure that any swarf and dust falling on the power tool during work do not collect on the battery.
○ Do not store an unused battery in a location exposed to swarf and dust.
Before storing a battery, remove any swarf and dust that may adhere to it and do not store it together with metal parts (screws, nails, etc.).
2. Do not pierce battery with a sharp object such as a nail, strike with a hammer, step on, throw or subject the battery to severe physical shock.
3. Do not use an apparently damaged or deformed battery.
4. Do not use the battery in reverse polarity.
5. Do not connect directly to an electrical outlets or car cigarette lighter sockets.
6. Do not use the battery for a purpose other than those specified.
7. If the battery charging fails to complete even when a specified recharging time has elapsed, immediately stop further recharging.
8. Do not put or subject the battery to high temperatures or high pressure such as into a microwave oven, dryer, or high pressure container.
9. Keep away from fi re immediately when leakage or foul odor are detected.
10. Do not use in a location where strong static electricity generates.
11. If there is battery leakage, foul odor, heat generated, discolored or deformed, or in any way appears abnormal during use, recharging or storage, immediately remove it from the equipment or battery charger, and stop use.
CAUTION
1. If liquid leaking from the battery gets into your eyes, do not rub your eyes and wash them well with fresh clean water such as tap water and contact a doctor immediately.
If left untreated, the liquid may cause eye-problems.
2. If liquid leaks onto your skin or clothes, wash well with clean water such as tap water immediately.
There is a possibility that this can cause skin irritation.
3. If you find rust, foul odor, overheating, discolor, deformation, and/or other irregularities when using the battery for the first time, do not use and return it to your supplier or vendor.
WARNING
If a conductive foreign matter enters in the terminal of lithium ion battery, the battery may be shorted, causing fire. When storing the lithium ion battery, obey surely the rules of following contents.
○ Do not place conductive debris, nail and wires such as iron wire and copper wire in the storage case.
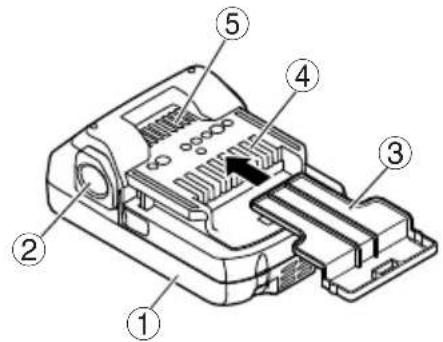
To prevent shorting from occurring, load the battery in the tool or insert securely the battery cover for storing until the ventilator is not seen (Fig. 1).
SPECIFICATIONS
POWER TOOL
| Model DV14DJL DV18DJL | | |
| No-load speed (Low/High) 0 – 350 / 0 – 1400 min-1 |
| No-load impact rate (Low/High) | 0 – 4900 / 0 – 19600 min-1 |
| Capacity | Drilling | Brick (Depth 30 mm) | 13 mm |
| Wood (Thickness 18 mm) | 32 mm | 38 mm |
| Metal (Thickness 1.6 mm) | Steel: 13 mmAluminum: 13 mm |
| Driving | Machine screw | 6 mm |
| Wood screw | 8 mm (diameter) × 50 mm (length)(Requires a pilot hole) | 8 mm (diameter) × 75 mm (length)(Requires a pilot hole) |
| Rechargeable battery | 2LEGK | BSL1415: Li-ion 14.4 V (1.5 Ah 4 celler) | BSL1815: Li-ion 18 V (1.5 Ah 5 celler) |
| 2LFGK/2LFRK | BSL1425: Li-ion 14.4 V (2.5 Ah 4 celler) | BSL1825: Li-ion 18 V (2.5 Ah 5 celler) |
| NNK/NN | — | — |
| Weight* | 1.6 kg (With BSL1415 attached) | 1.7 kg (With BSL1815 attached) |
\* Weight: According to EPTA-Procedure 01/2003
CHARGER
| Model | UC18YKSL | UC18YFSL |
| Charging voltage | 14.4 V — 18 V |
| Weight | 0.35 kg | 0.5 kg |
STANDARD ACCESSORIES
| DV14DJL(2LEGK) | 1 Plus driver bit (No. 2) ........1 |
| 2 Charger (UC18YKSL) ........1 |
| DV18DJL(2LEGK) | 3 Battery (BSL1415 or BSL1815) ........2 |
| 4 Plastic case ........1 |
| 5 Battery cover ........1 |
| DV14DJL(2LFRK) | 1 Plus driver bit (No. 2) ........1 |
| 2 Charger (UC18YKSL or UC18YFSL) .......1 |
| DV18DJL(2LFGK)(2LFRK) | 3 Battery (BSL1425 or BSL1825) ........2 |
| 4 Plastic case ........1 |
| 5 Battery cover ........1 |
| DV18DJL(NNK) | 1 Plus driver bit (No. 2) ........12 Plastic case ........1Without charger, battery and battery cover. |
| DV18DJL(NN) | 1 Plus driver bit (No. 2) ........1Without charger, battery, plastic case and battery cover. |
Standard accessories are subject to change without notice.
The charger and battery supplied are different depending on the set specification.
OPTIONAL ACCESSORIES (sold separately)
○ Battery
BSL1415S, BSL1415, BSL1425
BSL1815S, BSL1815, BSL1825
○ Hook
Optional accessories are subject to change without notice.
APPLICATIONS
○ Drilling of brick and concrete block, etc.
○ Driving and removing of machine screws, wood screws, tapping screws, etc.
○ Drilling of various metals.
○ Drilling of various woods.
BATTERY REMOVAL/INSTALLATION
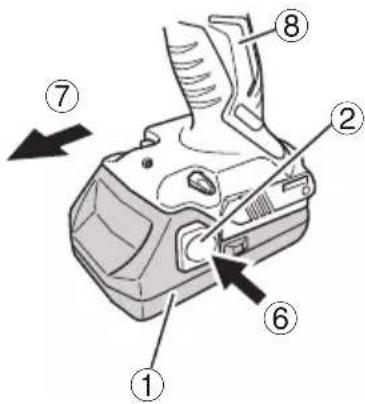
1. Battery removal
Hold the handle tightly and push the battery latch (2 pcs.) to remove the battery (See Figs. 1 and 2).
CAUTION
Never short-circuit the battery.
2. Battery installation
Insert the battery while observing its polarities (See Fig. 2).
CHARGING
Before using the power tool, charge the battery as follows.
1. Connect the charger's power cord to the receptacle.
When connecting the plug of the charger to a receptacle, the pilot lamp will blink in red (At 1-second intervals).
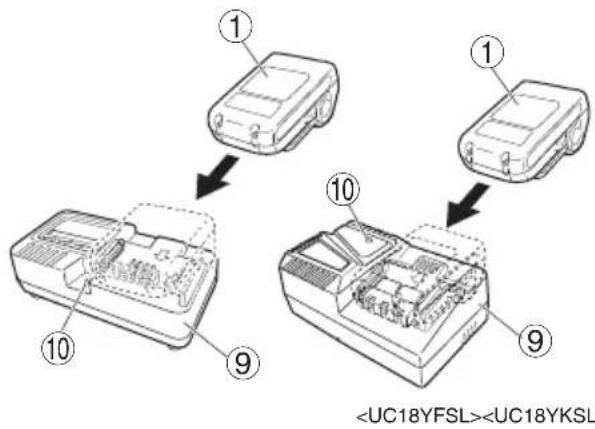
2. Insert the battery into the charger.
Firmly insert the battery into the charger as shown in Fig. 3.
3. Charging
When inserting a battery in the charger, charging will commence and the pilot lamp will light continuously in red.
When the battery becomes fully recharged, the pilot lamp will blink in red (At 1-second intervals). (See Table 1)
(1) Pilot lamp indication
The indications of the pilot lamp will be as shown in Table 1, according to the condition of the charger or the rechargeable battery.
Table 1
| Indications of the pilot lamp |
| Pilot lamp(red) | Beforecharging | Blinks | Lights for 0.5 seconds. Does not light for 0.5 seconds. (off for 0.5 seconds) | |
| Whilecharging | Lights | Lights continuously |
| Chargingcomplete | Blinks | Lights for 0.5 seconds. Does not light for 0.5 seconds. (off for 0.5 seconds) |
| Overheatstandby | Blinks | Lights for 1 second. Does not light for 0.5 seconds. (off for 0.5 seconds) | Battery overheated.Unable to charge.(Charging will commence when battery cools) |
| Chargingimpossible | Flickers | Lights for 0.1 second. Does not light for 0.1 seconds. (off for 0.1 seconds) | Malfunction in the battery or the charger |
(2) Regarding the temperature of the rechargeable battery. The temperatures for rechargeable batteries are as shown in Table 2, and batteries that have become hot should be cooled for a while before being recharged.
Table 2 Recharging ranges of batteries
| Rechargeable batteries | Temperatures at which the battery can be recharged |
| BSL1415S, BSL1415, BSL1425, BSL1815S, BSL1815, BSL1825 | 0°C – 50°C |
(3) Regarding recharging time
Depending on the combination of the charger and batteries, the charging time will become as shown in Table 3.
Table 3 Charging time (At 20°C)
| Battery\Charger | UC18YFSL UC18YKSL |
| BSL1415S, BSL1815S | Approx. 20 min. | Approx. 35 min. |
| BSL1415, BSL1815 A | approx. 22 min. | approx. 40 min. |
| BSL1425, BSL1825 A | approx. 35 min. | approx. 75 min. |
NOTE
The charging time may vary according to temperature and power source voltage.
4. Disconnect the charger's power cord from the receptacle
5. Hold the charger firmly and pull out the battery NOTE
Be sure to pull out the battery from the charger after use, and then keep it.
Regarding electric discharge in case of new batteries, etc.
As the internal chemical substance of new batteries and batteries that have not been used for an extended period is not activated, the electric discharge might be low when using them the first and second time. This is a temporary phenomenon, and normal time required for recharging will be restored by recharging the batteries 2-3 times.
(1) Recharge the batteries before they become completely exhausted.
When you feel that the power of the tool becomes weaker, stop using the tool and recharge its battery. If you continue to use the tool and exhaust the electric current, the battery may be damaged and its life will become shorter.
(2) Avoid recharging at high temperatures.
A rechargeable battery will be hot immediately after use. If such a battery is recharged immediately after use, its internal chemical substance will deteriorate, and the battery life will be shortened. Leave the battery and recharge it after it has cooled for a while.
CAUTION
☐ If the battery is charged while it is heated because it has been left for a long time in a location subject to direct sunlight or because the battery has just been used, the pilot lamp of the charger lights for 1 second, does not light for 0.5 seconds (off for 0.5 seconds). In such a case, first let the battery cool, then start charging.
When the pilot lamp flickers (at 0.2-second intervals), check for and take out any foreign objects in the charger's battery connector. If there are no foreign objects, it is probable that the battery or charger is malfunctioning. Take it to your authorized Service Center.
○ Since the built-in microcomputer takes about 3 seconds to confirm that the battery being charged with UC18YKSL or UC18YFSL are taken out, wait for a minimum of 3 seconds before reinserting it to continue charging. If the battery is reinserted within 3 seconds, the battery may not be properly charged.
PRIOR TO OPERATION
Setting up and checking the work environment
Check if the work environment is suitable by following the precautions.
HOW TO USE
1. Confi rm the clutch dial position (See Fig. 4)
The three modes of screwdriver, drill and impact drill can be switched by the position of the clutch dial in this unit.
(1) When using this unit as a screwdriver, line up the one of the numbers "1, 3, 5 ... 22" on the clutch dial, or the dots, with the triangle mark on the outer body.
(2) When using this unit as a drill, align the clutch dial drill mark “###” with the triangle mark on the outer body.
(3) When using this unit as an impact drill, align the clutch dial hammer mark "T" with the triangle mark on the outer body.
CAUTION
○ The clutch dial cannot be set between the numerals “1, 3, 5 ... 22” or the dots.
○ Do not use with the clutch dial numeral between "22" and the line at the middle of the drill mark. Doing so may cause damage (See Fig. 5).
2. Tightening torque adjustment
(1) Tightening torque
Tightening torque should correspond in its intensity to the screw diameter. When too strong torque is used, the screw head may be broken or be injured. Be sure to adjust the clutch dial position according to the screw diameter.
(2) Tightening torque indication
The tightening torque differs depending on the type of screw and the material being tightened.
The unit indicates the tightening torque with the numbers "1, 3, 5 ... 22" on the clutch dial, and a dots. The tightening torque at position "1" is the weakest and the torque is strongest at the highest number (See Fig. 4).
(3) Adjusting the tightening torque
Rotate the clutch dial and line up the numbers "1, 3, 5 ... 22" on the clutch dial, or the dots, with the triangle mark on the outer body. Adjust the clutch dial in the weak or the strong torque direction according to the torque you need.
CAUTION
☐ The motor rotation may be locked to cease while the unit is used as drill. While operating the combi drill, take care not to lock the motor.
☐ Too long hammering may cause the screw broken due to excessive tightening.
3. Rotation to Impact changeover (See Fig. 4)
The “Rotation (Rotation only)” and “Impact (Impact + Rotation)” can be switched by aligning the drill mark “” or the hammer mark “T” with the triangle mark on the outer body.
☐ To make holes in the metal, wood or plastic, switch to "Rotation (Rotation only)".
☐ To make holes in bricks or concrete blocks, switch to "Impact (Impact + Rotation)".
CAUTION
○ If an operation which is normally performed at the "Rotation" setting is performed at "Impact" setting, the effect of making holes does not only increase but it may also damage the bit or other parts.
☐ If it is hard to turn the clutch dial to hammer mark "T" position, turn the chuck slightly in either direction and then turn the clutch dial to hammer mark "T" position again.
4. Change rotation speed
Operate the shift knob to change the rotational speed. Move the shift knob in the direction of the arrow (See Figs. 6 and 7).
When the shift knob is set to "LOW", the drill rotates at a low speed. When set to "HIGH", the drill rotates at a high speed.
CAUTION
○ When changing the rotational speed with the shift knob, confirm that the switch is off.
Changing the speed while the motor is rotating will damage the gears.
When setting the shift knob to "HIGH" (high speed) and the position of the clutch dial is between "15" and "22", it may happen that the clutch does not engage and that the motor is locked. In such a case, please set the shift knob to "LOW" (low speed).
☐ If the motor is locked, immediately turn the power off. If the motor is locked for a while, the motor or battery may be burnt.
To extend the lifetime, the lithium-ion battery equips with the protection function to stop the output. Therefore, if the tool is overloaded, the motor may stop. However, this is not the trouble but the result of protection function. In this case, release the switch of tool and eliminate the causes of overloading.
5. The scope and suggestions for uses
The usable scope for various types of work based on the mechanical structure of this unit is shown in Table 4.
Table 4
| Work Clutch dial position | Suggestions | |
| Drilling | Brick | | Use for drilling purpose. |
| Wood | |
| Steel |
| Aluminum |
| Driving | Machine screw 1 – 22 | Use the bit or socket matching the screw diameter. |
| Wood screw | 1 – 2 | Use after drilling a pilot hole. |
6. How to select tightening torque and rotational speed
Table 5
| Use | Clutch Dial Position | Rotating speed selection (Position of the shift knob) |
| LOW (Low speed) HIGH (High speed) |
| Driving | Machine screw | 1 – 22 | For 4 mm or smaller diameter screws. | For 6 mm or smaller diameter screws. |
| Wood screw | 1 – | For 8 mm or smaller nominal diameter screws. | For 4.8 mm or smaller nominal diameter screws. |
| Drilling | Brick | | For 13 mm or smaller diameters. | For 8 mm or smaller diameters.(DV14DJL) |
| For 10 mm or smaller diameters.(DV18DJL) |
| Wood | | For 32 mm or smaller diameters.(DV14DJL) | For 18 mm or smaller diameters.(DV14DJL) |
| For 38 mm or smaller diameters.(DV18DJL) | For 22 mm or smaller diameters.(DV18DJL) |
| Metal | | | For drilling with a metal working drill bit. |
CAUTION
☐ The selection examples shown in Table 5 should be considered as general standard. As different types of tightening screws and different materials to be tightened are used in actual works proper adjustments are naturally necessary.
When using the combi drill with a machine screw at HIGH (high speed), a screw may damage or a bit may loose due to the tightening torque is too strong. Use the combi drill at LOW (low speed) when using a machine screw.
NOTE
The use of the battery in a cold condition (below 0 degree Centigrade) can sometimes result in the weakened tightening torque and reduced amount of work. This, however, is a temporary phenomenon, and returns to normal when the battery warms up.
7. Mounting and dismounting of the bit
(1) After inserting a driver bit, etc. into the keyless drill chuck, firmly tighten the sleeve by turning it toward the right (in the clockwise direction as viewed from the front) (See Fig. 8).
☐ If the sleeve becomes loose during operation, tighten it further. The tightening force becomes stronger when the sleeve is tightened additionally.
(2) Dismounting the bit
Loosen the sleeve by turning it toward the left (in the counter-clockwise direction as viewed from the front) (See Fig. 8).
CAUTION
When it is no longer possible to loosen the sleeve, use a vise or similar instrument to secure the bit. Set the clutch mode between 1 and 11 and then turn the sleeve to the loose side (left side) while operating the clutch. It should be easy now to loosen the sleeve.
8. Confir rm that the battery is mounted correctly
9. Check the rotational direction
The bit rotates clockwise (viewed from the rear side) by pushing the R-side of the selector button.
The L-side of the selector button is pushed to turn the bit counterclockwise (See Fig. 9) (The (L) and (R) marks are provided on the body).
CAUTION
Always use this unit with clockwise rotation, when using it as an impact drill.
10. Switch operation
☐ When the trigger switch is depressed, the tool rotates. When the trigger is released, the tool stops.
☐ The rotational speed of the drill can be controlled by varying the amount that the trigger switch is pulled. Speed is low when the trigger switch is pulled slightly and increases as the trigger switch is pulled more.
NOTE
A buzzing noise is produced when the motor is about to rotate; This is only a noise, not a machine failure.
11. For drilling into brick
Excessive pressing force never increases drilling speed. It will not only damage the drill tip or reduce working efficiency, but could also shorten the service life of drill bit. Operate the combi drill within 10-15 kg pressing force while drilling into brick.
12. Using the light
Pull the trigger switch to light up the light. The light keeps on lighting while the trigger switch is being pulled. The light goes out after releasing the trigger switch. (Fig. 10) (The light automatically goes out 10 seconds after releasing the trigger switch.)
CAUTION
Do not expose directly your eye to the light by looking into the light.
If your eye is continuously exposed to the light, your eye will be hurt.
13. Using the hook (sold separately)
The hook is used to hang up the power tool to your waist belt while working.
CAUTION
☐ When using the hook, hang up the power tool firmly not to drop accidentally.
If the power tool is dropped, it may lead to an accident.
When carrying the power tool with hooked to your waist belt, do not fit any bit to the tip of power tool. If the sharp bit such as drill is fitted to the power tool when carrying it with hooked to your waist belt, you will be injured.
○ Install securely the hook. Unless the hook is securely installed, it may cause an injury while using.
(1) Placing the hook and tightening the screws.
Install securely the hook in the groove of power tool and tighten the screws to fix the hook firmly.(Fig. 11)
(2) Removing the hook.
Remove the screws fixing the hook with Philips screw driver. (Fig. 12)
CAUTION
Only HiKOKI STANDARD ACCESSORIES phillips bit (No. 2 × 65L; Code No. 983006) may be used. Do not use other bits since they may come loose.
MAINTENANCE AND INSPECTION
Since use of as dull tool will degrade efficiency and cause possible motor malfunction, sharpen or replace the tool as soon as abrasion is noted.
2. Inspecting the mounting screws
Regularly inspect all mounting screws and ensure that they are properly tightened. Should any of the screws be loose, retighten them immediately. Failure to do so could result in serious hazard.
3. Maintenance of the motor
The motor unit winding is the very "heart" of the power tool.
Exercise due care to ensure the winding does not become damaged and/or wet with oil or water.
4. Cleaning on the outside
When the combi drill is stained, wipe with a soft dry cloth or a cloth moistened with soapy water. Do not use chloric solvents, gasoline or paint thinner, for they melt plastics.
5. Storage
Store the combi drill in a place in which the temperature is less than 40^ C and out of reach of children.
NOTE
Make sure that the battery is fully charged when stored for a long period (3 months or more). The battery with smaller capacity may not be able to be charged when used, if stored for a long period.
NOTE
Storing Lithium-ion Batteries
Make sure the lithium-ion batteries have been fully charged before storing them.
Prolonged storage of batteries with a low charge may result in performance deterioration, significantly reducing battery usage time or rendering the batteries incapable of holding a charge.
However, signifi cantly reduced battery usage time may
be recovered by repeatedly charging and using the batteries two to five times.
If the battery usage time is extremely short despite repeated charging and use, consider the batteries dead and purchase new batteries.
6. Service parts list
CAUTION
Repair, modification and inspection of HiKOKI Power Tools must be carried out by a HiKOKI Authorized Service Center.
This Parts List will be helpful if presented with the tool to the HiKOKI Authorized Service Center when requesting repair or other maintenance.
In the operation and maintenance of power tools, the safety regulations and standards prescribed in each country must be observed.
MODIFICATIONS
HiKOKI Power Tools are constantly being improved and modified to incorporate the latest technological advancements.
Accordingly, some parts may be changed without prior notice.
Please always use one of our designated genuine batteries. We cannot guarantee the safety and performance of our cordless power tool when used with batteries other than these designated by us, or when the battery is disassembled and modified (such as disassembly and replacement of cells or other internal parts).
GUARANTEE
We guarantee HiKOKI Power Tools in accordance with statutory/country specific regulation. This guarantee does not cover defects or damage due to misuse, abuse, or normal wear and tear. In case of complaint, please send the Power Tool, undismantled, with the GUARANTEE CERTIFICATE found at the end of this Handling instruction, to a HiKOKI Authorized Service Center.
NOTE
Due to HiKOKI's continuing program of research and development, the specifications herein are subject to change without prior notice.
The measured values were determined according to EN60745 and declared in accordance with ISO 4871.
Measured A-weighted sound power level: 96 dB (A)
Measured A-weighted sound pressure level: 85 dB (A)
Uncertainty KpA: 3 dB (A).
Wear hearing protection.
Vibration total values (triax vector sum) determined according to EN60745.
Impact drilling into concrete:
Vibration emission value ah,ID=11.1m/s^2
Uncertainty K = 1.5 m/s ^4
The declared vibration total value has been measured in accordance with a standard test method and may be used for comparing one tool with another.
It may also be used in a preliminary assessment of exposure.
WARNING
☐ The vibration emission value during actual use of the power tool can differ from the declared value depending on the ways in which the tool is used.
○ Identify safety measures to protect the operator that are based on an estimation of exposure in the actual conditions of use (taking account of all parts of the operating cycle such as the times when the tool is switched off and when it is running idle in addition to the trigger time).
ALLGEMEINE SICHERHEITSHINWEISE FÜR ELEKTROGERÄTE
WARNING
Lesen Sie sämtliche Sicherheitshinweise und Anweisungen durch.
Wenn die Warnungen und Anweisungen nicht befolgt werden, kann es zu Stromschlag, Brand und/oder ernsthaften Verletzungen kommen.
Bitte bewahren Sie alle Warnhinweise und Anweisungen zum späteren Nachschlagen auf.
Der Begriff „Elektrowerkzeug“ bezieht sich in den Warnhinweisen auf Elektrowerkzeuge mit Netz- (schnurgebunden) oder Akkubetrieb (schnurlos).
1) Sicherheit im Arbeitsbereich
a) Sorgen Sie für einen sauberen und gut ausgeleuchteten Arbeitsbereich.
Zugestellte oder dunkle Bereiche ziehen Unfälle förmlich an.
b) Verwenden Sie Elektrowerkzeuge niemals an Orten, an denen Explosionsgefahr besteht – zum Beispiel in der Nähe von leicht entfl ammbaren Flüssigkeiten, Gasen oder Stäuben.
Bei der Arbeit mit Elektrowerkzeugen kann es zu Funkenbildung kommen, wodurch sich Stäube oder Dämpfe entzünden können.
c) Sorgen Sie bei der Arbeit mit Elektrowerkzeugen dafür, dass sich keine Zuschauer (insbesondere Kinder) in der Nähe befi nden.
Wenn Sie abgelenkt werden, können Sie die Kontrolle über das Werkzeug verlieren.
2) Elektrische Sicherheit
a) Elektrowerkzeuge müssen mit passender Stromversorgung betrieben werden.
Nehmen Sie niemals irgendwelche Änderungen am Anschlussstecker vor.
Verwenden Sie bei Elektrowerkzeugen mit Schutzkontakt (geerdet) niemals Adapterstecker.
Stecker im Originalzustand und passende Steckdosen reduzieren das Stromschlagrisiko.
b) Vermeiden Sie Körperkontakt mit geerdeten Gegenständen wie Rohrleitungen, Heizungen, Herden oder Kühlschränken.
Bei Körperkontakt mit geerdeten Gegenständen besteht ein erhöhtes Stromschlagrisiko.
c) Setzen Sie Elektrowerkzeuge niemals Regen oder sonstiger Feuchtigkeit aus.
Wenn Flüssigkeiten in ein Elektrowerkzeug eindringen, erhöht sich das Stromschlagrisiko.
d) Verwenden Sie das Anschlusskabel nicht missbräuchlich. Tragen Sie das Elektrowerkzeug niemals an der Anschlussschnur, ziehen Sie es nicht damit heran und ziehen Sie den Stecker nicht an der Anschlussschnur aus der Steckdose.
Halten Sie die Anschlussschnur von Hitzequellen, Öl, scharfen Kanten und beweglichen Teilen fern.
Beschädigte oder verdrehte Anschlussschnüre erhöhen das Stromschlagrisiko.
e) Wenn Sie ein Elektrowerkzeug im Freien benutzen, verwenden Sie ein für den Außeneinsatz geeignetes Verlängerungskabel.
Ein für den Außeneinsatz geeignetes Kabel vermindert das Stromschlagrisiko.
f) Falls sich der Betrieb des Elektrowerkzeuges in feuchter Umgebung nicht vermeiden lässt, verwenden Sie eine Stromversorgung mit Fehlerstromschutzeinrichtung (Residual Current Device, RCD).
Durch den Einsatzeiner Fehlerstromschutzeinrichtung wird das Risiko eines elektrischen Schlages reduziert.
3) Persönliche Sicherheit
a) Bleiben Sie wachsam, achten Sie auf das, was Sie tun, und setzen Sie Ihren Verstand ein, wenn Sie mit Elektrowerkzeugen arbeiten.
Benutzen Sie keine Elektrowerkzeuge, wenn Sie müde sind oder unter Einfluss von Drogen, Alkohol oder Medikamenten stehen.
Bei der Arbeit mit Elektrowerkzeugen können bereits kurze Phasen der Unaufmerksamkeit zu schweren Verletzungen führen.
b) Benutzen Sie eine persönliche Schutzausrüstung. Tragen Sie immer einen Augenschutz.
Schutzausrüstung wie Staubmaske, rutschsichere Sicherheitsschuhe, Schutzhelm und Gehörschutz senken das Verletzungsrisiko bei angemessenem Einsatz.
c) Vermeiden Sie unbeabsichtigtes Einschalten. Achten Sie darauf, dass sich der Schalter in der Aus- (Off-) Position befindet, ehe Sie das Gerät mit der Stromversorgung und/oder Batteriestromversorgung verbinden, es aufheben oder herumtragen.
Das Herumtragen von Elektrowerkzeugen mit dem Finger am Schalter oder das Herstellen der Stromversorgung bei betätigtem Schalter zieht Unfälle regelrecht an.
d) Entfernen Sie sämtliche Einstellwerkzeuge (Einstellschlüssel), ehe Sie das Elektrowerkzeug einschalten.
Ein an einem beweglichen Teil des Elektrowerkzeugs angebrachter Schlüssel kann zu Verletzungen führen.
e) Sorgen Sie für einen festen Stand. Achten Sie jederzeit darauf, sicher zu stehen und das Gleichgewicht zu bewahren.
Dadurch haben Sie das Elektrowerkzeug in unerwarteten Situationen besser im Griff.
f) Kleiden Sie sich richtig. Tragen Sie keine lose Kleidung oder Schmuck. Halten Sie Haar, Kleidung und Handschuhe von beweglichen Teilen fern.
Lose Kleidung, Schmuck oder langes Haar kann von beweglichen Teilen erfasst werden.
g) Wenn Anschlüsse für Staubabsaug- und -sammelvorrichtungen vorhanden sind, sorgen Sie dafür, dass diese richtig angeschlossen und eingesetzt werden.
Durch Entfernen des Staubes können staubbezogene Gefahren vermindert werden.
4) Einsatz und Pfl ege von Elektrowerkzeugen
a) Uberanspruchen Sie Elektrowerkzeuge nicht. Benutzen Sie das richtige Elektrowerkzeug für Ihren Einsatzzweck.
Das richtige Elektrowerkzeug erledigt seine Arbeit bei bestimmungsgemäßem Einsatz besser und sicherer.
b) Benutzen Sie das Elektrowerkzeug nicht, wenn es sich nicht am Schalter ein- und ausschalten lässt.
Jedes Elektrowerkzeug, das nicht mit dem Schalter betätigt werden kann, stellt eine Gefahr dar und muss repariert werden.
c) Stecken Sie den Stecker der Stromversorgung oder Batteriestromversorgung vom Gerät ab, ehe Sie Einstellarbeiten vornehmen, Zubehörteile tauschen oder das Elektrowerkzeug verstauen.
Solche präventiven Sicherheitsmaßnahmen verhindern den unbeabsichtigten Anlauf des Elektrowerkzeugs und die damit verbundenen Gefahren.
d) Lagern Sie nicht benutzte Elektrowerkzeuge außerhalb der Reichweite von Kindern, lassen Sie nicht zu, dass Personen das Elektrowerkzeug bedienen, die nicht mit dem Werkzeug selbst und/oder diesen Anweisungen vertraut sind.
Elektrowerkzeuge in ungeschulten Händen sind gefährlich.
e) Halten Sie Elektrowerkzeuge in Stand. Prüfen Sie auf Fehlausrichtungen, sicheren Halt und Leichtgängigkeit beweglicher Teile, Beschädigungen von Teilen und auf jegliche andere Zustände, die sich auf den Betrieb des Elektrowerkzeugs auswirken können.
Bei Beschädigungen lassen Sie das Elektrowerkzeug reparieren, ehe Sie es benutzen.
Viele Unfälle mit Elektrowerkzeugen sind auf schlechte Wartung zurückzuführen.
f) Halten Sie Schneidwerkzeuge scharf und sauber.
Richtig gewartete Schneidwerkzeuge mit scharfen Schneidkanten bleiben weniger häufig g hängen und sind einfacher zu beherrschen.
g) Benutzen Sie Elektrowerkzeuge, Zubehör, Werkzeugspitzen und Ähnliches in Übereinstimmung mit diesen Anweisungen – beachten Sie dabei die jeweiligen Arbeitsbedingungen und die Art und Weise der auszuführenden Arbeiten.
Der Gebrauch des Elektrowerkzeuges für andere als die vorgesehenen Anwendungen kann zu gefährlichen Situationen führen.
5) Verwendung und Pfl ege der Batterie
a) Laden Sie das Gerät nur mit dem vom Hersteller empfohlenen Ladegerät auf.
Ein Ladegerät für einen speziellen Batterietyp kann bei Verwendung mit anderen Batterien zu Gefahren führen.
b) Verwenden Sie für das Gerät nur die speziell empfohlenen Batterien.
Eine Verwendung von anderen Batterien kann zu Verletzungen und Bränden führen.
c) Ist die Batterie nicht in Gebrauch, achten Sie darauf, dass sie nicht mit metallischen Gegenständen, beispielsweise Büroklammern, Münzen, Schlüssel, Nägel, Schrauben in Kontakt kommt, da diese Gegenstände einen Kurzschluss der Anschlüsse verursachen könnten.
Ein Kurzschluss der Batterieanschlüsse kann zu Verbrennungen oder Bränden führen.
d) Im Falle von Störungen, kann Flüssigkeit aus der Batterie austreten. Vermeiden Sie in diesem Fall jeglichen Kontakt. Sollten Sie dennoch mit der Batterie in Berührung kommen, waschen Sie die betroff eine Stelle gründlich mit Wasser ab. Ist die Flüssigkeit ins Auge geraten, suchen Sie einen Arzt auf.
Ausgetretene Batterieflüssigkeiten können zu Reizungen oder Verbrennungen führen.
6) Service
a) Lassen Sie Elektrowerkzeuge durch qualifi zierte Fachkräfte und unter Einsatz passender, zugelassener Originalteile warten.
Dies sorgt dafür, dass die Sicherheit des Elektrowerkzeugs nicht beeinträchtigt wird.
VORSICHT
Von Kindern und gebrechlichen Personen fernhalten. Werkzeuge sollten bei Nichtgebrauch außerhalb der Reichweite von Kindern und gebrechlichen Personen aufbewahrt werden.
SICHERHEITSHINWEISE FÜR AKKUSCHLAGSCHRAUBER
1. Tragen Sie beim Schlagbohren Ohrenschützer.
Starke und/oder dauerhafte Lärmbelastung kann zu Gehörverlust führen.
2. Benutzen Sie die Zusatzgriffe, sofern Sie dem Werkzeug mitgeliefert wurden.
Wenn Sie die Kontrolle über das Werkzeug verlieren, kann es zu Verletzungen kommen.
3. Halten Sie das Elektrowerkzeug an den isolierten Grifflächen, wenn Sie Arbeiten ausführen, bei denen das Schneidwerkzeug oder die Befestigungsvorrichtung mit verborgenen Kabeln in Kontakt geraten könnte. Wenn Schneidewerkzeuge oder Befestigungsvorrichtungen auf einen "stromführenden" Draht treffen, können die freigelegten Metallteile das Elektrowerkzeug "unter Strom setzen" und dem Bediener einen elektrischen Schlag versetzen.
4. Die Batterie immer bei einer Temperatur von 0 – 40°C laden. Laden bei einer Temperatur, die niedriger als 0°C ist, wird gefährliche Überladung verursachen. Die Batterie kann nicht bei einer Tem peratur über 40°C geladen werden.
Die beste Temperatur zum Laden wäre von 20 – 25°C.
5. Nach Beendung einer Ladung, lassen Sie das Ladegerät ungefähr 15 Minuten ruhen bevor die nächste Batterieladung unternommen wird.
Nicht mehr als zwei Batterien nacheinander laden.
6. Keine Fremdkörper durch das Anschlußloch der Batterie eindringen lassen.
7. Niemals die Batterie und das Ladegerät auseinandernehmen.
8. Niemals die Batterie kurzschließen. Kurzschluß der Batterie verursacht eine zu große Stromzufuhr und überhitzung, wodurch Durchbrennen oder Schaden beider Batterie entsteht.
9. Die Batterie nicht ins Feuer werfen.
Sie könnte dabei explodieren.
10. Bringen Sie die Batterie zum Geschäft, wo Sie sie gekauft haben, sobald die Lebensdauer der Batterie zur Neige geht. Die leere Batterie nicht wegwerfen.
11. Das Benutzen einer leeren Batterie beschädigt das Ladegerät.
12. Darauf achten, daß keine Gegenstände durch Belüftungsschlitze das Ladegeräts in das Gerät eindringen. Wenn Metallobjekte oder entzündliche Gegenstände durch die Belüftungsschlitze des Ladegeräts eindringen, kann dies zu elektrischen Schlägen führen oder das Ladegerät beschädigen.
13. Beim Einspannen von Bohrspitzen oder Stangenbohrern in das schlüssellose Spannfutter die Bohrhülse ausreichend festdrehen. Bei nicht ausreichend festgedrehter Bohrhülse kann die Bohrspitze verrutschen oder herausfallen und Verletzungen verursachen.
14. Der Motor dieses Produkts enthält einen starken Dauermagneten.
Beachten Sie die folgenden Vorsichtsmaßnahmen bezüglich am Werkzeug haftender Späne und der Auswirkungen des Dauermagneten auf elektronische Geräte.
ACHTUNG
○ Legen Sie das Werkzeug nicht auf einen Arbeitstisch oder Arbeitsbereich, auf dem Metallspäne liegen.
Die Späne könnten am Werkzeug haften und zu Verletzungen oder Funktionsstörungen führen.
○ Wenn Späne am Werkzeug haften, berühren Sie es nicht. Entfernen Sie die Späne mit einer Bürste.
Anderenfalls kann es zu Verletzungen kommen.


○ Wenn Sie einen Herzschrittmacher oder ein anderes elektronisches medizinisches Gerät benutzen, betätigen Sie das Werkzeug nicht und halten Sie sich von ihm fern.
Es kann zu einer Beeinträchtigung der Funktionsfähigkeit des elektronischen Geräts kommen.
○ Verwenden Sie das Werkzeug nicht in der Nähe von Präzisionsgeräten wie Mobiltelefonen, Magnetkarten oder elektronischen Speichermedien.
Anderenfalls kann es zu Betriebsstörungen, Defekt oder Datenverlust kommen.
WARNUNG ZUR LITHIUM-IONEN-BATTERIE
Um die Lebensdauer der Lithium-Ionen-Batterie zu verlängern, ist dieser mit einer Schutzfunktion zum Stoppen der Leistungsabgabe ausgestattet.
In den unten beschriebenen Fällen 1 bis 3 kann es vorkommen, dass der Motor trotz Betätigung des Schalters angehalten wird. Dies ist kein Defekt sondern das Resultat der Schutzfunktion.
1. Wenn die verbleibende Batterieleistung nicht mehr ausreicht, schaltet der Motor ab.
Laden Sie in einem solchen Fall die Batterie umgehend auf.
2. Wenn das Werkzeug überlastet ist, kann es zum Abschalten des Motors kommen. Lassen Sie in diesem Fall den Schalter des Geräts los und beseitigen Sie die Ursache der Überlastung. Danach können Sie das Gerät wieder verwenden.
3. Kommt es während des Betriebs zu einer Erhitzung der Batterie, wird das Gerät unter Umständen angehalten. Unterbrechen Sie in diesem Fall Ihre Arbeit und lassen Sie die Batterie abkühlen. Anschließend können Sie das Gerät wieder normal verwenden.
Bitte beachten Sie die folgenden Warnhinweise.
WARNUNG
Zur Vermeidung einer ausgelaufenen Batterie, Erwärmung, Rauchentwicklung, Explosionen und vorzeitiger Zündung beachten Sie bitte die folgenden Vorsichtsmaßnahmen.
1. Stellen Sie sicher, dass sich Späne und Staub nicht auf der Batterie ansammeln.
○ Stellen Sie während der Arbeit sicher, dass Späne und Staub nicht auf die Batterie fallen.
○ Stellen Sie sicher, dass Staub und Späne, die während der Bearbeitung auf das Elektrowerkzeug fallen, nicht in die Batterie gelangen.
○ Lagern Sie ungebrauchte Batterien nicht an Plätzen, an denen Staub oder Späne anfallen.
○ Vor dem Einlagern einer Batterie sind sämtlicher Staub und Späne zu entfernen. Weiterhin ist zu berücksichtigen, dass die Batterie nicht gemeinsam mit Metallteilen (Schrauben, Nägel, usw.) zu lagern ist.
2. Achten Sie darauf, dass die Batterie nicht durch einen spitzen Gegenstand, beispielsweise einen Nagel, beschädigt wird. Vermeiden Sie Schläge mit dem Hammer. Treten Sie nicht gegen die Batterie, werfen Sie diese nicht, und vermeiden Sie Stöße.
3. Beschädigte oder verformte Batterien dürfen nicht weiter verwendet werden.
4. Achten Sie auf den richtigen Anschluss der Pole.
5. Schließen Sie die Batterie nicht direkt an elektrische Ausgänge oder Zigarettenanzünder im Auto an.
6. Verwenden Sie die Batterie nur für den angegebenen Zweck.
7. Falls die Batterie nach Verstreichen der angegebenen Ladezeit nicht vollständig aufgeladen ist, brechen Sie den Ladevorgang unverzüglich ab.
8. Vermeiden Sie hohe Temperaturen und hohen Druck, wie er beispielsweise in der Mikrowelle, einem Trockner oder einem Hochdruckbehälter auftritt.
9. Wenn Sie ein Leck oder Rußgeruch feststellen, vermeiden Sie jeglichen Kontakt mit Feuerstellen.
10. Vermeiden Sie eine Verwendung an Orten, an denen starke statische Elektrizität erzeugt wird.
11. Werden ein Leck, Rußgeruch, Erwärmung, Verfärbungen, Verformungen oder sonstige Anomalitäten während der Verwendung, des Aufl adens oder der Lagerung festgestellt, entfernen Sie die Batterie unverzüglich vom Gerät oder dem Ladegerät und beenden Sie die Anwendung.
VORSICHT
1. Tritt die auslaufende Flüssigkeit in Kontakt mit Ihren Augen, reiben Sie diese nicht, sondern waschen Sie sie mit sauberem (Leitungs-) Wasser gut aus und suchen Sie unverzüglich einen Arzt auf.
Ohne sachgemäße Behandlung können Augenverletzungen auftreten.
2. Wenn die ausgelaufene Flüssigkeit auf Haut oder Kleidung triff t, waschen Sie diese unverzüglich mit sauberem Wasser ab.
Es besteht die Gefahr von Hautreizungen.
3. Beim Auftreten von Rost, Rußgeruch, Erwärmung, Verfärbungen, Verformungen oder sonstigen Anomalitäten während der ersten Verwendung der Batterie, ist diese nicht weiter zu verwenden. Bringen Sie die Batterie zum Händler oder Verkäufer zurück.
WARNUNG
Falls leitfähige Materialien die Kontakte des Lithium-Ionen Akkus berühren, besteht die Gefahr eines Kurzschlusses, was u. U. einen Brand verursachen kann. Zum Aufbewahren des Lithium-Ionen Akkus stets folgende Hinweise beachten.
○ Keine leitfähigen Materialien, Metallnägel oder Drähte wie z.B. Stahl- oder Kupferdrähte in das Akkufach platzieren.
○ Um Kurzschlüsse zu verhindern, den Akku in das Gerät einsetzen bzw. die Akkuabdeckung ordnungsgemäß aufsetzen, so dass der Lüfter vollständig verdeckt ist (Abb. 1).
TECHNISCHE DATEN
ELEKTRO-WERKZEUG
| Modell DV14DJL DV18DJL | | |
| Leerlaufdrehzahl (Niedrig/Schnell) 0 – 350 / 0 – 1400 min -1 |
| Leerlauf-Schlaggeschwindigkeit(Niedrig/Schnell) | 0 – 4900 / 0 – 19600 min-1 |
| Kapazität | Bohren | Ziegel(Tiefe 30 mm) | 13 mm |
| Holz(Dicke 18 mm) | 32 mm 38 mm | |
| Metall(Dicke 1,6 mm) | Stahl: 13 mm,Aluminum: 13 mm |
| Ein-schrauben | Maschinenschraube | 6 mm |
| Holzschraube | 8 mm (Durchmesser) × 50 mm (Länge)(Bei vorgebohrtem Loch.) | 8 mm (Durchmesser) × 75 mm (Länge)(Bei vorgebohrtem Loch.) |
| Wiederaufl adbare Batterie | 2LEGK BSL1415: Li-ion 14,4 V (1,5 Ah 4 Zellen) BSL1815: Li-ion 18 V (1,5 Ah 5 Zellen) |
| 2LFGK/2LFRK BSL1425: Li-ion 14,4 V (2,5 Ah 4 Zellen) BSL1825: Li-ion 18 V (2,5 Ah 5 Zellen) |
| NNK/NN | —— —— | |
| Gewicht* | 1,6 kg (Mit BSL1415 angebracht) 1,7 kg (Mit BSL1815 angebracht) |
\* Gewicht: Gemäß EPTA-Verfahren 01/2003
LADEGERÄT
| Modell UC18YKSL UC18YFSL | |
| Ladespannung 14,4 V – 18 V |
| Gewicht 0,35 kg 0,5 kg | |
STANDARDZUBEHÖR
| DV14DJL(2LEGK)DV18DJL(2LEGK) | 1 Plusschrauber (Nr. 2)......1 |
| 2 Ladegerät (UC18YKSL)......1 |
| 3 Batterie (BSL1415 oder BSL1815)......2 |
| 4 Plastikgehäuse......1 |
| 5 Batterieabdeckung......1 |
| DV14DJL(2LFRK)DV18DJL(2LFGK)(2LFRK) | 1 Plusschrauber (Nr. 2)......1 |
| 2 Ladegerät (UC18YKSL oder UC18YFSL)...1 |
| 3 Batterie (BSL1425 oder BSL1825)......2 |
| 4 Plastikgehäuse......1 |
| 5 Batterieabdeckung......1 |
| DV18DJL(NNK) | 1 Plusschrauber (Nr. 2)......12 Plastikgehäuse......1Ladegerät, Batterie und Batterieabdeckungsind im Lieferumfang nicht enthalten. |
| DV18DJL(NN) | 1 Plusschrauber (Nr. 2)......1Ladegerät, Batterie, Plastikgehäuse undBatterieabdeckung sind im Lieferumfangnicht enthalten. |
Das Standardzubehör kann ohne vorherige Bekanntmachung jederzeit geändert werden.
Das mitgelieferte Ladegerät und der Akku sind je nach Spezifikation des Sets verschieden.
SONDERZUBEHÖR (separat zu beziehen)
○ Batterie
BSL1415S, BSL1415, BSL1425
BSL1815S, BSL1815, BSL1825
○ Haken
Das Sonderzubehör kann ohne vorherige Bekannt-machung jederzeit geändert werden.
VERWENDUNG
○ Bohren von Ziegeln, Zementblöcken usw.
○ Einschrauben und Entfernung von Maschinenschrauben, Holzschrauben, Schneidschrauben, etc.
○ Bohren von verschiedenen Metallen.
○ Bohren von verschiedenen Hölzern.
HERAUSNEHMEN/EINSETZEN DER BATTERIE
1. Herausnehmen der Batterie
Den Handgriff festhalten und die Batterieverriegelungen (2 Stück) drücken, um die Batterie herauszunehmen (Siehe Abb. 1 und 2).
VORSICHT
Die Kontakte des Batterie niemals kurzschließen.
2. Einsetzen des Batterie
Den Batterie unter Beachtung der richtigen Richtung in das Gerät einsetzen (Siehe Abb. 2).
LADEN
Vor Gebrauch des Power-Werkzeugs, die Batterie wie folgt laden.
1. Den Netzstecker des Ladegerätes in eine Steckdose einstecken.
Beim Anschluss des Ladegeräts an eine Netzsteckdose blinkt die Kontrolllampe rot auf (in Sekundenabständen).
2. Eine Batterie in das Ladegerät einlegen.
Die Batterie in das Ladegerät stecken, wie in Abb. 3 gezeigt.
3. Laden
Beim Einlegen einer Batterie in das Ladegerät wird der Ladevorgang fortgesetzt, und leuchtet das Kontrollampe kontinuierlich in Rot auf.
Wenn die Batterie voll aufgeladen ist, blinkt die Kontrolllampe in rot (in Sekundenabständen). (Siehe Tafel 1)
(1) Anzeige der Kontrolllampe
Die Änzeigen der Kontrolllampe leuchten gemäß den Beschreibungen in Tafel 1 auf, entsprechend dem Zustand des verwendeten Ladegeräts oder der Akkubatterie.
Tafel 1
| Anzeigen der Kontrolllampe |
| Kontrollampe (rot) | Vor dem Laden Blinkt | Leuchtet für 0,5 Sekunden. Erlischt für 0,5 Sekunden. (Aus für 0,5 Sekunden) | |
| Beim Laden Leuchtet | Leuchtet kontinuierlich |
| Laden durchgeführt | Blinkt | Leuchtet für 0,5 Sekunden. Erlischt für 0,5 Sekunden. (Aus für 0,5 Sekunden) |
| Wegen Überhitzung angehalten | Blinkt | Leuchtet für 1 Sekunden. Erlischt für 0,5 Sekunden. (Aus für 0,5 Sekunden) |
| Laden unmöglich | Flackert | Leuchtet für 0,1 Sekunden. Erlicht für 0,1 Sekunden. (Aus für 0,1 Sekunden) |
(2) Über die Temperatur der Akkubatterie
Die Temperaturen für Batterien sind in Tafel 2 gezeigt.
Erhitzte Batterien vor dem Laden abkühlen lassen.
Tafel 2 Aufladebereiche für Batterien
| Akkubatterien | Temperaturen, bei denen die Batterie geladen werden kann |
| BSL1415S, BSL1415, BSL1425, BSL1815S, BSL1815, BSL1825 | 0°C – 50°C |
(3) Über die Aufl adezeit
Je nach Kombination von Ladegerät und Batterien wird die Aufladezeit wie in Tafel 3 gezeigt.
Tafel 3 Aufl adezeit (bei 20°C)
| Batterie\Ladegerät | UC18YFSL UC18YKSL |
| BSL1415S, BSL1815S Etwa. 20 min. Etwa. 35 min. |
| BSL1415, BSL1815 Etwa. 22 min. Etwa. 40 min. |
| BSL1425, BSL1825 Etwa. 35 min. Etwa. 75 min. |
HINWEIS
Die Aufl adezeit kann je nach Temperatur und Ladespannung unterschiedlich sein.
4. Den Netzstecker des Ladegeräts aus der Steckdose ziehen
5. Das Ladegerät festhalten und die Batterie herausziehen
HINWEIS
Achten Sie darauf, die Batterie nach der Verwendung aus dem Ladegerät zu nehmen und sie aufzubewahren.
Zur Leistung von neuen Batterien
Da die Batteriechemikalien von neuen Batterien und Batterien, die längere Zeit über nicht verwendet wurden, noch nicht bzw. nicht mehr aktiv sind, kann die Leistung von beim ersten und zweiten Einsatz niedrig sein. Dies ist eine vorübergehende Erscheinung, und die normale Batterieleistung wird nach zwei- oder dreimaligem Aufl aden der Batterien wieder hergestellt.
Verlängerung der Lebensdauer von Batterien
(1) Die Batterien aufl aden, bevor sie völlig erschöpft sind. Wenn festgestellt wird, daß die Leistung des Werkzeugs nachläßt, mit der Arbeit aufhören und die Batterie aufl aden. Wenn das Werkzeug weiter verwendet wird und die Batterie völlig erschöpft wird, kann die Batterie beschädigt und ihre Lebensdauer verkürzt werden.
(2) Nicht bei hohen Temperaturen aufl aden.
Eine Akkubatterie erhitzt sich bei der Verwendung. Wenn solch eine Batterie sofort nach der Verwendung aufgeladen wird, werden die Batteriechemikalien beeinträchtigt, und die Batterielebensdauer nimmt ab. Die Batterie etwas stehen lassen und erst aufl aden, wenn sie sich abgekühlt hat.
VORSICHT
☐ Wenn die Akkubatterie geladen wird, während sie aufgrund längerer Einwirkung von direktem Sonnenlicht erhitzt wurde, oder wenn sie soeben verwendet wurde, leuchtet die Steuerleuchte des Ladegeräts 1 Sekunde und erlischt dann für 0,5 Sekunden (leuchtet 0,5 Sekunden nicht). In diesem Fall zuerst die Batterie abkühlen lassen und erst dann mit dem Aufl aden beginnen.
☐ Wenn die Kontrollampe in schneller Folge flackert (in 0,2-Sekunden-Abständen), nachsehen ob Fremdkörper im Batterieanschluss des Ladegeräts sind und diese ggf. herausnehmen. Wenn keine Fremdkörper im Batteriefach sind, liegt wahrscheinlich eine Fehlfunktion bei der Batterie oder beim Ladegerät vor. Die Teile vom autorisierten Kundendienst prüfen lassen.
Da der eingebaute Mikrocomputer etwa 3 Sekunden braucht, um zu bestätigen, dass die im UC18YKSL oder UC18YFSL zum Laden eingelegte Batterie herausgenommen wird, sollten Sie mindestens 3 Sekunden warten, bevor Sie die Batterie zum Fortsetzen des Aufladens einlegen. Wenn die Batterie innerhalb von 3 Sekunden eingelegt wird, kann es sein, dass sie nicht richtig geladen wird.
VOR INBETRIEBNAHME
Aufstellung und überprüfung der Arbeitsumgebung
Prüfen Sie, ob die Arbeitsumgebung folgenden Vorsichtsbedingungen entspricht.
ANWENDUNG
1. Bestätigen Sie die Position der Kupplungsskala (Siehe Abb. 4)
Die drei Modi Schraubenzieher, Bohrer und Schlagbohrer können bei diesem Gerät durch die Stellung der Kupplungsskala umgeschaltet werden.
(1) Richten Sie bei Verwendung dieses Gerätes als Schraubenzieher eine der Zahlen „1, 3, 5 ... 22“ auf der Kupplungsskala oder den Punkt auf die Dreiecksmarkierung am äußeren Körper aus.
(2) Richten Sie bei Verwendung dieses Gerätes als Bohrer das Bohrer-Zeichen „„“ der Kupplungsskala auf die Dreieckmarkierung am äußeren Körper aus.
(3) Richten Sie zur Verwendung dieses Gerätes als Schlagbohrer die Hammermarkierung „T“ an der Kupplungsskala auf die Dreiecksmarkierung am äußeren Körper aus.
VORSICHT
○ Die Kupplungsskala kann nicht zwischen den Zahlen „1, 3, 5 ... 22“ oder den Punkten eingestellt werden.
○ Verwenden Sie das Gerät nicht mit der Kupplungsskalenzahl zwischen „22“ und der Linie in der Mitte des Bohrer-Zeichens. Dies kann Beschädigung verursachen (Siehe Abb. 5).
2. Einstellen des Anzugsdrehmoments
(1) Anzugsdrehmoment
Das Anzugsdrehmoment sollte dem Schraubendurchschnitt entsprechen.
Wenn zuviel Drehmoment angewandt wird, kann die Schraube brechen oder am Kopf beschädigt werden.
Achten Sie darauf, die Kupplungsskalenposition entsprechend dem Schraubendurchmesser einzustellen.
(2) Anzeige des Anzugsdrehmoments
Das Anzugsdrehmoment unterscheidet sich entsprechend der Art der Schraube und des angezogenen Materials.
Das Gerät zeigt das Anzugsdrehmoment mit den Zahlen „1, 3, 5 ... 22“ auf der Kupplungsskala und einem Punkt an. Das Anzugsdrehmoment ist am schwächsten an der Position „1“ und am stärksten an der höchsten Zahl (Siehe Abb. 4).
(3) Einstellen des Anzugsdrehmoments
Drehen Sie die Kupplungsskala und richten Sie eine der Zahlen „1, 3, 5 ... 22“ auf der Kupplungsskala oder den Punkt auf die Dreiecksmarkierung am äußeren Gehäuse aus. Verstellen Sie die Kappe entsprechend dem erforderlichen Drehmoment in Richtung von stärkerem oder schwächerem Drehmoment.
VORSICHT
○ Die Motordrehung kann anhalten, während das Werkzeug als Bohrer verwendet wird.
Achten Sie darauf, den Motor nicht bis zum Stillstand zu belasten, wenn Sie das Gerät als Schlagbohrschrauber verwenden.
○ Eine zu lange Schlagbewegung könnte wegen zu starkem Anziehen der Schraube die Schraube brechen.
3. Umschalten von Schlagbohren zu Bohren (Siehe Abb. 4)
Umschalten zwischen „Schlagbohren (Schlagen + Drehen)“ und „Bohren (nur Drehen)“ erfolgt durch Stellen der Bohrmarkierung „” bzw. der Hammermarkierung „T“ auf die Dreieckmarkierung am äußeren Körper.
○ Zum Bohren in Metall, Holz oder Plastik auf „Bohren (nur Drehen)“ umschalten.
○ Zum Bohren in Ziegeln oder Betonblöcken auf „Schlagbohren (Schlagen + Drehen)“ umschalten.
VORSICHT
○ Wenn ein normalerweise mit der Einstellung für „Bohren“ durchgefuhrter Betrieb mit der Einstellung für „Schlagbohren“ durchgeführt wird, wird nicht nur die Bohrwirkung verstärkt, sondern Beschädigung des Bohrers oder anderer Teile ist auch möglich.
○ Wenn sich die Kupplungsskala schwer auf die Hammermarkierung „T“ drehen lässt, drehen Sie das Bohrfutter leicht in beide Richtungen und drehen Sie dann die Kupplungsskala wieder auf die Hammermarkierung „T“.
4. Wechsel der Drehzahl
Die Drehzahl mit dem Schaltknopf wechseln. Den Schaltknopf in Richtung Pfeil bewegen (Siehe Abb. 6 und 7). Wenn der Schaltknopf auf „LOW“ eingestellt ist, dreht sich der Bohrer langsam. Wenn auf „HIGH“ eingestellt ist, dreht sich der Bohrer schnell.
VORSICHT
○ Beim Wechseln der Drehzahl mit dem Schaltknopf sich vergewissern, daß der Schalter auf ZU eingestellt und gesperrt ist.
Ändern der Geschwindigkeit bei laufendem Motor beschädigt das Getriebe.
○ Wenn Sie den Schaltknopf auf HIGH (hohe Geschwindigkeit) einstellen und die Kupplung auf einen Wert zwischen 15 und 22 eingestellt ist, kann es vorkommen, dass die Kupplung nicht richtig greift und der Motor blockiert. Stellen Sie in diesem Fall bitte den Schaltknopf auf „LOW“ (niedrige Drehzahl).
☐ Falls der Motor gesperrt ist, sofort abstellen. Falls der Motor längere Zeit in gesperrtem Zustand bleibt, mag es vorkommen, daß er oder der Akkumulator überhitzt werden.
Um die Lebensdauer der Lithium-Ionen-Batterie zu verlängern, ist dieser mit einer Schutzfunktion zum Stoppen der Leistungsabgabe ausgestattet. Daher kann es bei Überlastung des Werkzeugs zum Abschalten des Motors kommen. Dies ist jedoch kein Defekt sondern das Resultat der Schutzfunktion. Lassen Sie in diesem Fall den Schalter des Geräts los und beseitigen Sie die Ursache der Überlastung.
5. Einsatzbereich und Angaben
Der Einsatzbereich, basierend auf der Mechanik dieses Werkzeugs, wird in der folgenden Tafel 4 gezeigt:
Tafel 4
| Arbeit | Drehmomentskalen-position | Anweisung |
| Bohren | Ziegel | | Für Bohrarbeiten verwenden. |
| Holz | |
| Stahl |
| Aluminium |
| Einschrauben | Maschinenschreube 1 – 22 | Bohrespitze oder Hülse dem Schraubendurchschnitt verwenden. |
| Holzschraube | 1 – 2 | Nach bohren von Führungsloch verwenden. |
6. Wahl von Anziehdrehmoment und Drehfrequenz
Tafel 5
| Verwendung | Drehmomentskalen-position | Wahl der Drehgeschwindigkeit (Stellung des Schaltknopfs) |
| LOW (niedrige Geschwindigkeit) HIGH (hohe Geschwindigkeit) |
| Ein-schrauben | Maschinenschraube | 1 – 22 | Für Schrauben von 4 mm Durchmesser oder weniger. | Für Schraube von 6 mm Durchmesser oder weniger. |
| Holzschraube | 1 – 2 | Für 8 mm Durchmesser oder weniger Nenndurchschnitt. | Für 4,8 mm Durchmesser oder weniger Nenndurchschnitt. |
| Bohren | Ziegel | | Für 13 mm Durchmesser oder weniger. | Für 8 mm Durchmesser oder weniger. (DV14DJL) |
| Für 10 mm Durchmesser oder weniger. (DV18DJL) |
| Holz | | Für 32 mm Durchmesser oder weniger. (DV14DJL) | Für 18 mm Durchmesser oder weniger. (DV14DJL) |
| Für 38 mm Durchmesser oder weniger. (DV18DJL) | Für 22 mm Durchmesser oder weniger. (DV18DJL) |
| Metall | | | Für Bohren mit Eisenbearbeitungsbohrer. |
VORSICHT
Die Beispiele in Tafel 5 sollten als allgemeine Regeln verstanden werden. Da in der Praxis verschiedene Schrauben und unterschiedliche Materialien verwendet werden, können Anpassungen natürlich erforderlich sein.
○ Wenn Sie den Schlagbohrschrauber in HIGH-Einstellung (hohe Geschwindigkeit) mit einer Maschinenschraube verwenden, kann sich durch das hohe Anzugsdrehmoment das Bit lockern oder die Schraube beschädigt werden. Stellen Sie den Schlagbohrschrauber auf LOW (niedrige Geschwindigkeit) ein, wenn Sie mit Maschinenschrauben arbeiten.
HINWEIS
Die Verwendung der Batterie in kalter Umgebung (unter 0°C) kann möglicherweise in geschwächtem Anzugsdrehmoment und verringerter Arbeitsleistung resultieren. Dies ist jedoch eine zeitweilige Erscheinung, und die Leistung wird wieder normal, wenn sich die Batterie erwärmt.
7. Anbringen und Abnehmen des Schrauberbit
(1) Nach dem Einsetzen eines Schrauberbits o. dergl. in den Akku-Schlagbohrer ziehen Sie die Manschette fest an, indem Sie sie nach rechts drehen (im Unrzeigersinn von vorne gesehen) festdrehen (Siehe Abb. 8).
○ Sollte, sich das Bohrfutter während des Betriebs lockern, ist diese wieder festzudrehen. Eine fest zugedrehte gewährleistet erhöhte Spannkraft.
(2) Abnehmen der Werkzeugspitze
Lockern Sie die Manschette, indem Sie sie nach links drehen (gegen den Uhrzeigersinn von vorne gesehen) lösen (Siehe Abb. 8).
VORSICHT
Wenn das Bohrfutter nicht losgeschraubt werden kann, das eingesteckte Werkzeug in einem Schraubstock o.ä. befestigen, die Kupplung auf 1–11 stellen und das Bohrfutter gegen den Uhrzeigersinn drehen, während die Kupplung betätigt wird. Das Lösen des Bohrfutters sollte jetzt problemlos möglich sein.
8. Sich vergewissern, daß die Batterie richtig angebracht ist
9. Die Drehrichtung nachprüfen
Die Bohrerspitze dreht sich nach rechts (von der Hinterseite gesehen), wenn auf die R-Seite des Wählhebels gedrückt wird.
Um die Bohrerspitze nach links zu drehen auf die L-Seite des Wählhebels drücken (Siehe Abb. 9). (Die (L) und (R) Zeichen sind auf dem Körper markiert).
VORSICHT
Immer dieses Gerät im Uhrzeigersinn betätigen, wenn es als Schlagbohrer gebraucht wird.
10. Betätigung des Schalters
○ Wenn der Schalter gedrückt ist, dreht sich das Werkzeug. Wenn ausgelöst, wird das Werkzeug abgestellt.
○ Die Drehgeschwindigkeit des Bohrers kann durch Verändern des Betrags des Ziehens am Auslöser geregelt werden. Die Geschwindigkeit ist niedrig, wenn der Auslöser nur gering gezogen wird und nimmt zu, wenn er stärker gezogen.
HINWEIS
Wenn der Motor zu drehen beginnt, ist ein Summen zu hören. Dabei handelt es sich nicht um eine Störung.
Übermäßiger Druck erhöht niemals die Bohrgeschwindigkeit. Er verursacht nicht nur Beschädigung der Bohrerspitze und verringerte Arbeitswirksamkeit, sondern verkürzt auch die Standzeit des Bohrers. Betreiben Sie den Akku-Schlagbohrschrauber beim Bohren von Ziegelsteinen mit einem Druck von 10 bis 15 kg.
12. Verwendung des Lichts
Ziehen Sie den Auslöseschalter, damit die Lampe leuchtet. Solange der Auslöseschalter gezogen ist, leuchtet die Lampe. Wenn Sie den Auslöseschalter loslassen, erlischt das Licht. (Abb. 10)
(Wenn Sie den Auslöseschalter loslassen, erlischt das Licht nach 10 Sekunden automatisch.)
ACHTUNG
Niemals direkt in die LED blicken!
Wird das Auge kontinuierlich den LED-Strahlen ausgesetzt, kann es zu Augenverletzungen kommen.
13. Verwendung des Hakens (separat zu beziehen)
Der Haken dient während des Arbeitens zum Anhängen des Werkzeugs an einen Gürtel.
VORSICHT
○ Beim Aufhängen am Haken sicherstellen, dass das Werkzeug sicher den Gürtel fasst und nicht fallen kann. Bei Fall des Werkzeugs besteht Unfallgefahr.
○ Beim Tragen am Gürtel darf das Werkzeug nicht mit einem Bohrer usw. bestückt sein. Befi ndet sich ein scharfer Bohrer o.Ä. im Futter, während das Werkzeug am Gürtel getragen wird, besteht Verletzungsgefahr!
☐ Den Haken ordnungsgemäß anbringen. Falls der Haken nicht korrekt befestigt ist, besteht Verletzungsgefahr beim Einsatz.
(1) Anbringen des Hakens und Festziehen der Schrauben. Den Haken fest in die Nut am Werkzeug einpassen und die Halteschrauben des Werkzeugs ordnungsgemäß festziehen. (Abb. 11)
(2) Abnehmen des Hakens
Die Halteschrauben des Hakens mit einem Kreuzschraubendreher entfernen. (Abb. 12)
VORSICHT
Nur der Kreuzschlitzeinsatz (Nr. 2 × 65L; Code Nr. 983006) des HiKOKI-STANDARDZUBEHÖRS darf verwendet werden. Verwenden Sie keine anderen Einsätze, da diese sich lösen können.
WARTUNG UND INSPEKTION
1. Nachprüfen des Werkzeuges
Da ein stumpfes Werkzeug die Leistung vermindern wird und eventuell ein schlechtes Funktionieren des Motors verursachen wird, das Werkzeug schärfen oder es wechseln sobald Verschleiß sichtbar wird.
2. Nachprüfen der Befestigungsschrauben
Alle Befestigungsschrauben regelmäßig auf gute Festschraubung nachprüfen. Falls irgendeine der Schrauben locker sein sollte, sofort anziehen. Vernachlässigung dieses Punktes kann zu erheblicher Gefahr führen.
3. Wartung des Motors
Die Motorwicklung ist das „Herz“ des Elektrowerkzeugs. Daher ist besonders sorgfältig darauf zu achten, daß die Wicklung nicht beschädigt wird und/oder mit Öl oder Wasser in Berührung kommt.
4. Außenreinigung
Wenn den Schlagbohrschrauber schmutzig ist, ihn mit einem weichen und trockenen Tuch abwischen oder mit einem in Seifenwasser benetzten Tuch. Kein Chlorlösungsmittel, Benzin oder Farblösungsmittel verwenden, da sie Kunststoff e aufweichen.
5. Lagern
Den Schlagbohrschrauber an einen Ort wegräumen wo die Temperatur unter 40°C ist und außer Reichweite der Kinder.
HINWEIS
Vergewissern Sie sich, dass die Batterie nach einer längeren Lagerung (3 Monate oder mehr) voll aufgeladen ist. Eine Batterie mit geringerer Kapazität könnte sich nach längerer Lagerung eventuell nicht mehr aufl aden lassen.
HINWEIS
Aufbewahrung von Lithium-Ionen Akkus
Vergewissern Sie sich, dass die Lithium-Ionen Akkus voll aufgeladen sind, bevor Sie sie lagern.
Das Lagern der Akkus über längere Zeit mit einem niedrigen Ladestand kann zu einer Leistungsminderung führen, welche die Nutzungszeit der Akkus deutlich verkürzt oder mit sich bringt, dass die Akkus keine Ladung mehr halten können.
Eine deutliche Verkürzung der Nutzungszeit kann jedoch durch wiederholtes zwei- bis fünfmaliges Aufl aden und Benutzen der Akkus wieder behoben werden.
Sollte die Nutzungszeit trotz wiederholtem Aufladen und Benutzung extrem kurz sein, betrachten Sie die Akkus als tot und kaufen Sie neue Akkus.
6. Liste der Wartungsteile
VORSICHT
Reparatur, Modifikation und Inspektion von HiKOKI-Elektrowerkzeugen müssen durch ein autorisiertes HiKOKI-Kundendienstzentrum durchgeführt werden.
Diese Teileliste ist hilfreich, wenn sie dem autorisierten HiKOKI-Kundendienstzentrum zusammen mit dem Werkzeug für Reparatur oder Wartung ausgehändigt wird.
Bei Betrieb und Wartung von Elektrowerkzeugen müssen die Sicherheitsvorschriften und Normen beachtet werden.
MODIFIKATIONEN
HiKOKI-Elektrowerkzeuge werden fortwährend verbessert und modifi ziert, um die neuesten technischen Fortschritte einzubauen.
Dementsprechend ist es möglich, daß einige Teile ohne vorherige Benachrichtigung geändert werden.
Wichtiger Hinweis zu den Batterien für Akku-Geräte von HiKOKI
Verwenden Sie immer unsere angegebenen Originalbatterien. Wir können die Sicherheit und die Leistung unseres Akku-Gerätes nicht gewährleisten, wenn andere als die von uns angegebenen Batterien verwendet werden, oder wenn die Batterie zerlegt und verändert wird (etwa durch Zerlegen und Ersetzung von Zellen oder anderen innen gelegenen Teilen).
GARANTIE
Auf HiKOKI-Elektrowerkzeuge gewähren wir eine Garantie unter Zugrundelegung der jeweils geltenden gesetzlichen und landesspezifi schen Bedingungen. Dieses Garantie erstreckt sich nicht auf Gehäusedefekte und nicht auf Schäden, die auf Missbrauch, bestimmungswidrigen Einsatz oder normalen Verschleiß zurückzuführen sind. Im Schadensfall senden Sie das nicht zerlegte Elektrowerkzeug zusammen mit dem GARANTIESCHEIN, den Sie am Ende der Bedienungsanleitung fi nden, an ein von HiKOKI autorisiertes Servicecenter.
HINWEIS
Aufgrund des ständigen Forschungs und Entwicklung sprogramms von HiKOKI sind änderungen der hierin gemachten technischen Angaben vorbehalten.
Die gemessenen Werte wurden entsprechend EN60745 bestimmt und in Übereinstimmung mit ISO 4871 ausgewiesen.
Gemessener A-gewichteter Schallpegel: 96 dB (A)
Gemessener A-gewichteter Schalldruck: 85 dB (A)
Messunsicherheit KpA: 3 dB (A)
Gehörschutz tragen.
Gesamtvibrationswerte (3-Achsen-Vektorsumme), bestimmt gemäß EN60745.
Schlagbohren in Beton:
Vibrationsemissionswert ah, ID = 11,1 m/s ^2
Messunsicherheit K = 1,5 m/s²
Der erklärte Gesamtwert der Vibration wurde mit einer Standardtestmethode gemessen und kann zum Vergleichen eines Werkzeugs mit einem anderen benutzt werden. Er kann auch zu einer vorherigen Beurteilung der Aussetzung benutzt werden.
WARNUNG
☐ Der Vibrationsemissionswert während der tatsächlichen Benutzung des Elektrowerkzeugs kann von dem deklarierten Wert abweichen, abhängig davon, wie das Werkzeug verwendet wird.
○ Legen Sie Sicherheitsmaßnahmen zum Schutz des Bedieners fest, die auf einer Expositionseinschätzung unter den tatsächlichen Benutzungsbedingungen beruhen (unter Berücksichtigung aller Bereiche des Betriebszyklus, darunter neben der Triggerzeit auch die Zeiten, in denen das Werkzeug ausgeschaltet ist oder im Leerlaufbetrieb läuft).
AVERTISSEMENTS DE SÉCURITÉ GÉNÉRAUX POUR L'OUTIL
AVERTISSEMENT
Lire tous les avertissements de sécurité et toutes les instructions.
Ne pas suivre les avertissements et instructions peut donner lieu à un choc électrique, un incendie et/ou une blessure sérieuse.
Conserver tous les avertissements et toutes les instructions pour pouvoir s'y reporter ultérieurement.
Le terme “outil” dans les avertissements fait référence à votre outil électrique alimenté par le secteur (avec cordon d'alimentation) ou votre outil fonctionnant sur batterie (sans cordon d'alimentation).
1) Sécurité de la zone de travail
a) Conserver la zone de travail propre et bien éclairée.
Les zones en désordre ou sombres sont propices aux accidents.
b) Ne pas faire fonctionner les outils électriques en atmosphère explosive, par exemple en présence de liquides infl ammables, de gaz ou de poussières.
Les outils électriques produisent des étincelles qui peuvent enfl ammer les poussières ou les fumées.
c) Maintenir les enfants et les personnes présentes à l'écart pendant l'utilisation de l'outil.
Les distractions peuvent vous faire perdre le contrôle de l'outil.
2) Sécurité électrique
a) Il faut que les fi ches de l'outil électrique soient adaptées au socle.
Ne jamais modifier la fiche de quelque façon que ce soit.
Ne pas utiliser d'adaptateurs avec des outils à branchement de terre.
Des fiches non modifiées et des socles adaptés réduiront le risque de choc électrique.
b) Eviter tout contact du corps avec des surfaces reliées à la terre telles que les tuyaux, les radiateurs, les cuisinières et les réfrigérateurs. Il existe un risque accru de choc électrique si votre corps est relié à la terre.
c) Ne pas exposer les outils à la pluie ou à des conditions humides.
La pénétration d'eau à l'intérieur d'un outil augmentera le risque de choc électrique.
d) Ne pas maltraiter le cordon. Ne jamais utiliser le cordon pour porter, tirer ou débrancher l'outil. Maintenir le cordon à l'écart de la chaleur, du lubrifi ant, des arêtes ou des parties en mouvement.
Des cordons endommagés ou emmêlés augmentent le risque de choc électrique.
e) Lorsqu'on utilise un outil à l'extérieur, utiliser un prolongateur adapté à l'utilisation extérieure.
L'utilisation d'un cordon adapté à l'utilisation extérieure réduit le risque de choc électrique.
f) Si l'usage d'un outil dans un emplacement humide est inévitable, utiliser une alimentation protégée par un dispositif à courant diff érentiel résiduel (RCD).
L'usage d'un RCD réduit le risque de choc électrique.
3) Sécurité des personnes
a) Rester vigilant, regarder ce que vous êtes en train de faire et faire preuve de bon sens dans votre utilisation de l'outil. Ne pas utiliser un outil lorsque vous êtes fatigué ou sous l'emprise de drogues, d'alcool ou de médicaments.
Un moment d'inattention en cours d'utilisation d'un outil peut entraîner des blessures graves des personnes.
b) Utiliser un équipement de sécurité. Toujours porter une protection pour les yeux.
Les équipements de sécurité tels que les masques contre les poussières, les chaussures de sécurité antidérapantes, les casques ou les protections acoustiques utilisés pour les conditions appropriées réduiront les blessures de personnes.
c) Eviter tout démarrage intempestif. S'assurer que l'interrupteur est en position arrêt avant de brancher l'outil au secteur et/ou au bloc de batteries, de le ramasser ou de le porter.
Porter les outils en ayant le doigt sur l'interrupteur ou brancher des outils dont l'interrupteur est en position marche est source d'accidents.
d) Retirer toute clé de réglage avant de mettre l'outil en marche.
Une clé laissée fixée sur une partie tournante de l'outil peut donner lieu à des blessures de personnes.
e) Ne pas se précipiter. Garder une position et un équilibre adaptés à tout moment.
Cela permet un meilleur contrôle de l'outil dans des situations inattendues.
f) S'habiller de manière adaptée. Ne pas porter de vêtements amples ou de bijoux. Garder les cheveux, les vêtements et les gants à distance des parties en mouvement.
Des vêtements amples, des bijoux ou les cheveux longs peuvent être pris dans des parties en mouvement.
g) Si des dispositifs sont fournis pour le raccordement d'équipements pour l'extraction et la récupération des poussières, s'assurer qu'ils sont connectés et correctement utilisés.
Utiliser des collecteurs de poussière peut réduire les risques dus aux poussières.
4) Utilisation et entretien de l'outil
a) Ne pas forcer l'outil. Utiliser l'outil adapté à votre application.
L'outil adapté réalisera mieux le travail et de manière plus sûre au régime pour lequel il a été construit.
b) Ne pas utiliser l'outil si l'interrupteur ne permet pas de passer de l'état de marche à arrêt et vice versa.
Tout outil qui ne peut pas être commandé par l'interrupteur est dangereux et il faut le réparer.
c) Débrancher la fiche de la source d'alimentation en courant et/ou le bloc de batteries de l'outil avant tout réglage, changement d'accessoires ou avant de ranger l'outil.
De telles mesures de sécurité préventives réduisent le risque de démarrage accidentel de l'outil.
d) Conserver les outils à l'arrêt hors de la portée des enfants et ne pas permettre à des personnes ne connaissant pas l'outil ou les présentes instructions de le faire fonctionner.
Les outils sont dangereux entre les mains d'utilisateurs novices.
e) Observer la maintenance de l'outil. Vérifier qu'il n'y a pas de mauvais alignement ou de blocage des parties mobiles, des pièces cassées
ou toute autre condition pouvant affecter le fonctionnement de l'outil.
En cas de dommages, faire réparer l'outil avant de l'utiliser.
De nombreux accidents sont dus à des outils mal entretenus.
f) Garder aff ûtés et propres les outils permettant de couper.
Des outils destinés à couper correctement entretenus avec des pièces coupantes tranchantes sont moins susceptibles de bloquer et sont plus faciles à contrôler.
g) Utiliser l'outil, les accessoires et les lames etc., conformément à ces instructions, en tenant compte des conditions de travail et du travail à réaliser.
L'utilisation de l'outil pour des opérations diff érentes de celles prévues pourrait donner lieu à des situations dangereuses.
5) Utilisation des outils fonctionnant sur batteries et précautions d'emploi
a) Ne recharger qu'avec le chargeur spécifi é par le fabricant.
Un chargeur qui est adapté à un type de bloc de batteries peut créer un risque de feu lorsqu'il est utilisé avec un autre type de bloc de batteries.
b) N'utiliser les outils qu'avec des blocs de batteries spécifi quement désignés.
L'utilisation de tout autre bloc de batteries peut créer un risque de blessure et de feu.
c) Lorsqu'un bloc de batteries n'est pas utilisé, le maintenir à l'écart de tout autre objet métallique, par exemple trombones, pièces de monnaie, clés, clous, vis ou autres objets de petite taille qui peuvent donner lieu à une connexion d'une borne à une autre.
Le court-circuitage des bornes d'une batterie entre elles peut causer des brûlures ou un feu.
d) Dans de mauvaises conditions, du liquide peut être éjecté de la batterie; éviter tout contact. En cas de contact accidentel, nettoyer à l'eau. Si le liquide entre en contact avec les yeux, rechercher en plus une aide médicale.
Le liquide éjecté des batteries peut causer des irritations ou des brûlures.
6) Maintenance et entretien
a) Faire entretenir l'outil par un réparateur qualifié utilisant uniquement des pièces de rechange identiques.
Cela assurera le maintien de la sécurité de l'outil.
PRECAUTIONS
Maintenir les enfants et les personnes infirmes éloignés.
Lorsque les outils ne sont pas utilisés, ils doivent être rangés hors de portée des enfants et des personnes infi rmes.
AVERTISSEMENTS DE SECURITE POUR LE TOURNEVIS-PERCEUSE A PERCUSSION À BATTERIE
1. Portez des protections auditives lorsque vous utilisez la perceuse percussion.
L'exposition au bruit peut engendrer une perte de l'audition.
2. Utilisez la ou les poignées auxiliaires si elles sont prévues avec l'outil.
Toute perte de contrôle peut entraîner des blessures.
3. Tenir l'outil électrique par les surfaces isolées permettant de l'agripper pour eff ectuer une opération où l'accessoire de coupe ou l'attache peut entrer en contact avec des fils électriques masqués. Le contact de l'accessoire de coupe ou de l'attache avec un fil sous tension peut transmettre du courant dans les pièces métalliques exposées de l'outil et communiquer une décharge électrique à l'opérateur.
4. Chargez toujours la batterie à une température de 0 – 40°C. Une température inférieure à 0°C entrainera une surcharge dangereuse. La batterie ne peut pas être chargée à une température supérieure à 40°C.
La température la plus appropriée serait de 20 – 25°C.
5. Quand une charge a été effectuée, laissez le chargeur au repos pendant environ 15 minutes avant de commencer la prochaine charge de batterie.
Ne pas recharger plus de deux batteries de suite.
6. Ne laissez pas de corps étrangers pénétrer par le trou de raccord de la batterie rechargeable.
7. Ne désassemblez jamais la batterie rechargeable et le chargeur.
8. Ne court-circuitez jamais la batterie rechargeable. Le fait de court-circuiter la batterie générerera un courant électrique élevé et une surchauffe, ce qui entrainera la brûlure ou l'endommagement de la batterie.
9. Ne jetez pas la batterie au feu.
Elle pourrait exploser.
10. Apportez la batterie au magasin où vous l'avez achetée dès que la durée de vie de post-charge de la batterie devient trop courte pour une utilisation pratique. Ne jetez pas de batterie usagée.
11. L'utilisaiton d'une batterie usagée endommagera le chargeur.
12. Ne pas insérer d'objets dans les fentes de ventilation du chargeur. Ne pas introduire d'objets métalliques ou des pro duits inflammables dans les fentes d'aération du chargeur, cela provoquera un choc électrique ou endommagera le chargeur.
13. Lorsque vous montez un foret ou une mèche dans le plateau de serrage sans clavettes, serrez suffi samment le manchon. Si ce dernier est trop lâche, le foret ou la mèche risque de glisser ou de tomber et blesser quelqu'un.
14. Le moteur de ce produit contient un aimant permanent puissant.
Vous devez observer les précautions suivantes relatives à l'adhérence de copeaux à l'outils et à l'eff et de l'aimant permanent sur les appareils électroniques.
ATTENTION
○ Ne placez pas l'outil sur un banc ou une zone de travail jonchée de copeaux métalliques.
Les copeaux risquent d'adhérer à l'outil et de provoquer une blessure ou un dysfonctionnement.
Si des copeaux sont restés collés à l'outil, ne les touchez pas. Utilisez une brosse pour les décrocher.
Vous risquez sinon de vous blesser.


Si vous portez un pacemaker ou autre dispositif électronique médical, n'utilisez pas l'outil et ne vous en approchez pas.
Le fonctionnement de votre dispositif médical risquerait d'être affecté.
N'utilisez pas l'outil à proximité d'appareils de précision tels que des téléphones cellulaires, des cartes magnétiques ou des supports de mémoire électroniques.
Vous risqueriez de provoquer un dysfonctionnement du dispositif ou de subir une perte de données.
PRÉCAUTIONS RELATIVES A LA BATTERIE AU LITHIUM ION
Pour prolonger sa durée de vie, la batterie lithium-ion est équipée d'une fonction de protection qui coupe automatiquement l'alimentation.
Dans les cas 1 à 3 décrits ci-dessous, il est possible que le moteur s'arrête lorsque vous utilisez ce produit, même si vous actionnez le commutateur. Il ne s'agit pas d'un dysfonctionnement, mais du fonctionnement normal de la protection.
1. Lorsque la charge restante de la batterie diminue, le moteur s'arrête.
Dans ce cas de fi gure, chargez immédiatement la batterie.
2. En cas de surcharge de l'outil, actionnez le commutateur de l'outil et éliminez les causes de la surcharge. Vous pouvez ensuite recommencer à utiliser l'outil.
3. En cas de surchauff e due à un travail trop intensif, l'alimentation de la batterie peut se couper.
Dans ce cas, arrêtez toute utilisation de la batterie et laissez-la refroidir. Vous pouvez ensuite recommencer à l'utiliser.
En outre, respectez la précaution et l'avertissement suivants.
AVERTISSEMENT
Afin d'éviter toute fuite de la batterie, génération de chaleur, émission de fumée, explosion et inflammation, respectez scrupuleusement les précautions suivantes.
1. Assurez-vous que les copeaux et la poussière ne s'accumulent pas sur la batterie.
○ Lorsque vous travaillez, assurez-vous que les copeaux et la poussière ne tombent pas sur la batterie.
○ Assurez-vous que les copeaux et la poussière qui tombent sur l'outil lorsque vous travaillez ne s'accumulent pas sur la batterie.
○ Ne conservez pas une batterie inutilisée dans un endroit qui est exposé aux copeaux et à la poussière.
○ Avant de stocker une batterie, retirez tous les copeaux et la poussière qui ont pu y adhérer et ne la conservez pas avec des pièces métalliques (vis, clous, etc.).
2. Ne percez pas la batterie à l'aide d'un objet pointu tel qu'un clou. Ne la frappez pas à l'aide d'un marteau. Ne marchez pas dessus, ne la lancez pas et ne la soumettez pas un à choc physique important.
3. N'utilisez pas une batterie dont l'extérieur est déformé ou laisse penser qu'elle est défectueuse.
4. N'insérez pas la batterie à l'envers (pôles inversés).
5. Ne raccordez pas directement la batterie à une prise électrique ou à un allume-cigare.
6. N'utilisez pas la batterie à d'autres fi ns que celle spécifi ée.
7. En cas d'échec du chargement d'une batterie, même après un certain délai, arrêtez immédiatement le rechargement.
8. N'exposez pas la batterie à des températures ou à une pression élevées (four à micro-ondes, séchoir, conteneur sous haute pression).
9. Maintenez à la batterie à l'écart de toute flamme en cas de détection d'une fuite ou d'une mauvaise odeur.
10. Ne pas utiliser à proximité d'une source puissante d'électricité statique.
11. En cas de fuite de la batterie, de mauvaise odeur, de génération de chaleur, de décoloration, de déformation ou d'anomalie en cours d'utilisation, de rechargement ou d'entreposage, ôtez immédiatement la batterie de l'équipement ou du chargeur de batterie et ne l'utilisez plus.
ATTENTION
1. En cas de projection dans les yeux de liquide ayant fuit de la batterie, ne vous frottez pas les yeux, rincez-les à l'eau claire et contactez immédiatement un médecin.
En l'absence de traitement, le liquide peut détériorer l'oeil.
2. En cas de projection de liquide ayant fuit de la batterie sur votre peau ou vos vêtements, rincez immédiatement ces derniers à l'eau claire (au robinet).
Le liquide peut provoquer une irritation de la peau.
3. En cas de détection de rouille, de mauvaise odeur, de surchauff e, de décoloration, de déformation et/ou autres anomalies lors de la première utilisation de la batterie, n'utilisez pas cette dernière et renvoyez-la au fournisseur ou au fabricant.
AVERTISSEMENT
Si des corps étrangers conducteurs s'introduisent dans la batterie lithium-ion, un court-circuit peut se produire dans la batterie et provoquer un incendie. Lors du stockage d'une batterie lithium-ion, veillez à suivre scrupuleusement les instructions suivantes.
○ Ne pas placer de débris conducteurs, de clous ou de morceaux de fi ls électriques en fer ou en cuivre dans le boîtier de rangement.
Pour éviter tout court-circuit, charger la batterie dans l'outil ou insérer le couvercle de stockage de la batterie à fond, de manière à ne plus voir le ventilateur (Fig. 1).
SPECIFICATIONS
OUTIL ELECTRIQUE
| Modèle DV14DJL DV18DJL | | |
| Vitesse à vide (Basse/Grande) 0 – 350 / 0 – 1400 min -1 |
| Vitesse à percussion à vide(Basse/Grande) | 0 – 4900 / 0 – 19600 min-1 |
| Capacité | Perçage | Brique(profondeur 30 mm) | 13 mm |
| Bois(épaisseur 18 mm) | 32 mm 38 mm | |
| Métal(épaisseur 1,6 mm) | Acier: 13 mm,Aluminum: 13 mm |
| Enfoncement | Vis mécanigue 6 mm | |
| Vis de bois | 8 mm (diamètre) × 50 mm (Longueur)(Orifi ce préformé) | 8 mm (diamètre) × 75 mm (Longueur)(Orifi ce préformé) |
| Batterierechargeable | 2LEGK BSL1415: Li-ion 14,4 V (1,5 Ah 4 piles) BSL1815: Li-ion 18 V (1,5 Ah 5 piles) |
| 2LFGK/2LFRK BSL1425: Li-ion 14,4 V (2,5 Ah 4 piles) BSL1825: Li-ion 18 V (2,5 Ah 5 piles) |
| NNK/NN | —— —— | |
| Poids* | 1,6 kg (avec le BSL1415 en place) 1,7 kg (avec le BSL1815 en place) |
\* Poids: selon la procédure EPTA 01/2003
CHARGER
| Modèle UC18YKSL | UC18YFSL | |
| Tension de charge 1 | 4,4 V — 18 V |
| Poids | 0,35 kg | 0,5 kg |
ACCESSOIRES STANDARD
| DV14DJL(2LEGK)DV18DJL(2LEGK) | 1 Mèche-visseuse cruciforme (No. 2)......1 |
| 2 Chargeur (UC18YKSL)......1 |
| 3 Batterie (BSL1415 ou BSL1815) ......2 |
| 4 Boîtier en plastique ......1 |
| 5 Couvercle de la batterie ......1 |
| DV14DJL(2LFRK)DV18DJL(2LFGK)(2LFRK) | 1 Mèche-visseuse cruciforme (No. 2)......1 |
| 2 Chargeur (UC18YKSL ou UC18YFSL) ...1 |
| 3 Batterie (BSL1425 ou BSL1825) ......2 |
| 4 Boîtier en plastique ......1 |
| 5 Couvercle de la batterie ......1 |
| DV18DJL(NNK) | 1 Mèche-visseuse cruciforme (No. 2)......12 Boîtier en plastique ......1Ne contient pas le chargeur, la batterie et le couvercle de la batterie. |
| DV18DJL(NN) | 1 Mèche-visseuse cruciforme (No. 2)......1Ne contient pas le chargeur, la batterie, le boîtier plastique et le couvercle de la batterie. |
Les accessoires standard sont sujets à changement sans préavis.
Le chargeur et la batterie fournis dépendent des spécifi cations du lot.
ACCESSOIRES SUR OPTION (vendus séparément)
○ Batterie
BSL1415S, BSL1415, BSL1425
BSL1815S, BSL1815, BSL1825
○ Crochet
Les accessoires à option sont sujets à changement sans préavis.
APPLICATION
○ Percage de briques et de blocs de béton, etc.
Enfoncement et extraction de vis mécaniques, vis de bois, vis de taraudage, etc.
○ Forage de différents métaux.
○ Forage de différents bois.
1. Retrait de la batterie
Maintenir fermement la poignée et pousser le taquet de la batterie (2) pour l'enlever (Voir Fig. 1 et 2).
ATTENTION
Ne jamais court-circuiter la batterie.
2. Mise en place de la batterie
Insérer la batterie tout en respectant la polarité (Voir Fig. 2).
CHARGE
Avant d'utiliser l'outil électrique, chargez la batterie comme suit.
1. Brancher le cordon d'alimentation du chargeur sur une prise secteur.
Quand vous raccordez la fiche du chargeur à une prise murale, le voyant témoin clignote en rouge (à intervalles d'une seconde).
2. Insérer la batterie dans le chargeur.
Insérer fermement la pile dans le chargeur comme illustré aux Fig. 3. 27
3. Recharge
Quand vous insérez une batterie dans le chargeur, la recharge commence et la lampe témoin s'allume en rouge.
Quand la batterie est complètement chargée, le voyant témoin clignote en rouge (à intervalles d'une seconde). (voir Tableau 1)
(1) Explication de la lampe témoin
Les explications de la lampe témoin se trouvent sur le Tableau 1, en fonction de l'état du chargeur ou de la pile rechargeable.
Tableau 1
| Explications de la lampe témoin |
| Lampe témoin (rouge) | Avant la recharge | Clignote | S'allume pendant 0,5 seconde. Ne s'allume pas pendant 0,5 seconde.(Eteint pendant 0,5 seconde) | |
| Pendant la recharge | S'allume | S'allume sans interruption |
| Recharge terminée | Clignote | S'allume pendant 0,5 seconde. Ne s'allume pas pendant 0,5 seconde.(Eteint pendant 0,5 seconde) |
| Veille en surchauff e | Clignote | S'allume pendant 1 seconde. Ne s'allume pas pendant 0,5 seconde.(Eteint pendant 0,5 seconde) | Batterie en surchauff e.Chargement impossible(le chargement commencera une fois que la batterie sera froide). |
| Recharge impossible | Clignote | S'allume pendant 0,1 seconde. Ne s'allume pas pendant 0,1 seconde.(Eteint pendant 0,1 seconde) | Anomalie de la batterie ou du chargeur |
(2) Au sujet de la température de la batterie rechargeable Les plages de température des batteries rechargeables sont indiquées dans le Tableau 2 ; en outre, vous devez laisser refroidir les batteries avant de les recharger.
Tableau 2 Plage de recharge des batteries
| Batteries rechargeables | Températures de recharge de la batterie |
| BSL1415S, BSL1415, BSL1425, BSL1815S, BSL1815, BSL1825 | 0°C – 50°C |
(3) Au sujet du temps de recharge
Suivant le type de chargeur et de batterie, le temps de recharge indiqué sur le Tableau 3 varie comme suit:
Tableau 3 Temps de recharge (à 20°C)
| Batterie\Chargeur | UC18YFSL UC18YKSL |
| BSL1415S, BSL1815S | Env. 20 min. Env. 35 min. |
| BSL1415, BSL1815 Env. 22 min. Env. 40 min. |
| BSL1425, BSL1825 Env. 35 min. Env. 75 min. |
REMARQUE
Le temps de recharge peut varier selon la température et la tension de la source.
4. Débrancher le cordon d'alimentation secteur de la prise secteur
5. Tenir fermement le chargeur et dégager la batterie REMARQUE
Bien sortir la batterie du chargeur après usage, et la conserver.
En ce qui concerne le courant de décharge d'une batterie neuve
Etant donnée que les substances chimiques internes sont restées inactives dans le cas des batteries neuves ou des batteries qui sont restées longtemps inutilisées, le courant de décharge risque d'être très faible lors des première et deuxième utilisations. Ce phénomène est temporaire et le temps de recharge normal sera rétabli quand les batteries auront été rechargées 2 ou 3 fois.
(1) Recharger les batteries avant qu'elles ne soient complètement épuisées.
Quand la puissance de l'outil utilisé faiblit, l'éteindre et recharger la batterie. Si l'outil continue d'être utilisé jusqu'à épuisement du courant électrique, la batterie risque d'être endommagée et sa durée de vie se raccourcira.
(2) Eviter d'eff ectuer la recharge sous des températures élevées.
Une batterie est toujours chaude immédiatement après son utilisation. Si la batterie est rechargée immédiatement après utilisation, les substances chimiques internes risquent de se détériorer et la durée de vie de la batterie se raccourcira. Laisser la batterie refroidir un moment avant de l'utiliser.
ATTENTION
Si la batterie est chaude quand elle est rechargée, parce qu'elle est restée longtemps en plein soleil ou parce qu'elle vient juste d'être utilisée, la lampe pilote du chargeur clignote en s'allumant pendant 1 seconde, puis en s'éteignant pendant 0,5 seconde. Dans une telle éventualité, laisser la batterie refroidir, puis procéder à la recharge.
○ Quand la lampe témoin clignote rapidement (à intervalles de 0,2 seconde), vériffi er le chargeur et retirer tout objet étranger qui serait tombé dans son connecteur.
S'il n'y a rien d'amormal, il est alors probable que la batterie ou le chargeur fonctionne mal. Dans ce cas, les enlever et les porter à un réparateur agréé.
○ Etant donné qu'il faut environ 3 secondes au microordinateur intégré pour confi rmer l'extraction de la batterie en cours de chargement avec UC18YKSL ou UC18YFSL, attendre 3 secondes au minimum avant de la réinsérer pour continuer le chargement. Si la batterie est réinsérée dans les 3 secondes, elle risque de ne pas être correctement rechargée.
AVANT LA MISE EN MARCHE
Installation et vérification de l'environnement de travail Vérifier si l'environnement de travail est adéquat en suivant les précautions.
UTILISATION
1. Vérifier la position du sélecteur de débrayage (Voir Fig. 4)
Le sélecteur de débrayage de cet appareil permet d'alterner entre les modes tournevis, perceuse et perceuse à percussion.
(1) En mode visseuse, alignez l'un des chiffres du sélecteur "1, 3, 5 ... 22" ou le point avec le repère triangulaire sur le corps.
(2) En mode perceuse, alignez le symbole du foret “” sur le sélecteur de débrayage avec le repère triangulaire sur le corps.
(3) Si l'outil est utilisé comme perceuse à percussion, amener le repère de percussion "T" du sélecteur de débrayage en regard du repère triangulaire du corps de l'outil.
ATTENTION
○ Il est impossible de positionner le sélecteur de débrayage entre les chiffres "1, 3, 5 ... 22" ou le point.
○ N'utilisez pas l'outil avec le sélecteur de débrayage positionné entre le chiff re "22" et la ligne au centre du symbole du foret, vous risqueriez de l'endommager (Voir Fig. 5).
2. Réglage du couple de serrage
(1) Couple de serrage
Le couple de serrage devra correspondre au diamètre de la vis utilisée. Si trop de force est utilisée, il se peut que la vis se casse ou s'endommage dans la partie de sa tête. Assurez-vous de positionner le sélecteur de débrayage en fonction du diamètre de la vis.
(2) Indication du couple de serrage
Le couple de serrage varie en fonction du type de vis et du matériau à serrer. Le couple de serrage est indiqué par les chiff res "1, 3, 5 ... 22" sur le sélecteur de débrayage et un noir. La position "1" correspond au couple le plus faible et le chiffre le plus élevé au couple le plus important (Voir Fig. 4).
(3) Réglage du couple de serrage
Faites tourner le sélecteur de débrayage et alignez l'un des chiff res "1, 3, 5 ... 22" ou le point avec le repère triangulaire sur le corps. Faites tourner le sélecteur vers la droite ou la gauche, suivant le couple souhaité.
ATTENTION
○ Il se peut que la rotation du moteur se vérouille et s'arrête pendant que l'outil est utilisé en tant que perceuse.
Pendant le fonctionnement de la perceuse à percussion, faites attention à ne pas verrouiller le moteur.
○ Une percussion trop prolongée peut casser la vis par suite d'un serrage excessif.
3. Commutation rotation/percussion (Voir Fig. 4)
Pour passer de la “rotation (rotation seulement)” à la “percussion (percussion + rotation)” et vice versa, amenez le repère de burin “” ou le repère de marteau “T” en regard du repère triangulaire.
Pour percer des trous dans du métal, du bois ou du plastique, sélectionnez "rotation (rotation seulement)".
Pour percer des trous dans des briques ou des blocs de béton, sélectionnez "percussion (percussion + rotation)".
ATTENTION
Si vous effectuez une opération généralement réalisée en "rotation" sur le réglage "percussion", l'eff et de perçage des trous sera non seulement décuplé, mais il risque également d'abîmer la mèche ou d'autres pièces.
Si vous avez du mal à tourner le sélecteur de débrayage sur le repère de percussion, “T” faites doucement tourner le mandrin dans un sens ou l'autre puis tournez à nouveau le sélecteur de débrayage sur le repère de percussion “T”.
4. Changement de vitesse de rotation
Actionnez le bouton de décalage pour changer la vitesse de rotation. Enfoncez le bouton de blocage pour ralâcher le blocage et déplacez le bouton de décalage dans la direction de la flèche (Voir les Fig. 6 et 7).
Quand le bouton de décalage est mis sur "LOW" (petite vitesse), la perceuse tourne à petite vitesse. Quand mis sur "HIGH" (grande vitesse), la perceuse tourne à grande vitesse.
ATTENTION
○ Lors du changement de la vitesse de rotation à l'aide du bouton de décalage, assurez-vous que l'interrupteur est coupé.
Le fait de changer la vitesse quand le moteur tourne endommagera l'engrenage.
Si le bouton de réglage est en position "HIGH" (grande vitesse) et que le sélecteur de débrayage est sur "15" et "22", l'embrayage ne sera peut-être pas engagé et le moteur risque alors d'être bloqué. Dans ce cas, amenez le bouton de réglage en position "LOW" (petite vitesse).
Si le moteur a été vérouillé, débranchez immédiatement l'alimentation. Si le moteur reste vérouillé pendant un certain temps, le moteur ou la batterie en seront brûlés.
Pour prolonger sa durée de vie, la batterie lithium-ion est équipée d'une fonction de protection qui coupe automatiquement l'alimentation. Par conséquent, en cas de surcharge de l'outil, il est possible que le moteur s'arrête. Il ne s'agit cependantpas d'un dysfonctionnement, mais du fonctionnement normal de la protection. Dans ce cas, actionnez le commutateur de l'outil et éliminez les causes de la surcharge.
5. Portée et recommandations pour l'utilisation
La portée utilisable pour les diff érents types de travaux basée sur la structure mécanique de cet outil est indiquée au Tableau 4.
Tableau 4
| Travail | Position du sélecteur de débrayage | Recommendations |
| Forage | Brique |  | Utiliser pour opération de forage. |
| Bois | ### |
| Acier |
| Aluminum |
| Enfoncement | Vis mécanique 1 – 22 | | Utiliser la mèche ou la douille adaptés au diamètre de la vis. |
| Vis de bois | 1 – | Utiliser après forage d’un trou de préparation. |
6. Sélection de la couple de serrage et de la fréquence de rotation
Tableau 5
| Utilisation | Position du sélecteur de débrayage | Sélection de vitesse de rotation (Positiondu bouton de changement) |
| LOW (Petite vitesse) HIGH (Grande vitesse) |
| Enfoncement | Vis méchanique | 1 – 22 | Pour vis de 4 mm ou moins diamètre. | Pour vis de 6 mm ou moins diamètre. |
| Vis de bois |  | Pour vis de 8 mm ou moins, diamètre nominal. | Pour vis de 4,8 mm ou moins diamètre nominal. |
| Forage | Brique | [A07H] | Pour diamètre de 13 mm ou moins. | Pour diamètre de 8 mm ou moins (DV14DJL) |
| Pour diamètre de 10 mm ou moins (DV18DJL) |
| Bois | | Pour diamètre de 32 mm ou moins. (DV14DJL) | Pour diamètre de 18 mm ou moins. (DV14DJL) |
| Pour diamètre de 38 mm ou moins. (DV18DJL) | Pour diamètre de 22 mm ou moins. (DV18DJL) |
| Métal |  | ____ | Pour forage avec perceuse à travailler le fer. |
ATTENTION
Les exemples choisis et montrés au Tableau 5, seront pris en tant qu'exemples standard étant donné que différentes vis de serrages et différents matériels devant être serrés seront utilisés réellement, et pour lesquels un réglage approprié sera évidemment requis.
Si la perceuse à percussion est utilisée pour serrer une vis à métaux à grande vitesse (HIGH), la vis risque d'être endommagée ou de se desserrer à cause de la trop grande force de torsion. Ne serrer qu'à petite vitesse (LOW) une vis à métaux.
REMARQUE
L'utilisation de la batterie dans un environnement froid (en-dessous de 0 degré centi-grade) peut parfois entraîner un aff aiblissement du couple de serrage et une réduction du volume de travail. Il s'agit d'un phénomène purement temporaire, et la batterie recommencera à fonctionner normalement lorsqu'elle se sera réchauffée.
7. Pese et dépose du foret
(1) Après avoir inséré un foret de tournevis, etc. dans le mandrin sans clé, serrer fermement le manchon en le tournant vers la droite (dans le sens des aiguilles d'une montre, vu de l'avant) (Voir Fig. 8).
Si le manchon se desserre pendant le fonctionnement, le resserrer. La force de serrage augmente lorsque le manchon est resserré.
(2) Démontage de la foret
Desserrer le manchon en le tournant vers la gauche (dans le sens contraire des aiguilles d'une montre, vu de l'avant) (Voir Fig. 8).
ATTENTION
Lorsque le manchon ne peut pas être dévissé, bloquer l'outil emmanché dans un étau, etc., mettre l'embrayage sur 1 à 11 et tourner le manchon dans le sens contraire des aiguilles d'une montre tout en faisant fonctionner l'embrayage.
8. Vérifi ez se la batterie a été correctement installée
9. Vérifi ez la direction de rotation
La mèche tourne dans le sens horaire (vu de l'arrière) quand on appuie sur côté-R du sélecteur. En appuyant sura côté-L du sélecteur la mèche tourne dans le sens anti-horaire (Voir Fig. 9) (Les repères (L) et (R) sont marqués sur le corps).
ATTENTION
Utilisez toujours l'outil dans le sens horaire rotation, quand vous l'utilisez en tant que perceuse à rotation.
10. Fonctionnement de l'interrupteur
○ Quand le trigger de l'interrupteur est tiré, l'outil tourne. Quand le trigger est relâché, l'outil s'arrête.
○ La vitesse de rotation de la foreuse peut être contrôlée en faisant varier la force avec laquelle on appuie sur l'interrupteur. En appuyant légèrement sut l'interrupteur, la vitesse est basse et elle augmente lorsqu'on appuie plus fort.
REMARQUE
Un bruit de vibration se fait entendre lorsque le moteur est sur le point de tourner. Ceci est normal.
11. Perçage du brique
Une force excessive n'augmentera pas la vitesse de forage ; Elle ne pourra qu'endommager la pointe du foret ou réduire le rendement, aussi bien que réduire la durée de vie du foret. Entraînez la perceuse percussion/visseuse à batterie à une force comprise entre 10 et 15 kg quand vous travaillez sur des briques.
12. Utilisation de l'éclairage
Appuyez sur le déclencheur pour allumer le témoin. Le témoin reste allumé tant que vous appuyez sur le déclencheur. Le témoin s'éteint dès que vous avez relâché le déclencheur. (Fig. 10)
(Le témoin s'éteint automatiquement 10 secondes après avoir relâché le déclencheur.)
ATTENTION
N'exposez pas vos yeux directement à la lampe en la regardant.
Une exposition continue de vos yeux à la lampe pourrait les blesser.
13. Utilisation du crochet (vendus séparément)
Le crochet sert à suspendre l'outil électrique à votre ceinture pendant le travail.
ATTENTION
○ Lorsque vous employez le crochet, accrochez fermement l'outil pour en éviter toute chute accidentelle.
En cas de chute de l'outil électrique, un accident pourrait survenir.
Lorsque vous portez l'outil accroché à votre ceinture, n'installez aucune mèche au bout de l'outil. Si une mèche tranchante, comme une fraise, est installée sur l'outil accroché à votre ceinture, vous pourriez vous blesser.
○ Installez fermement le crochet. Une mauvaise installation pourrait provoquer des blessures pendant l'utilisation.
(1) Mise en place du crochet et serrage des vis. Installez le crochet à fond dans la gorge de l'outil électrique et serrez les vis pour le maintenir fermement. (Fig. 11)
(2) Dépose du crochet.
Enlevez les vis qui maintiennent le crochet, à l'aide d'un tournevis Philips. (Fig. 12)
ATTENTION
Seule la mèche phillips (no. 2 × 65L ; no. de code 983006) des ACCESSOIRES STANDARD HiKOKI pourra être utilisée. Ne pas utiliser d'autres mèches car elles pourraient se détacher.
ENTRETIEN ET VERIFICATION
1. Vérification de l'outil
Etant donné que l'utilisation d'un outil émoussé réduira le rendement et entrainera éventuellement un mauvais fonctionnement du moteur, aiguisez dès qu'une abrasion apparaît.
2. Vérifiez régulièrement toutes les vis de fixation
Vérifiez régulièrement toutes les vis de fixation et assurez-vous qu'elles sont bien serrées. S'il advient qu'une vis se desserre, la resserrer immédiatement.
Le fait de négliger ce point pourrait entrainer de sérieux dangers.
3. Entretien du moteur
Le bobinage de l'ensemble moteur est le "cœur" même de l'outil électro-portatif.
Veiller soigneusement à ce que ce bobinage ne soit pas endommagé et/ou mouillé par de l'huile ou de l'eau.
4. Nettoyage de l'extérieur
Quand la perceuse à percussion est sale, l'essuyer avec un chiffon sec et doux ou un chiffon imbibé d'eau savonneuse.
N'utilisez pas de solvant au chlore, d'essence ou de diluant, car ils font fondre les matières plastiques.
5. Rangement
Ranger la perceuse à percussion dans un endroit où la température est inférieure à 40°C et hors de portée des enfants.
REMARQUE
Si vous pensez ne pas avoir à utiliser la pile pendant une longue période (3 mois ou plus), veillez à ce qu'elle soit entièrement chargée avant de la ranger. Une pile moins chargée pourrait ne plus se recharger correctement après une longue période de stockage.
REMARQUE
Stockage des batteries au lithium-ion
Assurez-vous que les batteries au lithium-ion ont été entièrement chargées avant de les stocker.
Le stockage prolongé de batteries faiblement chargées peut entraîner une détérioration des performances, réduisant considérablement la durée d'autonomie des batteries alors incapables de tenir une charge.
Il est cependant possible de recouvrer la capacité d'autonomie d'une batterie considérablement endommagée en alternant deux à cinq fois charge et utilisation.
Si la durée d'autonomie de la batterie reste extrêmement courte malgré les charges et utilisations consécutives, considérez la batterie en fin de vie et procurez-vous en une neuve.
6. Liste des pièces de rechange
ATTENTION
Les réparations, modifications et inspections des outils électriques HiKOKI doivent être confiées à un service après-vente HiKOKI agréé.
Il sera utile de présenter cette liste de pièces au service après-vente HiKOKI agréé lorsqu'on apporte un outil nécessitant des réparations ou tout autre entretien.
Lors de l'utilisation et de l'entretien d'un outil électrique, respecter les règlements et les normes de sécurité en vigueur dans le pays en question.
MODIFICATIONS
Les outils électriques HiKOKI sont constamment améliorés et modifiés afin d'incorporer les tous derniers progrès technologiques.
En conséquence, il est possible que certaines pièces soient modifi ées sans avis préalable.
Avis important sur les batteries pour outils électriques sans fi | HiKOKI
Toujours utiliser une de nos batteries originales spécifiées. Nous ne saurions garantir la sécurité et la performance de notre outil électrique sans fil s'il est utilisé avec une batterie autre que celle que nous avons spécifié, ou encore si la batterie est démontée et modifiée (par exemple, le démontage et remplacement des cellules ou autres composants internes).
GARANTIE
Nous garantissons que l'ensemble des Outils électriques HiKOKI sont conformes aux réglementations spécifi ques statutaires/nationales. Cette garantie ne couvre pas les défauts ni les dommages inhérents à une mauvaise utilisation, une utilisation abusive ou l'usure et les dommages normaux. En cas de réclamation, veuillez envoyer l'Outil électrique, en l'état, accompagné du CERTIFICAT DE GARANTIE qui se trouve à la fin du Mode d'emploi, dans un service d'entretien autorisé.
REMARQUE
Par suite du programme permanent de recherche et de développement HiKOKI, ces spécifi cations peuvent faire l'objet de modifi cations sans avis préalable.
Au sujet du bruit et des vibrations
Les valeurs mesurées ont été déterminées en fonction de la norme EN60745 et déclarées conforme à ISO 4871.
Niveau de puissance sonore pondérée A: 96 dB (A)
Niveau de pression acoustique pondérée A: 85 dB (A)
Incertitude KpA: 3 dB (A)
Porter des protections anti-bruit.
Valeurs totales des vibration (somme vectorielle triaxiale) déterminée conformément à EN60745.
Forage à percussion dans le béton :
Valeur d'émission de vibration , ID = 11,1 m/s ^2 Incertitude K = 1,5 m/s ^2
La valeur totale des vibrations déclarées a été mesurée conformément à une méthode d'essai standard qui peut être utilisée pour la comparaison des diff érents outils.
Elle peut également être utilisée pour évaluer l'exposition au préalable.
AVERTISSEMENT
○ La valeur d'émission de vibration en fonctionnement de l'outil électrique peut être différente de la valeur déclarée, en fonction des utilisations de l'outil.
○ Identification les mesures de protection de l'futilisateur fondées sur une estimation de l'fexposition en conditions d'fuibilisation (tenant compte de tous les aspects du cycle d'futilisation, tels que les moments où l'foutil est mis hors tension ou lorsqu'fi I tourne à vide en plus des temps de déclenchements).
AVVERTIMENTI GENERALI DI SICUREZZA SUGLI UTENSILI ELETTRICI
AVVERTENZA
Leggere tutti gli avvertimenti di sicurezza e tutte le istruzioni.
La mancata osservanza degli avvertimenti e delle istruzioni potrebbe essere causa di scosse elettriche, incendi e/o gravi lesioni.
Salvare tutti gli avvertimenti e le istruzioni per riferimenti futuri.
Il termine “elettroutensili” riportato nelle avvertenze si riferisce agli elettroutensili azionati con alimentazione di rete (via cavi) o a batterie (senza cavi).
1) Sicurezza dell'area operativa
a) Mantenere l'area operativa pulita e ordinata.
Aree operative sporche o disordinate possono favorire gli infortuni.
b) Non utilizzare gli elettroutensili in atmosfere esplosive, ad es. in presenza di liquidi, gas o polveri infi ammabili.
Gli elettroutensili generano delle scintille che potrebbero accendere la polvere o i fumi.
c) Tenere lontani bambini e astanti durante l'utilizzo degli elettroutensili.
Qualsiasi distrazione può essere causa di perdita di controllo.
2) Sicurezza elettrica
a) Le spine degli elettroutensili devono essere idonee alle prese disponibili.
Non modifi care mai le prese.
Con gli elettroutensili a massa (messi a terra), non utilizzare alcun adattatore.
L'utilizzo di spine intatte e corrispondenti alle prese disponibili ridurrà il rischio di scosse elettriche.
b) Evitare qualsiasi contatto con le superfi ci a massa o a terra, quali tubi, radiatori, fornelli e frigoriferi.
In caso di messa a terra o massa del corpo, sussiste un maggior rischio di scosse elettriche.
c) Non esporre gli elettroutensili alla pioggia o all'umidità.
La penetrazione di acqua negli elettroutensili aumenterà il rischio di scosse elettriche.
d) Non tirare il cavo. Non utilizzarlo per il trasporto, o per tirare o scollegare l'elettroutensile.
Tenere il cavo lontano da fonti di calore, oli, bordi appuntiti o parti in movimento.
Cavi danneggiati o attorcigliati possono aumentare il rischio di scosse elettriche.
e) Durante l'uso degli elettroutensili all'esterno, utilizzare una prolunga idonea per usi esterni.
L'utilizzo di cavi per esterno riduce il rischio di scosse elettriche.
f) Se è impossibile evitare l'impiego di un utensile elettrico in un luogo umido, utilizzare l'alimentazione protetta da un dispositivo a corrente residua (RCD).
L'uso di un RCD riduce il rischio di scosse elettriche.
3) Sicurezza personale
a) Durante l'uso degli elettroutensili, state all'erta, verificate ciò che state eseguendo e adottate sempre il buon senso.
Non utilizzate gli elettroutensili qualora siate stanchi, sotto l'infl uenza di farmaci, alcol o cure mediche.
Anche un attimo di disattenzione durante l'uso degli elettroutensili potrebbe essere causa di gravi lesioni personali.
b) Indossate l'attrezzatura di protezione personale. Indossate sempre le protezioni oculari.
L'attrezzatura protettiva, quali maschera facciale, calzature antiscivolo, caschi o protezioni oculari ridurrà il rischio di lesioni personali.
c) Impedite le accensioni involontarie. Prima del collegamento a una sorgente di alimentazione e/o pacco batteria e prima di raccogliere o trasportare l'utensile, verifi cate che l'interruttore sia posizionato su OFF.
Il trasporto degli elettroutensili tenendo le dita sull'interruttore o l'attivazione elettrica degli utensile che hanno l'interruttore su ON, implica il rischio di incidenti.
d) Prima di attivare l'elettroutensile, rimuovete qualsiasi chiave di regolazione.
Lasciando la chiave in un componente in rotazione dell'elettroutensile, sussiste il rischio di lesioni personali.
e) Mantenersi in equilibrio. Mantenersi sempre su due piedi, in equilibrio stabile.
Ciò consente di controllare al meglio l'elettroutensile in caso di situazioni impreviste.
f) Vestirsi in modo adeguato. Non indossare abiti larghi o gioielli. Tenere i capelli, gli abiti e i guanti lontano dalle parti in movimento.
Abiti allentati, gioielli e capelli lunghi potrebbero impigliarsi nelle parti in movimento.
g) In caso di dispositivi provvisti di collegamento ad apparecchiature di rimozione e raccolta polveri, verificare che queste siano collegate e utilizzate in modo adeguato.
L'utilizzo della raccolta della polvere può ridurre i rischi connessi alle polveri.
4) Utilizzo e manutenzione degli elettroutensili
a) Non utilizzare elettroutensili non idonei. Utilizzare l'elettroutensile idoneo alla propria applicazione.
Utilizzando l'elettroutensile corretto, si garantirà un'esecuzione migliore e più sicura del lavoro, alla velocità di progetto.
b) Non utilizzare l'elettroutensile qualora non sia possibile accenderlo/spegnerlo tramite l'interruttore.
È pericoloso utilizzare elettroutensili che non possano essere azionati dall'interruttore. Provvedere alla relativa riparazione.
c) Prima di effettuare qualsiasi regolazione, sostituire gli accessori o depositare gli elettroutensili, scollegare la spina dalla presa elettrica e/o il pacco batteria dall'utensile elettrico.
Queste misure di sicurezza preventive riducono il rischio di avvio involontario dell'elettroutensile.
d) Depositare gli elettroutensili non utilizzati lontano dalla portata dei bambini ed evitare che persone non esperte di elettroutensili o non a conoscenza di quanto riportato sulle presenti istruzioni azionino l'elettroutensile.
È pericoloso consentire che utenti non esperti utilizzino gli elettroutensili.
e) Manutenzione degli elettroutensili. Verificare che non visiano componenti in movimento disallineati o bloccati, componenti rotti o altre condizioni che potrebbero influenzare negativamente il funzionamento dell'elettroutensile.
In caso di guasti, provvedere alla riparazione dell'elettroutensile prima di riutilizzarlo.
Molti incidenti sono causati da una scarsa manutenzione.
f) Mantenere gli strumenti di taglio affi lati e puliti.
Gli strumenti di taglio in condizioni di manutenzione adeguata, con bordi affi lati, sono meno soggetti al bloccaggio e sono più facilmente controllabili.
g) Utilizzare l'elettroutensile, gli accessori, le barrette, ecc. in conformità a quanto riportato nelle presenti istruzioni, tenendo in debita considerazione le condizioni operative e il tipo di lavoro da eseguire.
L'uso dell'utensile elettrico per operazioni diverse da quelle previste potrebbe causare una situazione pericolosa.
5) Utilizzo e cura dell'utensile batteria
a) Ricaricare solo con il caricatore specifi cato dal produttore.
Un caricatore adatto per un tipo di gruppo batteria può creare un rischio di incendio quando viene utilizzato con un altro gruppo batteria.
b) Usare utensili elettrici con gruppi batteria specifi catamente designati.
L'utilizzo di qualsiasi altro gruppo batteria può creare un rischio di lesioni e incendi.
c) Quando il gruppo batteria non viene utilizzato, tenerlo lontano da altri oggetti metallici come graff ette, monete, chiavi, chiodi, viti, o altri piccoli oggetti metallici che possono creare una connessione da un terminale a un altro.
Cortocircuitare i terminali della batteria insieme può causare ustioni o incendi.
d) In condizioni abusive, del liquido può fuoriuscire dalla batteria; evitare il contatto. Se il contatto si verifi ca accidentalmente, sciacquare con acqua. Se il liquido entra a contatto con gli occhi, richiedere assistenza medica.
Il liquido che fuoriesce dalla batteria può causare irritazioni o ustioni.
6) Assistenza
a) Affidate le riparazioni dell'elettroutensile a persone qualificate che utilizzino solamente parti di ricambio identiche.
Ciò garantirà il mantenimento della sicurezza dell'elettroutensile.
PRECAUZIONI
Tenere lontano dalla portata di bambini e invalidi. Quando non utilizzati, gli strumenti dovranno essere depositi lontano dalla portata di bambini e invalidi.
PRECAUZIONI PER IL TRAPANO AVVITATORE A PERCUSSIONE A BATTERIA
1. Durante l'uso del trapano a percussione, indossare una protezione per le orecchie.
L'esposizione al rumore può causare la perdita dell'udito.
2. Utilizzare le leve ausiliarie se fornite con l'utensile.
La perdita di controllo può causare lesioni alla persona.
3. Tenere l'utensile dalle superfici isolate quando si esegue una operazione in cui l'attrezzo di taglio o il dispositivo di fi ssaggio potrebbe venire a contatto con fili nascosti. Gli attrezzi di taglio o i dispositivi di fissaggio a contatto con un filo in "tensione" potrebbero esporre le parti metalliche dell'utensile in "tensione" e causare scosse elettriche all'operatore.
4. Caricare la batteria ad una temperatura di 0 – 40°C. Una temperatura minore può provocare sovraccarico, il che è pericoloso. La batteria non può essere ricaricata ad una temperatura superiore ai 40°C.
La temperatura ideale è compresa 20 - 25 gradi.
5. Quando un'operazione di caricatura è terminata, prima di iniziarne una seconda, lasciare che il caricatore riposi per 15 minuti.
Non caricare più di due batterie consecutivamente.
6. Non permettere che sostanze estranee entrino nel foro di collegamento della batteria ricaricabile.
7. Non smontare mai la batteria ricaricabile e il caricatore.
8. Non provocare assolutamente mai dei corto-circuiti alla batteria ricaricabile. Il fenomeno provoca surriscaldamento e grande corrente elettrica. Può quindi causare bruciature o danni alla batteria.
9. Non gettare la batteria nel fuoco.
Può esplodere.
10. Non appena la vita della batteria dopo le operazioni di ricaricatura diventa troppo breve per fini pratici, si porti la batteria al negozio dove è stata acquistata. Non la si getti mai via.
11. Usando una batteria scarica, il caricatore può venir danneggiato.
12. Non inserire nessun oggetto nelle fessure di ventilazione del caricatore.
Inserendo oggetti metallici o infiammabili nelle fessure di ventilazione, si possono causare facilmente delle scosse electtriche, o si può danneggiare il caricatore.
13. Per montare una punta o una trivella da trapano nel mandrino senza chiave, stringere il manicotto in maniera adeguata. Se il manicotto non è ben stretto, la punta o la trivella da trapano può scivolare o cadere, con il pericolo di lesioni alle persone.
14. Questo prodotto contiene un forte magnete permanente nel motore.
Osservare le seguenti precauzioni riguardo l'aderenza di trucioli all'utensile e l'eff etto del magnete permanente sui dispositivi elettronici.
ATTENZIONE
○ Non posizionare l'utensile su un banco di lavor o zona di lavoro dove sono presenti trucioli di metallo.
I trucioli potrebbero aderire all'utensile, causando lesioni o malfunzionamenti.
Se dei trucioli si sono attaccati all'utensile, non toccarlo. Rimuovere i trucioli con una spazzola.
La mancata osservanza di ciò potrebbe causare lesioni.


Se usate un pacemaker o altro dispositivo medico elettronico, non adoperate né avvicinate l'utensile. Il funzionamento del dispositivo elettronico potrebbe essere compromesso.
○ Non usate l'utensile in prossimità di dispositivi di precisione come cellulari, schede magnetiche o altri supporti di memoria elettronica.
Questo potrebbe causare un uso erroneo, malfunzionamento o perdita di dati.
PRECAUZIONI SULLA BATTERIA AGLI IONI DI LITIO
Per estendere la durata, la batteria agli ioni di litio è munita di una funzione di protezione per arrestarne l'uscita.
Nei casi da 1 a 3 descritti di seguito, durante l'utilizzo di questo prodotto, il motore potrebbe arrestarsi, anche se si sta tirando l'interruttore. Ciò non indica un malfunzionamento ma è il risultato della funzione di protezione.
1. Quando la rimanente alimentazione della batteria si esaurisce, il motore si arresta.
In tal caso, ricaricarla immediatamente.
2. Se l'utensile è sovraccarico, il motore potrebbe arrestarsi. In tal caso, rilasciare l'interruttore dell'utensile ed eliminare le cause del sovraccarico. Dopo ciò, sarà possibile riutilizzarlo.
3. Se la batteria si surriscalda in lavori di sovraccarico, l'alimentazione della batteria potrebbe arrestarsi.
In tal caso, interrompere l'uso della batteria e lasciarla raff reddare. Dopo di ciò, è possibile riutilizzarla.
Inoltre, si prega di prestare attenzione al seguente avvertimento e cautela.
AVVERTENZA
Per prevenire qualsiasi perdita delle batterie, generazione di calore, emissione di fumi, esplosione e accensione, assicurarsi di prestare attenzione alle seguenti precauzioni.
1. Assicurarsi che la polvere e i detriti non si accumulino sulla batteria.
○ Durante la lavorazione, assicurarsi che la polvere e i detriti non si depositino sulla batteria.
○ Assicurarsi che qualsiasi polvere e detriti che si depositano sull'utensile elettrico durante la lavorazione non si accumulino sulla batteria.
○ Non conservare una batteria inutilizzata in un luogo esposto a polvere e detriti.
○ Prima di ritirare una batteria, rimuovere la polvere e i detriti che si sono depositati su di essa e non conservarla insieme a parti metalliche (viti, chiodi, ecc.).
2. Non forare la batteria con un oggetto appuntito come un chiodo, non colpire con un martello, calpestare, lanciare o sottoporre la batterie a violenti urti fi sici.
3. Non usare batterie apparentemente danneggiate o deformate.
4. Non usare batterie con la polarità invertita.
5. Non collegare direttamente a prese elettriche o prese per caricabatteria da auto.
6. Non usare la batteria per uno scopo diverso da quelli specifi cati.
7. Se la ricarica della batteria non si completa anche quando è passato un tempo di ricarica specifi cato, interrompere immediatamente la ricarica.
8. Non mettere o sottoporre la batteria a temperature elevate o ad alta pressione come in un forno microonde, essicatore o contenitore ad alta pressione.
9. Tenere immediatamente lontano dal fuoco quando si rilevano perdite o maleodore.
10. Non usare in un luogo dove viene generata forte elettricità statica.
11. Se si verifi ca la perdita delle batterie, maleodore, generazione di calore, scolorimento o deformazione, o se appaiono anormalità di qualsiasi natura durante l'uso, la ricarica o la conservazione, rimuoverla immediatamente dall'apparecchio o carica batteria, e interrompere l'uso.
ATTENZIONE
1. Se il liquido che fuoriesce dalla batteria entra negli occhi, non sfregare gli occhi e lavarli bene con acqua fresca e pulita come acqua di rubinetto e contattare immediatamente un medico.
Se non viene trattato, il liquido può causare problemi agli occhi.
2. Se il liquido fuoriesce sulla pelle o gli abiti, lavare bene con acqua pulita come l'acqua del rubinetto immediatamente.
C'è una possibilità che possa causare irritazione alla pelle.
3. Se trovate ruggine, maleodore, surriscaldamento, scolorimento, deformazione, e/o altre irregolarità quando si utilizza la batteria per prima volta, non usarla e restituirla al fornitore o venditore.
AVVERTENZA
Se nel terminale della batteria a ioni di litio penetrano corpi estranei conduttivi, potrebbe verificarsi un cortocircuito della batteria con conseguente incendio. Nello stoccaggio della batteria a ioni di litio, attenersi scrupolosamente alle seguenti istruzioni.
○ Non inserire corpi conduttivi, chiodi e fili (ad esempio fili di ferro o rame) nel vano di stoccaggio.
Per impedire cortocircuiti, caricare la batteria nello strumento o applicare saldamente il coperchio della batteria per lo stoccaggio fino a nascondere la ventola (Fig. 1).
CARATTERISTICHE
UTENSILE ELETTRICO
| Modello | DV14DJL | DV18DJL |
| Velocità a vuoto (Bassa/Alta) | 0 - 350 / 0 - 1400 min ^-1 |
| Frequenza d'impulso a vuoto (Bassa/Alta) | 0 - 4900 / 0 - 19600 min ^-1 |
| Capacité | Perçage | Mattone(Profondità 30 mm) | 13 mm |
| Legno(Spessore 18 mm) | 32 mm | 38 mm |
| Metallo(Spessore 1,6 mm) | Acciaino: 13 mm,Alluminio: 13 mm |
| Enfonce-ment | Vite di macchina | 6 mm |
| Vite per legno | 8 mm (diametro) × 50 mm (lunghezza)(Questo é un foro preliminare) | 8 mm (diametro) × 75 mm (lunghezza)(Questo é un foro preliminare) |
| Batteria ricaricabile | 2LEGK | BSL1415: Li-ion 14,4 V (1,5 Ah 4 batterie) | BSL1815: Li-ion 18 V (1,5 Ah 5 batterie) |
| 2LFGK/2LFRK | BSL1425: Li-ion 14,4 V (2,5 Ah 4 batterie) | BSL1825: Li-ion 18 V (2,5 Ah 5 batterie) |
| NNK/NN | —— | —— |
| Peso* | 1,6 kg (con BSL1415) | 1,7 kg (con BSL1815) |
\* Peso: Secondo procedura EPTA 01/2003
CARICATORE
| Modello UC18YKSL | UC18YFSL | |
| Votaggio di carica 14,4 V — 18 V |
| Peso 0,35 kg 0,5 kg | | |
ACCESSORI STANDARD
| DV14DJL(2LEGK) | 1 Cacciavite a croce (n. 2) ........1 |
| 2 Caricatore (UC18YKSL) ........1 |
| DV18DJL(2LEGK) | 3 Batteria (BSL1415 o BSL1815) ........2 |
| 4 Custodia in plastica ........1 |
| 5 Coperchio della batteria ........1 |
| DV14DJL(2LFRK) | 1 Cacciavite a croce (n. 2) ........1 |
| 2 Caricatore (UC18YKSL o UC18YFSL) ...1 |
| DV18DJL(2LFGK)(2LFRK) | 3 Batteria (BSL1425 o BSL1825) ........2 |
| 4 Custodia in plastica ........1 |
| 5 Coperchio della batteria ........1 |
| DV18DJL(NNK) | 1 Cacciavite a croce (n. 2) ........12 Custodia in plastica ........1Caricatore, batteria e coperchio della batteria non contenuti. |
| DV18DJL(NN) | 1 Cacciavite a croce (n. 2) ........1Caricatore, batteria, custodia in plastica e coperchio della batteria non contenuti. |
Gli accessori standard possono essere cambiati senza preavviso.
Il caricatore e la batteria in dotazione variano a seconda delle specifi che del prodotto.
ACCESSORI FACOLTATIVI (venduti a parte)
○ Batteria
BSL1415S, BSL1415, BSL1425
BSL1815S, BSL1815, BSL1825
○ Gancio
Gli accessori disponibili a richiesta possono essere cambiati senza preavviso.
APPLICAZIONI
○ Foratura di mattoni e blocchi di cemento, ecc.
○ Per stringere o togliere delle viti di macchina, delle viti per legno, delle viti mordenti etc.
○ Per la foratura di metalli diversi.
○ Per la foratura di legni diversi.
RIMOZIONE E INSTALLAZIONE DELLA BATTERIA
1. Smontaggio della batteria
Tenere saldamente l'impugnatura e spingere il fermo (2 fermi) della batteria, in modo da smontaria (Ved. Fig. 1 e 2).
ATTENZIONE
Non mettere la batteria in corto circuito.
2. Montaggio della batteria
Inserire la batteria facendo attenzione alla corretta collocazione delle polarità (Ved. Fig. 2).
RICARICA
Prima di usare l'utensile elettrico, sostituire la batteria nel seguente modo.
1. Collegare il cavo di alimentazione del caricatore a una presa CA.
Quando si collega la spina del caricatore ad una presa a muro, la spia pilota lampeggia in rosso (A intervalli di 1 secondo).
2. Inserire la batteria nel caricatore.
Inserire saldamente la batteria nel caricatore come mostrato nella Fig. 3.
3. Carica
Quando si inserisce una batteria nel caricatore, la carica inizia e la spia si illumina stabilmente in rosso.
Quando la batteria è completamente carica, la spia pilota lampeggia in rosso (A intervalli di un secondo). (Vedere le Tabella 1)
(1) Indicazione della spia
Le indicazioni della spia sono come come indicato nella Tabella 1, a seconda delle condizioni del caricatore o della batteria ricaricabile.
Tabella 1
| Indicazioni della spia |
| Spia (rossa) | Prima della carica | Lampeggia | Si illumina per 0,5 secondi. Non si illumina per 0,5 secondi.(Spento per 0,5 secondi) | |
| Durante la carica | Si illumina | Si illumina stabilmente |
| Carica completa | Lampeggia | Si illumina per 0,5 secondi. Non si illumina per 0,5 secondi.(Spento per 0,5 secondi) |
| Standby di surriscaldamento | Lampeggia | Si illumina per 1 secondi. Non si illumina per 0,5 secondi.(Spento per 0,5 secondi) | Batteria surriscaldata.Impossibile ricaricare (la ricarica comincerà quando la batteria si raff redda). |
| Carica impossibile | Lampeggia | Si illumina per 0,1 secondi. Non si illumina per 0,1 secondi.(Spento per 0,1 secondi) | Malfunzionamento della batteria o del caricatore. |
(2) Temperatura della batteria ricaricabile
Le temperature delle batterie ricaricabili sono indicate nella Tabella 2. Prima di ricaricare batterie che si sono surriscaldate è necessario farle raff reddare.
Tabella 2 Gamma di temperature per la ricarica delle batterie
| Batterie ricaricabili | Temperature di carica per le batterie |
| BSL1415S, BSL1415, BSL1425, BSL1815S, BSL1815, BSL1825 | 0°C – 50°C |
(3) Tempo di carica necessario
A seconda della combinazione di caricatore e batterie, il tempo di carica è come indicato nella Tabella 3.
Tabella 3 Tempo di carica (a 20°C)
| Batteria\Caricatore | UC18YFSL UC18YKSL |
| BSL1415S, BSL1815S | Circa. 20 min. Circa. 35 min. |
| BSL1415, BSL1815 Circa. 22 min. Circa. | 40 min. |
| BSL1425, BSL1825 Circa. 35 min. Circa. | 75 min. |
NOTA
Il tempo di carica può variare a seconda della temperatura e della tensione della fonte di alimentazione.
4. Scollegare il cavo di alimentazione del caricatore dalla presa CA
5. Tenere saldamente il caricatore e estrarre la batteria NOTA
Assicurarsi di estrarre la batteria dal caricatore dopo l'uso e quindi conservarla.
Scarica nel caso di batterie nuove, ecc.
Poiché la sostanza chimica interna delle batterie nuove e delle batterie che non sono state usate per un lungo periodo di tempo non è attivata, la scarica esterna può essere abbassata quando le si usa per la prima e seconda volta. Questo è un fenomeno temporaneo e il tempo normale necessario per la carica viene ripristinato ricaricando la batteria per 2 o 3 volte.
Come mantenere più lunga la durata delle batterie
(1) Ricaricare le batterie prima che si scarichino completamente.
Quando si sente che la potenza dell'attrezzo si
indebolisce, interrompere l'uso e ricaricare la batteria. Se
si continua l'uso e si finisce la corrente elettrica, la batteria
può essere danneggiata e la sua durata abbreviarsi.
(2) Evitare di raggiungere alte temperature.
Una batteria ricaricabile si riscalda subito dopo l'uso. Se si ricarica una batteria subito dopo averla usata, la sostanza chimica interna viene deteriorata e la durata della batteria abbreviata. Consentire alla batteria di raff reddarsi per un po'e quindi ricaricarla.
ATTENZIONE
Se la batteria viene caricata mentre è calda perchérimasta esposta a lungo ai raggi solari o perchéimmediatamente dopo l'uso della batteria, la spiapilota del caricatore lampeggia illuminandosi per 1secondo e non illuminandosi per 0,5 secondi (spentaper 0,5 secondi). In questo caso, prima lasciarraff reddare la batteria e poi eseguire l'operazionedi carica.
☐ Quando la spia lampeggia velocemente (a intervalli di 0,2 secondi), controllare che non siano presenti oggetti estranei nel connettore della batteria del caricatore. Se non sono presenti oggetti estranei è probabile che la batteria od il caricatore non funzioni bene. Farla vedere a un Agente di manutenzione autorizzato.
○ Poiché il micro computer incorporato impiega circa 3 secondi per confermare che la batteria caricata con l'UC18YKSL o l'UC18YFSL è stata espulsa, aspettare almeno secondi prema di reinserirla per continuare il caricamento. Se la batteria viene reinserita entro 3 secondi, essapuò non essere caricata in modo appropriato.
PRIMA DI INIZIARE LE OPERAZIONI
Stabilire e controllare l'ambiente di lavoro
Controllare che l'ambiente di lavoro sia adatto seguendo le necessarie precauzioni.
OPERAZIONE
1. Verifi care la posizione della ghiera della frizione (Ved. Fig. 4)
Le tre modalità di cacciavite, trapano e trapano a percussione possono essere selezionate mediante la posizione della ghiera frizione dell'unità.
(1) Per utilizzare l'utensile come avvitatore, allineare uno dei numeri "1, 3, 5 ... 22" o uno dei punti sulla ghiera della frizione con il triangolo presente sul corpo dell'utensile.
(2) Per utilizzare l'utensile come trapano, allineare il simbolo del trapano “” sulla ghiera con il triangolo presente sul corpo dell'utensile.
(3) Quando si usa questa unità come trapano ad impatto, allineare il segno del martello “T” sul ghiera della frizione con il segno del triangolo sul corpo esterno.
ATTENZIONE
○ Per evitare possibili danni all'utensile
La ghiera della frizione non deve essere mai collocata su posizioni intermedie tra i numeri "1, 3, 5 ... 22" o fra i punti.
○ Non utilizzare l'utensile con la ghiera della frizione situata in posizione intermedia tra il numero "22" e la linea al centro del simbolo del trapano. Questo può causare danni (Ved. Fig. 5).
2. Regolazione della coppia di serraggio
(1) Coppia di serraggio
La coppia di serraggio deve essere regolata in corrispondenza del diametro della vite. Se la forza di serraggio è troppo elevata, la vite si può rompere o la testa ne può risultare danneggiata. Assicurarsi di posizionare la ghiera della frizione nella posizione appropriata per il diametro delle viti utilizzate.
(2) Indicazione della coppia di serraggio
a coppia di serraggio necessaria varia a seconda del tipo di vite e del materiale su cui si lavora. L'utensile indica la coppia di serraggio impostata mediante una scala numerata "1, 3, 5 ... 22" e punti sulla ghiera della frizione. Con la ghiera in posizione 1, verrà applicata la coppia di serraggio minore. Con la ghiera in posizione 22 verrà applicata la coppia di serraggio massima (Ved. Fig. 4).
(3) Regolazione della coppia di serraggio
Ruotare la ghiera della frizione per allineare il numero desiderato della scala “1, 3, 5 ... 22” o i punti con il triangolo di riferimento sul corpo dell’utensile. Selezionare la coppia di serraggio necessaria ruotando la ghiera fra i valori minimo e massimo.
ATTENZIONE
○ La rotazione del motore può essere bloccata, quando si usa l'utensile come trapano. Usando il trapano avvitatore a percussione, fare attenzione a non bloccare il motore.
○ Facendo lavorare a percussione l'utensile durante un tempo troppo prolungato, è possibile che la vite si rompa.
3. Cambiamento da rotazione a percussione (Ved. Fig. 4)
L'impostazione "rotazione (solo rotazione)" e l'impostazione "percussione (percussione + rotazione)" possono essere cambiate allineando il segno del trapano "→" o il segno del martello "T con il segno del triangolo sul corpo esterno.
○ Per fare dei fori in metallo, legno o plastica, passare all'impostazione "rotazione (solo rotazione)".
○ Per fare dei fori in mattoni o in blocchi di cemento, passare all'impostazione "percussione (percussione + rotazione)".
ATTENZIONE
Se un'operazione normalmente eseguita con l'impostazione "rotazione" viene invece eseguita con l'impostazione "percussione", l'eff etto di foratura non solo aumenta ma può anche danneggiare la punta o altre parti.
Se è difficile girare la manopola della frizione nella posizione del simbolo del martello “T”, ruotare leggermente il mandrino in ambo le direzioni e girare nuovamente la manopola della frizione nella posizione del simbolo del martello “T”.
4. Cambio della velocità di rotazione
Usare la manopola d'intercambio per cambiare la velocità di rotazione. Premere il pulsante di blocco per liberare e spostare la manopola d'intercambio in direzione della freccia (Ved. Figs. 6 e 7).
Quando la manopola d'intercambio è portata su "LOW" il trapano rota a bassa velocità. Su "HIGH" il trapano rota ad alta velocità.
ATTENZIONE
○ Quando si cambia la velocità di rotazione con la manopola del cambio, verifi care che l'interruttore sia disattivato.
Se si cambia la velocità con il motore in moto si causeranno danni agli ingranaggi.
Se si cerca di posizionare il selettore velocità su "HIGH" (alta velocità) con la ghiera frizione sulle posizioni fra "15" e "22", può accadere che la frizione non si innesti e il motore si blocchi. In questo caso spostare il selettore velocità su "LOW" (bassa velocità).
Se il motore si blocca, togliere immediatamente la corrente. Se il motore si blocca per qualche attimo, il motore o la batteria possono essere bruciati.
Per estendere la durata, la batteria agli ioni di litio è munita di una funzione di protezione per arrestarne l'uscita. Pertanto, se l'utensile è sovraccarico, il motore potrebbe arrestarsi. Ciò non indica un malfunzionamento ma è il risultato della funzione di protezione. In tal caso, rilasciare l'interruttore dell'utensile ed eliminare le cause del sovraccarico.
5. Suggerimenti e limite d'uso
La gamma di utilizzo per vari tipi di lavoro in base alla struttura meccanica dell'utensile è indicata nella Tabella 4.
Tabella 4
| Lavoro | Posizione della ghiera della frizione | Suggerimenti |
| Forature | Mattone | | Uso dell’utensile per forare. |
| Legno | |
| Acciaio |
| Alluminio |
| Serraggio di viti | Viti per macchine 1 – | 22 Usare punta o chiave | adatte per il diametro della vite. |
| Viti per legno | 1 – | Usare solo dopo ave eseguito un foro di preparazione. |
6. Scelta della coppia di serraggio e della frequenza di rotazione
Tabella 5
| Uso | Posizione della ghiera della frizione | Selezione della velocità di rotazione (Posizione della manopola di selezione) |
| LOW (bassa velocità) HIGH (alta velocità) |
| Serraggio di viti | Viti di macchina | -22 Per viti de 4 | mm diametro o meno. Per viti di 6 mm | diametro o meno. |
| Viti per legno |  | Per viti di 8 mm diametro nominale o meno. | Per viti di 4,8 mm diametro nominale o meno. |
| Foratura | Mattone |  | Per diametri di 13 mm o meno. | Per diametri di 8 mm o meno. (DV14DJL) |
| Per diametri di 10 mm o meno. (DV18DJL) |
| Legno | | Per diametri di 32 mm o meno. (DV14DJL) | Per diametri di 18 mm o meno. (DV14DJL) |
| Per diametri di 38 mm o meno. (DV18DJL) | Per diametri di 22 mm o meno. (DV18DJL) |
| Metallo | | | Per foratura con punta per il ferro. |
ATTENZIONE
Gli esempi di cui alla Tabella 5 sono da considerarsi come indicativi. I diversi tipi di viti e di materiale usati in pratica rendono necessari degli aggiustamenti dei valori dati.
- Quando si usa una punta con una vite di macchina ad alta velocità (HIGH), si può danneggiare una vite o si può allentare la punta a causa del fi ssaggio troppo forte. Usare la punta a bassa velocità (LOW) quando si impiega una vite di macchina.
NOTA
L'uso della batteria a basse temperature (sotto 0 gradi centigradi) può a volte risultare in una coppia di serraggio indebolita e una minore quantità di lavoro. Questo è tuttavia un fenomeno temporaneo e il funzionamento torna alla normalità quando la batteria si scalda.
7. Montaggio e smontaggio della punta
(1) Dopo aver inserito una punta di trapano, ecc. nel mandrino autoserrante, stringere saldamente il collare girandolo verso destra (in senso orario quando visto da davanti) (Ved. Fig. 8).
Se il collare dovesse allentarsi durante il funzionamento, stringerlo ulteriormente. La forza serrante aumenta quando il collare viene stretto.
(2) Per staccare l'attrezzo dalla punta
Allentare il collare girandolo verso sinistra (in senso antiorario quando visto da davanti) (Ved. Fig. 8).
ATTENZIONE
Quando non è possibile svitare il collare, stringere l'attrezzo inserito in una morsa, ecc., regolare il modo frizione su 1-11 e girare il collare in senso antiorario usando la frizione. Ora dovrebbe essere facile allentare il collare.
8. Assicurarsi che la batteria sia montata in modo corretto
9. Controllare la direzione della rotazione
La punta gira in senso orario (come visto dal retro) se si preme la parte di destra R del selettore.
Per far girare la punta in senso antiorario premere la parte sinistra L del selettore (Ved. Fig. 9)
(I contrassegni (L) ed (R) sono apportati sul corpo dell'attrezzo).
ATTENZIONE
Usare sempre questa unità con rotazione in senso orario quando se ne fa uso come trapano ad impatto.
10. Funzionamento dell'interruttore
○ Premendo il grilletto interruttore, l'utensile si mette in movimento.
Lasciando andare il grilletto, il motore si ferma.
○ La velocità di rotazione del trapano può essere dell'interruttore viene premuto. La velocità è bassa quando il grilletto dell'interruttore viene premuto leggermente, e aumenta a mano a mano che l'interrutoore viene premuto maggiormente.
NOTA
Prima di cominciare a ruotare, il motore produce un ronzio. Tale rumore non è indice di cattivo funzionamento delle macchina.
Una forza di pressione eccessiva non permette mai una maggiore velocità di foratura. Essa causerà soltanto danni alla punta da trapano o ridurrà l'effi cienza di lavoro, e potrebbe inoltre causare una riduzione della durata di servizio della punta da trapano. Per perforare i mattoni, usare il trapano avvitatore a percussione a batteria con una forza di pressione compresa tra 10-15 kg.
12. Utilizzo della luce
Tirare l'interruttore della luce per illuminare la luce. La luce continua a illuminarsi mentre viene tirato l'interruttore del grilletto. La luce si spegne dopo che viene rilasciato l'interruttore del grilletto. (Fig. 10)
(La luce si spegne automaticamente 10 secondi dopo che l'interruttore del grilletto è stato rilasciato.)
ATTENZIONE
Non esporre gli occhi alla luce in modo diretto.
Se gli occhi vengono esposti continuamente alla luce, potrebbero verifi carsi fastidi alla vista.
13. Uso del gancio (venduti a parte)
Il gancio viene utilizzato per agganciare l'utensile alla cintura durante il lavoro.
ATTENZIONE
○ Quando si utilizza il gancio, agganciare saldamente l'utensile per evitare cadute accidentali.
In caso di caduta dell'utensile, potrebbero verificarsi incidenti.
Durante il trasporto dell'utensile agganciato alla cintura,, non collocare punte in cima all'utensile. Se durante il trasporto dell'utensile agganciato alla cintura viene inserita una punta tagliente come quella per il trapano, quest'ultima potrebbe causare lesioni all'operatore.
○ Fissare saldamente il gancio. Se il gancio non è stato fi ssato saldamente, potrebbe provocare lesioni all'operatore durante l'uso.
(1) Posizionamento del gancio e serraggio delle viti.
Installare saldamente il gancio nella scanalatura dell'utensile e serrare le viti per fissare il gancio in modo saldo. (Fig. 11)
(2) Rimozione del gancio.
Rimuovere le viti che fi ssano il gancio mediante un cacciavite Philips. (Fig. 12)
ATTENZIONE
Può essere usata solo la punta philips degli ACCESSORI STANDARD HiKOKI (N. 2 x 65L; codice n. 983006). Non usare altre punte perché possono staccarsi.
MANUTENZIONE ED ISPEZIONE
1. Ispezione dell'utensile
Poiché condizioni imperfette causano un abbassamento dell'efficienza e possibili malfunzioni all'attrezzo, affilare o sostituire l'utensile quando si notano segni di abrasione.
2. Inspezione delle viti di montaggio
Ispezionare regolarmente le viti di montaggio e assicurarsi che siano ben fi ssate. Se una di queste dovesse essere alentata, riserrarla immediatamente.
Si rischia in caso contrario di provocare incidenti pericolosi.
3. Manutenzione del motore
L'avvolgimento del motore il vero e proprio "cuore" degli attezzi elettrici.
Fare attenzione a non danneggiare l'avvolgimento e/o non bagnarlo con olio o acqua.
4. Pulizia della carcassa dell'utensile
Se il trapano-avvitatore a percussione è sporco, pulirlo con uno staccio soffi ce, inumidito di acqua e sapone.
Non usare solventi cloridici, benzina o diluenti per benzina, in quanto potrebbero deformare la plastica.
5. Conservazione
Conservare il trapano-avvitatore a percussione ad una temperatura inferiore ai 40°C e non a portata di mano di bambini.
NOTA
Assicurarsi che la batteria sia completamente carica quando viene conservata per un lungo periodo (3 mesi o più). Una batteria con minore capacità potrebbe non essere in grado di essere caricata quando viene utilizzata, se conservata per un lungo periodo.
NOTA
Conservazione delle batterie agli ioni di litio
Prima di riporre le batterie agli ioni di litio, assicurarsi di averle caricate completamente.
Riporre le batterie per periodi prolungati con un basso livello di carica ne può provocare il deterioramento delle prestazioni o la significativa riduzione del tempo di utilizzo delle batterie, e potrebbe anche rendere le batterie incapaci di mantenere la carica.
Tuttavia, la significativa riduzione del tempo di utilizzo delle batterie può essere risolta caricando e utilizzando le batterie ripetutamente da due a cinque volte.
Se il tempo di utilizzo delle batterie rimane estremamente ridotto nonostante le ricariche ripetute, considerare le batterie inutilizzabili e acquistarne di nuove.
6. Lista dei pezzi di ricambio
ATTENZIONE
Riparazioni, modifiche e ispezioni di utensili elettrici HiKOKI devono essere eseguite da un centro assistenza HiKOKI autorizzato.
Questa lista dei pezzi torna utile se viene presentata con l'utensile al centro assistenza HiKOKI autorizzato quando si richiedono riparazioni o altri interventi di manutenzione.
Nell'uso e nella manutenzione degli utensili elettrici devono essere osservate le normative di sicurezza e i criteri prescritti in ciascun paese.
MODIFICHE
Gli utensili elettrici HiKOKI vengono continuamente migliorati e modifi cati per includere le più recenti innovazioni tecnologiche.
Di conseguenza, alcuni pezzi possono essere modifi cati senza preavviso.
Avviso importante sulle batterie per gli utensili elettrici a batteria HiKOKI
Utilizzare sempre una delle nostre batterie originali. Non possiamo garantire la sicurezza e le prestazioni dell'utensile elettrico a batteria quando esso viene utilizzato con batterie diverse da quelle da noi designate, o quando la batteria viene smontata e modificata (per esempio lo smontaggio e la sostituzione di pile o altre parti interne).
GARANZIA
Garantiamo gli Utensili Elettrici HiKOKI in conformità alle specifi che normative imposte dalla legge e dai paesi. Questa garanzia non copre difetti o danni dovuti a uso erroneo, abuso o normale usura. In caso di lamentele, si prega di inviare l'Utensile Elettrico, non smontato, insieme al CERTIFICATO DI GARANZIA che si trova al termine di queste Istruzioni per l'uso, ad un Centro di Assistenza Autorizzato HiKOKI.
NOTA
A causa del continuo programma di ricerche e sviluppo della HiKOKI, le caratteristiche riportate in questo foglio sono soggette cambiamenti senza preventiva comunicazione.
I valori misurati sono stati determinati in conformità a EN60745 e descritti in conformità alla normativa ISO 4871.
Livello misurato di potenza sonora pesato A: 96 dB (A)
Livello misurato di pressione sonora pesato A: 85 dB (A) )
KpA incertezza: 3 dB (A)
Indossare i dispositivi di protezione acustica.
Valori totali di vibrazione (somma vettori triass.) determinati secondo la norma EN60745.
Foratura con impatto nel calcestruzzo:
Valore di emissione vibrazioni ah, ID = 11,1 m/s
Incertezza K = 1,5 m/s²
Il valore totale delle vibrazioni dichiarato è stato misurato in conformità a un metodo di test standard e può essere utilizzato per confrontare un utensile con un altro.
Può anche essere utilizzato in una valutazione preliminare dell'esposizione.
AVVERTENZA
Il valore di emissione vibrazioni durante l'uso effettivo dell'utensile può essere diverso dal valore dichiarato in base alle modalità di utilizzo dell'utensile stesso.
Identificare le misure di sicurezza per la protezione dell'foperatore basate su stima dell'fesposizione nelle eff ettive condizioni di utilizzo (prendendo in considerazione tutte le parti del ciclo di funzionamento come i tempi in cui l'futensile resta spento e quando funziona senza essere utilizzato in aggiunta al tempo di avvio).
ALGEMENE VEILIGHEIDSWAARSCHUWINGEN VOOR ELEKTRISCH GEREEDSCHAP
WAARSCHUWING
Lees alle waarschuwingen en instructies aandachtig door.
Nalating om de waarschuwingen en instructies op te volgen kan in een elektrische schok, brand en/of ernstig letsel resulteren.
Bewaar alle waarschuwingen en aanwijzingen voor eventuele naslag in de toekomst.
De term "elektrisch gereedschap" heeft zowel betrekking op elektrisch gereedschap dat via de netvoeding van stroom wordt voorzien als gereedschap dat via een accu (snoerloos) van stroom wordt voorzien.
1) Veiligheid van de werkplek
a) Zorg voor een schone en goed verlichte werkplek.
Een rommelige of donkere werkplek verhoogt de kans op ongelukken.
b) Gebruik het elektrisch gereedschap niet in een omgeving met ontplofbare vloeistoff en, gassen of stof.
Elektrisch gereedschap kan vonken afgeven. Deze vonkjes kunnen stofdeeltjes of gassen doen ontbranden.
c) Houd kinderen en andere toeschouwers tijdens het gebruik van elektrische gereedschap uit de buurt.
A fl eidingen kunnen gevaarlijk zijn.
2) Elektrische veiligheid
a) De stekker op het elektrische gereedschap moet geschikt zijn voor aansluiting op de wandcontactdoos.
De stekker mag op geen enkele manier gemodifi ceerd worden. Gebruik geen verloopstekker met geaard elektrisch gereedschap.
Deugdelijke stekkers en geschikte wandcontactdozen verminderen het risico op een elektrische schok.
b) Vermijd lichamelijk contact met geaarde oppervlakken zoals leidingen, radiatoren, fornuizen en koelkasten.
Wanneer uw lichaam in contact staat met geaarde oppervlakken loopt u een groter risico op een elektrische schok.
c) Stel het elektrisch gereedschap niet bloot aan regen of vochtige omstandigheden.
Het risico op een elektrische schok wordt vergroot wanneer er water in het elektrisch gereedschap terechtkomt.
d) Behandel het snoer voorzichtig. Draag het gereedschap nooit door dit bij het snoer vast te houden. Trek niet aan het snoer wanneer u de stekker uit het stopcontact wilt halen.
Houd het snoer uit de buurt van warmtebronnen, olie, scherpe randen of bewegende onderdelen. Een beschadigd of verward snoer verhoogt het risico op een elektrische schok.
e) Gebruik buitenshuis een verlengsnoer dat specifi ek geschikt is voor het gebruik buiten.
Het gebruik van een snoer dat specifiek geschikt is voor gebruik buitenshuis vermindert het risico op een elektrische schok.
f) Als het elektrisch gereedschap in een vochtige omgeving gebruikt moet worden, dient een voeding met RCD (reststroom-apparaat) beveiliging te worden gebruikt.
Gebruik van een RCD vermindert de kans op een elektrische schok.
3) Persoonlijke veiligheid
a) Blijf waakzaam, let voortdurend op uw werk en gebruik uw gezond verstand wanneer u elektrisch gereedschap gebruikt.
Gebruik geen elektrisch gereedschap wanneer u moe bent of onder invloed van drugs, alcohol of medicijnen.
Eén moment van onoplettendheid kan in ernstig lichamelijk letsel resulteren.
b) Gebruik persoonlijke beschermingsmiddelen.
Draag altijd oogbescherming.
Beschermingsmiddelen zoals stofmaskers, niet-glijdende veiligheidsschoenen, een helm of oorbescherming vermindert het risico op lichamelijk letsel.
c) Voorkom dat het gereedschap per ongeluk kan starten. Controleer of de schakelaar in de uit stand staat voordat u de voeding en/of de accu aansluit, het gereedschap oppakt of gaat dragen.
Zorg ervoor dat u tijdens het verplaatsen van het elektrisch gereedschap uw vingers uit de buurt van de schakelaar houdt en sluit de stroombron niet aan terwijl de schakelaar op aan staat om ongelukken te vermijden.
d) Verwijder sleutels en moersleutels uit het gereedschap voordat u het elektrisch gereedschap aanzet.
Een (moer-)sleutel die op een bewegend onderdeel van het elektrisch gereedschap bevestigd is kan in lichamelijk letsel resulteren.
e) Reik niet te ver. Zorg ervoor dat u te allen tijde stevig staat en uw evenwicht behoudt.
Op deze manier heeft u tijdens een onverwachte situatie meer controle over het elektrisch gereedschap.
f) Draag geen loszittende kleding of sieraden. Houd uw haar, kleding en handschoenen uit de buurt van bewegende onderdelen.
Loszittende kleding, sieraden en lang haar kunnen in de bewegende onderdelen verstrikt raken.
g) Indien het elektrisch gereedschap van een aansluiting voor stofafzuiging is voorzien dan dient u ervoor te zorgen dat de stofafzuiging aangesloten en op de juiste manier gebruikt wordt.
Het gebruik van stofafzuiging vermindert eventuele stofgerelateerde risico's.
4) Bediening en onderhoud van elektrisch gereedschap
a) Het elektrisch gereedschap mag niet geforceerd worden. Gebruik het juiste gereedschap voor het karwei.
U kunt de klus beter en veiliger uitvoeren wanneer u het juiste elektrische gereedschap gebruikt.
b) Gebruik het elektrisch gereedschap niet als de schakelaar niet goed werkt.
Elektrisch gereedschap dat niet via de schakelaar bediend kan worden is gevaarlijk en moet onmiddellijk gerepareerd worden.
c) Haal de stekker uit het stopcontact voordat u de voeding en/of de accu van het elektrisch gereedschap losmaakt, afstellingen verricht, accessoires verwisselt of voordat u het elektrisch gereedschap opbergt.
Dergelijke preventieve veiligheidsmaatregelen verminderen het risico dat het elektrisch gereedschap per ongeluk opstart.
d) Berg elektrisch gereedschap buiten het bereik van kinderen op en sta niet toe dat personen die niet bekend zijn met het juiste gebruik van het gereedschap of deze voorschriften dit elektrisch gereedschap gebruiken.
Eletrisch gereedschap is gevaarlijk in onbevoegde handen.
e) Het elektrisch gereedschap moet regelmatig onderhouden worden. Controleer het gereedschap op een foutieve uitlijning, vastgelopen of defecte bewegende onderdelen en andere problemen die van invloed zijn op de juiste werking van het gereedschap.
Indien het gereedschap defect of beschadigd is moet het gerepareerd worden voordat u het gereedschap opnieuw gebruikt.
Slecht onderhouden elektrisch gereedschap is verantwoordelijk voor een groot aantal doe-het-zelf ongelukken.
f) Houd snijwerktuigen scherp en schoon.
Goed onderhouden snijwerktuigen met scherpe snijranden lopen minder snel vast en zijn gemakkelijker in het gebruik.
g) Elektrisch gereedschap, toebehoren, bits enz. moeten in overeenstemming met deze instructies worden gebruikt waarbij de werkomstandigheden en het werk in overweging moeten worden genomen.
Gebruik van het elektrisch gereedschap voor andere doeleinden dan waarvoor het is bedoelt, kan resulteren in een gevaarlijke situatie.
5) Gebruik van gereedschap en onderhoud van de batterij
a) Herlaad enkel met de lader die door de fabrikant wordt gespecifi ceerd.
Een lader die geschikt is voor één bepaald type batterijgroep kan brandgevaar veroorzaken bij een andere batterijgroep.
b) Gebruik de apparaten enkel met specifi ek ontworpen batterijgroepen.
Het gebruik van andere batterijgroepen kan letsels of brand veroorzaken.
c) Wanneer de batterijgroep niet in gebruik is, houdt u ze verwijderd van andere metalen voorwerpen zoals papierclips, munten, sleutels, spijkers, schroeven of andere metalen voorwerpen die een verbindingen van de ene terminal met de andere kunnen maken.
De batterijterminals kortsluiten kan brandwonden of brand veroorzaken.
d) Bij een verkeerd gebruik kan er vloeistof uit de batterij lekken; vermijd elk contact. Indien er toevallig contact ontstaat, goed met water spoelen. Indien de vloeistof in contact met de ogen komt, ook medische hulp inroepen.
Vloeistof die uit de batterij lekt kan irritatie en brandwonden veroorzaken.
6) Onderhoudsbeurt
a) Het gereedschap mag uitsluitend door bevoegd onderhoudspersoneel worden onderhouden die authentieke onderdelen gebruikt.
Hierdoor kunt u erop aan dat de veiligheid van het elektrisch gereedschap behouden blijft.
VOORZORGMAATREGELEN
Houd kinderen en kwetsbare personen op een afstand. Het gereedschap moet na gebruik buiten het bereik van kinderen en andere kwetsbare personen worden opgeborgen.
VEILIGHEIDSWAARSCHUWINGEN VOOR SNOERLOZE KLOP-BOOR-SCHOREFMACHINE
1. Draag oorbeschermers bij stootboren.
Blootstelling aan lawaai kan tot gehoorverlies leiden.
2. Gebruik de extra handgre(e)p(en) die met het gereedschap zijn meegeleverd.
Verlies van controle over het gereedschap kan in lichamelijk letsel resulteren.
3. Houd het gereedschap vast aan de geïsoleerde handgrepen tijdens het uitvoeren van een bewerking waarbij het snijtoebehoren of de klem in aanraking kan komen met verborgen bedrading. Snijtoebehoren of klemmen die een onder stroom staande draad aanraken, maken dat niet-geïsoleerde delen van het gereedschap ook onder stroom komen, waardoor de gebruiker een elektrische schok kan krijgen.
4. Laad de accu bij een temperatuur van 0 - 40°C. Een temperatuur van onder 0°C kan overlading veroorzaken, hetgeen gevaarlijk kan zijn. de accu kan niet bij een temperatuur van boven de 40°C geladen worden.
De meest geschikte temperatuur is tussen de 20 - 25°C.
5. Wacht ongeveer 15 minuten voordat met het laden van een andere batterij begonnen wordt.
Laad niet meer dan twee accu's achterelkaar op.
6. Voorkom dat stof of vuil in de aansluitopening van de accuterecht komt.
7. Demonteer de oplaadbare batterij of acculader niet.
8. Voorkom kortsluiting van de oplaadbare batterij. Kortsluiting kan resulteren in oververhitting. Dit kan schade of brandgevaar opleveren.
9. Gooi de batterij niet in het vuur.
Een brandende batterij kan ontploff en.
10. Breng de batterij naar de dealer waar deze gekocht werd, nadat deze na oplading onvoldoende kracht heeft voor praktisch gebruik. Gooi een ultgewerkte batterij niet weg.
11. Het gebruik van een uitgeputte batterij zal de acculader beschadigen.
12. Steek nooit een voorwerp in de ventilatie-openingen van de acculader.
Als een voorwerp of ontylambaar materiaal in de ventilatie-openingen van de acculader wordt gestoken, kan dit resulteren in een elektrische schok of beschadiging aan de acculader.
13. Wanneer u een bitje in de sleutelloze boorkop doet, moet u de klembus voldoende vastdraaien. Als de klembus niet goed vast zit, kan het bitje slippen of los komen en letsel veroorzaken.
14. Dit product bevat een krachtige permanente magneet in de motor.
Neem de volgende punten in acht betreffende het vastkleven van metaaldeeltjes aan het gereedschap en de invloed van de permanente magneet op elektronische apparatuur.
LET OP
○ Leg het gereedschap niet op een werkbank of andere plaats waar metaaldeeltjes liggen.
De deeltjes kunnen aan het gereedschap gaan kleven met letsel of een defect tot gevolg.
○ Als er deeltjes aan het gereedschap kleven, mag u het gereedschap niet aanraken. Verwijder de deeltjes met een borstel.
Indien dit niet wordt gedaan, kunt u letsel oplopen.


Als u een pacemaker of ander elektronisch medisch apparaat gebruikt, mag u het gereedschap niet bedienen of in de buurt van het gereedschap komen.
Dit kan namelijk de werking van het elektronisch medisch apparaat beïnvloeden.
○ Gebruik het gereedschap niet in de buurt van precisie-apparatuur zoals mobiele telefoons, magneetkaarten of elektronische geheugenmedia.
Dit zou kunnen resulteren in een foutieve werking, defect of verlies van gegevens.
OPMERKINGEN BIJ GEBRUIK LITHIUM-ION BATTERIJ
De lithium-ion batterij is voorzien van een beschermingsfunctie die volledige ontlading van de batterij voorkomt waardoor de levensduur wordt verlengd. In de gevallen 1 tot 3 die hieronder worden beschreven, kan tijdens het gebruik van dit product, zelfs indien u aan de schakelaar trekt, de motor stilvallen. Dit geeft geen probleem met het product aan maar wordt veroorzaakt door de beschermingsfunctie.
1. De motor komt tot stilstand wanneer de batterij leeg is. De batterij moet in dit geval onmiddellijk opgeladen worden.
2. De motor kan tot stilstand komen wanneer het gereedschap overbelast is. Laat de schakelaar onmiddellijk los en zoek naar de oorzaak van de overbelasting. Wanneer u het probleem verholpen heeft kunt u het gereedschap opnieuw gebruiken.
3. Wanneer de batterij oververhit is door overbelasting, kan het zijn dat de batterij stopt. In dit geval gebruikt u de batterij niet verder en laat u ze afkoelen. Daarna kunt u haar opnieuw gebruiken.
Gelieve eveneens aandacht te schenken aan volgende waarschuwing en aandachtspunt.
WAARSCHUWING
Om acculekken, het opwekken van warmte, rookemissie, explosie en ontsteking bijtijds te vermijden, moet u ervoor zorgen volgende voorzorgsmaatregelen onder de aandacht te brengen.
1. Zorg ervoor dat er geen spaanders en stof op de accu ophopen.
○ Zorg er tijdens de werkzaamheden voor dat er geen spaanders en stof op de accu kunnen vallen.
○ Zorg ervoor dat de spaanders en stof die tijdens het werk op het elektrisch gereedschap vallen zich niet op de accu ophopen.
○ Bewaar een ongebruikte accu niet op een plaats waar het aan spaanders en stof wordt blootgesteld.
○ Verwijder alle spaanders en stof van een accu voordat u hem opbergt en bewaar de accu niet op dezelfde plek als metalen onderdelen (schroeven, spijkers, enz.).
2. Doorboor de accu niet met een scherp voorwerp, zoals een nagel, klop er niet op met een hamer, stap niet op de accu of gooi er niet mee of stel hem niet bloot aan ernstige fysieke schokken.
3. Gebruik geen zichtbare beschadigde of vervormde accu.
4. Gebruik de accu niet met een omgekeerde polariteit.
5. Sluit hem niet rechtstreeks aan op elektrische toestellen of fi ttingen van sigarettenaanstekers in wagens.
6. Gebruik de accu niet voor andere doeleinden dan deze die gespecifi ceerd werden.
7. Wanneer de accu niet kan worden opgeladen, zelfs nadat de specifi eke oplaadtijd verstreken is, stopt u onmiddellijk met het opladen.
8. Breng de accu niet op hoge temperaturen of drukken of stel ze er niet aan bloot, zoals in een microgolfoven, droger of een hogedrukcontainer.
9. Blijf uit de buurt van vuur onmiddellijk nadat een lek of
vieze geur werd vastgesteld.
10. Gebruik hem niet in een plaats waar een grote statische elektriciteit wordt opgewekt.
11 In geval van een acculek, vieze geur, warmteopwekking, verkleuring of vervorming, of iets abnormaals tijdens het gebruik, het opladen of de opslag, haalt u hem onmiddellijk uit de uitrusting of de acculader en stopt u het gebruik.
LET OP
1. Wanneer u de lekkende vloeistof uit de accu in de ogen krijgt, wrijf dan niet in de ogen, en was ze goed uit met vers proper water, zoals kraantjeswater en roep er onmiddellijk een dokter bij.
Indien u geen behandeling krijgt, kan de vloeistof oogproblemen veroorzaken.
2. Wanneer de vloeistof lekt op uw huid of kleding, was ze onmiddellijk goed af met proper water, zoals kraantjeswater.
De kans bestaat dat dit huidirritatie veroorzaakt.
3. Wanneer u roest, een vieze geur, oververhitting, verkleuring, vervorming en/of andere onregelmatigheden vaststelt wanneer u de accu voor de eerste maal gebruikt, gebruik ze dan niet verder en stuur ze terug naar de leverancier of de verkoper.
WAARSCHUWING
Als een geleidende vreemde stof op de klem van de lithium-ionbatterij terechtkomt, kan de batterij worden kortgesloten, waardoor brand kan ontstaan. Wanneer u de lithium-ionbatterij bewaart, dient u de volgende regels in acht te nemen.
○ Plaats geen geleidende stoffen, nagels en draden zoals ijzer- en koperdraad in de opslagdoos.
○ Plaats de batterij in het gereedschap of bevestig het batterijdeksel stevig voor opslag tot u de ventilator niet meer ziet om kortsluiting te voorkomen (Afb. 1).
TECHNISCHE GEGEVENS
BOORMACHINE
| Model DV14DJL DV18DJL | | |
| Onbelaste snelheid (Laage/Hoge) 0 – 350 | / 0 – 1400 min | -1 |
| Onbelaste slag-verhouding (Laage/Hoge) 0 – 4900 / 0 – 19600 min | -1 |
| Kapaciteit | Boren | Steen(Diepte 30 mm) | 13 mm |
| Hout(Dikte 18 mm) | 32 mm 38 mm | |
| Metaal(Dikte 1,6 mm) | Staal: 13 mm,Aluminum: 13 mm |
| Drijven | Kolomschroef 6 mm | |
| Houtschroef | 8 mm (diameter) × 50 mm (lengte)(bij voorgeboord schroefgat) | 8 mm (diameter) × 75 mm (lengte)(bij voorgeboord schroefgat) |
| Oplaadbare batterij | 2LEGK | BSL1415: Li-ion 14,4 V (1,5 Ah 4 cellen) | BSL1815: Li-ion 18 V (1,5 Ah 5 cellen) |
| 2LFGK/2LFRK BSL1 | 425: Li-ion 14,4 V (2,5 Ah 4 cellen) BSL1 | 825: Li-ion 18 V (2,5 Ah 5 cellen) |
| NNK/NN | —— — | |
| Gewicht* | 1,6 kg (Met le BSL1415 bevestigd) 1,7 | kg (Met le BSL1815 en bevestigd) |
\* Gewicht: Volgens EPTA-procedure 01/2003
ACCULADER
| Model UC18YKSL UC18YFSL | |
| Oplaadspanning 14,4 V – 18 V |
| Gewicht 0,35 kg 0,5 kg | |
STANDAARD TOEBEHOREN
| DV14DJL(2LEGK)DV18DJL(2LEGK) | 1 Kruiskopdrijver (Nr. 2)......1 |
| 2 Acculader (UC18YKSL)......1 |
| 3 Batterij (BSL1415 of BSL1815)......2 |
| 4 Plastic doos ......1 |
| 5 Batterijdeksel......1 |
| DV14DJL(2LFRK)DV18DJL(2LFGK)(2LFRK) | 1 Kruiskopdrijver (Nr. 2)......1 |
| 2 Acculader (UC18YKSL of UC18YFSL)...1 |
| 3 Batterij (BSL1425 of BSL1825) ......2 |
| 4 Plastic doos ......1 |
| 5 Batterijdeksel......1 |
| DV18DJL(NNK) | 1 Kruiskopdrijver (Nr. 2)......12 Plastic doos ......1Acculader, batterij en batterijdeksel niet inbegrepen. |
| DV18DJL(NN) | 1 Kruiskopdrijver (Nr. 2)......1Acculader, batterij, plastic doos en batterijdeksel niet inbegrepen. |
De standaard toebehoren kunnen zonder nadere aankondiging gewijzigd worden.
De bijgeleverde oplader en accu verschillen afhankelijk van de specificaties van de machine.
○ Batterij
BSL1415S, BSL1415, BSL1425
BSL1815S, BSL1815, BSL1825
○ Haak
De extra toebehoren kunnen zonder nadere aankondiging gewijzigd worden.
TOEPASSINGEN
○ Boren in steen en betonblokken, etc.
○ Indraaien en uitdraaien van machineschroeven, houtschroeven, tapbouten, etc.
○ Boren van verschillende metalen.
○ Boren van verschillende houtsoorten.
INLEGGEN EN UITNEMEN VAN DE BATTERIJ
1. Verwijderen van de batterij
Houd de handgreep goed vast en druk tegen de accvergrendeling (2 stuks) om de batterij te verwijderen (Zie Afb. 1 en 2).
LET OP
Sluit de batterij nooit kort.
2. Aanbrengen van de batterij
Plaats de batterij met de polen juist aangebracht (Zie Afb. 2).
OPLADEN
Vóór het gebruik van het elektrisch gereedschap dient de batterij als volgt opgeladen te worden.
1. Sluit het netsnoer van het oplaadapparaat op het stopkontakt aan.
Wanneer de stekker van de acculader in het stopcontact wordt gestoken, zal het lampje in rood knipperen (met tussenpozen van 1 seconde).
2. Steek de batterij in het oplaadapparaat.
Steek de batterij stevig in de oplader, zoals in Afb. 3 getoond wordt.
3. Opladen
Wanneer een batterij in de acculader wordt aangebracht, blijft het controlelampje kontinu rood branden.
Wanneer de batterij volledig is opgeladen, gaat het lampje in rood knipperen (met tussenpozen van 1 seconde) (Zie Tabel 1).
(1) Aanduiding van het controlelampje
De aanduidingen van het controlelampje zijn zoals aangegeven in Tabel 1, al naar gelang de toestand van de oplaadbare batterij of de acculader.
Tabel 1
| Aanduidingen van het controlelampje |
| Controlelampje (rood) | Voor het laden Knippert | Brandt ongeveer 0,5 sekonde.Brandt ongeveer 0,5 sekonde niet.(Uit voor 0,5 sekonde) | | |
| Tijdens opladen Brandt | Blift branden |
| Na opladen Knippert | Brandt ongeveer 0,5 sekonde.Brandt ongeveer 0,5 sekonde niet.(Uit voor 0,5 sekonde) |
| Oververhitting standby | Knippert | Brandt ongeveer 1 sekonde.Brandt ongeveer 0,5 sekonde niet.(Uit voor 0,5 sekonde) | De batterij is oververhit. De batterij kan niet opgeladen worden (het opladen wordt hervat wanneer de batterij is afgekoeld). |
| Opladen onmogelijk | Knippert | Brandt ongeveer 0,1 sekonde.Brandt ongeveer 0,1 sekonde niet.(Uit voor 0,1 sekonde) | Er is iets mis met de accu of met het oplaad-apparaat |
(2) Betreff ende de temperatuur van de oplaadbare batterij De temperaturen voor herlaadbare batterijen worden weergegeven in Tabel 2. Oververhitte batterijen moeten een tijdje afkoelen voordat ze worden herladen.
Tabel 2 Temperatuur voor opladen van baterijen
| Oplaadbare batterijen | Geschikte temperatuur voor het opladen |
| BSL1415S, BSL1415, BSL1425, BSL1815S, BSL1815, BSL1825 | 0°C – 50°C |
(3) Tijd die benodigd is voor het opladen
De oplaadtijden in de onderstaande Tabel 3 zijn afhankelijk van de kombinatie van acculader en batterij.
Tabel 3 Oplaadtijden (bij 20°C)
| Batterij\Acculader | UC18YFSL UC18YKSL |
| BSL1415S, BSL1815S | Circa. 20 min. Circa. 35 min. |
| BSL1415, BSL1815 Circa. 22 min. Circa. | 40 min. |
| BSL1425, BSL1825 Circa. 35 min. Circa. | 75 min. |
OPMERKING
De tijd voor het opladen verschilt afhankelijk van de omgevingstemperatuur en het spanningsvoltage.
4. Trek de stekker van het oplaadapparaat uit het stopkontakt
5. Houd het oplaadapparaat stevig vast en trek de batterij er uit
OPMERKING
Verwijder beslist de accu van de lader na gebruik. Bewaar op een veilige plaats.
Betreff ende het ontladen raken van nieuwe batterijen e.d.
Aangezien bij nieuwe en langdurig niet gebruikte batterijen de chemische aktiviteit is teruggelopen, zal de stroomopbrengst bij het eerste en tweede gebruik slechts gering zijn. Dit is een tijdelijk verschijnsel; de normale oplaadtijd kan hersteld worden door de batterij 2 à 3 maal bij kamertemperatuur op te laden.
Om langdurig gebruik van de batterij te bevorderen.
(1) Laad batterij op vóórdat ze volledig uitgeput zijn. Merkt u dat de gevoede apparatuur minder krachtig gaat werken, onderbreek dan het gebruik en laad de batterij op. Als u apparatuur op batterijvoeding te lang blijft gebruiken, kan dit leiden tot teruglopen van de batterijwerking en eventueel zelfs beschadiging ervan.
(2) Verricht het opladen niet bij hoge temperatuur. Een oplaadbare batterij zal onmiddellijk na gebruik gewoonlijk erg warm zijn. Als u een dergelijke batterij onmiddellijk gaat opladen, zal de chemische balans in het inwendige verstord worden en zal de levensduur van de batterij afnemen. Laat de batterij daarom even afkoelen, voor u met opladen begint.
LET OP
Als wordt geprobeerd de batterij op te laden terwijl deze te warm is geworden door langdurige blootstelling aan direct zonlicht of onmiddellijk na gebruik van de batterij, is het mogelijk dat het controlelampje van de acculader knippert door 1 seconde op te lichten en 0,5 seconde niet op te lichten (lampje is 0,5 seconde uit). Mocht dit zich voordoen, laat de batterij dan eerst even afkoelen alvorens u deze oplaadt.
○ Wanneer het controlelampje snel knippert (vijfmaal per seconde), neem de batterij dan uit het oplaadapparaat en controleer op de aanwezigheid van een voorwerp dat er niet hoort. Is er geen voorwerp in de opening aanwezig, dan is de storing waarschijnlijk te wijten aan de oplaadbare batterij of het oplaadapparaat. Laat deze dan controleren door een bevoegde onderhoudsinstantie.
○ Aangezien de ingebouwde microprocessor ongeveer 3 seconden nodig heeft om vast te stellen dat de accu die met de UC18YKSL of UC18YFSL wordt opgeladen is losgekoppeld, dient u minimaal 3 seconden te wachten voordat u de accu weer aansluit om het opladen te vervolgen. Als de accu binnen 3 seconden opnieuw wordt ingestoken, bestaat de kans dat deze niet goed wordt opgeladen.
VOOR HET GEBRUIK
Gereedmaken en kontroleren van de werkplaats
Kontroleer of de werkplaats geschikt is door nauwkeurig de genormde voorzorgsmaatregelen op te volgen.
BEDIENING
1. Controleer de stand van de koppelingsinstelling (Zie Afb. 4)
De drie functies, schroevendraaier, boor en klopboor kunnen worden ingesteld via de stand van de koppelingsinstelling van de machine.
(1) Bij gebruik van deze machine als schroevendraaier plaatst u één van de nummers "1, 3, 5 ... 22" op de koppelingsinstelling, of een stip, tegenover het driehoekje op de machine.
(2) Bij gebruik van deze machine als boor plaatst u de boormarkering "###" op de koppelingsinstelling tegenover het driehoekje.
(3) Voor gebruik als klopboormoet u de "hamer" markering op de koppelingsinstelling in lijn brengen met het driehoekje op de behuizing van de machine.
LET OP
○ De koppelingsinstelling mag niet in een stand worden gezet tussen de nummers "1, 3, 5 ... 22" of de stippen in.
○ Gebruik de machine niet met de koppelingsinstelling tussen "22" en het streepje in het midden van de boormarkering. Dit kan resulteren in beschadiging (Zie Afb. 5).
2. Afstelling van het aantrekkoppel
(1) Aantrekkoppel
Instelling van het aantrekkoppel van de boor dient te gebeuren op basis van de schroefdiameter. Wan neer teveel kracht bij het aandraaien gebruikt wordt, zal de schroef beschadigd en misschien onbruikbaar worden. Plaats de koppelingsinstelling in een stand die geschikt is voor de diameter van het soort schroef in gebruik.
(2) Aanduiding van het aantrekkoppel
Het aantrekkoppel verschilt afhankelijk van het type schroef en het soort materiaal dat wordt vastgezet. De machine geeft het aantrekkoppel aan met nummers "1, 3, 5 ... 22" op de koppelingsinstelling en stippen. Het aantrekkoppel bij stand "1" is het kleinst en het koppel wordt groter naarmate het nummer oploopt (Zie Afb. 4).
(3) Instellen van het aantrekkoppel
Draai de koppelingsinstelling rond en plaats de nummers "1, 3, 5 ... 22" op de kap, of de stippen, tegenover het driehoekje op de machine. Draai de koppelingsinstelling in de richting van een zwakker of sterker aantrekkoppel overeenkomstig het koppel dat u nodig heeft.
LET OP
○ Het kan voorkomen dat de motor stopt wanneer het apparaat als een dril gebruikt wordt. Zorg ervoor dat de slagboor-schroefmachine niet vast loopt tijdens gebruik.
○ Wanneer te lang gedraaid wordt kan de schroef breken.
3. Wisseling van rotatie naar impakt en uitsluitend rotatie (Zie Afb. 4)
U kunt van "Rotation (uitsluitend rotatie)" naar "Impact (impakt + rotatie)" schakelen door de boormarkering "→" of de hamermarkering T" in lijn te brengen met de driehoek marking op de machine.
○ Voor het boren van gaten in metaal, hout of plastic, moet u "Rotation (uitsluitend rotatie)" gebruiken.
○ Voor het boren van gaten in steen of beton, moet u "Impact (impakt + rotatie)" gebruiken.
VOORZICHTIG
Indien "Impact" is ingesteld voor het boren dat normaliter met "Rotation" wordt uitgevoerd, zal de kracht van het boren sterker zijn maar wordt het boorstuk of andere delen mogelijk beschadigd.
Als de koppelingsinstelling moeilijk op de hamermarkering "T" stand kan worden gezet, draait u de boorkop een weinig naar links of rechts, waarna u de koppelingsinstelling opnieuw op de hamermarkering "T" stand probeert te zetten.
4. Veranderen van de draaisnelheid
Gebruik de toerenschakelaar om de draaisnelheid te veranderen. Druk op de vergrendeltoets en schuif de toerenschakelaar in de richting van de pijl (Zie Afb. 6 en 7).
Door de toerenschakelaar op "LOW" te zetten, draait de boor met lage snelheid. Wanneer de toets "HIGH" gezet wordt, draait de boor op hoge snelheid.
LET OP
○ Controleer of de hoofdschakelaar inderdaad uit staat voor u de instelling voor het toerental verandert.
De motor wordt beschadigd wanneer de draais nelheid veranderd wordt tijdens het draaien van de motor.
Als u de toerenschakelaar op "HIGH" (hoog toerental) zet, terwijl de koppelingsinstelling tussen "15" en "22" staat, kan het gebeuren dat de koppeling doorslipt en dat de motor vast komt te staan. Zet in dat geval de toerenschakelaar op "LOW" (laag toerental).
○ Schakel de netspanning onmiddelijk uit wanneer de motor vast loopt. Dit om te voorkomen dat de motor of accu beschadigd wordt.
De lithium-ion batterij is voorzien van een beschermingsfunctie die volledige ontlading van de batterij voorkomt waardoor de levensduur wordt verlengd. Wanneer het gereedschap overbelast raaktkan de motor tot stilstand komen. Dit geeft geen probleem met het product aan maar wordt veroorzaakt door de beschermingsfunctie. Laat de schakelaar onmiddelijk los en zoek naar de oorzaak van de overbelasting.
5. Manieren en suggesties voor gebruik
Tabel 4 geeft een overzicht van de diverse werkzaamheden die met dit apparaat kunnen worden uitgevoerd op basis van de mechanische eigenschappen van dit gereedschap.
Tabel 4
| Werk | Koppelingsinstelling-positie | Suggesties |
| Boren | Steen | | Gebruik een boor en dopsleutel die met de diameter van de schroef overeenkomen. |
| Hout | |
| Staal |
| Aluminium |
| Drijven | Kolomschroef 1 – 22 | | Bohrespitze of Hülse dem Schraubendurchschnitt verwenden. |
| Houtschroef | 1 – 2 | Gebruik na het voorboren van gat. |
6. Kiezen van het aantrekkoppel en de draaisnelheid
Tabel 5
| Toepassing | Koppelingsinstelling-positie | Kiezen van het toerental (kapstand) |
| LOW (laag toerental) HIGH (hoog toerental) |
| Drijven | Kolomschroef 1 –22 | Voor schroevan met een diameter van 4 mm of minder. | Voor schroevan met een diameter van 6 mm of minder. |
| Houstschroef | 1 – | Voor schroeven met een nominale diameter van 8 mm of minder. | Voor schroeven met een nominale diameter van 4,8 mm of minder. |
| Boren | Steen | T | Voor diameters van 13 mm of minder. | Voor diameters van 8 mm of minder. (DV14DJL) |
| Voor diameters van 10 mm of minder. (DV18DJL) |
| Hout | I | Voor diameters van 32 mm of minder. (DV14DJL) | Voor diameters van 18 mm of minder. (DV14DJL) |
| Voor diameters van 38 mm of minder. (DV18DJL) | Voor diameters van 22 mm of minder. (DV18DJL) |
| Metaal | I | —— | Voor boren met een staalboor. |
LET OP
○ Bovenstaande voorbeelden in Tabel 5 kunnen als standaard gezien worden voor de verschillende types schroeven en materialen, alhoewel verschillende schroeven en materialen gebruikt worden in de praktijk. Voor verschillende types dient het juiste draaikoppel te worden gekozen.
Als u de slagboor-schroefmachine gebruikt om een schroef met een vierkante of zeskantige kop in te schroeven, gebruik dan geen hoog toerental (HIGH). Dit zou kunnen leiden tot beschadiging van de schroefkop of van het bitje, daar het aandraaikoppel te groot is. Gebruik de slagboor-schroefmachine met het lage toerental ingeschakeld (LOW).
OPMERKING
Het gebruik van de batterij bij lage temperaturen (onder nul) kan soms een zwakker aantrekkoppel en slechtere werking van het gereedschap tot gevolg hebben. Dit is slechts tijdelijk en de werking zal weer normaal zijn als de batterij weer op normale temperatuur is.
7. Aanbrengen en verwijderen van het inzetstuk
(1) Steek de boor enz. in de sleutelloze boorkop en draai de klembus stevig naar rechts om deze vast te zetten. (klokwaarts, van voren af gezien) (Zie Afb. 8).
○ Mocht de klembus tijdens gebruik losraken, draai hem dan nog iets vaster. Steviger aandraaien van de klembus vergroot de kracht van het apparaat.
(2) Verwijderen van een boor/draaistuk
Maak de klembus los door deze naar links te draaien. (tegen de klok in, van voren af gezien) (Zie Afb. 8).
LET OP
Wanneer de klembus niet losgeschroefd kan worden, dient u het gereedschap in een bankschroef vast te zetten. Zet vervolgens de koppeling op 1–11 en draai de klembus linksom terwijl u de koppeling bediend.
8. Kontroleer of de accu op de juiste manier aange bracht is
9. Kontroleer de draairichting
De boor draait rechtsom (van achteren gezien) wanneer de R-kant van de omzetschakelaar ingedrukt wordt. De L-kant van de omzetschakelaar dient te worden ingedrukt om de boor linksom te laten draaien (Zie Afb. 9) (De (L) en de (R) markeringen zijn op de behuizing aangebracht).
LET OP
Gebruik deze machine altijd met de draairichting naar rechts wanneer deze gebruikt wordt als klopboor.
10. Bediening van de schakellaar
○ De boor gaat draaien wanneer aan de trekker getrokken wordt. Wanneer de trekker wordt losgelaten stopt de boor.
De draaisnelheid van de boor kunt u regelen door in meer of mindere mate aan de trekschakelaar te trekken. Wanneer u licht aan de trekschakelaar trekt, is de snelheid laag en bij harder trekken wordt de snelheid verhoogd.
OPMERKING
Een gezoem wordt gehoord als de motor begint te draaien; dit is alleen geluid en duidt geen defekt aan.
Overmatige druk bij het boren verhoogt niet de snelheid. De boorkop zal hierdoor echter wel worden beschadigd met een kortere levensduur tot gevolg, of de klus wordt mogelijk niet goed uitgevoerd. Gebruik de Snoerloze klop-boor-schroefmachine met een druk van 10-15 kg bij het boren in steen.
12. Het licht gebruiken
Trek aan de trekkerschakelaar om het lampje te laten branden. Het lampje blijft branden zolang de trekkerschakelaar wordt ingetrokken. Het lampje gaat uit zodat de trekkerschakelaar wordt losgelaten. (Afb. 10)
(Zodra u de trekkerschakelaar loslaat, gaat het lampje na 10 seconden automatisch uit.)
LET OP
Stel uw ogen niet rechtstreeks bloot aan het licht door in het lampje te kijken.
Als uw ogen voortdurend worden blootgesteld aan het licht, kan dit oogletsel veroorzaken.
13. Gebruik van de haak (los verkrijgbaar)
De haak wordt gebruikt om de machine aan uw heupriem te hangen terwijl u werkt.
LET OP
○ Wanneer u de haak gebruikt, dient u erop te letten dat de machine stevig bevestigd is zodat deze niet per ongeluk valt.
Als de machine valt, kan dit een ongeval veroorzaken.
○ Wanneer u de machine draagt terwijl deze bevestigd is aan uw heupriem, plaats dan geen uitrustingsstuk in de kop van de machine. Als de machine is uitgerust met een scherp uitrustingsstuk zoals een boor terwijl u het aan uw heupriem draagt, veroorzaakt dat letsel.
○ Bevestig de haak stevig. Als de haak niet stevig is bevestigd, kan dit letsel veroorzaken tijdens het gebruik.
(1) Plaatsen van de haak en vastdraaien van de schroeven. Plaats de haak stevig in de groef van de machine en draai de schroeven vast om de haak stevig te bevestigen. (Afb. 11)
(2) De haak verwijderen.
Verwijder de schroeven die de haak op zijn plaats houden met een Philips schroevendraaier. (Afb. 12)
LET OP
Alleen een HiKOKI STANDAARD ACCESSOIRES kruiskop-bit (nr. 2 × 65L; codenr. 983006) mag gebruikt worden. Gebruik geen andere bits want deze kunnen losraken.
ONDERHOUD EN INSPECTIE
1. Inspectie van de boor
Slijp of vervang de boor wanneer slijtage gekonstateerd wordt; gebruik van eengekonstateerd wordt; gebruik van een stompe boor vermindert de effi cientie en kan de motor beschadigen.
2. Inspectie van bevestigingsschroeven
Kontroleer deze schroeven regelmatig om te verzekeren dat ze goed aangedraaid zijn. Draai loszittende schroeven onmiddellijk vast. Dit om ongelukken te voorkomen.
3. Onderhoud van de motor
De motorwikkeling is het "hert" van het electrishce gereedschap.
Er moet daarom bijzonder zorgvuldig op gelet worden, dat de wikkeling niet beschadigd en/or met olie or water bevochtigd wordt.
4. Reiningen van de behuizing
Gebruik een zachte droge doek, of wat soppig water, wanneer de slagboor-schroefmachine bevuild is. Gebruik geen vloeis toff en zoals terpentine of benzine om te voorkomen dat de afwerking beschadigd wordt.
5. Opbergen
Bewaar de slagboor-schroefmachine op een plaats waar de temperatuur niet hoger is dan 40°C, en buiten het bereik van kinderen.
OPMERKING
Controleer of de batterij volledig is geladen als deze gedurende langere tijd is opgeslagen (3 maanden of langer). Een batterij met een kleinere capaciteit kan tijdens het gebruik mogelijk niet worden opgeladen als hij langdurig is opgeslagen.
OPMERKING
Opbergen van lithium-ion batterijen
Zorg dat de lithium-ion batterijen volledig zijn opgeladen voordat u deze opbergt.
Langdurig opbergen van de batterijen met een lage lading kan resulteren in een slechtere prestatie, een sterke afname van de gebruiksduur van de batterijen en ook is het mogelijk dat de batterijen niet meer opgeladen kunnen worden.
Een sterke afname van de gebruiksduur van de batterijen kan soms wel weer verholpen worden door de batterijen herhaaldelijk van twee- tot vijfmaal op te laden en te gebruiken.
Als de gebruiksduur van de batterijen zeer kort blijft nadat deze meerdere malen zijn opgeladen en gebruikt, zijn de batterijen versleten en dient u nieuwe batterijen aan te schaff en.
6. Lijst vervangingsonderdelen
LET OP
Reparatie, modificatie en inspectie van HiKOKI elektrisch gereedschap dient te worden uitgevoerd door een erkend HiKOKI Service-centrum.
Deze Onderdelenlijst komt van pas wanneer u deze samen met het gereedschap aanbiedt bij het erkende HiKOKI Service-centrum wanneer u om reparatie of ander onderhoud verzoekt.
Bij gebruik en onderhoud van elektrisch gereedschap dienen de in het land waar u zich bevindt geldende veiligheidsregelgeving en veiligheidsstandaarden stipt te worden opgevolgd.
MODIFICATIES
HiKOKI elektrisch gereedschap wordt voortdurend verbeterd en gewijzigd teneinde gebruik te kunnen maken van de nieuwste technische ontwikkelingen.
Daarom is mogelijk dat sommige onderdelen zonder voorafgaande kennisgeving gewijzigd worden.
Gebruik altijd een van onze voorgeschreven originele batterijen. Wij kunnen de veiligheid en prestatie van ons snoerloos elektrisch gereedschap niet garanderen bij gebruik van andere dan de voorgeschreven batterijen, of als de batterij gedemonteerd of gewijzigd is (zoals demontage of vervanging van batterijcellen of andere inwendige onderdelen).
GARANTIE
De garantie op het elektrisch gereedschap van HiKOKI is in overeenstemming met de wettelijke/landspecifi eke richtlijnen. Deze garantie dekt geen defecten of schade als gevolg van foutief gebruik, misbruik of normale slijtage. In geval van klachten verzoeken wij u het elektrisch gereedschap samen met het GARANTIECERTIFICAAT dat u achterin deze handleiding aantreft naar een erkend servicecentrum van HiKOKI te sturen. Indien door de gebruiker de machine wordt gedemonteerd vervalt de aanspraak op garantie.
OPMERKING
Op grond van het voortdurende research en ont wikkelingsprogramma van HiKOKI zijn veranderingen van de hierin genoemde technische opgaven voorbehouden.
De gemeten waarden zijn verkregen overeenkomstig EN60745 en voldoen aan de eisen van ISO 4871.
Gemeten A-gewogen geluidsniveau: 96 dB (A)
Gemeten A-gewogen geluidsdrukniveau: 85 dB (A)
Onzekerheid KpA: 3 dB (A)
Draag gehoorbescherming.
Totale trillingswaarden (triax vector som) bepaald overeenkomstig EN60745.
Stootboren in beton:
Trillingsemissiewaarde ah, ID = 11,1 m/s²
Onzekerheid K = 1,5 m/s²
De opgegeven totale trillingswaarde is gemeten overeenkomstig een standaard testmethode en kan gebruikt worden om het ene gereedschap met het andere te vergelijken.
De waarde kan ook gebruikt worden voor de eerste beoordeling van de blootstelling aan trillingen.
WAARSCHUWING
De trillingsemissiewaarde tijdens het feitelijke gebruik van het elektrisch gereedschap kan afwijken van de opgegeven waarde afhankelijk van de manieren waarop het gereedschap wordt gebruikt.
○ Neem kennis van de veiligheidsmaatregelen voor de bescherming van de gebruiker gebaseerd zijn op een schatting van blootstelling onder feitelijke gebruiksomstandigheden (rekening houdend met alle onderdelen van de gebruikscyclus, zoals de tijd dat het gereedschap is uitgeschakeld en wanneer dit onbelast draait inclusief de triggertijd).
ADVERTENCIAS DE SEGURIDAD GENERAL DE LA HERRAMIENTA ELÉCTRICA
ADVERTENCIA
Lea todas las instrucciones y advertencias de seguridad.
Si no se siguen las advertencias e instrucciones, podría producirse una descarga eléctrica, un incendio y/o daños graves.
Guarde todas las advertencias e instrucciones para futura referencia.
El término “herramienta eléctrica” en las advertencias hace referencia a la herramienta eléctrica que funciona con la red de suministro (con cable) o a la herramienta eléctrica que funciona con pilas (sin cable).
1) Seguridad del área de trabajo
a) Mantenga la zona de trabajo limpia y bien iluminada.
Las zonas desordenadas u oscuras pueden provocar accidentes.
b) No utilice las herramientas eléctricas en entornos explosivos como, por ejemplo, en presencia de líquidos infl amables, gases o polvo.
Las herramientas eléctricas crean chispas que pueden infl amar el polvo o los humos.
c) Mantenga a los niños y transeúntes alejados cuando utilice una herramienta eléctrica.
Las distracciones pueden hacer que pierda el control.
2) Seguridad eléctrica
a) Los enchufes de las herramientas eléctricas tienen que ser adecuados a la toma de corriente. No modifi que el enchufe.
No utilice enchufes adaptadores con herramientas eléctricas conectadas a tierra.
Si no se modifi can los enchufes y se utilizan tomas de corriente adecuadas se reducirá el riesgo de descarga eléctrica.
b) Evite el contacto corporal con superfi cies conectadas a tierra como tuberías, radiadores y frigoríficos.
Hay mayor riesgo de descarga eléctrica si su cuerpo está en contacto con el suelo.
c) No exponga las herramientas eléctricas a la lluvia o a la humedad.
La entrada de agua en una herramienta eléctrica aumentará el riesgo de descarga eléctrica.
d) No utilice el cable incorrectamente. No utilice el cable para transportar, tirar de la herramienta eléctrica o desenchufarla.
Mantenga el cable alejado del calor, del aceite, de bordes afi lados o piezas móviles.
Los cables dañados o enredados aumentan el riesgo de descarga eléctrica.
e) Cuando utilice una herramienta eléctrica al aire libre, utilice un cable prolongador adecuado para utilizarse al aire libre.
La utilización de un cable adecuado para usarse al aire libre reduce el riesgo de descarga eléctrica.
f) Si no se puede evitar el uso de una herramienta eléctrica en un lugar húmedo, utilice un suministro protegido mediante un dispositivo de corriente residual (RCD).
El uso de un RCD reduce el riesgo de descarga eléctrica.
3) Seguridad personal
a) Esté atento, preste atención a lo que hace y utilice el sentido común cuando utilice una herramienta eléctrica.
No utilice una herramienta eléctrica cuando esté cansado o esté bajo la infl uencia de drogas, alcohol o medicación.
La distracción momentánea cuando utiliza herramientas eléctricas puede dar lugar a importantes daños personales.
b) Utilice un equipo de protección. Utilice siempre una protección ocular.
El equipo de protección como máscara para el polvo, zapatos de seguridad antideslizantes, casco o protección para oídos utilizado para condiciones adecuadas reducirá los daños personales.
c) Evite un inicio involuntario. Asegúrese de que el interruptor está en "off" antes de conectar la herramienta a una fuente de alimentación y/o batería, cogerla o transportarla.
El transporte de herramientas eléctricas con el dedo en el interruptor o el encendido de herramientas eléctricas con el interruptor encendido puede provocar accidentes.
d) Retire las llaves de ajuste antes de encender la herramienta eléctrica.
Si se deja una llave en una pieza giratoria de la herramienta eléctrica podrían producirse daños personales.
e) No se extralimite. Mantenga un equilibrio adecuado en todo momento.
Esto permite un mayor control de la herramienta eléctrica en situaciones inesperadas.
f) Vístase adecuadamente. No lleve prendas sueltas o joyas. Mantenga el pelo, la ropa y los guantes alejados de las piezas móviles.
La ropa suelta, las joyas y el pelo largo pueden pillarse en las piezas móviles.
g) Si se proporcionan dispositivos para la conexión de extracción de polvo e instalaciones de recogida, asegúrese de que están conectados y se utilizan adecuadamente.
La utilización de un sistema de recogida de polvo puede reducir los riesgos relacionados con el polvo.
4) Utilización y mantenimiento de las herramientas eléctricas
a) No fuerce la herramienta eléctrica. Utilice la herramienta eléctrica correcta para su aplicación.
La herramienta eléctrica correcta trabajará mejor y de forma más segura si se utiliza a la velocidad para la que fue diseñada.
b) No utilice la herramienta eléctrica si el interruptor no la enciende y apaga.
Las herramientas eléctricas que no pueden controlarse con el interruptor son peligrosas y deben repararse.
c) Desconecte el enchufe de la fuente eléctrica y/o la batería de la herramienta eléctrica antes de hacer ajustes, cambiar accesorios o almacenar herramientas eléctricas.
Estas medidas de seguridad preventivas reducen el riesgo de que la herramienta eléctrica se ponga en marcha accidentalmente.
d) Guarde las herramientas eléctricas que no se utilicen para que no las cojan los niños y no permita que utilicen las herramientas eléctricas personas no familiarizadas con las mismas o con estas instrucciones.
Las herramientas eléctricas son peligrosas si son utilizadas por usuarios sin formación.
e) Mantenimiento de las herramientas eléctricas. Compruebe si las piezas móviles están mal alineadas o unidas, si hay alguna pieza rota u otra condición que pudiera afectar al funcionamiento de las herramientas eléctricas.
Si la herramienta eléctrica está dañada, llévela a reparar antes de utilizarla.
Se producen muchos accidentes por no realizar un mantenimiento correcto de las herramientas eléctricas.
f) Mantenga las herramientas de corte afi ladas y limpias.
Las herramientas de corte correctamente mantenidas con los bordes de corte afi lados son más fáciles de controlar.
g) Utilice la herramienta eléctrica, los accesorios y las brocas de la herramienta, etc. de acuerdo con estas instrucciones, teniendo en cuenta las condiciones laborales y el trabajo que se va a realizar.
La utilización de la herramienta eléctrica para operaciones diferentes a aquellas pretendidas podría dar lugar a una situación peligrosa.
5) Utilización y mantenimiento de las herramientas a batería
a) Recargue sólo con el cargador especificado por el fabricante.
Un cargador adecuado para un tipo de batería podría crear peligro de incendio si se utiliza con otra batería.
b) Utilice herramientas eléctricas sólo con baterías designadas específi camente.
La utilización de otras baterías podría crear peligro de daños e incendio.
c) Cuando no se utilice la batería, manténgala alejada de otros objetos metálicos como clips de papel, monedas, llaves, clavos, tornillos u otros objetos metálicos pequeños que puedan hacer una conexión de un terminal a otro.
Si se acortan y acercan los terminales de las baterías, podrían producirse quemaduras o un incendio.
d) Bajo condiciones abusivas, podría salir líquido de la batería; evite todo contacto. Si se produce un contacto accidentalmente, aclare con agua. Si entra líquido en los ojos, busque ayuda médica.
El líquido de la batería podría causar irritación o quemaduras.
6) Revisión
a) Lleve su herramienta a que la revise un experto cualifi cado que utilice sólo piezas de repuesto idénticas.
Esto garantizará el mantenimiento de la seguridad de la herramienta eléctrica.
PRECAUCIÓN
Mantenga a los niños y a las personas enfermas alejadas.
Cuando no se utilicen, las herramientas deben almacenarse fuera del alcance de los niños y de las personas enfermas.
PRECAUCIONES DE SEGURIDAD DEL TALADRO ATORNILLADOR DE IMPACTO A BATERIA
1. Lleve protectores auditivos cuando utilice el taladro de percusión.
La exposición al ruido puede causar daños auditivos.
2. Utilice los mangos auxiliares en el caso de que se proporcionen con la herramienta.
La pérdida de control puede causar daños personales.
3. Sostenga la herramienta eléctrica por las superficies de agarre aisladas cuando realice una operación en la que el accesorio de corte o el pasador pueda entrar en contacto con el cableado oculto. Si el accesorio de corte o los pasadores entra en contacto con un cable con corriente, las partes metálicas expuestas de la herramienta eléctrica pueden transmitir esa corriente y producir una descarga eléctrica al operador.
4. Siempre cargar la batería a una temperatura comprendida 0 – 40°C. Una temperatura inferior a 0°C causa una sobrecarga, lo que es peligroso. No puede cargarse la batería a una temperatura mayor de 40°C.
La temperatura más apropiada para cargar es la de 20 - 25°C.
5. Cuando se completa la carga, dejar descansar el cargador por 15 minutos antes de proseguir con la carga siguiente.
No cargue consecutivamente más de dos baterías.
6. No dejar que entre suciedad por el orificio de conexión de la batería recargable.
7. Nunca desarmar la batería recargable ni el cargador.
8. Nunca poner en cortocircuito la batería récargable. Poner en cortocircuito la batería produce una corriente eléctrica enorme y el consecuente recalentamiento, pudiendo quemar o deteriorar la batería.
9. Ño tirar la batería al fuego.
Si se quema la batería puede explotar.
10. Llevar la batería al sitio de compra original en el caso de que la duración de la batería recargable sea reducida al usarse. No tirar la batería descargada.
11. El uso de una batería descargada dañará el cargador.
12. No insertar objetos en las ranuras de ventilación del cargador.
La inserción de objetos metálicos o inflamables en dichas ranuras puede provocar descargas eléctricas o dañar el cargador.
13. Cuando monte una broca o barrena en el portabroca de apriete sin llave, apriete el manguito adecuadamente. Si el manguito no queda bien apretado, la broca o la barrena pueden deslizar y caerse, causando heridas.
14. Este producto contiene un fuerte imán permanente en el motor.
Cumpla las siguientes precauciones referentes a adherir astillas a la herramienta y el efecto del imán permanente en dispositivos electrónicos.
PRECAUCIÓN
○ No coloque la herramienta sobre un banco de trabajo o un área de trabajo en el que haya astillas de metal.
Las astillas pueden adherirse a la herramienta, causando lesiones o un funcionamiento incorrecto.
○ Si se han adherido astillas a la herramienta, no la toque. Retírelas con un cepillo.
De lo contrario podrían producirse lesiones.

natural_image
Two identical diagrams showing a cross-shaped object with a textured surface and another with a broken handle (no text or symbols)
○ Si utiliza marcapasos u otro dispositivo médico electrónico no utilice o acerque la herramienta.
El funcionamiento del dispositivo electrónico podría verse afectado.
○ No utilice la herramienta cerca de dispositivos de precisión como teléfonos móviles, tarjetas magnéticas o medios de memoria electrónicos.
Esto podría llevar a una operación incorrecta, funcionamiento incorrecto o pérdida de datos.
ADVERTENCIA DE LA BATERÍA DE LITIO
Para ampliar su duración, la batería de litio está equipada con la función de protección para detener la salida.
En los casos 1 a 3 descritos más abajo, cuando utilice este producto, incluso si tira del interruptor, el motor puede detenerse. No es un problema, sino el resultado de la función de protección.
1. Cuando la batería restante se agota, el motor se detiene.
En este caso, cárguela inmediatamente.
2. Si la herramienta se sobrecarga, el motor puede detenerse. En este caso, suelte el interruptor de la herramienta y elimine las causas de la sobrecarga. A continuación, puede volverla a utilizar.
3. Si la batería se calienta excesivamente al realizar un trabajo de sobrecarga, la potencia de la batería podría pararse.
En este caso, deje de utilizar la batería y deje que se enfríe. Posteriormente puede utilizarla de nuevo.
Asimismo, preste atención a las siguientes advertencias y precauciones.
ADVERTENCIA
Para evitar fugas de la batería, generación de calor, emisión de humo, explosiones e igniciones, preste atención a las siguientes precauciones.
1. Asegúrese de que no entran virutas o polvo en la batería.
○ Durante el trabajo, asegúrese de que no caen virutas o polvo en la batería.
○ Asegúrese de que las virutas o el polvo que caen sobre la herramienta eléctrica durante el trabajo no entran en la batería.
○ No almacene una batería sin utilizar en un lugar expuesto a virutas y polvo.
○ Antes de almacenar una batería, retire las virutas y el polvo que se haya adherido y no la almacene junto a piezas metálicas (tornillos, clavos, etc.)
2. No agujeree la batería con un objeto afi lado como un clavo, no la golpee con un martillo, la pise, la tire o la exponga a fuertes impactos físicos.
3. No utilice una batería que pudiera estar dañada o deformada.
4. No utilice la batería con las polaridades cambiadas.
5. No conecte la batería directamente a salidas eléctricas o a los encendedores de cigarros de los coches.
6. No utilice la batería para un fin diferente a los especificados.
7. Si la carga de la batería no finaliza incluso cuando ha transcurrido un determinado tiempo de recarga, detenga inmediatamente la recarga.
8. No coloque o exponga la batería a temperaturas elevadas o alta presión como en un microondas, una secadora o un contenedor de gran presión.
9. Aléjela del fuego inmediatamente cuando se detecte una fuga o un olor raro.
10. No la utilice en un lugar donde se genere gran electricidad estática.
11. Si hay una fuga de la batería, mal olor, se genera color, está descolorida o deformada, o de algún modo funciona de forma anormal durante su utilización, recarga o almacenamiento, retírela inmediatamente del equipo o del cargador de la batería y detenga su utilización.
PRECAUCIÓN
1. Si el líquido de fuga de la batería entra en contacto con los ojos, no se los frote y lávelos bien con agua limpia como, por ejemplo, agua del grifo y póngase en contacto con un médico inmediatamente.
Si no se trata, el líquido podría causar problemas de visión.
2. Si el líquido de fuga entra en contacto con la piel o la ropa, lávela bien con agua limpia como, por ejemplo, agua del grifo inmediatamente.
Podría producir irritación de la piel.
3. Si observa óxido, mal olor, recalentamiento, decoloración, deformación y/u otras irregularidades al utilizar la batería por primera vez, no la utilice y devuélvasela a su proveedor o distribuidor.
ADVERTENCIA
Si penetran materiales conductivos en el terminal de la batería de ion-litio, la batería podría experimentar un cortocircuito y provocar un incendio. Al guardar la batería de ion-litio, siga las normas de seguridad siguientes.
○ No deje restos conductivos, clavos ni cables, como por ejemplo cables de hierro o de cobre, en el estuche de almacenamiento.
Para evitar que se produzcan cortocircuitos, cargue la batería en la herramienta o fije con firmeza la tapa de la batería hasta que deje de verse el ventilador (Fig. 1).
ESPECIFICACIONES
HERRAMIENTA MOTORIZADA
| Modelo DV14DJL DV18DJL | | |
| Velocidad sin carga (Baja/Alta) 0 – 350 / 0 | -1400 min |
| Indice de impacto sin carga (Baja/Alta) 0 – 4900 / 0 – 19600 min |
| Capacidad | Taladrado | Ladrillos(Grosor 30 mm) | 13 mm |
| Madera(Grosor 18 mm) | 32 mm 38 mm | |
| Metal(Grosor 1,6 mm) | Acero: 13 mm,Aluminio: 13 mm |
| Apriete detornillos | Tornillo para metales | 6 mm |
| Tornillo para madera | 8 mm (diámetro) × 50 mm (longitud)(Existe un orifi cio preliminar) | 8 mm (diámetro) × 75 mm (longitud)(Existe un orifi cio preliminar) |
| Batería recargable | 2LEGK | BSL1415: Li-ion 14,4 V (1,5 Ah 4 elementos) | BSL1815: Li-ion 18 V (1,5 Ah 5 elementos) |
| 2LFGK/2LFRK | BSL1425: Li-ion 14,4 V (2,5 Ah 4 elementos) | BSL1825: Li-ion 18 V (2,5 Ah 5 elementos) |
| NNK/NN | —— —— | |
| Peso* | 1,6 kg (con BSL1415 colocado) 1,7 kg (con BSL1815 colocado) |
\* Peso: según procedimiento EPTA 01/2003
CARGADOR
| Modelo UC18YKSL | UC18YFSL | |
| Tensión de carga 14,4 V — 18 V |
| Peso 0,35 kg 0,5 kg | | |
ACCESORIOS ESTÁNDAR
| DV14DJL(2LEGK)DV18DJL(2LEGK) | 1 Destornillador en cruz (+) (No. 2) ......1 |
| 2 Cargador (UC18YKSL) ......1 |
| 3 Batería (BSL1415 o BSL1815) ......2 |
| 4 Caja de plástico......1 |
| 5 Tapa de la batería......1 |
| DV14DJL(2LFRK)DV18DJL(2LFGK)(2LFRK) | 1 Destornillador en cruz (+) (No. 2) ......1 |
| 2 Cargador (UC18YKSL o UC18YFSL)....1 |
| 3 Batería (BSL1425 o BSL1825) ......2 |
| 4 Caja de plástico......1 |
| 5 Tapa de la batería......1 |
| DV18DJL(NNK) | 1 Destornillador en cruz (+) (No. 2) ......12 Caja de plástico......1No incluye cargador, batería y tapa de la batería. |
| DV18DJL(NN) | 1 Destornillador en cruz (+) (No. 2) ......1No incluye cargador, batería, caja de plástico y tapa de la batería. |
Los accesorios estándar están sujetos a cambio sin previo aviso.
El cargador y la batería suministrados son diferentes dependiendo de la especificación establecida.
ACCESORIOS OPCIONALES (de venta por separado)
○ Batería
BSL1415S, BSL1415, BSL1425
BSL1815S, BSL1815, BSL1825
○ Gancho
Lo accesorios facultativos están sujetos a cambio sin previo aviso.
APLICACIÓN
○ Taladrado de un ladrillo, bloque de hormigón, etc.
○ Atornillamiento y desatornillamiento de tornillos para metales, tornillos para madera, tornillos que no necesitan abrir antes su agujero, etc.
○ Taladrado de varios metales.
○ Taladrado de varias maderas.
DESMONTAJE E INSTALACIÓN DE LA BATERIA
1. Desmontaje de la batería
Sujetar firmemente el asidero y presionar el cierre de la bataría (2 pzas) para desmontarla (Ver las Figs. 1 y 2).
PRECAUCIÓN
No cortocircuitar nunca la batería.
2. Instalación de la batería
Insertar la batería observando sus polaridades (Ver la Fig. 2).
CARGA
Antes de utilizar la herramienta eléctrica, cambie la batería de la siguiente manera.
1. Enchufe el cable de alimentación del cargador a un tomacorriente de CA
Cuando haya conectado el enchufe del cargador a una toma de la red, el piloto parpadeará en rojo (A intervalos de 1 segundo).
2. Inserte la batería en el cargador
Inserte fi rmemente la batería en el cargador como se muestra en la Fig. 3.
3. Carga
Cuando inserte una batería en el cargador, la carga comenzará la lámpara piloto permanecerá continuamente encendida en rojo.
Cuando la batería se haya cargado completamente, el piloto parpadeará en rojo (A intervalos de 1 segundo). (Vea las Tabla 1)
(1) Indicaciones de la lámpara indicadora
Las indicaciones de la lámpara indicadora serán tal y como se muestran en la Tabla 1, de acuerdo con la condición del cargador o de la batería.
Tabla 1
| Indicaciones de la lámpara indicadora |
| Lámpara piloto (rojo) | Antes de la carga | Parpadeo | Se encenderá durante 0,5 segundos. No se encenderá durante 0,5 segundos.(Apagada durante 0,5 segundos) | |
| Durante la carga | Iluminación | Iluminación permanente |
| Carga completa | Parpadeo | Se encenderá durante 0,5 segundos. No se encenderá durante 0,5 segundos.(Apagada durante 0,5 segundos) |
| Espera por recalentamiento | Parpadeo | Se encenderá durante 1 segundo. No se encenderá durante 0,5 segundos.(Apagada durante 0,5 segundos) | Batería recalentada. No puede cargarse (la carga comenzará cuando la batería se enfríe). |
| Carga imposible | Destello | Se encenderá durante 0,1 segundo. No se encenderá durante 0,1 segundos.(Apagada durante 0,1 segundos) | Mal funcionamento de la battería o del cargador. |
(2) Temperatura de las baterías
Las temperaturas para las baterías recargables se muestran en la Tabla 2; las baterías calientes deben dejarse enfriar antes de volver a cargarlas.
Tabla 2 Márgenes de carga de las baterías
| Baterías | Temperatura con la que podrá cargarse la batería |
| BSL1415S, BSL1415, BSL1425, BSL1815S, BSL1815, BSL1825 | 0°C – 50°C |
(3) Tiempo de recarga
Dependiendo de la combinación del cargador y las baterías, el tiempo de carga será como se muestra en la Tabla 3.
Tabla 3 Tiempo de carga (a 20°C)
| Batería\Cargador | UC18YFSL UC18YKSL |
| BSL1415S, BSL1815S | Aprox. 20 min. | Aprox. 35 min. |
| BSL1415, BSL1815 A | prox. 22 min. | Aprox. 40 min. |
| BSL1425, BSL1825 A | prox. 35 min. | Aprox. 75 min. |
NOTA
El tiempo de carga puede variar de acuerdo con la tem peratura y la tensión de la fuente de alimentación.
4. Desenchufe el cable de alimentación del cargador del tomacorriente de CA
5. Sostenga el cargador fi rmemente y saque la batería NOTA
Asegúrese de extraer la batería del cargador después del uso, y guárdela después.
Descarga eléctrica en caso de baterías nuevas, etc.
Como la substancia química interna de las baterías nuevas o las que no se hayan utilizado durante mucho tiempo no está activada, la descarga eléctrica puede ser inferior cuando se utilicen por primera y segunda vez. Este fenómeno es temporal, y el tiempo normal requerido para la recarga se restablecerá recargando las baterías 2-3 veces.
(1) Recarque las baterías antes de que se hayan agotado completamente.
Si siente que la potencia de la herramienta eléctrica se debilita, deje de utilizarla y recargue su batería. Si continuase utilizando la herramienta hasta agotar la capacidad de la batería, ésta podría dañarse y su duración útil podría acortarse.
(2) Evite realizar la recarga a altas temperaturas.
Una batería se calentará inmediatamente después de haberla utilizado. Si recargase tal batería inmediatamente después de haberla utilizado, su substancia química interna se deterioraría, y la duración útil de la batería se acortaría. Deje la batería y recárguela después de que se haya enfriado durante cierto tiempo.
PRECAUCIÓN
Si carga la batería mientras esté caliente por haber estado mucho tiempo en un lugar sometido a la luz solar directa, o por haber acabado de utilizarla, la lámpara de piloto del cargador parpadea durante 1 segundo y no se enciende durante 0,5 segundos (apagada durante 0,5 segundos). En tales casos, deje primero que se enfríe la batería e inicie luego la carga.
○ Cuando la lámpara piloto destelle (a intervalos de 0,2 segundos), realice una comprobación y extraiga los objetos extraños de la batería del cargador. Si no hay ningún objeto extraño, es posible que la batería o el cargador funcione mal. Llévelos a un agente de servicio técnico autorizado.
○ Como el microordenador incorporado tarda unos 3 segundos en confi rmar que se ha retirado la batería cargada con UC18YKSL o UC18YFSL; espere 3 segundos como mínimo antes de volverla a introducir para seguir cargando. Si se introduce antes de que transcurran 3 segundos, puede que la batería no se cargue correctamente.
ANTES DE USAR LA HERRAMIENTA
Instalación y comprobación del ambiente de trabajo
Compruebe si el ambiente de trabajo es adecuado tomando las precauciones siguientes.
COMO SE USA
1. Confi rmar la posición del dial del embrague (Ver la Fig. 4)
Los tres modos de destornillador, taladro y taladro atornillador pueden cambiarse mediante la rueda selectora.
(1) Cuando utilice esta unidad como destornillador, alinee uno de los números “1, 3, 5 ... 22” del dial del embrague, o los puntos, con la marca de triángulo del cuerpo exterior.
(2) Cuando utilice esta unidad como taladro, alinee la marca de taladro “” del dial del embrague con la marca de triángulo del cuerpo exterior.
(3) Cuando utilice esta unidad como un taladro de percusión, hacer coincidir la marca de martillo "T" del dial del embrague con la marca de triángulo del cuerpo exterior.
PRECAUCIÓN
○ El dial del embrague no se puede ajustar entre los números “1, 3, 5 ... 22” ni los puntos.
○ Evite usar la unidad con el número del dial del embrague entre “22” y la línea provista en el medio de la marca del taladro. Si lo hiciese, se podrían producir daños (Consulte la Fig. 5).
2. Ajuste del par de apriete
(1) Par de apriete
La intensidad del par de apriete deberá corresponder con el diámetro del tornillo. Cuando se utiliza un par excesivo el tornillo se romperá o se dañará su cabeza. Asegúrese de ajustar la posición del dial del embrague de acuerdo con el diámetro del tornillo.
(2) Indicación del par de apriete
El par de apriete difiere según el tipo de tornillo y del material que se está apretando.
La unidad indica el par de apriete mediante los números "1, 3, 5 ... 22" que aparecen en el dial del embrague, y los puntos. El par de apriete en la posición "1" es el más débil, y el más fuerte es el del número más alto (Consulte la Fig. 4).
(3) Ajuste del par de apriete
Gire el dial del embrague y alinee los números “1, 3, 5, ... 22” del dial del embrague, o los puntos, con la marca de triángulo provista en el cuerpo exterior. Ajuste la tapa en la dirección de par débil o fuerte, según el par que necesite.
PRECAUCIÓN
El giro del motor podrá trabarse mientras que se uas la unidad como taladro. Tenga cuidado de no bloquear el motor mientras se está operando el taladro atornillador de impacto.
○ Un aprite excesivo podrá causar la rotura del tornillo.
3. Cambio de rotación a impacto (Ver Fig. 4)
La “Rotación (rotación solamente)” y el “Impacto (Impacto + rotación)” podrá cambiarse alineando la marca de taladro “” o la marca de martillo “T” con la marca triangular.
Para taladrar orificios en metal, madera, o plástico, cambie a "Rotación (rotación solamente)".
Para taladrar orificios en ladrillos o en bloques de hormigón, cambie a "Impacto (impaacto + rotación)".
PRECAUCION
Si realiza una operación en el ajuste "Impacto", que normalmente se realiza en "Rotación", el efecto de taladrar orificios no solamente aumentará sino que también puede dañar la broca u otras partes.
Si le cuesta girar el dial del embrague hasta la marca de martillo “T”, mueva el portabroca ligeramente en cualquier dirección y luego vuelva a girar el dial del embrague hasta la marca de martillo “T”.
4. Cambio de velocidad de rotación
Operar la perilla de cambio para cambiar la velocidad de rotación. Oprimir el botón de cierre para desenganchar el cerrojo y mover la perilla de cambio en la dirección de la flecha (Ver la Figs. 6 y 7).
Cuando la perilla de cambio se deja en "LOW", el taladro gira despacio, mientras que en la marca "HIGH" gira rápidamente.
PRECAUCIÓN
○ Cuando cambie la velocidad rotacional con la perilla de cambio, compruebe que el interruptor esté desconectado.
Cambiar la velocidad mientras rota el motor puede hacer que se dañen los engranajes.
○ Cuando ponga el mando de cambio en "HIGH" (alta velocidad) y la posición del dial del embrague sea entre "15" y "22", puede suceder que el embrague no entre en toma y que el motor se bloquee. En tal caso, ponga el mando de cambio en "LOW" (baja velocidad).
○ Si se trabal el motor, desconectario de inmediato. Si el motor se trabal por cierto tiempo, puede quemarse tanto él como la bateria.
Para ampliar su duración, la batería de litio está equipada con la función de protección para detener la salida. Por lo tanto, si se sobrecarga al batería, el motor puede detenerse. No obstante, esto no esun problema, sino el resultado de la función de protección. En este caso, suelte el interruptor de la herramienta y elimine las causas de la sobrecarga.
5. Ambito y sugerencias para las utilizaciones
El ámbito de utilización para los diversos tipos de trabajos basados en la estructura mecánica de esta unidad es como se indica en la Tabla 4.
Tabla 4
| Trabajo | Establezca la posición del dial | Sugerencias |
| Taladrado | Ladrillos | [1286] | Utilizar par taladrar. |
| Madera | castrol |
| Acero |
| Aluminio |
| Apriete de tornillos | Tornillo para metales | 1 – 22 | Utilizar el destornillador o el receptáculo que concuerden con el diámetro del tornillo. |
| Tornillo para madera | 1 – | Utilizar después de haber taladrado un agujero guía. |
6. Modo de seleccionar el par de apriete y la velocidad de rotación
Tabla 5
| Utilizaciones | Establezca la posición del dial | Selección de la velocidad de rotación (Posición del mando de cambio) |
| LOW (Baja velocidad) HIGH (Alta velocidad) |
| Apriete de tornillos | Tornillo para metales | 1 – 22 | Para tornillos de 4 mm de diámetro o menos. | Para tornillos de 6 mm de diámetro o menos. |
| Tornillo para madera |  | Para tornillos de 8 mm de diámetro nominal o menos. | Para tornillos de 4,8 mm de diámetro nominal o menos. |
| Taladrado | Ladrillos | | Para diámetro de 13 mm o menos. | Para diámetro de 8 mm o menos. (DV14DJL) |
| Para diámetro de 10 mm o menos. (DV18DJL) |
| Madera | | Para diámetro de 32 mm o menos. (DV14DJL) | Para diámetro de 18 mm o menos. (DV14DJL) |
| Para diámetro de 38 mm o menos. (DV18DJL) | Para diámetro de 22 mm o menos. (DV18DJL) |
| Metal | | | Para taladrar con un taladro de trabajos en hierro. |
PRECAUCIÓN
○ Los ejemplos de selección mostrados en la Tabla 5 deberán considerarse como el estándar general ya que en la actualidad se utilizan diferentes tipos de tornillos de aprite y diferentes materiales a ser apretados todos los cuales, necesitan naturalmente los ajustes apropiados.
Si emplea el taladro atornillador de impacto con un tornillo para metal en HIGH (alta velocidad), es posible que tal tornillo se dañe o que se afl oje la broca debido a que el par de apriete es demasiado fuerte. Utilice el taladro atornillador de impacto en LOW (baja velocidad) cuando utilice un tornillo para metal.
NOTA
La utilización de la batería n lugares fríos (menos de 0 grados centigrados) puede resultar a veces en la reducción del par de apriete y el rendimiento del trabajo. Sin embargo, éste es un fenómeno temporal y, cuando la batería se caliente, volverá a la normalidad.
7. Montaje y desmontaje de la broca
(1) Después de insertar una broca de destornillador, etc. en el portabrocas automático, sujete firmemente el manguito girándolo hacia la derecha (visto desde el frente) (Véase Fig. 8).
Si el manguito se afloja durante la operación, apriételo. La fuerza de apriete será más intensa cuando el manguito esté bien apretado.
(2) Desmontaje de la broca
A fl oje el manguito girándolo hacia le izquierda (visto desde el frente) (Véase Fig. 8).
PRECAUCIÓN
Cuando el manguito no pueda desatornillarse, sujete la herramienta insertada en un tornillo de carpintero, etc. ajuste el modo de embrague a 1–11, y gire el manguito hacia la izquierda mientras accione el embrague.
8. Confi rmar que la batería está puesta correctamente
9. Examinar la dirección de rotación
La broca rota hacia la derecha (mirándola desde atrás) al oprimir el lado R (der.) de inversión.
El lado L (izq.) se usa para hacer girar la broca a la izquierda (Vea las Fig. 9). (Las marcas (L) y (R) están en el cuerpo del taladro.)
PRECAUCIÓN
Usar siempre esta unidad con rotación a derecha, cuando se lo emplea como taladro de impacto.
10. Operación del interruptor
○ Cuando se tira del gatillo del interruptor, la herramienta gira.
Cuando se suelta el gatillo, la herramienta se detiene.
○ La velocidad rotacional de la taladradora podrá controlarse variando la presión con la que se tire del interruptor de gatillo. La velocidad será baja cuando se tire ligeramente del gatillo, y aumentará a medida que se tire más de él.
NOTA
Se produce un ruido de zumbido antes de que el motor empíece a girar, lo cual no indica problema alguno de la máquina.
La fuerza excesiva no aumentará la velocidad de taladrado. No solamente dañará la punta de la broca o reducirá la eficacia de trabajo, sino que también acortará la duración útil de la broca. Utilice el taladro atornillador de impacto a batería con una fuerza de presión de 10-15 kg cuando taladre ladrillos.
12. Utilización de la luz
Tire del interruptor de activación para encender la luz. La luz sigue iluminando mientras se tire del interruptor de activación. La luz se apaga tras soltar el interruptor de activación. (Fig. 10)
(La luz se apaga automáticamente 10 segundos después de soltar el interruptor de activación.)
PRECAUCIÓN
No exponga los ojos directamente a la luz; evite mirar hacia ella directamente.
Si los ojos están expuestos de manera continua a la luz, pueden resultar lesionados.
13. Uso del gancho (de venta por separado)
El gancho se usa para colgarse la herramienta con alimentación eléctrica del cinturón mientras se trabaja.
PRECAUCIÓN
○ Cuando se utiliza el gancho, se debe sujetar la herramienta con fi rmeza para que no se caiga por accidente.
Al caer, puede provocar un accidente.
○ No ajuste ninguna broca en el extremo de la herramienta de alimentación eléctrica si la lleva enganchada del cinturón. Si la herramienta tiene ajustada una broca afi lada, por ejemplo una perforadora, y se lleva enganchada al cinturón, puede resultar lesionado.
○ Instale el gancho de forma segura. Si no está correctamente colocado, puede provocar lesiones durante su uso.
(1) Colgar el gancho y apretar los tornillos.
Instale el gancho en la ranura de la herramienta de alimentación eléctrica de forma segura y apriete los tornillos de manera que el gancho quede firmemente sujeto. (Fig. 11)
(2) Retirada del gancho.
Extraiga los tornillos que sujetan el gancho con un destornillador Philips. (Fig. 12)
PRECAUCIÓN
Sólo se deberá utilizar una broca phillips (N° 2 × 65L; código N° 983006) de los ACCESORIOS ESTÁNDAR de HiKOKI. No utilice otras brocas pues podrían afl ojarse.
MANTENIMIENTO E INSPECCIÓN
1. Inspección de la herramienta
Debido a que cuando se usa una broca en malas condiciones se desmejora la efi ciencia y pueden producirse desperfectos del motor, siempre conviene usar la broca afiladas. Afilar inmediatamente la broca en cuanto se note abrasión.
2. Inspección de los tornillos de montaje
Inspeccionar regularmente los tornillos de montaje y asegurarse que están bien apretados. Si se afl oja algún tornillo, hay que apretarlos inmediatamente. De lo contrario, en ésto, puede ser muy peligroso.
3. Mantenimiento de motor
La unidad de bobinado del motor es el verdadero "corazón" de las herramientas eléctrias.
Prestar el mayor cuidado a asegurarse de que el bobinado no se dañe y/o se humedezca con aceite o agua.
4. Limpieza del exterior
Cuando el taladro atornillador de impacto esté sucio, limpiarlo con un paño seco o un paño mojado en agua jabonosa. No utilizar disolventes clóricos, gasolina o disolventes para pinturas ya que éstos funden los materiales plásticos.
5. Almacenamiento
Guardar el taladro atornillador de impacto en un lugar en el cual la temperatura sea inferior a 40°C y esté alejado del alcance de los niños.
NOTA
Asegúrese de que la batería está completamente cargada si la va a almacenar durante un prolongado período de tiempo (3 meses o más). Es posible que la batería con una capacidad más pequeña no se pueda cargar cuando se utilice si se ha almacenado durante un prolongado período de tiempo.
NOTA
Almacenar baterías de ion-litio
Compruebe que las baterías de ion-litio se han cargado completamente antes de almacenarlas.
Un almacenamiento prolongado de las baterías con carga baja podría deteriorar su funcionamiento, reduciendo en gran medida el tiempo de uso de la batería o haciendo que las baterías no puedan mantener una carga.
No obstante, la reducción en gran medida del tiempo de uso de la batería puede recuperarse si se carga y utiliza de dos a cinco veces.
Si el tiempo de uso de la batería es extremadamente corto a pesar de haber cargado y utilizado la batería varias veces, deberá considerarla agotada y comprar una nueva.
6. Lista de repuestos
PRECAUCIÓN
La reparación, modificación e inspección de las herramientas eléctricas HiKOKI deben ser realizadas por un Centro de Servicio Autorizado de HiKOKI.
Esta lista de repuestos será de utilidad si es presentada junto con la herramienta al Centro de Servicio Autorizado de HiKOKI, para solicitar la reparación o cualquier otro tipo de mantenimiento.
En el manejo y el mantenimiento de las herramientas eléctricas, se deberán observar las normas y reglamentos vigentes en cada país.
MODIFICACIONES
HiKOKI Power Tools introduce constantemente mejoras y modifi caciones para incorporar los últimos avances tecnológicos.
Por consiguiente, algunas partes pueden ser modificadas sin previo aviso.
Aviso importante sobre las pilas de las herramientas inalámbricas de HiKOKI
Utilice siempre una de nuestras pilas genuinas. No podemos garantizar la seguridad y el funcionamiento de nuestra herramienta eléctrica inalámbrica cuando se utiliza con pilas diferentes a las indicadas por nosotros o cuando la pila se desmonta y modifi ca (como cuando se desmontan y sustituyen celdas u otras piezas internas).
GARANTÍA
Las herramientas motorizadas de HiKOKI incluye una garantía conforme al reglamento específico legal/nacional. Esta garantía no cubre los defectos o daños debidos al uso incorrecto, el abuso o el desgaste normal. En caso de reclamación, envíe la herramienta motorizada, sin desmontar y con el CERTIFICADO DE GARANTÍA que aparece al final de estas instrucciones de uso, al Centro de Servicio Autorizado de HiKOKI.
NOTA
Debido al programa continuo de investigación y desarrollo de HiKOKI estas especificaciones están sujetas a cambio sin previo aviso.
Los valores medidos se determinaron de acuerdo con EN60745 declararon de conformidad con ISO 4871.
Nivel de potencia auditiva ponderada A: 96 dB (A)
Nivel de presión auditiva ponderada A: 85 dB (A)
Duda KpA: 3 dB (A)
Utilice protecciones auriculares.
Valores totales de la vibración (suma de vectores triax.) determinados de acuerdo con EN60745.
Perforación por impacto de hormigón:
Valor de emisión de la vibración ah, ID = 11,1 m/s²
Incertidumbre K = 1,5 m/s²
El valor total de vibración declarado se ha medido de acuerdo con un método de prueba estándar y puede utilizarse para comparar una herramienta con otra.
También puede utilizarse en una evaluación de exposición preliminar.
ADVERTENCIA
○ El valor de emisión de la vibración durante la utilización de la herramienta eléctrica puede ser diferente del valor declarado dependiendo de las formas de utilización de la herramienta.
○ Identifique las medidas seguras para proteger al operario basadas en una estimación de exposición en las condiciones reales de uso (teniendo en cuenta todas las partes del ciclo de funcionamiento como tiempos cuando la herramienta está apagada y cuando funciona lentamente además del tiempo de activación).
AVISOS GERAIS DE SEGURANÇA PARA A FERRAMENTA ELÉCTRICA
AVISO
Leia todas as instruções e avisos de segurança.
Se não seguir todas as instruções e os avisos, pode provocar um choque eléctrico, incêndio e/ou ferimentos graves.
Guarde todos os avisos e instruções para referência futura.
O termo “ferramenta eléctrica” em todos os avisos refere-se à sua ferramenta ligada à corrente (com fios) ou à ferramenta eléctrica a baterias (sem fi os).
1) Segurança da área de trabalho
a) Mantenha a área de trabalho limpa e bem iluminada.
As áreas escuras ou cheias de material são propícias aos acidentes.
b) Não trabalhe com ferramentas eléctricas em ambientes explosivos, tais como na presença de líquidos infl amáveis, gases ou pó.
As ferramentas eléctricas criam faíscas que podem infl amar o pó dos fumos.
c) Mantenha as crianças e outras pessoas afastadas quando trabalhar com uma ferramenta eléctrica.
As distracções podem fazer com que perca controlo.
2) Segurança eléctrica
a) As fi chas da ferramenta eléctrica devem corresponder às tomadas.
Nunca modifique a ficha.
Não utilize fi chas adaptadoras com ferramentas eléctricas ligadas à terra.
As fichas não modificadas e tomadas correspondentes reduzirão o risco de choques eléctricos.
b) Evite contacto corporal com superfícies ligadas à terra, tais como tubos, radiadores, máquinas e frigorífi cos.
Existe um risco acrescido de choque eléctrico se o seu corpo estiver ligado à terra.
c) Não exponha ferramentas eléctricas à chuva ou condições de humidade.
A entrada de água numa ferramenta eléctrica aumentará o risco de choques eléctricos.
d) Não abuse do fio. Nunca utilize o fio para transportar, puxar ou desligar a ferramenta eléctrica.
Mantenha o fi o afastado do calor, óleo, margens c) afi adas ou peças em movimento.
Os fios danificados ou entrelaçados podem aumentar o risco de choques eléctricos.
e) Quando trabalhar com uma ferramenta eléctrica no exterior, utilize uma extensão adequada para utilização exterior.
A utilização de um fio adequado para utilização no exterior reduz o risco de choques eléctricos.
f) Se não for possível evitar a utilização de uma máquina eléctrica num local húmido, utilize uma fonte de alimentação protegida por um dispositivo de corrente residual (RCD).
A utilização de um RCD reduz o risco de choque eléctrico.
3) Segurança pessoal
a) Mantenha-se alerta, esteja atento ao que está a fazer e utilize senso comum quando trabalhar com uma ferramenta eléctrica.
Não utilize uma ferramenta eléctrica quando estiver cansado ou sob a influência de drogas, álcool ou medicamentos.
Um momento de desatenção enquanto trabalha com ferramentas eléctricas pode resultar em ferimentos pessoais graves.
b) Utilize equipamento de protecção pessoal.
Utilize sempre protecção para os olhos.
O equipamento de protecção, tal como uma máscara de pó, sapatos de segurança anti-derrapantes, chapéu rígido ou protecção auricular utilizados para condições adequadas reduzirá os ferimentos pessoais.
c) Evite ligar por acidente. Certifique-se de que o interruptor está na posição de desligado antes de ligar a fonte de alimentação e/ou bateria, levantar ou transportar a ferramenta.
Transportar ferramentas eléctricas com o dedo no interruptor ou activar ferramentas que estão com o interruptor ligado é propício a acidentes.
d) Remova qualquer chave de parafusos ou chave-inglesa de regulação antes de ligar a ferramenta.
Uma chave-inglesa ou de parafusos ligada à parte rotativa da ferramenta pode provocar ferimentos pessoais.
e) Não se estique. Mantenha sempre o controlo e equilíbrio adequados.
Isto permite obter um melhor controlo da ferramenta em situações inesperadas.
f) Use vestuário adequado. Não use roupas largas ou jóias. Mantenha o cabelo, roupas e luvas afastados das peças móveis.
As roupas largas, jóias ou cabelo comprido podem ser apanhados em peças móveis.
g) Se forem fornecidos dispositivos para a ligação de extractores de pó e dispositivos de recolha, certifique-se de que estes estão ligados e são utilizados adequadamente.
A utilização de uma recolha de pó pode reduzir os perigos relacionados com o pó.
4) Utilização da ferramenta e manutenção
a) Não force a ferramenta eléctrica. Utilize a ferramenta correcta para a sua aplicação.
A ferramenta correcta fará o trabalho melhor e com mais segurança à velocidade para a qual foi concebida.
b) Não utilize a ferramenta eléctrica se o interruptor não a ligar ou desligar.
Qualquer ferramenta que não possa ser controlada com o interruptor é perigosa e deve ser reparada.
c) Desligue a fi cha da rede antes e/ou a bateria da ferramenta eléctrica antes de efectuar quaisquer regulações, mudar os acessórios ou guardar ferramentas eléctricas.
Tais medidas de segurança de prevenção reduzem o risco de ligar a ferramenta eléctrica acidentalmente.
d) Guarde as ferramentas eléctricas fora do alcance de crianças e não permita que pessoas não habituadas à ferramenta eléctrica ou estas instruções trabalhem com a ferramenta.
As ferramentas eléctricas são perigosas nas mãos de utilizadores inexperientes.
e) Efectue a manutenção de ferramentas eléctricas. Verifi que a existência de desalinhamentos ou dobragens das peças móveis, quebras de peças e quaisquer outras condições que possam afectar o funcionamento das ferramentas eléctricas.
Se danificada, mande reparar a ferramenta antes de utilizar.
Muitos acidentes são causados por ferramentas com má manutenção.
f) Mantenha as ferramentas de corte afiadas e limpas.
As ferramentas de corte com uma manutenção adequada e extremidades afi adas são menos propensas a dobrar e mais fáceis de controlar.
g) Utilize a ferramenta eléctrica, acessórios e pontas de ferramentas, etc., de acordo com estas instruções, tomando em consideração as condições de trabalho e o trabalho a ser efectuado.
A utilização de uma ferramenta eléctrica para operações diferentes das concebidas pode resultar num mau funcionamento.
5) Utilização e manutenção da ferramenta com bateria
a) Apenas é recarregável com o carregador especifici cada pelo fabricante.
Um carregador que seja adequado para um tipo de bateria pode criar um risco de incêndio quando utilizado com outra bateria.
b) Utilize ferramentas eléctricas apenas com as baterias especialmente concebidas.
A utilização de quaisquer outras baterias poderá criar um risco de ferimentos e incêndios.
c) Quando não estiver a ser utilizada uma bateria, mantenha-a afastada de outros objectos metálicos, tais como clipes de papel, moedas, chaves, pregos, parafusos ou outros objectos metálicos pequenos que possam fazer uma ligação de um terminal para o outro.
Fazer curto-circuito dos terminais da bateria poderá causar queimaduras ou um incêndio.
d) Em condições abusivas, poderá ser ejectado líquido da bateria. Evite o contacto. Se ocorrer um contacto acidental, lave com água. Se o líquido entrar em contacto com os olhos, procure ajuda médica.
O líquido ejectado da bateria poderá provocar irritações ou queimaduras.
6) Manutenção
a) Faça a manutenção da sua ferramenta eléctrica por um pessoal de reparação qualifi cado e utilize apenas peças de substituição idênticas.
Isto garantirá que a segurança da ferramenta eléctrica é mantida.
AVISO
Mantenha afastadas das crianças e pessoas doentes. Quando não estiverem a ser utilizadas, as ferramentas devem ser guardadas fora do alcance de crianças e pessoas doentes.
AVISOS DE SEGURANÇA DO BERBEQUIM APARAFUSADOR DE IMPACTO A BATERIA
1. Use protectores para os ouvidos quando perfurar com percussão.
A exposição a ruídos pode provocar a perda de audição.
2. Utilize a(s) empunhadeira(s) auxiliare(s) caso seja(m) fornecida(s) com a ferramenta.
A perda de controlo pode provocar lesões.
3. Segure na ferramenta pelas superfícies isoladas, quando efectuar uma operação em que o acessório de corte ou a broca possa entrar em contacto com cabos ocultos. O contacto do acessório de corte ou a broca com um cabo com corrente poderá electrifi car as partes metálicas da ferramenta podendo electrocutar o utilizador.
4. Recarregue sempre a bateria numa temperatura entre 0° e 40°C. Uma temperatura de menos de 0°C provocará uma recarga excessiva, o que é perigoso. Enquanto que numa temperatura acima de 40°C, a bateria não pode ser recarregada.
A temperatura mais apropriada para a recarga é entre 20° e 25°C.
5. Quando terminar um recarregamento, libere o recarregador por cerca de 15 minutos antes da próxima recarga da bateria.
Não recarregue mais do que duas baterias
onsecutivamente.
6. Não deixe que materiais estranhos entrem no orifício de conexão da bateria recarregável.
7. Não desmonte nunca a bateria recarregável nem o recarregador.
8. Nunca provoque curto-circuito na bateria recarregável. Ao fazer isso, a bateria provocará uma grande corrente elétrica e um sobreaquecimento, podendo resultar em queima ou danos à bateria.
9. Não jogue a bateria no fogo.
Queimando-se, ela pode explodir.
10. Leve a bateria à loja onde você a comprou assim que a vida útil da bateria após a recarga começar a ficar muito curta para uso prático. Não descarte a bateria velha.
11. O uso de uma bateria velha pode danificar o recarregador.
12. Não insira nenhum objeto nas aberturas de ventilação do recarregador.
A inserção de objetos metálicos ou inflamáveis nas aberturas de ventilação do recarregador pode causar choques elétricos ou danifi car o recarregador.
13. Ao montar um palhetão de chave no mandril automático, aperte adequadamente o manguito. Se o manguito não estiver apertado, o palhetão pode deslizar ou cair, podendo provocar ferimentos.
14. Este produto contém um íman forte e permanente no motor.
Observe as precauções seguintes relativas à adesão de limalhas à ferramenta e o efeito do íman permanente em dispositivos electrónicos.
CUIDADO
Não coloque a ferramenta numa mesa ou zona de trabalho onde estejam presentes limalhas de metal. As limalhas podem aderir à ferramenta, resultando em ferimentos ou avarias.
Se tiverem aderido limalhas à ferramenta, não lhe toque. Retire as limalhas com uma escova.
Caso contrário, poderá resultar em ferimentos.


Se utilizar um pacemaker ou outro dispositivo médico electrónico, não utilize nem se aproxime da ferramenta.
O funcionamento do dispositivo electrónico poderá fi car afectado.
Não utilize a ferramenta perto de dispositivos precisão, tais como telemóveis, cartões magnéticos ou suportes de memória electrónicos.
Caso contrário, poderá provocar um funcionamento incorrecto, avaria ou perda de dados.
PRECAUÇÕES PARA A BATERIA DE IÕES DE LÍTIO
Para aumentar a vida útil, a bateria de iões de lítio está equipada com uma função de protecção para impedir a transmissão de corrente.
Nos casos 1 a 3 descritos abaixo, quando utilizar este produto, mesmo que esteja a puxar o gatilho, o motor poderá parar. Isto não constitui uma avaria, sendo o resultado da função de protecção.
1. Quando a carga restante da bateria se esgotar, o motor pára.
Nesse caso, carregue-a imediatamente.
2. Se a ferramenta estiver sobrecarregada, o motor poderá parar. Nesse caso, solte o botão da ferramenta e elimine as causas da sobrecarga. De seguida, pode voltar a utilizá-la.
3. Se a bateria estiver sobreaquecida em condições de sobrecarga, a alimentação da bateria poderá parar.
Neste caso, pare de utilizar a bateria e deixe-a arrefecer.
Após este período, pode voltar a utilizá-la.
Além disso, tenha em consideração os seguintes avisos e precauções.
AVISO
Para evitar antecipadamente qualquer fuga na bateria, produção de calor, emissão de fumo, explosão e ignição, certifi que-se de que toma as seguintes precauções.
1. Certifi que-se de que limalhas e pó não se acumulam na bateria.
○ Durante o trabalho, certifique-se de que limalhas e pó não caem na bateria.
○ Certifique-se de que qualquer limalha e pó que caia na ferramenta durante os trabalhos não se acumulam na bateria.
○ Não guarde uma bateria não utilizada num local exposto a limalhas e ao pó.
○ Antes de guardar uma bateria, remova quaisquer limalhas e pó que possam existir na mesma e não a guarde com peças metálicas (parafusos, pregos, etc.).
2. Não perfure a bateria com objectos afiados como pregos, não lhe bata com um martelo, e não pise, arremesse, nem submeta a bateria a impactos físicos severos.
3. Não utilize uma bateria que pareça estar danificada ou deformada.
4. Não utilize a bateria com a polaridade invertida.
5. Não a ligue directamente a quaisquer tomadas eléctricas ou tomadas de isqueiro de automóvel.
6. Não utilize a bateria para fins que não os especificados.
7. Se a bateria não carregar completamente mesmo após ter passado o tempo de recarga especificado, pare imediatamente de a recarregar.
8. Não coloque nem submeta a bateria a temperaturas elevadas ou a alta pressão, como as de um forno microondas, secador, ou recipiente de alta pressão.
9. Afaste-a imediatamente do fogo quando fugas ou maus odores forem detectados.
10. Não utilizar em locais onde seja produzida uma forte electricidade estática.
11. Se a bateria apresentar fugas, maus odores, produção de calor, descoloração ou deformações, ou parecer funcionar de forma anormal durante a utilização, recarga ou armazenamento, remova-a imediatamente do equipamento ou do carregador de baterias e pare de a utilizar.
CUIDADO
1. Se o líquido vertido pela bateria entrar nos seus olhos, não os esfregue e lave-os bem com água fresca e limpa como água da torneira e contacte imediatamente um médico.
Se não for tratado, o líquido pode provocar problemas nos olhos.
2. Se o líquido verter para a sua pele ou roupa, lave-as imediatamente com água limpa como água da torneira. Existe a possibilidade do líquido provocar irritação cutânea.
3. Se se deparar com ferrugem, maus odores, sobreaquecimento, descoloração, deformações e/ou outras irregularidades ao utilizar a bateria pela primeira vez, pare de utilizá-la e devolva-a ao seu fornecedor ou vendedor.
AVISO
Se uma matéria estranha condutora penetrar no terminal da bateria de iões de lítio, a bateria pode sofrer um curto-circuito e causar um incêndio. Quando guardar a bateria de iões de lítio respeite as seguintes disposições.
Não coloque detritos condutores, pregos e fios de arame, tais como fios de ferro e de cobre no compartimento de arrumação.
Para impedir curtos-circuitos, coloque a bateria na ferramenta ou coloque fixamente a tampa da bateria para armazenamento de modo a que não seja possível ver o ventilador (Fig. 1).
ESPECIFICAÇÕES
FERRAMENTA ELÉTRICA
| Modelo DV14DJL DV18DJL | | |
| Rotação sem carga (Baixa/Alta) 0 – 350 / 0 | -1400 min |
| Coefi ciente de impacto sem carga (Baixa/Alta) | 0 – 4900 / 0 – 19600 min ^-1 |
| Capacidade | Perfuração | Tijolo(Profundidade 30 mm) | 13 mm |
| Madeira(Espessura 18 mm) | 32 mm 38 mm | |
| Metal(Espessura 1,6 mm) | Aço: 13 mm,Alumínio: 13 mm |
| Aparafusa-mento | Parafuso para metal | 6 mm |
| Parafuso paramadeira | 8 mm (diâmetro) × 50 mm (comprimento)(Requer um orifício-piloto) | 8 mm (diâmetro) × 75 mm (comprimento)(Requer um orifício-piloto) |
| Bateria recarregável | 2LEGK | BSL1415: Li-ion 14,4 V (1,5 Ah 4 células) | BSL1815: Li-ion 18 V (1,5 Ah 5 células) |
| 2LFGK/2LFRK | BSL1425: Li-ion 14,4 V (2,5 Ah 4 células) | BSL1825: Li-ion 18 V (2,5 Ah 5 células) |
| NNK/NN | —— — | |
| Peso* | 1,6 kg (Com BSL1415 instalada) 1,7 | kg (Com BSL1815 instalada) |
\* Peso: de acordo com o procedimento EPTA 01/2003
RECARREGADOR
| Modelo UC18YKSL UC18YFSL | |
| Voltagem para recarga | 14,4 V — 18 V |
| Peso 0,35 kg 0,5 kg | | |
ACESSÓRIOS-PADRÃO
| DV14DJL(2LEGK)DV18DJL(2LEGK) | 1 Palhetão de chave mais (N°2)......1 |
| 2 Recarregador (UC18YKSL)......1 |
| 3 Bateria (BSL1415 ou BSL1815)......2 |
| 4 Estojo de plástico......1 |
| 5 Tampa da bateria......1 |
| DV14DJL(2LFRK)DV18DJL(2LFGK)(2LFRK) | 1 Palhetão de chave mais (N°2)......1 |
| 2 Recarregador (UC18YKSL ou UC18YFSL) ...1 |
| 3 Bateria (BSL1425 ou BSL1825)......2 |
| 4 Estojo de plástico......1 |
| 5 Tampa da bateria......1 |
| DV18DJL(NNK) | 1 Palhetão de chave mais (N°2)......12 Estojo de plástico......1Recarregador, bateria e tampa da bateria não fornecidos. |
| DV18DJL(NN) | 1 Palhetão de chave mais (N°2)......1Recarregador, bateria, estojo de plástico e tampa da bateria não fornecidos. |
Os acessórios-padrão estão sujeitos a mudanças sem aviso prévio.
O carregador e a bateria fornecidos são diferentes, dependendo das especificações.
ACESSÓRIOS OPCIONAIS (vendidos separadamente)
○ Bateria
BSL1415S, BSL1415, BSL1425
BSL1815S, BSL1815, BSL1825
○ Gancho
Os acessórios opcionais estão sujeitos a mudanças sem aviso prévio.
APLICAÇÕES
○ Perfurar tijolos e blocos de concreto, etc.
○ Aparafusar e retirar parafusos de metal, parafusos de madeira, parafusos de rosca, etc.
○ Perfuração de vários tipos de metais.
○ Perfuração de vários tipos de madeira.
RETIRADA/INSTALAÇÃO DA BATERIA
1. Retirada da bateria
Segure a empunhadeira firmemente e aperte a lingüeta da bateria (2 peças) para retirar a bateria (Veja Figs. 1 e 2).
CUIDADO
Não provoque nunca curto-circuito na bateria.
2. Instalação da bateria
Insira a bateria, observando a direção correta (Veja Fig. 2).
RECARGA
Antes de utilizar a ferramenta eléctrica, carregue a bateria da seguinte forma.
1. Conecte o cabo de eletricidade do recarregador na tomada.
Ao ligar a ficha do carregador a uma tomada, a lâmpada avisadora piscará a vermelho (Em intervalos de 1 segundo).
2. Insira a bateria no recarregador.
Insira firmemente a bateria no recarregador como mostra a Fig. 3.
3. Recarga
A recargã se inicia ao inserir a bateria no recarregador e a lâmpada piloto se acenderá continuamente em vermelho.
Quando a bateria fi car completamente recarregada, a luz avisadora piscará a vermelho (Em intervalos de 1 segundo). (Veja Tabela 1)
(1) Indicação da lâmpada piloto
As indicações da lâmpada piloto serão apresentadas na Tabela 1, de acordo com a condição do carregador ou a bateria recarregável.
Tabela 1
| Indicações da lâmpada piloto |
| Lâmpada piloto (vermelha) | Antes da recarga | Pisca | Acende-se por 0,5 segundo. Não se acende por 0,5 segundo. (desliga-se por 0,5 segundo) | |
| Durante a recarga | Acende | Fica continuamente acesa |
| Recarga completa | Pisca | Acende-se por 0,5 segundo. Não se acende por 0,5 segundo. (desliga-se por 0,5 segundo) |
| Standby em caso de sobreaque-cimento | Pisca | Acende-se por 1 segundo. Não se acende por 0,5 segundo. (desliga-se por 0,5 segundo) | Bateria sobreaquecida. Não é possível carregar (a carga inicia quando a bateria arrefecer). |
| Recarga impossível | Pisca | Acende-se por 0,1 segundo. Não se acende por 0,1 segundo. (desliga-se por 0,1 segundo) | Defeito na bateria ou no carregador |
(2) Quanto a temperaturas da bateria recarregável.
As temperaturas aplicáveis às baterias recarregáveis estão indicadas na Tabela 2; as baterias que tenham aquecido devem ser deixadas a arrefecer durante algum tempo antes de serem recarregadas.
Tabela 2 Limites para recarga de baterias
| Baterias recarregáveis | Temperaturas nas quais a bateria pode ser recarregada |
| BSL1415S, BSL1415, BSL1425, BSL1815S, BSL1815, BSL1825 | 0°C – 50°C |
(3) Quanto ao tempo de recarga
Conforme a combinação do recarregador e das baterias, o tempo de recarga será o que mostra o Tabela 3.
Tabela 3 Tempo de recarga (a 20°C)
| Bateria\Recarregador | UC18YFSL UC18YKSL |
| BSL1415S, BSL1815S | Aprox. 20 min. | Aprox. 35 min. |
| BSL1415, BSL1815 A | prox. 22 min. | Aprox. 40 min. |
| BSL1425, BSL1825 A | prox. 35 min. | Aprox. 75 min. |
NOTA
O tempo de recarga pode variar conforme a temperatura e a voltagem da fonte de energia.
4. Desconecte da tomada o cabo de energia do recarregador
5. Segure o recarregador fi rmemente e puxe a bateria para fora
NOTA
Não esqueça de retirar a bateria do recarregador depois da utilização e de guardá-la de forma correta.
Quanto à descarga elétrica no caso de novas baterias, etc.
Como a substância química interna das novas baterias e daquelas que não foram usadas por um prolongado período não está ativada, pode haver uma pequena descarga elétrica ao usá-las pela primeira e segunda vezes. Este fenômeno é temporário e o tempo normal requerido para a recarga será restabelecido depois da recarregar a bateria umas duas ou três vezes.
Como prolongar a vida útil das baterias.
(1) Recarregue as baterias antes que elas se descarreguem completamente.
Quando sentir que a potência da ferramenta enfraquece, pare de usá-la e recarregue a bateria. Se continuar a usar a ferramenta e descarregar a corrente elétrica, a bateria pode se danificar e sua vida útil ficará menor.
(2) Evite fazer a recarga em altas temperaturas.
Um bateria recarregável se aquece imediatamente depois do uso. Se ela for recarregada imediatamente depois de ter sido usada, sua substância química interna pode deteriorar e sua vida útil pode diminuir. Deixe a bateria descansar e recarregue-a somente depois que ela tiver esfriado por algum tempo.
CUIDADO
Se a bateria for carregada enquanto estiver quente por ter permanecido por um longo tempo em local sujeito à luz directa do sol, ou porque acabou de ser usada, a lâmpada piloto do carregador pisca acendendo-se durante 1 segundo e não se acende durante 0,5 segundos (apagada durante 0,5 segundos). Nesse caso, primeiro deixe a bateria esfriar para depois iniciar a recarga.
☐ Quando a lâmpada piloto piscar (em intervalos de 0,2 segundo), verifi que se existe algum objeto estranho no conector do carregador da bateria. Caso exista, retire-o de lá imediatamente. Caso exista, retire-o de lá imediatamente. Se não houver nenhum objeto estranho, é provável que a bateria ou o recarregador estejam com defeito. Leve ambos até o serviço autorizado.
○ Como o microcomputador integrado demora cerca de 3 segundos a confi rmar que a bateria está a ser carregada sem UC18YKSL ou UC18YFSL, aguarde no mínimo 3 segundo antes de o voltar a inserir para continuar com o carregamento. Se a bateria for novamente inserida nos 3 segundos, a bateria pode não carregar correctamente.
ANTES DA OPERAÇÃO
Definição e verificação do ambiente de trabalho
Confi rme se o ambiente de trabalho é apropriado, seguindo as precauções.
MODO DE USAR
1. Verifi que a posição do disco de engate (Veja Fig. 4)
Os três modos de chave de fenda, berbequim e berbequim de impacto podem ser comutados pela posição do disco de engate esta unidade.
(1) Ao usar este aparelho como chave de fenda, alinhe-a com os números “1, 3, 5 ... 22” da tampa, ou os pontos, com a marca de triângulo da parte externa do corpo.
(2) Ao usar este aparelho como furadeira, alinhe a marca “” da broca do disco de engate com a marca de triângulo da parte externa do corpo.
(3) Ao usar este aparelho como berbequim com percussão, alinhe a marca “T” do disco de engate do martelo com a marca do triângulo na parte externa da máquina.
CUIDADO
○ O disco de engate não pode ser ajustado entre os numerais “1, 3, 5 ... 22” nem entre os pontos.
Não utilize com os numerais do disco de engate entre "22" e a linha no meio da marca da broca. Isto poderia provocar danos (Veja Fig. 5).
2. Ajuste do torque de aperto
(1) Torque de aperto
O torque de aperto deve corresponder em sua intensidade ao diâmetro do parafuso. Quando se empregar um torque forte demais, a cabeça do parafuso pode se quebrar ou se danificar. Certifique-se de ajustar a posição do disco de engate de acordo com o diâmetro do parafuso.
(2) Indicação do torque de aperto
Ó torque de aperto difere conforme o tipo de parafuso e de material que está sendo apertado.
O aparelho indica o torque de aperto com os números “1, 3, 5 ... 22” no disco de engate e os pontos. A posição “1” indica o torque de aperto mais fraco, enquanto o número maior corresponde ao torque mais forte (Veja Fig. 4).
(3) Ajuste do torque de aperto
Gire o disco de engate e alinhe os números “1, 3, 5 ... 22”, ou os pontos, com a marca de triângulo da parte externa do corpo. Ajuste a tampa na direção de torque fraco ou forte, conforme sua necessidade.
CUIDADO
Enquanto o aparelho é usado como berbequim, a rotação do motor pode ser travada para parar. Enquanto o berbequim aparafusadora de impacto é operado, fi que atento para não travar o motor.
○ Uma martelada muito longa pode provocar uma quebra do parafuso devido à força de aperto excessiva.
3. Comutação de rotação para impacto (Veja Fig. 4)
A “Rotação (somente Rotação)” e o “Impacto (Impacto + Rotação)” podem ser comutados alinhando-se a marca da broca “” ou a marca “T” do martelo com a marca do triângulo na parte externa da máquina.
Para fazer furos no metal, na madeira ou no plástico, mude para "Rotação (somente Rotação)".
Para fazer furos em tijolos ou blocos de concreto, mude para "Impacto (Impacto + Rotação)".
CUIDADO
Se uma operação que é feita normalmente no ajuste de "Rotação" for feita no ajuste de "Impacto", não apenas se aumenta o efeito de fazer furos como pode-se danifi car a broca ou outras peças.
Se for difícil rodar o manípulo da embraiagem para a posição da marca de martelo “T”, rode ligeiramente o engate e rode novamente o manípulo da embraiagem para a marca da posição de martelo “T”.
4. Mudança na velocidade de rotação
Opere o comutador para mudar a velocidade de rotação.
Desloque o comutador na direção da seta (Veja Figs. 6 e 7).
Quando o comutador estiver ajustado para "LOW", o berbequim gira em velocidade baixa. Quando ajustado para "HIGH", o berbequim gira em velocidade alta.
CUIDADO
○ Ao mudar a velocidade de rotação com o comutador, confi rme que o interruptor está desligado.
Mudar a velocidade enquanto o motor estiver girando danifi ca as engrenagens.
○ Ao ajustar o comutador para “HIGH” (velocidade alta) e a posição do disco de engate se encontrar entre “15” e “22” pode acontecer que a embraiagem não engrene e que o motor trave. Caso isto aconteça, ajuste o comutador para “LOW” (velocidade baixa).
Se o motor travar, desligue-o imediatamente. Se o motor estiver travado por algum tempo, ele ou a bateria podem queimar.
Para aumentar a vida útil, a bateria de iões de lítio está equipada com uma função de protecção para impedir a transmissão de corrente. Assim, se aferramenta estiver sobrecarregada, o motor poderá parar. No entanto, isto não constitui uma avaria, sendo o resultado da função de protecção. Nesse caso, solte o botão da ferramenta e elimine as causas da sobrecarga.
5. A fi nalidade e sugestões de uso
A finalidade de uso para vários tipos de trabalhos baseados na estrutura mecânica deste aparelho é mostrada na Tabela 4.
Tabela 4
| Trabalho | Posição do disco de engate | Sugestões |
| Perfuração | Tijolo | 12306 | Utilize para perfuração. |
| Madeira | ### |
| Metal |
| Alumínio |
| Aparafusamento | Parafuso para metal 1 | -22 | Use a broca ou o encaixe correspondentes ao diâmetro do parafuso. |
| Parafuso para madeira | 1 - | Use depois de perfurar um orifício-piloto. |
6. Como selecionar a potência de aperto e a velocidade de rotação
Tabela 5
| Uso | Posição do disco de engate | Seleção da velocidade de rotação (Posição do comutador) |
| LOW (velocidade baixa) HIGH | (velocidade alta) |
| Aparafusamento | Parafuso de metal | 1 – 22 | Para parafusos de diâmetro de 4 mm ou menores. | Para parafusos de diâmetro de 6 mm ou menores. |
| Parafuso de madeira |  | Para parafusos de diâmetro nominal de 8 mm ou menores. | Para parafusos de diâmetro nominal de 4,8 mm ou menores. |
| Perfuração | Tijolo | [70SK] | Para diâmetros de 13 mm ou menores. | Para diâmetros de 8 mm ou menores. (DV14DJL) |
| Para diâmetros de 10 mm ou menores. (DV18DJL) |
| Madeira | | Para diâmetros de 32 mm ou menores. (DV14DJL) | Para diâmetros de 18 mm ou menores. (DV14DJL) |
| Para diâmetros de 38 mm ou menores. (DV18DJL) | Para diâmetros de 22 mm ou menores. (DV18DJL) |
| Metal | | —— | Para perfurar trabalhos em metal com broca. |
CUIDADO
A seleção de exemplos mostrados na Tabela 5 deve ser utilizada como um padrão geral. Como são usados diferentes tipos de parafusos de aperto e de materiais a serem presos com eles nos trabalhos normais, é naturalmente necessário que se façam os ajustes adequados.
○ Ao utilizar o berbequim aparafusadora de impacto com um parafuso de metal em HIGH (velocidade alta), pode-se danifi car um parafuso ou afrouxar uma broca, devido a um torque de aperto muito forte. Utilize o berbequim aparafusadora em LOW (velocidade baixa) ao usar um parafuso de metal.
NOTA
O emprego da bateria em condição de baixas temperaturas (abaixo de 0°C) pode às vezes resultar num torque de aperto fraco e numa reduzida quantidade de trabalho. No entanto, este é um fenômemo temporário e o retorno à normalidade ocorre quando a bateria se aquece.
7. Montagem e desmontagem da broca
(1) Após inserir um palhetão de aparafusador, etc. no mandril porta-brocas automático, aperte bem o manguito rodando-o para a direita (no sentido horário, como se fosse visto de frente) (Veja Fig. 8).
Se o manguito afrouxar durante a operação, aperte-o mais. A força de aperto se torna mais forte quando o maguito é apertado a mais.
(2) Desmontagem da broca
Desaperte o manguito rodando-o para a esquerda (no sentido anti-horário, como se fosse visto de frente) (Veja Fig. 8).
CUIDÃO
Quando não for mais possível afrouxar o manguito, use uma morsa ou algum instrumento similar para prender a broca. Ajuste o modo embreagem entre 1 e 11 e então gire o manguito para o lado frouxo (lado esquerdo) enquanto opera a embreagem. Assim fi ca fácil afrouxar o manguito.
8. Verifi que se a bateria está montada corretamente
9. Verifi que a direção de rotação
A broca gira no sentido horário (vista de trás) ao apertar o lado R (direito) do seletor. O lado L (esquerdo) do seletor é apertado para girar a broca no sentido anti-horário. (Veja Fig. 9) (As marcas (L) e (R) estão no corpo do aparelho).
CUIDADO
Use sempre este aparelho na rotação horária, ao usá-lo como berbequim com percussão.
10. Operação do interruptor
○ Quando o interruptor de gatilho é apertado, a ferramenta gira. Quando o gatilho é solto, a ferramenta pára de funcionar.
A velocidade de rotação do berbequim pode ser controlada pela variação da força de aperto no gatilho. A velocidade é baixa quando o gatilho é apertado um pouco e aumenta à medida que o gatilho é apertado com mais força.
NOTA
Pode ser produzido um som de pio quando o motor estiver para começar a girar, mas é apenas um ruído, não um defeito da máquina.
11. Para fazer furos em tijolos
Uma força de pressão excessiva nunca aumenta a velocidade de perfuração. Ela não apenas danifica a broca ou reduz a efi cácia do trabalho, mas pode também reduzir a vida útil da broca. Ao fazer furos em tijolos, opere o berbequim aparafusador de impacto a bateria com uma força entre 10 e 15 kg.
12. Utilizar a luz
Prima o interruptor do gatilho para acender a luz. A luz acende enquanto o gatilho é premido. A luz apaga quando soltar o gatilho. (Fig. 10)
(A luz se apaga automaticamente 10 segundos após soltar o gatilho.)
ATENÇÃO
Não olhe directamente para a luz.
Se os seus olhos estiverem continuamente expostos à luz, sofrerão lesões.
13. Utilização do gancho (vendidos separadamente)
O gancho é utilizado para prender a ferramenta eléctrica ao cinto enquanto trabalha.
CUIDADO
○ Quando utilizar o gancho, prenda a ferramenta eléctrica firmemente, de modo a não cair acidentalmente.
Se a ferramenta eléctrica for deixada cair, pode ocorrer um acidente.
○ Quando transportar a ferramenta eléctrica presa ao cinto, não encaixe uma ponteira na ponta da ferramenta eléctrica. Se uma ponteira aguçada, tal como uma broca, for encaixada na ferramenta eléctrica, quando a transportar presa ao cinto, sofrerá ferimentos.
○ Coloque o gancho fixamente. Se o gancho não for colocado fi xamente, poderá causar ferimentos durante a utilização.
(1) Colocar o gancho e apertar os parafusos.
Instale o gancho fi xamente na ranhura da ferramenta eléctrica e aperte os parafusos para fixar firmemente o gancho. (Fig. 11)
(2) Remover o gancho.
Retire os parafusos que fi xam o gancho com uma chave de parafusos Philips. (Fig. 12)
CUIDADO
Somente pode ser usada a ponta phillips (N° 2 × 65L; Código N° 983006) dos ACESSÓRIOS PADRÃO da HiKOKI. Não use nenhuma outra ponta que pode não se prender fi rmemente à ferramenta.
MANUTENÇÃO E INSPEÇÃO
1. Inspeção da ferramenta
Como o uso de uma ferramenta sem fi o diminui a eficiência e causa possíveis falhas no motor, afie ou troque a ferramenta assim que notar que ela está fi cando cega.
2. Inspeção dos parafusos de fi xação
Inspeção regularmente todos os parafusos de fixação e se certifi que de que estão corretamente apertados. Caso algum parafuso se afrouxe, reaperte-o imediatamente, do contrário existe risco de graves problemas.
3. Manutenção do motor
O enrolamento do motor do aparelho é o “coração” da ferramenta elétrica.
Tome o devido cuidado para assegurar que o enrolamento não se danifique e/ou fique molhado com óleo ou água.
4. Limpeza externa
Quando o berbequim aparafusadora de impacto estiver manchado, limpe-o com um pano macio e seco ou humedecido com água com sabão. Não utilize solventes clorídricos, gasolina ou solventes de tinta, pois eles derretem plásticos.
5. Armazenagem
Guarde o berbequim aparafusadora de impacto num local cuja temperatura seja menor que 40°C e fora do alcance de crianças.
NOTA
Certifi que-se de que a bateria se encontra totalmente carregada quando a mesma tiver sido armazenada durante um longo período (3 meses ou mais). Poderá não ser possível utilizar uma bateria com menor capacidade depois de a mesma ter estado armazenada durante um longo período.
NOTA
Guardar baterias de iões de lítio
Certifi que-se de que as baterias de iões de lítio foram totalmente carregadas antes de guardá-las.
Armazenamento prolongado das baterias com pouca carga pode resultar em deterioração do desempenho, redução significativa do tempo de utilização das baterias ou tornar as baterias incapazes de manter a carga.
Contudo, o tempo de utilização da bateria significativamente reduzido pode ser recuperado carregando e utilizando repetidamente as baterias duas a cinco vezes.
Se o tempo de utilização das baterias for extremamente curto apesar do carregamento e utilização repetidos, considere as baterias inactivas e adquira baterias novas.
6. Lista de peças para conserto
CUIDADO
Consertos, modificações e inspeção de Ferramentas Elétricas da HiKOKI devem ser realizados por uma Ofi cina Autorizada da HiKOKI.
Esta lista de peças pode ser útil se apresentada com a ferramenta na Ofi cina Autorizada da HiKOKI ao solicitar conserto ou manutenção.
Na operação e na manutenção das ferramentas elétricas, devem-se observar as normas de segurança e os padrões prescritos por cada país.
MODIFICAÇÃO
As Ferramentas Elétricas da HiKOKI estão sempre sendo aperfeiçoadas e modifi cadas para incorporar os mais recentes avanços tecnológicos.
Dessa forma, algumas peças podem mudar sem aviso prévio.
Aviso importante sobre as baterias para as ferramentas sem fi os HiKOKI.
Utilize sempre uma das nossas baterias originais designadas. Não podemos garantir a segurança e desempenho da nossa ferramenta sem fios quando é utilizada com baterias diferentes das baterias designadas por nós ou quando a bateria é desmontada e modifi cada (assim como desmontagem e substituição das células ou outras peças internas).
GARANTIA
Garantimos que a HiKOKI Power Tools obedece às respectivas normas específi cas estatutárias/de país. Esta garantia não cobre avarias ou danos derivados de má utilização, abuso ou desgaste normal. Em caso de queixa, envie a Ferramenta, não desmontada, juntamente com o CERTIFICADO DE GARANTIA que se encontra no fundo destas instruções de utilização, para um Centro de Serviço Autorizado HiKOKI.
NOTA
Devido ao contínuo programa de pesquisa e desenvolvimento da HiKOKI, as especificações aqui contidas estão sujeitas a mudanças sem aviso prévio.
Os valores medidos foram determinados de acordo com a EN60745 e declarados em conformidade com a ISO 4871.
Nível de potência sonora ponderada A medida: 96 dB (A)
Nível de pressão sonora ponderada A medida: 85 dB (A)
Imprecisão KpA: 3 dB (A)
Use proteção auditiva.
Os valores totais da vibração (soma do vector triax) são determinados de acordo com a norma EN60745.
Perfuração por impacto de betão:
Valor de emissão de vibrações ah, ID = 11,1 m/s²
Incerteza de K = 1,5 m/s ^2
O valor total de vibração declarado foi medido de acordo com um método de teste padrão e pode ser utilizado para comparar uma ferramenta com outra.
Também pode ser utilizado numa avaliação preliminar da exposição.
AVISO
O valor de emissão de vibrações durante a utilização da ferramenta eléctrica pode ser diferente do valor declarado, consoante as formas de utilização da ferramenta.
Identificar as medidas de segurança para proteger o operador, que são baseadas numa estimativa de exposição nas actuais condições de utilização (tendo em conta todas as partes do ciclo de funcionamento, tais como os tempos em que a ferramenta é desligada e quando está a funcionar ao ralenti, além do tempo de accionamento do gatilho).
| Item No. | Part Name Q'TY | |
| 31 | PINION (B) | 1 |
| 32 | FIRST RING GEAR | 1 |
| 33 | WASHER (B) | 1 |
| 34 | MOTOR SPACER | 1 |
| 35 | MOTOR DC 14.4V | 1 |
| 36N | MACHINE SCREW(W/SP.WASHER) M4X6 | 2 |
| 37 | INTERNAL WIRE FERRITE SET | 1 |
| 38 | INTERNAL WIRE (BLACK) 110L | 1 |
| 39 | HOUSING (A).(B) SET | 1 |
| 40) | SHIFT KNOB 1 | |
| 41 | LOCK NUT M4 (BLACK) | 2 |
| 42 | INTERNAL WIRE (RED) 140L | 1 |
| 43 | PUSHING BUTTON | 1 |
| 44 | SWITCH TERMINAL SET | 1 |
| 45 | SUPPORT (D) | 1 |
| 46 | TAPPING SCREW(W/FLANGE) D3X16 (BLACK) | 9 |
| 47 | NAME PLATE | 1 |
| 48 | BATTERY (INCLUD.504) | 2 |
| 49 | WIRING SET(INCLUD.35,38,42,44) | 1 |
| 49 | WIRING SET(INCLUD.35,37,44,45) | 1 |
| 501 | + DRIVER BIT NO.2 65L | 1 |
| 502 | CHARGER(UC18YKSL/UC18YFSL) | 1 |
| 503 | CASE | 1 |
| 504 | BATTERY COVER | 1 |
| Item No. | Part Name Q'TY | |
| 1 | SPECIAL SCREW (LEFT HAND)M6X23 | 1 |
| 2 | DRILL CHUCK 13VLRV-N(W/O CHUCK WRENCH) | 1 |
| 3 | GEAR BOX ASS'Y(INCLUD.4-34) | 1 |
| 4 CLUTCH DIAL 1 | |
| 5 | C L I C K S P | R |
| 6 | O - R I N G | 1 |
| 7 | S P I N D L E | |
| 8 | S P R I N G ( | C |
| 9 | R A T C H E T | ( |
| 10 WASHER (A) 1 | |
| 11 NUT | 1 |
| 12 WASHER | 1 |
| 13 SLIP BLOCK | 2 |
| 14 STOPPER SPRING | 2 |
| 15 | FRONT CASE | 1 |
| 16 SPRING (A) | 4 |
| 17 | STEEL BALL D5 | 4 |
| 18 LOCK RING | 1 |
| 19 | NEEDLE ROLLER SET (4 PCS.) | 4 |
| 20 | SLEEVE | 1 |
| 21 | RING GEAR | 1 |
| 22 | CARRIER | 1 |
| 23 | PLANET GEAR (C) SET (3 PCS.) | 3 |
| 24 | WASHER (A) 1 | |
| 25 | REAR CASE | 1 |
| 26 | SCREW SET D3X12 (4 PCS.) | 4 |
| 27 | SHIFT ARM | 1 |
| 28 | SLIDE RING GEAR | 1 |
| 29 | PINION (C) | 1 |
| 30 | PLANET GEAR (A) SET (6 PCS.) | 6 |


natural_image
Line drawing of a quill pen with inkwell (no text or symbols)
| English Nederlands | | |
| GUARANTEE CERTIFICATE1 Model No.2 Serial No.3 Date of Purchase4 Customer Name and Address5 Dealer Name and Address(Please stamp dealer name and address) | GARANTIEBEWIJS1 Modelnummer2 Serienummer3 Datum van aankoop4 Naam en adres van de gebruiker5 Naam en adres van de handelaar(Stempel a.u.b. naam en adres vande de handelaar) |
| Deutsch Español | | |
| GARANTIESCHEIN1 Modell-Nr.2 Serien-Nr.3 Kaufdaturn4 Name und Anschrift des Kunden5 Name und Anschrift des Händlers(Bitte mit Namen und Anschrift des Handlers abstempeln) | CERTIFICADO DE GARANTÍA1 Número de modelo2 Número de serie3 Fecha de adquisición4 Nombre y dirección del cliente5 Nombre y dirección del distribuidor(Se ruega poner el sello del distribuidor con su nombre y dirección) |
| Français Português | | |
| CERTIFICAT DE GARANTIE1 No. de modèle2 No de série3 Date d'achat4 Nom et adresse du client5 Nom et adresse du revendeur(Cachet portant le nom et l'adresse du revendeur) | CERTIFICADO DE GARANTIA1 Número do modelo2 Número do série3 Data de compra4 Nome e morada do cliente5 Nome e morada do distribuidor(Por favor, carímbe o nome e morada do distribuidor) |
| Italiano | | | |
| CERTIFICATO DI GARANZIA1 Modello2 N° di serie3 Data di acquisto4 Nome e indirizzo dell'acquirente5 Nome e indirizzo del rivenditore(Si prega di apporre il timbro con questi dati) | | |
HiKOKI
Siemensring 34, 47877 willich, Germany
Tel: +49 2154 49930
Fax: +49 2154 499350
URL: http://www.hikoki-powertools.de
Brabanthaven 11, 3433 PJ Nieuwegein, The Netherlands
Tel: +31 30 6084040
Fax: +31 30 6067266
URL: http://www.hikoki-powertools.nl
Precedent Drive, Rooksley, Milton Keynes, MK 13, 8PJ,
United Kingdom
Tel: +44 1908 660663
Fax: +44 1908 606642
URL: http://www.hikoki-powertools.uk
Parc de l'Eglantier 22, rue des Cerisiers, Lisses-C.E. 1541,
91015 EVRY CEDEX, France
Tel: +33 1 69474949
Fax: +33 1 60861416
URL: http://www.hikoki-powertools.fr
Koningin Astridlaan 51, B-1780 Wemmel, Belgium
Tel: +32 2 460 1720
Fax: +32 2 460 2542
URL http://www.hikoki-powertools.be
Via Piave 35, 36077, Altavilla Vicentina (VI), Italy
Tel: +39 0444 548111
Fax: +39 0444 548110
URL: http://www.hikoki-powertools.it
C/ Puigbarral, 26-28, Pol. Ind. Can Petit, 08227 Terrassa
(Barcelona), Spain
Tel: +34 93 735 6722
Fax: +34 93 735 7442
URL: http://www.hikoki-powertools.es
IndustrieZentrum NÖ –Süd, Straße 7, Obj. 58/A6 2355
Wiener Neudorf, Austria
Tel: +43 2236 64673/5
Fax: +43 2236 63373
URL: http://www.hikoki-powertools.at

natural_image
Simple line drawing of a quill pen in an inkwell (no text or symbols)
| English Nederlands | | |
| EC DECLARATION OF CONFORMITYWe declare under our sole responsibility that Cordless Combi Drill, identified by type and specific identification code *1), is in conformity with all relevant requirements of the directives *2) and standards *3). Technical fi le at *4) – See below.The European Standard Manager at the representative office in Europe is authorized to compile the technical fi le.The declaration is applicable to the product affi xed CE marking. | EC VERKLARING VAN CONFORMITEITWij verklaren onder onze eigen verantwoordelijkheid dat Snoerloze klop-boor-schroefmachine, geïdentificeerd door het type en de specifieke identificatiecode*1), voldoet aan alle relevante bepalingen van de richtlijnen*2) en normen*3). Technische documentatie bij*4) – zie onder.De Europese Normen Manager bij de vertegenwoordiging in Europa is gemachtigd om het technisch dossier samen te stellen.Deze verklaring is van toepassing op producten voorzien van de CE-markeringen. |
| Deutsch Español | | |
| EG-KONFORMITÄTSERKLÄRUNGWir erklären in alleiniger Verantwortung, dass der durch den Typ und den spezifischen Identifizierungscode *1) identifizierte Akku-Schlagbohrschrauber allen einschlägigen Bestimmungen der Richtlinien *2) und Normen *3) entspricht. Technische Unterlagen unter *4) – Siehe unten.Die Leitung der repräsentativen Behörde für europäische Normen und Richtlinien ist berechtigt, die technischen Unterlagen zusammenzustellen.Die Erklärung gilt für die an dem Produkt angebrachte CE-Kennzeichnung. | DECLARACIÓN DE CONFORMIDAD DE LA CEDeclaramos bajo nuestra única responsabilidad que el Taladro atornillador de impacto a batería, identificado por tipo y por código de identificación específico *1), está en conformidad con todas las disposiciones correspondientes de las directivas *2) y de las normas *3). Documentación técnica en *4) – Ver a continuación.El Director de Normas Europeas en la oficina de representación en Europa está autorizado para elaborar el expediente técnico.La declaración se aplica al producto con marcas de la CE. |
| Français Português | | |
| DECLARATION DE CONFORMITE CENous déclarons sous notre entière responsabilité que la perceuse percussion/visseuse à batterie, identifiée par le type et le code d'identification spécifique *1) est en conformité avec toutes les exigences applicables des directives *2) et des normes *3). Dossier technique en *4) - Voir ci-dessous.Le Gestionnaire des normes européennes du bureau de représentation en Europe est autorisé à constituer le dossier technique.Cette déclaration s'applique aux produits désignés CE. | DECLARAÇÃO DE CONFORMIDADE CEDeclaramos, sob nossa única e inteira responsabilidade, que Berbequim Aparafusador de Impacto a Bateria, identificado por tipo e código de identificação específico *1), está em conformidade com todos os requerimentos relevantes das diretivas *2) e normas *3). Ficheiro técnico em *4)–Consulte abaixo.O Gestor de Normas Europeas no escritório de representação na Europa está autorizado a compilar o fi cheiro técnico.A declaração aplica-se aos produtos com marca CE. |
| Italiano | | |
| DICHIARAZIONE DI CONFORMITÀ CEDichiariamo sotto la nostra esclusiva responsabilità che il Trapano avvitatore a percussione a batteria, identificato dal tipo e dal codice identificativo specifico *1), è conforme a tutti i requisiti delle direttive *2) e degli standard *3). Documentazione tecnica presso *4) – Vedere sotto.Il gestore delle norme europee presso l'ufficio di rappresentanza in Europa è autorizzato a compilare il fascicolo tecnico.La dichiarazione è applicabile ai prodotti cui sono applicati i marchi CE. | | |
| *1) DV18DJL C348454R C348525NDV14DJL C348458R C348526N*2) 2006/42/EC, 2014/30/EU, 2014/35/EU, 2011/65/EU*3) EN60745-1:2009+A11:2010EN60745-2-2:2010EN60335-1:2012+A11:2014EN60335-2-29:2004+A2:2010EN55014-1:2006+A1:2009+A2:2011EN55014-2:1997+A1:2001+A2:2008 | | |
| *4) Representative office in EuropeHikoki Power Tools Deutschland GmbHSiemensring 34, 47877 Willich, GermanyHead office in JapanKoki Holdings Co., Ltd.Shinagawa Intercity Tower A, 15-1, Konan 2-chome, Minato-ku, Tokyo, Japan | 29. 6. 2018Naoto YamashiroEuropean Standard Manager29. 6. 2018A. NakagawaCorporate Officer |