
Max Breeze Smart 15K - Air Conditioning Klarstein - Free user manual and instructions
Find the device manual for free Max Breeze Smart 15K Klarstein in PDF.

| Product type | Portable monoblock air conditioner |
| Brand | Klarstein |
| Model | Max Breeze Smart 15K |
| Article numbers | 10035741, 10035742 |
| Cooling power | 15000 BTU (4.3 kW) |
| Power supply | 220-240 V ~ 50/60 Hz |
| Nominal power consumption (cooling) | 1.6 kW |
| Energy efficiency class | A |
| Nominal EER | 2.6 |
| Sound power level | 65 dB(A) |
| Refrigerant | R290 (propane), GWP = 3 |
| WiFi | IEEE 802.11 b/g/n, 2.4 GHz band |
| Operating modes | Cooling, ventilation, dehumidification, auto, sleep |
| Timer | 1 to 24 hours (on/off) |
| Control | Touch panel or remote control (AAA batteries not included) |
| Smartphone app | Klarstein (iOS/Android) |
| Water tank capacity for efficiency | 3 liters |
| Filters | Washable air filter + activated carbon filter (replace every 6 months) |
| Installation | Window kit (hook-and-loop tape, seal) - spacer not provided |
| Dimensions (approx.) | Approx. 45 × 35 × 70 cm |
| Weight (approx.) | Approx. 30 kg |
| Color | White |
Frequently Asked Questions - Max Breeze Smart 15K Klarstein
User questions about Max Breeze Smart 15K Klarstein
0 question about this device. Answer the ones you know or ask your own.
Ask a new question about this device
Download the instructions for your Air Conditioning in PDF format for free! Find your manual Max Breeze Smart 15K - Klarstein and take your electronic device back in hand. On this page are published all the documents necessary for the use of your device. Max Breeze Smart 15K by Klarstein.
USER MANUAL Max Breeze Smart 15K Klarstein
INHALTSVERZEICHNIS
natural_image
Line drawing of a mobile phone with keypad and scroll (no text or symbols)Leistung erhöhen
Member of Berlin Brands Group
Handwerkerstr. 11
15366 Dahlwitz-Hoppegarten
Deutschland
natural_image
Symbol of a trash bin crossed with a diagonal line, no text or numbers presentBerlin Brands Group UK Limited
PO Box 42
272 Kensington High Street
London, W8 6ND
United Kingdom
Congratulations on purchasing this device. Please read the following instructions carefully and follow them to prevent possible damages. We assume no liability for damage caused by disregard of the instructions and improper use. Scan the QR code to get access to the latest user manual and more product information.

CONTENTS
Notes on Refrigerant R290 32
Safety Instructions 33
Device Overview 35
Accessories 36
Control Panel 37
Installation 39
Fixing the Window Seal 41
Installation of the Activated Carbon Filter 42
Commissioning and Operation 43
Device Control by Smartphone 49
Cleaning and Care 51
Troubleshooting 52
Product Data Sheet 53
Disposal Considerations 55
Declaration of Conformity 55
TECHNICAL DATA
| Item number 10035741, 10035742 | |
| Power supply 220-240 V ~ 50/60 Hz | |
| Cooling capacity 15000 BTU | |
| WiFi standard | 802.11 b/g/n |
| WiFi frequency | 2,4 GHz |
| WiFi radio-frequency power (max.) | 20 dBm |
NOTES ON REFRIGERANT R290
Warnings
- The air conditioning system must be kept and transported upright. Otherwise, irreparable compressor damage may occur. Leave the unit for at least 24 hours before putting it into operation.
- Switch off the device and disconnect it from the power supply before cleaning.
- Make sure that the product creates a steady stream of air. Ensure the air inlets and outlets are not blocked.
• To prevent leaks, operate this unit on a horizontal surface. - Any person performing work on a refrigerant circuit should have a current certificate from an industry-accredited assessment body. This ensures competence for the safe handling of refrigerants according to an industry-recognised assessment specification.
- If the device stops working, dispose of it properly.
- Store the device in a well-ventilated place when not in use.
- Store the device so that it is not damaged.
- Repairs may only be carried out by the manufacturer or an authorised specialist company.
- Do not damage any components of the refrigerant circuit. Escaping refrigerant may not be noticed because it is odourless.
- Maintenance and repairs must be carried out under the supervision of specialists in the use of fl ammable refrigerants.
Information for rooms with refrigerant pipes
- Limit the piping to a minimum.
- Be careful not to damage the piping.
- Appliances with fl ammable refrigerants may only be installed in a well-ventilated room.
• Comply with national gas regulations. - All mechanical connections must be freely accessible for maintenance purposes.
CAUTION
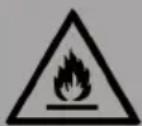
Risk of fire! This device contains the flammable refrigerant R290. If the refrigerant escapes and is exposed to an external ignition source, there is a risk of fire.
SAFETY INSTRUCTIONS
Special notes
- Only use agents recommended by the manufacturer for defrosting or cleaning.
- Never store the appliance in a room in which there are permanent sources of ignition (e.g. open flames, a switched on gas appliance or a switched on electric heater).
- Do not puncture or burn the appliance.
• Note that coolant may be odourless.
Note: Only use the unit in rooms larger than X m ^2 (see table):
| Model X ( m^2 ) | |
| 5000 BTU/h, 7000 BTU/h, 8000 BTU/h 10 m^2 | |
| 9000 BTU/h, 10000 BTU/h, 10500 BTU/h 13 m^2 | |
| 12000 BTU/h, 14000 BTU/h, 16000 BTU/h,18000 BTU/h 1 | 8 m^2 |
General safety instructions
• The device is only suitable for indoor use.
- Do not use the product if it needs to be repaired or if it has not been installed properly.
- Do not use the product in the following areas:
- near heat sources,
- in areas where oil can splash,
- in areas exposed to direct sunlight,
- in areas where splash water can occur,
-
near bathtubs, in washrooms, near showers or swimming pools.
-
Never insert your fingers or other objects into the ventilation openings. In particular, warn children of the dangers this may cause.
- Ensure that the unit is held vertically during transport and storage so that the compressor is correctly positioned.
• Always turn off the appliance before cleaning and unplug it from the wall outlet. - Switch off the appliance before moving it and unplug it from the wall outlet. Move the appliance slowly and carefully.
• To avoid the risk of fire, do not cover the unit.
- All fan connections must comply with local electrical safety regulations. If necessary, refer to these regulations.
- Supervise children so that they do not play with the unit.
- If the power cord is damaged, it must be replaced by the manufacturer, customer service or a similarly qualified person to avoid danger.
- This equipment may be used by children over the age of 8 and by persons (including children) with limited physical, sensory or mental capabilities and/or lack of experience and knowledge, provided they have been instructed in the use of this equipment by a person responsible for their safety and understand the hazards associated with the use of this equipment. Cleaning and maintenance of the appliance may only be carried out by children under supervision.
- The appliance must be installed in accordance with national wiring regulations.
• Type and voltage of fuses: T, 250 V AC, 2 A or higher.
- Contact customer service for cleaning and maintenance.
- Do not pull the power cord, deform or modify it, or immerse it in water. Incorrect handling of the power cord may result in damage to the equipment and/or electric shock.
• National gas regulations must be observed.
- Do not block the ventilation openings.
- Do not operate the appliance solely by inserting or removing the power plug, as this may result in electric shock or fire due to heat.
- Immediately unplug the appliance from the wall outlet if it emits strange noises, odours or smoke.
Instructions for Handling Damage
- In case of damage to the device, contact the manufacturer, customer service or a similarly qualified person.
- If damage occurs, turn off the power, unplug the power cord, and contact the manufacturer, the service representative, or a similarly qualified person.
• The power cord must be securely earthed. - If the power cord is damaged, turn off the power to avoid danger and unplug the power cord from the wall outlet. The power cord must be replaced by the manufacturer, customer service or a similarly qualified person.

WARNING
Risk of injury! Repairs to the coolant circuit may only be carried out by trained specialist personnel. Never attempt to repair the unit yourself!
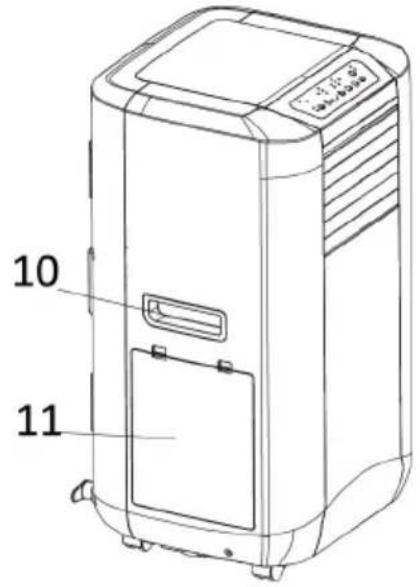
DEVICE OVERVIEW
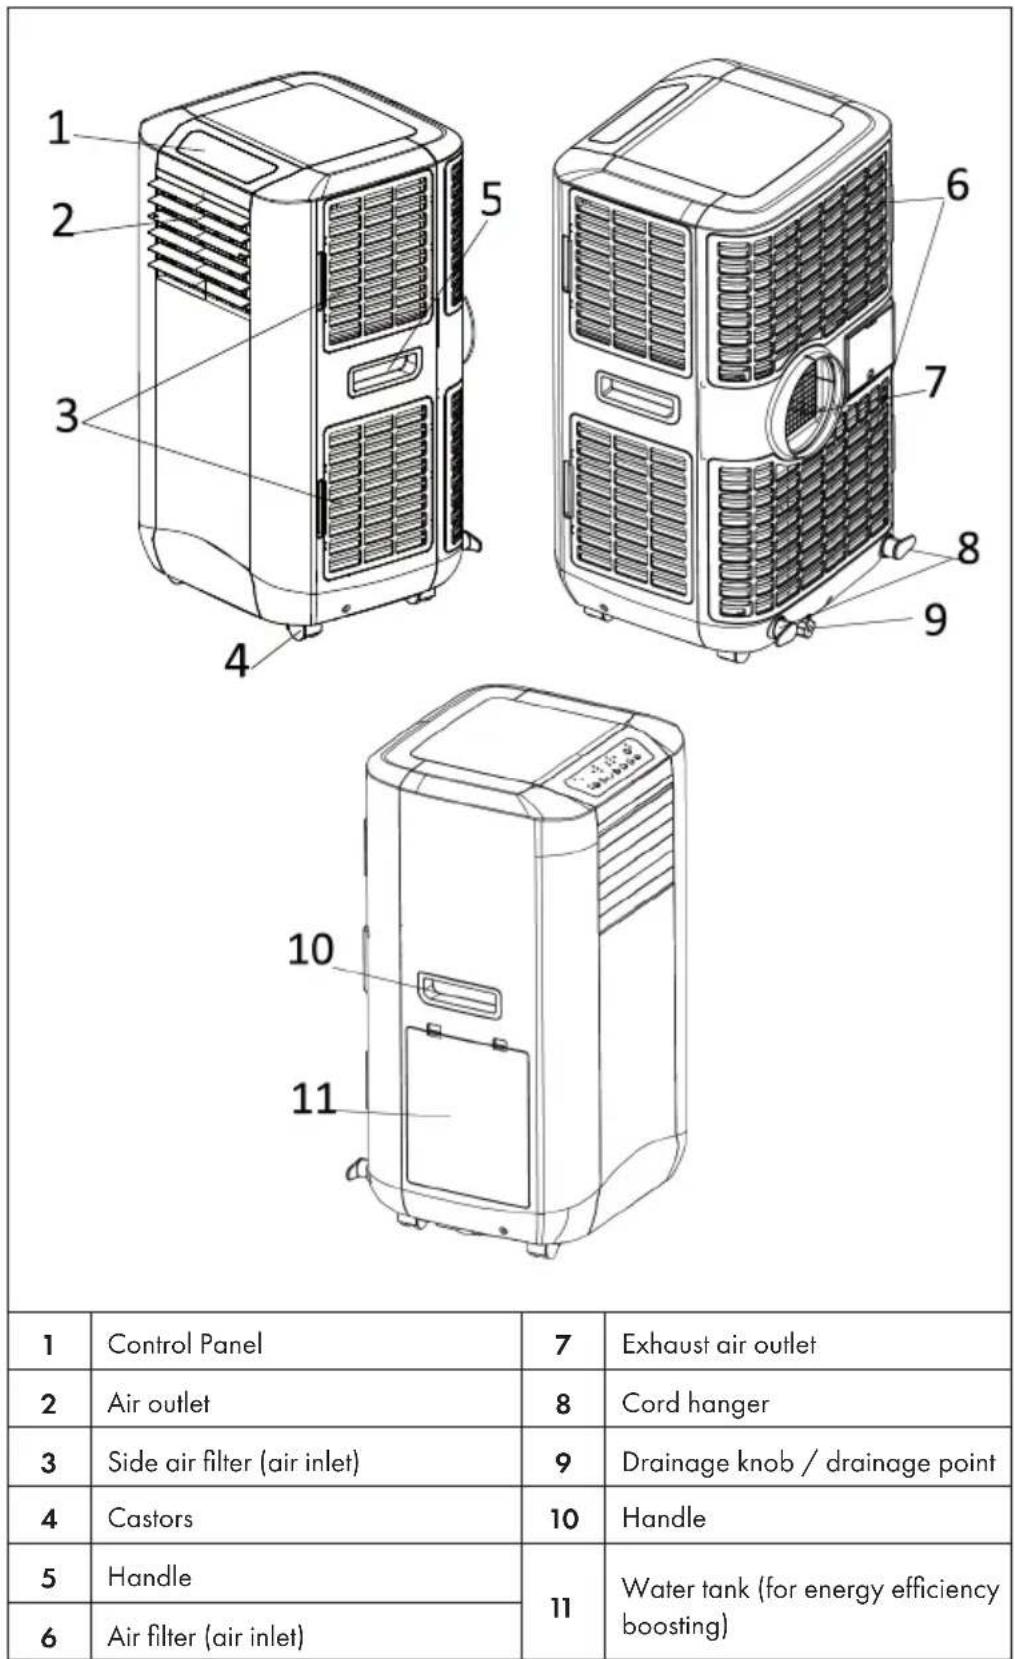
| 1 | Control Panel | 7 | Exhaust air outlet |
| 2 | Air outlet | 8 | Cord hanger |
| 3 | Side air filter (air inlet) | 9 | Drainage knob / drainage point |
| 4 | Castors | 10 | Handle |
| 5 | Handle | 11 | Water tank (for energy efficiency boosting) |
| 6 | Air filter (air inlet) |
ACCESSORIES
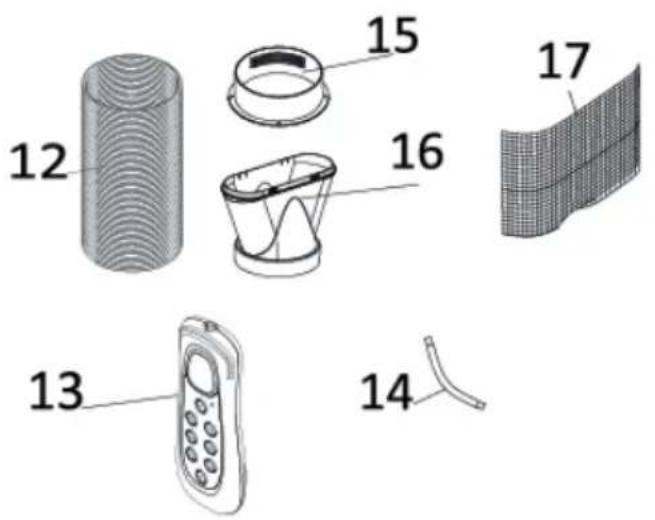 | |
| 12 | Exhaust hose |
| 13 | Remote control |
| 14 | Drain tube for continuous drainage |
| 15 | Round Adapter –for connecting the unit and the exhaust pipe |
| 16 | Flat Adaptor – for connecting the exhaust pipe and the window spacer (not included!) |
| 17 | Active carbon filter |
CONTROL PANEL
Control panel with press buttons
| Button Indicator lights | |||
| 1 | ON/OFF (POWER) | a | Water full |
| 2 | MODE | b | AUTO mode |
| 3 | SPEED (ventilation) | c | DEHUMIDIFY (DRY) mode |
| 4 | TIMER | d | Medium fan speed |
| 5 | TEMPERATURE DOWN | e | High fan speed |
| 6 | TEMPERATURE UP | f | Timer |
| 7 | SLEEP | g | Compressor operation |
| h | FAN mode | ||
| i | COOL mode | ||
| j | Low fan speed | ||
| k | Sleep mode | ||
Control panel with soft touch buttons
| Buttons Indicator lights | |||
| 1 | ON/OFF (POWER) | a | Compressor operation |
| 2 | TEMPERATURE DOWN | b | Water full |
| 3 | TEMPERATURE UP | c | Heat mode indicator (optional, only for the model with this function) |
| 4 | MODE | ||
| 5 | TIMER | d | DEHUMIDIFY (DRY) mode |
| 6 | SLEEP | e | AUTO mode |
| 7 | SPEED (ventilation) | f | Display window |
| 8 | WIFI | g | Medium fan speed |
| h | High fan speed | ||
| i | Low fan speed | ||
| j | WiFi | ||
| k | Ionizer/TiO2 (optional, only for the model with this function) | ||
| l | COOL mode | ||
| m | FAN mode | ||
| n | Timer | ||
| o | Sleep mode | ||
INSTALLATION
The appliance is a portable air conditioner that can be transported from room to room.
Use of the window spacer (not included)
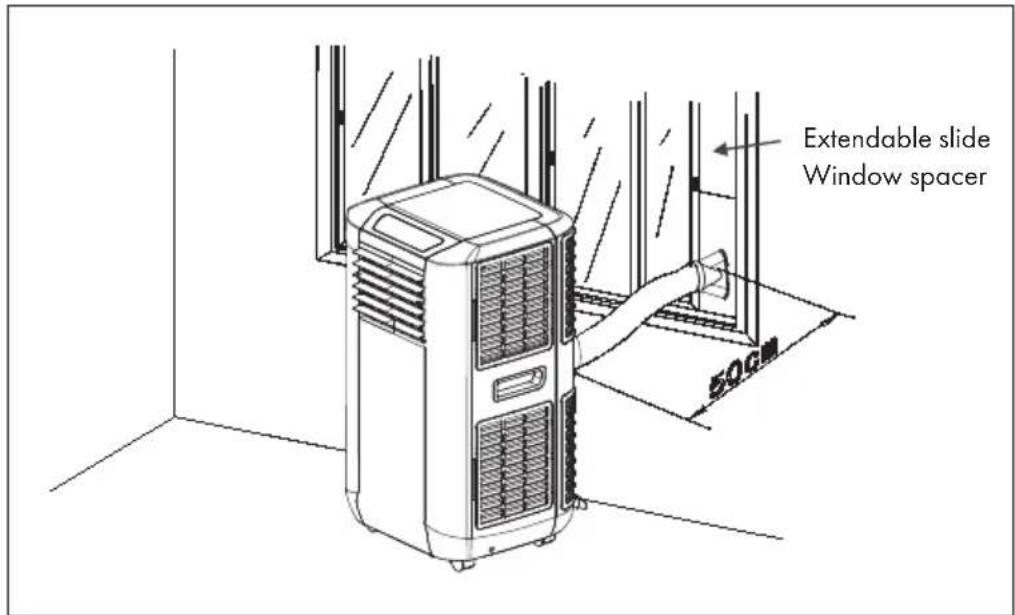
- Insert the window spacer into the window gap and adjust the length if necessary.
- Pull the exhaust hose through the hole in the window spacer and push the window closed until the window spacer is properly held. The window spacer can also be used for sliding windows.
Note: Make sure that protection against burglary is still guaranteed.
Installation of the exhaust air hose
| Only use the exhaust hose supplied and attach the exhaust hose to the rear of the air conditioner. | 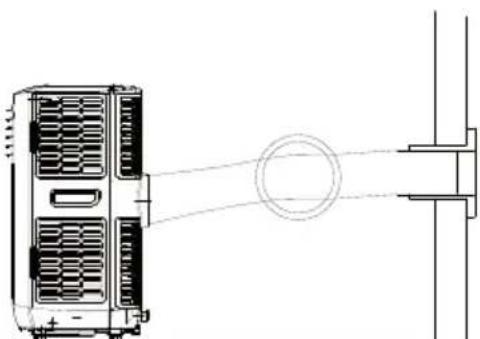 |
| Make sure that the exhaust hose is not kinked, as this would cause the exhaust air to accumulate, which could cause the appliance to overheat. | 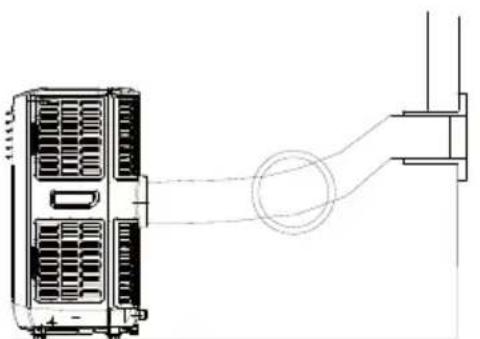 |
| The hose can be extended from 300 mm to 1500 mm. To ensure maximum efficiency, the hose should be as short as possible. | 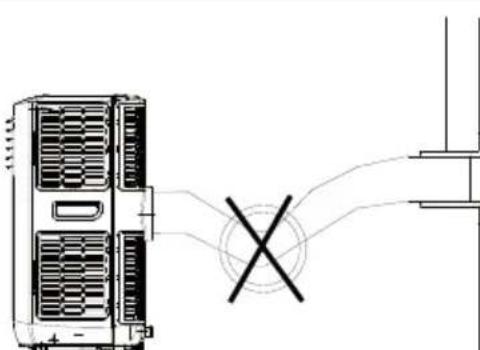 |
| ATTENTION: The length of the exhaust hose is specially adapted to the requirements of the appliance. Do not replace or extend the hose with your own hose as this would cause a malfunction. | 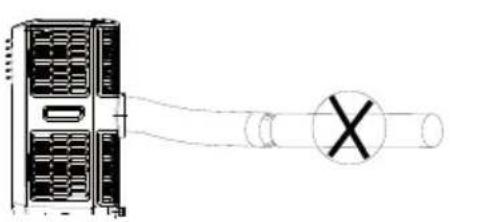 |
FIXING THE WINDOW SEAL
Fixing the seal for side-opening windows and roof windows
The installation of the window seal is simple. You can attach the seal to a tilted window, a side-opened window or a roof window. We have chosen a side-opened window for demonstration purposes. It is particularly suitable because the exhaust hose can be attached to the side far down.
The Velcro tape is attached to the three open sides. The side where the window is against the frame is left out. Clean and dry the window frame beforehand so that the tape adheres.
| 1 2 3 | ||
| Attach the velcro tape on the left, on the top and on the bottom of the window frame.We recommend that you cut the tape into strips for each window side first. | Now attach the velcro tape to the inner window sides. | Stick the window sealing to the velcro strips on the window frame first (starting with the top), then on the velcro strips on the window.Push the exhaust air tube of the air conditioner through the hole, which can be adjusted in height and size. |
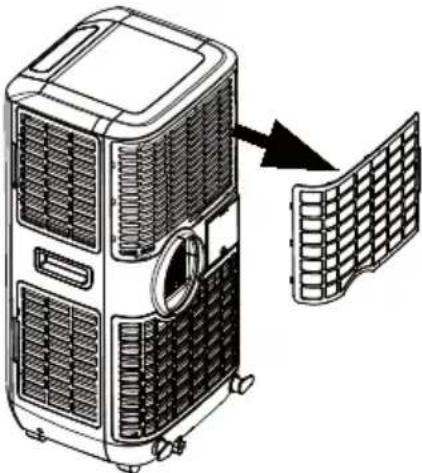
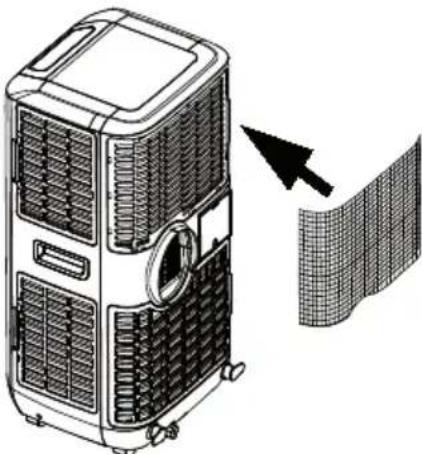
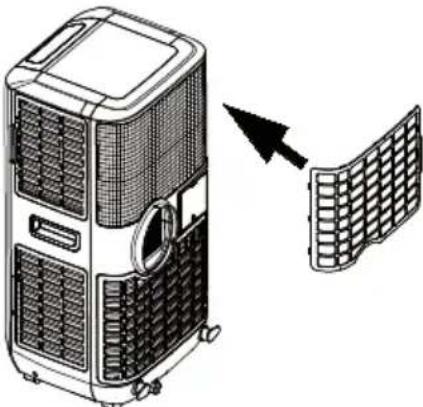
INSTALLATION OF THE ACTIVATED CARBON FILTER
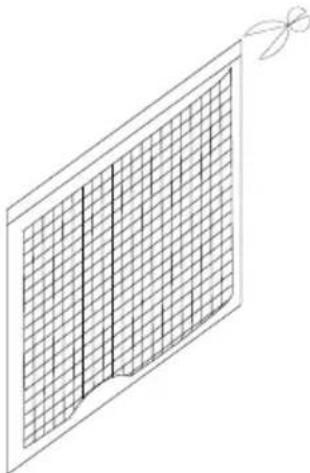
This appliance is equipped with an activated carbon filter. Activated carbon is charcoal that has been treated with oxygen to open millions of tiny pores between carbon atoms. It is used to eliminate unwanted odours (smoke, vapours and animal odours). Please note that the activated carbon filter cannot be washed out. The service life is variable and depends on the environmental conditions in which the appliance is used. The filter should be checked regularly and replaced if necessary (the normal lifetime is 6 months). The installation of the activated carbon filter in this appliance is shown below:
| 1 | |
 |  |
| Remove the filter frame from the appliance. | Remove the activated carbon filter from the packaging. |
| 3 | 4 |
 |  |
| Insert the activated carbon filter in the appliance. | Put the filter frame back into the appliance. |
COMMISSIONING AND OPERATION
Turning on/off
Press the ON/OFF button. The appliance switches on and runs in automatic mode.
Automatic mode
In automatic mode, the appliance can cool, ventilate or heat, depending on the ambient temperature and the setpoint adjustment. The appliance has the following default settings:
- If the ambient temperature is >23 °C, the appliance is automatically set to cooling mode. The default setting is 24 °C. The "Automatic mode" and "Cooling mode" indicator lamps light up.
- If the ambient temperature is < 24^ but >20^ , the appliance runs in fan mode. The "Automatic mode" and "Fan mode" indicator lamps light up.
- If the ambient temperature is < 20^ C , the appliance runs in heating mode. The "Automatic mode" and "Heating mode" indicator lamps light up.
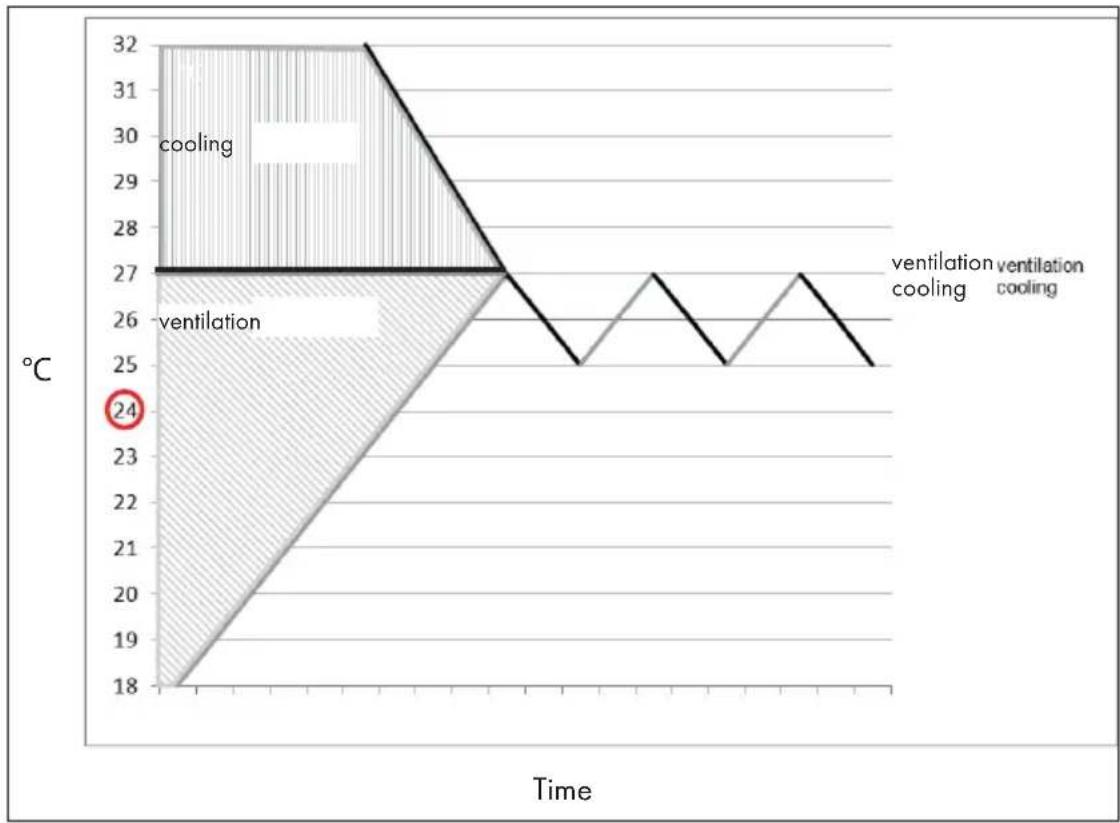
Setting the setpoint in automatic cooling mode 18-32 °C
If you set the setpoint at 24^ C, the appliance will start cooling at 27^ C (setpoint + 3^ C). The appliance then cools down to 25^ C (setpoint + 1^ C) and then switches back to fan mode.
line
| Time | Temperature (°C) | |------|------------------| | Start | 24 | | Peak | 32 | | End | 25 |Setting the mode/function
Press the MODE button to select the desired mode: cooling, fan or dehumidification. The corresponding indicator lights up.
Setting the temperature
- Press the Temperature up or Temperature down buttons to adjust the temperature.
- The screen displays the set temperature when you press the Temperature up or Temperature down buttons. Otherwise, the ambient temperature is displayed.
- The preset temperature of the appliance is 24^ C for cooling.
Setting ventilation speed
Press the SPEED button to select the speed. You can now set a high, medium or low speed. The corresponding indicator lights up.
Setting the timer
- To set the timer, press the TIMER button. You can set a time between 1-24 hours. When the set time has expired, the appliance switches off automatically. If you press the TIMER button, the remaining time until the power turns off is displayed. If you do not set a time in the timer, the appliance runs continuously.
- It is also possible, when the appliance is switched off, to set the time in the timer until the appliance switches on automatically. For example, if you set the timer to "2", the appliance will automatically turn on after 2 hours.
Sleep mode
- If you press the SLEEP button in cooling mode, the temperature is increased by 1^ C after one hour, by 1^ C again after the second hour and then the temperature is maintained.
- When the sleep mode is active, the fan speed is permanently set to low. If you press the SLEEP button again, the appliance will run at the previously set temperature and speed.
- The appliance switches off automatically if the sleep mode has been active for 12 hours.
Note: The sleep mode is only available in cooling mode.
Dehumidify (DRY) mode
In dehumidification mode, the temperature cannot be adjusted and the fan speed is set permanently low. In dehumidification mode, the appliance extracts humidity from the environment, which is collected in a tank inside the appliance. When the water tank is full, the appliance stops automatically. The "Water tank full" indicator lights up and an alarm sounds. Drain the water or use continuous water drainage (see section "Draining water").
Adjust the air vent

Self-diagnosis
The appliance has a self-diagnostic function. If there is something wrong with the appliance, the screen displays "E1" or "E2".
- "E1" means that the room temperature sensor cable is not connecting properly (the cable is in the middle of the evaporator).
- "E2" means that the anti-freeze sensor cable is not connected correctly (the cable is on the side of the evaporator).
Note: Self-diagnosis "E2" is only for models with cooling and heating function. In the event of these error messages, contact the customer service. Do not attempt to repair the appliance yourself.
All the above functions can also be used with the remote control supplied with the appliance. To use the remote control, 2 AAA batteries are required (not supplied).
natural_image
Line drawing of a mobile phone with keypad and buttons (no text or symbols)Efficiency boosting
This appliance is equipped with "energy efficiency boosting" function. By filling 3 litres of water into the water tank on the side, energy efficiency can be increased.
The principle is as follows: When the appliance is in operation, the condenser becomes hot. If you fill water into the water tank on the side after one hour of operation, the condenser is cooled and the appliance uses less energy.
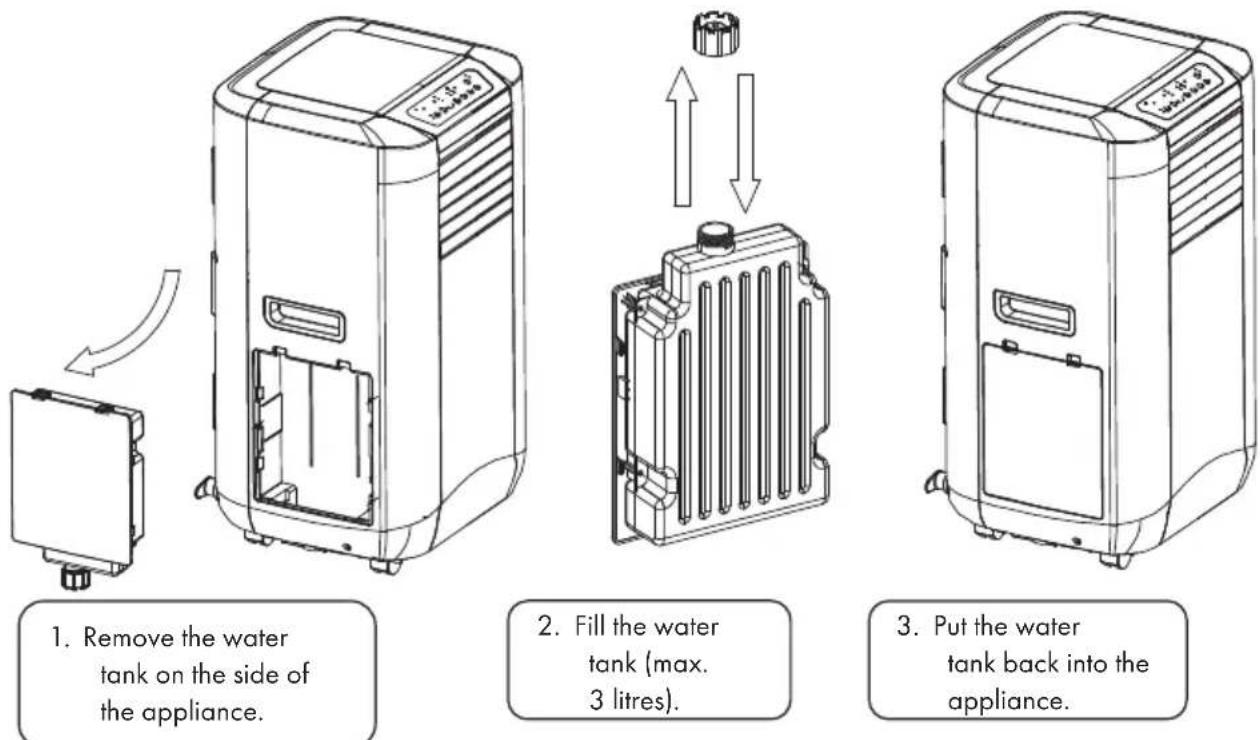
Note: Do not fill the water tank higher than the 3-litre mark, otherwise the "Water tank full" indicator lights up red and the appliance stops operating. If this happens, drain off some water until the indicator light goes out. The appliance should then continue normal operation.
Important notes
- To prolong the life of the compressor, wait at least 3 minutes after switching off the appliance before switching it on again.
- The cooling system is deactivated when the ambient temperature is lower than the set temperature. The fan continues to run at the speed you set. If the ambient temperature rises higher than the set temperature, the cooling system is reactivated.
- This appliance has an ANTI-FROST function. If the heating function is used at low temperatures, the heating function may stop to defrost the appliance. The heating function will then continue as normal.
Draining water
When you use the appliance in cooling or dehumidifying mode, moisture extracted from the ambient air is collected in the water tank inside the appliance. When the water tank is full, the compressor and the motor of the appliance are automatically switched off. At the same time, the "Water tank full" indicator lights up. An alarm tone also sounds. To empty the water tank, follow the instructions below:
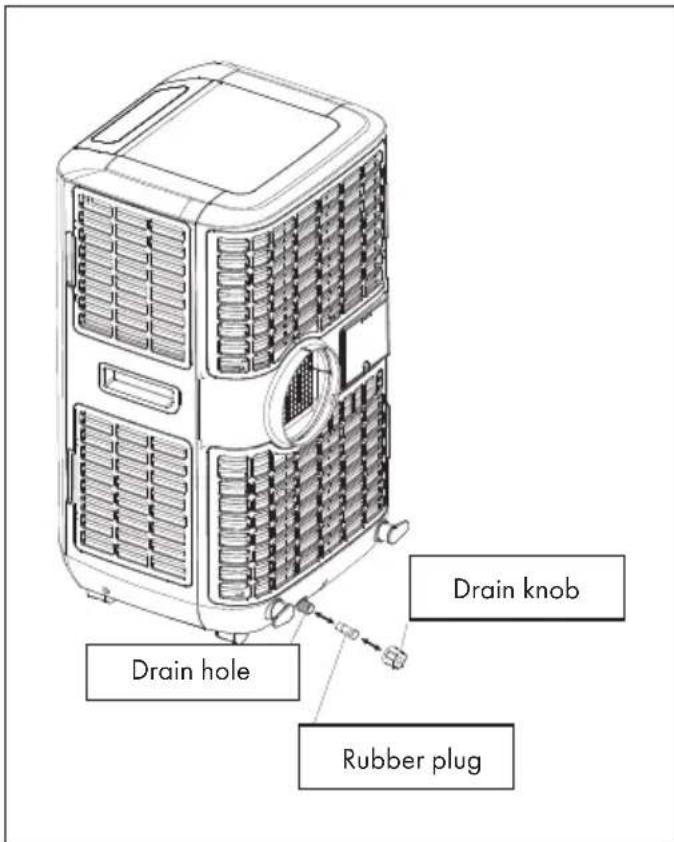
- Switch off the appliance and do not move it while the water tank is full.
- Place a container (for example a water bowl) under the drain hole.
- Remove the drain knob and rubber plug from the drain hole and allow the water to drain off.
- Replace the rubber plug and drain knob when the water bowl is almost full and empty it.
- Repeat steps 2-4 until the water tank is empty.
- Then replace the rubber plug and drain knob and tighten the drain knob properly.
- When you switch the appliance on again, the display "Water tank full" or "Compressor running" should stop flashing.
If you do not want to empty the water tank so often, proceed as follows:
- Remove the rubber plug and drain knob from the appliance and keep them for future use.
- Connect the supplied drain hose to the water outlet and place the other end of the hose in a drain.
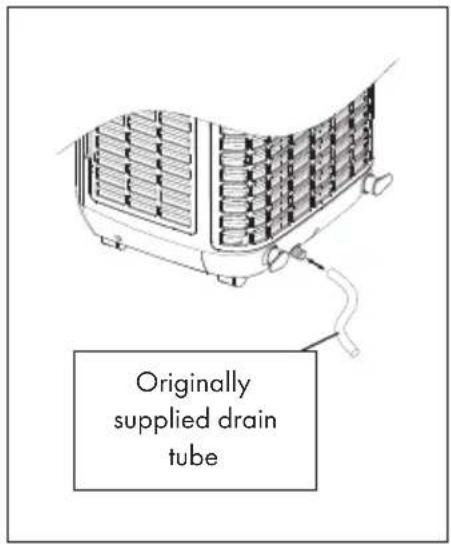
- The drain hose can be extended by using an extension hose (not supplied) with a suitable connector.
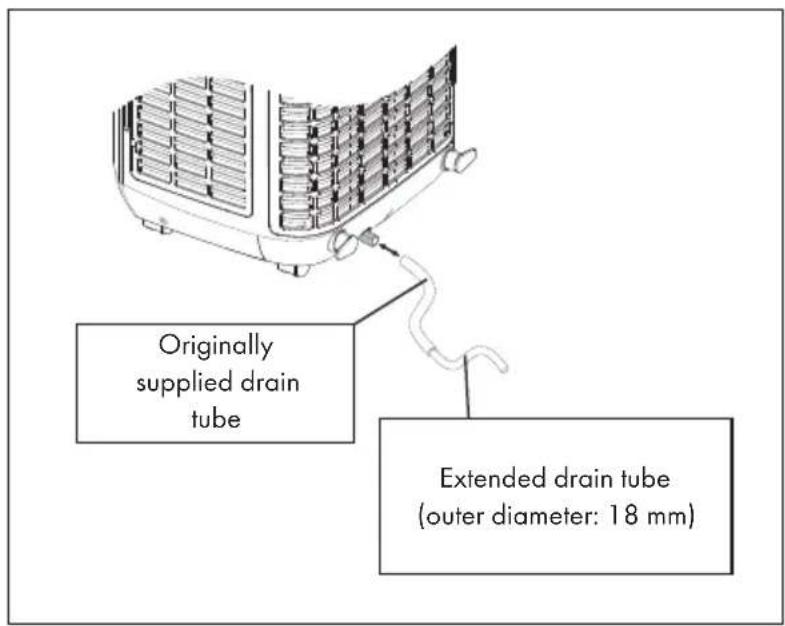
Important notes on permanent water drainage
• The drain must be lower than the water outlet of the appliance.
- The flashing "Water tank full" indicator does not work with this type of drainage.
- If you want to extend the water tube, you can connect it to another tube (diameter: 18 mm).
DEVICE CONTROL BY SMARTPHONE
If you integrate the device into your home WiFi, you can conveniently operate it via the associated Klarstein app. The app not only allows you to remotely control the device via your smartphone, but also gives you access to recipes and additional information.
Follow these steps to connect your smartphone to your Klarstein device:
- Download the Klarstein app first by scanning the QR code with your smartphone (see below), or download it directly from App Store or Google Play.
- Make sure your smartphone is connected to the same WiFi network that your Klarstein device is to be connected to.
- Open the Klarstein app.
- Sign in to your account. If you do not have an account, sign up in the Klarstein app.
- Follow the instructions from the app.
App Download
Use the scan function of your smartphone to scan the QR code and save the app on your smartphone.
Note: The app provides further information on how to use the app and help on how to connect to your device as soon as you open it for the first time.
| iOS Android | |
 |  |
Troubleshooting connection problems
If your Klarstein device cannot be found in the WLAN, check the following:
• Is the device plugged in?
• Is the WiFi feature of my phone enabled?
- Is the WiFi function of the Klarstein device activated? (Follow the instructions in the app)
- Has the WLAN password been entered correctly?
- Are the router, Klarstein device and smartphone in the immediate vicinity during the connection attempt? (Ideally no more than 5 m apart)
- If you have deactivated the 2.4 GHz band in the settings of your wireless router, activate it in your router settings.
Note: For further help, follow the instructions in the app when setting up the connection.
CLEANING AND CARE
Switch off the appliance before cleaning and always unplug the power cord from the wall outlet. Clean the appliance regularly to maximise its efficiency.
Cleaning the housing
Clean the appliance housing with a soft, damp cloth. Never use aggressive chemicals, gasoline, detergents, chemically treated sponges or other cleaning solutions to clean the appliance, as this could damage the housing.
Filter cleaning
Use a hoover to clean the filter or tap the filter gently to remove loose dust and dirt. The filters can be rinsed under running water (maximum 40 °C). Dry the filters carefully before putting them back in place.
Note: Never use the appliance without the filter.
Storage
If you are not going to use the appliance for a long period of time, proceed as follows:
- Drain the water completely from the water tank and only use the ventilation mode for a few hours so that the appliance is completely dried from the inside.
- Clean or change the filter.
- Unplug the appliance from the power outlet and attach the appliance to the cable hanger.
- Store the appliance in its original carton or cover it for storage.
TROUBLESHOOTING
| Problem Possible cause | |
| The appliance does not work. Is the appliance | nce plugged into the mains socket?Is there a power failure?Is the “water tank full” indicator flashing?Is the room temperature lower than the set temperature? |
| The appliance seems to have little effect on the ambient temperature. | Is the appliance in direct sunlight? (If so, close the curtains).Are there too many windows and doors open?Are there too many people in the room?Is there a heat-generating appliance in the room? |
| The appliance does not appear to have an effect on the ambient temperature. | Is the filter dusty or dirty?Are the air vents blocked?Is the room temperature lower than the set temperature? |
| The appliance is too loud. Is the appliance | uneven, so that vibrations are generated?Is the floor under the appliance uneven? |
| The compressor is not running. It could be | that the overheating protection is active. Wait until the compressor has cooled down. |
Note: If the problem cannot be solved, contact the customer service. Have the appliance serviced at regular intervals.
PRODUCT DATA SHEET
Information according to regulation (EU) No. 626/2011
Supplier's trademark:
Klarstein
Supplier's model identifier:
10035741, 10035742
Inside sound power levels at standard rating conditions on cooling mode in dB: 65 dB
Refrigerant (R290) leakage contributes to climate change. Refrigerant with lower global warming potential (GWP) would contribute less to global warming than a refrigerant with higher GWP, if leaked to the atmosphere. This appliance contains a refrigerant fluid with a GWP equal to 3. This means that if 1kg of this refrigerant fluid would be leaked to the atmosphere, the impact on global warming would be 3 times higher than 1kg of CO_2 , over a period of 100 years. Never try to interfere with the refrigerant circuit yourself or disassemble the product yourself and always ask a professional.
Energy efficiency ratio ( EER_rated ):
2,6
Energy efficiency class:
A
Energy consumption 1,6 kWh per 60 minutes, based on standard test results. Actual energy consumption will depend on how the appliance is used and where it is located.
Cooling capacity P_rated in kW:
4,3 kW
Information according to regulation (EU) No. 206/2012
| Model identifier(s) 10035741, 10035742 | |||
| Description Symbol Value Unit | |||
| Rated capacity for cooling P | rated for cooling 4,3 kW | ||
| Rated capacity for heating P | rated for heating - kW | ||
| Rated power input for cooling P | EER | 1,6 kW | |
| Rated power input for heating P | COP | - kW | |
| Rated Energy efficiency ratio EERd 2,6 - | |||
| Rated Coefficient of performance | COPd | -- | |
| Power consumption in thermostat-off mode | P_TO | - | W |
| Power consumption in standby mode | P_SB | 1 | W |
| Electricity consumption of single/double duct appliances (indicate for cooling and heating separately) | DD: Q_DD SD: Q_SD | 1,6 DD: kWh/aSD: kWh/h | |
| Sound power level | L_WA | 65 | dB(A) |
| Global warming potential | GWP | 3 | kgCO _2 eq. |
| Contact details for obtaining more information | Chal-Tec GmbH, Wallstraße 16, 10179 Berlin, Germany. | ||
DISPOSAL CONSIDERATIONS
natural_image
Symbol of a trash bin crossed with a diagonal line, no text or numbers presentIf there is a legal regulation for the disposal of electrical and electronic devices in your country, this symbol on the product or on the packaging indicates that this product must not be disposed of with household waste. Instead, it must be taken to a collection point for the recycling of electrical and electronic equipment. By disposing of it in accordance with the rules, you are protecting the environment and the health of your fellow human beings from negative consequences. For information about the recycling and disposal of this product, please contact your local authority or your household waste disposal service.
This product contains batteries. If there is a legal regulation for the disposal of batteries in your country, the batteries must not be disposed of with household waste. Find out about local regulations for disposing of batteries. By disposing of them in accordance with the rules, you are protecting the environment and the health of your fellow human beings from negative consequences.
DECLARATION OF CONFORMITY
CE UK CA
Manufacturer:
Chal-Tec GmbH, Wallstrasse 16, 10179 Berlin, Germany.
Importer for Great Britain:
Berlin Brands Group UK Limited
PO Box 42
272 Kensington High Street
London, W8 6ND
United Kingdom
Hereby, Chal-Tec GmbH declares that the radio equipment type Max Breeze Smart is in compliance with Directive 2014/53/EU. The full text of the EU declaration of conformity is available at the following internet address: use.berlin/10035741
For Great Britain: Hereby, Chal-Tec GmbH declares that the radio equipment type Max Breeze Smart is in compliance with the relevant statutory requirements. The full text of the declaration of conformity is available at the following internet address: use.berlin/10035741
Estimado cliente:
ÍNDICE
natural_image
Line drawing of a mobile phone with keypad and buttons (no text or symbols)natural_image
Symbol of a trash bin crossed with a diagonal line, no text or numbers presentBerlin Brands Group UK Limited
PO Box 42
272 Kensington High Street
London, W8 6ND
United Kingdom
SOMMAIRE
natural_image
Line drawing of a mobile phone with keypad and buttons (no text or symbols)FICHE DE DONNÉES PRODUIT
natural_image
Symbol of a trash bin crossed with a diagonal line, no text or numbers presentDÉCLARATION DE CONFORMITÉ

Fabricant :
Chal-Tec GmbH, Wallstraße 16, 10179 Berlin, Allemagne.
Berlin Brands Group UK Limited
PO Box 42
272 Kensington High Street
London, W8 6ND
United Kingdom
INDICE
Note sul refrigerante R290 110
natural_image
Line drawing of a mobile phone with keypad and buttons (no text or symbols)natural_image
Symbol of a trash bin crossed with a diagonal line, no text or numbers presentBerlin Brands Group UK Limited
PO Box 42
272 Kensington High Street
London, W8 6ND
United Kingdom

- INHALTSVERZEICHNIS
- Leistung erhöhen
- Member of Berlin Brands Group
- Handwerkerstr. 11
- Dahlwitz-Hoppegarten
- Deutschland
- CONTENTS
- NOTES ON REFRIGERANT R290
- Warnings
- Information for rooms with refrigerant pipes
- CAUTION
- SAFETY INSTRUCTIONS
- Special notes
- General safety instructions
- Instructions for Handling Damage
- WARNING
- DEVICE OVERVIEW
- ACCESSORIES
- CONTROL PANEL
- INSTALLATION
- Installation of the exhaust air hose
- FIXING THE WINDOW SEAL
- Fixing the seal for side-opening windows and roof windows
- INSTALLATION OF THE ACTIVATED CARBON FILTER
- COMMISSIONING AND OPERATION
- Turning on/off
- Automatic mode
- Setting the setpoint in automatic cooling mode 18-32 °C
- Setting the mode/function
- Setting the temperature
- Setting ventilation speed
- Setting the timer
- Sleep mode
- Dehumidify (DRY) mode
- Adjust the air vent
- Self-diagnosis
- Efficiency boosting
- Important notes
- Draining water
- Important notes on permanent water drainage
- DEVICE CONTROL BY SMARTPHONE
- App Download
- Troubleshooting connection problems
- CLEANING AND CARE
- Cleaning the housing
- Filter cleaning
- Storage
- TROUBLESHOOTING
- PRODUCT DATA SHEET
- DISPOSAL CONSIDERATIONS
- DECLARATION OF CONFORMITY
- CE UK CA
- Manufacturer:
- Importer for Great Britain:
- Estimado cliente:
- ÍNDICE
- SOMMAIRE
- FICHE DE DONNÉES PRODUIT
- DÉCLARATION DE CONFORMITÉ
- Fabricant :
- INDICE
Brand : Klarstein
Model : Max Breeze Smart 15K
Category : Air Conditioning