myVARIO - Stroller Bebebi - Free user manual and instructions
Find the device manual for free myVARIO Bebebi in PDF.

| Product type | Stroller |
| Brand | Bebebi |
| Model | myVARIO |
| Recommended age | 0 to 3 years |
| Maximum supported weight | 15 kg (carrycot up to 15 kg, footrest max 5 kg) |
| Dimensions (approx.) | Not specified in manual; estimated 85 × 60 × 105 cm (L × W × H) |
| Weight (approx.) | Not specified; estimated 10 kg |
| Materials | Metal chassis (steel/aluminum), anti-harm treated textiles |
| Safety standards | EN 1888:2002+A1:2005+A2:2005+A3:2005 (stroller), ECE R44/04 (carrycot) |
| Safety harness | 5-point harness with sliding buckle |
| Brake | Rear parking brake, lever-operated |
| Wheels | Swiveling front wheels with lock, fixed rear wheels |
| Suspension | Not specified; ball bearings to be maintained |
| Adjustments | Height-adjustable handle, reclining backrest, adjustable footrest (5 positions), adjustable canopy |
| Included accessories | Carrycot, hammock, UV protection, carrycot adapter |
| Optional accessories | Car seat, car carrycot, ISOFIX base, storage net (max 3 kg) |
| Maintenance | Clean with soapy water, oil moving parts every 4 weeks, check screws |
| Textile washing | Hand wash below 30 °C, do not machine wash |
| Warranty | 2 years against material and manufacturing defects |
| Operating temperature | -20 °C to +60 °C |
Frequently Asked Questions - myVARIO Bebebi
User questions about myVARIO Bebebi
0 question about this device. Answer the ones you know or ask your own.
Ask a new question about this device
Download the instructions for your Stroller in PDF format for free! Find your manual myVARIO - Bebebi and take your electronic device back in hand. On this page are published all the documents necessary for the use of your device. myVARIO by Bebebi.
USER MANUAL myVARIO Bebebi

Bebebi
www.bebebi.de
Allgemeines ....5
natural_image
Top-down view of a person lying in a car seat with a hand adjusting the seat area, no visible text or symbols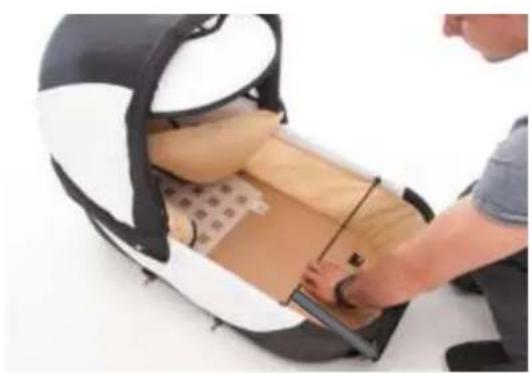
natural_image
Person assembling a car seat with visible tread pattern and fabric (no text or symbols)
natural_image
Top-down view of a medical or anatomical structure with a curved base and two small square markers, no visible text or symbols.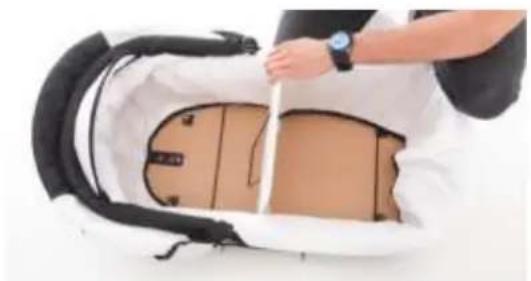
natural_image
Person performing CPR on a patient's abdomen with medical equipment (no visible text or symbols)BESONDERHEITEN BEIM BELLAMI, PARIS, LONDON, MYVARIO ODER FLORIDA KINDERWAGEN
natural_image
Close-up of a hand holding a medical or surgical tool near a curved surface (no visible text or symbols)natural_image
Close-up of a person wearing safety goggles with a curved arrow indicating motion (no text or symbols visible)natural_image
Close-up of a person's torso wearing a black garment with a red pendant and white trim (no visible text or symbols)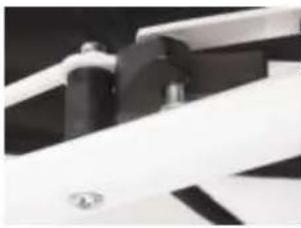
natural_image
Close-up of mechanical components with no visible text or symbolsnatural_image
Close-up of a black mechanical clamp or bracket component with four circular holes, no visible text or symbols
natural_image
Close-up of a person adjusting a black object with red and white elements (no visible text or symbols)natural_image
Mechanical linkage assembly with articulated joints and mounting brackets (no visible text or symbols)natural_image
Close-up of a hand adjusting a mechanical bracket with a red knob (no visible text or symbols)natural_image
Close-up of a hand adjusting a mechanical bracket with metal frame (no visible text or symbols)natural_image
Close-up of a hand adjusting a metal bicycle frame with a handle (no visible text or symbols)natural_image
Close-up of a mechanical device with wires and components, no visible text or symbolsnatural_image
Close-up of a transparent mechanical device with metal brackets and connectors, next to a white checkered basket (no visible text or symbols)natural_image
Close-up of a person using a small bicycle model with visible wheels and legs (no text or symbols)MONTAGE DES SPORTSITZES
natural_image
Person applying spray to a black and white safety bag (no text or symbols visible)
natural_image
Close-up of a hand holding a black mechanical component, possibly a fastener or clamp, against a white background (no text or symbols visible)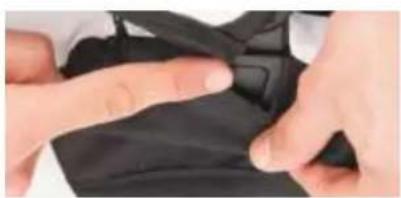
natural_image
Close-up of hands adjusting a black fabric piece (no visible text or symbols)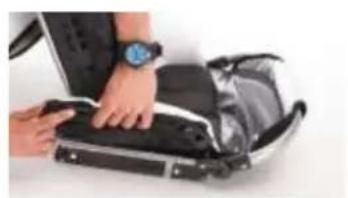
natural_image
Person adjusting a black athletic device with a watch (no visible text or symbols)natural_image
Close-up of a person adjusting a black and white patterned athletic device (no visible text or symbols)natural_image
Close-up of a hand inserting a black plastic bag into a device, with no visible text or symbols.
natural_image
Close-up of a black electronic device with a white panel and black base, against a plain light background (no visible text or symbols)
natural_image
Close-up of a mechanical component with visible internal cavities and a shaft (no text or symbols)ADAPTER DER BABYSCHALE
natural_image
Close-up of a hand adjusting a black mechanical component with a knob (no visible text or symbols)natural_image
Close-up of a hand adjusting a black mechanical component with a knob (no visible text or symbols)natural_image
Close-up of hands adjusting a black tire on a car wheel (no visible text or symbols)natural_image
Close-up of a person adjusting a black tire on a wheeled vehicle (no text or symbols visible)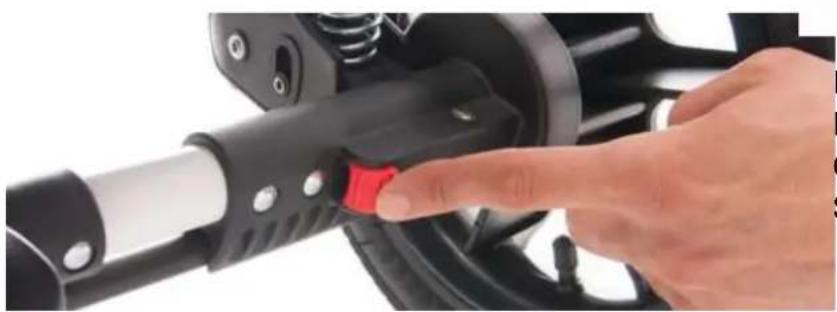
natural_image
Close-up of a hand pressing a red button on a black bicycle suspension system (no text or symbols visible)natural_image
Close-up of a hand adjusting a black tire wheel, with a blue arrow pointing to the wheel rim (no text or symbols visible)ZUSAMMENKLAPPEN DES WAGEN
natural_image
Two-panel image showing a hand holding a red tool over a black and white mechanical component, no text or symbols visible.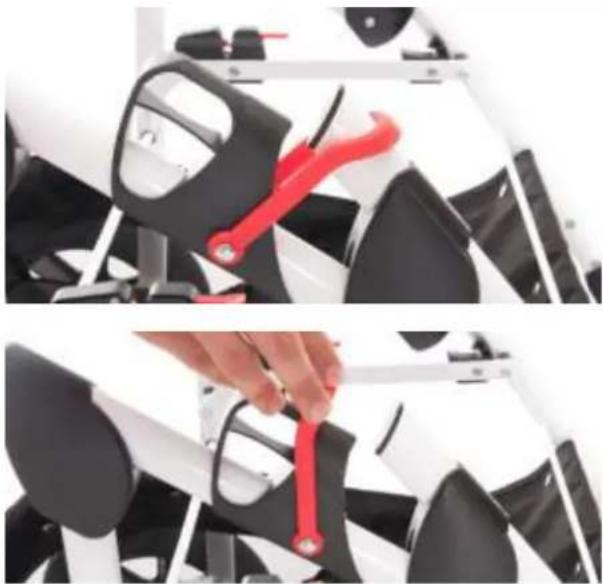
natural_image
Two-panel image showing a hand holding a red tool over a black and white mechanical component, no text or symbols visible.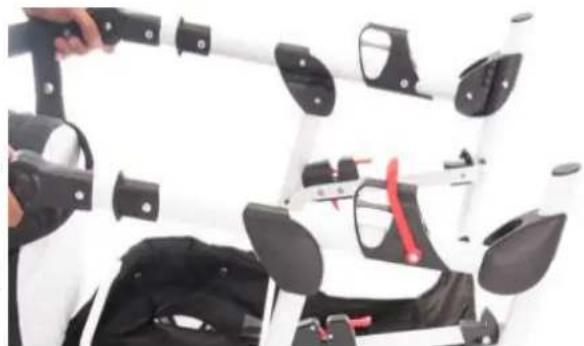
natural_image
Close-up of a robotic arm with white plastic components and black connectors, no visible text or symbols
natural_image
Line drawing of a car seat with a strap and seatbelt (no text or symbols)natural_image
Illustration of a car seatbelt with a magnified inset showing a cable being inserted (no text or symbols)natural_image
Illustration of a car seatbelt with a diagonal belt and arrow indicating direction (no text or symbols)natural_image
Illustration of a car seatbelt with a strap and two inset images showing different seat designs (no text or symbols)6 ZUM SCHLUSS FÜHREN SIE DEN SICHERHEITSGURT WIEDER ZUR AUFROLLAUTOMATIK IHRES AUTOS. ACHTEN SIE AUCH HIER DARAUF, DASS DER GURT STRAFF FESTGEZOGEN IST
natural_image
Illustration of a car seatbelt with a belt and arrow indicating direction (no text or symbols)7 DAS SONNENVERDECK
natural_image
Close-up of a black plastic device with a hand adjusting its lock and adjustment knob (no visible text or symbols)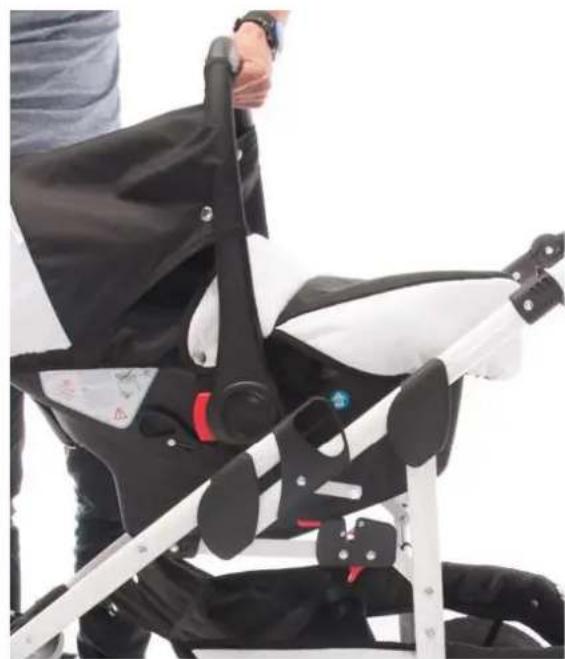
natural_image
Person wearing a black and white stroller with a red button, viewed from the side (no visible text or symbols)FALSCHER GURT: BECKENGURT?
For the safety of your Child 39
Construction 42
unpack the pram and build up the chassis 42
The baby carriage 42
SPECIAL FEATURES IN THE BELLAMI, PARIS, LONDON, MYVARIO OR FLORIDA KINDERWAGEN 42
With the Bellami pram, the myVARIO and the Florida pram, the way to build the carrycot is different. You can see this on the left side. 42
SPcial features for Model Retro 43
The Pushchair 44
Attach the safety bar 45
Operating the footrest 45
Adjusting the seat position 45
Adapter of the car seat 46
Mount the adapters to the infant carrier. You put the baby seat up and down like the carycot and the sports seat. See installation and operation of the car seat / infant carrier (optional) 46
Safety Belt 46
Unlocking the swivel tires 46
Mount the rear tires 47
Remove the rear tires 47
Pack the chassis for transporting 48
Special features for Model Retro 49
Assembly and Handling of the car seat / infant carrier (sold separately) 50
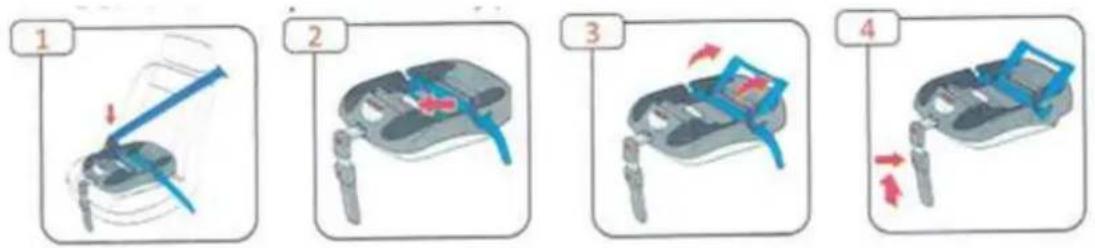
1 Open the safety belt, to place the car seat 50
2 PUT THE CHILD SEAT ALONG THE DRIVING DIRECTION ON THE CAR SEAT. AND KEEP ON STABLE HOLD. 50
3 PLUG IN THE SAFETY BELT THROUGH THE SIDE BRACKETS IN THE SAFETY BELT TAKE OVER AND THAT THE SAFETY BELT IS NOT LOOSE 51
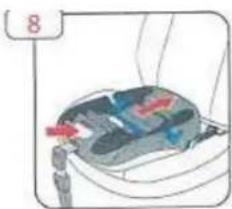
4 REMOVE THE SAFETY BELT FROM RECORDING BEHIND THE CAR SEAT AND MAKE 51
5 MAKE SURE THE SAFETY BELT IS CLEANED THROUGH THE BRACKET. HE MUST NOT BE TURNED! 52
6 FINALLY, RUN THE SAFETY BELT AGAIN TO THE ROLLING MACHINE OF YOUR CAR. ALSO, HERE MAKE SURE THE BELT IS STRAFFICALLY TIGHTENED 52
7 The Suncover 53
8 carry handle adjustment 55
How do I connect the car seat with my stroller CHASSIS? 56
Specials for the Bellami Pram 57
The steps to release the adapters 58
For the protection of your baby!!! 58
Checklist to ensure that 58
To protect your vehicle 59
Cleaning 59
Assembly and Handling of the ISOFIX Base (sold separately) 60
ISOFIX Base with harness mounting 60
ISOFIX BasE with ISOFIX Hook 60
Unplug the ISOFIX Base 60
Assembling the Car seat 61
Unplug the car seat 61
ISOFIX BasE Content 62
Maintenance 63
Check the screws 63
Check front tires 63
Check back tires 63
Check moving parts 63
Check brake mechanism 63
Care instructions 64
Maintain the fabric pieces 64
Maintenance of the chassis 64
Loss of air tires 64
Quality agreement 64
Warranty 64
Warranty in case of complaints 64
No warranty 65
The pram is intended for children from the age of 0-3 years and an approved weight to 15 KG.
The pram meets the EU safety standards
EN 1888: 2002 + A1: 2005 + A2: 2005 + A3: 2005
The Baby carrier (car seat) meets the safety standard ECE R 44/04
The product has been tested in a temperature range of -20^ C to +60^ C ( -4^ F to +140^ F). Besides the many positive properties of our materials such as air permeability, etc., many fabrics are very sensitive to intensive solar radiation. Experience has shown us that the rays of the sun are now so aggressive that must recommend that you park the pram in the shade. Avoid exposing it to direct sunlight, and the fresh colors on your buggy will be preserved for longer. Colors may vary. No complaints may be made in this regard. Please note that improper handling, possible water rings, or differences in color (as described above) do not justify a complaint. Regular care of all metal parts, particularly the chrome parts and especially after trips to the sea, is necessary on the pram to maintain a quality appearance. Commercially available treatment products are sufficient for this. The axles must be cleaned and lightly oiled approximately every 4 weeks.
You are responsible for the safety of your child. Not complying with these notes may put the safety of your child at risk. Nevertheless, all possibly occurring conditions and unforeseeable situations cannot be covered. Common sense, caution and vigilance are factors this product cannot provide; they are taken for granted in persons using the stroller/pram. The person using the stroller/pram and its appropriate accessories should understand all instructions. You should explain the operation of the stroller/pram to all persons using it and its appropriate accessories. Consult a dealer if any of the instructions are incomprehensible and more detailed explanations are required, or if you have further queries.
- Never leave your child unattended.
• Always use the restraint system. - Ensure that all the locking devices are engaged before use.
• To avoid injury, ensure that your child is kept away when unfolding and folding this product. - Do not let your child play with this product.
- Check that the pram body or seat unit or car seat attachment devices are correctly engaged before use.
• This product is not suitable for running or skating.
CONGRATULATIONS
High quality prams and ongoing quality controls give you the safeness that you have a stroller for a very long time.
WARNING: Check before use that the stroller is not damaged. Also, be sure that all parts are not loose.
WARNING: Never leave your child unattended.
WARNING: Never use force to the stroller or buggy. A strong pressure on the reversible handle or other metal and plastic parts can lead or cracking and warping. Especially the reversible handle or the swivel tires get damaged when forcing with high pressure.
WARNING: Check all parts on its correct fitting and that all locks are closed before use the pram.
WARNING: Driving on stairs or steps damage the buggy and you risk the health of your new born child.
WARNING: Always make sure, that you activate the brakes if you park the pram. Especially on buses, trains, subways and trams. Be sure to park on a not slippery underground
WARNING: The pram, buggy or the carry cots are no beds or cradle replacements and may not be used in cars.
WARNING: Make sure that your child in out of reach, when folding or unfolding the pram or other parts of the bought product.
WARNING: Don't let your child play with the pram.
WARNING: If you use the handle of your pram to carry bags and high weights, your pram is not stable and can be totally damaged.
WARNING: This pram model is for one child. It has one seat unit
WARNING: On the footrest max. put a pressure of 5 kg in horizontal position on. Never use the footrest as ladder. In vertical position the footrest can be loaded with 15 kg of weight.
WARNING: No part of the pram can be used in your car. Only the car seat is certified for using in the car. Look at the norm ECE R44/04.
WARNING: Always use the harness as soon as your child can sit unaided.
WARNING: Make sure that your pram stands still before using the brake. If you use the brake earlier, you damage the whole brake system. Also check all parts of the pram before using it.
WARNING: Always use the safety belt
WARNING: It is necessary to check that the carrycot or the seat unit is properly engaged before use.
WARNING: Please check the brake system every 4 weeks to be sure that the mechanic is working correctly. To maintain the brake system, clean the suspensions and then oil the whole mechanic.
WARNING: Make sure that the brake is closed before you sit in or remove your baby.
WARNING: The use of buggy boards / stroller platforms may impair the functionality of the stroller and you use it on your own risk.
WARNING: Loose components and screws must be locked tightened. If you use your pram without tightened the screws your pram gets broken and is not usable anymore.
WARNING: The seat unit can be used when your child can sit, or at an age of 6 months.
WARNING: The weighing of your child in a stroller is safe only in the running direction. In the opposite direction to the stroller movements can lead to deformations and cracks on the frame, thereby repealing the warranty claim.
WARNING: Do not Skate or jog.
WARNING: Avoid direct sunlight, due to increasingly aggressive solar radiation many textiles can react very sensitively.
WARNING: Regular maintenance of the metal parts, especially after a stay by the sea is very important for the durability and functionality of the stroller
WARNING: The maximum load of the shopping cart is 3 KG!
CONSTRUCTION
UNPACK THE PRAM AND BUILD UP THE CHASSIS
1) Lift the handle until the frame opens and you here a locking noise.
2) In your package there are 2 axle parts to insert into the tires. If you do that you can easy build the rear axle.
3) The front swivel tires are fast installed. Just put them in the mounting hole until you again here a click noise.
Pay attention that no plastic parts or other foreign objects are on the mechanical parts.
THE BABY CARRIAGE
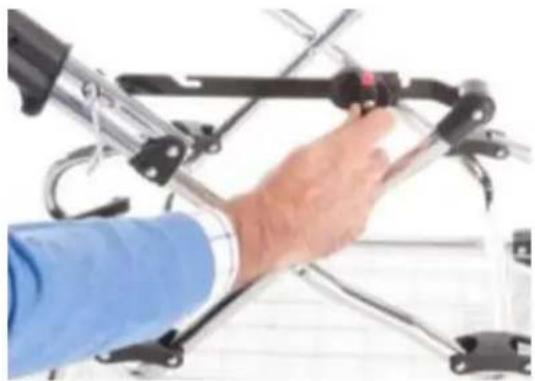
Unfold the baby carriage. If you look under the mattress you see two metal bails which are connected to the carriage. Like you see in the picture pull the bails in your direction until you can fix them with the mounting lug like you see in picture

natural_image
Top-down view of a person lying on a back panel with a medical device on the chest (no visible text or symbols)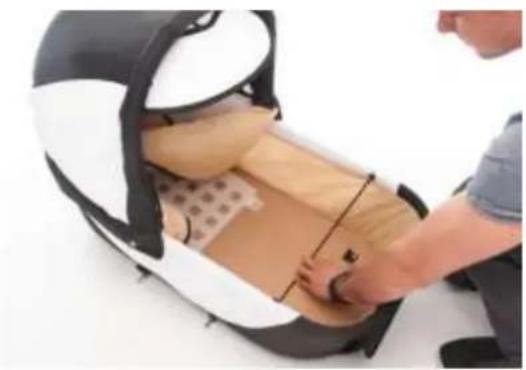
natural_image
Person adjusting a small white and black OLA device with a wooden panel, no visible text or symbols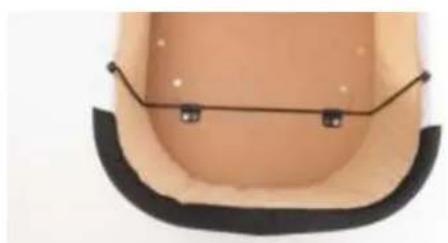
natural_image
Top-down view of a curved, beige object with black border and two small square markers (no text or symbols visible)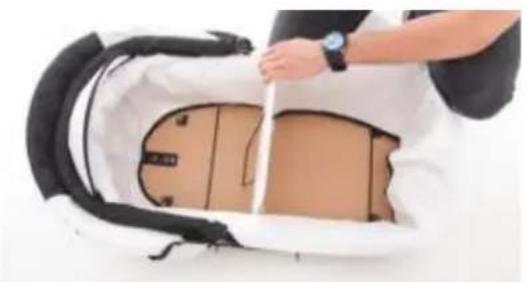
natural_image
Person performing a medical procedure on a patient's abdomen, no visible text or symbolsSPECIAL FEATURES IN THE BELLAMI, PARIS, LONDON, MYVARIO OR FLORIDA KINDERWAGEN
natural_image
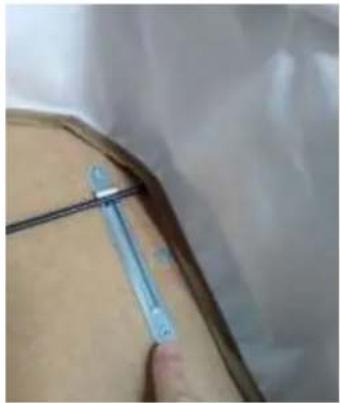
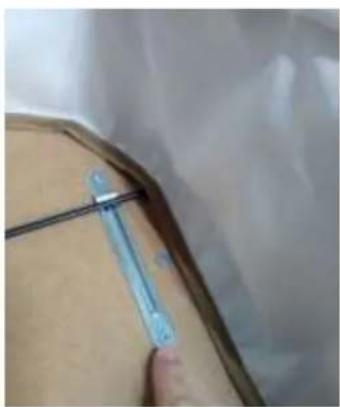
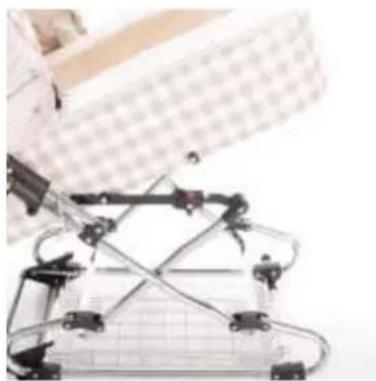
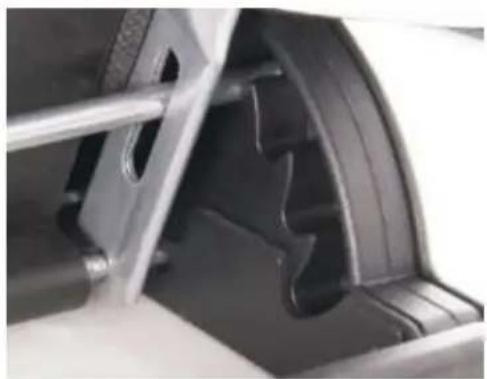
Close-up of a medical procedure on a human arm, showing a blue tool inserted into the skin (no visible text or symbols)With the Bellami pram, the myVARIO and the Florida pram, the way to build the carrycot is different. You can see this on the left side.
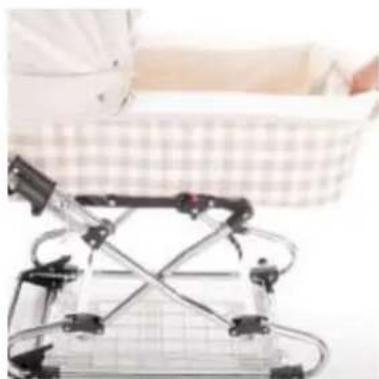
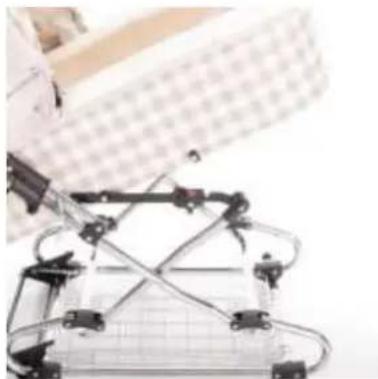
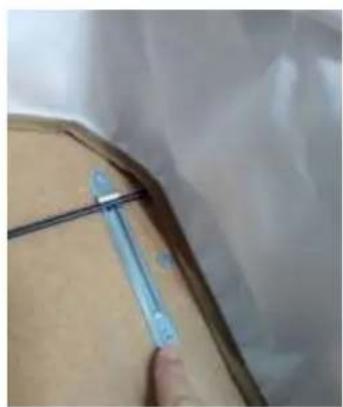
You have to lift the baby carriage and then use the metall braces to lift up the complete carriage. Now you forward the metall braces like you see it in the pictures. The metal rail is a wooden rail that lies across at the Paris and London pram. For more help, see https://servicecenter.pro-concept-store.com
Insert the baby carriage insert. You end the process by closing the Velcro fasteners.
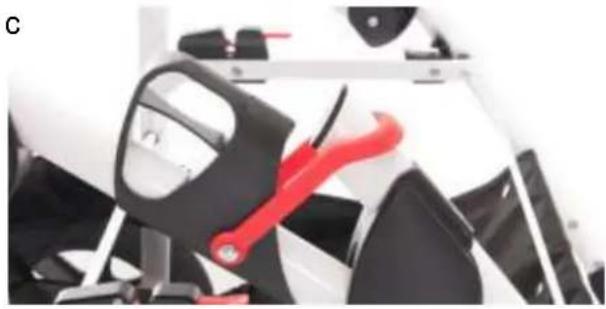
SPECIAL FEATURES FOR MODEL RETRO
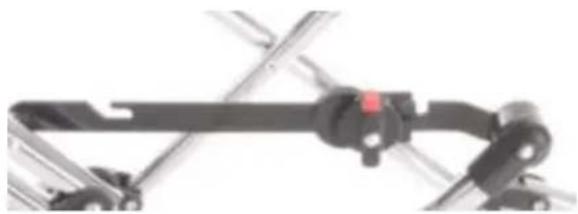
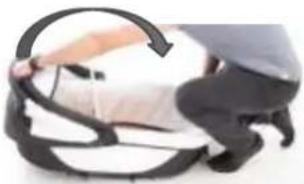
The frame of the Retro stroller has a special mechanism that is opened and closed by a rotary movement on the closure element. As you can see in the photos, the handling here is "very easy".
natural_image
Mechanical linkage system with articulated joints and a red valve (no visible text or symbols)Find the lever and the red button
natural_image
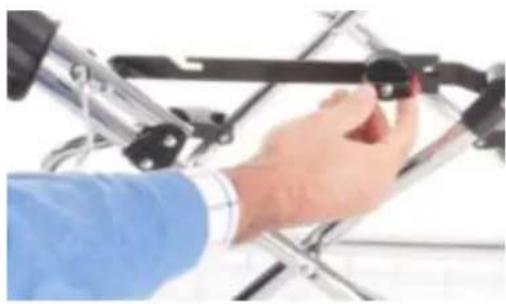
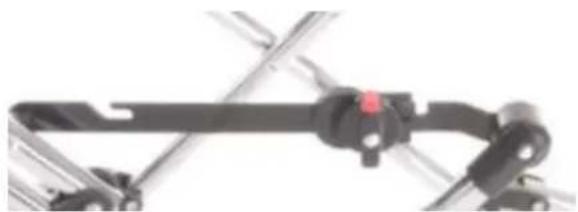
Close-up of a hand adjusting a mechanical component with a blue sleeve (no visible text or symbols)Now turn the knob to the left. So the red smaller button points up
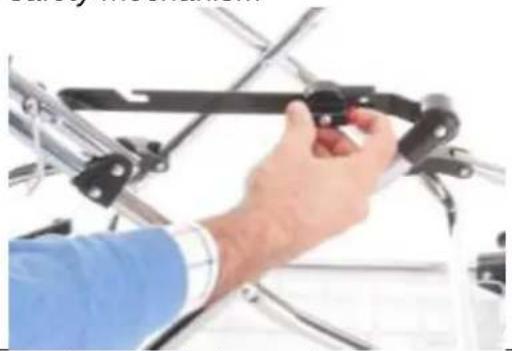
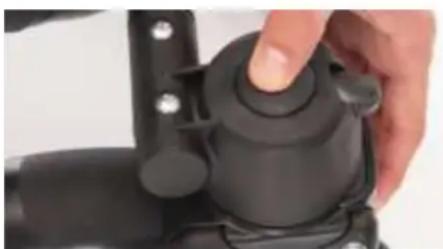
Press the red button to release the safety mechanism
natural_image
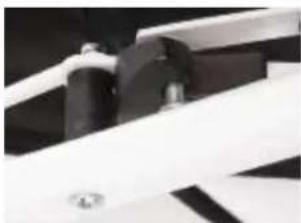
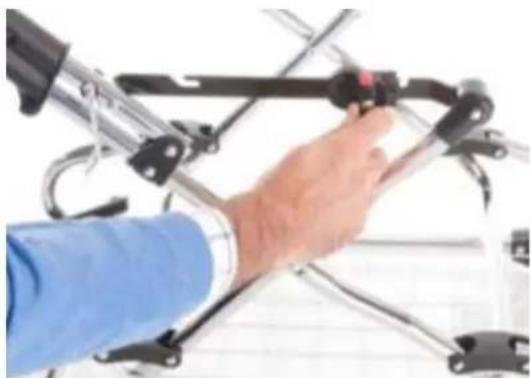
Close-up of a hand adjusting a mechanical bracket with metal frame (no visible text or symbols)Now put on the baby carriage
natural_image
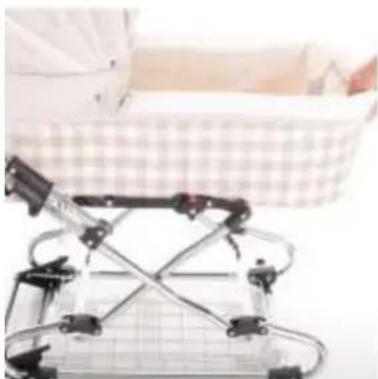
Close-up of a hand adjusting a metal bicycle frame with a handle (no visible text or symbols)Push the carrycot completely into the holder. First, let links hook up (see photo 4) and then right click.
natural_image
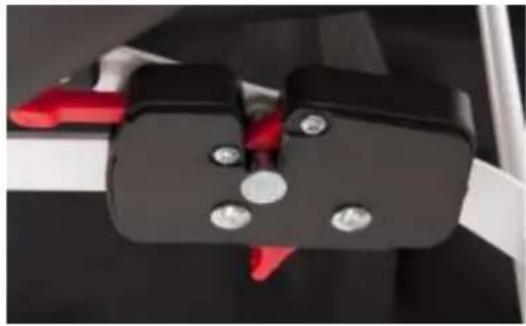
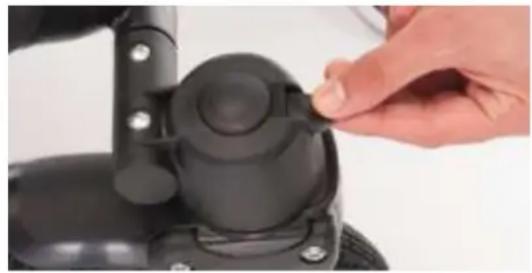
Close-up of a mechanical device with visible wiring and components, no text or symbols present.Press the red button again and turn the knob to the right.
natural_image
Close-up of a robotic device with metal frame and connectors, next to a white box (no visible text or symbols)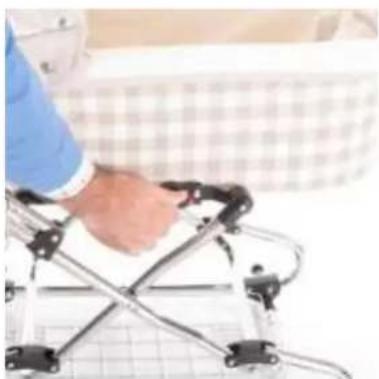
natural_image
Close-up of a person using a small robotic device on a grid floor, with checkered pattern in background (no visible text or symbols)To attach your body onto your chassis, position the body centrally over the chassis.
natural_image
Close-up of a person wearing a black helmet with a curved arrow indicating motion (no text or symbols visible)Under the body there are locking points, lower the body so that these locate on the chassis mounting bars.
Ensure that all locking points are unlocked at the moment of bringing the parts together
natural_image
Close-up of a person's torso wearing a black jacket with red buttons and a white shirt, holding a small object (no visible text or symbols)Push the body downwards so that all locks 'click' and engage.
natural_image
Close-up of a mechanical component with black and white parts, no visible text or symbolsGive the body a gentle lift to check that all points are securely fastened.
natural_image
Close-up of a black mechanical clamp or bracket with four screws and red connectors (no visible text or symbols)Hint: The best way to unset the baby carriage from the chassis is to lift the body a bit after you have released locking points.
To release the baby carriage from the frame. You must unlock the mounting bars.
natural_image
Close-up of a person's torso and lap area with a red object on the lap (no visible text or symbols)THE PUSHCHAIR
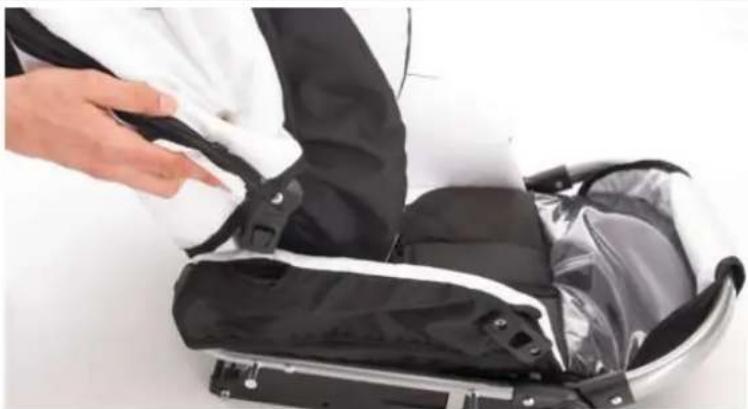
To build up the seat unit remove all package material and lay it down. Now you see a hinge on both sides which must pulled towards you and then you can lock it with the adapters seen on the picture.
The hood can be attached easily like the carry cot. Press the Buttons on both sides of the end of the hood.
natural_image
Person applying spray to a black and white safety bag on a vehicle (no text or symbols visible)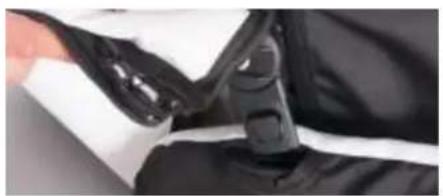
natural_image
Close-up of a hand holding a black mechanical component, possibly a tool or clamp, against a white background (no visible text or symbols)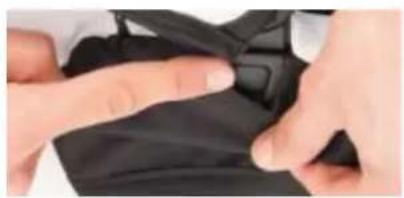
natural_image
Close-up of hands adjusting a black fabric piece with a button (no visible text or symbols)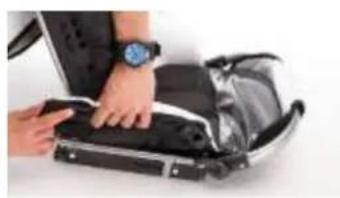
natural_image
Person installing or adjusting a black electronic device with a wristwatch (no visible text or symbols)ATTACH THE SAFETY BAR
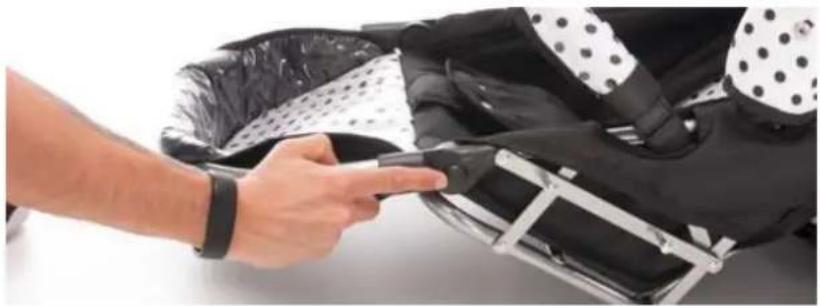
The bumper bar on the body can be removed for easier access. Press the button on either side of the bumper bar and pull the bumper bar out from the body arms
OPERATING THE FOOTREST
To lower the footrest, reach underneath the footrest and locate the flattened strip. Pull this down to lower the foot rest.
The footrest will also fold away to give more leg room for toddlers.
The footrest max onload are 5 kg. Kids can't use the footrest to get onto the seat. It's no ladder.
natural_image
Close-up of a person adjusting a black and white patterned fabric item, with a hand adjusting the part (no visible text or symbols)ADJUSTING THE SEAT POSITION
The Pushchair body has some seat positions, from lie flat to upright.
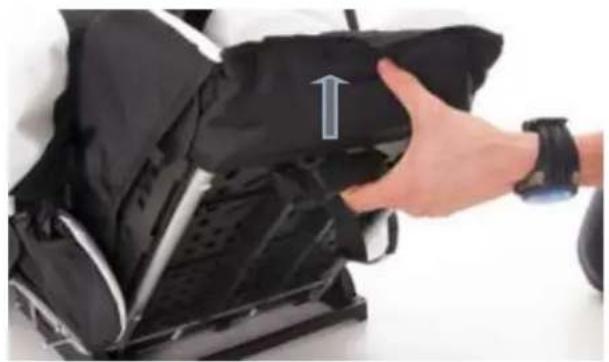
To adjust the seat, place the palm of your hand on the hand rest at the back of the body. Grip and release the catch, then either lift or lower to the desired position.
natural_image
Close-up of a hand inserting a black device into a black seat, with an arrow indicating the upward motion (no text or symbols visible)
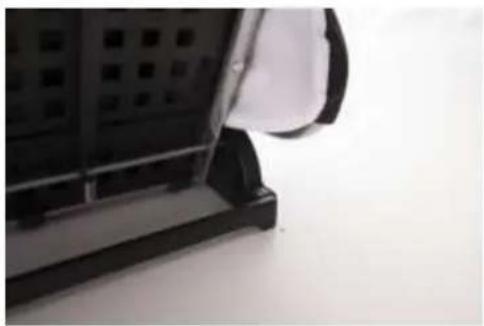
WARNING! If you adjust the Backrest, be sure that the cross-bracing for the mechanic of the adjustment is lift on both sides. Otherwise the adjustment will damage, and the backrest cannot be used anymore. (s. Picture)
natural_image
Close-up of a black plastic door with a white seat and metal bracket, against a plain light background (no text or symbols visible)
WARNING: Pay attention that your baby's fingers are away from the moving parts. Otherwise it can cause major bruises.
natural_image
Close-up of a car wheel and brake disc assembly (no visible text or symbols)ADAPTER OF THE CAR SEAT
Mount the adapters to the infant carrier. You put the baby seat up and down like the carrycot and the sports seat. See installation and operation of the car seat / infant carrier (optional)
SAFETY BELT
Secure your child with the belt. Make sure that the belt is tight, which you can adjust with the sliding buckles. Make sure that the buckles are really tight when closing to secure them.

Opening the strap: Press the red dot and both tongues open and you can take out your child. The belt should never be used as a carrying handle
UNLOCKING THE SWIVEL TIRES
natural_image
Close-up of a hand adjusting a black mechanical component with a knob (no visible text or symbols)To unlock the tires, please press in the small pins above the fixings for the swivel tires, and the wheel will fall easily off from the mount.
To make the tires unswivel, you just must
pull down the anker, so the tires will hold position
Advice: Pay attention to the cleanness of the axles and tires. Maintain the tires and axles regular with machine oil to keep the mechanic in good condition.
natural_image
Close-up of a hand adjusting a black mechanical component with a knob (no visible text or symbols)MOUNT THE REAR TIRES
natural_image
Close-up of hands adjusting a black tire on a car wheel (no visible text or symbols)The rear wheels have a modern mounting rail. This is simply inserted into the wheel and then pushed into the receptacle on the frame.
natural_image
Close-up of a person adjusting a black tire on a car wheel (no text or symbols visible)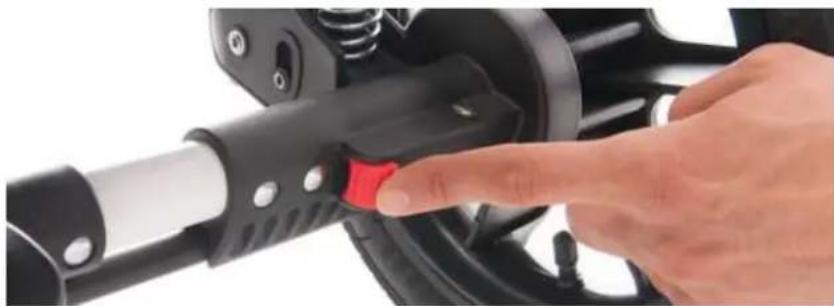
natural_image
Close-up of a hand pressing a red button on a black bicycle brake system (no text or symbols visible)The lock confirms the correct hold of the axle, by a click noise. Check the correct position of the axle
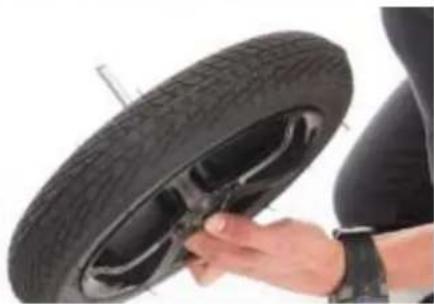
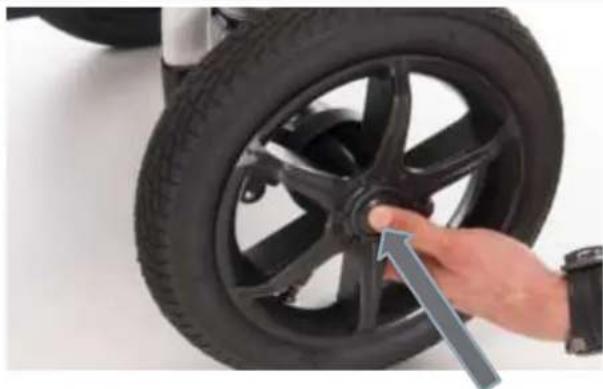
REMOVE THE REAR TIRES
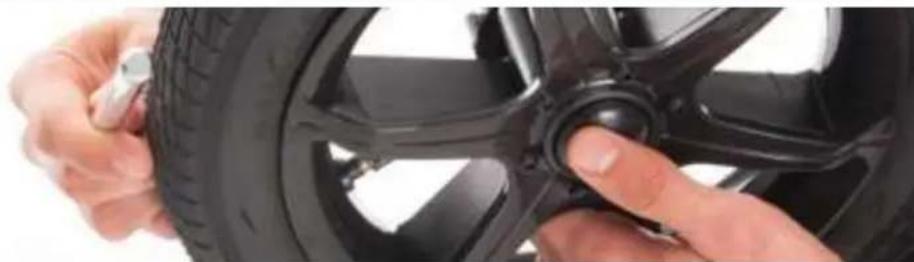
The rear tires can be unmounted easily from the axle by pressing the button in the center of the
wheel. Or you have another mount, then you press the hook together and unmount the wheel from the axle.
natural_image
Close-up of a hand adjusting a black tire wheel, with a blue arrow pointing to the rim (no text or symbols visible)If you hit the brake pedal on the back of your pram, two small tacks brake the pram. These spikes work together with the rear tires brake pinion. Remember: Do not hit the brake in the run.
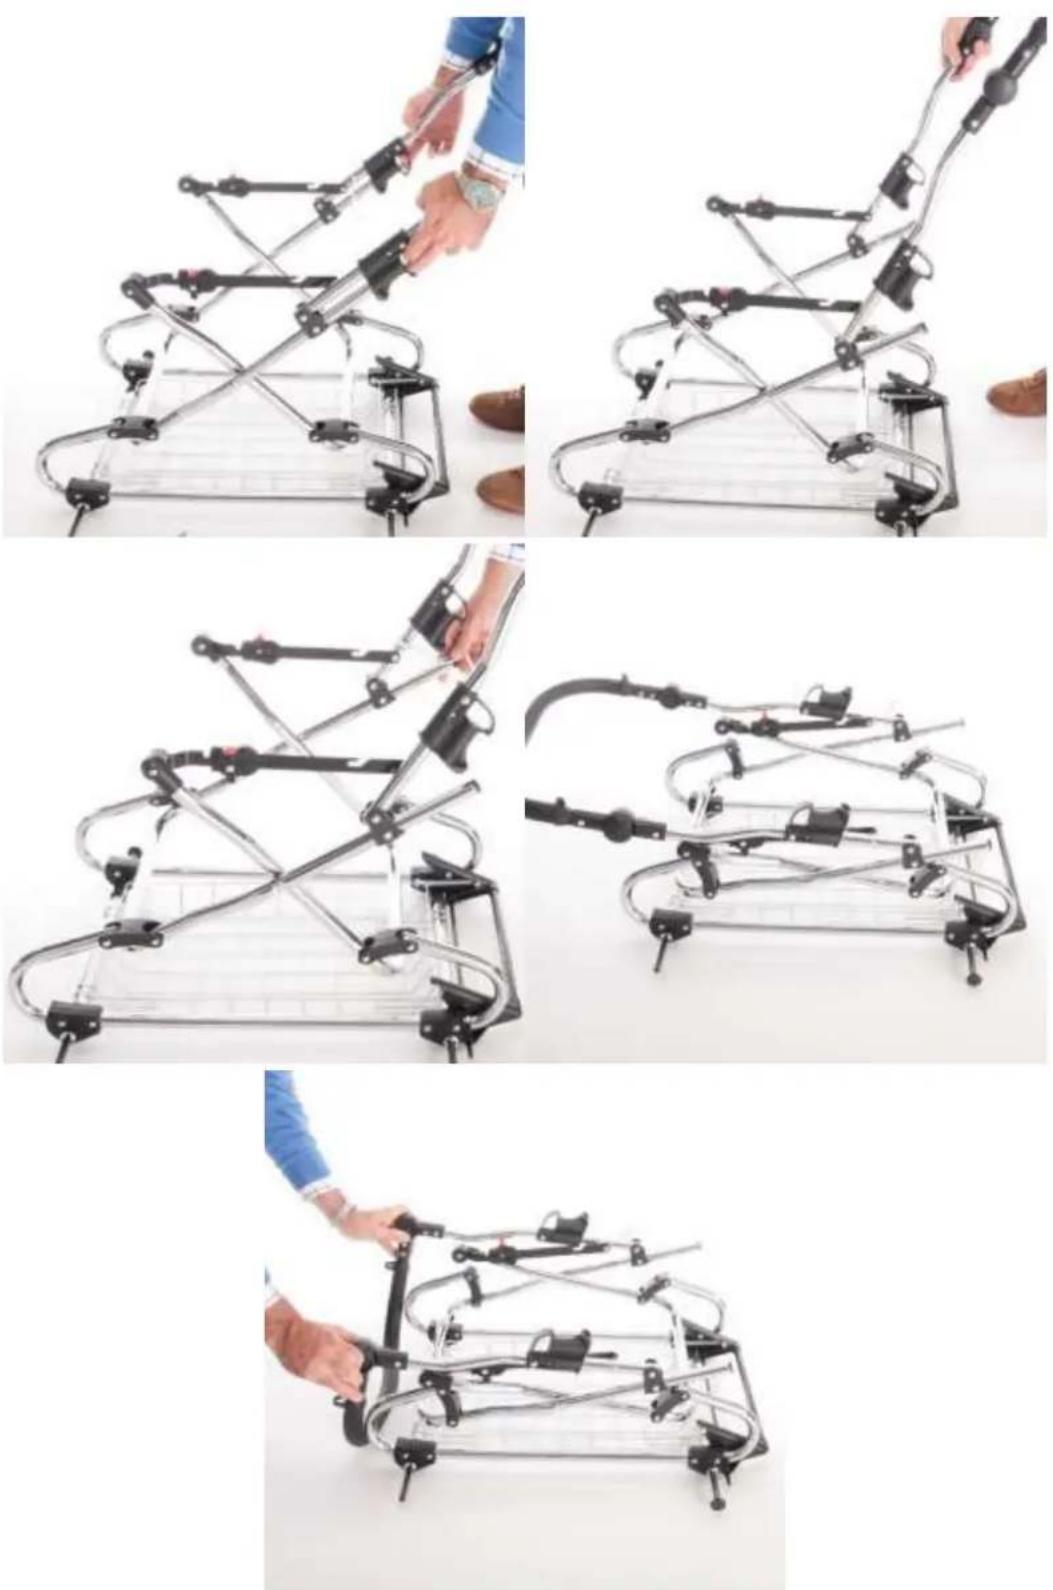
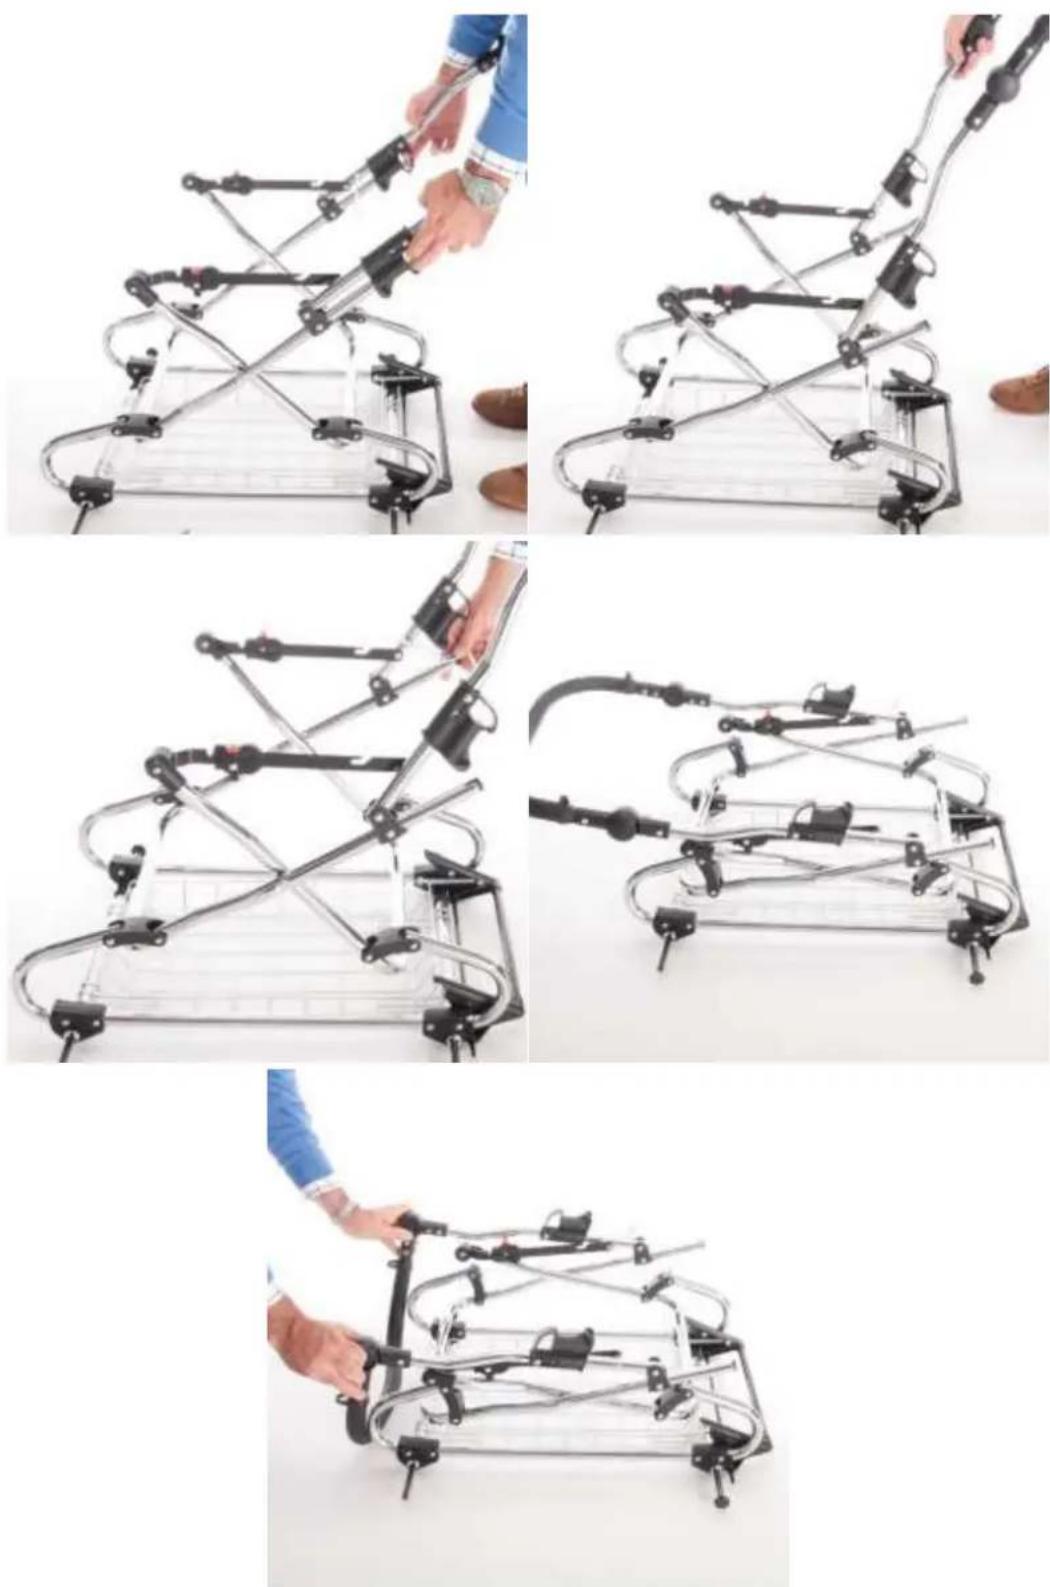
PACK THE CHASSIS FOR TRANSPORTING
- Remove the attachment (car seat, carry c from the frame
- Remove the swivel tires
- Release the folding lock (button, lever or loop)
- Pull the two latches simultaneously and the pushchair will collapse. Now push the safety catch to one side, so that the frame can fold.
natural_image
Close-up of a motorcycle gear assembly with black and red clamps (no visible text or symbols)
WARNING! If you not removing the before folding, the frame could be damaged during folding.

natural_image
Close-up of a hand holding a red tool interacting with a black-and-white striped object (no text or symbols visible)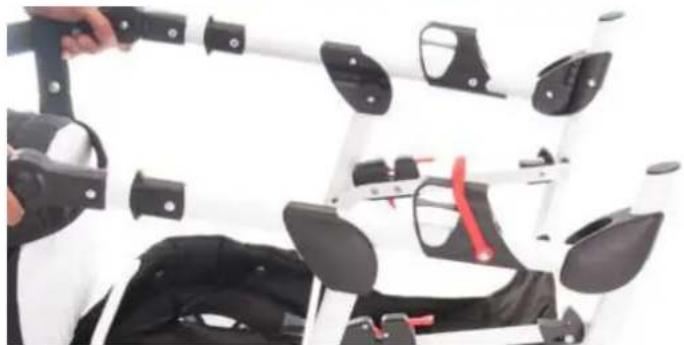
natural_image
Close-up of a robotic arm with black and white components, no visible text or symbolsSPECIAL FEATURES FOR MODEL RETRO
The Retro stroller can be folded "very easy". All you have to do is pull on two levers and the whole frame folds forward.
ASSEMBLY AND HANDLING OF THE CAR SEAT / INFANT CARRIER (SOLD SEPARATELY)
Read these advices carefully. You always need access to this manual. All our prams were produced by a separate company called Adbor. The car seat itself is called Capri and is certified by the European Class ECE R 44/04
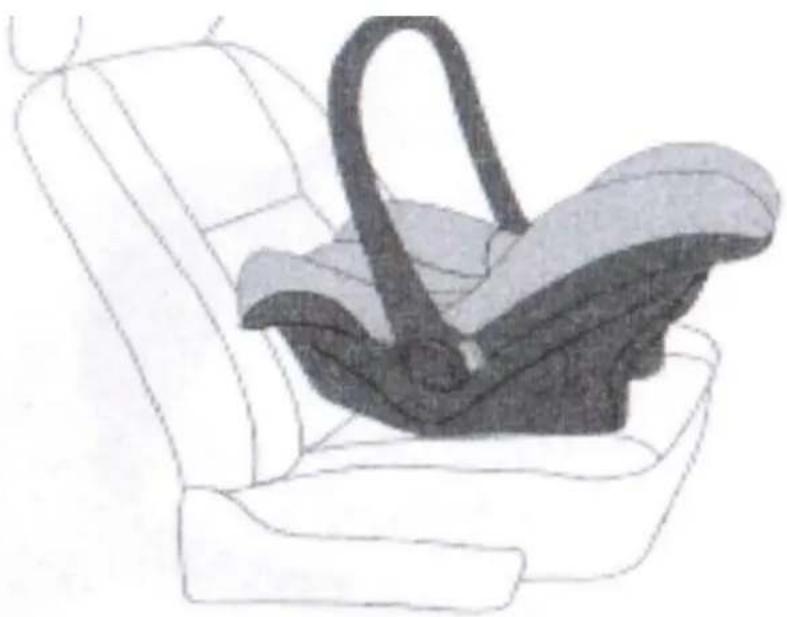
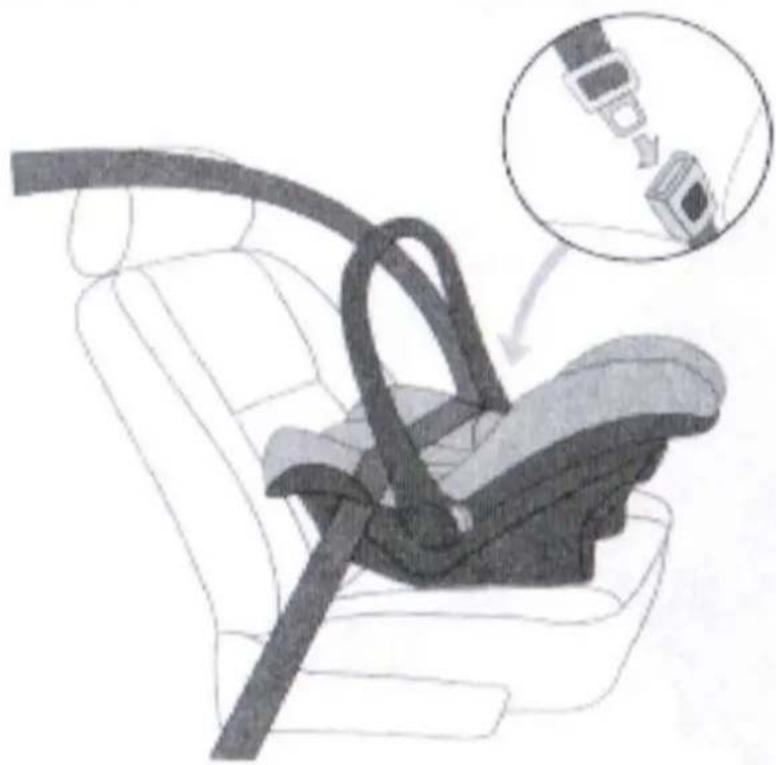
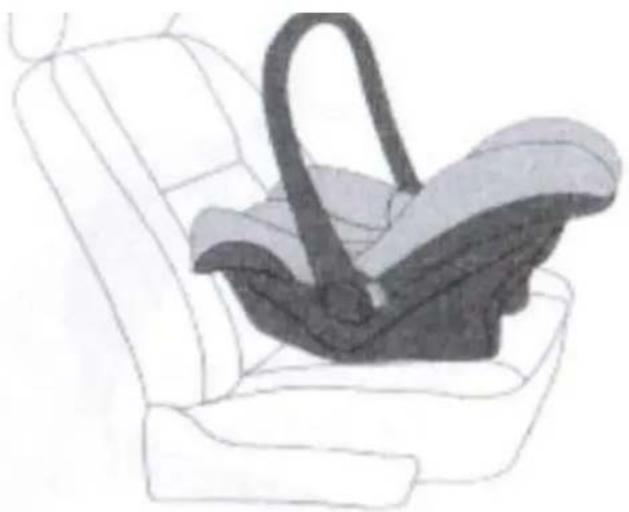
1 OPEN THE SAFETY BELT, TO PLACE THE CAR SEAT
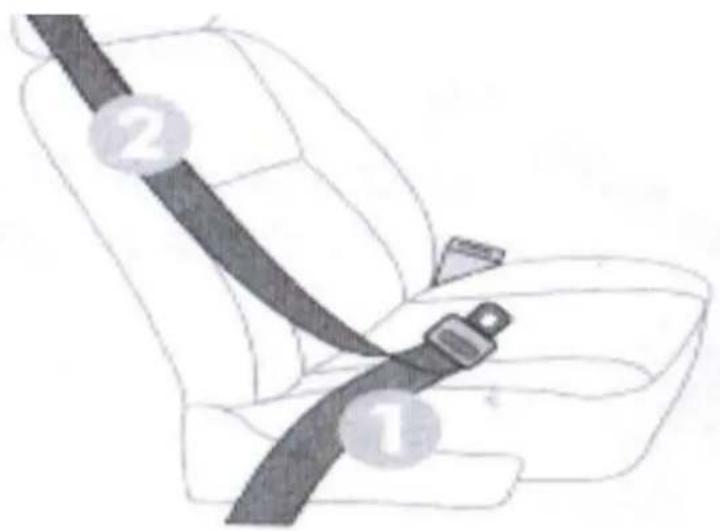
2 PUT THE CHILD SEAT ALONG THE DRIVING DIRECTION ON THE CAR SEAT. AND KEEP ON STABLE HOLD.
natural_image
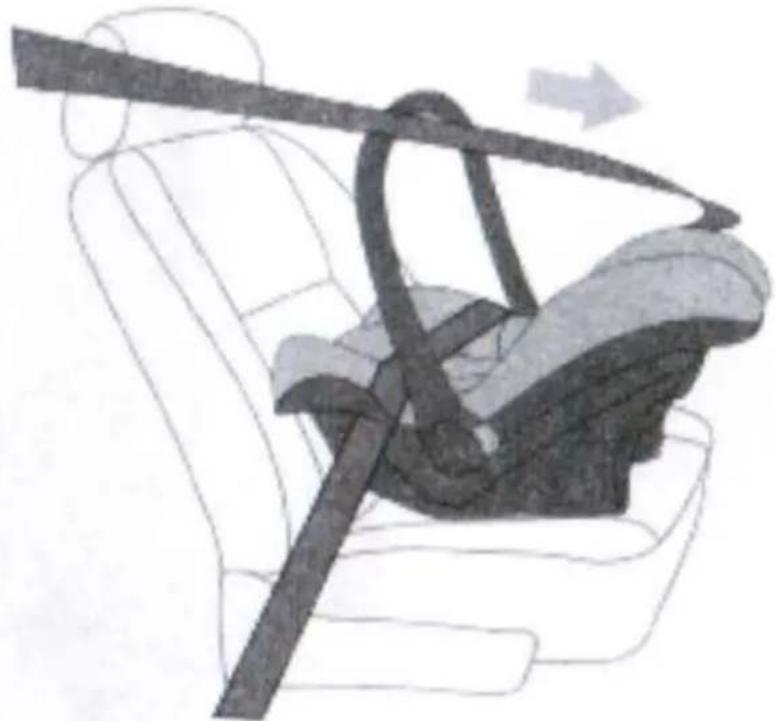
Line drawing of a car seat with a black strap and gray seat cover (no text or symbols)3 PLUG IN THE SAFETY BELT THROUGH THE SIDE BRACKETS IN THE SAFETY BELT TAKE OVER AND THAT THE SAFETY BELT IS NOT LOOSE
natural_image
Illustration of a car seatbelt with a magnified inset showing the cable being inserted (no text or symbols present)4 REMOVE THE SAFETY BELT FROM RECORDING BEHIND THE CAR SEAT AND MAKE SURE THAT THE SAFETY BELT IS ALSO TOWED AT THE REAR LOCK ON THE CAR SEAT
natural_image
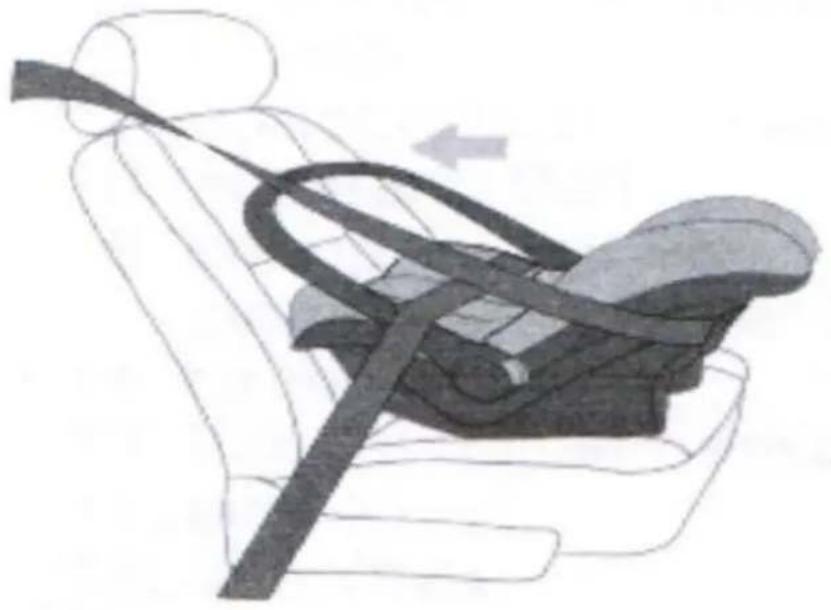
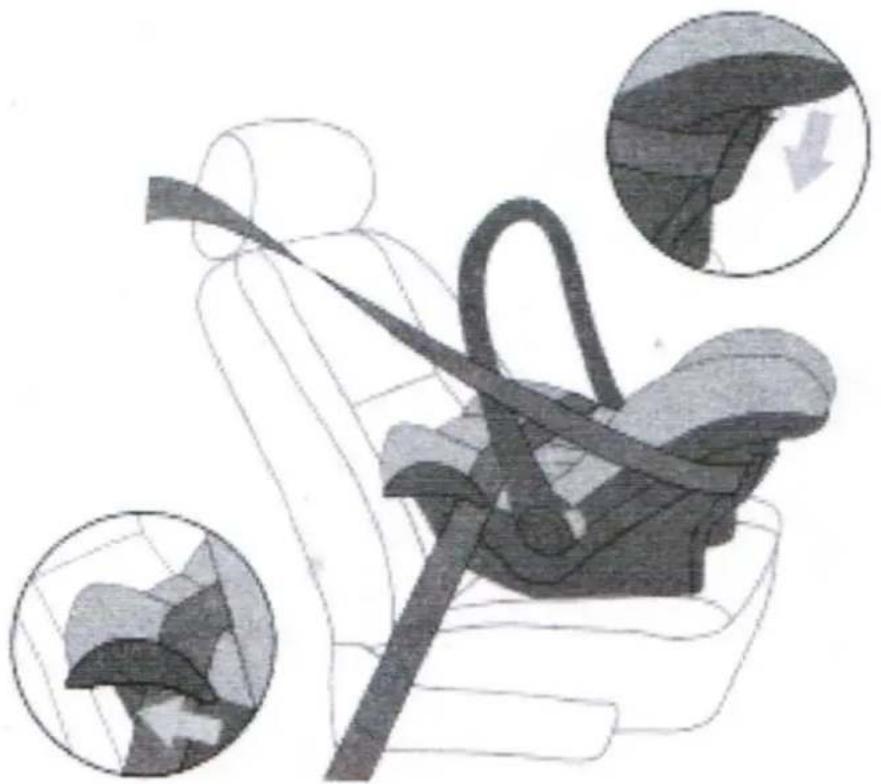
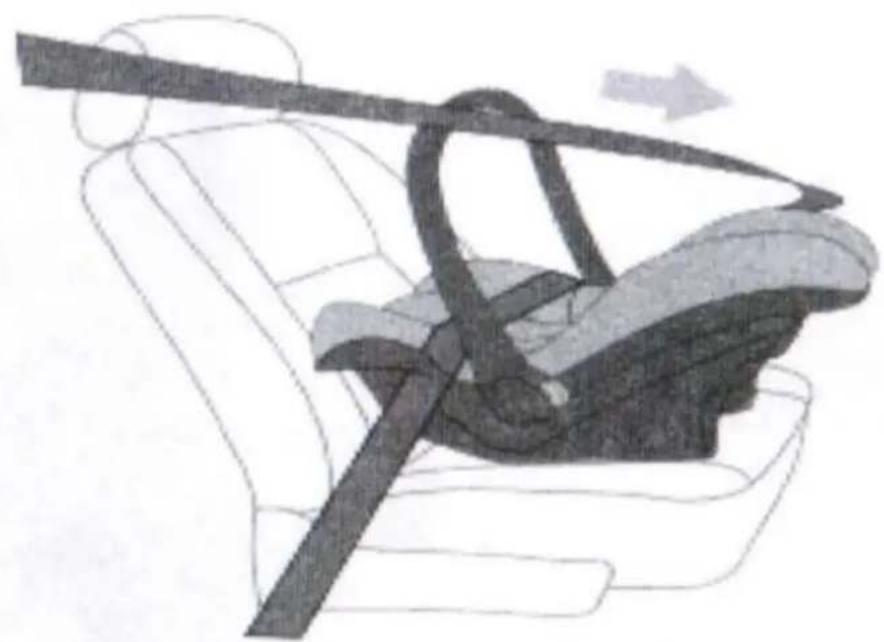
Illustration of a car seatbelt with a diagonal belt and arrow indicating direction (no text or symbols)5 MAKE SURE THE SAFETY BELT IS CLEANED THROUGH THE BRACKET. HE MUST NOT BE TURNED!
natural_image
Illustration of a car seatbelt with two inset images showing the seatbelt being lifted (no text or symbols present)6 FINALLY, RUN THE SAFETY BELT AGAIN TO THE ROLLING MACHINE OF YOUR CAR. ALSO, HERE MAKE SURE THE BELT IS STRAFFICALLY TIGHTENED

natural_image
Illustration of a car seatbelt with a belt and arrow indicating direction (no text or symbols)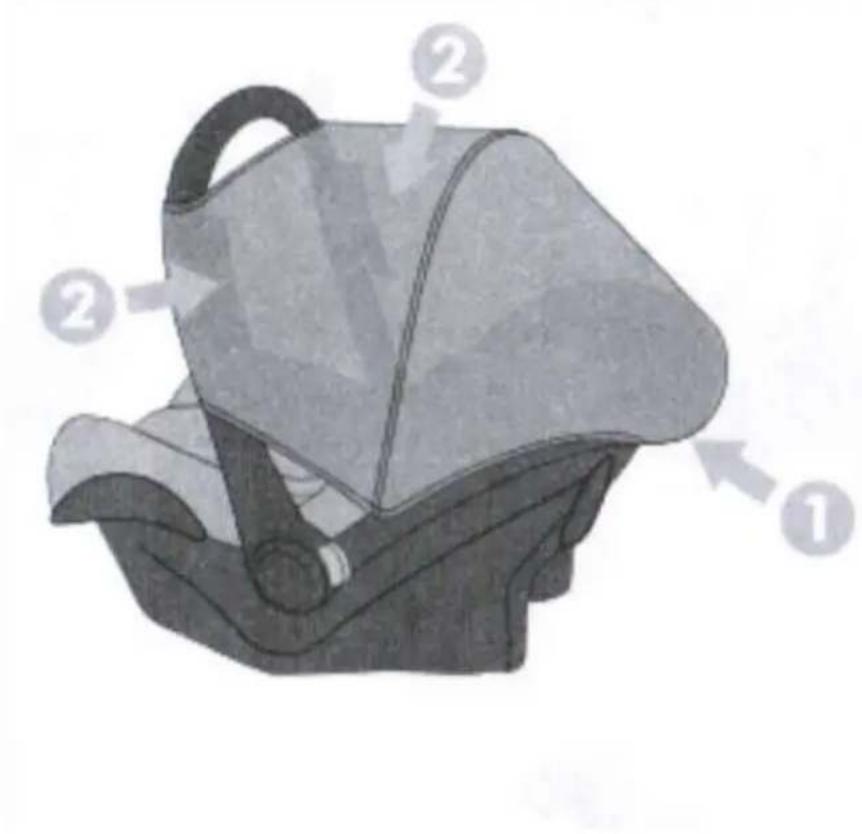
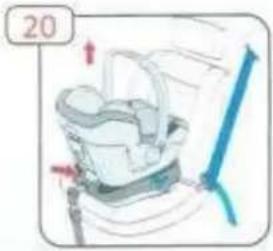
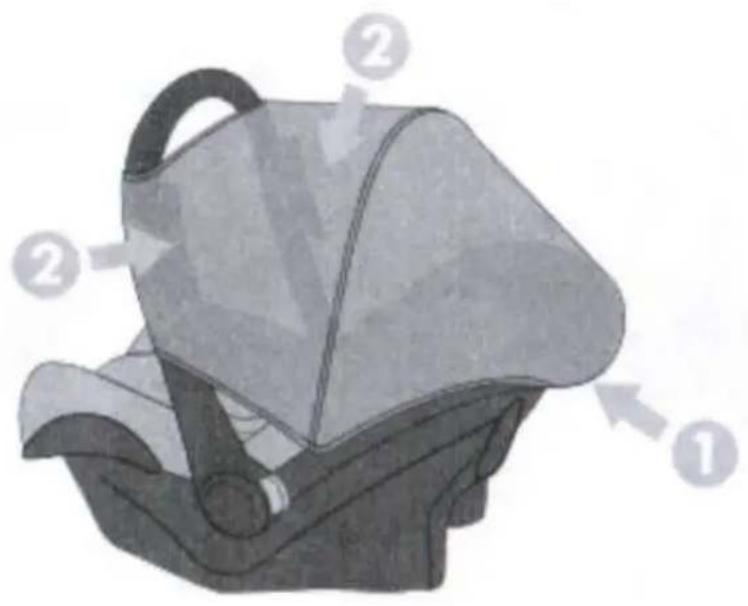
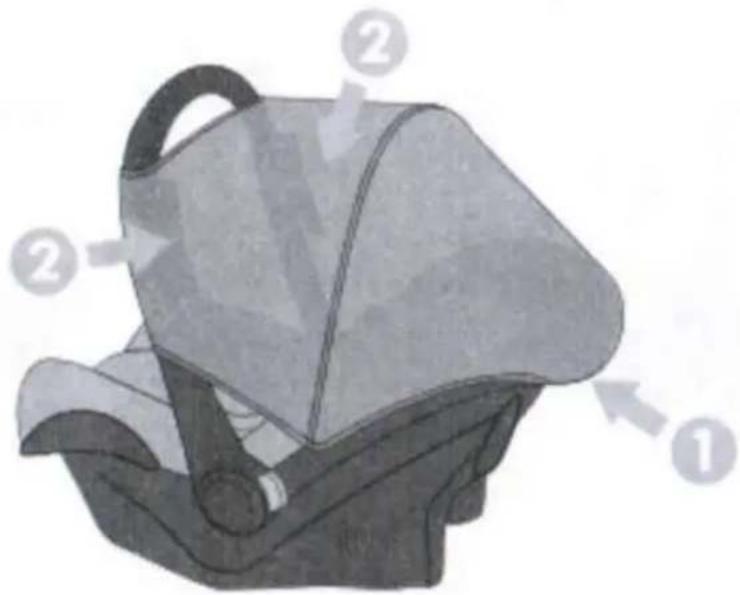
The hood is first attached to position 1 and then to the carrying handle (see item 2).
8 CARRY HANDLE ADJUSTMENT
The carrying handle has 4 adjustment functions.
1st car position
2nd carrying position
3rd sleeping position
- seating position. No tilting possible
To move the carrying handle you must note the following.
- Press the two red buttons with both hands to release the catch
- Move the carrying handle to the desired position until it engages.
HOW DO I CONNECT THE CAR SEAT WITH MY STROLLER CHASSIS?
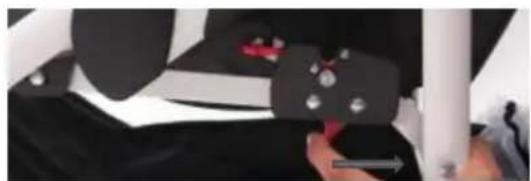
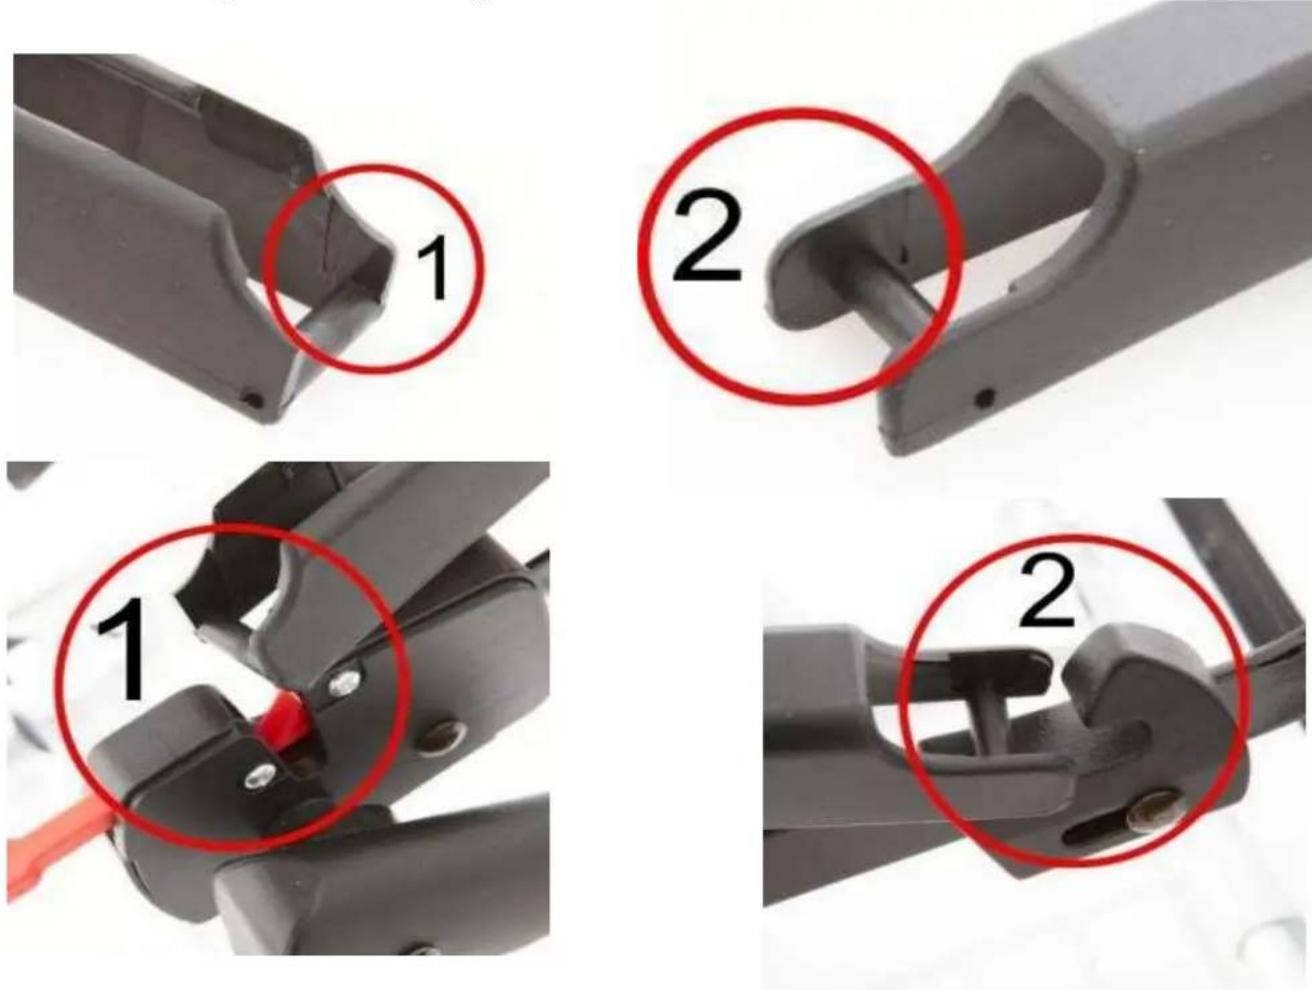
There are two important points to note. Point 1 is that the adapter can only be connected in a way to the frame. This you can see in the photos below. Point 2 is that you pay Wore out that the adapter is properly locked.
natural_image
Close-up of a mechanical tool with a red circle highlighting a numbered component (number 2), no visible text or symbols beyond the number.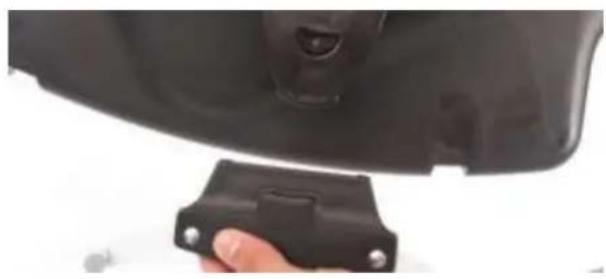
natural_image
Close-up of a black plastic rear panel with a hand holding a small black plastic clip (no text or symbols visible)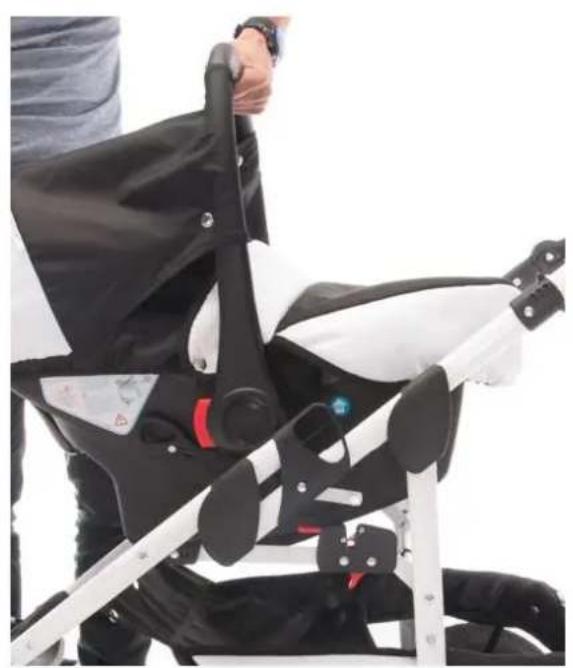
natural_image
Person wearing a black and white prosthetic seat with a red button, viewed from the side (no visible text or symbols)SPECIALS FOR THE BELLAMI PRAM
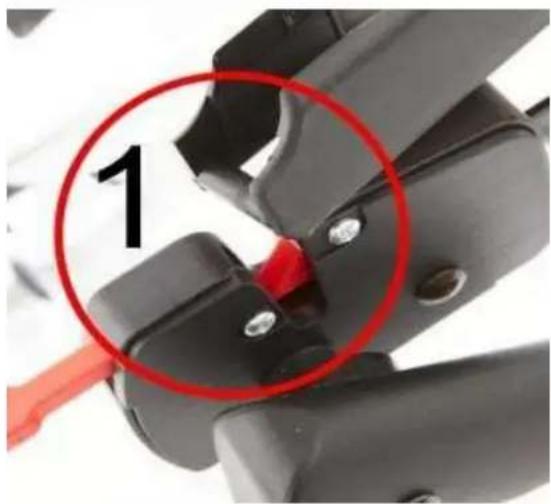
There are two important points to keep in mind.
Point 1 is that the adapters can only be connected to the frame in one way. You can see this in the photos below.
Point 2 is that it's making sure that the adapters are locked correctly.
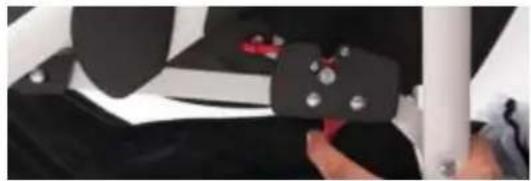
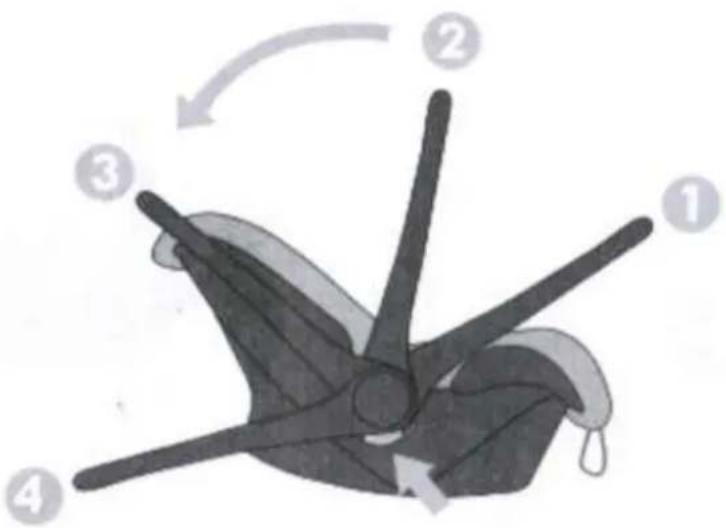
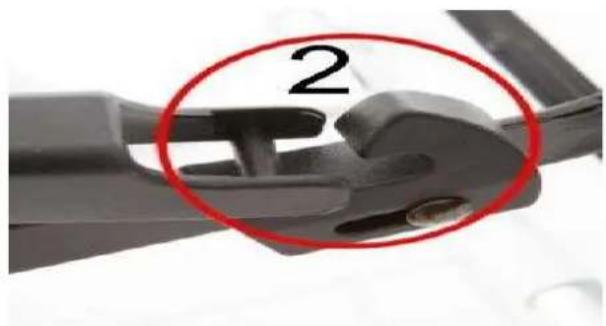
The adapters are placed on the frame as shown in the pictures. You can see that the adapters have two different sides. One side (marked with a 1 on the picture) shows the side that is later connected to the lock. And the other side (marked with a 2 in the picture) is hooked into the hook on the other side of the mounting rail.
The steps in short form:
1.) Mount the adapter to the baby carrier
2.) Hook the adapter in the direction of the hook (Fig. 2) and secure it with slight pressure into the catch (Fig. 1).
3.) Finish. The baby carrier is correctly attached.
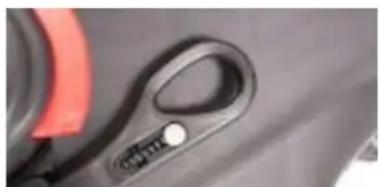
THE STEPS TO RELEASE THE ADAPTERS
1.) Look on the side of the car seat
2.) There is the release anker.
3.) Pull the trigger with your finger
4.) The adapters fall of the car seat

WARNING! Wrong use of the car seat release will cause mail functions or defective parts.
natural_image
Close-up of a car's side panel showing a knob and handle (no text or symbols visible)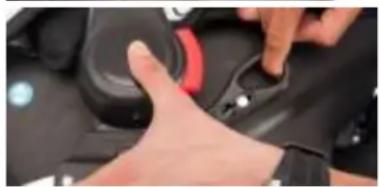
natural_image
Close-up of hands adjusting a black mechanical component with a red button (no visible text or symbols)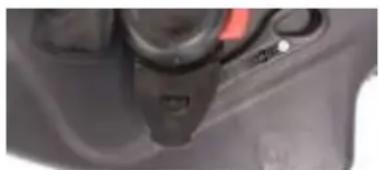
natural_image
Close-up of a mechanical component with a red accent, possibly part of a tool or device (no visible text or symbols)FOR THE PROTECTION OF YOUR BABY!!!
• Always secure your baby in the infant carrier using the seat belt.
- Never leave your baby unattended in the infant carrier when placing it on elevated surfaces (e.g. a table, nappy changing unit, etc.).
- Never allow the strap end 8 (see 3.6) to become caught in moving parts (e.g. automatic doors, escalators, etc.).
- Caution! The plastic parts of the infant carrier heat up in the sun, so that your baby may get burnt. Protect your baby and the infant carrier against intensive solar radiation (e.g. by putting a light cloth over the seat).
- The infant carrier requires only one seating position in the car. This advantage means, however, that your baby must be in a semi-reclined position.
- Take your baby out of the infant carrier as often as possible to relieve its spine. We recommend frequent breaks during long journeys. Even outside of the car, please avoid leaving your baby in the infant carrier for too long.
- The head support is used to provide extra comfort for very small babies.
- Caution! Only use the head support when the headrest is in the lowest position (see 3.1).
CHECKLIST TO ENSURE THAT
- your baby is buckled up correctly For the safety of your baby, please check that...
- the shoulder straps of the infant carrier are comfortable, but FIRM fit around your child,
- the shoulder straps are adjusted correctly,
• the shoulder straps are not twisted, - the buckle tongues are engaged in the harness buckle 1.
Please do not leave your child unattended in the child safety seat in the vehicle. For the protection of all vehicle occupants:
Always check that...
- the backrests of the vehicle seats are locked (i.e. that a foldable rear seat bench latch is engaged).
- all heavy or sharp-edged objects in the vehicle (e.g. on the parcel shelf) are secured.
- all persons in the vehicle have their seat belts fastened.
- the child safety seat is always secured when it is in the vehicle, even if no child is being transported.
TO PROTECT YOUR VEHICLE
- Some vehicle seat covers of sensitive materials (e.g. velour, leather, etc.) may develop wear Place the infant carrier rearward-facing on the vehicle seat (baby is facing backwards).
Tip! In certain cases, it is possible that the infant carrier does not rest securely or is inclined too steeply on the vehicle seat. This can be remedied by placing a blanket under the child seat or choosing another seating position.
CLEANING
- The cover can be removed and washed with a mild detergent using the washing machine's cycle for delicate items (30 °C). Please observe the instructions on the washing label of the cover. The colors of the cover may fade if washed at more than 30 °C. Do not spin, and never tumble dry in an electric clothes dryer (the fabric may separate from the padding).
- The plastic parts can be cleaned using soapy water. Do not use harsh cleaning agents (such as solvents).
- The harness can be removed and washed in lukewarm soapy water.
ASSEMBLY AND HANDLING OF THE ISOFIX BASE (SOLD SEPARATELY)
ISOFIX BASE WITH HARNESS MOUNTING
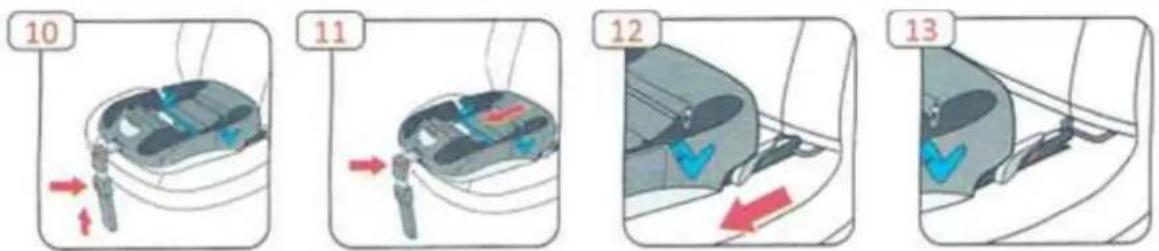
Place the ISOFIX base on the car seat, with the leg in the direction of the footwell, and tighten the belt as normal.
The belt is now passed over a device. Now drag them to the front
Now you can push the mechanism up and attach the strap with the ISOFIX base
Finally, adjust the leg to the appropriate height and ensure the correct fit of the straps and the base station.
ISOFIX BASE WITH ISOFIX HOOK

Place the ISOFIX base on the car seat, with the leg in the direction of the footwell. Now insert the hooks into the ISOFIX base.
By a loud CLICK sound you can see the tightness and correct mounting of the ISOFIX base Now you can adjust the base station so that it fits snugly against the backrest of the car seat. Finally, adjust the leg to the appropriate height and ensure the correct fit of the straps and the base station
UNPLUG THE ISOFIX BASE
Release the leg by pressing the button.
Now push the ISOFIX base forward to get the ISOFIX hooks. With a courageous jerk you can disconnect the base station from the body of the car Now your ISOFIX base is relaxed again.
ASSEMBLING THE CAR SEAT
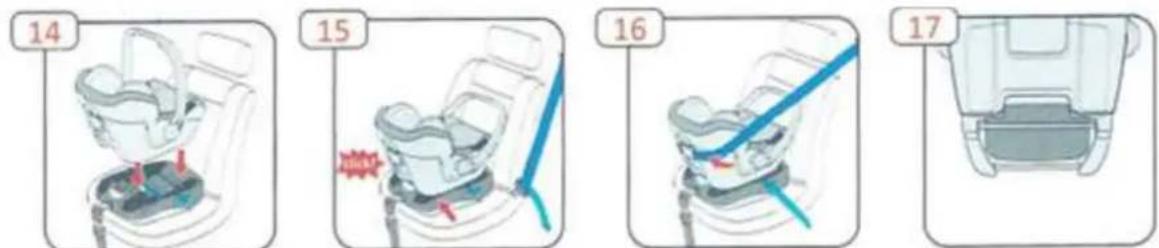
Grasp the carrycot by the carrying handle and press in the direction of travel with the two metal bars into the ISOFIX base devices
Here, too, a loud CLICK sound signals the correct seat. In addition, a sign changes from red to green at the front of the ISOFIX base
For additional safety, you can also make the seat belt around the baby seat. Please pay attention to the instructions of the infant carrier
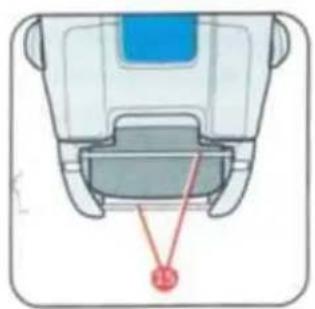
A view from below of the metal bars that are put into the ISOFIX base.
UNPLUG THE CAR SEAT
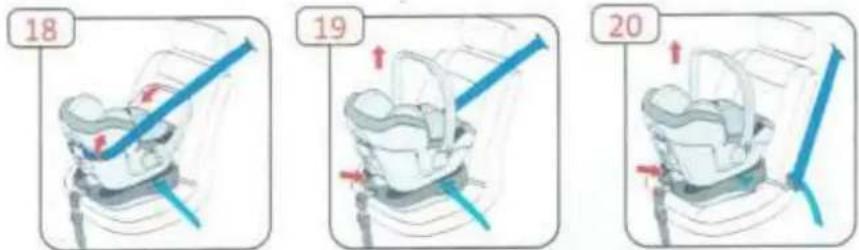
Remove the seatbelt, if present, and put the carrying handle in an upright position. Now press the button directly on the front of the ISOFIX base and lift out the carrycot on the carrying handle.
The baby seat can now be easily removed from the car.
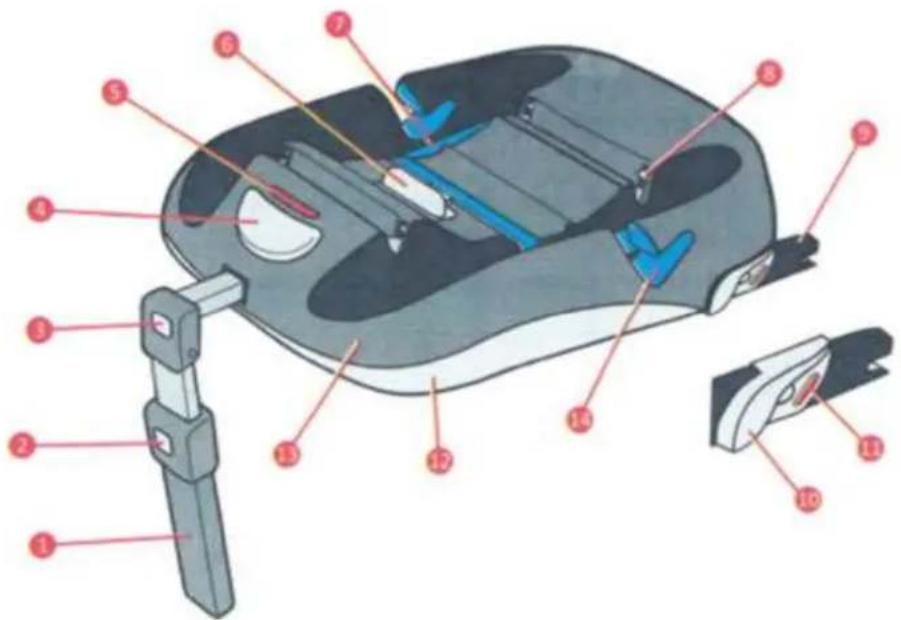
natural_image
Diagram of a device's internal structure with a red arrow pointing to a labeled component (no text or symbols present)1.) Telescoping (vertical sliding)
2.) Push button for adjusting the telescopic foot
3.) Push button to adjust the horizontal position of the base station
4.) Release button to release the infant carrier / car seat
5.) Signaling the correct fit (red = FALSE | Green = TRUE)
6.) Push button for releasing and locking the belt holder
7.) belt holder
8.) Safety ISOFIX hooks for shells and car seats
9.) ISOFIX hooks
10.) Loosen ISOFIX hooks of the car ISOFIX
11.) signaling the correct fit (red = FALSE | Green = TRUE)
12.) Scratch resistant surface for ISOFIX base station
13.) base station
14.) Seatbelt Usage for ISOFIX base without ISOFIX hooks
15.) Baby Bowl Blanks with metal braces for secure attachment
MAINTENANCE
CHECK THE SCREWS
The screws of our strollers are fixed with an adhesive, but it may be, however, that the stroller is a bit loose. Therefore, prior to any use of the stroller please check the fittings. If a screw is loosed it must be fixed urgently again.
CHECK FRONT TIRES
The front tires must be cleaned and oiled at intervals of 4 weeks. To do this, remove the swivel tires from mount and clean the tires and the clean with a paper towel. After that, the wheel must be cleaned.
CHECK BACK TIRES
The rear tires must be cleaned and oiled at intervals of 4 weeks. For this, take the rear tires off the axle and clean the tires and the axle with a cloth or paper towel. Then also the wheel and the brake driver to be cleaned. After cleansing and deliverance of hair and dirt oil the mechanism of uptake and the rear wheel bearings and the axle again.
CHECK MOVING PARTS
Your stroller is an important part of newly won in your life. Pay attention to the fact that any moving parts are cleaned and oiled. Just so you can use it for other children the stroller too.
folding mechanism
Adapter on the frame for Papers
Push handle adjustment Backrest adjustment hood adjustment footrest adjustment safety bar
Handle of the car seat
CHECK BRAKE MECHANISM
The brakes of your pram are one of the most important components of your new car. This must be cleaned and oiled regularly (min. Every 4 weeks) checked. Make sure that it is the pinion have no damage and clean them carefully. In most strollers with essays the wheel is held in the full stop, using a brake pin. This pin must be continuous well-oiled.
CARE INSTRUCTIONS
All materials are easy to maintain
MAINTAIN THE FABRIC PIECES
To clean dirty fabrics, use only a clothes brush or clean water (dry with a hair dryer), avoid hard rubbing. Stubborn stains can be removed with a mild detergent. If you ever get in a heavy rain, dry your pram with stretched fabrics in a warm dry room, to avoid moisture in the inner fabric. A guaranteed weather protection is only grant when you use our rain cover. Besides our positive qualities, our fabrics react to intense solar radiations. Therefore, we recommend that you park your pram in the shade.
MAINTENANCE OF THE CHASSIS
The chassis requires a special maintain. The axles must be cleaned up every 4 weeks and then use machine ole (wd40). Moving parts can be kept functional by using silicon spray A squeaking chassis can so be prevented. Chrome-plated parts and metal parts must keep clean and can be maintained by using car polish if necessary. Small pain damages on the frame must be wiped immediately with a pain pen to avoid rust. Screws on the frame should be checked every month and maybe re-tightened.
Never use a pressure washer, ball bearings of the tires and functional parts can be destroyed (Grind- and squeaking noises)
Tires: Caution to the right pressure on the tires. A sufficient air pressure can damage the rim. The pressure must be between 0,8 and max. 1,2 bar
WARNING! The max pressure filling is quickly reached, an excess can lead to accidents and injuries. The plain-wheel bushes and the springs must be renewed on time. Avoid a longer parking of pneumatic tires on light PVC or linoleum floors. Because of all rubber tires on the market can cause discolorations. Small pebbles in the rubber tires can also damage the flooring. Our tires are under pressure, so direct solar radiation and the stowing in the luggage compartment under pressure at temperatures above 45^ C can flatten or crush the filled tire.
LOSS OF AIR TIRES
To prevent a total loss of air and a wobbling of the tires. Half fill the tires and then set up the mature coat until the wheel runs smoothly. Finally pump up the tires until max.
QUALITY AGREEMENT
WARRANTY
With this product you have a warranty against your contract partner for 2 years. The warranty period begins with the delivery of the product. Please keep this completed form signed, your sales receipt to prove. The warranty applies to all material and manufacturing defects that are at time of delivery
WARRANTY IN CASE OF COMPLAINTS
The warranty reefers to all material and manufacturing defects existing at time of delivery
NO WARRANTY
Damage caused by improper use (see instructions)
Damage caused by faulty installation or commissioning
Damage caused by careless handling or improper maintenance of the purchased goods Damage due to improper modifications of the purchased item
Bebebi
www.bobebi.de
Généralités....68
SPcial features for Model Retro 74
Special features for Model Retro 79
Accords & garanties....94
Recours en garantie de 2 ans....94
natural_image
Top-down view of a person lying on a curved surface with a small electronic device and a small square component, no visible text or symbols.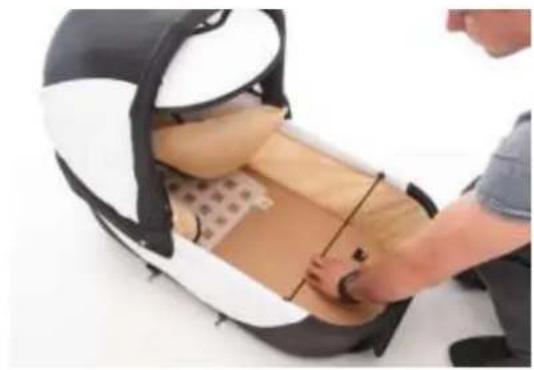
natural_image
Person adjusting a car seat with visible seatbelt and patterned seat (no text or symbols)
natural_image
Top-down view of a curved, textured surface with two small square markers and dark lines, possibly indicating measurement or alignment points (no text or symbols visible)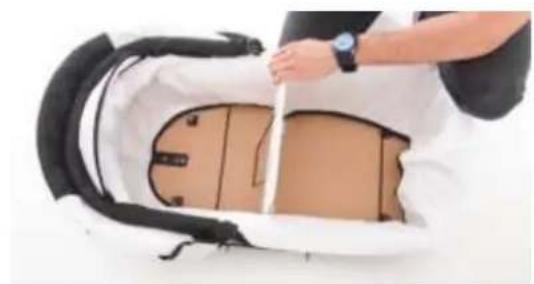
natural_image
Person performing a backbathing exercise on a patient's abdomen (no visible text or symbols)natural_image
Close-up of a pair of safety goggles with a curved arrow indicating rotation (no text or symbols visible)natural_image
Close-up of a person holding a black device with red buttons and blue droplets (no visible text or symbols)natural_image
Close-up of mechanical components with no visible text or symbols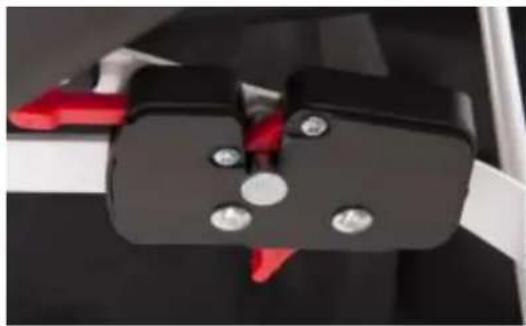
natural_image
Close-up of a black mechanical clamp or bracket with four metallic pins, no visible text or symbolsSPECIAL FEATURES FOR MODEL RETRO
The frame of the Retro stroller has a special mechanism that is opened and closed by a rotary movement on the closure element. As you can see in the photos, the handling here is "very easy".
natural_image
Mechanical linkage assembly with metal frame and mounting bracket (no visible text or symbols)Find the lever and the red button

natural_image
Close-up of a hand adjusting a metal bracket component (no visible text or symbols)Now turn the knob to the left. So the red smaller button points up
natural_image
Close-up of a hand adjusting a bicycle frame with metal brackets and a handle (no visible text or symbols)Push the carrycot completely into the holder. First, let links hook up (see photo 4) and then right click.
natural_image
Close-up of a transparent mechanical device with black connectors, placed on a white surface next to a patterned basket (no text or symbols visible)Press the red button to release the safety mechanism

natural_image
Close-up of a hand adjusting a mechanical bracket with metal frame (no visible text or symbols)Now put on the baby carriage
natural_image
Close-up of a robotic platform with visible wiring and components, no text or symbols presentPress the red button again and turn the knob to the right.

natural_image
Close-up of a person using a small wheeled device with metal legs and wheels, next to a white checkered basket (no visible text or symbols)natural_image
Close-up of a person's torso wearing a black garment with red buttons and a white collar (no visible text or symbols)MONTAGE DU HAMAC
natural_image
Person applying a spray bottle to a black and white backpack (no text or symbols visible)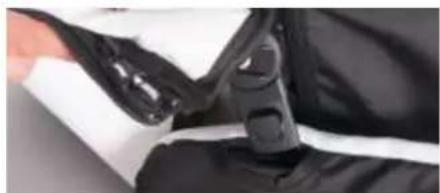
natural_image
Close-up of a hand holding a black plastic clip against a white background (no text or symbols visible)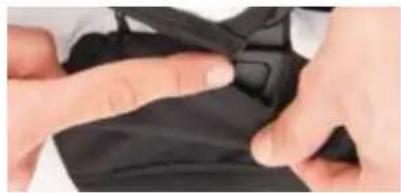
natural_image
Close-up of hands adjusting a black fabric piece (no visible text or symbols)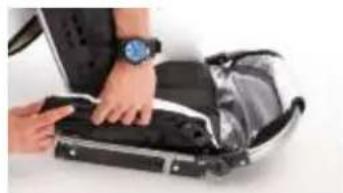
natural_image
Person installing or adjusting a black electronic device with a watch (no visible text or symbols)natural_image
Close-up of a person adjusting a black and white patterned athletic jacket with a wrist strap (no visible text or symbols)RÉGLAGE DU DOSSIER
natural_image
Person adjusting a black athletic vest with a hand holding the seat (no visible text or symbols)natural_image
Close-up of a car wheel and brake disc assembly (no visible text or symbols)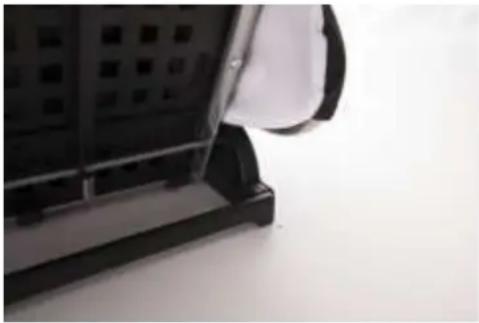
natural_image
Close-up of a black plastic device with a white panel and black bracket, placed on a plain surface (no visible text or symbols)natural_image
Close-up of a hand adjusting a black mechanical component with a knob (no visible text or symbols)
natural_image
Close-up of a hand adjusting a black mechanical component with a knob (no visible text or symbols)natural_image
Close-up of hands adjusting a black tire on a car wheel (no visible text or symbols)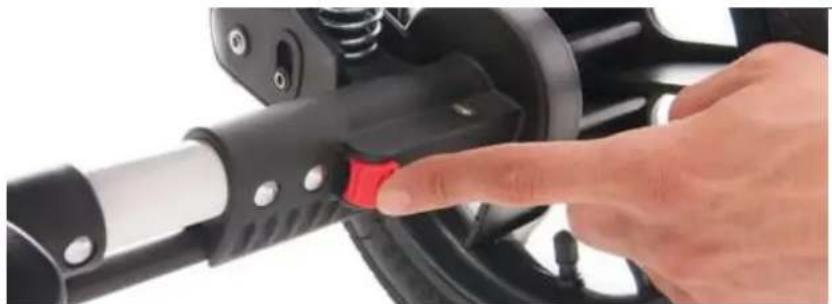
natural_image
Close-up of a hand pressing a red button on a black bicycle brake system (no text or symbols visible)
natural_image
Close-up of a hand adjusting a black tire on a car wheel (no text or symbols visible)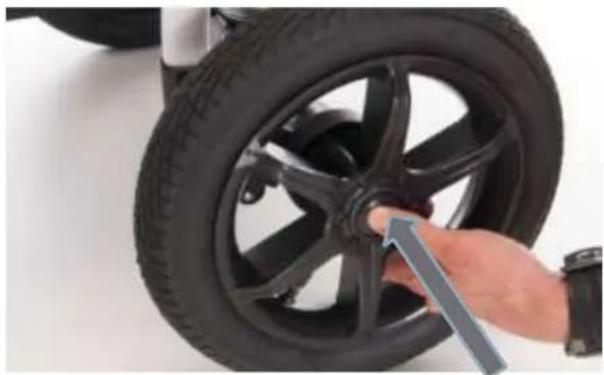
natural_image
Close-up of a hand adjusting a black tire with a tool, no visible text or symbolsDÉMONTAGE DE LA POUSSETTE
natural_image
Close-up of a motorcycle seatbelt with black and white panels, featuring a red tool handle (no visible text or symbols)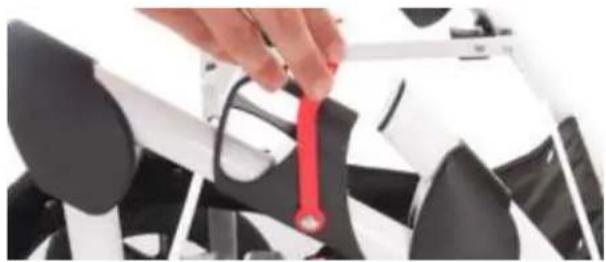
natural_image
Close-up of a hand holding a red tool over a black and white object, possibly a device or mechanical part (no visible text or symbols)
natural_image
Close-up of a white robotic arm with black and white components, no visible text or symbolsSPECIAL FEATURES FOR MODEL RETRO
The Retro stroller can be folded "very easy". All you have to do is pull on two levers and the whole frame folds forward.
MONTAGE ET UTILISATION DU SIÈGE AUTO / NACELLE AUTO (DISPONIBLE EN OPTION)
natural_image
Line drawing of a car seat with a baby seat, no text or symbols presentnatural_image
Illustration of a car seatbelt buckle with a magnified inset showing the seat being lifted (no text or symbols present)natural_image
Diagram of a car seatbelt with a belt and arrow indicating direction (no text or symbols)natural_image
Illustration of a car seatbelt with two inset images showing the seatbelt being lifted (no text or symbols present)natural_image
Line drawing of a car seatbelt with a belt, showing the seat and seat (no text or symbols)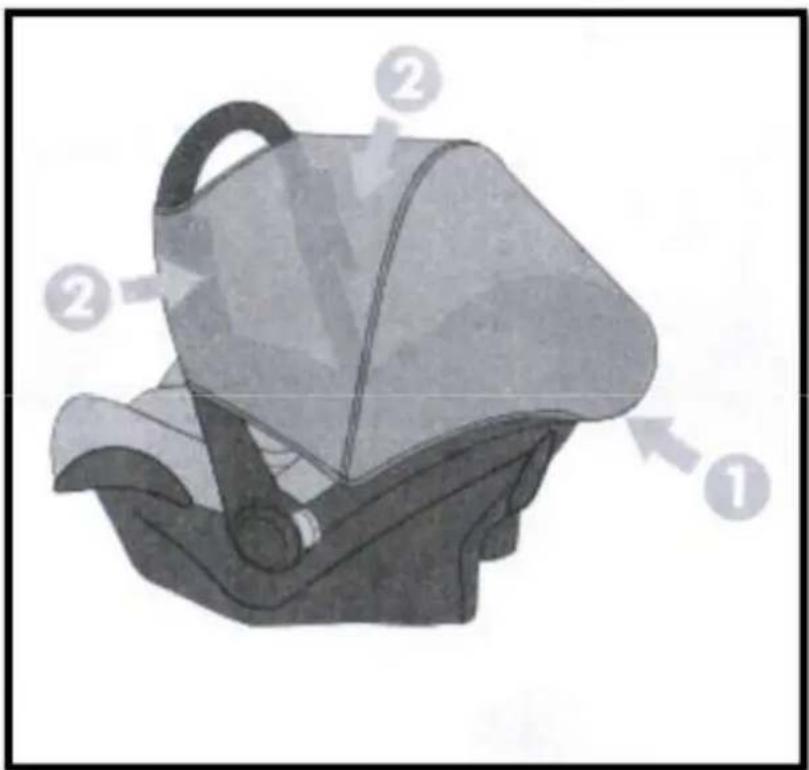
- Position en votiere
- Position de Portage
- Position de Repros
- Position assise. Pas de balancement possible
natural_image
Close-up of two mechanical components with red circles highlighting the '2' mark, no text or symbols present.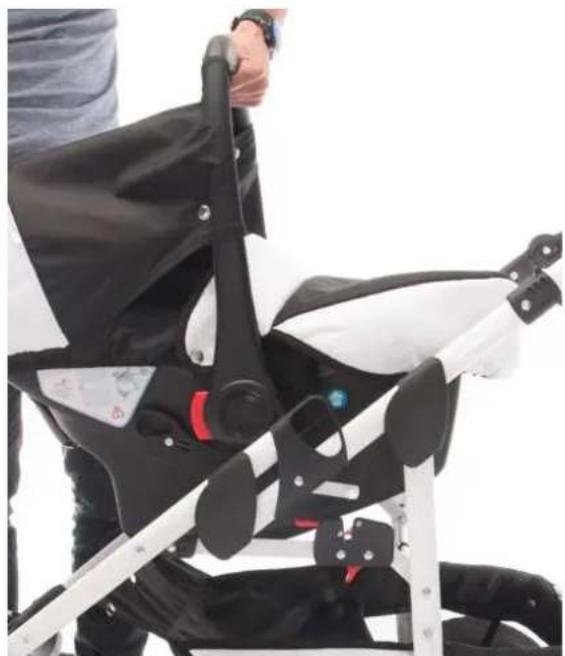
natural_image
Person wearing a black and white stroller with a red button, viewed from the side (no visible text or symbols)natural_image
Close-up of a car's side panel showing a black handle and a red clip (no text or symbols visible)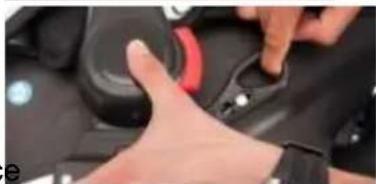
natural_image
Close-up of hands adjusting a black mechanical component with a red circular knob (no visible text or symbols)
natural_image
Close-up of a mechanical component with a red accent and blue adjustment knob (no visible text or symbols)CE À QUOI VOUS DEVEZ PARTICULIÈREMENT FAIRE ATTENTION!!!
QUE FAIRE SI LA CEINTURE 3 POINTS EST TROP COURTE?
natural_image
Illustration of a car interior with a blue checkmark on the wheel (no text or symbols)natural_image
Illustration of a baby car seat with a blue diagonal line and number 18 (no text or symbols on the diagram itself)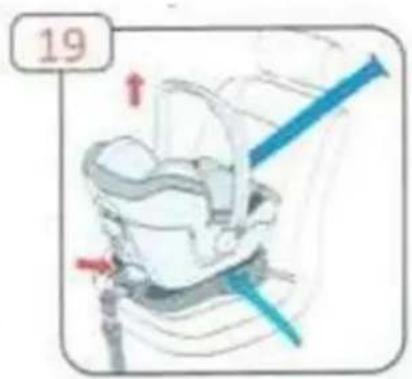

AUCUNE GARANTIE NE S'APPLIQUERA POUR ...
natural_image
Top-down view of a person lying in a car seat with a hand adjusting the abdomen area, no visible text or symbols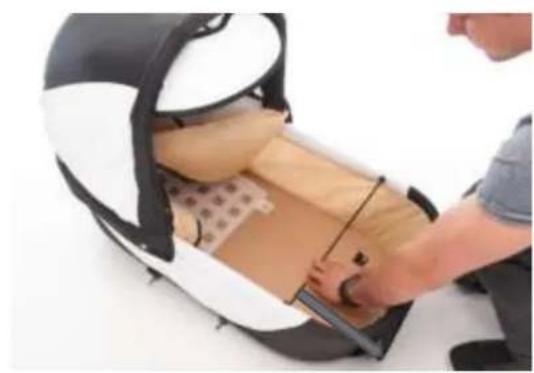
natural_image
Person assembling a car seat with visible tread pattern and fabric (no text or symbols)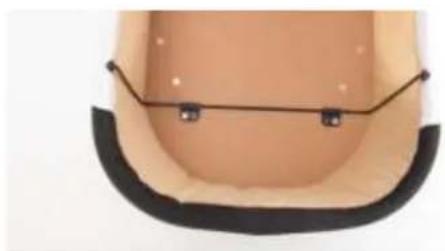
natural_image
Top-down view of a curved mechanical component with two small hardware clips (no text or symbols visible)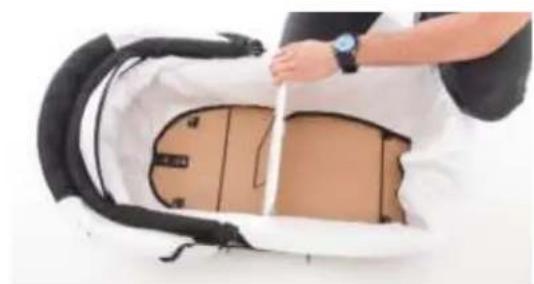
natural_image
Person performing a medical procedure on a patient's abdomen, with no visible text or symbolsCARACTERÍSTICAS ESPECIALES EN BELLAMI, PARÍS, LONDRES, MYVARIO O FLORIDA KINDERWAGEN
natural_image
Close-up of a hand holding a medical or surgical tool near a curved skin (no visible text or symbols)natural_image
Person wearing a black safety helmet with a white headband, partially covered by hands (no visible text or symbols)natural_image
Close-up of a person's torso wearing a black suit with red buttons and a white cap, partially covered by a white cylindrical object (no visible text or symbols)
natural_image
Close-up of a mechanical component with black and white surfaces, no visible text or symbolsnatural_image
Close-up of a black mechanical clamp or bracket with four circular components, no visible text or symbolsnatural_image
Mechanical linkage assembly with articulated joints and a red button (no visible text or symbols)natural_image
Close-up of a hand adjusting a mechanical bracket with a knob (no visible text or symbols)natural_image
Close-up of a hand adjusting a mechanical bracket component (no visible text or symbols)natural_image
Close-up of a hand adjusting a metal frame structure with a hook (no visible text or symbols)natural_image
Close-up of a mechanical device with wires and components, no visible text or symbolsnatural_image
Close-up of a transparent mechanical device with metal arms, next to a white checkered basket (no visible text or symbols)natural_image
Close-up of a person's hand using a metal robotic device on a grid floor, with a checkered pattern in the background (no visible text or symbols)MONTAJE DE LOS DEPORTES
natural_image
Person applying spray to a black and white jacket on a suit jacket (no visible text or symbols)natural_image
Close-up of a hand holding a black mechanical clip or clamp, partially visible against a white background (no text or symbols)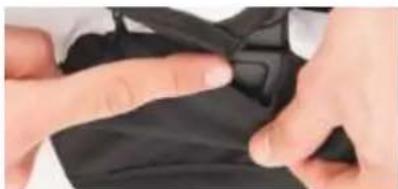
natural_image
Close-up of hands adjusting a black fabric piece with a button (no visible text or symbols)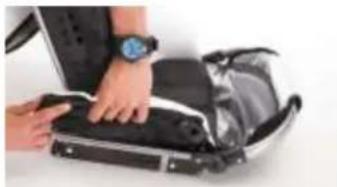
natural_image
Person installing or adjusting a black device with a watch (no visible text or symbols)natural_image
Close-up of a person adjusting a black and white patterned athletic device with a tool (no visible text or symbols)AJUSTE DEL RESPALDO
natural_image
Person adjusting a black mechanical component with an arrow indicating upward motion (no text or symbols visible)
natural_image
Close-up of a black plastic device with a white panel and black base, no visible text or symbols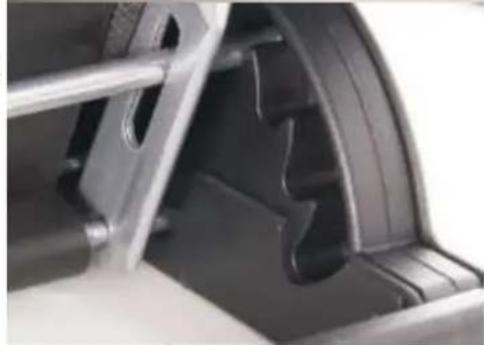
natural_image
Close-up of a mechanical component with visible slots and grooves (no text or symbols)ADAPTADOR DE BABY SHELL
natural_image
Close-up of a hand adjusting a black mechanical component with a yellow knob (no text or symbols visible)MONTAJE DE LAS RUEDAS TRASERAS

natural_image
Close-up of hands adjusting a black tire with a small tool on the wheel (no visible text or symbols)natural_image
Close-up of a hand pressing a red button on a black bicycle suspension bracket (no text or symbols visible)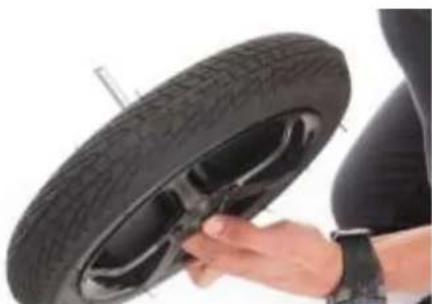
natural_image
Close-up of a person adjusting a black tire with a hand holding the wheel (no text or symbols visible)natural_image
Close-up of a hand using a tool to trim a black car wheel rim (no text or symbols visible)CÓMO PLEGAR EL COCHE
natural_image
Close-up of a motorcycle's front bumper with red-handled tool, no visible text or symbols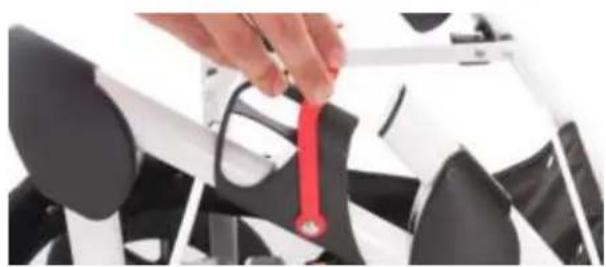
natural_image
Close-up of a hand adjusting a red tool on a mechanical component (no visible text or symbols)
natural_image
Close-up of a white robotic device with black and white components, no visible text or symbols
natural_image
Person assembling a transparent mechanical device with visible wiring and connectors (no text or symbols)natural_image
Line drawing of a car seat with a strapless seat and seatbelt (no text or symbols)natural_image
Illustration of a car seatbelt with a magnified inset showing the cable being inserted (no text or symbols present)natural_image
Illustration of a car seatbelt with a diagonal belt and arrow indicating direction (no text or symbols)natural_image
Illustration of a car seatbelt with two inset images showing different seat designs (no text or symbols)13 FINALMENTE, EJECUTE LA CORREA DE SEGURIDAD DE NUEVO AL CARRETE AUTOMÁTICO. TAMBIÉN, AQUÍ ASEGÚRESE DE QUE LA CORREA ESTÉ APRETADA DE FORMA STRAÁFICA

natural_image
Illustration of a car seatbelt with a belt and arrow indicating direction (no text or symbols)7 LA PUESTA DEL SOL

natural_image
Close-up of a person using a black and white stroller device, showing hand positioning and mounting bracket (no text or symbols visible)CARACTERÍSTICAS ESPECIALES EN EL BELLAMI COCHE INFANTIL
flowchart
graph TD
    A["1: Shift from seatbelt"] --> B["2: Shift from seatbelt"]
    B --> C["3: Shift from seatbelt"]
    C --> D["4: Shift from seatbelt"]
natural_image
Illustration of a washing machine with a bag and base, no text or symbols present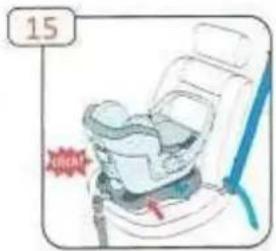
natural_image
Illustration of a baby car seat with a red warning sign and number 15 (no text or symbols on the diagram itself)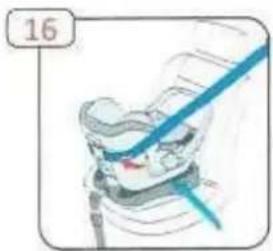
natural_image
Illustration of a baby car seat with a blue diagonal stripe, no text or symbols present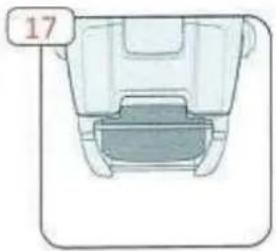
natural_image
Top-down view of a mechanical component with a labeled part '17' (no text or symbols on the object itself)natural_image
Illustration of a baby's seat with a blue arrow indicating direction (no text or symbols)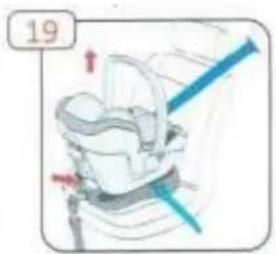
natural_image
Illustration of a medical or laboratory apparatus with arrows indicating motion or force direction (no text or symbols)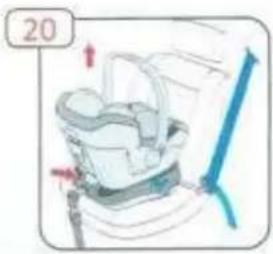
natural_image
Person performing a medical or therapeutic procedure on a patient's abdomen, with no visible text or symbols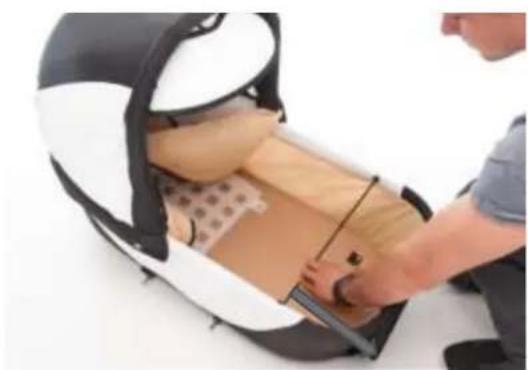
natural_image
Person adjusting a car seat with a handheld device (no visible text or symbols)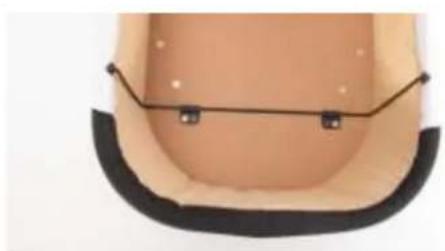
natural_image
Top-down view of a beige dome-shaped object with black curved edges and small square markers at the bottom (no text or symbols visible)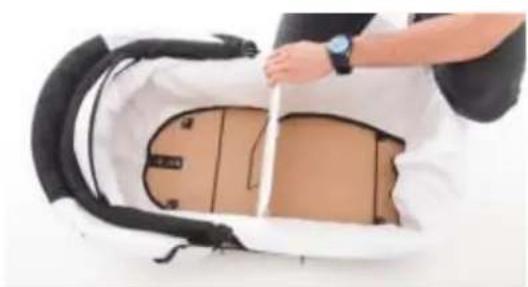
natural_image
Person performing a medical or rehabilitation procedure on a patient's abdomen, with no visible text or symbols.CARATTERISTICHE SPECIALI NELLE BELLAMI, PARIGI, LONDRA, MYVARIO O FLORIDA KINDERWAGEN

natural_image
Close-up of a hand holding a medical or surgical tool near a curved surface, no visible text or symbolsnatural_image
Person adjusting a black helmet with a white seat, no visible text or symbolsnatural_image
Close-up of a person holding a black object with red and white elements, possibly part of a device or device (no visible text or symbols)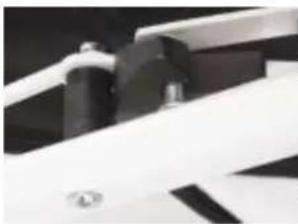
natural_image
Close-up of a mechanical component with black and white surfaces, no visible text or symbolsnatural_image
Close-up of a black mechanical clamp or bracket with four screws, no visible text or symbols
natural_image
Close-up of a person's torso with a black jacket and red accents, showing a finger pressing a button (no visible text or symbols)natural_image
Mechanical linkage assembly with articulated arms and mounting brackets (no visible text or symbols)natural_image
Close-up of a hand adjusting a mechanical bracket with a circular knob (no visible text or symbols)natural_image
Close-up of a hand adjusting a mechanical linkage component (no visible text or symbols)natural_image
Close-up of a hand adjusting a metal frame structure with hooks and chains (no visible text or symbols)natural_image
Close-up of a mechanical device with transparent frame and grid structure (no visible text or symbols)natural_image
Close-up of a small mechanical device with transparent legs and connectors, next to a white checkered basket (no visible text or symbols)natural_image
Close-up of a person using a metal robotic device on a grid-patterned surface (no visible text or symbols)MONTAGGIO DEL BUGGY
natural_image
Person applying spray to a black and white safety bag on a white surface (no text or symbols visible)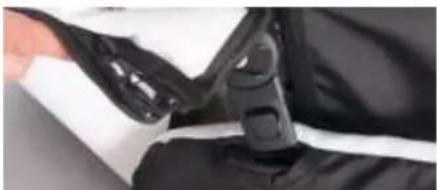
natural_image
Close-up of a hand holding a black mechanical clip or bracket, partially visible against a white background (no text or symbols)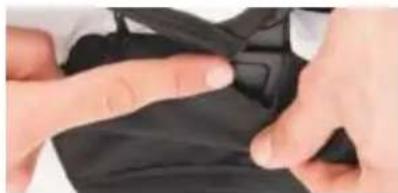
natural_image
Close-up of hands adjusting a black fabric or garment with a button (no visible text or symbols)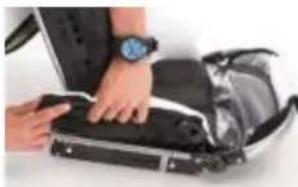
natural_image
Person handling a briefcase with a wristwatch, next to a gray athletic bag (no visible text or symbols)natural_image
Close-up of a person adjusting a black and white patterned athletic device with a hand interacting with it (no visible text or symbols)natural_image
Close-up of a hand holding a black athletic vest with an upward arrow, next to a mechanical device (no visible text or symbols)
natural_image
Close-up of a black electronic device with a white panel and black base, against a plain light background (no visible text or symbols)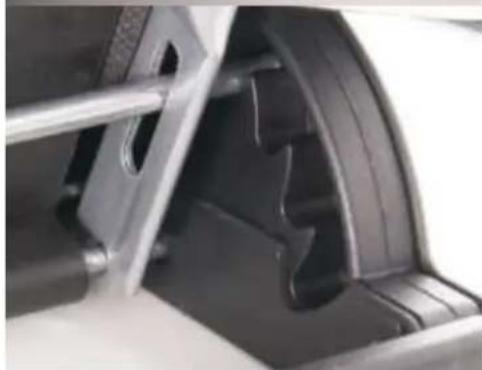
natural_image
Close-up of a mechanical component with visible internal structure and mounting brackets (no text or symbols)ADAPTER DE SEGGIOLINO AUTO
natural_image
Close-up of a hand adjusting a black mechanical component with a knob (no visible text or symbols)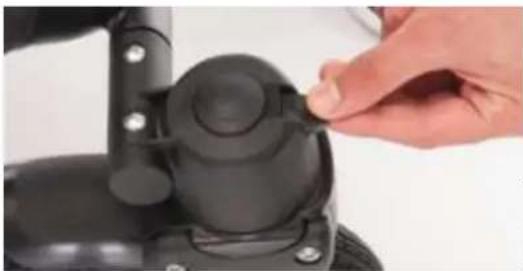
natural_image
Close-up of a hand adjusting a black mechanical component with a knob (no visible text or symbols)natural_image
Close-up of hands adjusting a black tire on a car wheel (no visible text or symbols)natural_image
Close-up of a hand pressing a red button on a black bicycle brake system (no text or symbols visible)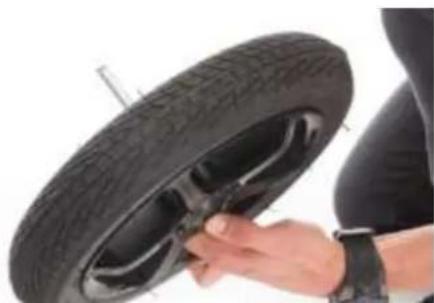
natural_image
Close-up of a person adjusting a black tire on a wheeled vehicle (no text or symbols visible)natural_image
Close-up of a hand adjusting a black tire wheel, no visible text or symbolsCOME PIEGARE L'AUTO
natural_image
Close-up of a motorcycle's front wheel and side seat, showing black and red metal clamps (no text or symbols visible)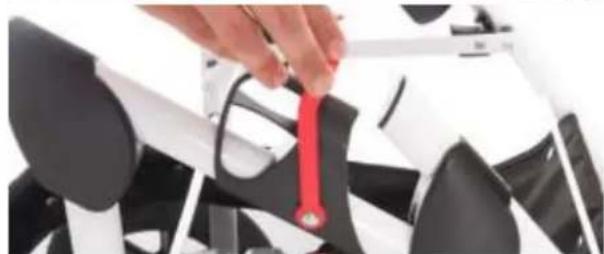
natural_image
Close-up of a hand holding a red object over a black and white abstract object (no text or symbols visible)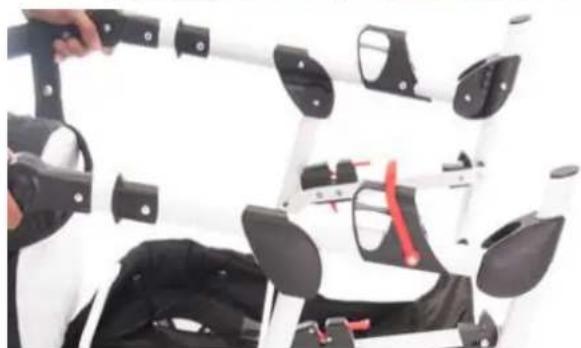
natural_image
Close-up of a robotic arm with black and white components, no visible text or symbols
natural_image
Person assembling a mechanical frame with visible wiring and connectors (no text or symbols)15 METTI IL SEDILE PER BAMBINI LUNGO LA DIREZIONE SULLA SEDILE. E STABILE
natural_image
Line drawing of a car seat with a baby seat highlighted in shades (no text or symbols)natural_image
Illustration of a car seatbelt in a car seat, showing the seatbelt being lifted by a cable (no text or symbols present)17 RIMUOVERE LA CINTURA DI SICUREZZA DALLE REGISTRAZIONI DIETRO IL SEGGIOLINO AUTO E ASSICURARSI CHE LA CINTURA DI SICUREZZA SIA ANCHE RIMOSSA AL BLOCCO POSTERIORE SULLA SEDE DELL'AUTOMOBILE
natural_image
Illustration of a car seatbelt with a diagonal belt and arrow indicating direction (no text or symbols)18 ASSICURARSI CHE LA CINTURA DI SICUREZZA SIA PULITA ATTRAVERSO LA STAFFA. NON DEVE ESSERE GIRATO!

natural_image
Illustration of a car seatbelt with two inset images showing the seatbelt being lifted (no text or symbols present)natural_image
Illustration of a car seatbelt with a belt and arrow indicating direction (no text or symbols)7 IL TRAMONTO
natural_image
Close-up of a black plastic device with adjustment knobs and a hand adjusting its component (no visible text or symbols)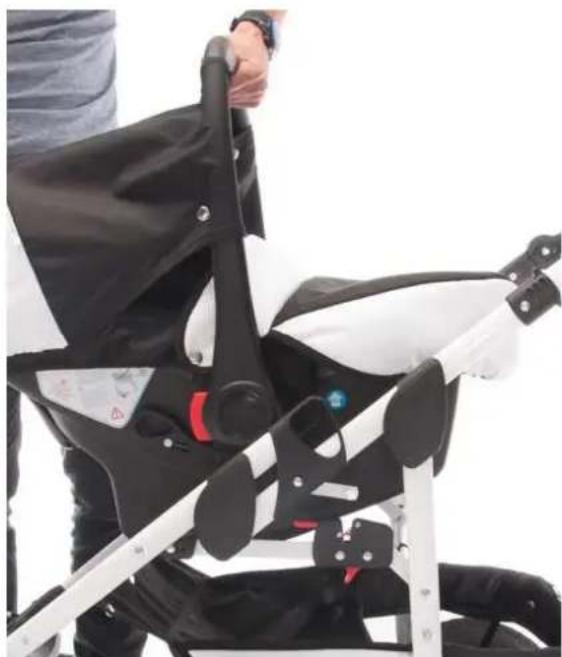
natural_image
Person wearing a black and white stroller with a red button, viewed from the side (no visible text or symbols)PRINCIPALI CARATTERISTICHE BELLAMI PASSEGGINO
natural_image
Close-up of a metal bracket component with a red circle highlighting the number 1 (no text or symbols on the part itself)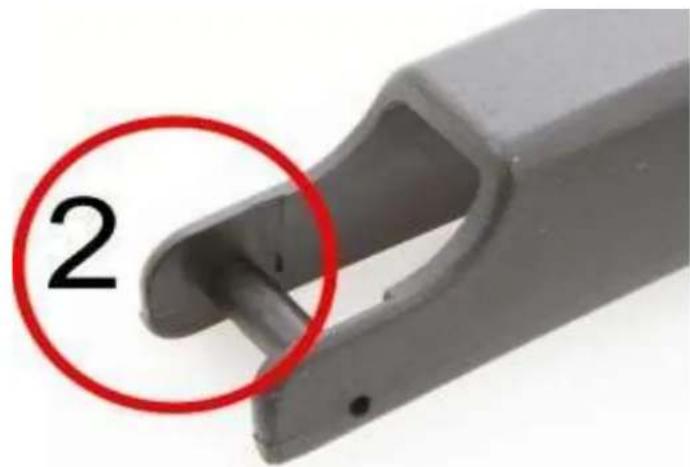
natural_image
Close-up of a black mechanical clamp with a red tool inserted, circled number 1 (no text or symbols on the clamp itself)
natural_image
Close-up of a mechanical tool with a red circle highlighting a numbered component (number 2), no visible text or symbols beyond the number.SALDARE GLI ADATTATORI DEL BABY SHELL:
natural_image
Simple line drawing of a small object inside a container, no text or symbols present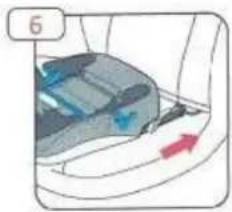
natural_image
Diagram of a car interior with a red arrow indicating direction (no text or symbols)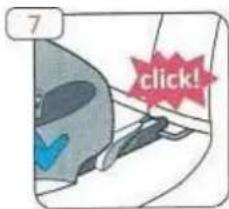
natural_image
Diagram of a mechanical component with red arrows indicating force or movement (no text or symbols)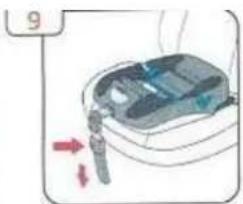
natural_image
Illustration of a medical device with arrows indicating force or movement (no text or symbols)natural_image
Illustration of a car interior with a blue checkmark on the wheel (no text or symbols)natural_image
Illustration of a washing machine with a bag and base, no text or symbols present
natural_image
Illustration of a baby car seat with a red warning sign and number 15 (no text or symbols on the diagram itself)
natural_image
Illustration of a baby car seat with a blue diagonal stripe, no text or symbols present
natural_image
Top-down view of a mechanical component with a labeled part '17' (no text or symbols on the object itself)natural_image
Illustration of a person wearing a helmet with a blue diagonal line, no text or symbols present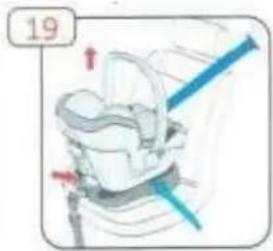
natural_image
Illustration of a baby car seat with a blue safety belt and red directional arrows (no text or symbols)