
Mi Smart Projector 2 - Projector Xiaomi - Free user manual and instructions
Find the device manual for free Mi Smart Projector 2 Xiaomi in PDF.
| Product type | Projector |
| Brand | Xiaomi |
| Model | Mi Smart Projector 2 (XMTYY02FMGL) |
| Dimensions | 115 × 150 × 150 mm |
| Net weight | 1.3 kg |
| Power supply | External adapter 19V / 3.42A, power consumption <65 W, standby <0.5 W |
| Display technology | DLP with LED light source |
| Standard resolution | 1920 × 1080 P |
| Throw ratio | 1.2:1 |
| Screen size | 60" to 120" |
| Focus | Automatic and manual |
| Keystone correction | Automatic omnidirectional |
| Operating system | Android TV |
| Internal storage | 2 GB DDR3 RAM / 16 GB eMMC |
| Wireless connectivity | Wi-Fi 802.11 a/b/g/n/ac (2.4/5 GHz), Bluetooth 5.0/BLE |
| Ports | HDMI, USB 2.0, headphone output, DC IN |
| Speakers | 2 × 5 W (full range) |
| Audio | Dolby Audio + DTS-HD |
| Noise level | ≤28 dB(A) (visual mode, 25°C) |
| Operating temperature | 0 °C to 40 °C, humidity 20% to 80% |
| Storage temperature | -20 °C to 55 °C, humidity ≤90% |
| Remote control | Infrared, range up to 5 m, batteries (not included) |
| Housing material | Not specified |
Frequently Asked Questions - Mi Smart Projector 2 Xiaomi
User questions about Mi Smart Projector 2 Xiaomi
0 question about this device. Answer the ones you know or ask your own.
Ask a new question about this device
Download the instructions for your Projector in PDF format for free! Find your manual Mi Smart Projector 2 - Xiaomi and take your electronic device back in hand. On this page are published all the documents necessary for the use of your device. Mi Smart Projector 2 by Xiaomi.
USER MANUAL Mi Smart Projector 2 Xiaomi
natural_image
Simple line drawing of a rectangular container with a perforated interior and two small circular components at the bottom (no text or symbols)腳墊
進風孔
natural_image
Simple diagram of a rectangular box with four circular holes and a vertical line extending from its center (no text or symbols)外接三腳架 1/4" 螺母

注意
natural_image
Front view of a Xiaomi remote control with buttons and antenna (no text or symbols on the device itself)電源鍵:
關機狀態下,按一下可開機;
開機狀態下,按一下彈出關機功能表。
Safety Instructions....15
Exterior....17
Connection Ports....18
Remote Control....19
Auto Focus....20
Keystone Correction....20
Frequently Used Menu....21
Specifications 22
Troubleshooting....23
Regulatory Compliance 24
Product Certifications 25
User Notice
Thank you for choosing the Mi Smart Projector 2.
Read this manual carefully before use, and retain it for future reference.
Illustrations of product, accessories, and user interface in the user manual are for reference purposes only. Actual product and functions may vary due to product enhancements.
Safety Instructions
Before using the product, make sure to carefully read the following safety instructions.

This warning symbol informs the user that this product contains non-insulated voltage sources that can cause an electric shock. Coming into contact with any internal component may result in an electric shock.

This symbol informs the user about important handling and maintenance related information. Please read this information carefully to ensure proper use.

This symbol informs the user to be aware of high temperatures.

This symbol informs the user to avoid touching this part.

Transportation Instructions: It is recommended to transport this projector in its original or similar packaging.

Preventing Electric Shocks and Fire Hazards:
- Only use the provided genuine power adapter.
- Unplug the projector from the electrical outlet during thunderstorms or when it is not being used for a long time, so as to avoid damage caused by a power surge or lightning strike.
- Do not place any flammable objects near this projector so as to avoid fire.
- Do not block any of the vents as this may cause heat build-up inside the projector, and possibly result in a fire.
- Do not block the lens when the projector is turned on. Any object placed close to the lens may get very hot and/or deformed, and may even cause a fire.

Safety Precautions:
- Do not place this projector on an unstable platform, stand or table so as to prevent it from falling and causing serious damage or personal injury.
- Do not look directly into the lens when the projector is turned on to avoid eye damage.
- Do not attempt to disassemble this projector as it may contain dangerous high voltage components. This projector must only be maintained and repaired by a qualified or authorized technician.
- Do not expose this projector to rain or moisture (operating humidity is 20%–80%).
- Do not immerse this projector in, nor expose it to water or other liquids. Immediately unplug the projector if any liquid or object got into its housing, and have it checked by a qualified technician before using it again.
-
Do not place this projector in any of the following environments:
-
In poorly ventilated or narrow spaces.
- Near devices that produce a strong magnetic field.
- In direct sunlight.
- In extremely hot, cold or humid environments.
- Close to a fire alarm.
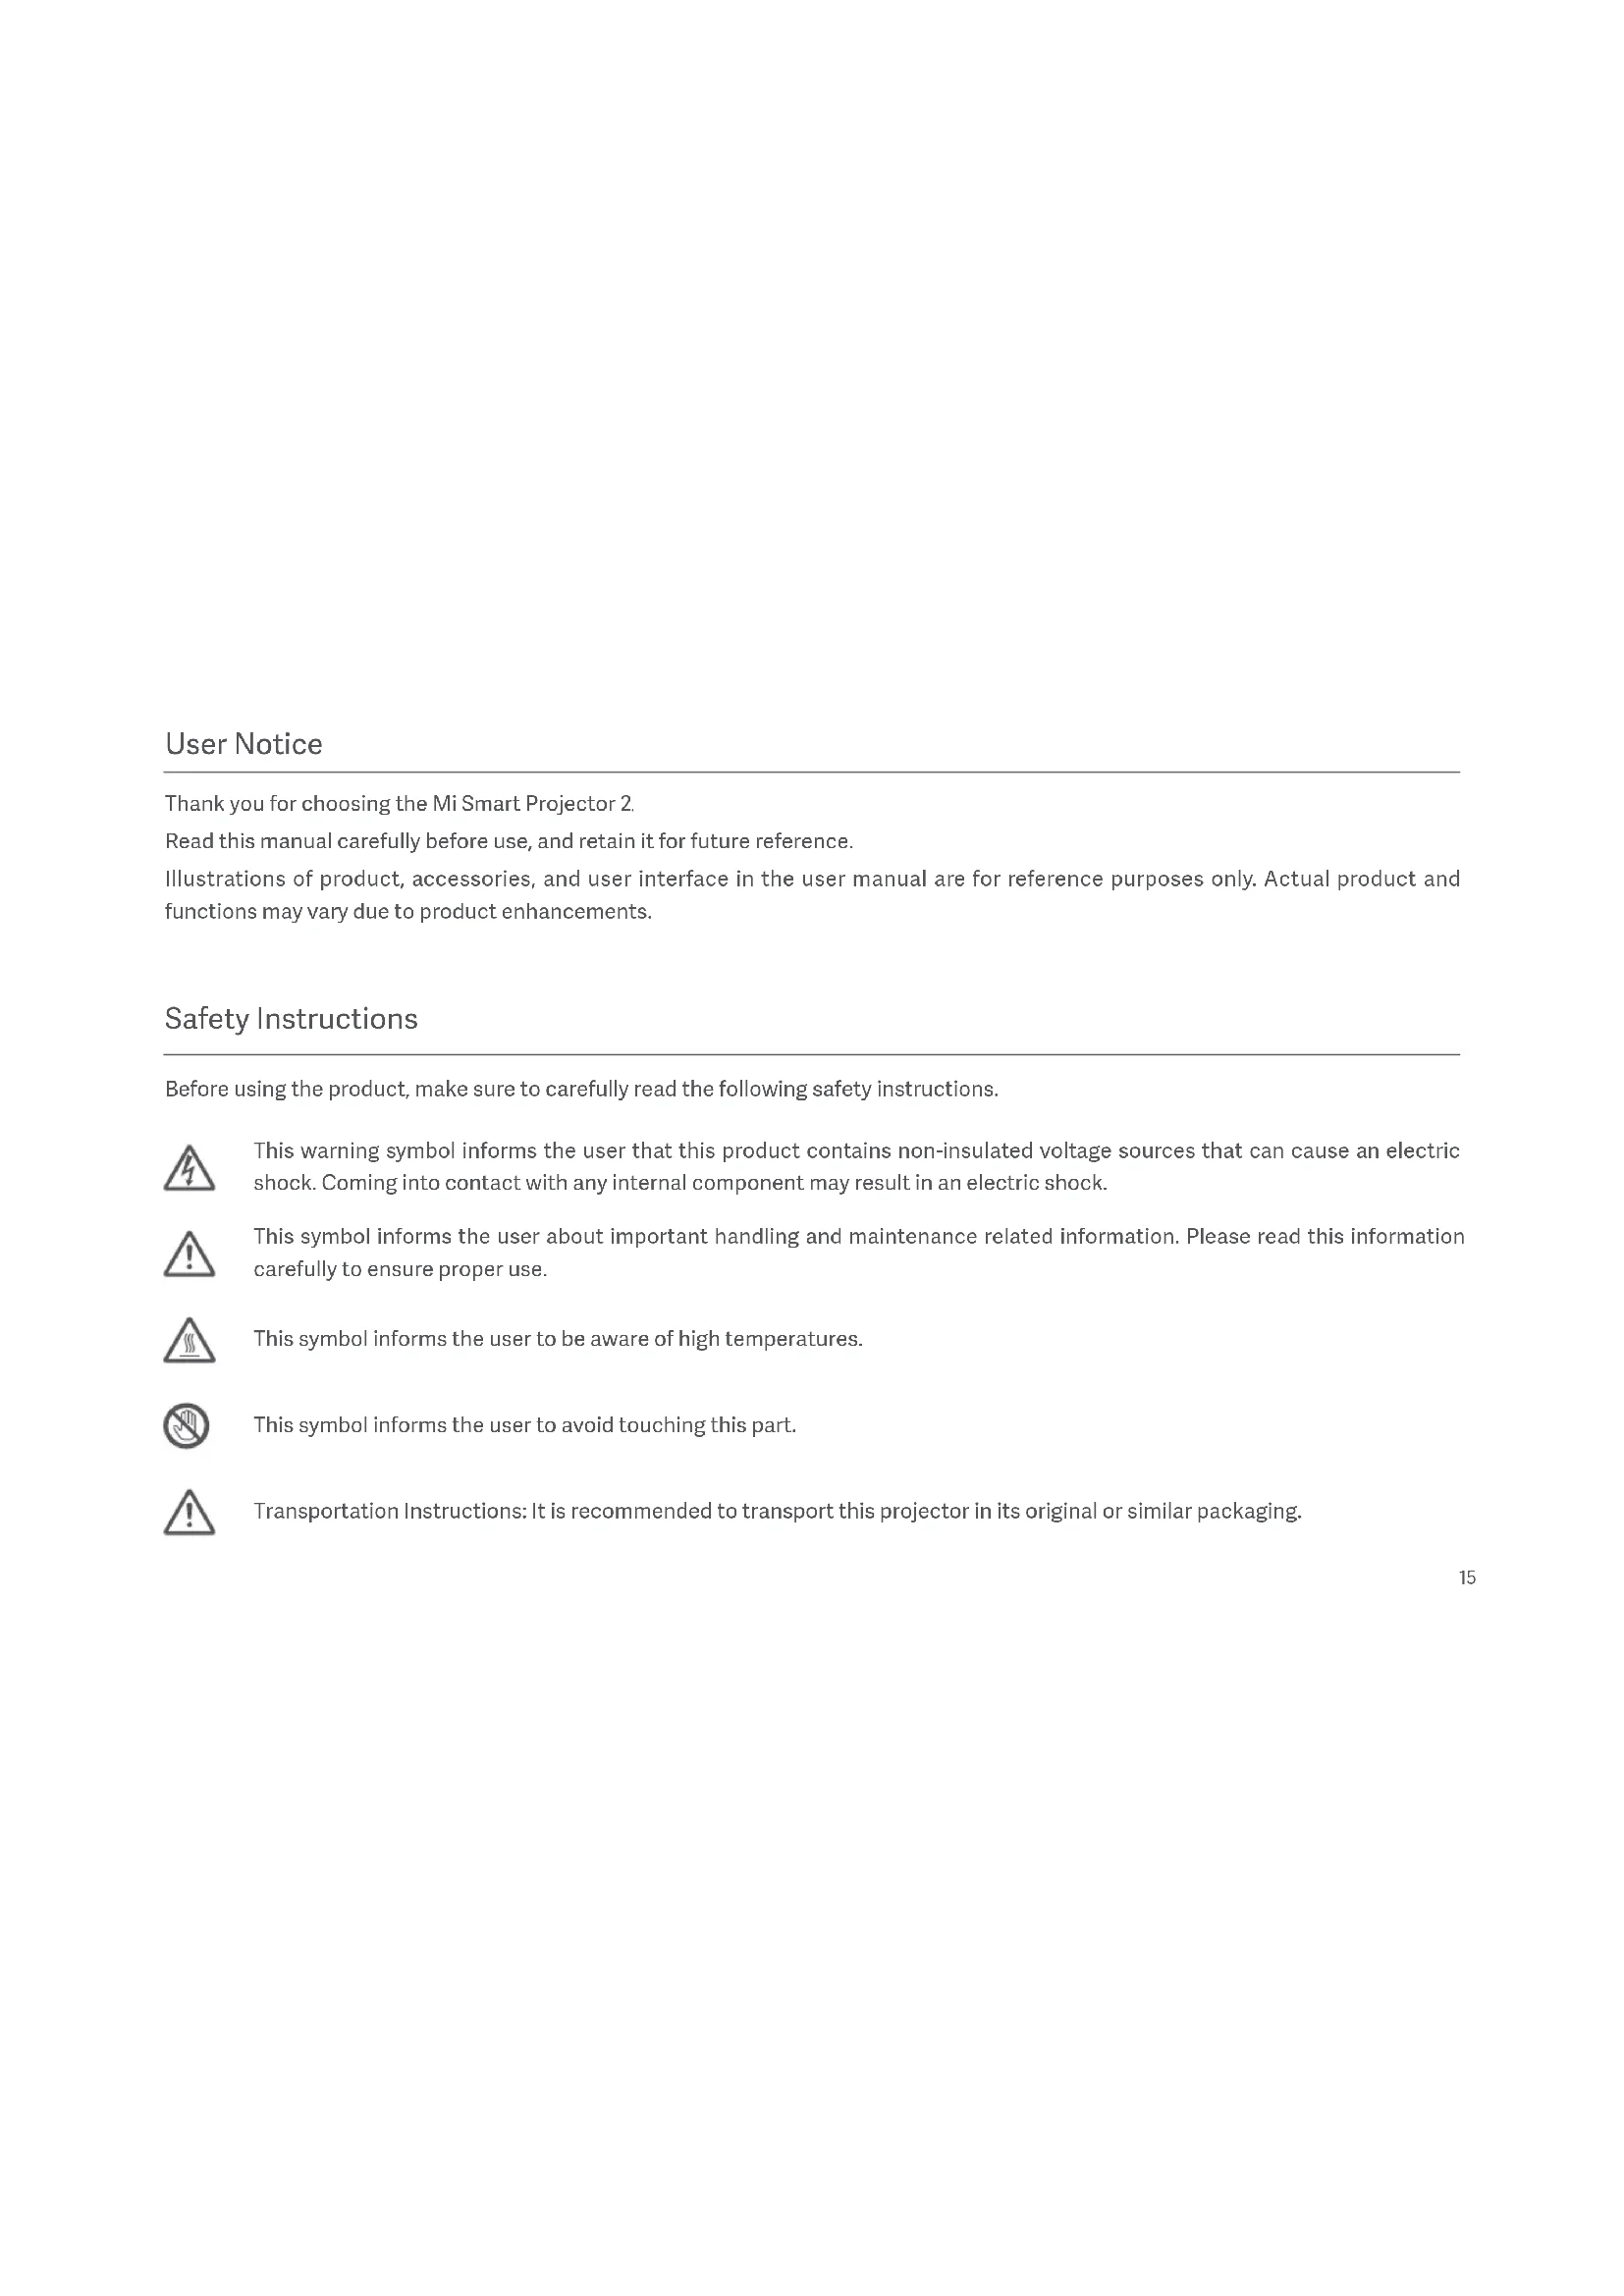
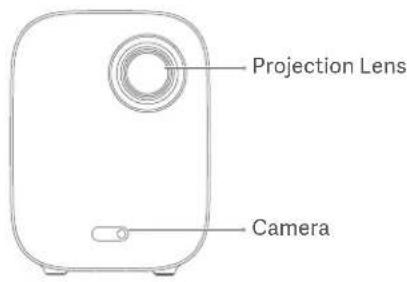
Exterior
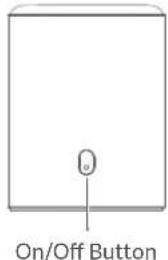
(Press to turn on)
natural_image
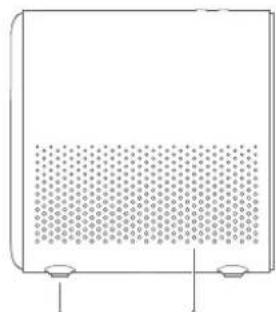
Simple line drawing of a rectangular container with a perforated interior and two small circular buttons at the bottom (no text or symbols)Rubber Feet Air Inlet

Caution
- The air vents allow the air to exchange internally and externally. Do not place any objects within 20 cm of the air vents.
- Do not look directly into the lens to avoid eye damage as the projector will emit strong light during working.
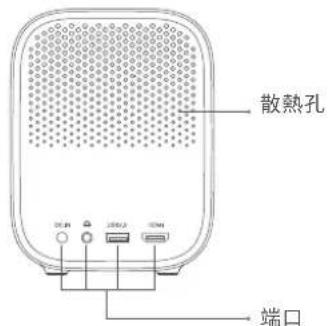
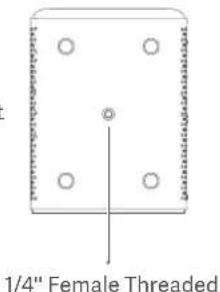
- If you plan to mount the projector on a suspended ceiling, make sure to select the right screws and bracket
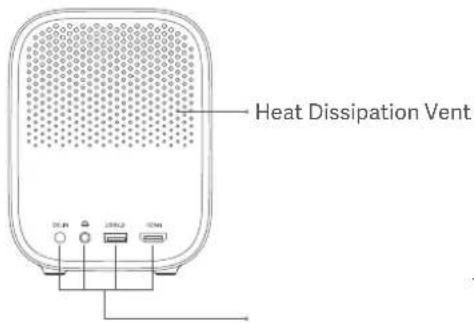
Tripod MountConnection Ports for it.
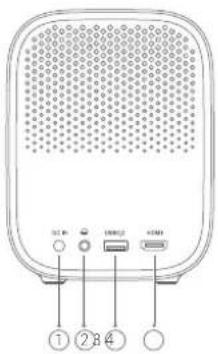
① DC IN
- DC in port.
②
③ USB2.0
④ HDMI
- Headphone port. - HDMI input port.- Supports USB 2.0.
Remote Control
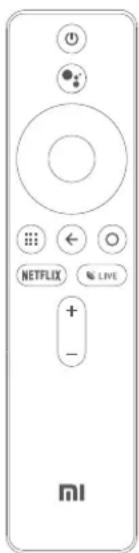

Power Button:
When the projector is off, press to turn on.
When the projector is on, press to open the menu. Then select the right option to turn the projector off.

Google Assistant: Press the Assistant button on your remote to talk to Google Assistant.

Navigation Pad: Move to up, down, left, or right, then press the middle to confirm.

APP: Access the app interface.

Return: Return to the previous menu.

Home: Return to the home screen.

Pairing the Remote Control:
Hold the remote control close to the projector within a distance of 20~cm , then simultaneously press the app button and the home button to pair.

NETFLIX: Access the Netflix App.

LIVE: Access the Live Channel.

Volume Button: + Increase the volume; - Decrease the volume.

Note:
- Pay attention to the positive and negative poles when installing batteries in the remote control.
- Dispose of, or recycle the battery in accordance with local laws and regulations of the country or region it is used in.
- It is recommended that the distance between the remote control and the projector is no more than 5 meters.
- The illustration of the remote control is for reference purposes only. Actual products and functions may vary due to the regions they are used in.
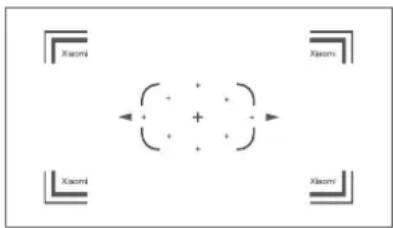
Auto Focus Keystone Correction
Go to Settings > Projector > Focus and select Execute Focus, the screen will focus and once it is finished you can press the left or right button on the remote control for further fine-tuning.
Go to Settings > Projector > Focus and select the Auto Focus switch, when it is enabled, moving the projector will automatically trigger the screen to focus.
Go to Settings > Projector > Keystone Correction > Keystone Correction, and use the up and down buttons to select Quick Adjustment, Fine Tuning, and Reset, then press the OK button to enter the correction mode.
If the projector is moved, it will start automatic keystone correction and the projected image will be adjusted automatically.
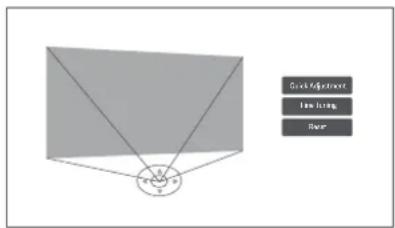
Note: Go to Settings > Projector > Keystone Correction, to configure Auto Keystone. Auto Keystone is enabled by default.
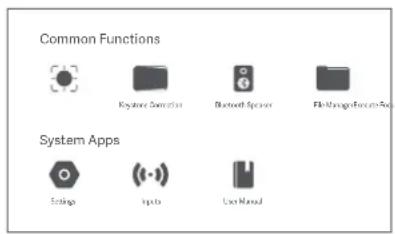
Frequently Used Menu
Open the app, then select Launch Board. The frequently used functions are displayed on this page. Select the User Manual to see the detailed instructions for the users.

Note:
The menu page will be updated from time to time, and the current app version shall prevail.
Specifications
| Basic Information | Name Mi Smart Projector 2 | |
| Model XMTYY02FMGL | ||
| Item Dimensions 115 x 150 x 150 mm | ||
| Net Weight 1.3 kg | ||
| Electrical Specifications | Power Consumption Rated Power < 65 W; Standby Power < 0.5 W | |
| Input External Adapter, 19 V 3.42 A = | ||
| Optical Parameters | Display Technology LED light source with DLP technology | |
| Standard Resolution 1920 x 1080P | ||
| Projection Parameters | Projection Ratio (TR) 1.2:1 | |
| Screen Size 60" to 120" | ||
| Lens Focus Auto Focus | ||
| Keystone Correction Omni-directional auto-keystone correction | ||
| System | Built-in Storage 2 GB DDR3 / 16 GB eMMC | |
| Operating System Android TV | ||
| Bluetooth Bluetooth 5.0/BLE | ||
| Wireless Connectivity Wi-Fi IEEE 802.11 a/b/g/n/ac 2.4GHz/5GHz | ||
| Audio | Audio Effects Dolby Audio + DTS-HD | |
| Speaker 2 x 5 W Full-range | ||
| Others | Noise Level ≤ 28 dB(A) viewing mode @ ambient temperature of 25 °C | |
| Storage Temperature/Humidity | -20°C to 55 °C / ≤ 90% | |
| Operating Temperature/Humidity | 0°C to 40 °C / 20%-80% | |
Troubleshooting
| FaultSolution | |
| No projected image | Turn off the projector and disconnect from the power, then plug in the power cord and turn on the projector. |
| Android system crashes | Turn off the projector and disconnect from the power, then plug in the power cord and turn on the projector. |
| Screen display error | Turn off the projector and disconnect from the power, then plug in the power cord and turn on the projector. |
| Remote control is missing or not paired and the projector cannot be turned on remotely. | Turn off the projector and disconnect from the power. Wait for five minutes, then plug in the power cord and turn on the projector. After the projector has been restarted, pair the remote control again. |
| If the projector overheats, it will automatically turn off. | Please remove any obstacles from the air inlets and outlets so as to ensure a smooth airflow through the projector. Follow the instructions above to restart the projector. |
| Other internal system errors | Please contact a qualified technician to service the device, or return the projector to the after-sales department |
Regulatory Compliance

This device complies with part 15 of the FCC Rules. Operation is subject to the following two conditions: (1) This device may not cause harmful interference, and (2) this device must accept any interference received, including interference that may cause undesired operation.
Note: This equipment has been tested and found to comply with the limits for a Class B digital device, pursuant to part 15 of the FCC rules. These limits are designed to provide reasonable protection against harmful interference in a residential installation. This equipment generates, uses and can radiate radio frequency energy and, if not installed and used in accordance with the instructions, may cause harmful interference to radio communications.
However, there is no guarantee that interference will not occur in a particular installation. If this equipment does cause harmful interference to radio or television reception, which can be determined by turning the equipment off and on, the user is encouraged to try to correct the interference by one or more of the following measures:
--Reorient or relocate the receiving antenna.
--Increase the separation between the equipment and receiver.
--Connect the equipment into an outlet on a circuit different from that to which the receiver is connected.
--Consult the dealer or an experienced radio/TV technician for help.
Important: You are cautioned that changes or modifications not expressly approved by the party responsible for compliance could void the user's authority to operate the equipment.
RF Exposure Information: The radiated output power of this device meets the limits of FCC/IC radio frequency exposure limits. This device should be operated with a minimum separation distance of 20cm (8 inches) between the equipment and a person's body.
Canada Compliance Compliance
This device complies with Industry Canada CAN ICES-003 (B)/NMB-003(B).
This device complies with Industry Canada licence-exempt RSS standard(s).
Operation is subject to the following two conditions: (1) this device may not cause interference, and (2) this device must accept any interference, including interference that may cause undesired operation of the device.
This device is restricted to indoor use when operating in the 5150 to 5250 MHz frequency range.
RF Exposure Information: The radiated output power of this device meets the limits of FCC/IC radio frequency exposure limits. This device should be operated with a minimum separation distance of 20cm (8 inches) between the equipment and a person's body.
The product complies with "RG1 IEC 62471-5:2015".

Caution:
- Risk of explosion if the battery is replaced by an incorrect type.
- Disposal of a battery into fire or a hot oven, or mechanically crushing or cutting of a battery, that can result in an explosion.
- Leaving a battery in an extremely high temperature surrounding environment that can result in an explosion or the leakage of flammable liquid or gas.
- A battery subjected to extremely low air pressure that may result in an explosion or the leakage of flammable liquid or gas.
Product Certifications
Dolby Audio
Manufactured under license from Dolby Laboratories. Dolby, Dolby Audio, and the double-D symbol are trademarks of Dolby Laboratories Licensing Corporation.
dts HD
For DTS patents, see http://patents.dts.com. Manufactured under license from DTS, Inc. (for companies headquartered in the U.S./Japan/Taiwan) or under license from DTS Licensing Limited (for all other companies). DTS, DTS-HD Master Audio, DTS-HD, VirtualX, and the DTS-HD logo are registered trademarks or trademarks of DTS, Inc. in the United States and other countries. © 2020 DTS, Inc. ALL RIGHTS RESERVED.
HDMI™ HIGH-DEFINITION MULTIMEDIA INTERFACE
The terms HDMI, HDMI High-Definition Multimedia Interface, and the HDMI Logo are trademarks or registered trademarks of HDMI Licensing Administrator, Inc.
Bluetooth®
The Bluetooth ^® word mark and logos are registered trademarks owned by Bluetooth SIG, Inc. and any use of such marks by (Xiaomi Inc.) is under license. Other trademarks and trade names are those of their respective owners.
Manufactured for: Xiaomi Communications Co., Ltd. Manufactured by:
Formovie(Chongqing)InnovativeTechnologyCo.,Ltd. Address: 4-401, #2 Longgang Road, Guojiatuo Area, Jiangbei District, Chongqing, China
Production Date: See packaging Made in China
Sommaire
Fabricant: Formovie (Chongqing) Innovative Technology Co., Ltd.
Adresse : 4-401, #2 Longgang Road, Guojiatuo Area, Jiangbei District, Chongqing, China
Dirección: 4-401, #2 Longgang Road, Guojiatuo Area, Jiangbei District, Chongqing, China
natural_image
Front view of a Xiaomi remote control with buttons and ports (no readable text or symbols beyond branding)① 電源ボタン:
Formovie (Chongqing) Innovative Technology Co., Ltd. 所在地:4-401, #2 Longgang Road, Guojiatuo Area, Jiangbei District, Chongqing, China
製造日:パッケージを参照してください。
中国製
輸入販売 小米技術日本株式会社

- 注意
- User Notice
- Safety Instructions
- Preventing Electric Shocks and Fire Hazards:
- Safety Precautions:
- Exterior
- Caution
- Remote Control
- Note:
- Auto Focus Keystone Correction
- Frequently Used Menu
- Regulatory Compliance
- Caution:
- Product Certifications
- Dolby Audio
- dts HD
- HDMI™ HIGH-DEFINITION MULTIMEDIA INTERFACE
- Bluetooth®
- Sommaire
Brand : Xiaomi
Model : Mi Smart Projector 2
Category : Projector