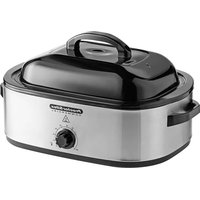
32921 - Food Warmer PROCTOR SILEX - Free user manual and instructions
Find the device manual for free 32921 PROCTOR SILEX in PDF.


| Product Type | Roaster Oven and Warmer |
| Brand | Proctor Silex |
| Model | 32921 |
| Power Supply | 120 V, 60 Hz AC |
| Power | Approximately 1500 W |
| Capacity | Approximately 18 to 22 liters (depending on model) |
| Materials | Painted steel base, nonstick removable metal pan, metal lid, chrome-plated metal rack |
| Main Functions | Roasting, baking, steaming, warming, simmering |
| Controls | Rotary thermostat with off (O) |
| Temperature Range | From 110 °C (225 °F) to 230 °C (450 °F) |
| Included Accessories | Lid, rack, removable pan |
| Care and Cleaning | Wash removable parts in hot soapy water; wipe base with a damp cloth; do not immerse base |
| Safety | Grounded plug (3-prong); do not use an adapter; hot surfaces; risk of steam burns |
| Parts and Repairability | Technical service at 1-866-285-1087 (US/Canada) or +910-693-4277 |
| Weight | Approximately 4.5 kg (10 lb) |
| Dimensions (L x W x H) | Approximately 45 x 30 x 30 cm |
Frequently Asked Questions - 32921 PROCTOR SILEX
User questions about 32921 PROCTOR SILEX
0 question about this device. Answer the ones you know or ask your own.
Ask a new question about this device
Download the instructions for your Food Warmer in PDF format for free! Find your manual 32921 - PROCTOR SILEX and take your electronic device back in hand. On this page are published all the documents necessary for the use of your device. 32921 by PROCTOR SILEX.
USER MANUAL 32921 PROCTOR SILEX
Roaster Oven/Warmer
Operation Manual
Page 2
Roaster Oven/Warmer Safety
IMPORTANT: This operation manual should be reviewed with all equipment operators as part of your operator training program.
Your safety and the safety of others is very important.
We have provided many important safety messages in this manual and on your appliance.
Always read and obey all safety messages.

This is the safety alert symbol.
This symbol alerts you to hazards that can kill or hurt you and others.
All safety messages will be preceded by the safety alert symbol and the word “DAN GER” or “WARNING.” These words mean:
!DANGER
WARNING
You will be killed or se ri ous ly injured if you don't follow instructions.
You can be killed or se ri ous ly injured if you don't follow instructions.
All safety messages will identify the hazard, tell you how to reduce the chance of injury, and tell you what can happen if the instructions are not followed.
WARNING

Electrical Shock Hazard
Plug into a grounded outlet.
Do not remove ground.
Do not use an adapter.
Failure to follow these instructions can result in death, fire, or electrical shock.
Technical Services
For assistance or replacement parts, call our
Technical Services number:
1-866-285-1087 (USA, Canada) or
+ 910-693-4277 (all others)
8:00 a.m. – 5:00 p.m. EST Monday – Friday
www.hamiltonbeachcommercial.com
Roaster Oven/Warmer Safety
IMPORTANT SAFETY INSTRUCTIONS
WARNING – When using electrical appliances, basic safety precautions should always be followed to reduce the risk of fire, electric shock, and/or injury to persons, including the following:
- Read all instructions.
- This appliance is not intended for use by persons (including children) with reduced physical, sensory, or mental capabilities, or lack of experience and knowledge, unless they are closely supervised and instructed concerning use of the appliance by a person responsible for their safety.
- Close supervision is necessary when any appliance is used by or near children. Children should be supervised to ensure that they do not play with the appliance.
- Do not touch hot surfaces. Use handles or knobs. Use pot holders when removing hot containers.
- To protect against a risk of electrical shock, do not immerse cord, plug, or base in water or other liquid.
- Unplug from outlet when not in use. Unplug before putting on or taking off parts and allow to cool before cleaning.
-
Do not operate any appliance with a damaged cord or plug or after the appliance malfunctions, has been dropped or damaged in any manner. Supply cord replacement and repairs must be conducted by the manufacturer, its service agent, or similarly qualified persons in order to avoid a hazard. Call the provided customer service number for information on examination, repair, or adjustment.
-
The use of accessory attachments not recommended by the appliance manufacturer may cause injuries.
- Do not use outdoors.
- Do not let cord hang over edge of table or counter, or touch hot surfaces.
- Do not place on or near a hot gas or electric burner, or in a heated oven.
- Extreme caution must be used when moving an appliance containing hot food, water, or other hot liquids.
- Do not use appliance for other than intended use.
- Lift and open cover carefully to avoid scalding, and allow water to drip into the cooker.
- ⚠ WARNING Risk of electric shock. Cook only in removable container.
- Do not place the unit directly under cabinets when operating as this product produces large amounts of steam. Avoid reaching over the product when operating.
- Use oven mitts to remove the insert pan or rack from the roaster oven/warmer; or to remove a baking pan or cooked food from the insert pan.
- SAVE THESE IN STRUC TIONS -
OTHER CONSUMER SAFETY INFORMATION
⚠ WARNING Electrical Shock Hazard: This product is provided with a grounded (3-prong) plug to reduce the risk of electric shock. The plug fits only one way into a grounded outlet. Do not defeat the safety purpose of the plug by modifying the plug in any way or by using an adapter. If the plug does not fit into the outlet, have an electrician replace the outlet.
The length of the cord used on this appliance was selected to reduce the hazards of becoming tangled in or tripping over a longer cord. If a longer cord is necessary, an approved extension cord may be used. The electrical rating of the extension cord must be equal to or greater than the rating of the appliance. The extension cord must be a grounding-type, 3-wire cord. Care must be taken to arrange the extension cord so that it will not drape over the countertop or tabletop where it can be pulled on or accidentally tripped over.
Parts and Features
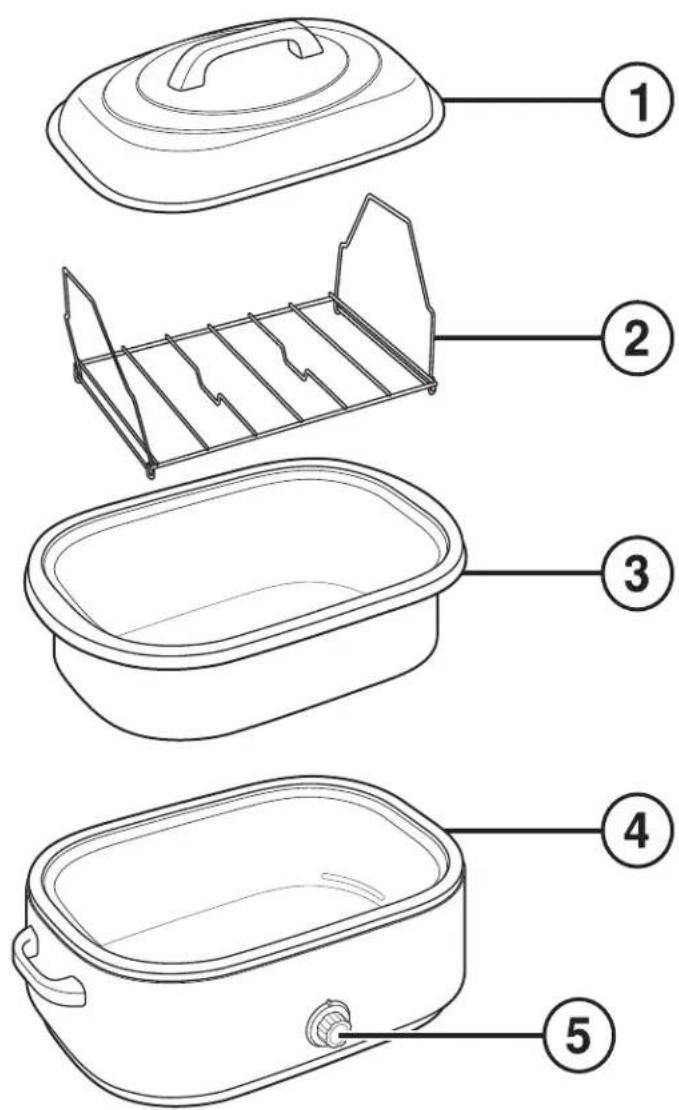
- Lid*
- Rack*
-
Insert Pan*
-
Base*
-
Temperature Control Knob*
Operation
Using Your Roaster Oven/Warmer
WARNING

Burn Hazard
Escaping steam may cause burns.
Use oven mitts to protect hands when removing insert pan, rack, baking pan or cooked food.
Failure to follow these instructions can result in burns or serious injury.
BEFORE FIRST USE: Wash the insert pan, rack, and lid before using. During the first use of the roaster oven/warmer, some smoke and odor may be noticed. The smoke and odor should not occur after this first heating of the roaster oven/warmer.
- Make sure temperature control is turned to O. Plug cord into 120-volt AC outlet.
- Remove rack. Leave insert pan in roaster oven/warmer.
- Set temperature control to desired setting and let preheat 15 minutes with lid on.
- Place food to be cooked in the pan on the rack (or directly in the insert pan). Then place rack in oven and replace the lid.
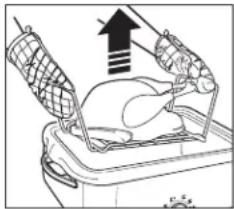
- When finished cooking, remove lid. Wearing oven mitts, remove food by using the rack.
- Turn temperature control to O and unplug roaster oven/warmer.
NOTE: The insert pan should always be placed in the roaster oven/warmer base when cooking.


Roasting Meats and Poultry
- We recommend the use of a meat thermometer to ensure perfectly cooked roasts and poultry every time. If using a meat thermometer, the meat or poultry should be removed from the roaster oven/warmer when the thermometer reading is 5 to 10 degrees below the desired temperature. The internal temperature will continue to rise after the meat has been removed from the roaster oven/warmer.
-
Most hams sold today are labeled as “Cook Before Eating” or “Fully Cooked.” Ham labeled “Cook Before Eating” has been smoked or cured but NOT cooked. This ham must be thoroughly cooked to an internal temperature of 155° to 160°F (68° to 71°C). The “Fully Cooked” hams have been smoked or cured and already cooked. The ham does not require further cooking, but heating to 140°F (60°C) improves the flavor.
-
The roaster oven/warmer cooks turkeys in less time than conventional ovens. A 14- to 18-pound (6.3- to 8.1-kg) unstuffed turkey will cook in approximately 2 1/2 hours. A turkey cooked in the roaster oven/warmer is moist and juicy, but does not brown.
- The Roasting Chart lists cooking times for tender cuts of meat that are usually dry-roasted. These roasts are from the rib or sirloin area. To tenderize cuts from the leg (ham) or shoulder/chuck area, cook in liquid for a longer period of time.
- Times indicated are approximate and should be used only as a general guideline. Individual cuts of meat and personal preference may dictate longer or shorter roasting times.
Operation
Using Your Roaster Oven/Warmer
Baking
The roaster oven/warmer can bake your favorite cakes, pies, breads, or casseroles like a conventional oven. Pans and dishes should be placed on the rack for best heat circulation. Using the rack is also recommended for convenience in removing hot dishes and pans from the roaster oven/warmer.
Do not remove the lid of the roaster oven/warmer unless necessary. Removing the lid allows heat to escape and affects the temperature of the roaster oven/warmer.
Steaming
Preheat roaster oven/warmer to 450°F (230°C). To steam in the roaster oven/warmer, you will need a metal colander. Place rack in the insert pan. Place insert pan in roaster oven/warmer.
Pour 1 quart (1 L) boiling water into the insert pan. Place food to be steamed in the colander and place colander in insert pan. Cover and steam according to the following times or until desired doneness.
| Item to Steam | Amount of Time |
| 2 cauliflower heads, cut up | 10 minutes |
| 2 bunches of broccoli, cut up | 10 minutes |
| 2 pounds (900 g) shrimp | 10 minutes |
Warming Rolls, Biscuits, etc.
Preheat roaster oven/warmer to 250° F ( 120° C). You will need two small ovenproof containers to hold water. Emptied and washed food cans are perfect. Fill the cans two-thirds full with hot water and place in opposite corners of the insert pan.
Stack rolls, biscuits, or pancakes in insert pan. Do not let them touch sides of pan. Cover and keep warm up to 1 hour.
Quantity Cooking
The insert pan may be used as a large cooking utensil when cooking or heating large quantities. It may be used to simmer sauces, soups, or stews, or simply to heat or warm large quantities. When cooking or heating soups or stews in the roaster oven/warmer, stir occasionally for quicker, even heating.
For example, set the temperature control at 400° F ( 200° C) and the roaster oven/warmer will warm vegetable beef soup from refrigerated temperature to serving temperature in about two hours. To cook soups, stews, or sauces, set the temperature control on 225° F ( 110° C) and allow 4 to 8 hours to simmer, depending on recipe.
Operation
Roasting Chart and Tips
| FOOD | WT. LBSWT. KGS | MEATTHERMOMETER | COOK TIME (18 Qt./325°F) (17 L/163°C) | COOK TIME (22 Qt./325°F) (20.8 L/163°C) |
| Whole Turkey 14-18 | 6.4-8.2 | 180°F/82°C 2 to 3 | hours 2 to 3 hours | |
| Whole Turkey 19-24 | 8.6-10.9 | 180°F/82°C 3 to | 3 1/2 hours | 3 to3 1/2 hours |
| Turkey Breast 5-7 | 2.3-3.2 | 180°F/82°C 1 1/2 | hours 1 1/2 hours | |
| Roasting Chicken 6-8 | 2.7-3.6 | 180°F/82°C 1 to | 1 1/2 hours | 1 to1 1/2 hours |
| Beef Roast 5-7 | 2.3-3.2 | 160°F/71°C (medium) | 2 1/2 hours 2 1/2 hours | |
| Fresh Pork Roast 5-7 | 2.3-3.2 | 160°F/71°C (medium) | 2 hours | 2 hours |
| Picnic Shoulder Ham (Fully Cooked) | 7-103.2-4.5 | 140°F/60°C 2 to 3 | hours 2 to 3 hours | |
| Whole Ham (Fully Cooked) | 15-186.8-8.2 | 140°F/60°C 2 to 3 | hours 2 to 3 hours |
Tips
- Before baking or roasting in the roaster oven/warmer, make sure the pan or dish you plan to use will fit by placing it in the insert pan. Most heat-resistant glass casserole dishes fit in the roaster oven/warmer.
- The insert pan must always be used when cooking in the roaster oven/warmer. If cooking large quantities of soups or stews, the insert pan may be used as the cooking pan in the roaster oven/warmer base. It may also be used as a large roasting pan in the roaster oven/warmer base.
- Do not use the insert pan as a baking pan or casserole dish for cakes, breads, or casseroles.
A separate pan must be placed in the insert pan when cooking these foods.
- Baking pans and casserole dishes should be placed on the rack for best heat circulation. If necessary, the rack can be removed to fit a large roasting pan or two casseroles in roaster oven/warmer.
- Foil oven roasting bags can be used in the roaster oven/warmer. We do not recommend using plastic oven roasting bags in the roaster oven/warmer.
- Do not remove the lid of the roaster oven/warmer unless necessary. Removing the lid allows heat to escape and affects the temperature of the roaster oven/warmer.
Pan Sizes
Following are pan sizes which will fit in the roaster oven/warmer:
- One 9- x 13-inch (23- x 33-cm) baking or 10- x 14-inch (26- x 35-cm) roasting pan
- Two 9- x 5-inch (23- x 13-cm) or 8- x 4-inch (20- x 10-cm) loaf pans
• One tube or bundt pan
Caring for the Roaster Oven/Warmer
Cleaning Instructions
WARNING

Electrical Shock Hazard Disconnect power before cleaning.
Do not immerse cord, plug, or base in water or other liquid.
Failure to follow these instructions can result in death, fire, or electrical shock.
Cleaning
- Turn temperature control to 0. Unplug roaster oven/warmer from outlet and let cool.
- Wash cover, rack, and insert pan in hot, soapy water. To remove burned-on food, let soak and then scrub with a nylon scouring pad. Rinse in hot water; then dry.
- Wipe the inside of the roasteroven/warmer base with a damp cloth.
- Wipe the outside of the roaster oven/warmer with a damp, soapy cloth; then dry.
NOTE: Discoloration of the lid may occur if washed in the dishwasher.
Sanitizing
- Wash lid, rack, and removable insert pan as instructed in "Cleaning Instructions."
- Immerse lid, rack, and removable insert pan in sanitizing solution for 2 minutes.
- Allow to air dry.
- Rinse with clean water before using.
Recommended sanitizing solution:
The sanitizing solution should consist of 1 tablespoon (15 ml) of household bleach per 1 gallon (3.8 liter) of clean, cool water (60°F/16°C) mixed according to the instructions on the bleach.

8 a.m. - 5 p.m. EST Lunes - Viernes
www.hamiltonbeachcommercial.com

- ROASTER OVEN/WARMER
- ROASTER OVEN/WARMER SAFETY
- YOUR SAFETY AND THE SAFETY OF OTHERS IS VERY IMPORTANT
- DANGER
- WARNING
- TECHNICAL SERVICES
- IMPORTANT SAFETY INSTRUCTIONS
- SAVE THESE IN STRUC TIONS
- OTHER CONSUMER SAFETY INFORMATION
- PARTS AND FEATURES
- OPERATION
- USING YOUR ROASTER OVEN/WARMER
- ROASTING MEATS AND POULTRY
- BAKING
- STEAMING
- WARMING ROLLS, BISCUITS, ETC
- QUANTITY COOKING
- ROASTING CHART AND TIPS
- TIPS
- PAN SIZES
- FOLLOWING ARE PAN SIZES WHICH WILL FIT IN THE ROASTER OVEN/WARMER
- CARING FOR THE ROASTER OVEN/WARMER
- CLEANING INSTRUCTIONS
- CLEANING
- SANITIZING
- RECOMMENDED SANITIZING SOLUTION
Brand : PROCTOR SILEX
Model : 32921
Category : Food Warmer