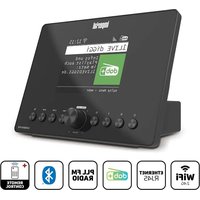
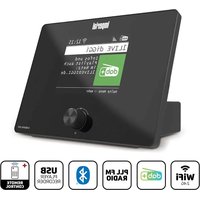
DABMAN OR 3 - Radio Imperial - Free user manual and instructions
Find the device manual for free DABMAN OR 3 Imperial in PDF.

| Product Type | DAB+/FM Radio with Camping Lamp |
| Dimensions | 100 x 200 x 100 mm |
| Weight | 810 g |
| Power Supply | Rechargeable battery (USB-C, solar panel, hand crank) |
| Charge Input | USB-C, 5 V / 2 A |
| Charge Output (power bank) | USB, 5 V / 2 A |
| Charging Time | Approximately 3 hours |
| Speakers | 2 x 7 W |
| Radio Reception | DAB+ (band III), FM 87.5-108 MHz |
| Bluetooth | Version 5.0, range 10 m |
| Waterproof Rating | IPX5 |
| Operating Temperature | -10 °C to +50 °C |
| Additional Functions | Flashlight, lantern, SOS function (siren + flashing light), tiltable solar panel, charging hand crank |
| Maintenance and Cleaning | Wipe with a dry, soft cloth; do not use liquids or solvents |
| Safety | Do not open the casing, keep out of reach of children, avoid heat sources |
| General Information | CE marking, legal warranty, telephone support at +49 2676 95 20 101 |
Frequently Asked Questions - DABMAN OR 3 Imperial
User questions about DABMAN OR 3 Imperial
0 question about this device. Answer the ones you know or ask your own.
Ask a new question about this device
Download the instructions for your Radio in PDF format for free! Find your manual DABMAN OR 3 - Imperial and take your electronic device back in hand. On this page are published all the documents necessary for the use of your device. DABMAN OR 3 by Imperial.
USER MANUAL DABMAN OR 3 Imperial
natural_image
Green industrial lamp device with handle and control buttons (no visible text or symbols on body)natural_image
Color calibration bar with grayscale and RGB color swatches, no text or symbols present


text_image
bda_DABMAN OR 3_V1_04_23_DE_EN_FR_NL.indd 2
natural_image
Color palette bar with grayscale shades and a central crosshair symbol (no text or labels)
natural_image
Color palette bar with grayscale swatches and a central crosshair symbol (no text or labels)
natural_image
Color palette bar with grayscale shades and a central crosshair symbol (no text or labels)3. LIEFERUMFANG
TELESTAR Service Center,
Am Weiher 14,
56766 Ulmen
e-mail: service@telestar.de
D
Anzahl Erklärung
1 DABMAN OR 3 Radio
natural_image
Color palette bar with grayscale shades and a central crosshair symbol (no text or labels)
4. ÜBERSICHT DER BEDIENELEMENTE

text_image
Technical diagram of a device with numbered components and labeled buttons, likely for assembly or control instructions.
text_image
10-87 ①112 OK < 1314 —Bedienungsanleitung
14

4. ÜBERSICHT DER BEDIENELEMENTE
natural_image
Color palette bar with grayscale swatches and a central crosshair symbol (no text or labels)
4. ÜBERSICHT DER BEDIENELEMENTE

text_image
Technical diagram of a portable air conditioner unit with numbered parts labeled 15, 16, 17, 18, and 19.

Bedienungsanleitung
16

4. ÜBERSICHT DER BEDIENELEMENTE
natural_image
Color palette bar with grayscale shades and a central crosshair symbol (no text or labels)
8. TECHNISCHE DATEN
D
natural_image
Green industrial portable device labeled 'imperial' with control panel and display (no readable text beyond branding)DAB+/FM Outdoor-Radio with camping light

natural_image
Color calibration bar with grayscale and red squares, no text or symbols present


bda_DABMAN OR 3_V1_04_23_DE_EN_FR_NL.indd 32

26.04.2023 14:10:18

1. TABLE OF CONTENTS
- Safety Instructions.... 35
2.1 Explanation of symbols 35
2.1 Explanation of symbols 36
2.2. Intended Use.... 37
2.3. Safety instructions.... 38
2.4. Operational safety 39
2.5. Connecting the device.... 40
2.6. Protecting the device against damages 40
2.7. Risk of injury 41
2.8. Notes on the radio interface.... 41
2.9. Cleaning the device 42
2.10. Actions in case of malfunction 42

- DELIVERY CONTENTS 43
- OVERVIEW OF THE CONTROLS 44
- OPERATION AND FUNCTIONS.... 48
5.1.First use 48
5.2. Standby mode.... 48
5.3. Mode selection.... 48
5.4. DAB+ Digitalradio Mode.... 49
5.4.1.DAB+ station search.... 49
5.4.2. Station list.... 49
5.4.3. Saving / recalling a favourite stations 49
5.4.4.DAB settings 50
5.5.FM radio mode 50
5.5.1.FM station search 50
5.5.2. Setting the FM frequency manually 51
5.5.3. Saving / recalling a favourite stations ..... 51
DABMAN OR 3
1. TABLE OF CONTENTS
5.5.4.FM menu 51
5.6. Wireless music streaming (Bluetooth) 51
5.7. System setup 52
5.7.1. Alarm 52
5.7.2. Backlight.... 52
5.7.3.Time setup 52
5.7.4.Language 52
5.7.5. Factory reset.... 53
5.7.6. Software Version 53
5.8. Outdoor battery charging.... 53
5.8.1. Solar panel.... 53
5.8.2.Hand crank....53
5.9.SOS emergency function 54
5.10.Torch 54
6. TROUBLESHOOTING 55
7. DISPOSAL INFORMATION.... 56
7.1. Disposing of the packaging 56
7.2.Device disposal....56
8. TECHNICAL DATA....57
9. SERVICE & SUPPORT....58
10. CE LABELLING....59
User manual

natural_image
Color palette bar with grayscale shades and a central crosshair symbol (no text or labels)
2. SAFETY INSTRUCTIONS
2.1 Explanation of symbols
SYMBOL MEANING

DANGER!
This signal word indicates a hazard with a high degree of risk, which, if ignored, results in death or serious injury.
E

WARNING!
This signal word indicates a hazard with a medium degree of risk, which, if ignored, may result in death or serious injury.

CAUTION!
This signal word indicates a hazard with a low degree of risk, which, if ignored, may result in minor or moderate injury.

NOTE!
This signal word warns of possible property damage.

This sign warns of danger.


text_image
2. SAFETY INSTRUCTIONS2. SAFETY INSTRUCTIONS
2.1 Explanation of symbols
SYMBOL MEANING
E

Protection class II
Electrical devices with protection class II have a reinforced or double insulation equal to the rated insulation voltage between active and touchable parts
(VDE 0100 part 410, 412.1). They usually have no connection to the protective conductor. Even if they have electrically conductive surfaces, they are protected by a reinforced or double insulation from contact with other live parts
CE
The products marked with this symbol meet the requirements of the directives of the European Community.
User manual
36


2. SAFETY INSTRUCTIONS
2.2. Intended Use
The device serves as a receiver for DAB+ FM radio signals, for charging mobile devices such as smartphones or tablets with a charging voltage of 5V and a maximum charging current of 2A, and as a flashlight. Any other operation or use of the device is considered improper and can lead to personal injury or damage to property
Do not use the device for any other purpose.
The device is only intended for private use and not for commercial use.
We assume that the person operating this device has general knowledge of how to use electronic entertainment devices.
There is no liability in the event of improper use.
Only use spare parts and accessories supplied or approved by us.
Do not modify the device and do not use any accessories or spare parts not explicitly approved or supplied by us.
Do not use the device in potentially explosive areas.
These include e.g. fuel storage areas, tank facilities, or areas where solvents are stored or processed.
Do not operate the device in areas with particle-contaminated air (e.g. flour or wood dust)
Do not expose the device to extreme conditions, e.g. extremely high or low temperatures, open fire.

2. SAFETY INSTRUCTIONS
2.3. Safety instructions

NOTE!
E
Risk of injury!
Risk of injury to children and persons with reduced physical, sensory, or mental abilities (e.g. partially disabled, elderly persons with limited physical and mental abilities), or lack of experience and knowledge.
Please keep the device only in places that are inaccessible to children.
This device may be used by children over the age of 8 and by persons with reduced physical, sensory or mental abilities or lack of experience and/or knowledge, if they are supervised or have been instructed in the safe use of the device and have understood the resulting hazards.Never let children use the device unattended.
Do not store the used packaging materials (bags, polystyrene pieces, etc.) within the reach of children.
Children are not allowed to play with the packaging.


User manual
38


2. SAFETY INSTRUCTIONS
2.4. Operational safety

DANGER!
Risk of injury!
Risk of injury due to electric shock from live parts.
There is a risk of electric shock or fire due to an unintentional short circuit.
Please check the device for damages before every use. If you notice any visible damage or if the device has visible damages, please stop operating it.
If you notice a technical or mechanical problem, please contact TELESTAR Service.
Use only the supplied power supply unit!
Never open the casing of the device.
In the event of a malfunction, disconnect the radio from the power source.
If you move the device from a cold to a warm environment, moisture may develop inside the device. In such a case, wait for approximately one hour before using it.
In case of prolonged periods of absence or thunder storm, unplug the device from the wall socket.
If foreign bodies or liquids enter the device, immediately disconnect the power supply unit from the wall socket. Have the device inspected by a qualified person before using it again.
Otherwise, you run the risk of an electric shock.
E


2. SAFETY INSTRUCTIONS
2.5. Connecting the device
Only connect the device to a professionally installed, earthed and electrically fused wall socket.
Make sure that the power source (wall socket) is easily accessible.
Do not bend or squeeze the cable connections.
Before operating the device, check that the voltage indicated on the device matches the local mains voltage.
2.6. Protecting the device against damages

NOTE!
Unfavorable environmental conditions such as humidity, excessive heat, or lack of ventilation can damage the device.
Use the device only in dry rooms.
Avoid the direct proximity of: heat sources, such as radiators, open flames, e.g. candles, devices with strong magnetic fields,
e.g. speakers.
Ensure that there is sufficient distance to other objects and that the device is not covered to always guarantee sufficient ventilation.
Avoid direct sunlight and places with excessive dust.
Make sure that contact with moisture, water, and splashing water is avoided and that there are no liquid filled items - e.g. vases - placed near the device.
Do not place any heavy objects on the device.
Make sure that there are no open sources of fire (e.g. lighted candles) near the device.
User manual
40


2. SAFETY INSTRUCTIONS
2.7. Risk of injury

WARNING!
Excessive sound pressure can cause hearing damage or loss. Listening in close proximity to the speakers at increased volume for a long period of time may cause harm to the user. Please check the volume from a sufficient distance from the device. Set the volume to a low level and only increase the volume to a level that is comfortable for you.
E
2.8. Notes on the radio interface
The device generates an electro-magnetic field.
Please pay attention to any indications in your surroundings that may prohibit or restrict the use of electronic devices.
This may be the case in hospitals, petrol stations and patrol depots or airports, for example. If there are such warning signs, promptly unplug the device from the power source. The components contained in the device generate electro-magnetic energy and magnetic fields. These may inhibit medical devices such as a cardiac pacemaker or defibrillator. Therefore, please maintain sufficient and safe distance between the radio and medical devices.
Should you have reason to believe that the radio has caused a disruption of a medical device, immediately switch off and unplug the radio from the power source.


natural_image
Color palette bar with grayscale swatches and a central crosshair symbol (no text or labels)
2. SAFETY INSTRUCTIONS
2.9. Cleaning the device
Before cleaning, unplug the device from the wall socket.
Use a dry, soft cloth to clean the device. Please do not use liquids to clean the device.
Do not use solvents and cleaning agents as they may damage the surface and/or inscriptions of the device.
2.10. Actions in case of malfunction
If the device malfunctions, press Reset button and wait for a few seconds. Reconnect the device to the power supply. It may be necessary to reset to the factory settings. If this does not work, please contact your dealer or contact TELESTAR Digital GmbH directly.
E


User manual
42


natural_image
Color palette bar with grayscale shades and a central crosshair symbol (no text or labels)
3. DELIVERY CONTENTS
Please remove all parts from the packaging and completely remove all pakkaging materials. If one or more of the specified parts are missing, please contact:
TELESTAR Service Center,
Am Weiher 14,
56766 Ulmen
e-mail: service@telestar.de
E
Anzahl Erklärung
1 DABMAN OR 3 Radio
1 User manual
1 USB charging cable


43


natural_image
Color palette bar with grayscale shades and a central crosshair symbol (no text or labels)
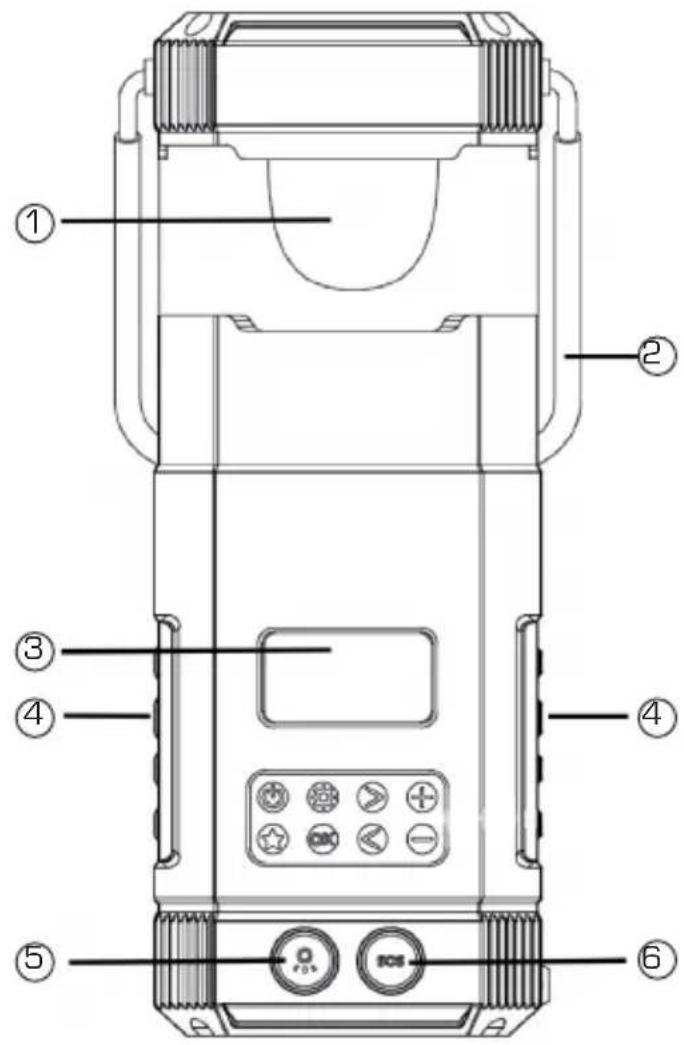
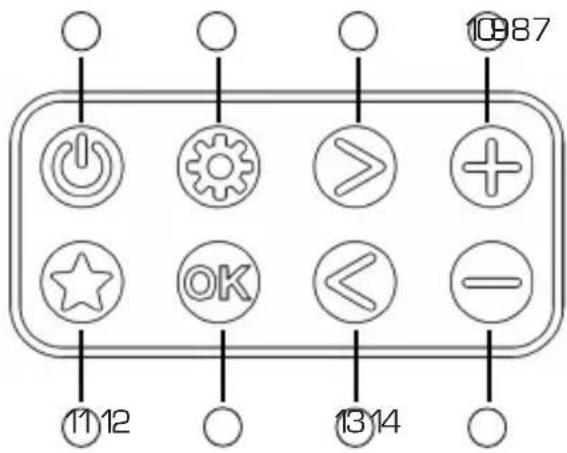
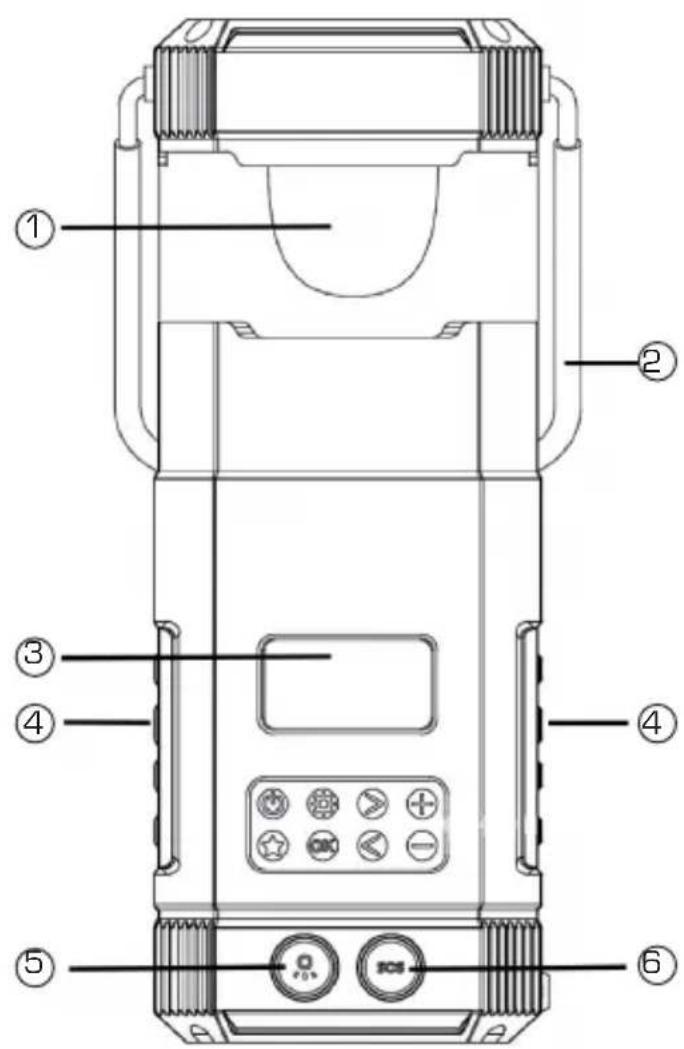
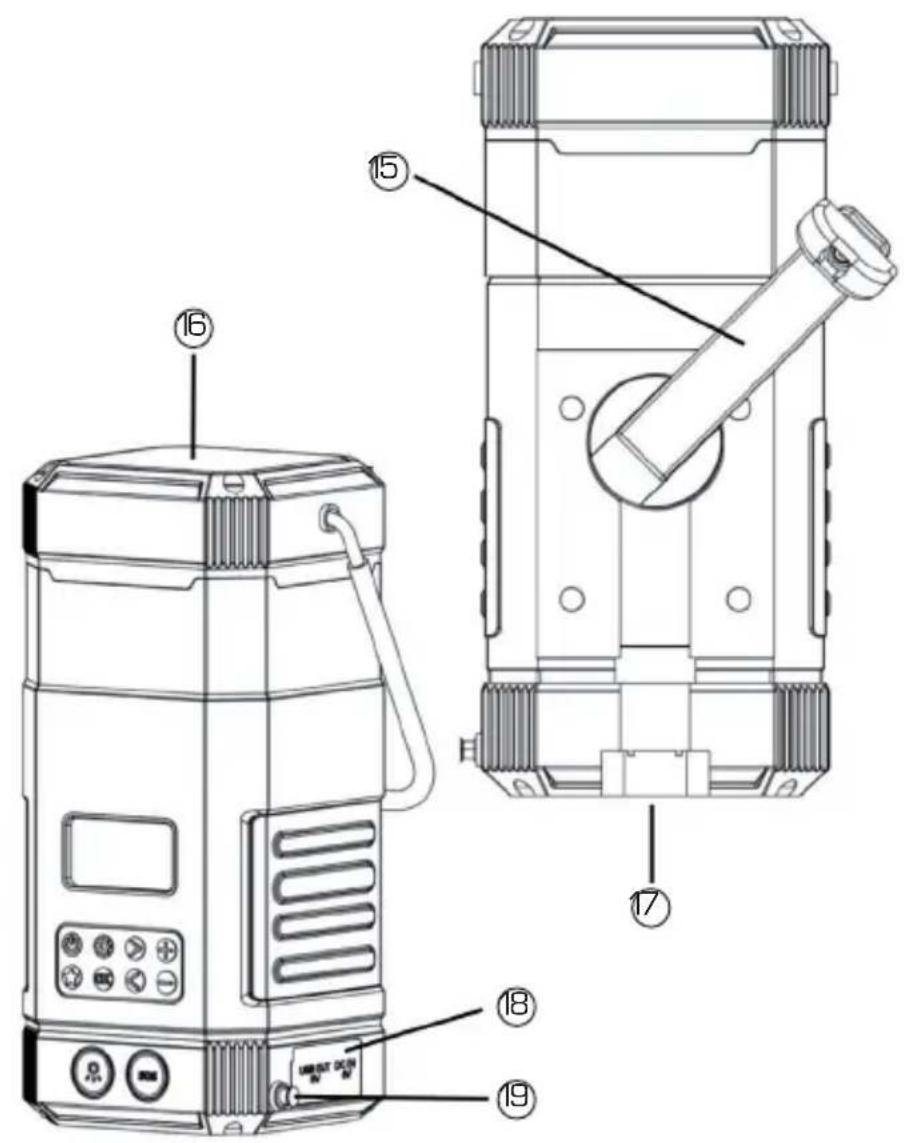
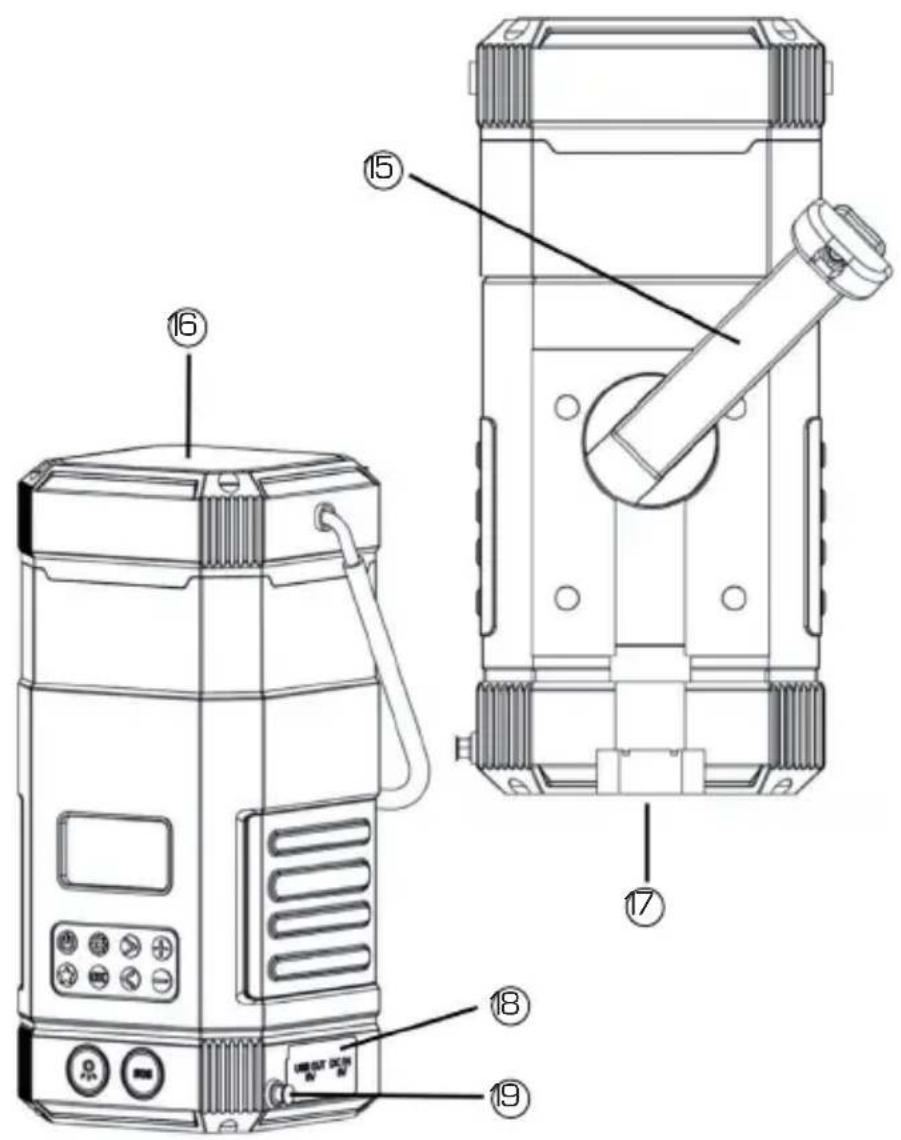
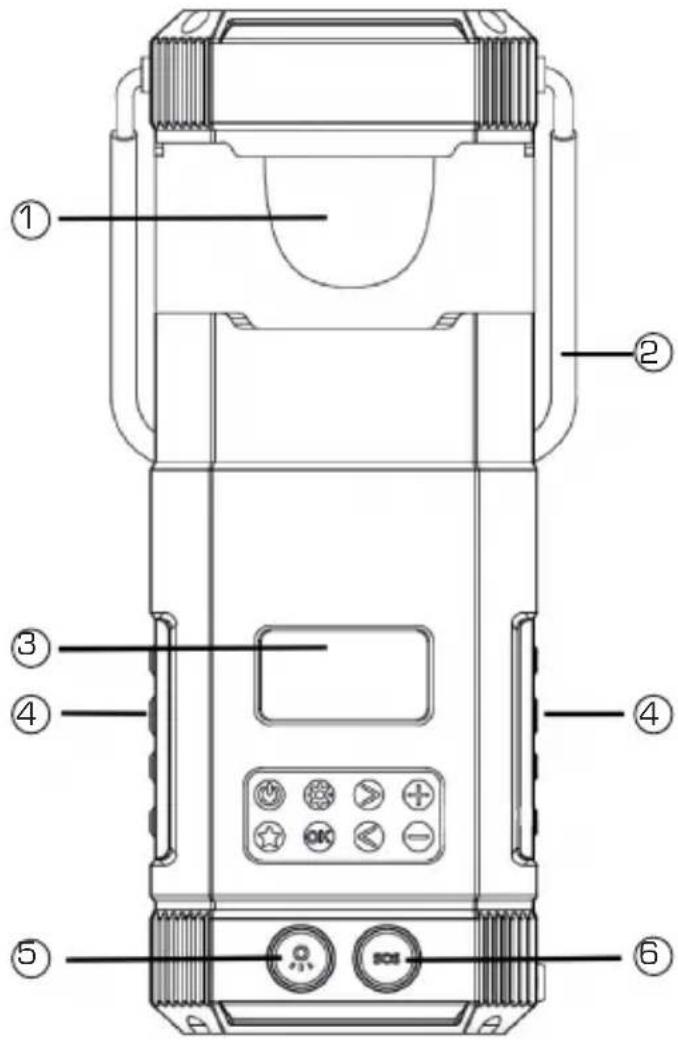
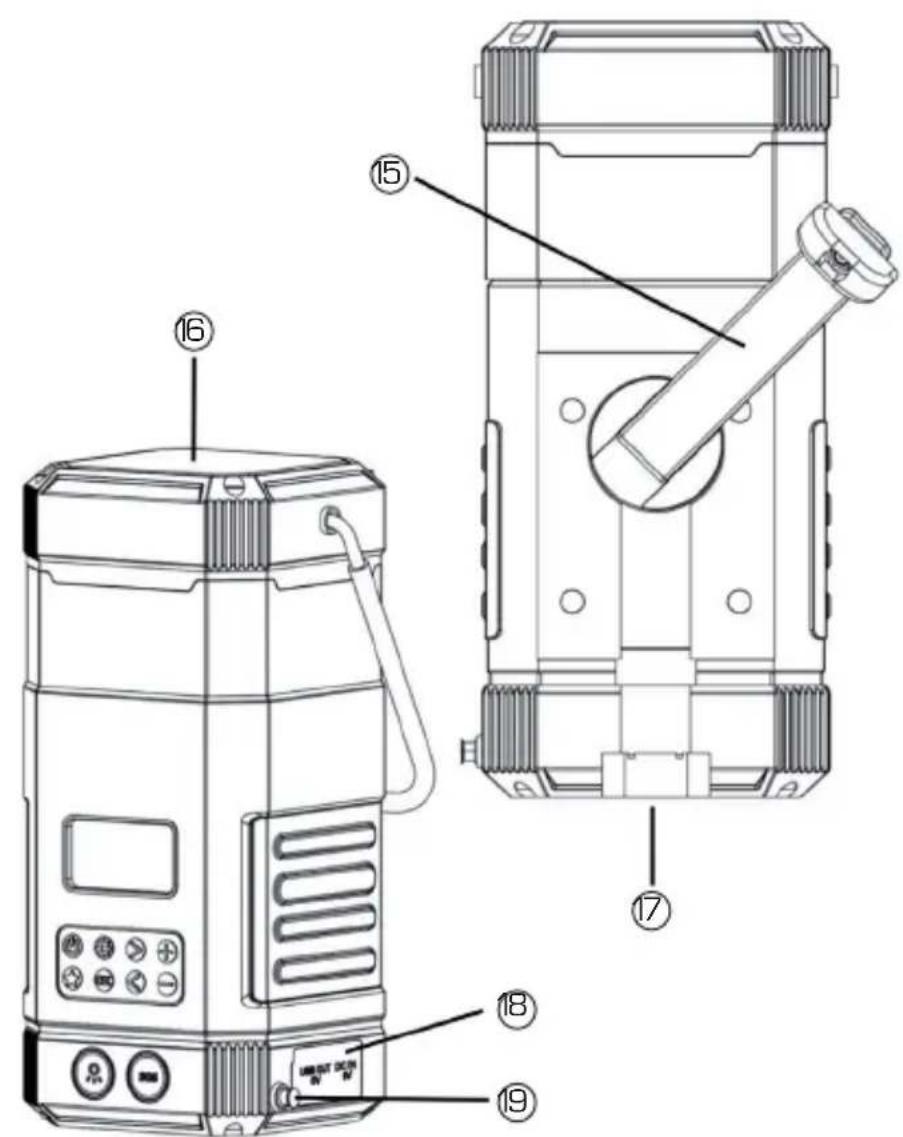
4. OVERVIEW OF THE CONTROLS

text_image
Technical diagram of a device with numbered components and labeled parts in Chinese

text_image
10987 ①⑪⑫⑫ ⑬⑬⑭⑮ ⑯⑰⑱⑲⑳ ⑰⑱⑲⑳ ⑱⑲⑳⑴ ⑲⑳⑴⑵User manual


4. OVERVIEW OF THE CONTROLS
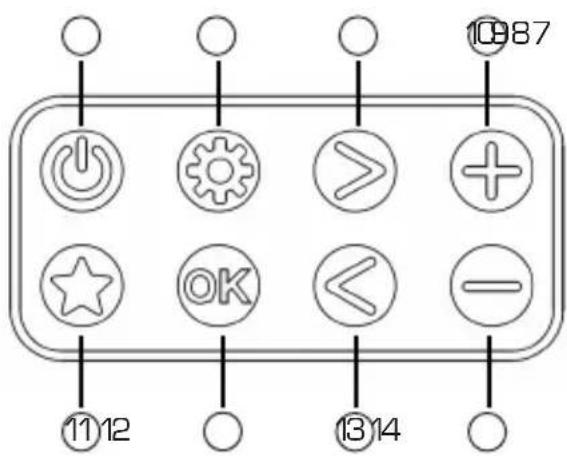
| NO. | Description Function | |
| 1 | Lantern To use the lantern, pull the device up and out. | |
| 2 | carrying handle Handle for carrying or hanging. | |
| 3 | Display Displays track/artist information, radio info. | |
| 4 | speaker | |
| 5 | Lamp/Lantern on off | A short press activates the flashlightWhen the lantern is pulled out, the lantern is switched on instead |
| 6 | SOS button Pressing this button triggers an alarm tone and an emergency signal light. | |
| 7 | On/Off/ Standby | Short press: mode change (DAB / FM / Bluetooth)Long press: 2 seconds: standbyPress and hold: in standby: switch off the radio completely |
| 8 | Menu Short press: change information about the current channelLong press: opens the main menu | |
| 9 | Right > DAB: next station from the station listFM: short press +0.05MHz / long press: seeks the next available FM station | |
| 10 | volume + Increase radio volume | |
| 11 | favourites Short press: Open Favorites channel listLong press: save favorite stations in favourites | |
| 12 | Confirmation OK Short press: confirm selection in menusLong press: starts a full channel search | |
| 13 | Left < DAB: previous station from the station listFM: short press -0.05MHz / long press: searches backwards for the next available FM station | |
| 14 | Volume - Decrease the volume of the radio |
E


natural_image
Color palette bar with grayscale swatches and a central crosshair symbol (no text or labels)
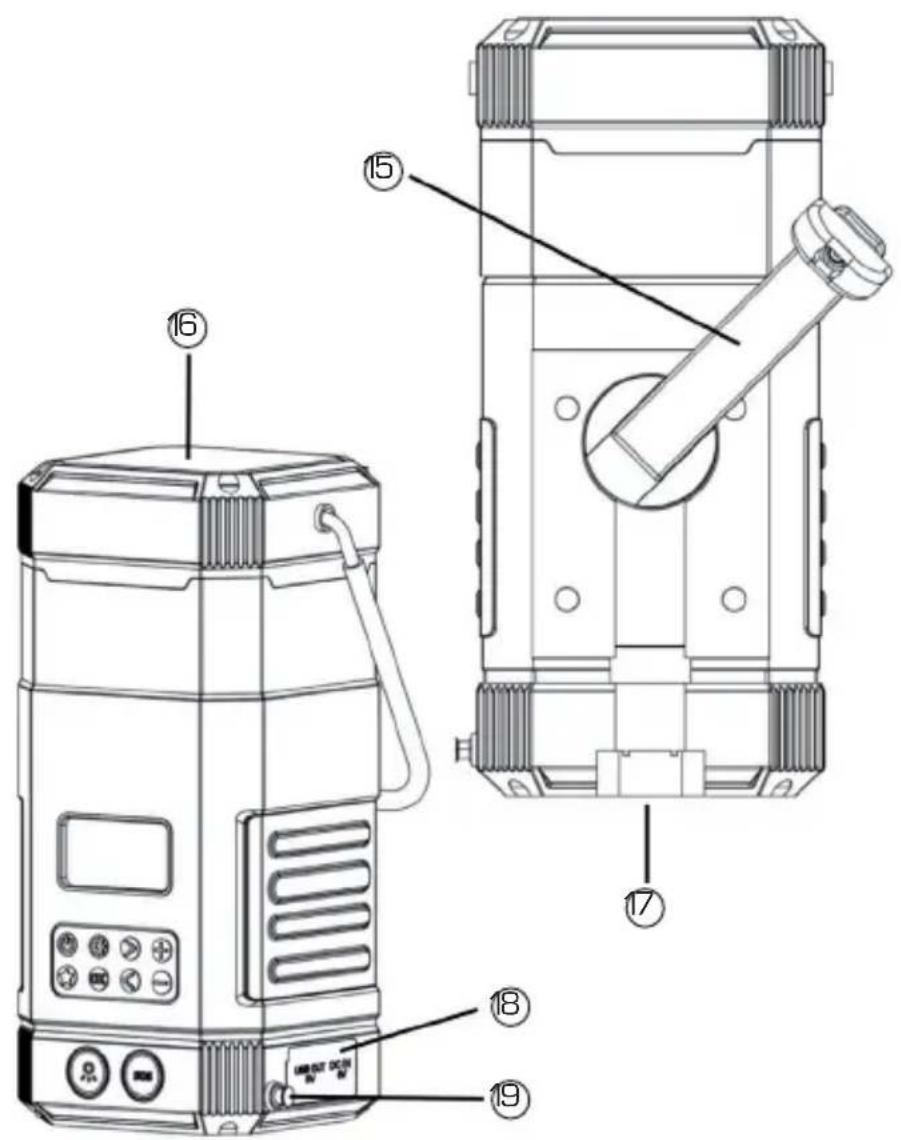
4. OVERVIEW OF THE CONTROLS

text_image
Technical diagram of a portable air conditioner unit with numbered parts labeled for identification.

User manual
46


4. OVERVIEW OF THE CONTROLS
| NO. | Description Function | |
| 15 | Hand crank | Twist hand crank to manually recharge the internal battery. |
| 16 | Solar panel Face the solar panel to the sun to recharge the radio. | |
| 17 | LightEmergency Light | Bright light to use during night time.Emergency light flashes if SOS button is pushed. |
| 18 | Connectionsunder the cover | |
| USB-C chargingsocket | Use to recharge the integrated battery of the radio. | |
| USB-C output Power bank function to charge any mobile device. | ||
| Reset button Hard reset the radio in case of software error. | ||
| Chargingindicator | Blink red: Charging in process.Constantly red: Radio fully charged | |
| 19 | Telescopicantenna | If possible, extend the antenna to its full length to ensure the best possible radio reception. |
E


5. OPERATION AND FUNCTIONS
5.1. First use
Fully extend the antenna. Long press the On/Off button 📧 until the radio powers on. Use the buttons Ⓧ to select the language and confirm with OK button. The radio performs a full scan of all available DAB+ stations.
5.2. Standby mode
To activate the standby mode, long press the On/Off button ⚙To reactivate the radio, short press the On/Off button. To fully turn off the radio and preserve battery life, long press the On/Off ⚙button again in standby mode. No alarms are available, when the radio is turned off completely.
In standby mode, press the settings button to quickly view your currently set alarm settings, or press the OK button to quickly jump to the alarm settings wizard (chapter 5.7.1).
5.3. Mode selection
To select the desired audio mode, short press the mode button ☐ while the radio is turned on. The available audio modes are:
-DAB+ digital radio
-FM analogue radio
-Bluetooth wireless audio
User manual
48


5. OPERATION AND FUNCTIONS
5.4. DAB+ Digitalradio Mode
Use this mode to listen to digital radio broadcasts. You can cycle through available stations with the left and right buttons. To access more functions, open the menu by long pressing the settings button Navigate the menu with the left and right buttons, and use the OK button to confirm. To exit the menu use the settings button again.
E
5.4.1. DAB+ station search
The radio automatically performs a full station search when you turn it on for the first time.
If you would like to perform a full station scan again at a later time (e.g. after moving), press and hold down the OK button for approx. 2 seconds.

5.4.2. Station list
After the scan is complete, you can view all currently available stations in the station list, accessible in the menu. Navigate through the list with the left and right buttons and confirm your selection with OK.
5.4.3. Saving / recalling a favourite stations
If you want to save the current DAB+ station as a favourite, press the favourite @ button for about 2 seconds.
To recall a favourite later, short press the favourite @button.

5. OPERATION AND FUNCTIONS
5.4.4. DAB settings
The DAB menu contains the following options:
Trim invalid stations:
Prune unavailable stations from station list.
Station order:
Sort stations in the station list by name or frequency.
DRC:
Adjust the level of the Dynamic Range Compression, reducing the volume differences between loud and quite passages.
Manual tune:
Manually tune a DAB frequency.


5.5. FM radio mode
Use this mode to listen to analogue radio broadcasts. You can cycle through available stations by long pressing the left and right buttons. To access more functions, open the menu by long pressing the settings button
Navigate the menu with the left ⚙ and right buttons, and use the OK button to confirm. To exit the menu use the settings button again.
5.5.1. FM station search
To perform a full station scan, press and hold down the OK button for approx. 2 seconds.
All found radio stations will be saved in the favourite station list.
User manual


5. OPERATION AND FUNCTIONS
5.5.2. Setting the FM frequency manually
Press the left and right buttons briefly to set an FM frequency manually. The frequency is adjusted in 0.05 MHz steps.
E
5.5.3. Saving / recalling a favourite stations
If you want to save the current FM station as a favourite, press the favourite button for about 2 seconds.
Use the / buttons Ⓧ to select a memory location and confirm with OK.
To recall a favourite later, short press the favourite @button on the radio.
5.5.4. FM menu
Other menu items in the FM menu include:
Scan settings:
Restrict the full scan to strong stations only.
Audio settings:
Only allow mono stations to improve reception.
5.6. Wireless music streaming (Bluetooth)
A Bluetooth-enabled mobile phone can be used for wireless playback of any audio content. For this purpose, you need to activate the "Bluetooth" mode by pressing the mode button ⚙Once this is done, search for
"DABMAN OR 3" on your mobile device. For more details about operation of your mobile phone, please refer to the device's manual.


5. OPERATION AND FUNCTIONS
5.7. System setup
You can find the system setup in the menu of every audio mode.
E
5.7.1. Alarm
Use this menu to configure the alarm function. Two separate alarms can be programmed. Each alarm can be repeated daily, on weekdays or on weekends. The alarms can play a standard alarm sound or the last set FM or DAB station.
5.7.2. Backlight
Use this entry to set the display backlight illumination level and timeout.
5.7.3. Time setup
Use this entry to set time/date, change the time or date format or configure automatic time setting via FM/DAB.
5.7.4. Language
Select one of the following menu languages:
English, German, French, Italian, Spanish, Dutch, Finnish, Polish.
User manual
52


5. OPERATION AND FUNCTIONS
5.7.5. Factory reset
Reset the radio to factory settings.
Attention: All settings and favourites will be deleted by this procedure!
E
5.7.6. Software Version
The current software version of the radio is displayed here.
5.8. Outdoor battery charging
5.8.1. Solar panel
To recharge the radio, place the radio's solar panel directly into sunlight.
The panel can be tilted for optimal alignment. Be careful to not shade any part of the solar panel. Even small shadows can drastically decrease the panel's performance. Artificial light sources mostly do not provide enough energy to charge the radio.
5 hours of solar charging can power the radio for about 15 minutes or the integrated torch for about 1 hour.
5.8.2. Hand crank
To recharge the radio, extend the hand crank and turn it in either direction.
For optimal charging, turn the crank at 120 - 150 rpm (2 - 2.5 times a second). 30 minutes of turning can power the radio for about 15 minutes.

5. OPERATION AND FUNCTIONS
5.9. SOS emergency function
Use this function in an emergency to alert people near your location. To activate, long press the SOS button on the bottom of the radio. The radio will play a loud siren and flash a red and blue signal light.
Attention: The siren is very loud. Prolonged close range exposure can cause hearing damage. Try to set up the radio some distance away, when using the emergency function. Use of the emergency function drains the battery at an excessive rate.
5.10. Torch

To turn on the torch, press the button on top of the radios. If you press the button a second time, the light flashes.
If the solar panel is folded upwards, the button does not activate the torch, but the reading light under the solar module instead. This can be operated in 3 different levels.
User manual
54


6. TROUBLESHOOTING
| Problem Solution | |
| The device does not switch on. | Make sure the radio is charged, by connecting it to a power source and charging for at least 30 minutes.If the radio is charged but still does not switch on, press the reset button under the charge cover with a small object. |
| No sound or low volume Is the radio muted? Use the volume up button to increase the volume. | |
| No signal or hissing in DAB/FM mode. | Re-position the radio or change the antenna.Check that the antenna is fully extended. |
| Some buttons/functions can no longer be used | Reset the radio to factory settings (chapter 5.7.5). |


natural_image
Color palette bar with grayscale swatches and a central crosshair symbol (no text or labels)7. DISPOSAL INFORMATION
7.1. Disposing of the packaging
The packaging consists exclusively of materials that may be recycled. Please dispose of this according to the 'Dual system'.

E
7.2. Device disposal
The symbol on the right of a crossed-out waste bin on wheels indicates that this device is subject to Directive 2012 / 19 / EU.
This directive specifies that this device may not be disposed of in normal household waste at the end of its service life but must be taken to specific collection centres, recycling centres or waste disposal companies.
This type of disposal is free of charge. Protect the environment and ensure a proper disposal.
Further information is available at your local waste collection company or your city or municipal office.


User manual
56


natural_image
Color palette bar with grayscale shades and a central crosshair symbol (no text or labels)
8. TECHNICAL DATA
| Model number IMPERIAL DABMAN OR 3 | |
| Description DAB+/DAB/UKW/Bluetooth | |
| Speaker power 2 x 7 W | |
| FM 87,5 - 108 MHz | |
| DAB/DAB+ 174 - 240 MHz (Band III) | |
| Bluetooth Version 5.0 / Range ca. 10 m | |
| Charging input USB-C 5 V 2 A | |
| Charging output 5 V 2 A | |
| Charging time | ca. 3 hours |
| Waterproof IPX 5 | |
| Operating temperature (-10 °C) - (+55 °C) | |
| Dimensions 100 x 200 x 100 mm | |
| Weight 810 g | |
E


9. SERVICE & SUPPORT
E
Dear customer!
Thank you for choosing one of our products. Our product meets the legal requirements and has been manufactured under constant quality control.
The technical data correspond to the current status at the time of printing.
Subject to changes.
The warranty period for the DABMAN OR 3 corresponds to the statutory provisions at the time of purchase.
We also offer a HOTLINE telephone service with professional support.
Professional specialists are ready to offer their assistance in our service area. Here you can ask any questions you may have about TELESTAR products and get suggestions on troubleshooting.
Our technicians are available Monday- Friday from
08:00 - 16:45 at the following phone number:
02676 / 95 20 101
or by email at: service@telestar.de
If the Service Hotline cannot help you, please send your DABMAN OR 3 to the following address, preferably in its original packaging, but definitely packed safely for transport:
TELESTAR - DIGITAL GmbH
Service Center
Your device is CE marked and complies with all necessary EU standards. TELESTAR DIGITAL GmbH hereby declares that the DABMAN OR 3 device complies with the essential requirements and other relevant provisions of RoHS Directive 2011/65/EU, RE Directive 2014/53/EU and ErP Directive 2009/125/EC.
The Declaration of Conformity for this product is available at: http://www.telestar.de/de_DE/Konformitaetserklaerung/352-529/?productID=24714
E

All technical data and functions described in these operating instructions are correct at the time of printing and are subject to change without prior notice. We assume no liability for misprints or errors. Copying and reproduction only permitted with the express permission of TELESTAR-DIGITAL GmbH.

© TELESTAR 2023
text_image
E User manual 60 bda_DABMAN OR 3_V1_04_23_DE_EN_FR_NL.indd 60 26.04.2023 14:10:25imperial®
DABMAN OR 3
Guide d'utilisation
P

natural_image
Green industrial portable device labeled 'imperial' with handle and control buttons (no readable text beyond branding)natural_image
Color calibration bar with grayscale and RGB color swatches, no text or symbols present


bda_DABMAN OR 3_V1_04_23_DE_EN_FR_NL.indd 62

26.04.2023 14:10:27
1. TABLE DES MATIÈRES
natural_image
Color palette bar with grayscale swatches and a central crosshair symbol (no text or labels)2. CONSIGNES DE SÉCURITÉ
natural_image
Color palette bar with grayscale swatches and a central crosshair symbol (no text or labels)
2. CONSIGNES DE SÉCURITÉ
natural_image
Color palette bar with grayscale shades and a central crosshair symbol (no text or labels)
3. CONTENU DE LA BOÎTE
TELESTAR Service Center,
Am Weiher 14,
D-56766 Ulmen
Courriel : service@telestar.de
F
Numéro Explication
1 DABMAN OR 3 Radio
natural_image
Color palette bar with grayscale shades and a central crosshair symbol (no text or labels)
4. COMMANDES RADIO


text_image
Technical diagram of a device with numbered parts labeled 1 through 6, including control buttons and display panel.
text_image
10987 ①⑪⑫⑫ ⑬⑬⑭⑮ ⑰⑱⑲⑳⑴Guide d'utilisation


4. COMMANDES RADIO
natural_image
Color palette bar with grayscale swatches and a central crosshair symbol (no text or labels)
4. COMMANDES RADIO

text_image
Technical diagram of a portable air conditioner unit with numbered parts labeled 15, 16, 17, 18, and 19.

Guide d'utilisation
76


4. COMMANDES RADIO
text_image
5. FONCTIONNEMENT5. FONCTIONNEMENT
text_image
5. FONCTIONNEMENT5. FONCTIONNEMENT
5.5.4. Menu FM
natural_image
Color palette bar with grayscale shades and a central crosshair symbol (no text or labels)
5. FONCTIONNEMENT
natural_image
Color palette bar with grayscale shades and a central crosshair symbol (no text or labels)
8. DONNÉES TECHNIQUES
F
natural_image
Green industrial portable device labeled 'imperial' with control panel and handle (no visible text beyond label)natural_image
Color calibration bar with grayscale and RGB color swatches, no text or symbols presentnatural_image
Color palette bar with grayscale swatches and a central crosshair symbol (no text or labels)3. LEVEROMVANG
TELESTAR Service Center,
Am Weiher 14,
56766 Ulmen
e-mail: service@telestar.de
NL
Aantal Verklaring
1 DABMAN OR 3 Radio
natural_image
Color palette bar with grayscale gradient and a central crosshair symbol (no text or labels)
4. OVERZICHT VAN DE BEDIENINGSELEMENTEN


text_image
Technical diagram of a device with numbered components and labeled parts in Chinese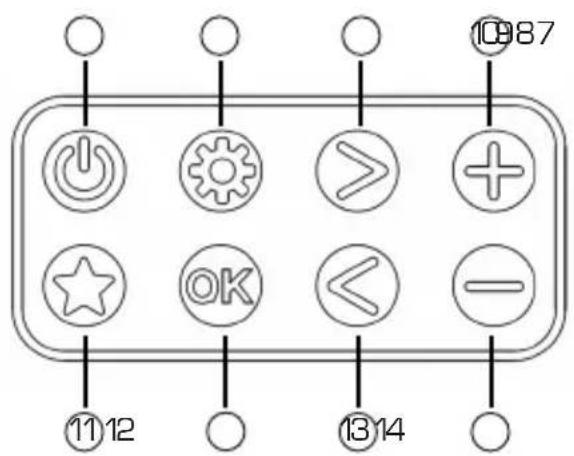
text_image
10987 ①⑪⑫⑫ ⑬⑬⑭natural_image
Color calibration bar with grayscale and RGB color swatches, no text or symbols present
4. OVERZICHT VAN DE BEDIENINGSELEMENTEN

text_image
Technical diagram of a device with numbered parts, including front and side views with labeled components.

6. PROBLEEMOPLOSSING
natural_image
Color palette bar with grayscale shades and a central crosshair symbol (no text or labels)
natural_image
Color palette bar with grayscale shades and a central crosshair symbol (no text or labels)


bda_DABMAN OR 3_V1_04_23_DE_EN_FR_NL.indd 121

26.04.2023 14:10:45

natural_image
Color palette bar with grayscale swatches and a central crosshair symbol (no text or labels)


bda_DABMAN OR 3_V1_04_23_DE_EN_FR_NL.indd 122

26.04.2023 14:10:45

natural_image
Color palette bar with grayscale shades and a central crosshair symbol (no text or labels)


bda_DABMAN OR 3_V1_04_23_DE_EN_FR_NL.indd 123

26.04.2023 14:10:45

natural_image
Color bar with grayscale gradient and a central crosshair symbol (no text or labels)
natural_image
Abstract digital network background with light blue gradient and white nodes (no text or symbols)