
Café Plus - Coffee machine DUALIT - Free user manual and instructions
Find the device manual for free Café Plus DUALIT in PDF.
User questions about Café Plus DUALIT
0 question about this device. Answer the ones you know or ask your own.
Ask a new question about this device
Download the instructions for your Coffee machine in PDF format for free! Find your manual Café Plus - DUALIT and take your electronic device back in hand. On this page are published all the documents necessary for the use of your device. Café Plus by DUALIT.
USER MANUAL Café Plus DUALIT
natural_image
Illustration of a Dualit coffee maker with no visible text or symbols on the device itself
Café Plus
Capsule Machine
text_image
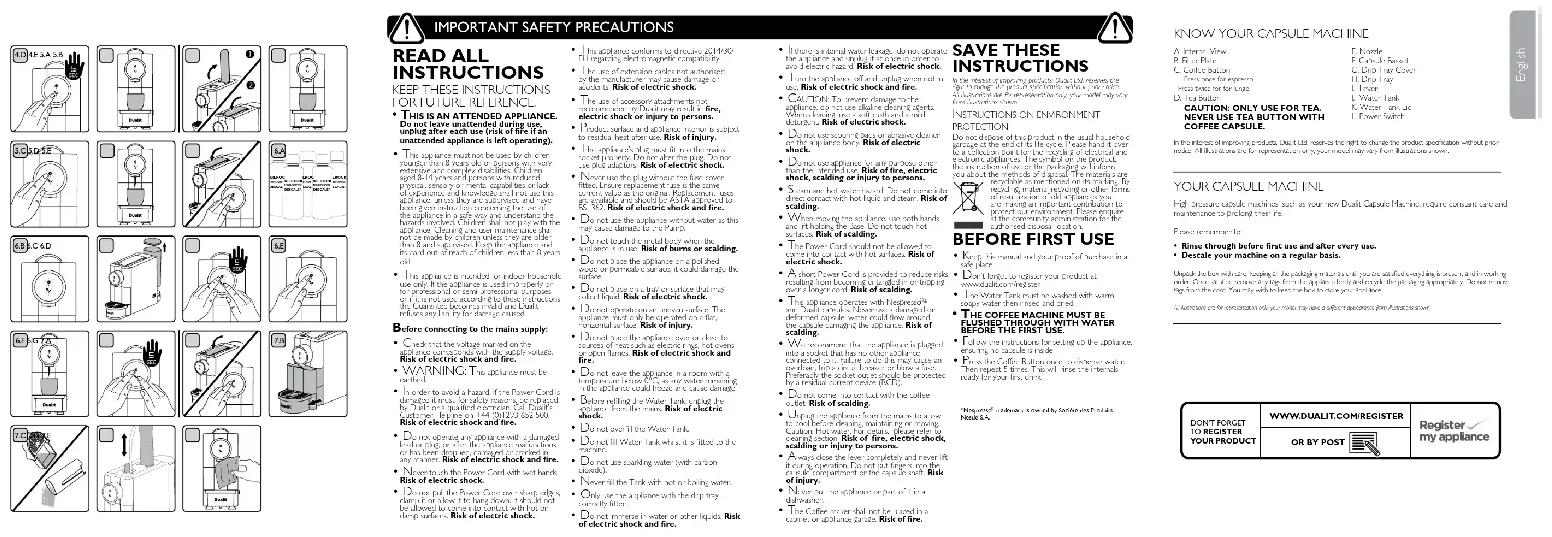
IMPORTANT SAFETY PRECAUTIONS READ ALL INSTRUCTIONS KEEP THESE INSTRUCTIONS FOR FUTURE REHRINCE. • THIS IS AN ATTENDED APPLIANCE. Do not leave announcement during use. • Use of the electric shock (first 12 months) or the unattended appliance is left operating. • The first package must be used to allow the first package to install a suitable electrical shock. • The first package must be used to install a suitable electrical shock. • The first package must be used to install a suitable electrical shock. • The first package must be used to install a suitable electrical shock. • The first package must be used to install a suitable electrical shock. • The first package must be used to install a suitable electrical shock. • The first package must be used to install a suitable electrical shock. • The first package must be used to install a suitable electrical shock. • There are no specifications for the first package required to install a suitable electrical shock. • The first package must be used to install a suitable electrical shock. • The first package must be used to install a suitable electrical shock. • The first package must be used to install a suitable electrical shock. • The first package must be used to install a suitable electrical shock. • The first package must be used to install a suitable electrical shock. • The first package must be used to install a suitable electrical shock. • This is an ATTENDED APPLIANCE. Do not leave announcement during use. • Use of the electric shock (first 12 months) or the unattended appliance is left operating. • The first package must be used to install a suitable electrical shock. • The first package must be used to install a suitable electrical shock. • The first package must be used to install a suitable electrical shock. • The first package must be used to install a suitable electrical shock. • The first package must be used to install a suitable electrical shock. • The first package must be used to install a suitable electrical shock. • The first package must be used to install an optional electrical shock. • The first package must be used to install an optional electrical shock. • The first package must be used to install an optional electrical shock. • The first package must be used to install an optional electrical shock. • The first package must be used to install an optional electrical shock. • The first package must be used to install an optional electrical shock. • The first package must be used to install an optional electrical shock. • The first package must have been installed in the first two weeks of the year. • The first package must have been installed in the second week of the year. • The first package must have been installed in the third week of the year. • The first package must have been installed in the fourth week of the year. • The first package must have been installed in the fifth week of the year. • The first package must have been installed in the sixth week of the year. • The first package must have been installed in the seventh week of the year. • The first package must have been installed in the eighth week of the year. • The first package must have been installed in the第九 week of the year. • The first package must have been installed in the 10th week of the year. • The first package must have been installed in the 11st week of the year. • The first package must have been installed in the 12nd week of the year. • The first package must have been installed in the 13rd week of the year. • The first package must have been installed in the 14th week of the year. • The first package must have been installed in the 15th week of the year. • The first package must have been installed in the 16th week of the year. • The first package must have been installed in the 17th week of the year. • The first package must have been installed in the 18th week of the year. • The first package must have been installed in the 19th week of the year. • The first package must have been installed in the 20th week of the year. • The first package must have been installed in the 21st week of the year. • The first package must have been installed in the 22nd week of the year. • The first package must have been installed in the 23rd week of the year. • The first package must have been installed in the 24th week of the year. • The first package must have been installed in the 25th week of the year. • The first package must have been installed in the 26th week of the year. • The first package must have been installed in the 27th week of the year. • The first package must have been installed in the 28th week of the year. • The first package must have been installed in the 29th week of the year. • The first package must have been installed in the 30th week of the year. • The first package must have been installed in the 31st week of the year. • The first package must have been installed in the 32nd week of the year. • The first package must have been installed in the 33rd week of the year. • The first package must have been installed in the 34th week of the year. • The first package must have been installed in the 35th week of the year. • The first package must have been installed in the 36th week of the year. • The first package must have been installed in the 37th week of the year. • The first package must have been installed in the 38th week of the year. • The first package must have been installed in the 39th week of the year. • The first package must have been installed in the 40th week of the year. • The first package must have been installed in the 41st week of the year. • The first package must have been installed in the 42nd week of the year. • The first package must have been installed in the 43rd week of the year. • The first package must have been installed in the 44th week of the year. • The first package must have been installed in the 45th week of the year. • The first package must have been installed in the 46th week of the year. • The first package must have been installed in the 47th week of the year. • The first package must have been installed in the 48th week of the year. • The first package must have been installed in the 49th week of the year. • The first package must have been installed in the 50th week of the year. The second panel has been installed in all three sections of each section, but it is also available for all three sections. For example, there are no specifications for all three sections. For example, there are no specifications for all three sections. For example, there are no specifications for all three sections. For example, there are no specifications for all three sections. For example, there are no specifications for all three sections. For example, there are no specifications for all three sections. For example, there are no specifications for all three sections. For example, there are no specifications for all three sections. For example, there are no specifications for all three section lines, lines, lines, lines, lines, lines, lines, lines, lines, lines, lines, lines, lines, lines, lines, lines, lines, lines, lines, lines, lines, lines, lines, lines, lines, lines, lines, lines, lines, lines, lines, lines, lines, lines, lines, lines, lines, lines, lines, lines, lines, lines, lines, lines, lines, lines, lines, lines, lines, lines, lines and other sections Before connecting to the main supply: - Does not use any power supply with or without access to a specific electronic device or circuit board (e.g., power supply or equipment), or use either a power supply or equipment (e.g., power supply or equipment). - Does not use any power supply with or without access to a specific electronic device or circuit board (e.g., power supply or equipment). - Does not use any power supply with or without access to a specific electronic device or circuit board (e.g., power supply or equipment). - Does not use any power supply with or without access to a specific electronic device or circuit board (e.g., power supply or equipment). - Does not use any power supply with or without access to a specific electronic device or circuit board (e.g., power supply or equipment). - Does not use any power source with or without access to a specific electronic device or circuit board (e.g., power supply or equipment). - Does not use any power source with or without access to a specific electronic device or circuit board (e.g., power supply or equipment). - Does not use any power source with or without access to a specific electronic device or circuit board (e.g., power supply or equipment). - Does not use any power source with or without access to a specific electronic device or circuit board (e.g. power supply or equipment). - Does not use any power source with or without access to a specific electronic device or circuit board (e.g., power supply or equipment). - Does not use any power source with or without access to a specific electronic device or circuit board (e.g., power supply or equipment). - Does not use any power source with or without access to a specific electronic device or circuit board (e.g., power supply or equipment). - Does not use any power source with or without connection to a specific electronic device or circuit board (e.g., power supply or equipment). - Does not use any power source with or without connection to a specific electronic device or circuit board (e.g., power supply or equipment). - Does not use any power source with or without connection to a specific electronic device or circuit board (e.g., power supply or equipment). - Does not use any power source with or without connection to a specific electronic device or circuit board (e.g., power supply or electronics). - Does not use any power source with or without connection to a specific electronic device or circuit board (e.g., power supply or electronics). - Does not use any power source with or without connection to a specific electronic device or circuit board (e.g., power supply or electronics). - Does not use any power source with or without connection to a specific electronic device or circuit board (e.g., power supply or electronics). - Does not use any power source with or without connection to a specific electronics device or circuit board (e.g., power supply or electronics). - Does not use any power source with or without connection to a specific electronics device or circuit board (e.g., power supply or electronics). - Does not use any power source with or without connection to a specific electronics device or circuit board (e.g., power supply or electronics). - Does not use any power source with or without connection to a specific electronics device or circuit board (e.g., power supply or electronics). - Does NOT use any power source with or without connection to a specific electronics device or circuit board (e.g., power supply or electronics). - Does NOT use any power source with or without connection to a specific electronics device or circuit board (e.g., power supply or electronics). - Does NOT use any power source with or without connection to a specific electronics device or circuit board (e.g., power supply or electronics). - Does NOT use any power source with or without connection to a specific electronics device or circuit boards - Does not use any power source with or without connection to a specific electronics device or circuit board (e.g., power supply or electronics). - Does not use any power source with or without connection to a specific electronics device or circuit board (e.g., power supply or electronics). - Does not use any power source with or without connection to a specific electronics device or circuit board (e.g., power supply or electronics). - Does not use any power source with or without connection to a specific electronics device/ Circuit board/ Circuit board/ Circuit board/ Circuit board/ Circuit board/ Circuit board/ Circuit board/ Circuit board/ Circuit board/ Circuit board/ Circuit board/ Circuit board/ Circuit board/ Circuit board/ Circuit board/ Circuit board/ Circuit board/ Circuit board/ Circuit board/ Circuit board/ Circuit board/ Circuit board/ Circuit board/ Circuit board/ Circuit board/ Circuit board/ Circuit board/ Circuit board/ Circuit board/ Circuit board/ Circuit board/ Circuit board/ Circuit board/ Circuit board/ - Does not use any power source with or without connection to a specific electronics device/ Circuit board/ Circuit board/ Circuit board/ Circuit board/ Circuit board/ Circuit board/ Circuit board/ Circuit board/ Circuit board/ Circuit board/ Circuit board/ Circuit board/ Circuit board/ Circuit board/ Circuit board/ Circuit board/ Circuit board/ Circuit board/ Circuit board/ Circuit board/ Circuit board/ Circuit board/ Circuit board/ Circuit board/ Circuit board/ Circuit board/ Circuit board/ Circuit board/ - Does not use any power source with or without connection to a specific electronic device/ Circuit board/ Circuit board/ Circuit board/ Circuit board/ Circuit board/ Circuit board/ Circuit board/ Circuit board/ Circuit board/ Circuit board/ Circuit board/ Circuit board/ Circuit board/ Circuit board/ Circuit board/ Circuit board/ Circuit board/ Circuit board/ Circuit board/ Circuit board/ Circuit board/ - Does not use any power source with or without connection to a specific electronic device/ Circuit board/ Circuit board/ Circuit board/ Circuit board/ Circuit board/ Circuit board/ Electrical switch / Electrical switch / Electrical switch / Electrical switch / Electrical switch / Electrical switch / Electrical switch / Electrical switch / Electrical switch / Electrical switch / Electrical switch / Electrical switch / Electrical switch / Electrical switch / Electrical switch / Electrical switch / Electrical switch / Electrical switch / Electrical switch / Electrical switch / Electrical switch / Electrical switch / Electrical switch / Electrical switch / Electrical switch / Electrical switch / Electrical switch / Electrical switch / Electrical switch / Electrical switch / Electrical switch / Electrical switch / Electrical switch / Electrical switch / Electric - Does not use any power source with or without connection to a specific electronics device/ Electrical switch / Electrical switch / Electrical switch / Electrical switch / Electrical switch / Electrical switch / Electrical switch / Electrical switch / Electrical switch / Electrical switch / Electrical switch / Electrical switch / Electrical switch / Electrical switch / Electrical switch / Electrical switch / Electrical switch / Electrical switch / Electrical switch / Electrical switch / Electrical switch / Electrical switch / Electrical switch / Electrical switch / Electrical switch / Electrical switch / Electrical switch / Electrical switch / Electrical switch / Electrical switch / Electrical switch / Electrical switch / Electrical switch - Does not use any power source with or without connection to a specific electronic device/ Electrical switch / Electrical switch / Electrical switch / Electrical switch / Electrical switch / Electrical switch / Electrical switch / Electrical switch / Electrical switch / Electrical switch / Electrical switch / Electrical switch / Electrical switch / Electrical switch / Electrical switch / Electrical switch / Electrical switch / Electrical switch / Electrical switch / Electrical switch / Electrical switch / Electrical switch / Electrical switch / Electrical switch / Electrical switch / Electrical switch / Electrical switch / Electrical switch - Does not use any power source with or without connection to a specific electronic devices/ Electrical switch / Electrical switch / Electrical switch / Electrical switch / Electrical switch / Electrical switch / Electrical switch / Electrical switch / Electrical switch / Electrical switch / Electrical switch / Electrical switch / Electrical switch / Electrical switch / Electrical switch / Electrical switch / Electrical switch / Electrical switch / Electrical switch - Does not use any power source with or without connection to a specific electronic devices/ Electrical switches / Electrical switches | Electric shock | Electric shock | Electric shock | Electric shock | Electric shock | Electric shock | Electric shock | Electric shock | Electric shock | Electric shock | Electric shock | Electric shock | Electric shock | Electric shock | Electric shock | Electric shock | - Does not use any power source with or without connection to a specific electronic devices/ Electrical switches | Electric switches | Electric switches | Electric switches | Electric switches | Electric switches | Electric switches | Electric switches | Electric switches | Electric switches | Electric switches | Electric switches | Electric switches | Electric switches | Electric switches | - Does not use any power source with or without connection to a specific electronic devices/ Electrical switches | Electric switches | Electric switches | Electric switches | Electric switches | Electric switches | Electric switches | Electric switches | Electric switches | Electric switches | Electric switches | Electric switches | Electric switches | - Does not use any power source with or without connection to a specific electronic devices/ Electrical switches | Electric switches | Electric switches | Electric switches | Electric switches | Electric switches | Electric switches | Electric switches | Electric switches | Electric switches | Electric switches | Electric switches | Electric switches | - Does not use any energy source with or without connection to a specific electronic devices/ Electrical switches | Electric switches | Electric switches | Electric switches | Electric switches | Electric switches | Electric switches | Electric switches | Electric switches | Electric switches | Electric switches | Electric switches | - Does not use any energy source with or without connection to a specific electronic devices/ Electrical switches | Electric switches | Electric switches | Electric switches | Electric switches | Electric switches | Electric switches | Electric switches | Electric switches | Electric switches | Electric switches | - Does not use any energy source with or without connection to a specific electronic devices/ Electrical switches | Electric switches | Electric switches | Electric switches | Electric switches | Electric switches | Electric switches | Electric switches | Electric switches | Electric switches | - Does not use any energy source with or without connection to a specific electronic devices/ Electrical switches | Electric switches | Electric switches | Electric switches | Electric switches | Electric switches | Electric switches | Electric switches | Electric switches | Electric switches | - Does not use any energy source with or without connection to a specific electronic devices/ Electrical switches | Electric switches | Electrolytic cells and/or electrolytic cells and/or electrolytic cells and/or electrolytic cells and/or electrolytic cells and/or electrolytic cells and/or electrolytic cells and/or electrolytic cells and/or electrolytic cells and/or electrolytic cells and/or electrolytic cells and/or electrolytic cells and/or electrolytic cells and/or electrolytic cells and/or electrolytic cells and/or electrolytic cells and/or electrolytic cells and/or electrolytic cells - Does not use any energy source with or without connection to a specific electronic devices/ Electrical switches and/or electrolytic cells and/or electrolytic cells and/or electrolytic cells and/or electrolytic cells and/or electrolytic cells and/or electrolytic cells and/or electrolytic cells and/or electrolytic cells and/or electrolytic cells and/or electrolytic cells and/or electrolytic cells and/or electrolytic cells and/or electrolytic cells and/or electrolytic cells and/or electrolytic cells and/or electrolytic cells and/or electroylics and/or electroylics and/or electroylics and/or electroylics and/or electroylics and/or electroylics and/or electroylics and/or electroylics and/or electroylics and/or electroylics and/or electroylics and/or electroylics and/or electroylics and/or electroylics and/or electroylics and/or electroylics and/or electroylics and/or electrooicons and/or electrooicons and/or electrooicons and/or electrooicons and/or electrooicons and/or electrooicons and/or electrooicons and/or electrooicons and/or electrooicons and/or electrooicons and/or electrooicons and/or electrooicons and/or electrooicons and/or electrooicons and/or electrooicons and/or electrooicons and/or electrooicons and/or electroocycnics and/or electroocycnics and/or electroocycnics and/or electroocycnics and/or electroocycnics and/or electroocycnics and/or electroocycnics and/or electroocycnics and/or electroocycnics and/or electroocycnics and/or electroocycnics and/or electroocycnics and/or electroocycnics and/or electroocycnics and/or electroocycnics and/OR electroocycnics and/OR electroocycnics and/OR electroocycnics and/OR electroocycnics and/OR electroocycnics and/OR electroocycnics and/OR electroocycnics and/OR electroocycnics and/OR electroocycnics and/OR electroocycnics and/OR electroocycnics and/OR electroocycnics and/OR electroocycnics and/OR electroocycnics and/OR electrooicncns and/OR electroocycnics and/OR electroocycnics and/OR electroocycnics and/OR electroocycnics and/OR electroocycnics and/OR electroocycnics and/OR electroocycnics and/OR electroocycnics and/OR electroocycnics and/OR electroocycnics and/OR electroocycnics and/OR electroocycnics and/OR electroocycnics and/OR electroocycnics and OUR ELECTRONIC INSTRUCTIONS BEFORE FIRST USE - Does not use any power source with an operation - Does not use any power source with an operation - Does not use any power source with an operation - Does not use any power source with an operation - Does not use any power source with an operation - Does not use any power source with an operation - Does not use any power source with an operation - Does not use any power source with an operation - Does not use any power source with an operation - Does not use any power source with an operationIn the interest of improving products, Duits Ltd receives the right to share the product specified on without prior
Note: All activities are represented only by your model paper, from its material shown.
YOUR CAPSUE MACHINE
• Rises through before first use and after every van.
- Descalc your machine on a regular basis.
In the 12 months' annual season, by: August 1st, January 19, 2018.
m = 311
DON'T FORGET
TO REGISTER
YOUR PRODUCT
WWW.DUALIT.COM!REGISTER
[Table_Title]
。
。
-
2017年
-
2015
OR BY
(1)
[Non-Text]
post
表决结果:同意
单位
三
(No text)
-
(1)
LIMESCALE WARNING CLEANING AND DESCALING
HARD WATER WILL CAUSE LIMESCALE BUILD-UP, RESULTING IN BLOCKAGES THAT WILL CAUSE PERMANENT DAMAGE OR WILL DECREASE THE LIFE OF YOUR MACHINE. TO PREVENT THIS, DESCALE REGULARLY AND USE A WATER SOFTENER.
IMPORTANT NOTICE: PRODUCT FAILURE DUE TO THE BUILD UP OF LIMESCALE IS NOT COVERED BY GUARANTEE.
| WATER HARDNESS TABLE | ||||
| WATER HARDNESS | ACTION FREQUENCY | |||
| Hardness level | CaCO_3 mg/l | Descale | Water Softener | Slow Coffee Extraction or Drop in Steam Output |
| Soft 0-1 | 100 At Least | Once Every 2Months or Every 100 Cycles | Replace Annually | Descale Immediately |
| Medium | 101-200 At | Least Once Per Monthor Every 50 Cycles | Replace Bi-Annually | Descale Immediately |
| Hard* | 201+ At Least | Once per Monthor Every 25 Cycles | Replace Bi-Annually | Descale Immediately |
*Treat bottled water as hard water.
During Use - Water Softeners
You must use a Water Softener Bag in medium and hard water areas, but Dualit recommends the use of a water softener in all areas. Follow the manufacturer's instructions for use. Replace the Water Softener Bag according to the Water Hardness Table above.
During Use - Descaler
Dualit recommends only using Kirock (coffee compatible) limescale removing solution. Follow the manufacturer's dosage and safety/handling precautions. Descalc your appliance regularly according to the Water Hardness Table above. For further assistance, contact Dualit's Customer Services by emailing info@dualit.com.
- See descale instructions for full descale procedure and further details.
- User must descale using a specific limescale removing solution. Coffee machine cleaners will not descale your machine.
| DON'T FORGETTO REGISTERYOUR PRODUCT | WWW. DUALIT.COM/REGISTER | Registermy appliance |
| OR BY POST |
YOUR CAFÉ PLUS CAPSULE MACHINE


IMPORTANT NOTICE: PRODUCT FAILURE DUE TO THE BUILD-UP OF LIMESCALE IS NOT COVERED BY WARRANTY.
Dualit recommends cleaning and descaling regularly, in a well-ventilated area to prevent limescale build up in the machine.
Please note: Always clean your machine before beginning the descaling process.
CLEANING YOUR FILTER PLATE
Use a small brush to remove any build-up of debris on the Filter Plate. A soft toothbrush or something similar works well. A torch may be useful to check the plate is completely clean. Once cleaned, use the descaling steps to clean inaccessible parts within the machine.
CAUTION: Do not use sharp implements. Risk of machine damage.
SETTING UP
Ensure that the appliance is unplugged and cool before starting. Remove all packaging and protective films from the appliance. The Setting up process will take approximately 15 minutes to complete and will help you achieve optimum performance from your machine.
SAFETY INSTRUCTION: Never lift the lever whilst the beverage is being dispensed. Hot beverage may cause injury and burns.
IMPORTANT NOTICE: PRODUCT FAILURE DUE TO THE BUILD-UP OF LIMESCALE IS NOT COVERED BY GUARANTEE. Dualit recommends descaling
regularly, in a well-ventilated area to prevent limescale build up in the machine. See Limescale warning. Dualit recommends the use of a Water Softener Bag in all areas. For more information contact our Customer Service Team by emailing info@dualit.com.


Register your appliance on www.dualit.com. This will only take 60 seconds. You will need the product model and serial number that are on the rating label on the base of the product.
Position in a safe space. This must be away from heat sources, water taps and not in a cupboard or in a tray that collects water. The surface must be flat in order to keep the machine level and stable.
Remove the Water Tank from the back of the appliance. Rinse before filling with fresh water. DO NOT USE ANY OTHER LIQUID. Maximum fill level is the MAX marker, do not overfill.
DAILY USE
DISPENSING COFFEE OR TEA

To achieve optimum performance from your Capsule Machine follow this procedure. SAFETY INSTRUCTION: Never lift the lever whilst the beverage is being dispensed. Hot beverage may cause injury and burns. Your Dualit Café Plus has a Filter Plate used to create the smooth espresso crema. This needs regular cleaning to maintain optimum performance. If you notice your coffee is extracting slowly or not at all, please refer to the Cleaning Section. Extraction between 10 and 40 seconds for a 35ml espresso shot is within the normal range. If extraction lasts longer than 45 seconds, please follow the cleaning procedure then carry out a descale.

Unplug the machine then remove and fill the Water Tank. Once filled, secure back into position.

Plug in the power cord at the mains and use the Power Switch to switch on. Ensure Lever is down. Coffee & Tea Buttons will flash slowly to indicate machine is warming up.

Place a cup on the Drip Tray. For best results, pre-warm the cup by dispensing hot water into the cup before inserting a capsule. Dispose of water before dispensing coffee.

Lift the Lever fully and insert a capsule. Ensure capsule is not damaged or deformed. If so, discard and use a new capsule. Once inserted push the Lever down fully. Carefully select the tea or coffee button. Failure to select the correct button for your capsule may block your Filter Plate: preventing or slowing down extraction. Caution: Do not use tea function with coffee capsules, this may damage your machine and invalidate warranty. Please see cleaning section if you extract a coffee capsule using the Tea Button.
To ensure the best taste and no flavour transfer, you should always dispense hot water to rinse the system when switching between coffee and tea.

FOR COFFEE FOR TEA
Press the Coffee Button once to dispense an Espresso. The Coffee Button will illuminate blue. Press twice to dispense a Lungo, the Coffee Button will flash blue slowly.
Press the Tea Button once to dispense tea; the Tea Button will illuminate green. Note: Tea extracts at a higher temperature to coffee.
It is important to note that you must not use the Tea Button to extract coffee capsules. Please carefully select the required button. Failure to do so may block your filter plate, preventing or slowing down extraction.
CAUTION: Do not use tea function with coffee capsules, this may damage your machine and invalidate warranty. Please see Cleaning Section within your Instruction Manual if you extract a coffee capsule using the Tea Button.


Your Dualit Café Plus has a Filter Plate used to create the smooth espresso crema. This needs regular cleaning to maintain optimum performance. If you notice your coffee is extracting slowly or not at all, please refer to the Cleaning Section.
The Coffee & Tea Buttons will illuminate once dispense has finished. Your beverage is now ready to be consumed. Note: The Buttons may flash to indicate that the machine is warming up ready for next use.
Lift the Lever fully, to empty the capsule into the Capsule Basket. We recommend the Capsule Basket is emptied after use.
Extraction between 10 and 40 seconds for a 35ml espresso shot is within the normal range.
If extraction lasts longer than 45 seconds, please follow the cleaning procedure then carry out a descale.

After using the machine we recommend flushing the machine through. Ensure the Lever is pushed down fully and press the Coffee Button. Water will flush through the machine and into the Drip Tray.
Note:
- Do not use a Coffee capsule in Tea mode.
- Switch off and unplug after use.
- Do not leave capsules in machine after use.
• Empty Drip Tray regularly.
- Your machine is fitted with a Descale indicator. If the Coffee & Tea Buttons flash quickly immediately after switching on the machine, then descaling is required.
PROGRAMMABLE DOSING MEMORY
The Capsule Machine has an Auto-Dose feature that ensures the correct amount of drink is dispensed every time. Ensure the machine has enough water in the Water Tank and is switched on.
NOTE - The factory setting of the machine is programmed to 35ml for the Espresso button, 70ml for the Lungo button and 180ml for the Tea button. However, this can be adjusted to suit your taste preference.
For tea, we recommend using 1 capsule for a 150-180ml tea cup (depending on your strength and taste preference). For a mug (250ml) we recommend using 2 capsules and setting your dose to 125ml.

Open the Lever fully and insert a capsule. Then push the Lever down fully. Place a cup on the Drip Tray.

Press the Coffee Button once and hold for 5 seconds, then release. The machine will start dispensing. Press the Coffee Button again when the desired amount is reached, and the dispensing will stop.

Press the Coffee Button twice and hold for 5 seconds, then release. The machine will start dispensing. Press the Coffee Button again when the desired amount is reached, and the dispensing will stop.

Press the Tea Button once and hold for 5 seconds, then release. The machine will start dispensing. Press Tea Button again when the desired amount is reached and the dispensing will stop.

The Dosing Memory has now been programmed to dispense your chosen quantity of coffee or tea. NOTE: program will be saved even if machine is unplugged.
AUTO-START
The Auto-Start feature allows you to pre-select your dose whilst the machine is warming up. Then, once the machine has warmed up it will automatically dispense the selected Coffee or Tea.


Lift the Lever fully and insert the capsule. Then close the Lever fully, The Coffee & Tea Button will be flashing to indicate that the machine is warming up when the machine is turned on.

Place a small cup on the Drip Tray. If you like a particularly hot coffee, we recommend pre-warming the cup first.

Whilst the machine is warming up, press the Coffee Button once for Espresso, twice for Lungo or press the Tea Button once for tea. The selected Button will flash and the other Buttons will cease to illuminate. Tip: press Buttons firmly.

The machine will now auto dispense the selected beverage, once it has warmed up.

After using the machine we recommend flushing the machine through. Remove capsule and ensure the Lever is pushed down fully, then press the Coffee Button. Water will flush through the machine and into the Drip Tray. Empty the Drip Tray, switch off and unplug after use.
DESCALE
HARD WATER WILL CAUSE LIMESCALE BUILD-UP, RESULTING IN BLOCKAGES THAT CAUSE PERMANENT DAMAGE.
IMPORTANT NOTICE: PRODUCT FAILURE DUE TO THE BUILD-UP OF LIMESCALE IS NOT COVERED BY GUARANTEE.
Dualit recommends cleaning and descaling regularly, in a well-ventilated area to prevent limescale build up in the machine. Please note: Always clean your machine before beginning the descaling process. Refer to the cleaning section. Refer to the Limescale Warning to determine descaling frequency. It is essential that a compatible descaler is used. Dualit recommends using Kirock's coffee compatible descaler. The descale process takes approximately 30 minutes.
Caution: Avoid contact with descaling solution. Steam released during descale process may be harmful. Risk of scalding and injury.

Ensure your descaling product is suitable for coffee machines: follow descaling product instructions carefully. If you are using a water softener, ensure water softener is removed before adding descaler. Fill water tank with descale solution.

The Coffee & Tea Buttons will quickly flash, immediately after switching on, to indicate descaling is required. Ensure your descaling product is suitable for coffee machines and follow descaling product instructions carefully.

Ensure the correct ratio of water is used to create the Descaling Solution. Turn the machine off, remove the Water Tank and fill with the Descaling Solution. Remove Drip Tray and place large container under the nozzle.

Insert Water Tank. Turn on and wait for the Coffee & Tea Buttons to stop flashing. Press both Coffee & Tea Buttons firmly at the same time and hold for 5 seconds. Both Buttons will now quickly flash.

Ensure the Lever is pushed down fully and no capsule is present, then press the Coffee Button to start descaling. Your machine will dispense. This will continue until the Water Tank is empty. Wait 10 minutes for the Descaling Solution to take effect.

Rinse the Water Tank and fill with fresh water. Repeat step 6.E and flush at least two full tanks of water through the machine to remove any traces of the Descaling Solution.

To exit the Descale Mode, press both Coffee & Tea Buttons at the same time and hold for 5 seconds. Both lights will go back to solicit illumination. NOTE: If the machine is turned off in Descale Mode, it will stay in this mode when switched back on. If you are using water softener, ensure that it is placed back into the Water Tank once the Water Tank is clean.
CLEANING
AFTER EACH USE
BEFORE CLEANING, MAKE SURE THERE IS NO CAPSULE IN THE MACHINE, FOLLOW STEP I AND THEN SWITCH OFF, UNPLUG AND ALLOW TO COOL.


Ensure the Lever is pushed down and no capsule is present. Press the Coffee Button. Water will flush through the machine and into the Drip Tray. Then switch off, unplug and allow to cool.

Remove the Drip Tray and Capsule Basket assembly, then lift the Capsule Basket out of the Drip Tray. WARNING: Drip Tray will be hot after use. Handle with care - risk of scalding.

Empty and Rinse the Drip Tray and Water Tank into the sink after each session. Refill the Water Tank with fresh water, just before you make your next beverage.

Use a small brush to remove any build up of debris on the Filter Plate. A soft toothbrush or something similar works well. A torch may be useful to check the plate is completely clean. Once cleaned, follow the descaling process to clean inaccessible parts within the machine. Caution: Do not use sharp implements, risk of machine damage.

Wipe down the body and Nozzle of the capsule machine with a damp, non abrasive cloth.
| DON'T FORGETTO REGISTERYOUR PRODUCT | WWW.DUALIT.COM/REGISTER | Registermy appliance |
| OR BY POST |
TROUBLESHOOTING
IMPORTANT NOTICE: Product failure due to the build up of limescale is not covered by guarantee - descale regularly.
+TO CONTACT CUSTOMER SERVICES, PLEASE EMAIL INFO@DUALIT.COM WITH YOUR MODEL AND SERIAL NUMBERS.
POSSIBLE CAUSE(S) SOLUTION(S)
THE CAPSULE MACHINE DOES NOT TURN ON
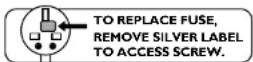
| 1. The unit may not be properly connected to the power supply. | 1.1 Check the plug is in the socket and the switch is turned on.1.2 Check and replace the fuse if necessary. Note: in order to open the plug, remove the label to reveal the screw.1.3 The machine may be in Standby Mode, which activates automatically after 10 minutes. In this Mode the tea and coffee lights turn off to conserve energy. You can exit Standby Mode by pressing any Button. |
THE CAPSULE MACHINE IS NOT DISPENSING TEA OR COFFEE
| 1. The Coffee or Tea Buttons illuminate without flashing, but no tea or coffee is dispensed. | 1.1 The Nozzle could be blocked. Follow the Cleaning instructions. If this does not clear the blockage refer to descale your machine.1.2 The inserted capsule could be faulty. Wait a few moments before opening the Lever. Flush the machine through and try to dispense you tea or coffee again with another capsule.1.3 Ensure that the Lever is properly closed and the Capsule Basket is empty.1.4 There could be air trapped in the pipework. Remove the capsule and ensure that the Water Tank is full. Press the Coffee or Tea Button. Water should exit the Nozzle. If it doesn't, press again to release the trapped air. |
| 2. You may have run out of water. | 2. Remove the Water Tank and fill with fresh water. |
| 3. The Water Tank may not be seated correctly. | 3. Position by aligning the connection and pushing down firmly. Tip: Bubbles rise in the Water Tank when it is correctly seated. Then push the Water Tank Lid down to cover the Water Tank. |
MY MACHINE IS MAKING A LOUD NOISE OR EXTRACTION HAS STOPPED MID USE
| 1. You may have run out of water (the machine is making a noise and the Buttons are flashing). | 1. Tum the machine off and remove the Water Tank. Refill with fresh water and then place the Water Tank back onto the machine. Follow instructions before dispensing. |
| 2. There may be an airlock in the pipework. | 2. Remove the capsule and ensure that the Water Tank is full. Press the Coffee or Tea Button. Water should exit the Nozzle. If it doesn't, press again to release the trapped air. |
| MY CAPSULE MACHINE IS LEAKING | |
| 1. There is water beneath the capsule machine. | 1.1 There will be a small amount of condensation forming underneath the capsule machine after making numerous beverages. This is safe and does not mean the machine is leaking.1.2 Ensure that the Water Tank has been correctly inserted. When refilling with water, always switch off the capsule machine and only then remove and refill the Water Tank. Otherwise, water could leak from the appliance. If you still feel the capsule machine is leaking, stop, unplug and contact Dualit customer services* for help. |
| MY COFFEE HAS NO CREMA | |
| 1. Little to no crema is produced. | 1.1 Each time coffee is dispensed, essential oil is deposited in the Nozzle. Descale and follow instructions.1.2 Use Dualit or Nespresso®capsules*.1.3 Check your capsules are in date. Stale coffee affects crema and taste.1.4 Ensure that you are not using the Tea Button for Coffee. |
| FACTORY SETTINGS | |
| 1. What is the factory setting of the capsule machine? | 1. The factory setting of the machine is programmed to 35ml for the Espresso Button, 70ml for the Lungo Button and 180ml for the Tea Button. |
| 2. Can I change the factory settings? | 2. Yes. Please follow 'Programmable Dosing Memory'. |
| COFFEE & TEA BUTTONS | |
| 1. What happens if I repeatedly press the Buttons while tea or coffee is being dispensed? | 1. The capsule machine interrupts the dispensing of the tea or coffee prematurely. |
| 2. Is the Programmable Dosing Memory deleted when the appliance is unplugged? | 2. No, the programming is not affected by unplugging the appliance. |
| 3. The Buttons flash for a long time. When is the capsule machine ready to use? | 3. It takes a little time for the capsule machine to achieve the optimum water temperature (approx. 30-60 seconds). Once it does, the Buttons will illuminate and will be ready to dispense tea or coffee. |
| CAPSULES | |
| 1. The capsule does not drop automatically into the Capsule Basket when I lift the Lever. | 1.1 The Capsule Basket could be full. Please empty it.1.2. Ensure that you fully lift the Lever. |
| 2. The capsule cannot be inserted correctly. | 2. The Capsule Basket could be full. Please empty it. |
^ Nespresso ^ trademark is owned by Société des Produits Nestlé S.A
| COFFEE DISPENSE IS SLOW OR STOPS DURING EXTRACTION | |
| 1. The Water Tank is empty. 1. Fill up the Water Tank & dispense just water. | |
| 2. Internal pipes may be blocked. | 2. Descale regularly. |
| 3. Wrong button may have been selected. | 3. Ensure you are not using Tea Button with Coffee Capsules. |
| 4. The Filter Plate may be blocked. | 4. The Filter Plate may need cleaning. Refer to Cleaning section and Descaling. |
| BUTTONS ARE FLASHING ALTERNATELY AND THE MACHINE IS NOT DISPENSING | |
| 1.The Water Tank is empty. 1. Fill up the Water Tank & only dispense water. | |
| 2. Internal pipes may be blocked. | 2. Descale regularly. |
| 3. Faulty flow-sensor. 3. Contact Dualit customer services * for help. | |
| BUTTONS ARE FLASHING QUICKLY FOR 5-6 SECONDS EVERY TIME MACHINE IS TURNED ON | |
| 1. Machine is recommending the user to descale. | 1. Enter Descale Mode and follow the instructions. |
| MACHINE TURNS OFF AUTOMATICALLY AFTER A PERIOD OF INACTIVITY | |
| 1. Machine has entered into Standby Mode after 10 minutes which is an EU approval requirement. | 1. Press Coffee or Tea Button to reactivate the machine. The Buttons will flash and the machine will warm up, ready for use. ALWAYS SWITCH OFF & UNPLUG AFTER USE. |
| COFFEE & TEA BUTTONS ARE FLASHING QUICKLY EVERY TIME MACHINE IS TURNED ON | |
| 1. You are in Descale Mode. 1. Press and hold Tea & Coffee Buttons for 5 seconds to exit. | |
| MY MACHINE IS VIBRATING WHEN DISPENSING | |
| 1. Your machine has a powerful 19 bar pump which can cause vibrations when machine is placed incorrectly. | 1. Unplug the device and remove the Water Tank. Ensure the machine is placed on a flat, even surface. Ensure the Water Tank and Capsule Basket/Drip Tray are fully located. |
| MY COFFEE IS NOT HOT ENOUGH | |
| 1. Internals have not been pre-heated. | 1. Press the Coffee Button ensuring no capsule is inside the coffee machine; this will run hot water through internal pipework. |
| 2. Cup or mug is not pre-warmed. | 2. Pre-warm your cup by dispensing hot water into it. |
| LEVER DOES NOT CLOSE | |
| 1. The capsule may not be located correctly. | 1.1 Ensure that the capsule is located correctly.1.2 Ensure the Capsule Basket is not over filled, empty Capsule Basket if full. |
GUARANTEE
This appliance is of excellent quality and construction. However, if any defects in materials or workmanship do appear during the relevant guarantee period, we will, at our discretion, either repair or replace the defective parts, free of charge, subject to the terms and conditions of our Guarantee shown below.
This Guarantee covers both parts and labour. Carriage is not included.
Your Guarantee period is as follows:
• 1 year
This Guarantee provides benefits which are additional to, and do not affect, your statutory rights. This Guarantee does not cover the cost of returning the product to the dealer from whom it was purchased or to ourselves. This Guarantee applies only to products sold and located in mainland Great Britain. It does not cover liability in respect of or replacement of plugs, cables or fuses and also does not cover defects due to:
- Failure to use or maintain product in accordance with Dualit's instructions.
• The product being connected to an unsuitable electricity supply. - Accidental damage to or abuse or misuse of the product.
- Product modification except by Dualit or approved agent.
- Dismantling of or interference with the product.
- Theft or attempted theft of the product. Before returning any product under this Guarantee, please check that:
-
You have followed the product instructions correctly.
-
Your mains electricity supply is functional.
• The defect is not due to a blown fuse.
If you wish to claim under this Guarantee you should: - Send the product, postage or carriage paid, to the dealer from whom it was purchased or to Dualit direct.
- Ensure that the product is clean and packed carefully (preferably in its original carton).
- Endose details of your name, address and telephone number and when and where the product was purchased, together with proof of purchase (e.g. a till receipt).
- Give exact details of the nature of the defect.
This Guarantee does not cover any other claims whatsoever, including without limitation, any liability for incidental, indirect or consequential damage, nor does it cover any claims for conversion or modification or for the costs of repair carried out by any third party without the prior consent of Dualit. If replacement parts are fitted to the product this will not extend the period of the Guarantee.
For further advice contact Dualit's Customer Services by emailing info@dualit.com. (09:00 to 17:00 GMT time, Monday to Friday).
| DON'T FORGETTO REGISTERYOUR PRODUCT | WWW.DUALIT.COM/REGISTER | Registermy appliance |
| OR BY POST |

CONSIGNES DE SÉCURITÉ IMPORTANTES

LISEZ TOUTES LES INSTRUCTIONS
CONSERVEZ CES INSTRUCTIONS POUR RÉFÉRENCE ULTÉRIEURE.
BFOUR LE CAFÉ POUR LE THÉ
Costco Wholesale Spain S.L.U.