VT-80 MK - Receiver Dynavox - Free user manual and instructions
Find the device manual for free VT-80 MK Dynavox in PDF.
User questions about VT-80 MK Dynavox
0 question about this device. Answer the ones you know or ask your own.
Ask a new question about this device
Download the instructions for your Receiver in PDF format for free! Find your manual VT-80 MK - Dynavox and take your electronic device back in hand. On this page are published all the documents necessary for the use of your device. VT-80 MK by Dynavox.
USER MANUAL VT-80 MK Dynavox
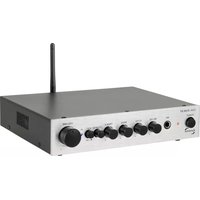
Frequenzgang: 20 Hz - 20 kHz (+/-3dB) Nennausgangsleistung (Musik) an 4 Ohm: 160 W Impedanz: 4 - 8 Ohm Eingangsempfindlichkeit: 220 mV (1 kHz, THD 1%) Verzerrung: 0.3 % (1 kHz, 1 W) Signal-Rausch-Abstand: 83 dB Leistungsaufnahme: im Aus-Zustand <0,4 W im Auto-Standby-Zustand <0,4 W Kein vernetzter Bereitschaftsbetrieb Eingänge: 2 x Stereo Cinch-Buchse, SD, USB, BT und FM-Tuner Ausgänge: PRE-OUT (Stereo Cinch) Bananen-Schraubklemmen für 4 Lautsprecherboxen, 3,5 mm Kopfhörer-Klinkenbuchse Netzanschluss: 230 V / AC, 50Hz Abmessungen (L x B x H): 250 x 180 x 95 mm Gewicht: 2,9 kg Farbe: schwarz / silber TECHNISCHE DATEN25 We thank you, for the trust you place in us by choosing this audio product. This device complies with all defined interna- tional safety standards. Nevertheless, the safety instructions should be observed in order to avoid a hazard. To ensure proper commissioning, please read this manual completely before setting up and connecting the unit. We assume no liability for damage to property or personal injury caused by improper handling or non- observance of the safety instructions. In such cases, any guarantee claim will be void. We strongly recom- mend that you keep the original packaging for future transport. About Dynavox VT-80MK The VT-80MK is a HiFi compact amplifier for two analog stereo input sources, as well as digital input pos- sibilities (SD, USB, BT and Tuner). The music can optionally be playback via one and / or a second pair of loudspeakers or a headphone. Further equipment features are sound control (bass / treble). The signal from the currently selected source can be passed on to a further power amplifier or active subwoofer at the regu- lated and pre-amplified signal output (PRE-OUT). Thanks to its signal output on up to 4 loudspeakers, the VT-80MK is ideally suited for sounding a second room, a terrace, etc. The signal inputs for SD (cards), USB (sticks) and a BT data transmission also allows the playback of digital media. The small device dimensions make the VT-80MK to a space-saving amplifier for a small- up to a medium-sized stereo system. DEAR CUSTOMER26 All equipment that is connected to the domestic mains voltage can be dangerous to the user if not handled properly. Damage caused by not observing these operating instructions will void the guarantee claim! We do not accept liability for consequential damages! Check regularly the technical safety of the device. If the power cable or the housing is damaged, the device has been stored for an extended period of time under unfavorable conditions, the device has been subjected to severe stress during transport or if there is no functions, safe operation is no longer possible. The device must then be put out of operation and secured against unintentional recon- nection (pull the mains plug out of the socket!). Leave the service to qualified personnel. If an error occurs, the device fuse have to get replaced by a specialist to one of the same type. The product is only approved for connection to 230 V / 50 Hz AC, isolated ground receptacle and indoor use. Changes to the device or the serial number will invalidate the guarantee claim. SECURITY PRECAUTIONS Any use, other than described above, will damage this product, as well as risks, such as short circuit, fire, electric shock, etc. The entire product must not be altered or modified and the housing must not be opened!27 Always unplug the power cord at it’s plug and never unplug the power cord at it’s cord, when disconnec- ting from the power supply. Ensure that the power cord is not squeezed, extremely bent, or damaged by sharp edges. Do not touch the power cord with wet or damp hands. Always turn off the unit before connecting or disconnecting cables, if you don‘t use it for an extended period of time, or cleaning its surface. Ensure that a distance of 5 cm is left around the unit and ambient air can circulate. Ventilation openings must not be obscured. Ensure that the unit is not exposed to liquids, moisture, rain or water vapor. No objects may enter into the device (ventilation slots, etc.). -> It must be imme- diately disconnected from the power supply and inspected by a specialist if this has happened. Never suspend the unit to high temperatures (sun- light) or strong vibrations. Before cleaning the outer surfaces of the product, unplug the power cord. Do not use abrasives, solvents, thinners, flammable chemicals, polishes and other cleaning products that leave traces. Use a lint free cloth for cleaning. For reasons of safety and authorization (CE) the unauthorized conversion and / or modification of the device is not permitted. We assume no liability for damage to property or personal injury caused by improper handling or non-observance of the safety instructions. In such cases, any guarantee claim will be voided! SECURITY PRECAUTIONS28 USER INFORMATION Electronic waste This device is subject to the provisions of the EU Directive 2002/96 / EC, the legal implementation of which is regulated in Germany by the Electrical and Electronic Equipment Act (ElektroG). This is indica- ted by the symbol of a dashed waste bin on the device. All items which are WEEE marked in this way, which are no longer used, has to be disposed of separately from the household waste at state- approved locations. For further information on the disposal of the old appliance, please contact the city administration, the disposal office or the store where You purchased the product. CE mark This device complies with the valid EU directives for obtaining the CE mark and thus complies with the requirements for electrical and electronic devices (EMC directives, safety guidelines and the guideli- nes for low-voltage devices). Dynavox is constantly working on improving and developing its products. Therefore, changes to the design and technical design of the device are reser- ved, as long as they serve the purpose of progress. The content of this manual is for informational pur- poses only. It is subject to change without notice29 USER INFORMATION and does not constitute an obligation on the part of the trademark owner. The latter assumes no responsibility or liability for errors or inaccuracies, which may be contained in this manual. Dynavox is a registered trademark of Sintron Distribution GmbH, 76473 Iffezheim, Germany. This document is a product of Sintron Distribution GmbH, 76473 Iffezheim and may not be copied or distributed in whole or in part without explicit and written permission. Automatic shutdown in the sense of the Ecodesign Regulation This device switches itself off automatically after approx. 15 minutes without an input signal or at volume 0 and then consumes less than 0.4 watts. To switch the device on again, the on / off switch (1) must be pressed twice. This device does not have a standby or standby state. To deactivate the automatic switch-off, set the corresponding switch on the back(26) of the device to the "Autostandy OFF" position. If the device is not used for a long time, it is generally recommended to disconnect the device from the mains. Minimum quality: highly sensitive audio amplifiers are apt to generate demodulation products in the vicinity of rf sources.30 FRONT VIEW
Switches on and off the amplifier. Reduce volume before switching on!
2. Headphone jack plug ( )
This 3,5mm jack plug allowes the use of a head- phone with a impendance of 32 - 600 Ohm.
Jack for USB memory.
Regulates the high tone content of the output signal.
Regulates the low tone content of the output signal.
7. SPEAKER (A, B, A/B)
Regulates the signal output of the speaker connec- tions. With the switching positions A and B you’re able to turn on and off the outputs „SPEAKER A“ and „SPEAKER B“. With the switching position A/B, under usage of suitable speakers (8 - 16 Ohm), you’re able to use both outputs „SPEAKER A“ and „SPEAKER B“ at once.
9. Display and Mediaplayer
IR-Receiver for remote control.
Switches between the digital playback possibilities SD, USB, BT and FM-Tuner.
Starts the playback of incomming digital music signals (USB/SD/BT) or interrupt them and starts the FM autoscan.
Moves back one track during the song playback of digital music signals (USB/SD/BT) or moves back one chanel in tuner mode.
15. Move Forward ( )
Moves forward on track during the song playback of digital music siganls (USB/SD/BT) or moves forward one chanel in tuner mode.
ONE (repeats the current song), FOLD (repeats the whole folder), ALL (repeats all files on the memory storage), RAN (playback in random mode).
Regulated and amplified signal output, to transfer to additional power amplifiers or active-subwoofers.
21. Speaker Connection (SPEAKER A und B)
Speaker connectors with screw connection or with 4 mm banana plugs, for up to 4 speakers. (Under usage of suitable speakers (8 - 16 Ohm), it is possible to run two speaker pairs at once.)
22. Power Socket (AC 230V/50Hz)
Socket to plug the power cord in scope of delivery.
23. FM Antenna (FM ANT.)
Connection socket for FM Tuner antenna.
Device fuse. (follow the safety instructions!).
26. Auto-Standby (A-S ON/OFF)
The auto standby function can be switched off here. If this switch is set to "I" (On), the VT-80MK swit- ches off automatically after approx. 15 minutes wit- hout an input signal or at volume 0. To switch off this function, set the switch to the "0" position (off).36 MODE Switches between the digital playback possibilities USB, SD, BT and FM-Tuner. MUTE ( ) Mutes all signal outputs. Equalizer (EQ) Switches between preseted sounds: Normal, Pop, Live, Rock, Jazz und Hall. Increase The Volume (VOL+) Rises the volume of digital signal inputs. (U/SD) Switches between SD and USB. This remote control is used to operate the digital module (USB/SD/BT/FM-Tuner und AUX3). REMOTE CONTROL This remote in powered by a CR2025 lithium battery.37 PLAY/PAUSE ( ) Starts the playback of incoming digital music signals (USB/SD/BT) or interrupt them or starts the FM autoscan. Move Back ( ) Moves back one track during the song playback of digital music signals (USB/SD/BT) or moves back one chanel in tuner mode. Move Forward ( ) Moves forward one track during the song playback of digital music siganls (USB/SD/BT) or moves forward one chanel in tuner mode. Numeric Buttons (0 - 9) To input the desired track directly or choose channel in Tuner mode. Decrease The Volume (VOL-) Lowers the volume of digital signal inputs.
ONE (repeats the current song), FOLD (repeats the whole folder), ALL (repeats all files on the memory storage), RAN (playback in random mode).38 Headphone TYPICAL SETUP When connecting 4 loudspeakers, please note that these must have an impedance between 8 and 16 Ohm! Using lower impedances will damage the amplifier! SD/USB39 Analog Audio output of a computer Source Loudspeakers IiIIiIIi L R TYPICAL SETUP Mobile phone or Tablet Power Amplifier or Activ-Subwoofer IIIIIIII L R40 Establish the cable connection in the following sequence. Never change any cable connections while the unit is switched on! As connectors for inputs and outputs, there are mechanically identical RCA jacks, be careful not to mix up these connecti- ons during installation! Also make sure not to mix up inputs on the right and left. The RCA connectors are often marked as follows: red for the right chan- nel, black or white for the left channel. Make sure that all plug connections are in secure tightness. Inadequate connections can cause noise, failures, and malfunctions. Connection of source devices You can connect up to two stereo sources with RCA high-level output to the stereo RCA inputs "INPUT" (18/19). Use commercially available RCA cables. Often the output connectors of the source devices are labeled "LINE OUT". All two input connectors of this amplifier (AUX1, AUX2) are equivalent high-level inputs with RCA jacks. For SD/USB/BT/Tuner set the input selector to AUX3, you can insert and play digi- tal storage media to the "SD" (3) and "USB" (4), inputs provided for this purpose. Never pull the sto- rage media during operation! This may result the loss of data. To use the BT function or Tuner, use the button "MODE" to switch to the responding menu (If you have inserted memory storages at inputs 3 and 4, you may have to switch to the BT channel or Tuner by pressing the "MODE" button
CONNECTION AND COMMISSIONING41
(12) first). Now locate the amplifier in the list for available devices with your BT-compatible source device. You can find more information in the opera- ting instruction of your source device. The VT-80MK will appear in the list under the name "VT-80MK". After you have selected it, the connection will get confirmed acoustically. From now on, all audio signals are transmitted to the Dynavox VT-80MK. The wireless cross-link port (BT) can be deactivated (switched off) with the input selector (AUX IN). USB/SD The songs are played in the same sequence in which they were saved on the memory card USB/SD, no matter if they were saved in different folders. Choosing a special folder is not possible. The name of the actuallly played music title is shown in the display. In Mode RPT (Folder) you can repeat the folder content in which the actual played song is located. Tuner The Dynavox VT-80MK has got a simple integrated FM Tuner. Just like the digital inputs it can be selec- ted with the mode button with the input selector switch in position AUX3. With shortly pressing the play/pause button in tuner mode the autoscan of the channels starts. All found channels are saved and get a sequential channel number. This channel numbers can be selected with the number buttons on the remote control or by pressing the fast for- ward/backward buttons to reach the previous or next channel. Sorting or deleting of the channels is not possible. Connecting an additional power amplifier or active subwoofer The RCA jacks "PRE-OUT" (20), on the back of the
unit, can be used to add another output stage (eg for sounding a further room) or an active subwoofer to the volume controled Stereo output (line level), of the currently selected source. The output level of the pre-amplified output "PRE-OUT" (20) depends on the volume setting, the sound control (BASS, TREBLE) and the insertion of a headphone. Connect this signal output to the signal input ("LINE IN" / "INPUT" etc.) of the power amplifier / active sub- woofer using commercially available RCA cables. Connecting a headphone A headphone equipped with a 3.5 mm jack plug can be plugged into the headphone socket " " (9) on the front of the unit. All headphones with an impe- dance between 32 and 600 Ohm can be used. Unsuitable headphones with another impedance may damage the unit or produce an unexpectedly high volume that can damage your hearing. As long as a headphone is plugged in, the speakers are switched off. Before plugging in, be careful to redu- ce the volume of the "VOLUME" knob (11) (this knob is also used to adjust the volume of the head- phone). Connecting the speakers Use cables with sufficient cable cross-section to con- nect your speakers to the VT-80MK. Ensure that bare loudspeaker wires can never touch each other or the back of the housing! No active speakers may be con- nected! Use only speakers with a nominal impedance of 4 - 8 Ohm. In addition, you have the possibility to operate the amplifier with 4 loudspeakers. For this, only use speakers with a nominal impedance of 8 -43
CONNECTION AND COMMISSIONING
16 Ohm. Using speakers with a different nominal impedance will damage the amplifier. For each loud- speaker (R: right or L: left), you will find on the back oft he unit two loudspeaker terminals (21) (positive + and negative -), which are connected to one side of a loudspeaker cable. There are similar connections on the loudspeaker, as is the polarity. The other end of the speaker cable assigned to the loudspeaker is connected here. The loudspeaker cable must be con- nected to the same terminals: the "+" marked termi- nal on the amplifier must lead to the "+" marked connection of the loudspeaker. The loudspeaker cables are fitted without connectors. Remove an approximately 1 cm long piece of insulation from each end of the double cable. Twist the bare strand to avoid mutual shorts. Rotate the screw of the loud- speaker clamp counterclockwise to open the clamp contacts and insert the bare wire end into the clamp hole. Now turn the screw connection of the loud- speaker clamp clockwise again in order to tighten the wire in the loudspeaker clamp. You can check that the cable is correctly seated by pulling it lightly. In case you use pre-assembled speaker cables with 4 mm banana plugs, simply plug them into the bana- na holder of the loudspeaker clamp. Make sure that the polarity is correct. Volume control Ther volume setting with the remote control is only for input channel AUX3 (USB/SD/BT/Tuner). The volu- me can be set in steps of 0-30 and is an additional volume control to the master volume knob on the front of the device. This means the max. volume of 30 is always limitted by the master volume. If the44 volume is set to 30, it still can be increased (decrea- sed) with the master volume knob, if this one is not yet set to max. volume (min. volume). Apart from that the volume can be changed by BT sources (e.g. smartphone or tablet) in BT mode. The volume of the analog inputs AUX1 and AUX2 can only be set by the master volume knob. Connection of the mains cable Lastly, connect the double-groove plug of the power cable to the double-groove power supply socket (22) of the amplifier. Plug the power cord into an electrical outlet that is supplied with a suitable vol- tage (230 V / 50 Hz). Make sure that the plug in the item, as well as in the electrical outlet are secure. Do not turn the unit on until the volume control (11) has been adjusted to the minimum volume.