
Featherweight C240 - Sewing machine SINGER - Free user manual and instructions
Find the device manual for free Featherweight C240 SINGER in PDF.
| Product Type | Domestic Sewing Machine |
| Brand | Singer |
| Model | Featherweight C240 |
| Power Supply | Mains, with pedal C-9002 |
| Lighting | Integrated LED |
| Sewing Speed | Adjustable via control buttons |
| Available Stitches | Numerous stitches, digital code selection |
| Buttonhole | One-step automatic with 5B foot |
| Needle Threader | Integrated, for needles 9/70 to 18/110 |
| Feed System | Integrated Even Feed System (IEF) |
| Feed Dogs | Lowerable via switch |
| Free Arm | Yes, after removing storage compartment |
| Thread Cutter | Integrated at front |
| Storage Compartment | Removable, with space for pedal |
| Included Accessories | 5 bobbins, needles, screwdriver, elevating plate, seam ripper/brush, edge/quilting guide, spool pins (large/small), folding spool pin, hard cover, pedal, cord, 6 presser feet (general 0A, multi-purpose 1A, decorative stitch 2A, blind hem 3, zipper 4, buttonhole 5B) |
| Safety | Double insulation, automatic overload stop, child protection |
| Cleaning | Wipe exterior, clean bobbin area with brush – no lubrication |
| Noise Level | Less than 75 dB(A) |
| Standards | IEC/EN 60335-2-28, UL1594 |
Frequently Asked Questions - Featherweight C240 SINGER
User questions about Featherweight C240 SINGER
0 question about this device. Answer the ones you know or ask your own.
Ask a new question about this device
Download the instructions for your Sewing machine in PDF format for free! Find your manual Featherweight C240 - SINGER and take your electronic device back in hand. On this page are published all the documents necessary for the use of your device. Featherweight C240 by SINGER.
USER MANUAL Featherweight C240 SINGER
INSTRUCTION MANUAL MANUEL D'INSTRUCTIONS MANUAL DE INSTRUCCIONES
C240
This household sewing machine is designed to comply with IEC/EN 60335-2-28 and UL1594.
IMPORTANT SAFETY INSTRUCTIONS
When using an electrical appliance, basic safety precautions should always be followed, including the following:
Read all instructions before using this household sewing machine. Keep the instructions at a suitable place close to the machine. Make sure to hand them over if the machine is given to a third party.
DANGER - To reduce the risk of electric shock:
- A sewing machine should never be left unattended when plugged in. Always unplug this sewing machine from the electric outlet immediately after using and before cleaning, removing covers, lubricating or when making any other user servicing adjustments mentioned in the instruction manual.
WARNING - To reduce the risk of burns, fire, electric shock, or injury to person:
- Do not allow to be used as a toy. Close attention is neccesary when this sewing machine is used by or near children.
- Use this sewing machine only for its intended use as described in this manual. Use only attachments recommended by the manufacturer as contained in this manual.
- Never operate this sewing machine if it has a damaged cord or plug, if it is not working properly, if it has been dropped or damaged, or dropped into water. Return the sewing machine to the nearest authorized service center for examination, repair, electrical or mechanical adjustment.
- Never operate the sewing machine with any air openings blocked. Keep ventilation openings of the sewing machine and foot control free from the accumulation of lint, dust, and loose cloth.
- Keep fingers away from all moving parts. Special care is required around the sewing machine needle.
- Always use the proper needle plate. The wrong plate can cause the needle to break.
- Do not use bent needles.
- Do not pull or push fabric while stitching. It may deflect the needle causing it to break.
- Wear safety glasses.
- Switch the sewing machine off ("O") when making any adjustment in the needle area, such as threading needle, changing needle, threading bobbin, or changing presser foot, etc.
- Never drop or insert any object into any opening.
- Do not use outdoors.
- Do not operate where aerosol (spray) products are being used or where oxygen is being administrated.
- To disconnect, turn all controls to the off ("O") position, then remove plug from outlet.
- Do not unplug by pulling on cord. To unplug, grasp the plug, not the cord.
- The foot control is used to operate the machine. Avoid placing other objects on the foot control.
- Do not use the machine if it is wet.
- If the LED lamp is damaged or broken, it must be replaced by the manufacturer or its service agent or a similarly qualified person, in order to avoid a hazard.
- If the supply cord connected with the foot control is damaged, it must be replaced by the manufacturer or its service agent or a similarly qualified person, in order to avoid a hazard.
- This sewing machine is provided with double insulation. Use only identical replacement parts. See instructions for Servicing of Double-Insulated Appliances.
SAVE THESE INSTRUCTIONS
For Europe only:
This appliance can be used by children aged from 8 years and above and persons with reduced physical, sensory or mental capabilities or lack of experience and knowledge if they have been given supervision or instruction concerning use of the appliance in a safe way and understand the hazards involved. Children shall not play with the appliance. Cleaning and user maintenance shall not be made by children without supervision.
The noise level under normal operating conditions is less than 75dB(A)
The machine must only be used with foot control of type "C-9002" manufactured by CHIENHUNG TAIWAN., LTD.
For outside Europe:
This sewing machine is not intended for use by persons (including children) with reduced physical, sensory or mental capabilities, or lack of experience and knowledge, unless they have been given supervision or instruction concerning use of the sewing machine by a person responsible for their safety. Children should be supervised to ensure that they do not play with the sewing machine.
The noise level under normal operating conditions is less than 75dB(A).
The machine must only be used with foot control of type "C-9002" manufactured by CHIENHUNG TAIWAN., LTD.
SERVICING OF DOUBLE INSULATED PRODUCTS
In a double-insulated product, two systems of insulation are provided instead of grounding. No ground means is provided on a double-insulated product, nor should a means for grounding be added to the product. Servicing of a double-insulated product requires extreme care and knowledge of the system and should be done only by qualified service personnel. Replacement parts for a double-insulated product must be identical to those parts in the product. A double-insulated product is marked with the words 'DOUBLE INSULATION' or 'DOUBLE INSULATED'.
Table of contents
Introduction 5
Machine Overview 5
Accessories 5
Presser Feet 7
StitchChart 8
Preparations 9
Unpacking. 9
Connect to the Power Supply 9
Pack Away After Sewing 9
Free Arm 10
Leveling the Machine Base Plate 10
ThreadCutter 10
Spool Pins 10
Bobbin Winding 11
Inserting the Bobbin. 12
Threading the Machine 12
Needle Threader 13
Threading for Twin Needle 13
Integrated Even Feed System 14
Presser Foot Pressure. 15
Thread Tension 15
Needles 16
Changing the Needle 16
Lowering Feed Teeth 17
Presser Foot Lifter 17
Changing the Presser Foot. 17
Machine Operation Buttons 18
Warning Messages/Sound 19
Sewing 20
Select a Stitch. 20
Stitch Adjustments 20
Sewing Techniques 21
Multi-Stitch Zigzag Stitch 21
Buttonholes 21
Sew on a Button 22
Sewing Hems in Heavy Fabric 23
Quilting 23
Blindhem 24
Sewing in Zippers 24
Maintenance 25
Cleaning the Machine 25
Replacing the Stitch Plate 25
Troubleshooting 26
Introduction
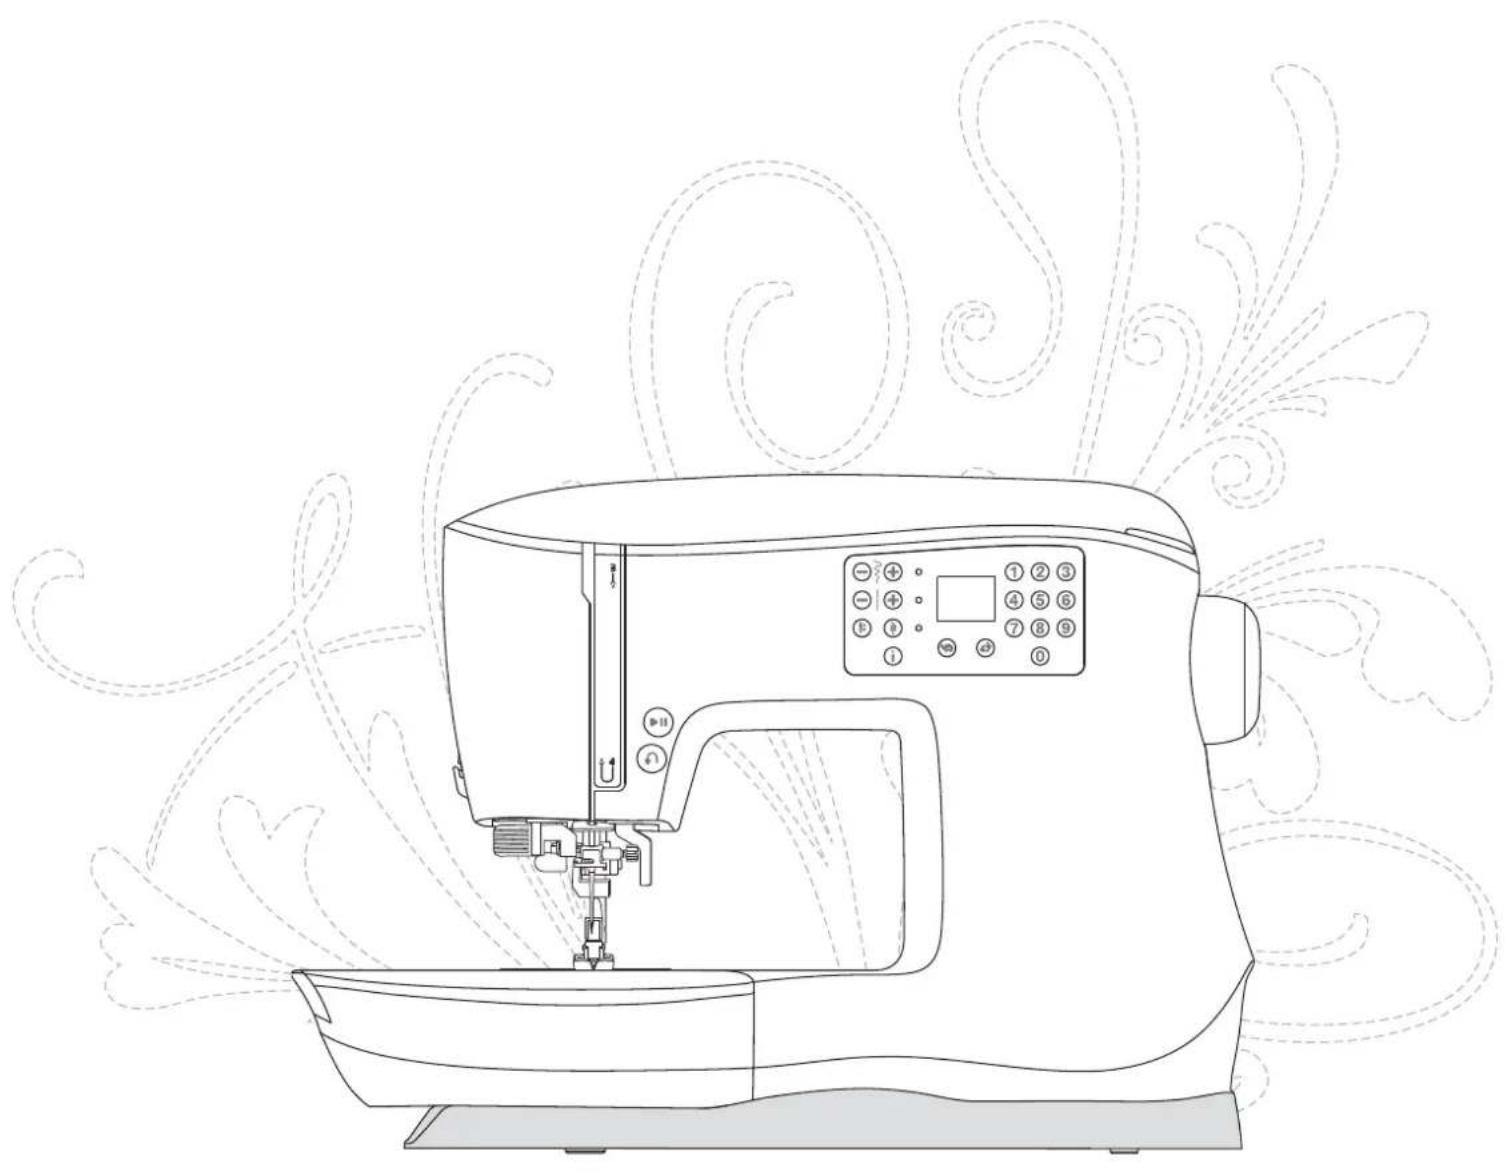
Machine Overview
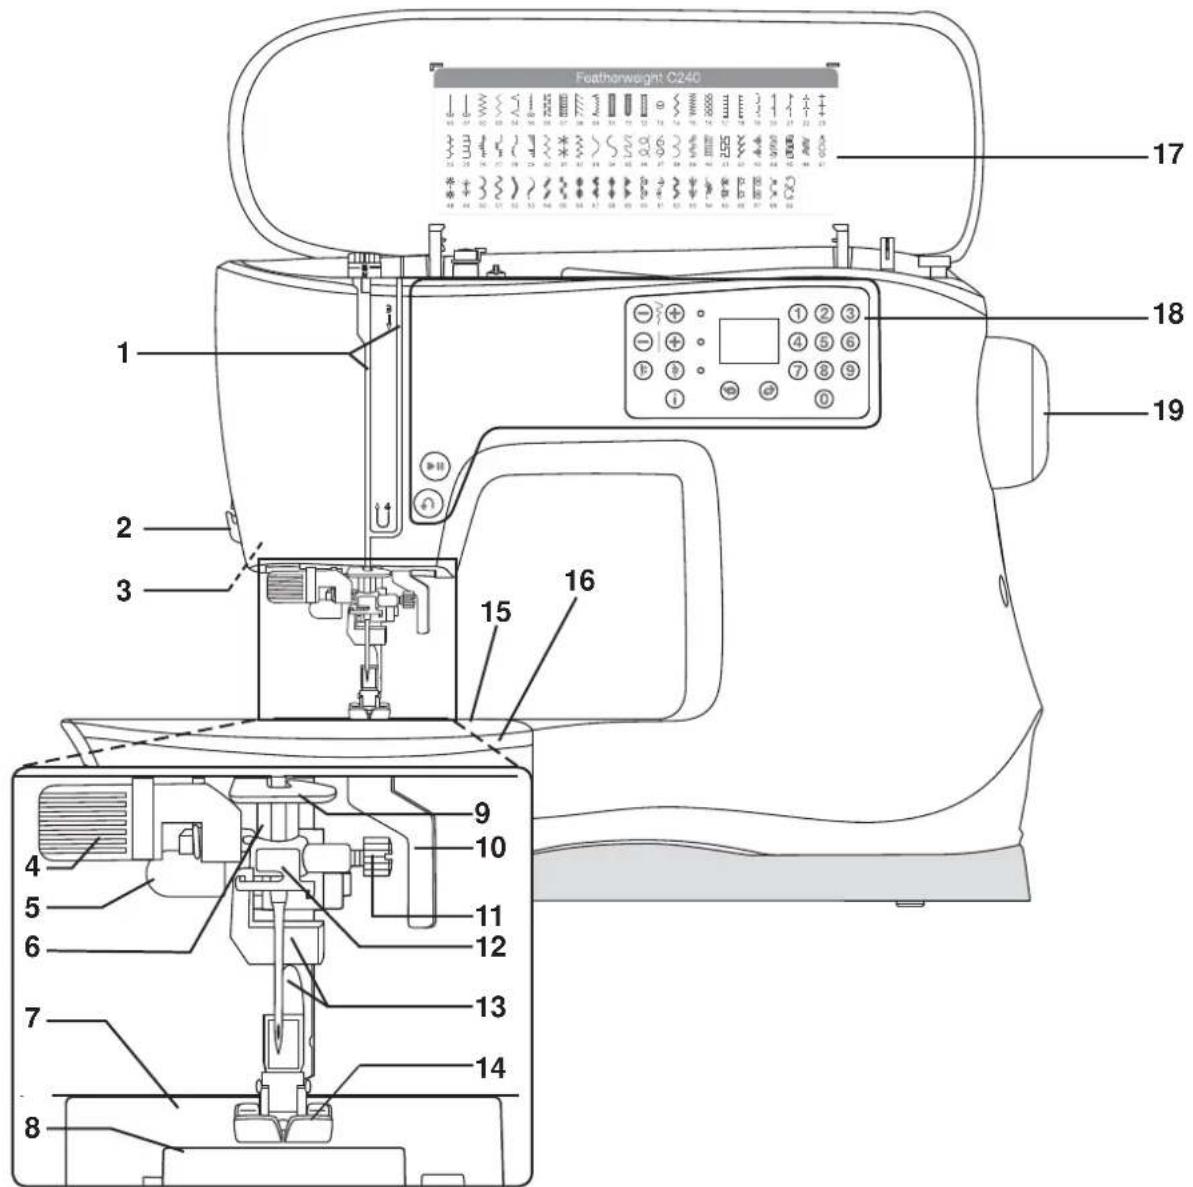
Front Side
- Threading slots
- Thread cutter
- LED lights
- Built-in needle threads
- Buttonhole lever
- Needle bar
- Stitch plate
- Bobbin cover
- Lower thread guide
-
Presser foot lifter
-
Needle clamp screw
- Needle thread guide
- Presser foot bar and presser foot holder
- Presser foot
15.Free arm - Removable storage compartment
- Stitch chart
- Machine operation buttons and display
- Handwheel
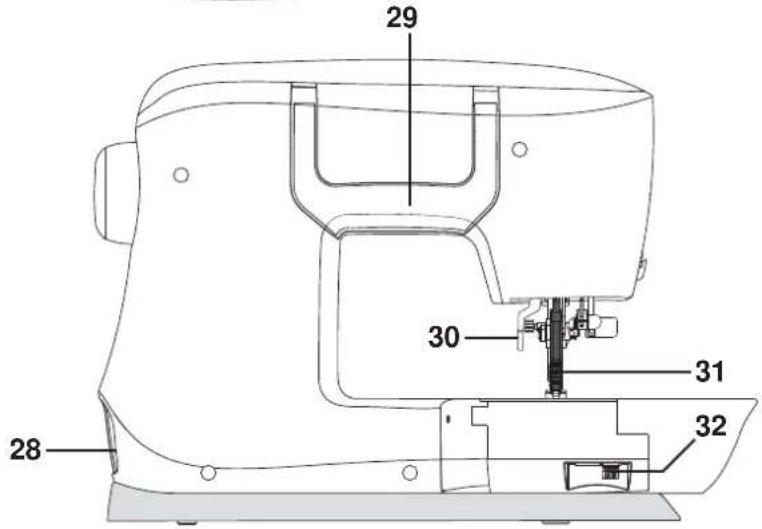
Top Parts
- Presser foot pressure dial
- Thread guides
- Spool caps
- Attachment for auxiliary spool pin / Bobbin winding spindle
- Take-up lever
- Thread tension discs
- Bobbin winding tension disc
- Thread tension dial
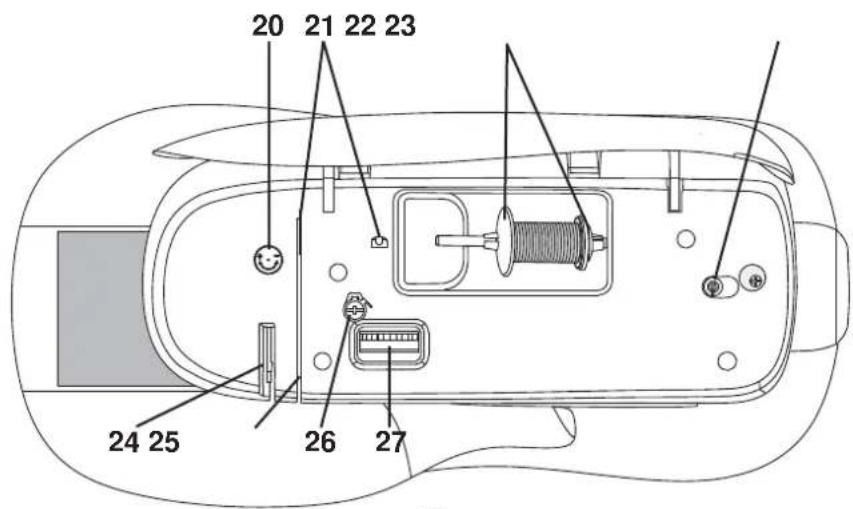
Rear Side
- Main switch, connectors for power cord and foot control
- Handle
- Presser foot lifter
- Integrated Even Feed System
- Switch for lowering the feed teeth
Accessories
Included Accessories
- Bobbins (5) (SINGER® Class 15 transparent bobbins)
- Felt pad
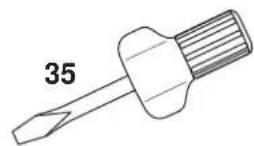
- Screwdriver for needle plate
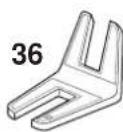
- Clearance plate
- Spool cap, large (2)
- Spool cap, small
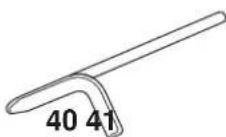
- Seam ripper & brush
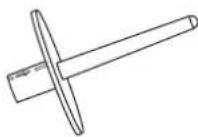
- Edge/quilting guide
- Auxiliary spool pin

33 34
37 38
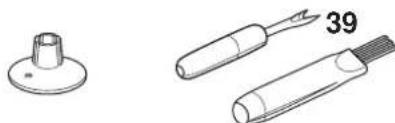
Included Accessories Not in Picture
- Foot control
Power cord - Needles
- Hard cover
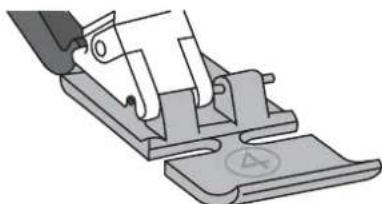
Presser Feet
| General Purpose Foot 0A with Integrated Even Feed System (shown as the display, attached on the machine upon delivery) This foot is used mainly for straight stitching and zigzag stitching with a stitch length longer than 1.0 mm. | |
| All Purpose Foot 1A with Integrated Even Feed System (shown as the display) This foot is used for decorative stitches. The groove on the underside of the foot is designed to flow smoothly over the stitches. | |
| Satin Stitch Foot 2A (shown as the display) When sewing decorative stitches or short zigzag stitches and other stitches with less than 1.0 mm stitch length, use this foot. The groove on the underside of the foot is designed to flow smoothly over the stitches. | |
| Blind Hem Foot 3 with Integrated Even Feed System (shown as the display) This foot is used for blindhem stitches. The toe on the foot guides the fabric. The red guide on the foot is designed to ride along the fold of the hem edge. | |
| Zipper Foot 4 with Integrated Even Feed System This foot can be snapped on either the right or the left of the needle, making it easy to sew close to both sides of the zipper teeth. Move the needle position to the right or left to sew closer to zipper teeth. | |
| One-step Buttonhole Foot 5B (shown as the display) This foot has a space in the back to set the size of the buttonhole. The machine will sew a buttonhole to fit that button size. |
Important: Make sure that the Integrated Even Feed System is disengaged when using presser foot 2A, 5B.
Stitch Chart
Stitches
= Engage Integrated Even Feed System
| Stitch | ||||||||||||||
| No. | 00 | 02 | 40 | 07 | ● | ● | ● | ● | ● | 09 | 101 | 12 | 13 | |
| Presser foot | OR | OR | OR | OR | 3 | 1R | 3 | 3 | 3 | 58 | 58 | 58 |
| Stitch | |||||||||||||||
| No. | 14 | 15 | 7 | 9 | ● | ● | ● | ● | ● | ● | ● | 25 | 12 | 24 | |
| Presser foot | 1R | 2R | 1R | 1R | 1R | 1R | 1R | 1R | 1R | 1R | 1R | 1R | 1R | 1R |
| Stitch | ||||||||||||||
| No. | 28 | 30 | 23 | ● | 37 | 38 | 3● | ● | ● | ● | 40 4 | |||
| Presser foot | 1A | 1R | 1R | 1A | 1A | 1A | 1A | 2A | 1A | 1A | 2A | 2A | 2A | 2A |
| Stitch | 木 | 3 | 3 | ||||||||||||
| No. | 42 4 | 3 44 45 | 46 47 | 48 49 | 50 51 | 52 53 | 54 55 | ||||||||
| Presser foot | 2A | 2A | 2A | 2A | 2A | 2A | 2A | 2A | 2A | 2A | 2A | 2A | 2A | 2A | 2A |
| Stitch | |||||||||||||||
| No. | 56 5 | 58 59 | 60 6 | 62 63 | 64 65 | 66 67 | 68 69 | ||||||||
| Presser foot | 2A | 2A | 2A | 2A | 2A | 2A | 2A | 2A | 2A | 2A | 2A | 2A | 2A | 2A |
Preparations
Unpacking
- Place the box on a steady, flat surface. Lift the machine out of the box, remove the outer packaging and lift off the machine carrying case.
- Remove all outer packing material and the plastic bag.
Note: Your sewing machine is adjusted to provide the best stitch result at normal room temperature. Extreme hot and cold temperatures can affect the sewn result.
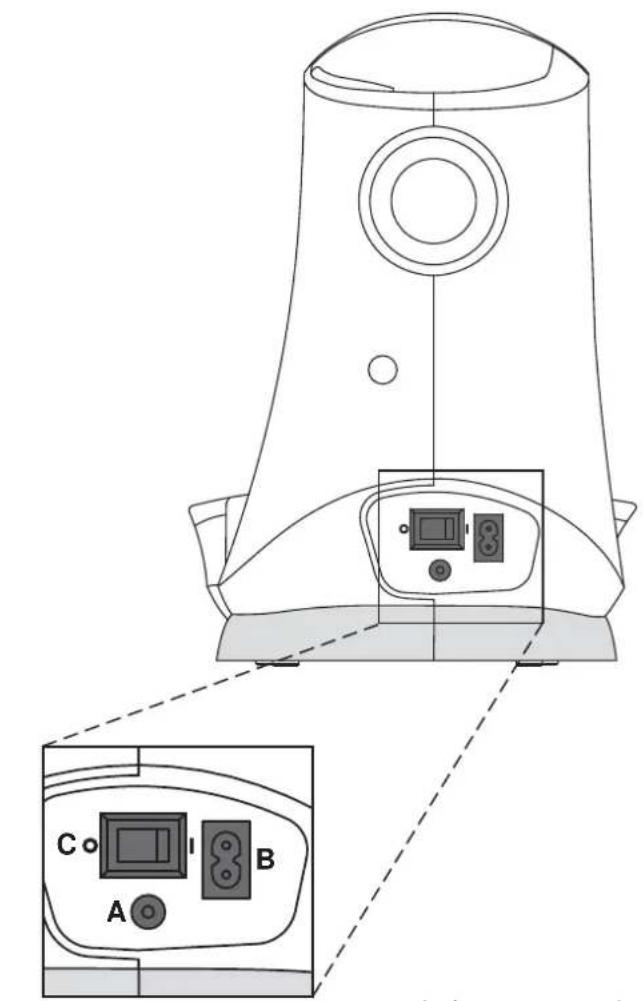
Connect to the Power Supply
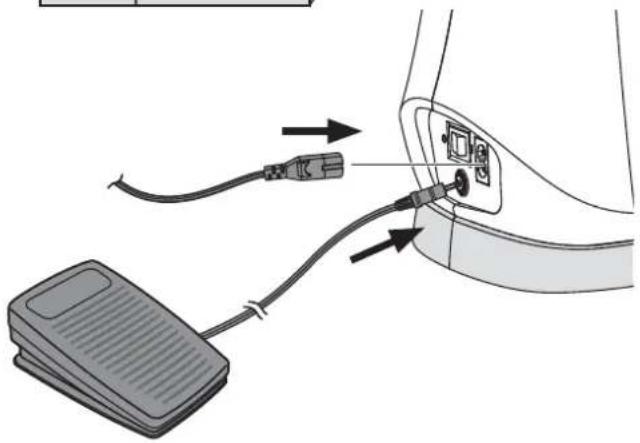
Among the accessories you will find the power cord and the foot control.
Note: Consult a qualified electrician if in doubt as to how to connect the machine to the power source. Unplug the power cord when the machine is not in use.
For this sewing machine, foot control model C-9002 manufactured by CHIENHUNG TAIWAN., LTD must be used.
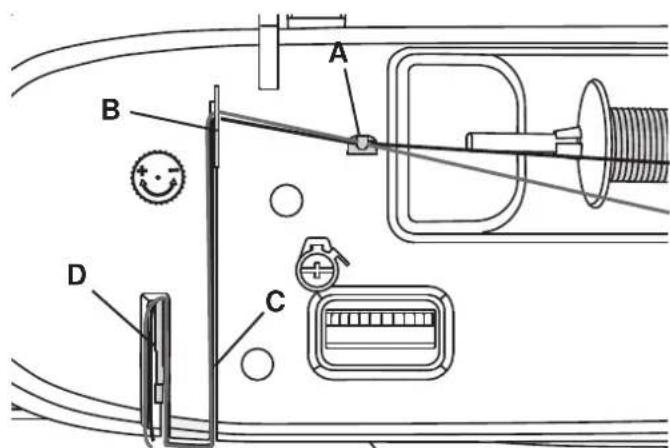
- Connect the foot control cord to the front socket on the bottom right side of the machine (A).
- Connect the power cord to the rear socket on the bottom right side of the machine (B). Plug the cord into the wall socket.
- Press the ON/OFF switch to ON to turn on power and light (C).
Pack Away After Sewing
- Switch the main switch off.
Note: After switching off, residual power may still remain in the machine. This may cause the light to stay on for a few seconds while the power is consumed. This is normal behavior for an energy efficient appliance. - Unplug the cord from the wall socket and then from the machine.
- Unplug the foot control cord from the machine. Wind the cord around the foot control for easy storage.
- Place all accessories in the Removable Storage Compartment. Slide the Removable Storage Compartment on to the machine around the free arm.
- Place the foot control in the space above the free arm.
- Put on the hard cover.
For the USA and Canada This sewing machine has a polarized plug (one blade wider than the other). To reduce the risk of electric shock, this plug is intended to fit in a polarized outlet only one way. If the plug does not fit fully in the outlet, reverse the plug. If it still does not fit, contact a qualified electrician to install the proper outlet. Do not modify the plug in any way.
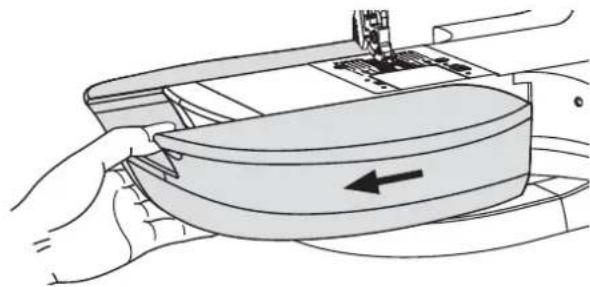
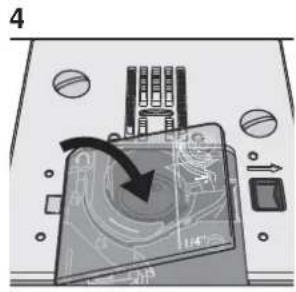
Free Arm
To use the free arm, slide off the removable storage compartment. When attached, a hook keeps the removable storage compartment securely attached to the machine. Take off the removable storage compartment by sliding it to the left.
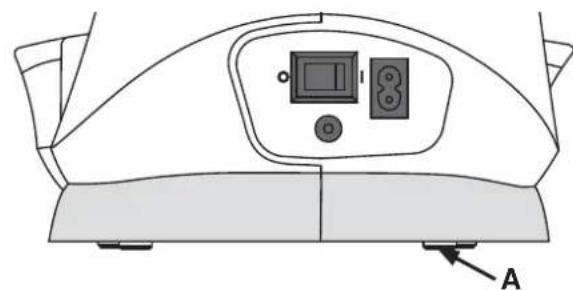
Leveling the Machine Base Plate
To make sure your machine stands steadily on your sewing surface you can adjust the base plate height. Turn the base plate adjusting screw (A) by hand. Turn clockwise to lower and counter-clockwise to raise the base plate.
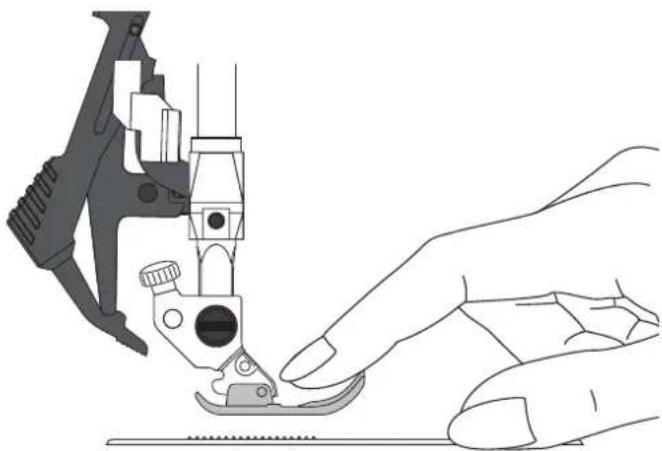
Thread Cutter
To use the thread cutter, pull the thread from back to front as shown (B).
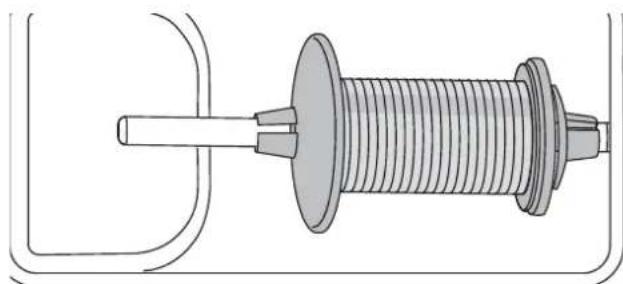
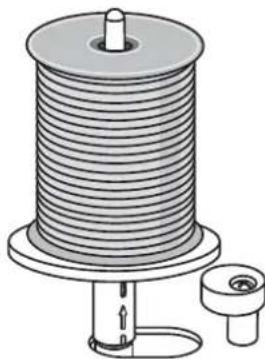
Spool Pins
Your machine has two spool pins, a main spool pin and an auxiliary spool pin. The spool pins are designed for many types of thread. The main spool pin is used in a horizontal position. (the thread reels off the spool). The horizontal position can be used for most sewing and embroidery threads. The auxiliary spool pin is used in a vertical position.
Main Spool Pin
Place a spool cap and the thread spool on the spool pin. Make sure that the thread reels over the top and slide on the second spool cap.
Use a spool cap slightly larger than the thread spool.
For narrow thread spools, use a smaller spool cap in front of the spool. For large thread spools, use a larger spool cap in front of the spool.
The flat side of the spool cap should be pressed firmly against the spool. There should be no space between the spool cap and the thread spool.
Large spool cap

Small spool cap
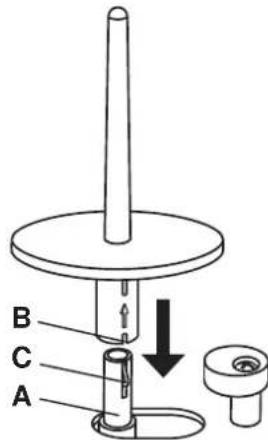
Auxiliary Spool Pin
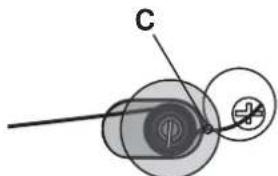
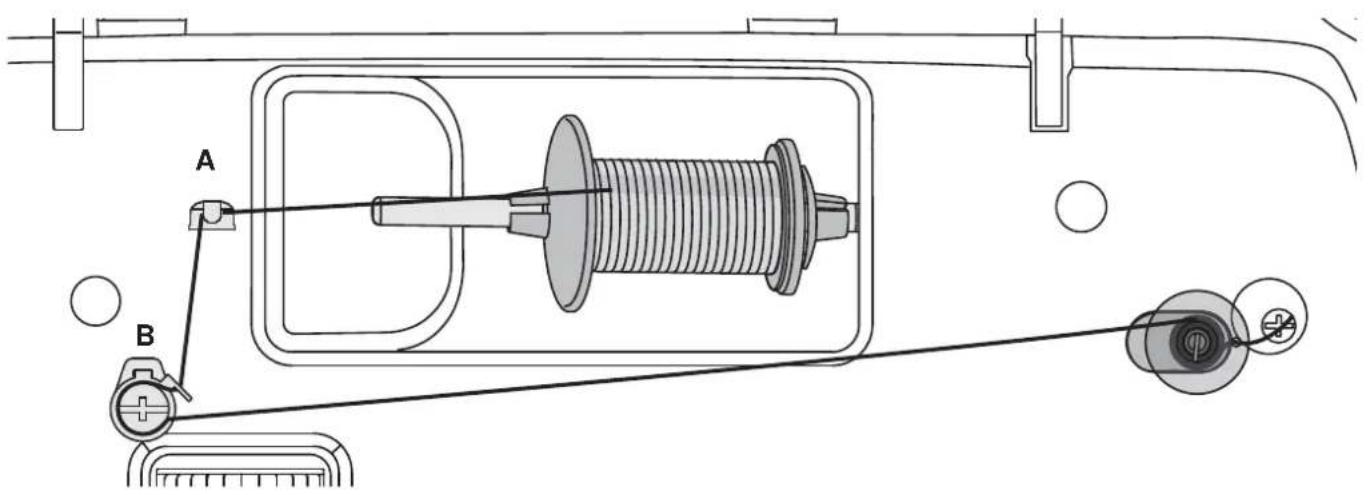
The auxiliary spool pin is used when winding a bobbin thread from a second spool of thread or for a second spool when sewing with a twin needle (Twin needle not included). It can also be used for many specialty threads. Insert the auxiliary spool pin onto the end of the bobbin winding spindle (A). Aling the notch (B) with the spring (C) on the bobbin winding spindle. Install the second thread spool onto the auxiliary spool pin.
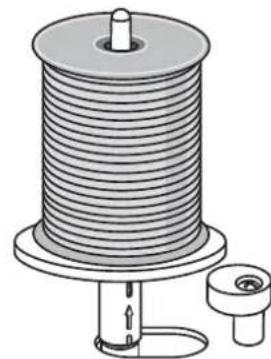
Auxiliary spool pin.
Bobbin Winding
- Place the thread spool on the spool pin in horizontal position. Slide a spool cap tightly against the spool.
- Place the thread into the thread guide (A) from front to back. Pull the thread counter-clockwise around the bobbin winder tension disc (B).
- Thread through the hole in the bobbin (C) from the inside to the outside.
- Place an empty bobbin on the bobbin winding spindle.
- Push the bobbin winding spindle to the right to wind.
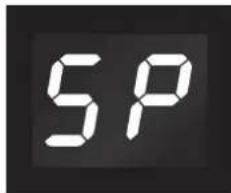
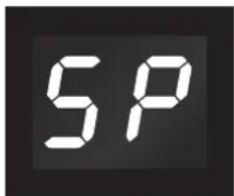
The letters "SP" flash on the LED display (D).
Press the foot control to wind the bobbin.
When the bobbin is full, release the foot control. Push the bobbin winding spindle to the left. Remove the bobbin and cut the thread.
D
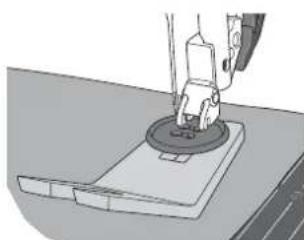
Inserting the Bobbin
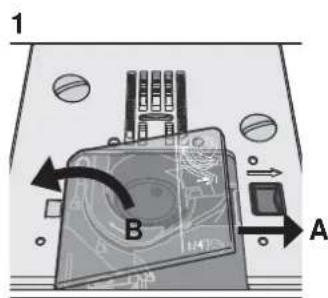
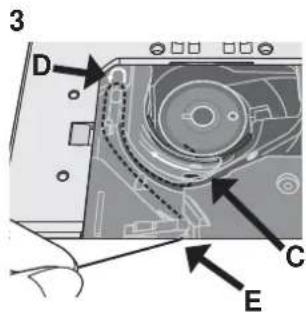
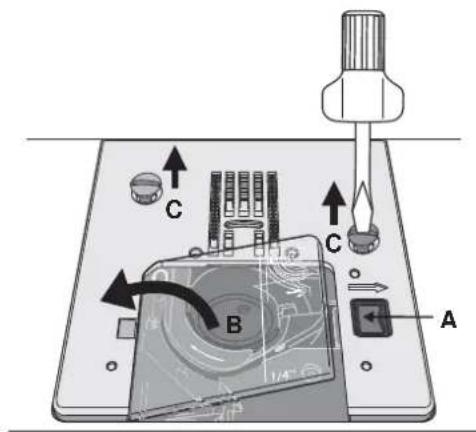
Make sure that the needle is fully raised and the machine is turned off before inserting or removing the bobbin. Open the bobbin cover by pushing the release button to the right (A). Remove the cover (B).
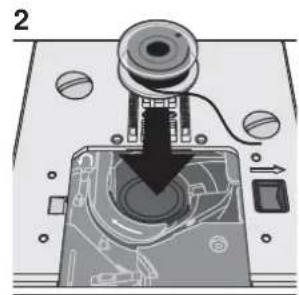
- Insert the bobbin in the bobbin case with the thread running in a counterclockwise direction.
- Pull the thread through the slit (C).
- With a finger held gently on top of the bobbin, draw the thread at the arrow markings into the stitch plate thread guide from (C) to (D).
- Pull the thread at the arrow markings into the stitch plate thread guide from (D) to (E).
- To cut off excess thread pull thread back over the cutting off blade at point (E).
- Replace the bobbin cover.
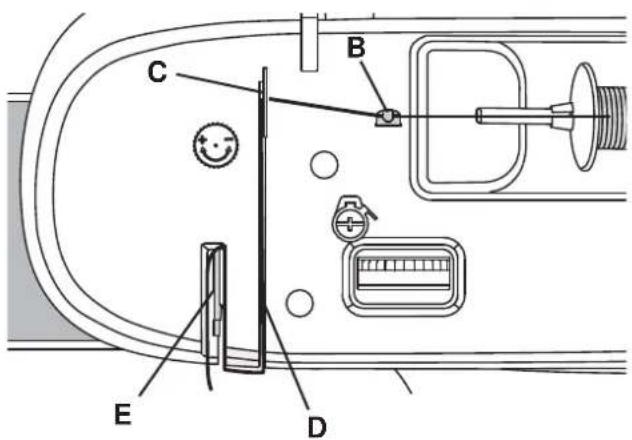
Threading the Machine
Make sure that the presser foot is raised and the needle is in its highest position.
- Place the thread on the spool pin and fit the appropriately sized spool cap.
- Pull the thread into the right thread guide (B) from front to back and the left thread guide (C) from back to front. Pull the thread between the tension discs (D).
- Thread down through the right-hand threading slot and then upwards through the left-hand threading slot
- Bring the thread from the right into the take-up lever (E) and down in the left-hand threading slot, into the lower thread guide (F) and to the needle thread guide (G).
- Thread the needle.

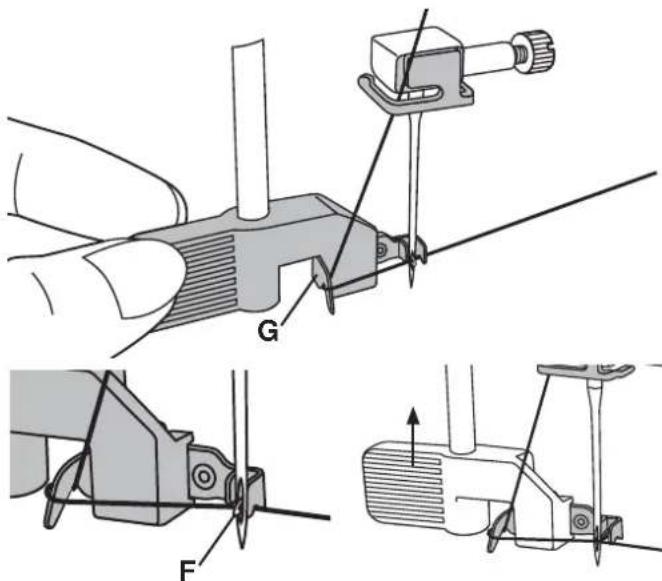
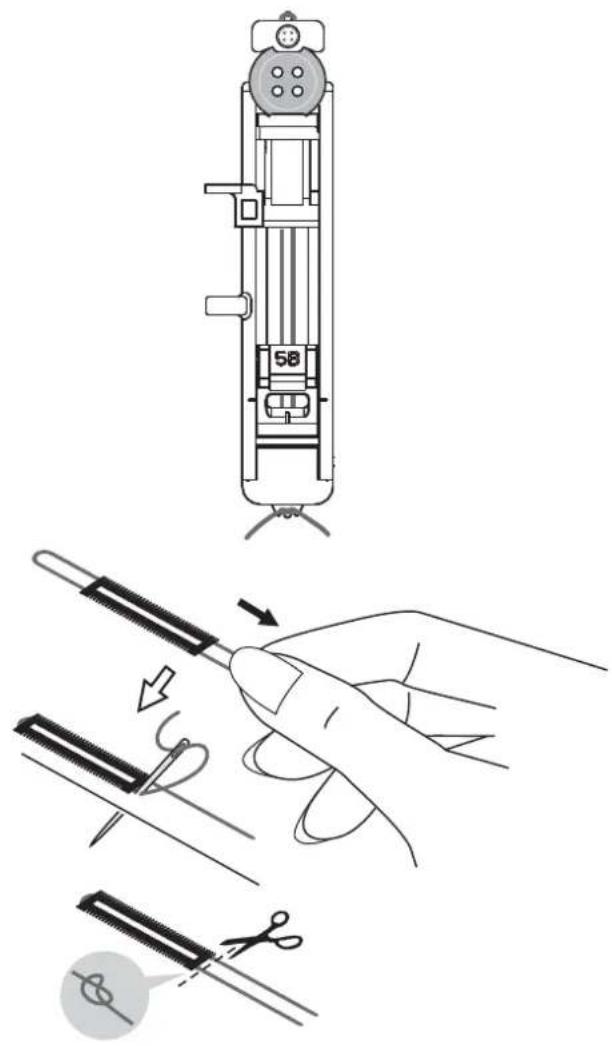
Needle Threader
The needle threads allow you to quickly and easily thread the eye of the needle. The needle must be in its highest position to use the built-in needle thread. Press the needle up/down button to make sure the needle is fully raised.
We also recommend lowering the presser foot.
- Use the handle to pull the needle threads all the way down. The threads hook (F) swivels through the needle eye.
- Place the thread from the back over the hook (G) and under the thread hook (F).
- Let the needle threader gently swing back. The hook pulls the thread through the needle eye and forms a loop behind the needle. Pull the thread loop out behind the needle.
Note: The needle threads is designed to be used for SINGER® size 9/70, 11/80, 14/90, 16/100, and 18/110 needles. You cannot use the needle threads for size 60 needles or smaller, wing needles or twin needles.
When threading the needle manually, make sure that the needle is threaded from front to back.
Threading for Twin Needle (optional accessory)
Replace the sewing needle with a twin needle. Make sure that the presser foot is raised and the needle is in its highest position.
- Place the thread on the spool pin and fit the appropriately sized spool cap. Insert the auxiliary spool pin. Slide on a felt pad. Place the second thread on the spool pin.
- Pull the thread into the right thread guide (A) from front to back and the left thread guide (B) from back to front. Pull both threads between the tension discs (C).
- Thread down through the right-hand threading slot and then upwards through the left-hand threading slot.
-
Bring the threads from the right into the take-up lever (D) and down in the left-hand threading slot. Place the threads into the lower thread guide (E). Place one thread into the slot on the left side of the needle thread guide (F) and the other thread into the slot on the right side of the needle thread guide (G). Make sure that the threads do not become twisted together.
-
Thread the needles.
Note: The weight and irregular surface of specialty threads, like metallics, can cause increased tension on the thread. Reducing the tension will help prevent needle breakage.
Note: When you are using a twin needle, you might need to reduce the stitch width to prevent damage of the twin needle, stitch plate or presser foot. How much you need to reduce it depends on the stitch position, the stitch width and/or the size of the twin needle.
Integrated Even Feed System
For sewing any fabric precisely, sewing machine provides the ideal solution: the integrated dual feed, Integrated Even Feed System. The Integrated Even Feed System feeds the fabric from the top and bottom at the same time. The fabrics are fed precisely. On light fabrics such as silk or rayon the dual feed prevents puckering of the seam. The even feeding action also ensures perfect matching of checked and striped fabrics. The Integrated Even Feed System keeps all layers of quilt projects aligned to prevent shifting of the layers.
Engaging the Integrated Even Feed System
Important: For all work with the Integrated Even Feed System, use presser feet with the center back cut-out (F) . Raise the presser foot. Press the Integrated Even Feed System down until it engages.
Disengaging the Integrated Even Feed System
Raise the presser foot. Hold the Integrated Even Feed System with two fingers at the ribbed ankle. Pull the Integrated Even Feed System down, then pull it away from you to release the Integrated Even Feed System slowly upward.
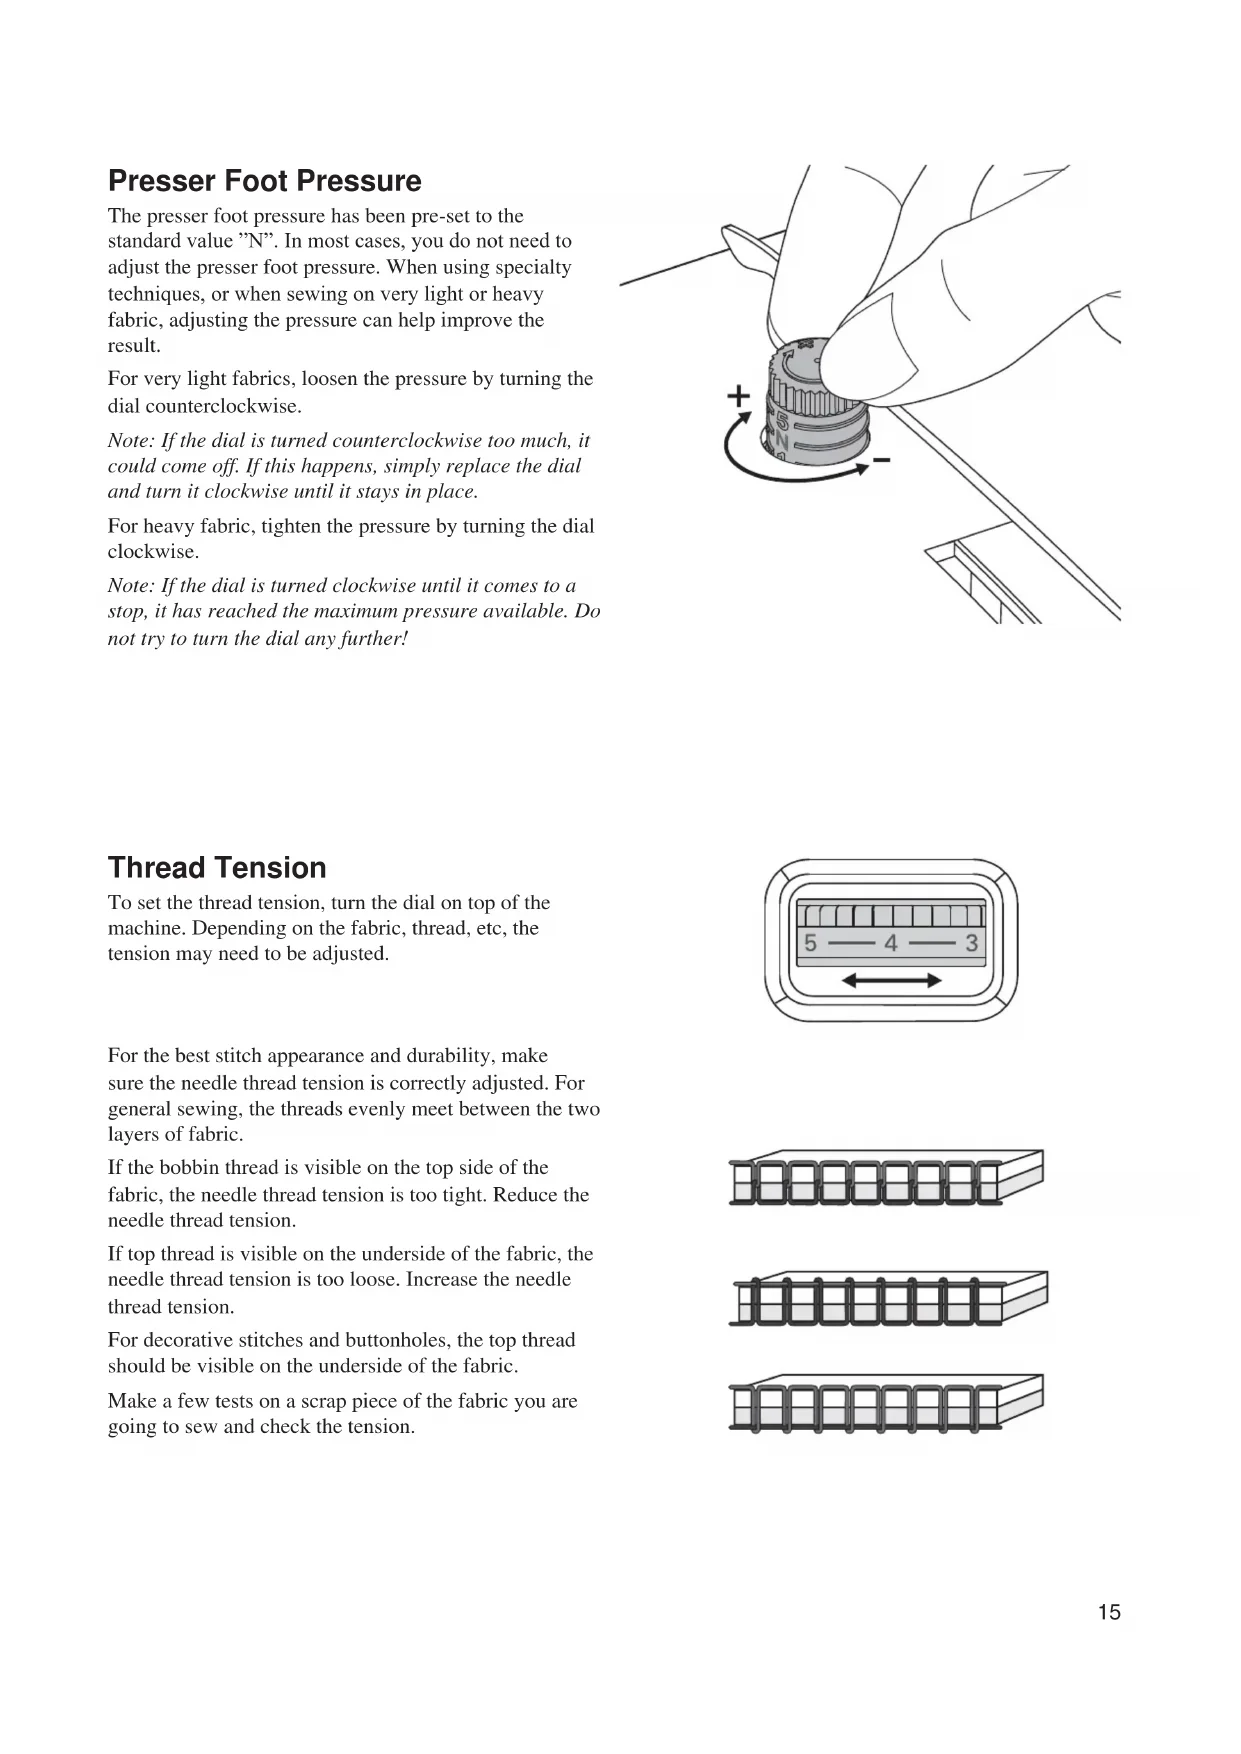
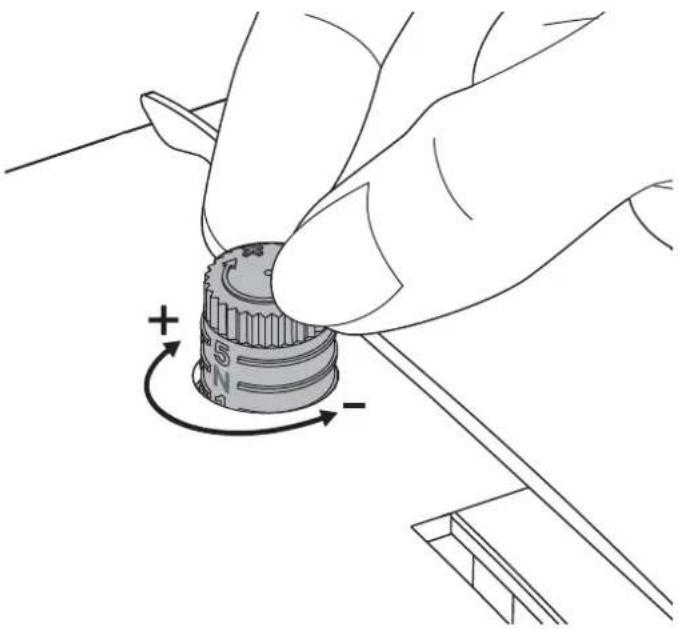
Presser Foot Pressure
The presser foot pressure has been pre-set to the standard value "N". In most cases, you do not need to adjust the presser foot pressure. When using specialty techniques, or when sewing on very light or heavy fabric, adjusting the pressure can help improve the result.
For very light fabrics, loosen the pressure by turning the dial counterclockwise.
Note: If the dial is turned counterclockwise too much, it could come off. If this happens, simply replace the dial and turn it clockwise until it stays in place.
For heavy fabric, tighten the pressure by turning the dial clockwise.
Note: If the dial is turned clockwise until it comes to a stop, it has reached the maximum pressure available. Do not try to turn the dial any further!
Thread Tension
To set the thread tension, turn the dial on top of the machine. Depending on the fabric, thread, etc, the tension may need to be adjusted.
For the best stitch appearance and durability, make sure the needle thread tension is correctly adjusted. For general sewing, the threads evenly meet between the two layers of fabric.
If the bobbin thread is visible on the top side of the fabric, the needle thread tension is too tight. Reduce the needle thread tension.
If top thread is visible on the underside of the fabric, the needle thread tension is too loose. Increase the needle thread tension.
For decorative stitches and buttonholes, the top thread should be visible on the underside of the fabric.
Make a few tests on a scrap piece of the fabric you are going to sew and check the tension.


Needles
The sewing machine needle plays an important role in successful sewing. Use only quality needles. For best results, use SINGER® branded needles in your SINGER® sewing machine.
Note:Turn the machine off before changing the needle.
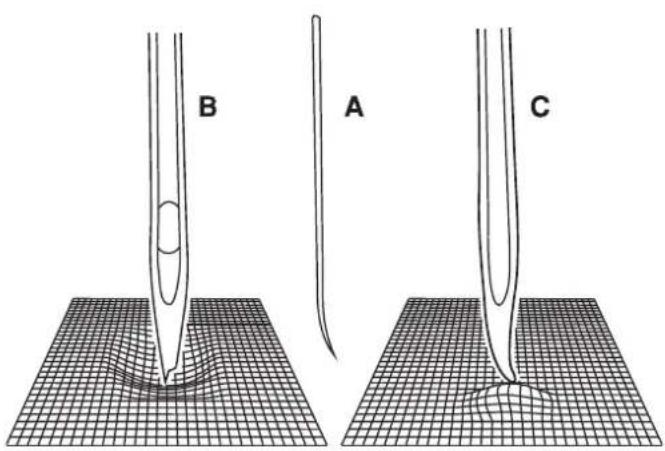
Change the needle regularly, especially if it is showing signs of wear resulting in sewing problems. Needles can show signs of wear when you see snags in the fabric or hear a slight popping sound as you are sewing. If the needle becomes bent (A), the point becomes damaged (B) or the needle becomes dull (C), you should replace it with a new needle and discard the old one.
Generally, the needle should be replaced after every 4 projects or approximately every 16 hours of sewing time.
It is also important to use the right needle for the fabric you are sewing. Go to www.singer.com to view the Stitch Reference Guide.
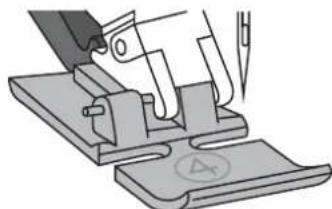
Changing the Needle
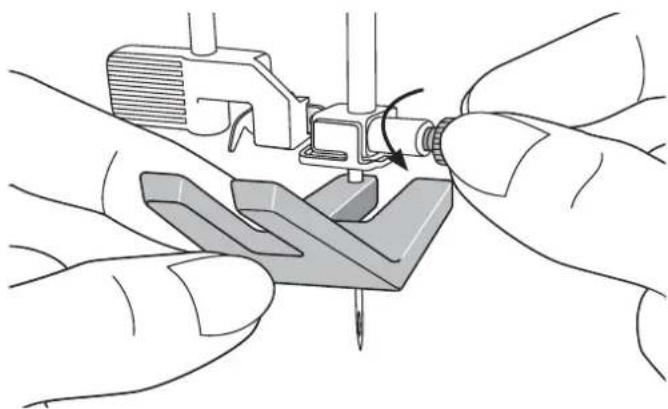
- Use the hole in the Clearance Plate to hold the needle.
- Loosen the needle screw. Use the screwdriver if necessary.
- Remove the needle.
- Insert the new needle, using the Clearance Plate. Push the new needle upwards with the flat side away from you until it will go no further.
- Tighten the needle screw as tight as it will go.
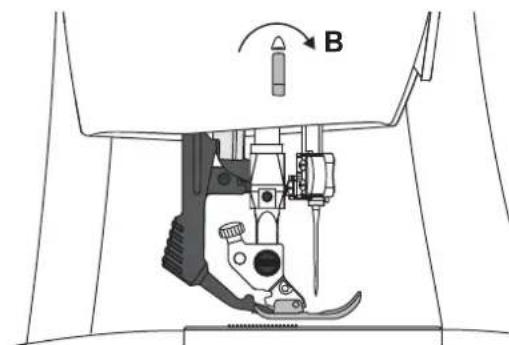
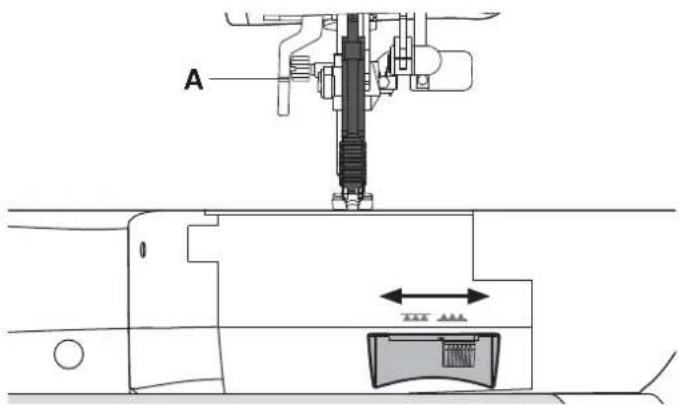
Lowering Feed Teeth
You can lower the feed teeth by moving the switch at the back of the free arm to the left. Move the switch to the right if you wish to raise the feed teeth.
Note: The feed teeth will not raise immediately when the lever is switched. Turn the handwheel one full turn or start sewing to re-engage the feed teeth.
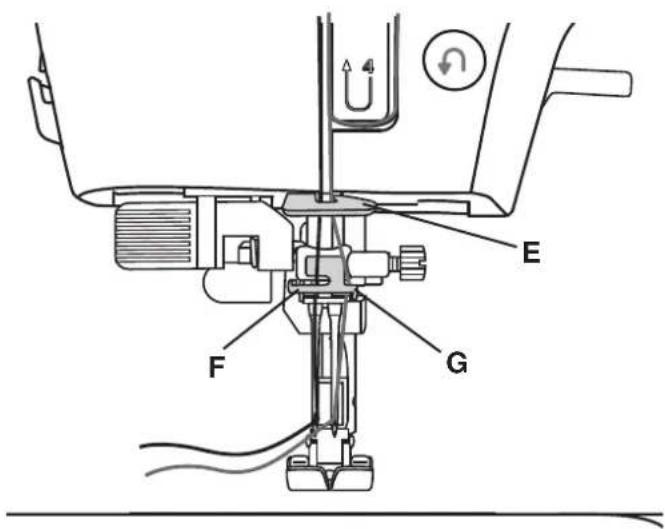
Presser Foot Lifter
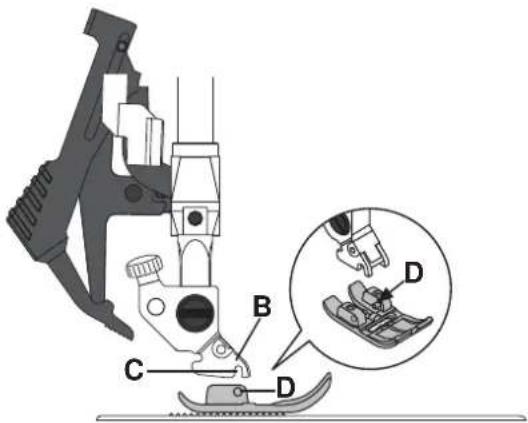
The presser foot is lowered or raised with the presser foot lifter (A). If you are sewing on heavy fabric or several layers of fabric, the presser foot can be raised higher to make it easier to place the fabric underneath the presser foot.
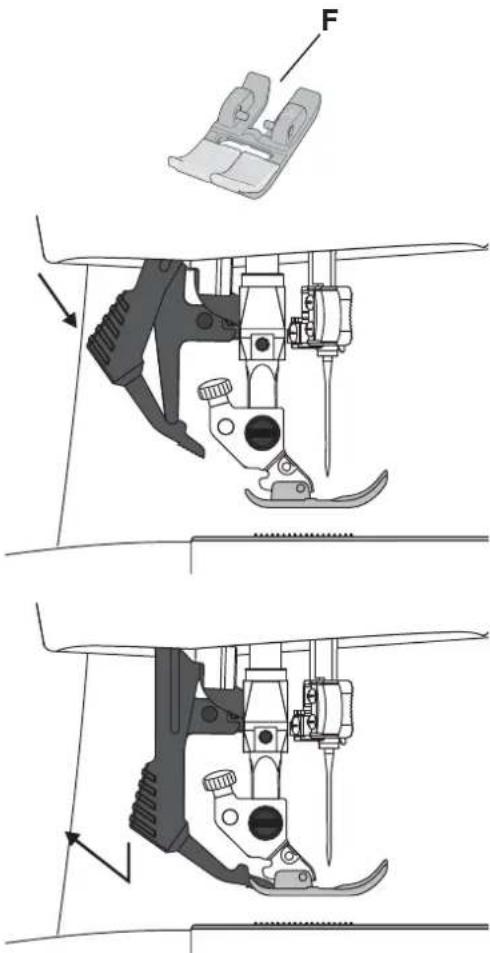
Changing the Presser Foot
Remove Presser Foot
Press the presser foot downwards until it disengages from the presser foot holder.
Attach Presser Foot
Place the presser foot under the presser foot holder (B), lining up the notch (C) with the pins (D).
Lower the presser foot lifter and the presser foot will engage in the presser foot holder.
Note: Check that the presser foot is properly attached by raising the presser foot lifter.
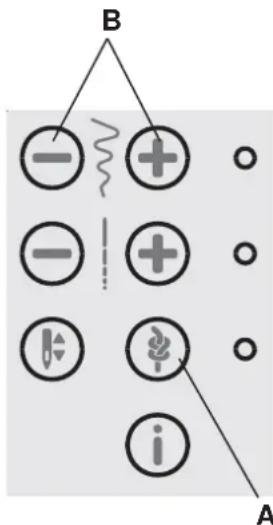
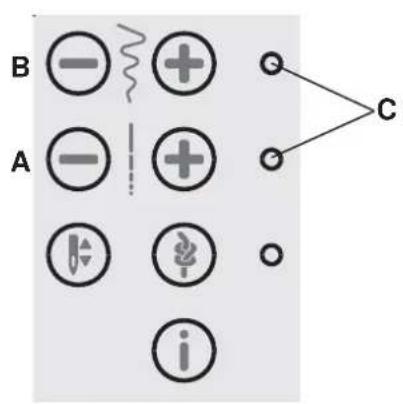
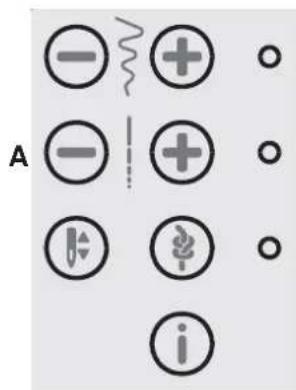
Machine Operation Buttons
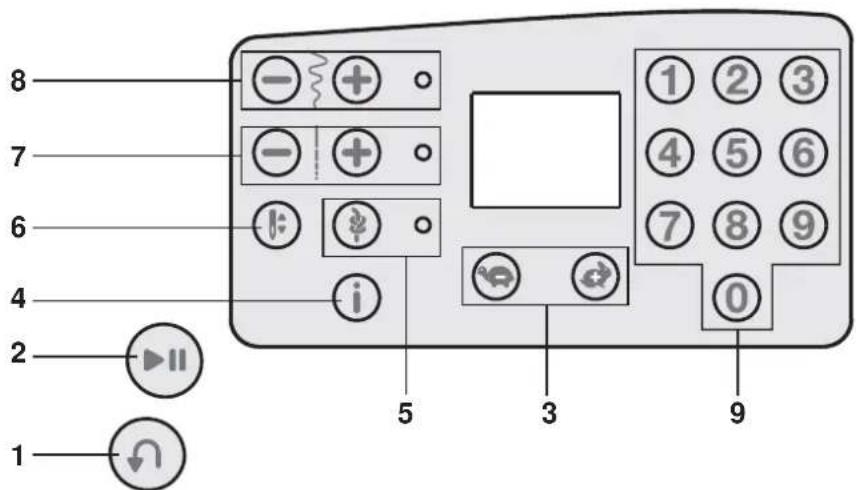
Reverse (1)
If you press the Reverse Button while sewing, the machine sews in reverse for as long as you keep the button pressed.
Start/Stop (2)
Press this button to start or stop the machine without using the foot control. Press the button once to start and press it again to stop.
Speed Control Buttons (3)
The Speed Control Buttons set the maximum sewing speed. To increase sewing speed, using the "+" button, to decrease sewing speed, using the "-" button.
Info Button (4)
Press this button to show the presser foot recommendation on the display. If a dot is visible in the lower right corner of the screen, the Integrated Even Feed System should be engaged.
Immediate Tie-Off/Tie-Off (5)
For immediate tie-off press the button while sewing. The machine sews tie-off stitches immediately and stops automatically.
To set the machine to perform a tie-off at the end of a stitch, press the button before starting to sew. The LED light next to the button becomes lit. After sewing the desired length of stitching, press the Reverse Button while actively sewing. The machine will complete the current stitch, tie-off and stop automatically.
Needle Up/Down (6)
Press this button to move the needle up or down. The setting of the needle stop position is changed at the same time.
You can also tap the foot control to raise or lower the needle.
Stitch Length (7)
Increase or decrease the stitch length using the "+" and "-" buttons.
Stitch Width or Stitch Positioning (8)
Increase or decrease the stitch width using the "+" and "-" buttons.
For straight stitches, use the "+" and "-" buttons to change the stitch position.
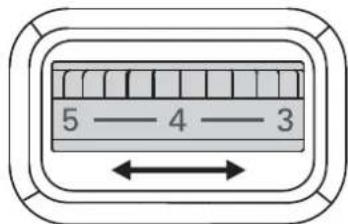
Note: There are 29 needle positions available. 3.5 on the display is the center position.
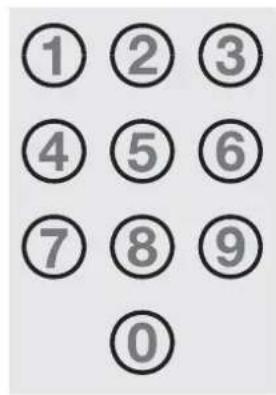
Stitch Selection (9)
Press a combination of the 0 to 9 buttons to select the stitch represented by that number.
Warning Messages/Sound
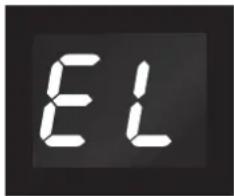
Main Motor Overloaded
Your sewing machine can get overloaded when sewing on heavy fabrics e.g., the thread gets twisted or jammed or the hand wheel axle cannot move. A monotone beep sound is heard and the letters "EL" flash on the LED display. Please refer to the Troubleshooting section of this manual to find a recommended solution. When the problem has been solved, the machine will continue to sew.
Note: When sewing, if the thread gets jammed inside the hook preventing the needle from moving and you continue pressing the foot control, the security switch will stop the machine completely. Restart the sewing machine by switching the ON/OFF switch to the OFF position and then ON again.
Bobbin Winding Position
When the bobbin lever is pushed to the right, the letters "SP" flash on the LED display.
If you press any button, a beep will inform you to push the bobbin winder spindle to the left, sewing position.
Note: You cannot sew in bobbin winding position.
Machine Sound
It is possible to turn off the sound on the machine buttons. Press the Immediate Tie-off Button (A) while turning on the machine.
Select between the audio on or off by touching the stitch width "+" or "-" buttons (B).
Touch “-” to turn off the audio and the display will show "0". Touch "+" to turn on the audio and the display will show "1".
Press the Immediate Tie-off Button again to return to sewing mode.
Sewing
When the machine is turned on, straight stitch 00 is selected by default.
Select a Stitch
Press a combination of the 0 to 9 buttons to select the stitch represented by that number.
Stitch Adjustments
Your machine will automatically set the length (A) and width/positioning (B) for the selected stitch. You can make your own adjustments on the selected stitch.
The setting changes only affect the selected stitch, and will be reset to default when another stitch is selected. The changed settings are not automatically saved when turning your machine off.
Press "+" or "-" once next to the setting you wish to change. The set value will be indicated in numbers on the display and the LED light (C) next to the setting control lights up. Change the set value by pressing the "+" or "-" button when the LED light is lit.
When trying to exceed minimum or maximum settings a warning sound will be heard.
Note: The default value of a setting will flash on the display when scrolling through the setting values.
Sewing Techniques
Multi-Step Zigzag Stitch
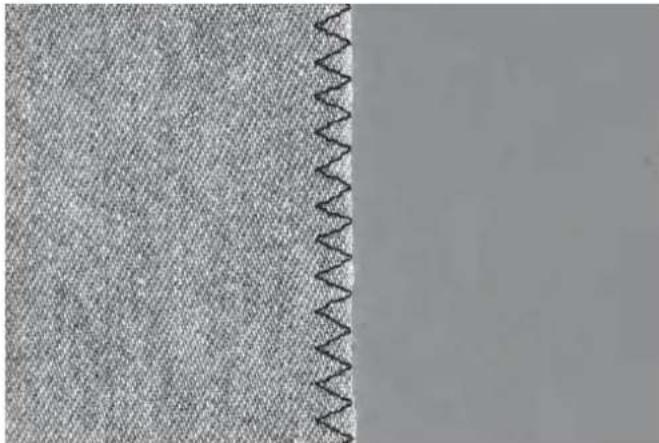
Stich number 03 can be used to overcast raw edges. Make sure the needle pierces the fabric on the left side and overcasts the edge on the right side.
Stich number 03 can also be used as an elastic stitch to allow seams to stretch when sewing knit fabrics.
Buttonholes
Your machine's buttonholes are specially adjusted for different kinds of fabric and garments.
The fabric should be interfaced and/or stabilized where buttonholes are to be sewn.
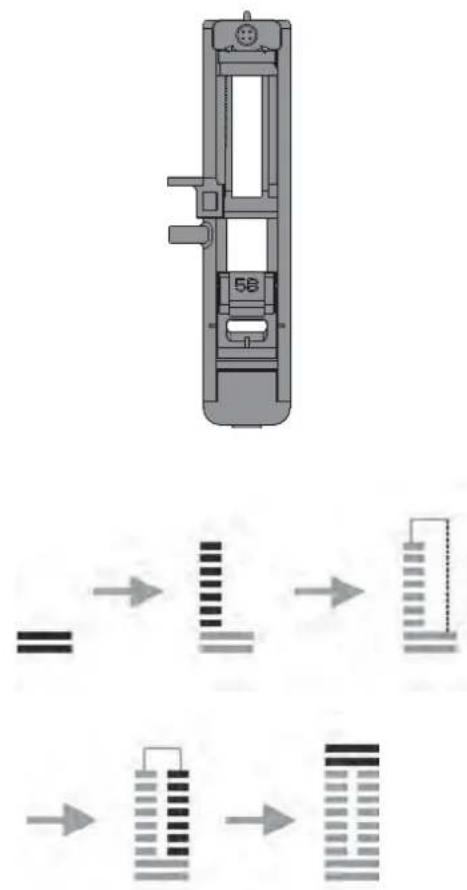
One Step Buttonhole Foot 5B
- Mark the the position of the buttonhole on your garment.
- Attach Buttonhole Foot 5B and pull out the button holder plate. Insert the button. The button will determine the length of the buttonhole.
- Make sure that the thread is pulled though the hole in the presser foot and placed under the foot.
- Select the buttonhole you want to sew and adjust the length as desired.
Note: Always sew a test buttonhole on a scrap piece of fabric.
- Position your garment under the presser foot so that the marking on the fabric is aligned with the center of the Buttonhole Foot.
- Lower the Buttonhole Lever all the way down, and push it away from you.
- Hold the end of the upper thread and start sewing. The buttonholes are sewn from the front of the presser foot to the back.
- Once the machine has sewn the buttonhole, raise the presser foot.
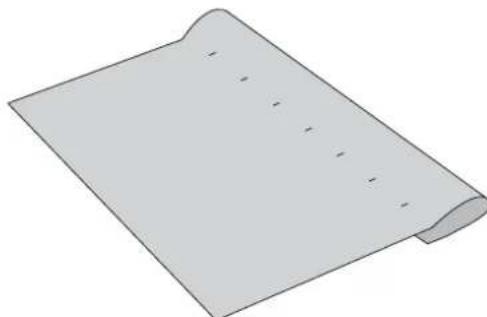
Cored Buttonhole (Stretch Fabrics)
When sewing buttonholes in stretch fabrics we recommend cording the buttonhole to increase the stability and to keep the buttonhole from stretching out.
- Loop a piece of heavy thread or pearl cotton over the finger at the back of the Buttonhole Foot 5B. Pull the thread tails under the foot, toward the front, then secure around the finger at the front of the foot.
- Stick a buttonhole. The satin buttonhole columns will stitch over the cord.
- When the buttonhole is finished, lift the cord off the finger and pull out the slack.
- Cross the cord in front of the needle and thread cord ends into a large needle, pull to the wrong side and knot ends before cutting excess.
- Use the seam ripper to carefully open the buttonhole.
Sew on a Button
- To sew on a button, remove the presser foot and select the button sewing stitch, number 13.
- Lower the feed teeth.
- Place the button under the presser foot holder. Turn the handwheel slowly to make sure the holes in the button are aligned with the swing of the needle and the width is appropriate for the actual button. If necessary, adjust the stitch width to accommodate the width between the holes.
- You can increase or decrease the number of stitches that will fasten the button on the fabric in steps of two, using the Stitch Length Buttons (A). The set number of stitches is indicated on the display. 8 stitches is default.
- Start to sew. The machine will sew the program for you and then tie-off and stop.
Note: Use the Clearance Plate to create a thread shank for your button.
Sewing Hems in Heavy Fabric
When sewing over seams in extra heavy fabric or a blue jeans hem, the foot can tip as the machine climbs over the seam. Use the Clearance Plate to balance the height of the presser foot as you sew.
One side of the Clearance Plate is thicker than the other. Use the side that suits the thickness of the seam best.
Quilting
A quilt usually consists of three layers, two layers of fabric with a layer of batting sandwiched between. To sew three layers together, you have a wide variety of stitches and techniques to choose from.
Stitch-in-the-Ditch
Use the All Purpose Foot 1A with IEF. To stitch-in-the-ditch, use the red center guide on the presser foot to follow the seams in the quilt blocks.
Begin by pin basting your quilt through all layers with safety pins, starting from the center of your quilt and working out. Place a pin every 6-8 inches (15-20 cm).
Crazy Quilt Stitching
Embellish your quilt with decorative stitches. The stitches can be sewn in a coordinating or contrasting color. Decorative threads like rayon embroidery or heavy cotton threads are sometimes used.
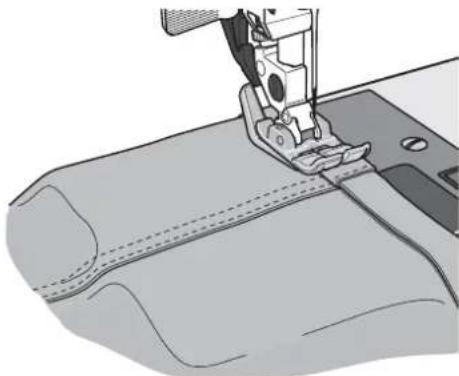
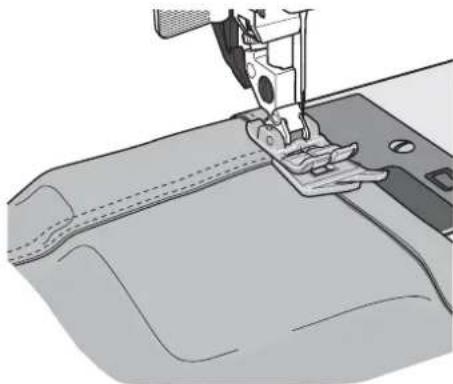
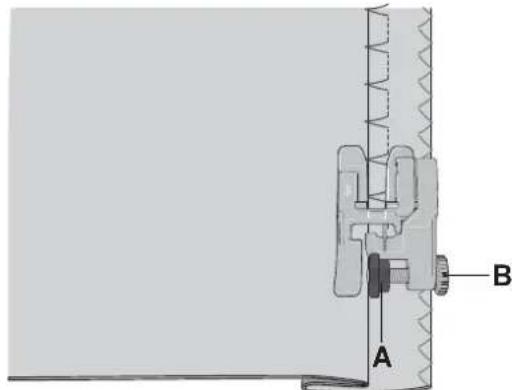
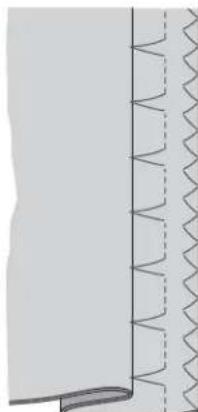
Blindhem
The Blindhem Stitch, number 04 is used to make invisible hems on skirts, trousers and home decorating. Use Blind Hem Foot 3 with IEF.
- Finish the edge of the hem.
- Fold and press the hem allowance to the wrong side.
- Fold the hem back on itself so approximately 3/8 (1 cm) of the finished edge extends beyond the fold. The wrong side of your project should now be facing up.
- Place the fabric under the presser foot so that the fold runs along edge guide A.
- When the needle swings into the fold it should catch a small amount of fabric. If the stitches are visible on the right side, adjust edge guide A by turning adjusting screw B until the stitch that catches the hem just barely shows.
Elastic Blindhem Stitch
The Elastic Blindhem Stitch, number 09, is especially suitable for stretchy fabrics, because the zigzag in the stitch lets the stitch stretch. The hem is finished and sewn at the same time. There is no need to finish the raw edge first on most knits.
Blindhem stitch, number 04

Elastic blindhem stitch, number 09
Sewing in Zippers
There are different ways to sew in zippers. Follow the directions included with your pattern for best results.
For all types of zippers it is important to sew close to the teeth of the zipper. The Zipper Foot 4 with Integrated Even Feed System can be snapped to the presser foot bar on the left or right, depending on how you will insert your zipper.
Set the stitch position so the needle enters close to the edge of the zipper teeth by using one of the 29 needle positions available for the straight stitch. If the presser foot is attached on the right side, the needle must only be moved to the right. If the foot is attached on the left, the needle must only be moved to the left.
Maintenance
Cleaning the Machine
To keep your sewing machine operating well, clean it often. No lubrication (oiling) is needed.
Wipe the exterior surface of your machine with a soft cloth to remove any dust or lint built up.
Cleaning the Bobbin Area

Note: Raise the needle, lower the feed teeth and turn off the machine.
Remove the presser foot. Push the Bobbin Cover Release Button (A) to the right and remove the bobbin cover (B) and the bobbin. Use the screwdriver to remove the two screws (C) in the stitch plate. Lift up the stitch plate.
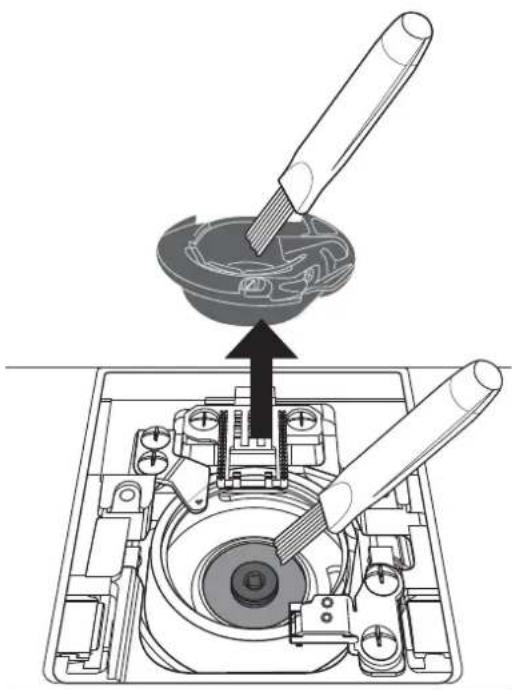
Clean the feed teeth and the bobbin area with the brush found with the accessories.
Cleaning Under the Bobbin Area
Clean the area under the bobbin case after sewing several projects or any time you notice an accumulation of lint in the bobbin case area.
Remove the bobbin case by lifting it up and to the right. Clean the area with the brush or with a dry cloth.
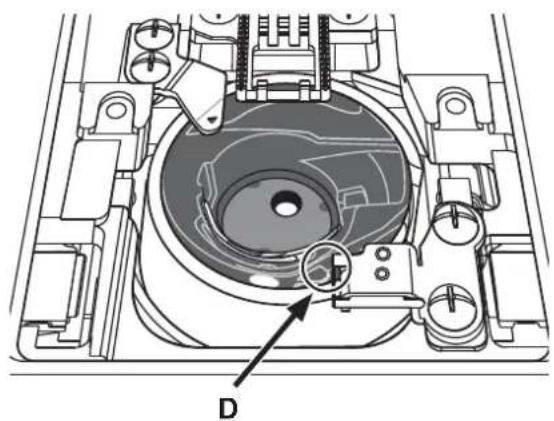
Put the bobbin case back into the hook race so that the tip fits into the stopper (D).
Note: Do not blow air into the bobbin case area. The dust and lint will be blown into your machine.
Replacing the Stitch Plate
With the feed teeth lowered, replace the stitch plate and insert and tighten the two stitch plate screws. Replace the bobbin cover.
Troubleshooting
In this troubleshooting guide you will find solutions to the problems you may have with your machine. For further information please go to www.singer.com.
Problem/Cause Remedy
| General Problems | |
| Fabric does not move? Make sure that the feed teeth are not lowered. | |
| The needle breaks? Insert needle correctly, see page 15. | Attach correct needle for the fabric. |
| The machine will not sew? Check that all plugs are securely plugged into the machine and into the wall socket. Push bobbin winder lever to sewing position. | |
| The sewing machine function buttons do not respond to touch? | The sockets and function buttons on the machine can be sensitive to static electricity. If the buttons do not respond to touch, turn the machine OFF and then ON again. If the problem persists, go to www.singer.com for information on locating an authorized service center. |
| The Machine Skips Stitches | |
| Did you insert the needle properly? Insert needle correctly, see page 15. | |
| Did you insert a wrong needle? Insert correct needle. | |
| Is the needle bent or blunt? Insert a new needle. | |
| Did you thread the machine properly? Check how the machine is threaded. | |
| Is the correct presser foot used? Attach correct presser foot. | |
| Is the needle too small for the thread? Make sure the needle is correct for the thread and fabric. | |
| Needle Thread Breaks | |
| Did you insert the needle properly? Insert needle correctly, see page 15. | |
| Did you insert a wrong needle? Insert correct needle. See | Stitch Reference Guide at www.singer.com |
| Is the needle bent or blunt? Insert a new needle. | |
| Did you thread the machine properly? Check how the machine is threaded. | |
| Is the needle too small for the thread? Change the needle | to the proper size for the thread. |
| Are you using poor thread with slubs or thread which has become dry? | Change to a new thread with a smooth, even filament. |
| Is a correct spool cap used? Attach a spool cap of the right size for the actual thread spool. | |
| Is the best spool pin position used? | Try a different spool pin position (vertical or horizontal). |
| Is the stitch plate hole damaged? Change the stitch plate. | |
| Bobbin Thread Breaks | |
| Did you insert the bobbin properly? | Check the bobbin thread. |
| Is the stitch plate hole damaged? Change the stitch plate. | |
| Is the bobbin area clean? | Clean lint from bobbin area. |
| Is the bobbin wound correctly? | Wind a new bobbin. |
| The Seam has Uneven Stitches | |
| Is the thread tension correct? Check needle thread tension | and the threading. |
| Are you using too thick or slubbed thread? Change the thread. | |
| Is the bobbin thread evenly wound? Check bobbin winding. | |
| Is a correct needle used? Insert a proper needle correctly, | see page 15. |
| The Machine does not Feed or Feeds Irregularly | |
| Did you thread the machine properly? Check how the machine is threaded. | |
| Has sewing lint collected between the feed teeth? Remove the stitch plate and clean the feed teeth with a brush. |
| The Main Motor Becomes Overloaded | |
| Has the thread become twisted or jammed in the bobbin case area or the feed teeth? | Remove the stitch plate and clean threads and lint from the feed teeth and bobbin case area. Re-thread the machine, both top and bobbin threads. |
We reserve the right to change the machine equipment and the assortment of accessories without prior notice, or make modifications to the performance or design.
Such modifications, however, will always be to the benefit of the user and the product.
Intellectual property
SINGER, and the Cameo "S" Design, are exclusive trademarks of The Singer Company Limited S.à.r.l. or its Affiliates.
Please note that on disposal, this product must be safely recycled in accordance with relevant National legislation relating to electrical/ electronic products. Do not dispose of electrical appliances as unsorted municipal waste, use separate collection facilities. Contact your local government for information regarding the collection systems available. When replacing old appliances with new ones, the retailer may be legally obligated to take back your old appliance for disposal free of charge.
If electrical appliances are disposed of in landfills or dumps, hazardous substances can leak into the groundwater and get into the food chain, damaging your health and well-being.
MANUEL D'INSTRUCTIONS C240

SINGER
Point zigzag multi-point 21
Boutonnières 21
Couture de bouton 22
| Point | ||||||||||||||
| N° | 00 | 02 | 40 | 50 | ● | ● | ● | ● | ● | 09 | 10 1 | 12 | 13 | |
| Pied-de-biche | OR | OR | OR | OR | 3 | 1R | 3 | 3 | 3 | 3 | 58 | 58 | 58 |
| Point | |||||||||||||||
| N° | 14 | 15 | 7 | 9 | ● | ● | ● | ● | ● | ● | ● | 25 | 12 | 24 | |
| Pied-de-biche | IR | 2R | IR | IR | IR | IR | IR | IR | IR | IR | IR | IR | IR | IR |
| Point | ||||||||||||||
| N² | 28 | 30 | 23 | ● | 37 | 38 | 3● | ● | ● | ● | 40 4 | |||
| Pied-de-biche | 1A | 1R | 1R | 1R | 1R | 1R | 1R | 2R | 1R | 1R | 2R | 2R | 2R | 2R |
| Point | ||||||||||||||
| N° | 42 48 | 44 45 | 46 47 | 48 49 | 50 51 | 52 53 | 54 55 | |||||||
| Pied-de-biche | 2A | 2A | 2A | 2A | 2A | 2A | 2A | 2A | 2A | 2A | 2A | 2A | 2A | 2A |
| Point | ||||||||||||||
| N° | 56 57 | 58 59 | 60 61 | 62 63 | 64 65 | 66 67 | 68 69 | |||||||
| Pied-de-biche | 2A | 2A | 2A | 2A | 2A | 2A | 2A | 2A | 2A | 2A | 2A | 2A | 2A |
Preparations
Déballage
Broche porte-bobine repliable
Broche porte-bobine repliable.
Bobinage de canette
Point zigzag multi-point
| Punctuation | \ | \ | \ | \ | \ | \ | \ | \ | \ | \ | \ | \ | \ | \ | \ |
| N.\(^9\) | 14 | 15 | 17 | 9 | ● | ● | ● | ● | ● | ● | ● | 25 | 12 | 324 | |
| Prensatelas | 1R | 2R | 1R | 1R | 1R | 1R | 1R | 1R | 1R | 1R | 1R | 1R | 1R | 1R |
| Punta | ||||||||||||||
| N.° | 28 | 30 | 23 | 37 | 38 | 3 | 40 4 | |||||||
| Prensatelas | 1A | 1B | 1A | 1A | 1A | 1A | 1A | 2A | 1A | 1A | 2A | 2A | 2A | 2A |
| Punta | ||||||||||||||
| N.9 | 42 48 | 44 45 | 46 47 | 48 49 | 50 51 | 52 53 | 54 55 | |||||||
| Prensatelas | 2A | 2A | 2A | 2A | 2A | 2A | 2A | 2A | 2A | 2A | 2A | 2A | 2A |
| Punta | ||||||||||||||
| N.° | 56 57 | 58 59 | 60 61 | 62 63 | 64 65 | 66 67 | 68 69 | |||||||
| Prensatelas | 2A | 2A | 2A | 2A | 2A | 2A | 2A | 2A | 2A | 2A | 2A | 2A | 2A |