
Side - Basket Airforce - Free user manual and instructions
Find the device manual for free Side Airforce in PDF.

| Brand | Airforce |
| Model | Side |
| Product Type | Cooker Hood |
| Power Supply | 220-240 V, 50 Hz |
| Minimum Installation Distance (Electric Hob) | 65 cm |
| Minimum Installation Distance (Gas/Mix Hob) | 65 cm or according to cooker manufacturer's instructions |
| Operating Modes | Extracting (external evacuation) and recirculating (recycling with charcoal filter) |
| Number of Motors | 2 (right and left, independent or synchronized) |
| Motor Speeds | Multi-speeds adjustable via touch buttons |
| Grease Filter | Metal, dishwasher safe, clean once a month |
| Charcoal Filter (optional) | Active, not washable, replace every 6 months in recirculation mode |
| Lighting | LED (replacement by technical service) |
| Functions | Timer, clock, filter management, motor synchronization, touch controls |
| Power Cable Length | 1250 mm |
| Repairability | Filters replaceable by user; LED bulb and cable by professional |
Frequently Asked Questions - Side Airforce
User questions about Side Airforce
0 question about this device. Answer the ones you know or ask your own.
Ask a new question about this device
Download the instructions for your Basket in PDF format for free! Find your manual Side - Airforce and take your electronic device back in hand. On this page are published all the documents necessary for the use of your device. Side by Airforce.
USER MANUAL Side Airforce
natural_image
Isometric line drawing of a modular shelving unit with three shelves and metal supports (no text or symbols)D
INSTRUCTIONS ON MOUNTING AND USE
F
PRESCRIPTIONS DE MONTAGE ET MODE D'EMPLOI
NL
MONTAGEVOORSCHRIFTEN EN GEBRUIKSAANWIIZING
ES
MONTAJE Y MODO DE EMPLEO
1
natural_image
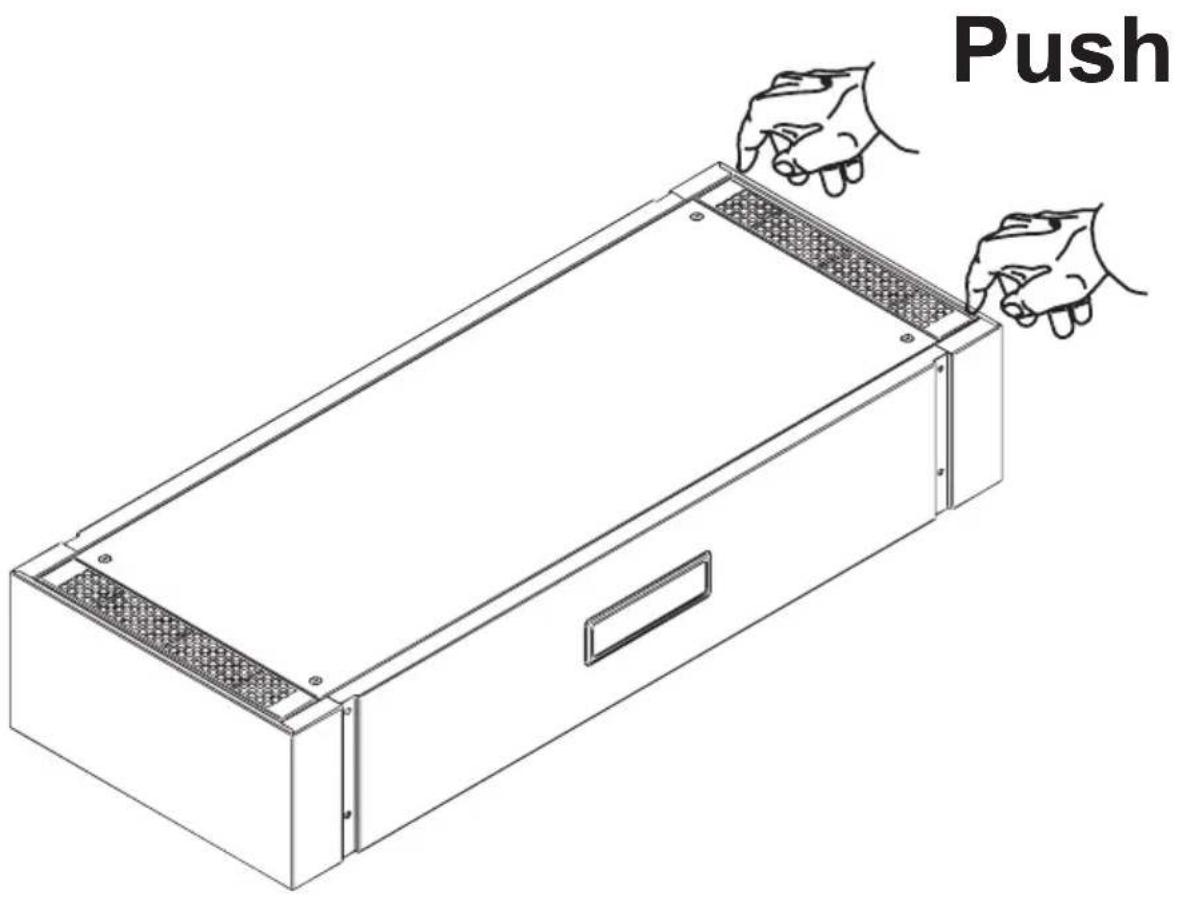
Illustration of two gloves with textured soles (no text or symbols)EN Always wear work gloves for all installation and maintenance operations

natural_image
Technical line drawing of a rectangular electronic device with a grid pattern and an upward arrow indicating assembly or operation (no text or symbols present)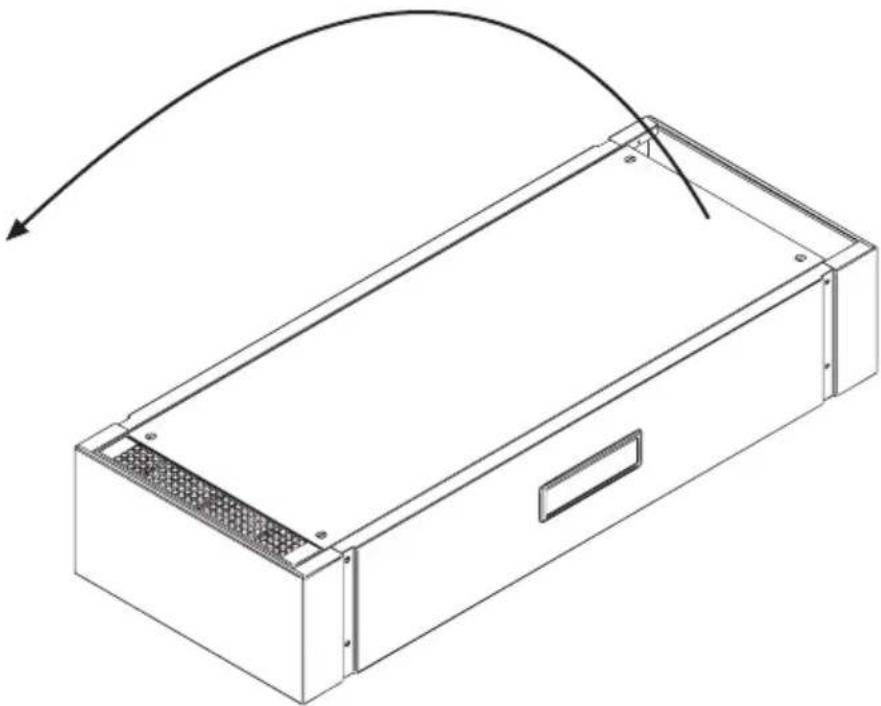
natural_image
Isometric line drawing of a rectangular electronic device with a curved arrow indicating motion or force (no text or symbols)natural_image
Pure geometric diagram showing intersecting lines and a parallelogram with labeled points (no text or symbols)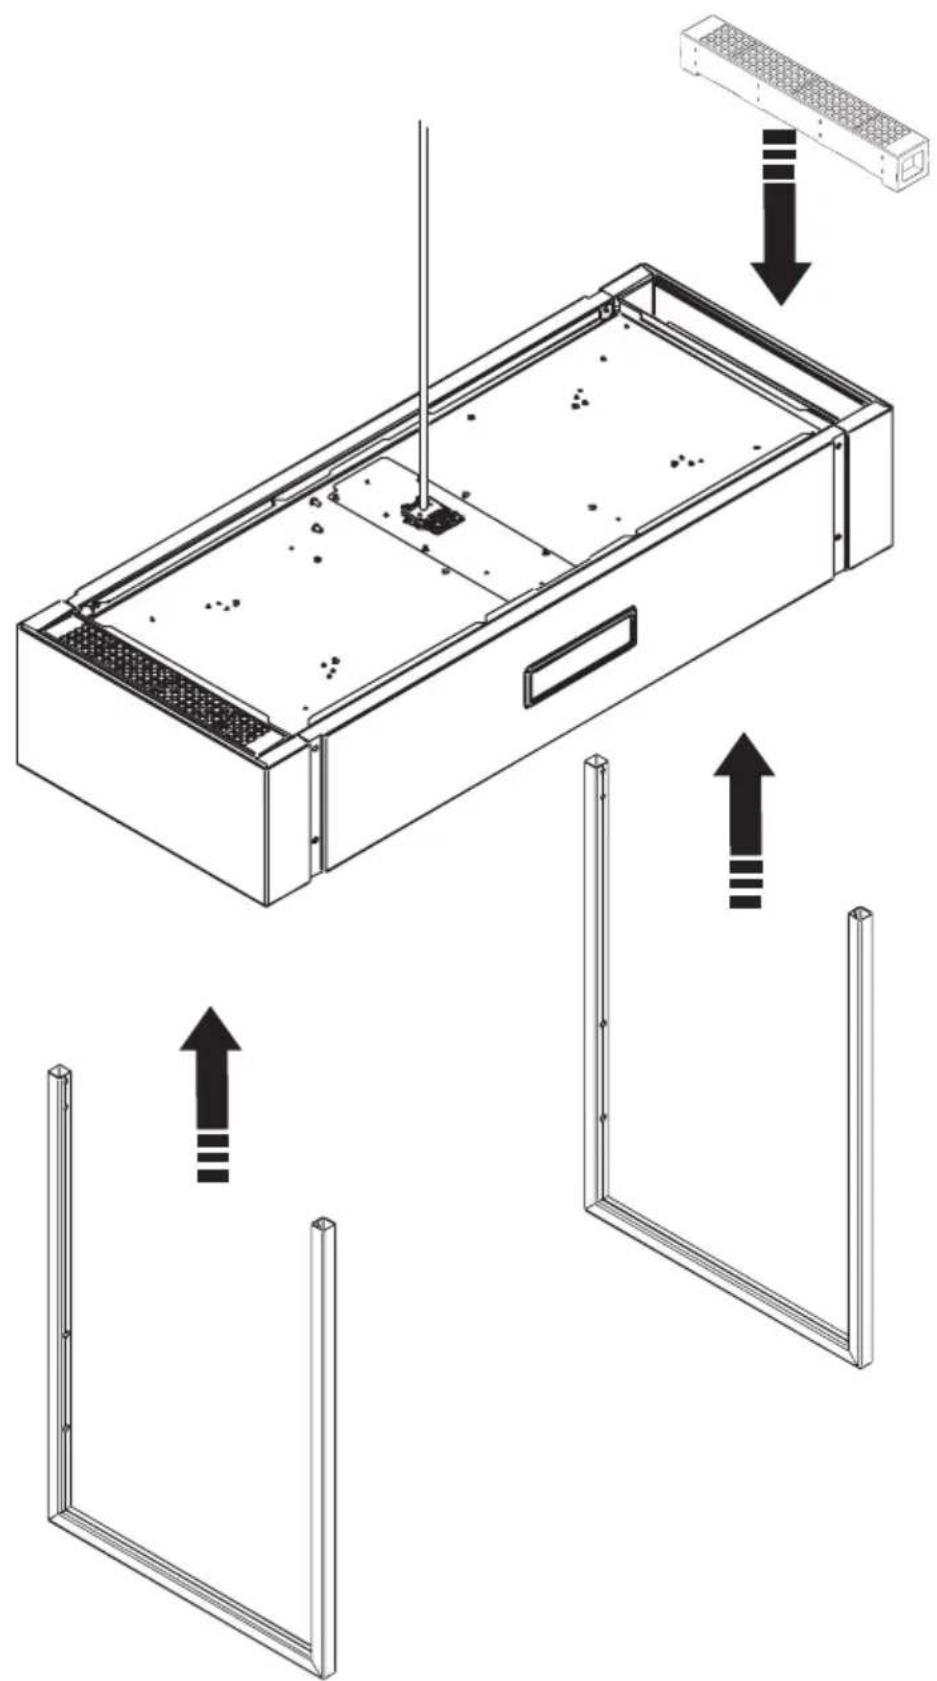
natural_image
Technical line drawing of two mechanical assembly components with support beams and internal components (no text or symbols)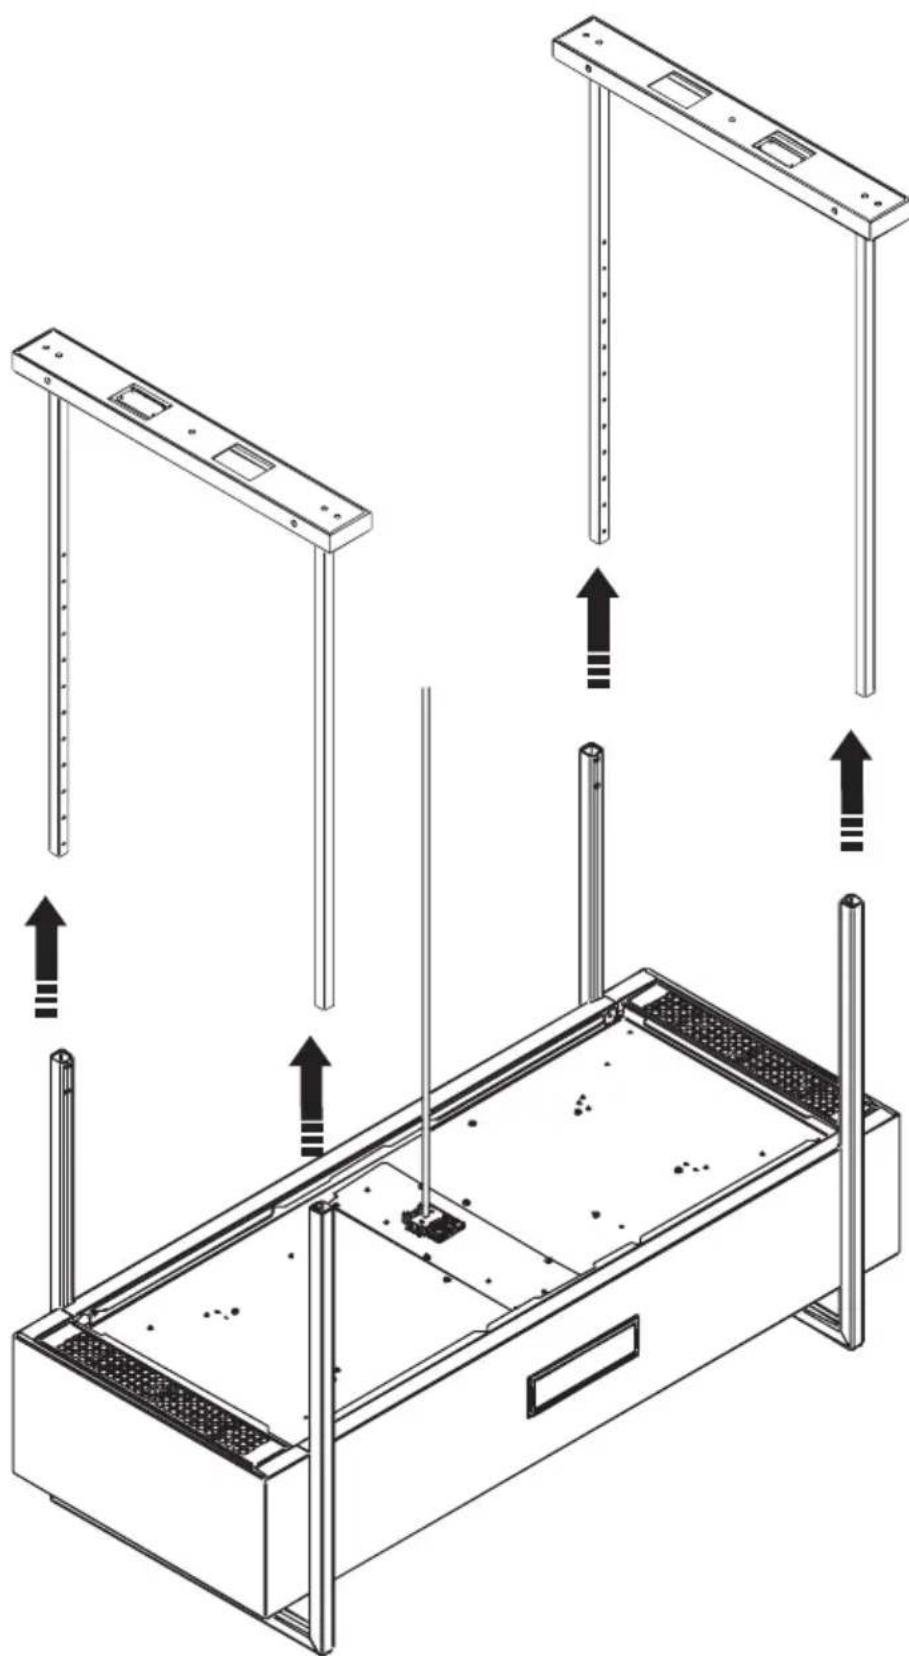
natural_image
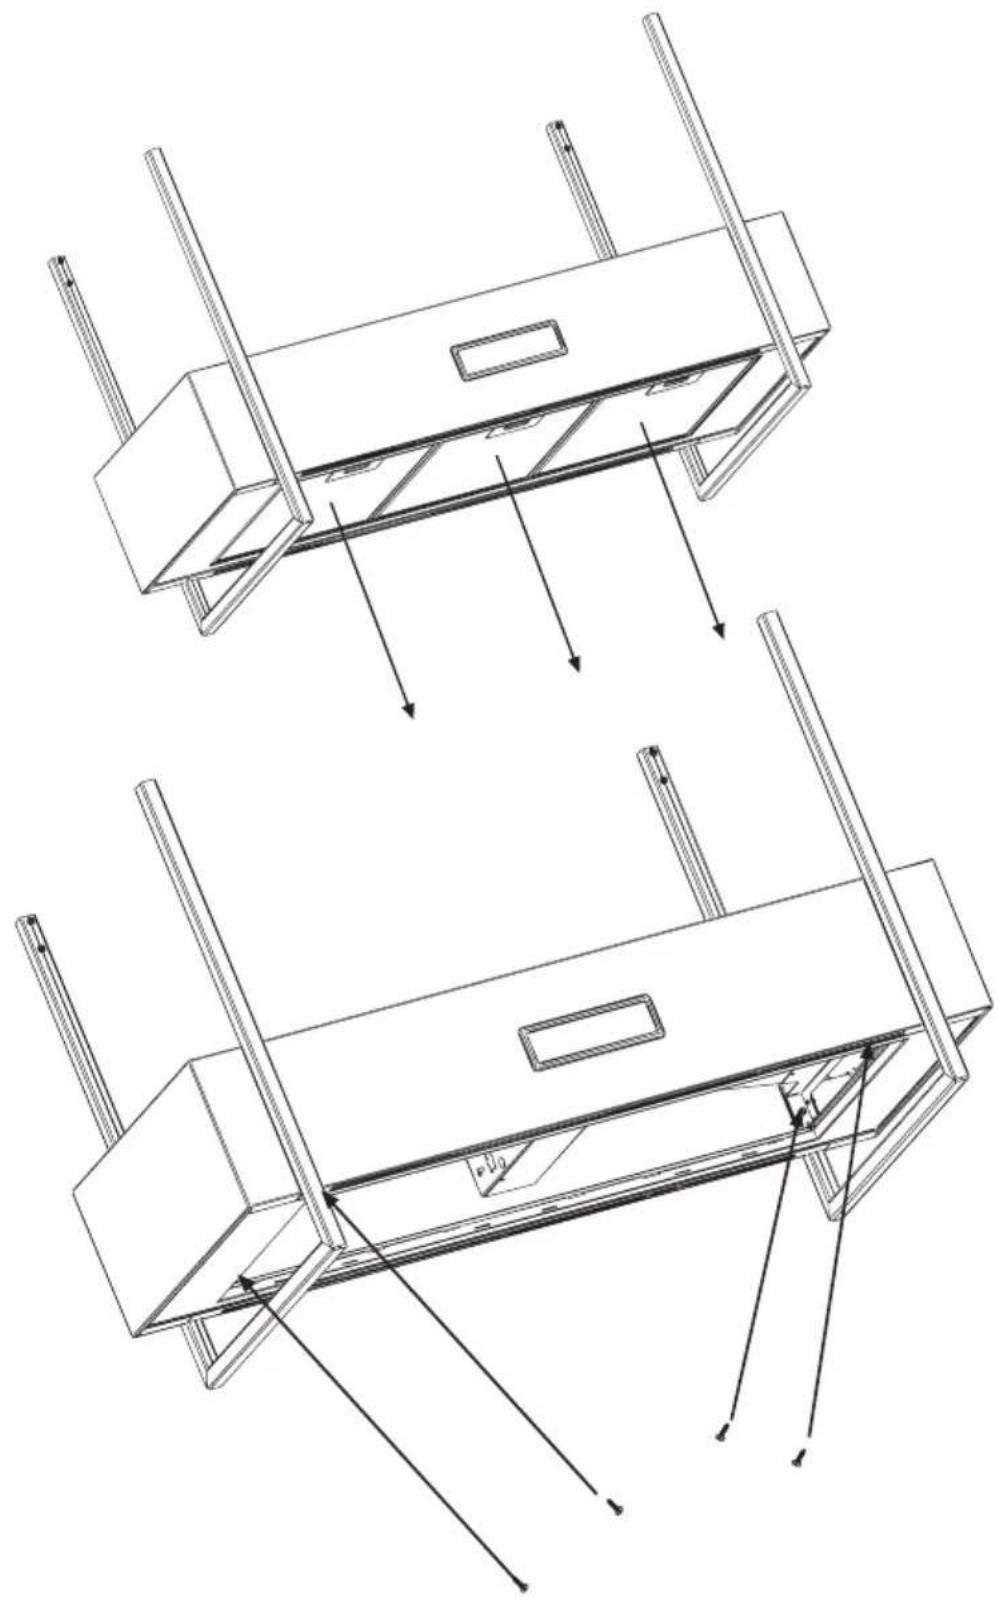
Isometric line drawing of a rectangular device with vertical supports and an open base, showing internal components and directional arrows (no text or symbols)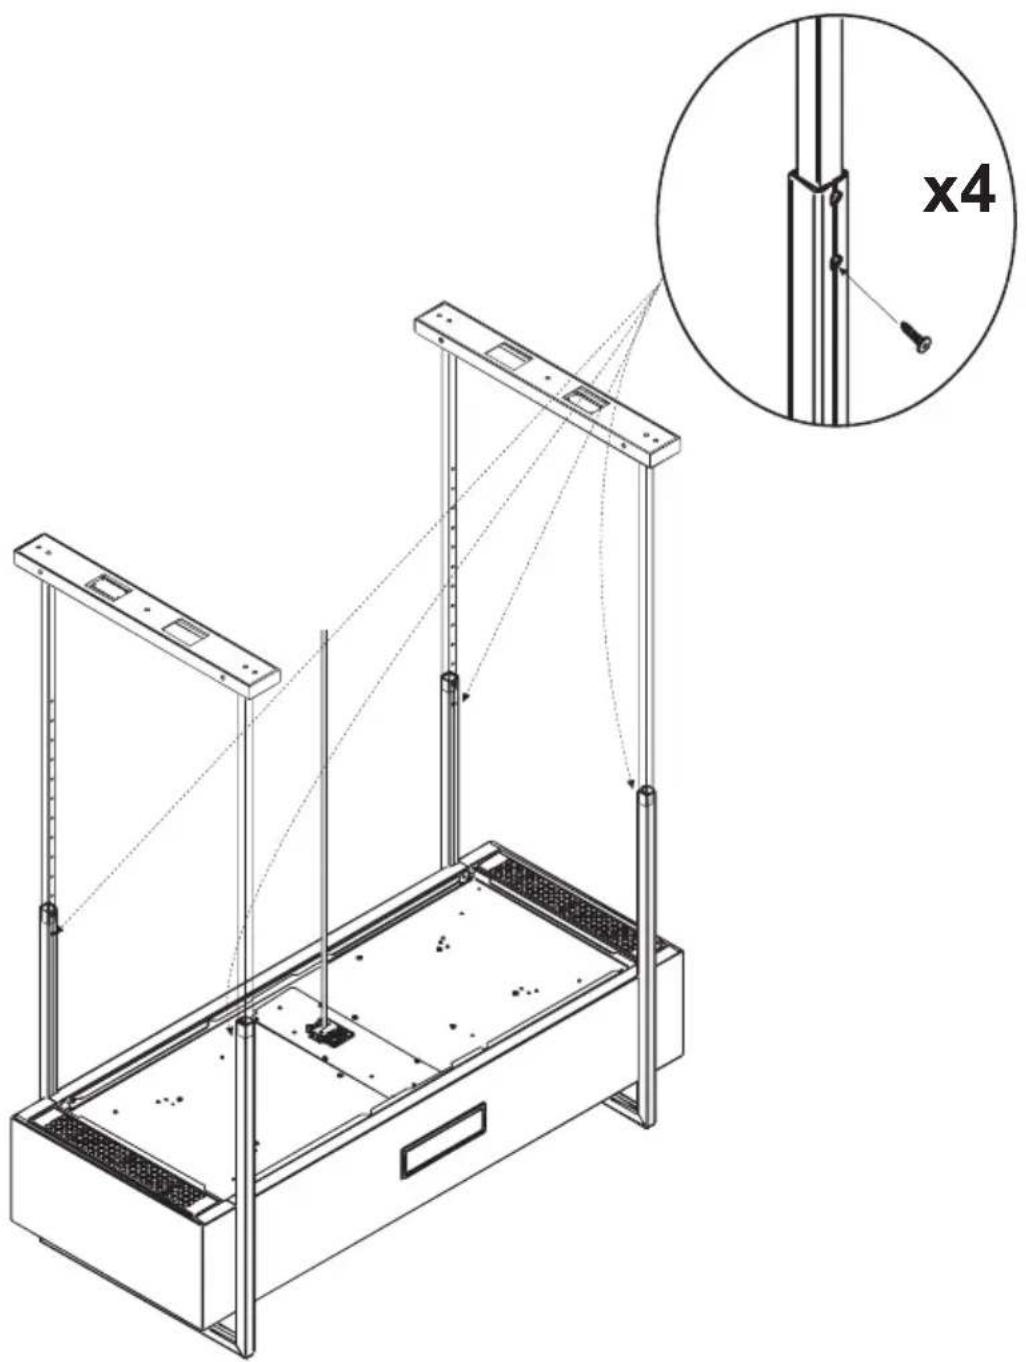
natural_image
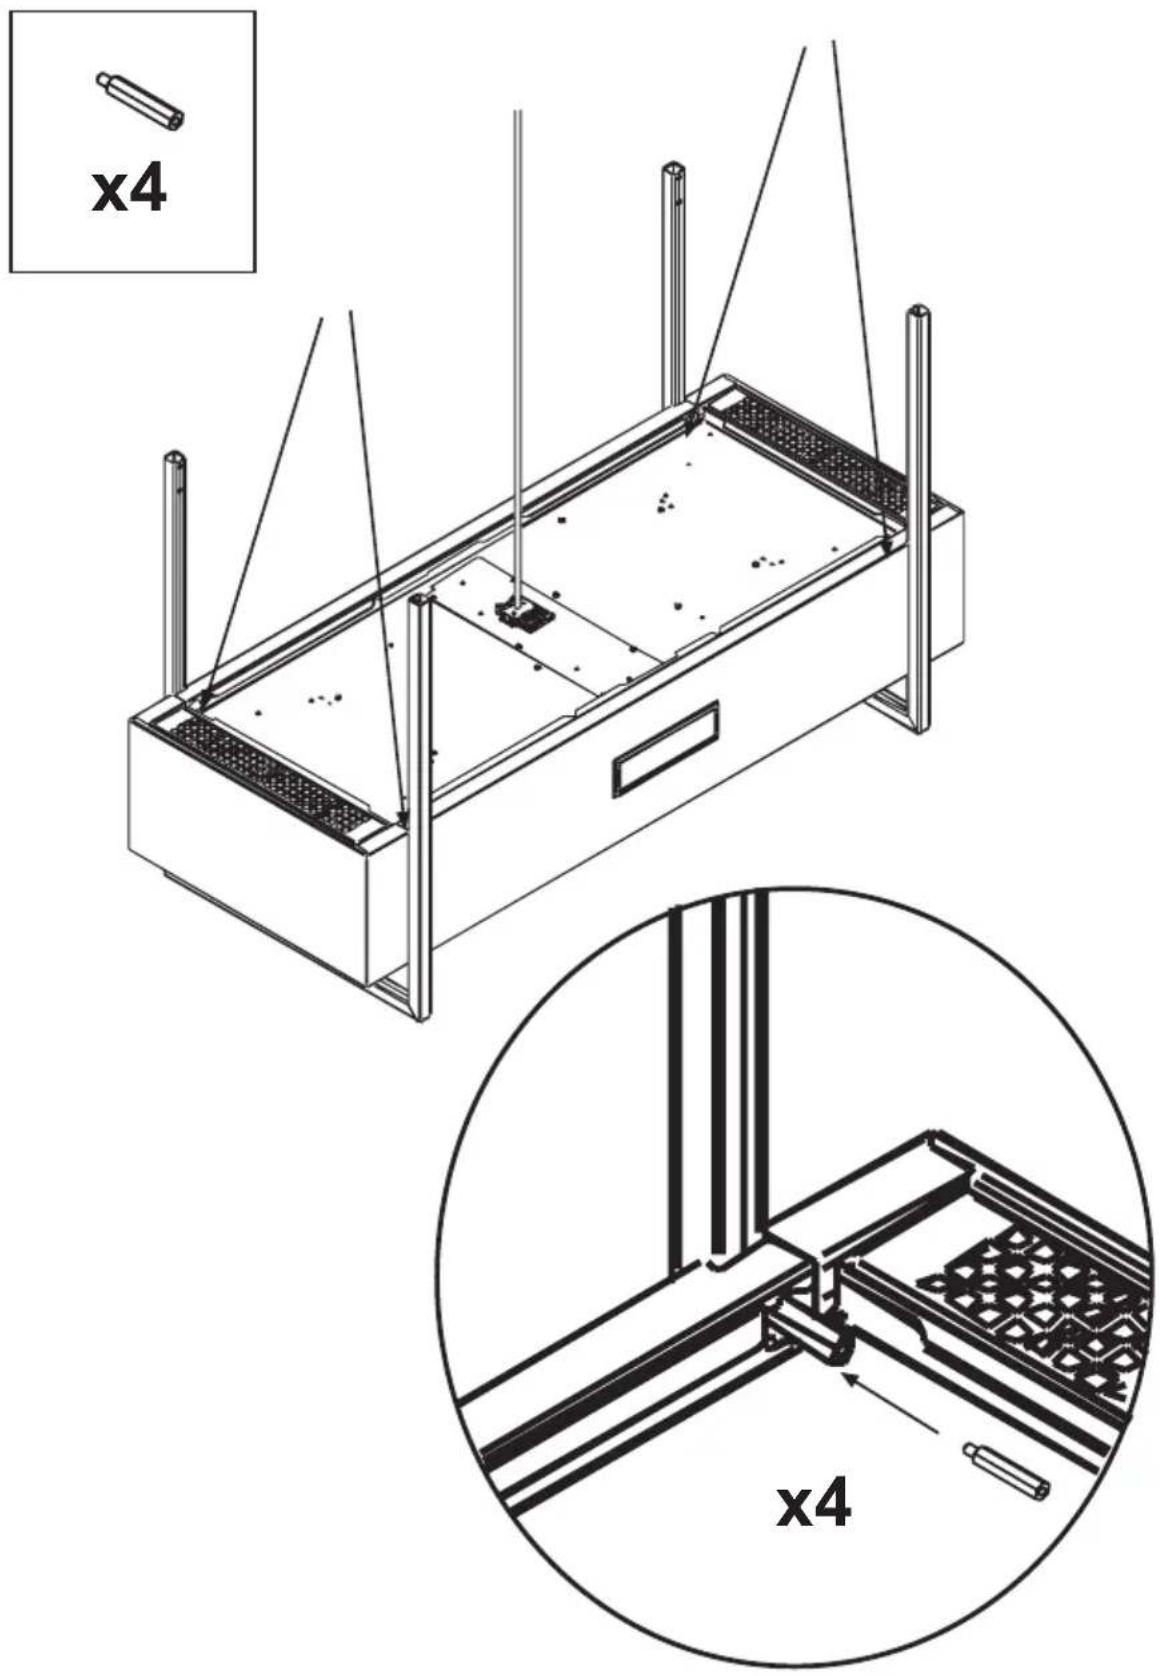
Technical line drawing of a mechanical device with supports and a magnified inset showing a cross-sectional view labeled 'x4' (no text or symbols on the diagram itself)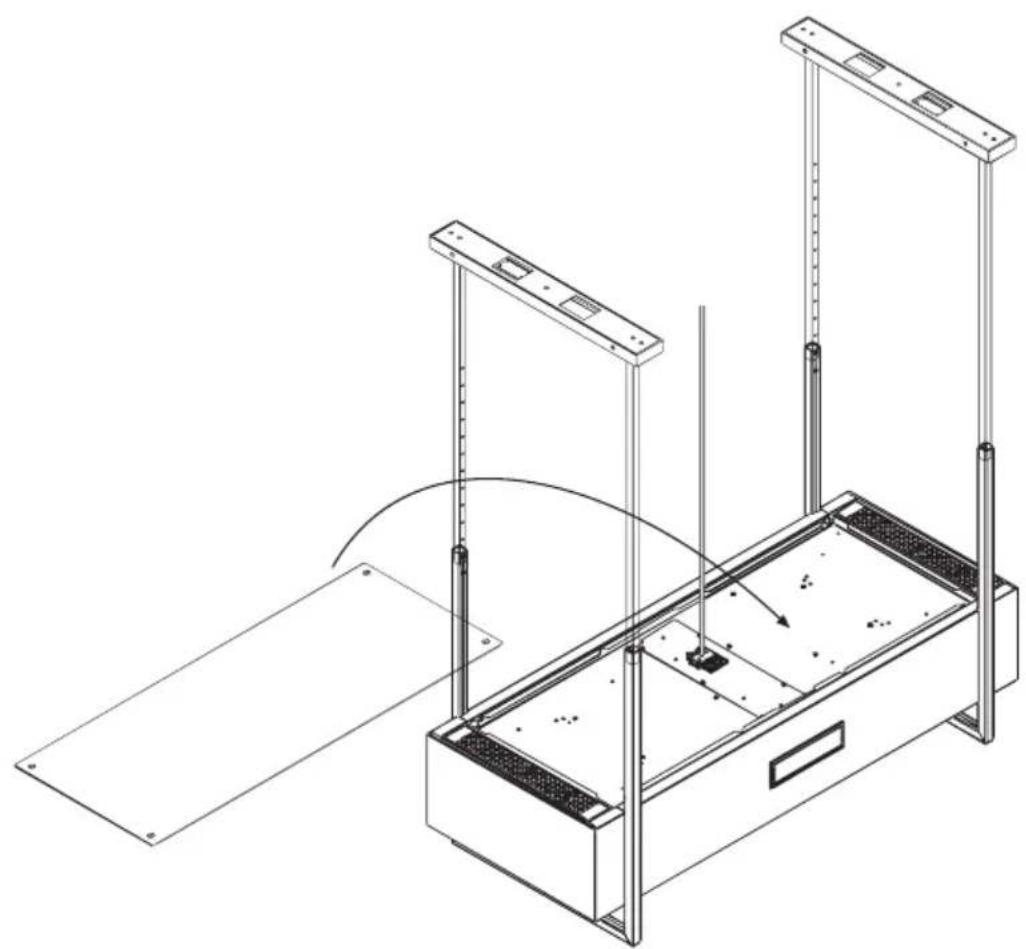
natural_image
Technical line drawing of a mechanical device with vertical supports and a base plate, showing internal components and motion direction (no text or symbols)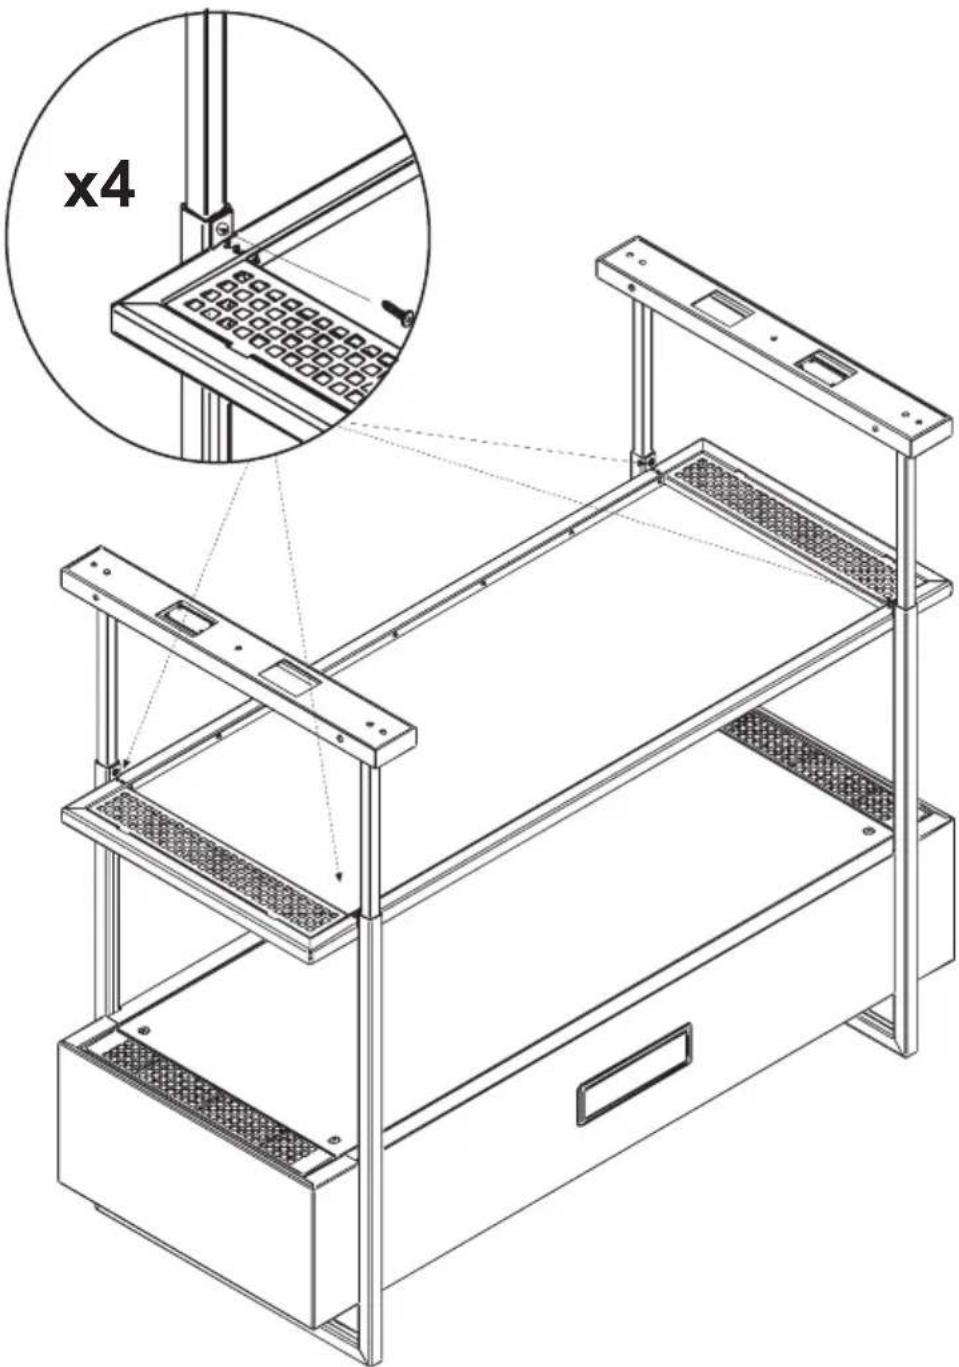
natural_image
Technical line drawing of a multi-level rack with structural supports and a magnified inset showing a grid-patterned component (no text or symbols)Warnung
The appliance should not be used by children under 8 years of age and by persons with reduced physical, sensory and mental capabilities, or lack of experience and knowledge, unless they are supervised or have received instructions regarding the safe use of the appliance and are aware of the possible risks. Children must not play with the appliance. Any intended cleaning and maintenance by the user should not be carried out by children unless supervised. The hood should never be used without without the grid properly fitted! Never use the hood without the grill properly fitted!
The accessible components can overheat when the cooktop is in use.
The hood must not be connected to the flues of other appliances that run on gas or other fuels. When the hood is used at the same time as other appliances that run on gas or other fuels, provision must be made for an adequate supply of air. No food must be cooked flambé underneath the hood. The use of an unprotected flame could cause damage to the filters and could cause fires, so should be avoided. When frying food, never leave the pan unattended because the cooking oil could flare up. Please comply with the technical and safety provisions set forth by your local competent authorities regarding the ventilation of hoods.
This appliance conforms to European Directive 2002/96/EC, Waste Electrical and Electronic Equipment (WEEE). Please dispose of this product correctly in the interest of health and the environment.
The symbol 📁 on the product, or on the documents accompanying the product, indicates that this appliance may not be treated as household waste. Instead it shall be handed over to the applicable collection point for the recycling of electrical and electronic equipment. Disposal must be carried out in accordance with local environmental regulations for waste disposal. For more detailed information about treatment, recovery and recycling of this product, please contact your local city office, your household waste disposal service or the shop where you purchased the product. If the power cable is damaged you should, in the interest of safety, contact the manufacturer or the manufacturer's technical assistance service to request a replacement, or ask someone who is similarly qualified.
Check also the drawings on the initial pages with the alphabetical and numerical references in the explanatory text. Closely follow the instructions in this manual. We cannot accept liability for any faults, detriment or fire damage to the appliance due to non-compliance with the manual's instructions.
You should affix the hood to a wall of sufficient weight-bearing capacity, so not to one made of plasterboard.
The cooker hood must be placed at a minimum distance of 65 cm from the cooking plane for electric cookers and 65cm for gas or mixed cookers. If the instructions for installation for the gas hob specify a greater distance, this has to be taken into account. Do not tile, grout or silicone this appliance to the wall. Surface mounting only. Do not fix chimney flue to furniture or fly over shelves unless the chimney flue can be easily removed, in case maintenance is ever required.
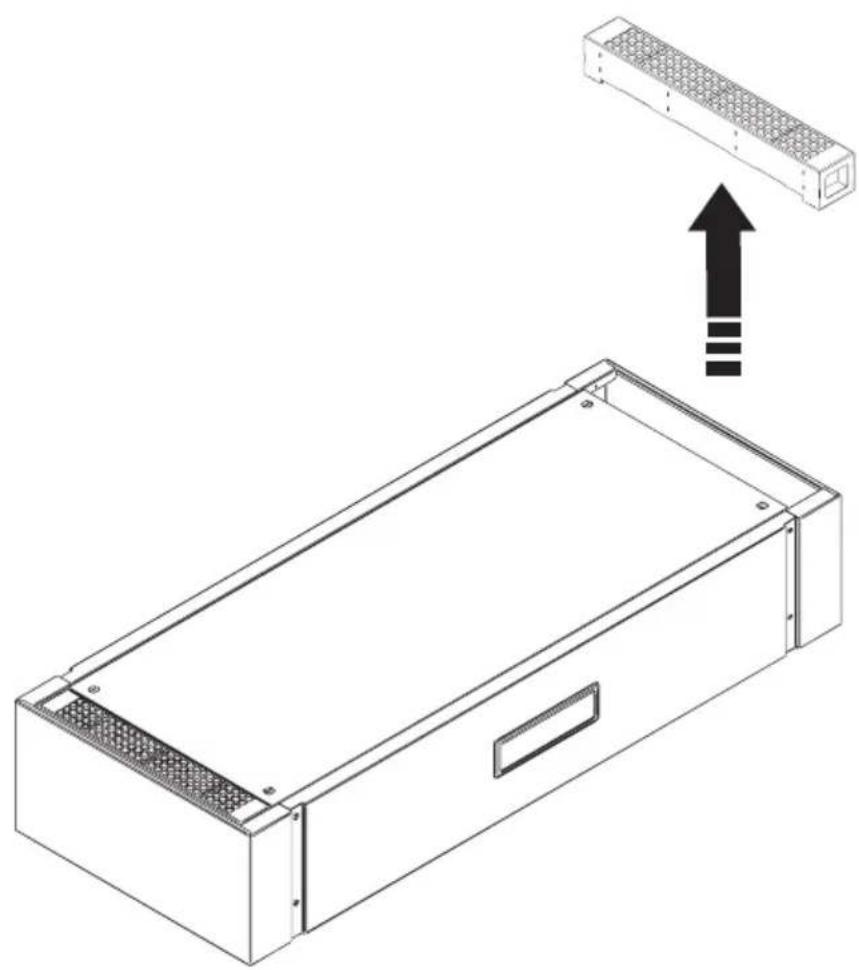
The cooker hood is provided with an upper air exit B for discharging fumes externally for models including chimney flue C (Suction Version A- exhaust pipe not supplied). If cooking fumes and vapours cannot be externally discharged, the cooker hood can be used in the recirculating version F: the installation of 1 active charcoal filter F allows the recirculation of fumes and vapours through the upper grid G.
Make sure that there is a power socket near the hood and that the system has a 30 mA differential. The mains voltage must be the same as that on the label inside the hood. The hood has a 1250 mm power cable with or without plug: if it does have a plug, connect the hood to an accessible approved socket; or if it does not (connection direct to the mains), fit an approved bipolar switch with a minimum contact opening of no less than 3 mm (accessible). This installation and electrical connection must be executed by a qualified technician.
If the cooking top is in use, the cooker hood must always operate.
Product performance test carried out in accordance with standard (EU) No 65/2014-Ref: IEC 61591
Maximum performance is achieved by placing the mobile panels, if any, in the open position.
This product allows you to choose the operating mode (extraction or filtering) according to installation.
This model should only be set in the filtering version.
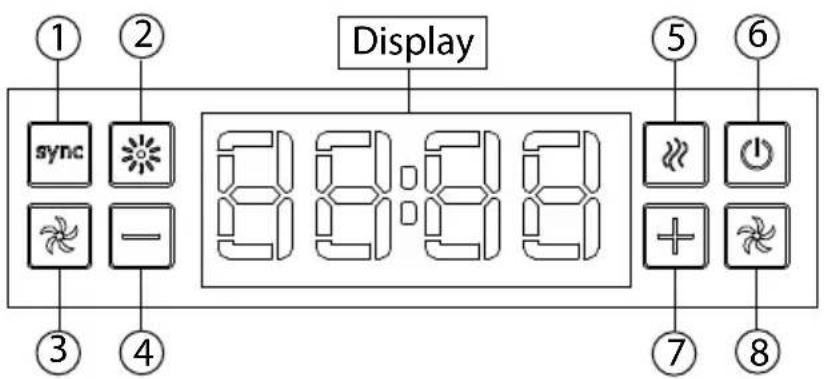
On first start-up for a few seconds the display shows which mode is active.
Filtering: the display indicates: FC1
Extraction: the display indicates: FC0
During this phase, you can change the mode by pressing key: 5
To confirm the selection, press the key: 6
To reference the operating mode selection, disable and re-enable voltage to the appliance.
Key:6 on/off motor: pressing the key starts both the motors at first speed or if already on it causes switch off.
This device is equipped with a dual motor, on the right and left, with independent and/or synchronised operation.
To select each motor, use key 3 (for the left motor), use the key: 8 (for the right motor).
To increase and reduce the speed of the motor, use the key: 4 (to decrease), use the key: 7 (to increase)
Key: 1 synchronises the two motors aligning the speed between the two motors at the highest speed
use the key: 4 (to decrease), use the key: 7 (to increase).
To switch off a single motor use the key: 3 (left motor) use the key: 8 (right motor).
Clock adjustment: to adjust the time, simultaneously press the key: 4 and the key: 7 with the motors off and lights off, using keys 4 and 7 set the correct time, to confirm simultaneously press the key: 4 and the key: 7.
Timer: to enable this function with the motor on, simultaneously press the keys 5 and 7, the timer indicates 10 minutes to increase or decrease the time using the keys 7 and 4.
Filter management: on pressing the key: 5 on the display the wear status is displayed of the filters expressed as a percentage: FC (carbon filters), on subsequent pressing the key: 5 the display shows the wear status of the grease filters FG (grease filters).
Saturated filters: if the key: 5 flashes with the hood on, or remains fixed in standby, the display on switching on the motor will display the status of the filters: you must wash the grease filters or replace the carbon filters.
Reset filters: following maintenance or replacement of the various filters to reset the alarm press the key: 5, press the key for a long time: 5 the timer will reset and a beep confirms the operation carried out.
Maintenance
Prior to any maintenance operation ensure that the cooker hood is disconnected from the electrical outlet.
Cleaning
The hood must be cleaned frequently both inside (apart from the area behind the grease filter) and outside. Use a cloth moistened with neutral liquid detergents. Never use products containing abrasives.
Warning
Failure to carry out the basic standards of the cleaning of the cooker hood and replacement of the filters may cause fire risks. Therefore we recommend observing these instructions.
Anti-grease Filter
must be cleaned once a month, with non abrasive detergents, by hand or in dishwasher on low temperature and short cycle. When washed in a dishwasher, the grease filter may discolour slightly, but this does not affect its filtering capacity.
Charcoal Filter - (only for filter version)
The active charcoal filters F are not washable nor regenerative. It should be changed every 6 months in normal use. The active charcoal filters capture unpleasant cooking odours.
Reducing environmental impact:
To reduce energy consumption, we recommend you always use the lowest suction speed among those suitable for the cooking mode currently active, avoid leaving the appliance running for more than 15 minutes after burner shutdown and switch off the lights if you leave the cooking area.
Replacing lightbulbs
Warning! Prior to touching the light bulbs ensure they are cooled down.
Led Light
If the lighting group LED does not work, please contact the technical service center in order to replace the whole group.
Attention
Brand : Airforce
Model : Side
Category : Basket