
Express Anti-calc GV7255G0 - Iron TEFAL - Free user manual and instructions
Find the device manual for free Express Anti-calc GV7255G0 TEFAL in PDF.
| Product type | Steam generator with iron |
| Brand | Tefal |
| Model | Express Anti-calc GV7255G0 |
| Water tank | 1.4 L, removable |
| Power supply | 220-240 V, grounded plug |
| Power | Not specified, estimated 2400 W |
| Boiler type | Built-in, with removable scale collector |
| Anti-scale system | Integrated scale collector with orange indicator light |
| Main functions | Steam ironing, dry ironing, vertical steaming, turbo (depending on model) |
| Settings | Iron temperature (3 positions), variable steam output |
| Safety | Overpressure valve, thermal fuse, auto-off (not mentioned), iron lock (Lock-System) |
| Maintenance | Soleplate cleaning with non-metallic sponge, descaling via removable collector |
| Spare parts | Scale collector, collector cover (available from approved service center) |
| Repairability | Repair by approved service center only |
| Weight | Not specified, estimated 5 kg |
| Dimensions (approx.) | 30 x 25 x 30 cm (estimated) |
| Power cord length | Not specified, approximately 2 m |
| Soleplate type | Not specified, probably stainless steel or ceramic |
| Use | Domestic only |
Frequently Asked Questions - Express Anti-calc GV7255G0 TEFAL
User questions about Express Anti-calc GV7255G0 TEFAL
0 question about this device. Answer the ones you know or ask your own.
Ask a new question about this device
Download the instructions for your Iron in PDF format for free! Find your manual Express Anti-calc GV7255G0 - TEFAL and take your electronic device back in hand. On this page are published all the documents necessary for the use of your device. Express Anti-calc GV7255G0 by TEFAL.
USER MANUAL Express Anti-calc GV7255G0 TEFAL
natural_image
Exterior view of a Tefel air iron machine with black and white body, no visible text or symbols on the device itself.F
NL
D
GB
I
E
P
DK
S
FIN
N
GR
TR
PL
CZ
SK
H
RUS
UA
HR
RO
SLO
EST
LT
LV
text_image
1* 2 3 4 5 6 7 8 9 10* 11 12 13 14 15 16 17 18 19 19a 19b 19c 19d 19e EXPRESS ANTI-CALC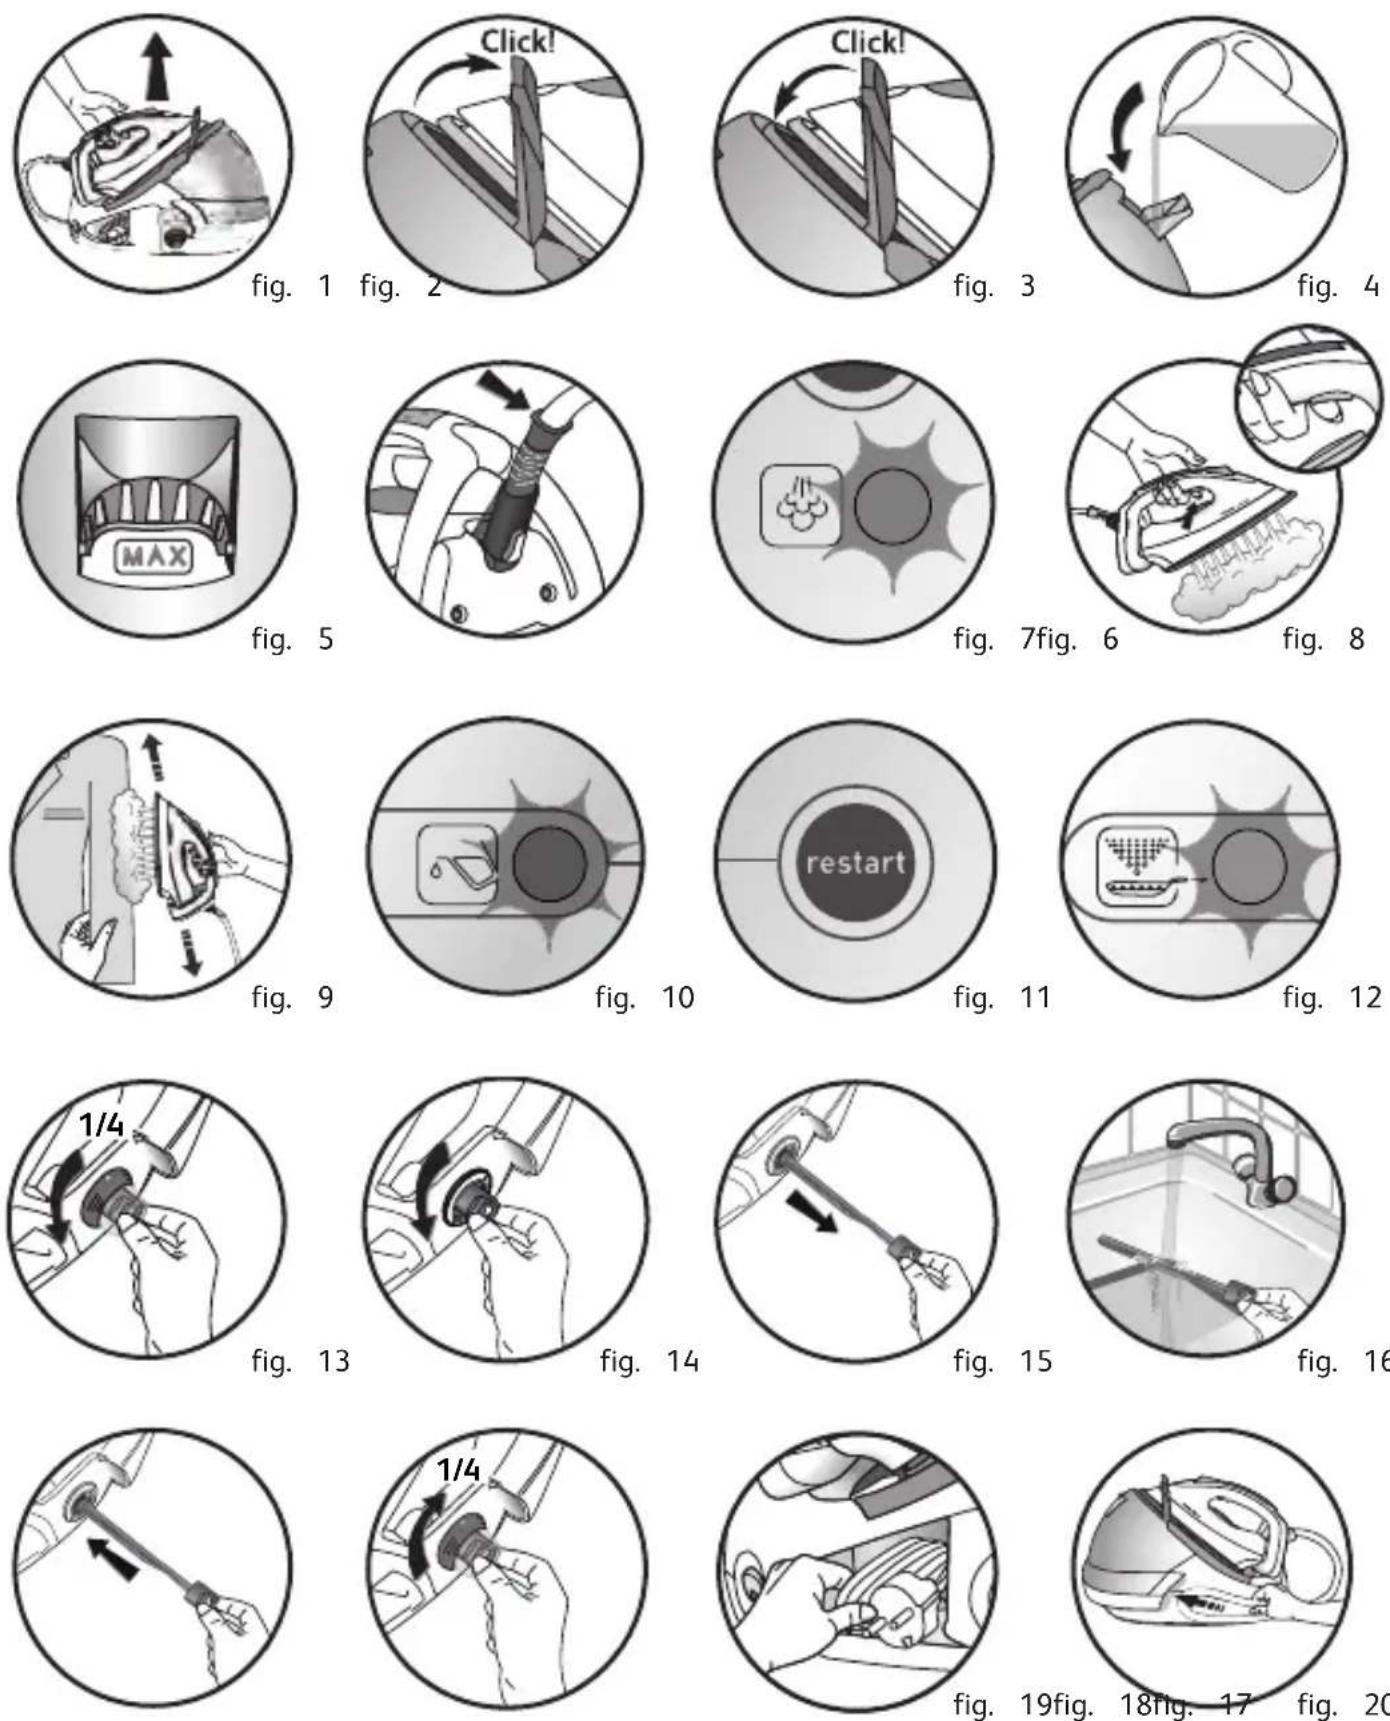
Recommendations importantes
Important recommendations
Safety instructions
- Please read these instructions carefully before first use. This product has been designed for domestic use only. Any commercial use, inappropriate use or failure to comply with the instructions, the manufacturer accepts no responsibility and the guarantee will not apply.
- For your safety, this appliance conforms to the applicable standards and regulations (Low Voltage, Electomagnetic Compatibility, Environmental Directives, as applicable...).
- Your steam generator is an electrical appliance: it must be used in normal conditions of use. It is only designed for domestic use.
- Your generator is fitted with 2 safety systems:
- a pressure release valve which, in the event of a malfunction, releases any excess steam;
- a thermal fuse to prevent the appliance from overheating.
• Always plug in your steam generator:
- an electrical installation with voltage between 220V and 240V.
- an earthedsocket.
Connecting to the wrong voltage may cause irreparable damage to the appliance and will invalidate your guarantee.
If you are using a mains extensionlead, ensure that it is correctly rated (10A) with an earth, and is fully extended.
- Completelyunwind the power cord from its storage space before connecting to an earthedsocket.
- If the electric powercordortheiron-unitisdamaged, it must bereplaced by an Approved Service Centre in ordertopreventany danger.
- Donot unplug the appliance by pullingon thecord.
Always unplug your appliance:
- before filling the water tank or rinsing the collector,
- before cleaning your generator,
-
after each use.
-
The appliance must be used and placed on a flat, stable, heat-resistant surface. When you place the iron on the iron rest, make sure that the surface on which you place it is stable.
- This appliance is not intended for use by persons (including children) with reduced physical, sensory or mental capabilities, or lack of experience and knowledge, unless they have been given supervision or instruction concerning use of the appliance by a person responsible for their safety.
- Children should be supervised to ensure that they do not play with the appliance.
- Never leave the appliance unattended :
- whenit is connected tothe mains,
- until ithas cooled down(around 1 hour).
- The soleplate and generator iron-rest can become very hot and cause burns: never touch these parts. Never touch the electric cords with the sole plate of the iron.
- Your appliance gives off steam which can cause burns. Handle your iron carefully, particularly when using the vertical steam function. Never direct the steam towards person or animals.
- Always wait before rinsing the collector until the steam generator has cooled down and has been unplugged for at least 2 hours before unscrewing the collector.
- While rinsingout the boiler, never fill it directly under the tap.
- If you lose or damage the boiler rinsecap, haveit replaced byan approved Service Centre.
- Do not immerse your steam generator in water or any other liquid. Do not rinse it under a running tap.
- The appliance must not be used if it has fallen to the floor, shows evidence of damage, leaks or fails to function correctly. Never dismantle your appliance. To avoid any danger, have it inspected in an approved service centre.
- This appliance has been designed for domestic use only. Any commercial use, inappropriate use or failure to comply with the instructions, the manufacturer accepts no responsibility and the guarantee will not apply.
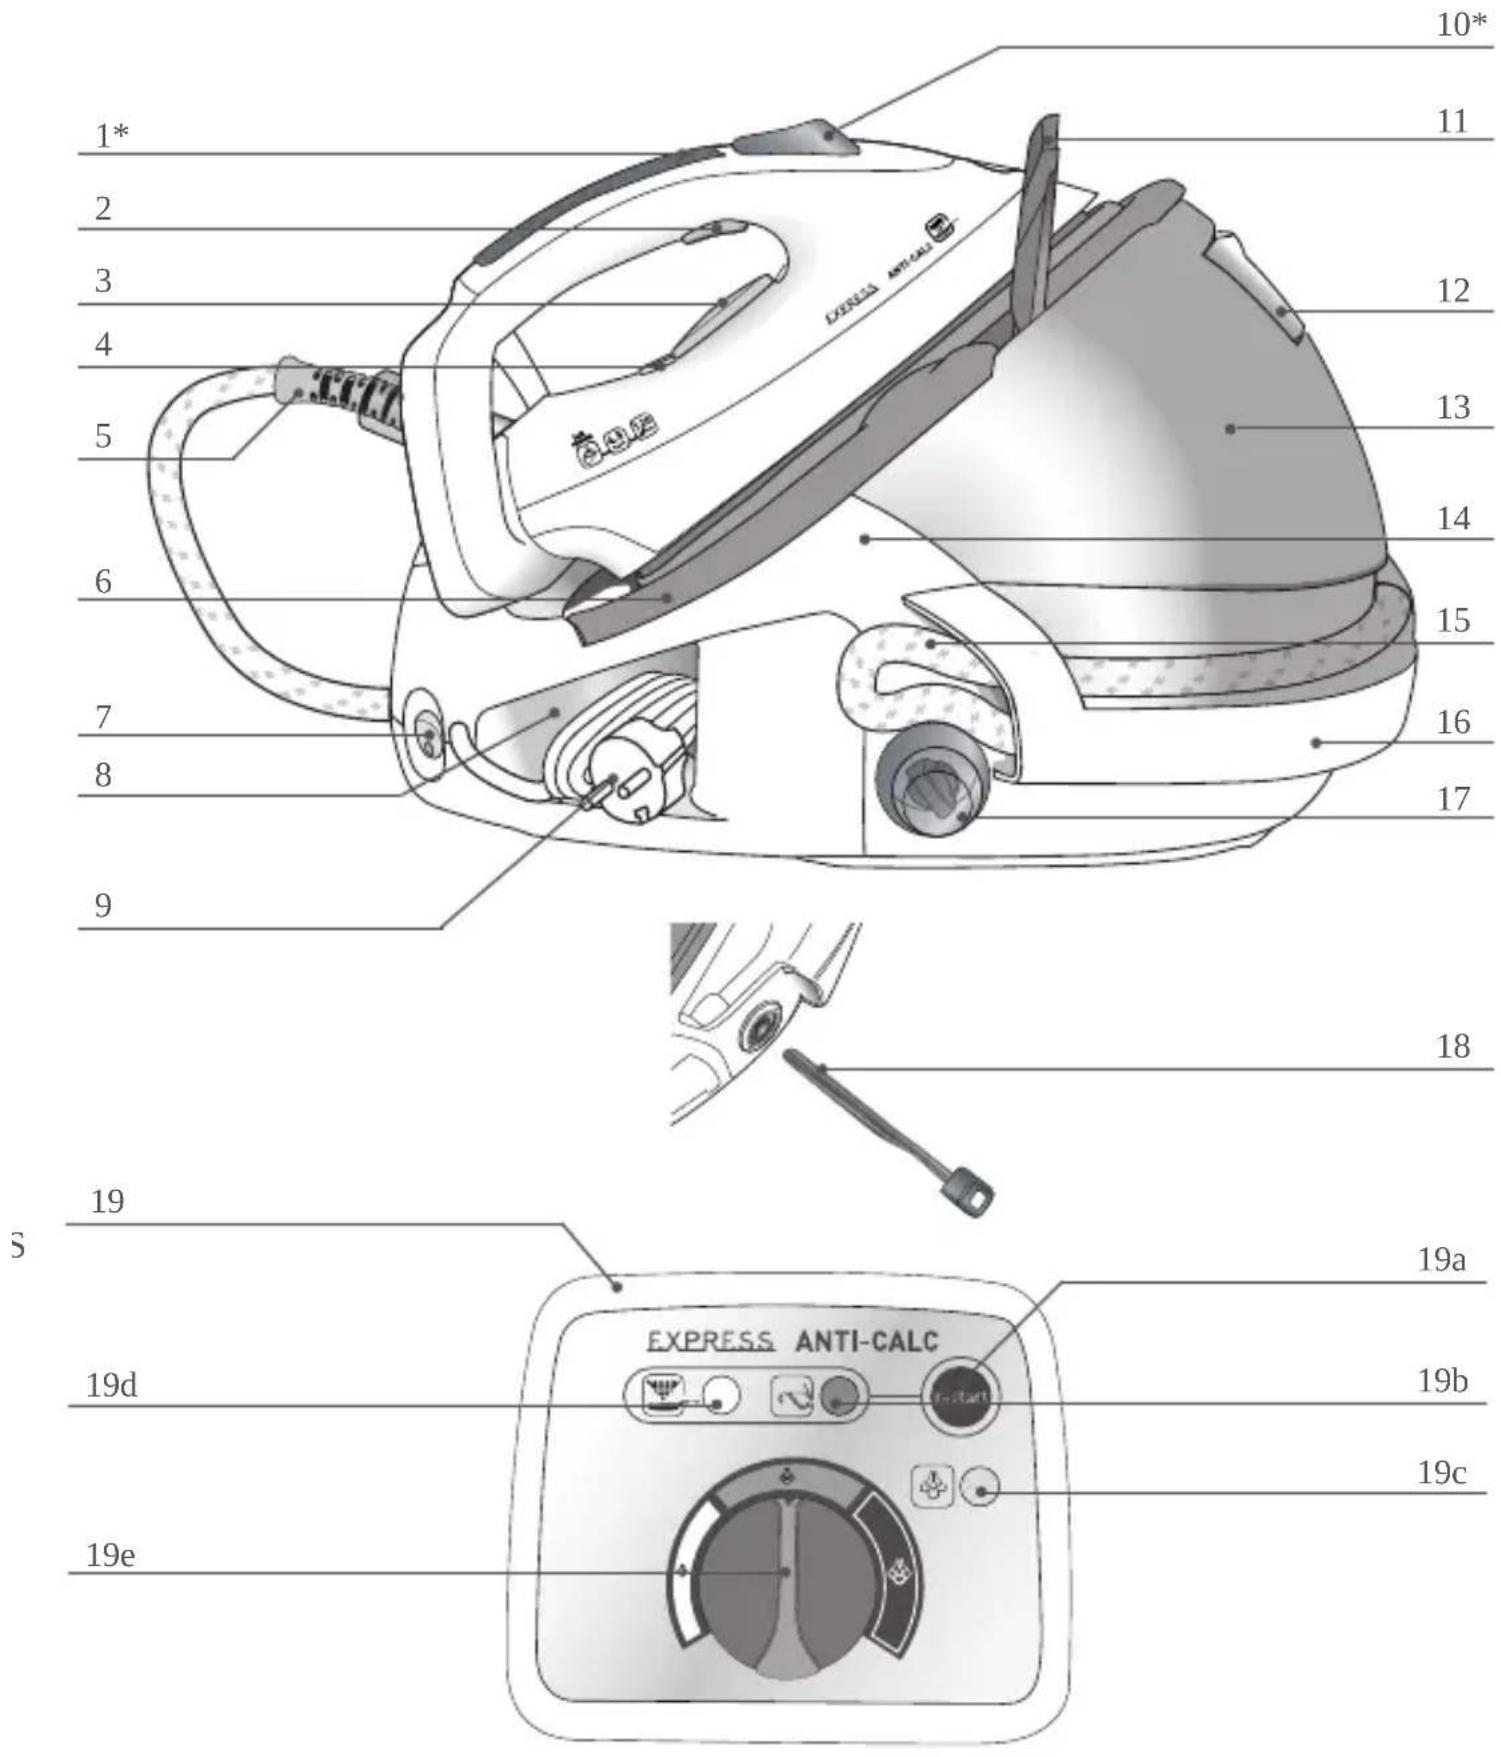
Description
- Comfort handle (depending on model)
- Steam control button
- Iron temperature adjustment button
- Iron thermostat light
- Easycord system
- Iron rest
- Illuminated on / off switch
- Power cord storage space
- Power cord
- Turbo button (depending on model)
11.Lock-System hoop -
Water tank filler cover
-
Water tank
- Steam generator boiler (in the base unit)
- Iron-base steam cord
- Slide storage place for the steam cord
- Scale collector cover
- Scale collector
- Control panel
a - Restart button
b - "Water tank empty" light
c - "Steam ready" light
d - "Anti-calc" indicator
e - Steam output control dial
Locking system for retaining the iron on the base - Lock-syst
Yoursteam generatoris fitted with a ring tohold the iron onto thebase with a locked positionfor easy transport and storage - fig.1 :
- Locking - fig.2
- Unlocking - fig.3
To transport your steam generator using the handle of the iron :
- placethe iron in position on thehousing plate on thesteamgenerator andfoldthe ringove iron until it locks into position (you will hear a "click") - fig.2.
- Hold the iron by the handle to transport your steam generator - fig.1.
Ironing Boards:
Due to the powerful steam output, a mesh type ironing board must be used to allow a ny excess steam to escape and to avoid steam venting.
Preparation
What water may be used?
- Your iron has been designed to operate using untreated tap water.
- Heat concentrates the elements contained in water during evaporation. The types of listed belowcontain organic waste or mineral elements that can cause spitting, brownst or premature wear of the appliance: water from dothes dryers, scented or softened water, water from refrigerators, batteries or air conditioners, pure distilled or demineralised w rain water should not be used in your iron. Also do not use boiled, filtered or bottled
If your water is very hard (check water your local water authority) dining possible to mix untreated tap water with store-bought distilled or demineralised water in the following proportions: water. 50% untreated tap water, 50% distilled or demineralised water.
Filling the water tank
- Place the steam generator on a stable, horizontal and heat-resistant surface.
- Ensure that your steam generator is unplugged and that the soleplate and the iron rest have cooled down.
- Open the water tank filler cover - fig.4.
- Pour in untreated tap water up to the max mark - fig.5.
- Close the water tank filler cover.
Using the Easycord system
- Your iron is equipped with an extension cord system to prevent the cord from dragging the laundry and creasing it again when ironing.
• Take the steam cord out of its housing and unwind it completely. - Remove the tie to release the cord outlet.
- Press the Eject button - fig.6 and the Easycord system extends automatically.
- When the cord outlet tips, the Easycord system extends automatically without you having to press the Eject button.
Always use the Easycord system for enhanced comfort of use.
Switch on the steam generator
The first time the appliance is completely unwind the power cord and the steam cord from its storage space.
used, there may be some • Lower the retaining hoop (depending on model) to unlock the safety catch - fig.3.
fumes and smell but this is Plug your steam generator into a mains socket with an earth pin".
not harmful. They will not • Press on the on / off switch. The green light (located on the control panel) flashes and the affect use and will disappear boiler heats up - fig.7.
rapidly. When the green "steam ready" light stops flashing (after 2 minutes approximately), the appliance is ready.
Operating the control panel
- Green light flashes: the boiler heats up. - fig.7.
- Green light on: the steam is ready - fig.7.
- Red light "water tank" on: the water tank is empty - fig.10.
- The orange "anti-calc" indicator flashes - fig.12: you need to rinse the scale collector.
Use
Steam ironing
- Place theiron'stemperaturecontrolslideaccordingtothetypeofffabrictobeironed(seetablebelow).Do not place the iron on a
- The thermostat light comes on. Be careful! The steam generator is ready when the thermostat support. When light goes out and when the green "steam ready" light stays on.
- Adjust the steam output control dial (located on the control panel).
- While ironing, the light on top of the iron and the steam ready light turn on and off, asthe iron on the iron rest temperature adjusts without interrupting ironing. plate of the unit. It is
- To obtain steam, press on the steam control button under the iron handle and keep it equipped with non-slip pads and has been fig.8. The steam will stop when you release the button.
- When starting, and regularly while it is being used, your steam generator's electric pump designed to withstand water into the boiler. It makes a noise but this is quite normal. You may also hear a clicking high temperature. which is the steam valve opening. Again this is normal.
• Always spray starch onto the reverse side of the fabric to be ironed.
| SETTING THE TEMPERATURE AND STEAM OUTPUT ACCORDING TO TYPE OF FABRIC TO BE IRONED | ||
| TYPE OF FABRICS | SETTING TEMPERATURECONTROL | SETTINGSTEAM OUTPUT CONTROLDIA |
| Linen, cotton | ●●● |  |
| Silk, Wool | ●● |  |
| Synthetics(polyester, acetate, acrylic, polyamide) | ● |  |
To prime the steam circuit, • Iron temperature setting:
either before using the iron for start with the fabrics to be ironed at a low temperature ( ) and finish with those which need the first time, or if you have higher temperatures ( or Max).
used the steam function for a Mixed fibre fabric: set the ironing temperature to the setting for the most delicate fabric. few minutes, press the steam. - Woollen garments: press repeatedly on the steam control button - fig.8 to obtain short bursts control button several times in a row, holding the iron away from steam, without placing the iron on the garment itself.
row, holding the iron away from your clothes fig 8. This will • Steam output setting:
- Thick fabric: increase the steam setting.
ejected from the steam circuit. At a low temperature : set the steam output control dial to the low position.
Dry ironing
- Do not press the steam control button under the iron handle.
Vertical steam ironing
Recommendations : for fabrics other than linen or cotton, hold the iron a few centimetres from the garment to avoid burning the fabric.
- Set the iron temperature control slide and the steam output control dial (located on the control panel) to the MAX position. - Hang the garment on a coat hanger and hold the fabric slightly taut with one hand.
As steam is very hot : never attempt to remove creases from a garment while worn, always hang garments on a coat hanger.
- Holding the iron in a vertical position - fig.8, tilted slightly forwards, press repeatedly on the steam control button (underneath the iron handle) moving the iron from top to bottom - fig.9.
Refilling the water tank
- When the red "tank empty" indicator light turns on, there is no more steam - fig.10. The water tank is empty.
- Unplug the steam generator. Open the tank filler flap - fig.4.
Fill the water tank up without exceeding the MAX level - fig.5. - Close the water tank filler cover.
- Plug in the steam generator. Press the "Restart" button - fig.11, on the control panel to continue ironing. When the green indicator remains lit, the steam is ready.
TURBO Function (according to model)
- Press the Turbo control 2 or 3 times when you need extra steam:
- for ironing thicker fabrics,
- for getting rid of creases,
- for powerful vertical steaming.
- for ironing thicker fabrics, - for getting rid of creases, - for powerful vertical steaming.
Use the Turbo function with care as its exceptional steam power can cause bur
Maintenance and cleaning
Cleaning your steam generator
- Do not use detergent or descaling products for cleaning the soleplate base-unit. Tip: for easy, non-aggressive
- Never hold the iron or the base unit under the tap.
• Empty and rinse the removable water tank. - Clean the plastic parts of the appliance occasionally with a soft cloth.
cleaning of the sole plate of your iron, use a damp sponge to clean the sole plate while it is still warm.
Easy descaling of your steam generator:
Do not use any descaling substances (vinegar, industrial descaling To extend the life of your steam generator and avoids scale on your ironing, your steam generator is equipped with a built-in scale collector. This valve, located in the tank, automatically removes the scale that forms inside.
the anti-scale valve : Operation:
they could damage it. An orange "anti-scale" light located on the control panel starts blinking to tell you that the anti-scale valve needs rinsing - fig.12. Before emptying your steam
generator, it must always be left to cool for 2 hours to avoid any risks of scalding. Important: This operation must not be carried out unless the steam generator been unplugged for at least two hours and has cooled down completely.
Important: This operation must not be carried out unless the steam generat to been unplugged for at least two hours and has cooled down completely.
To carry out this operation, the steam generator must be close to a sink as w come out of the tank when it is opened.
- Once the steam generator has cooled down completely, remove the scale collector cover - fig. 13.
- Unscrew the anti-scalevalve and remove it from the housing; it contains the scale that has built up in the tank - fig.14 and fig.15.
- To clean the valve properly, just rinse it under running water to remove the scale it contains - fig.16.
- Put the valve back into its housing and screw it in completely to keep it watertight - fig.17.
- Refit the scale collector cover - fig. 18.
The next time you use your iron, press the “restart” button on the control pa off the orange “anti-scale” light.
Storing the steam generator
- Press the illuminated on/off switch and unplug the generator.
- Place the iron on the housing plate on the steam generator.
- Raise the retaining hoop over the iron until it locks into place (audible click) - fig.2.
- Your iron is then safely retained on its base. Warning: do not touch the soleplate while still hot.
- Slot the extension cord outlet in the notch (depending on model). Take the end of the cord support and press to return the flexible part into the base.
- Store the steam cord in its slide storage place - fig.19. Take it, fold it in two so as to make a loop. Put the end of this loop in the slide storage place then push gently until you see the end on the other side of the slide storage place - fig.20.
- Leave the steam generator to cool for at least one hour before putting it away if it is to be stored in a cupboard or confined space.
- You can store the steam generator in complete safety.
Problems with your steam generator?
| PROBLEMS CAUSES SOLUTIONS | ||
| The steam generator does not switch or the iron indicator and ON/OFF indicator do not switch on. | The appliance is not switched on. | Check that your appliance is correctly plugged in and press the illuminated on/off switch. |
| Water runs out of the holes in the soleplate. | Waterhas condensed in the pipes because you are using steam for the first time or you have not used it for sometime. | Press on the steam control button away from your ironing board until the iron produces steam. |
| The soleplate is not hot enough. | Decrease the steam output while ironing at low temperature (steam output control dial on the control panel). Wait for the thermostat light to go out before activating the steam control button. | |
| Your thermostat is faulty: the iron is not hot enough. | Contact an Approved Service Centre. | |
| Water streaks appear on the linen. | Your ironing board cover is soaked with water as it is not suited to the power steam generator. | Check that your ironing board is suitable (see page 20). |
| White streaks come through the holes the soleplate. | Your generator tank is ejecting scale as has not been descaled regularly. | Rinse the collector (see § descaling your steam generator). |
| Brown streaks come through the holes the soleplate and stain the linen. | You are using chemical descaling agent or additives in the water for ironing. | Never add this type of product in the water tank or in the boiler (see page 5 for what water may be used). Contact an Approved Service Centre. |
| Fabric fibres have accumulated in the holes of the soleplate and are burning | Clean the soleplate with a non-metallic sponge. | |
| The soleplate is dirty or brown and may stain the linen. | Your linen is not rinsed sufficiently or have ironed a new garment before washing it. | Ensure linen is rinsed thoroughly to remove any soap deposits or chemicals on new garments which may besucked up by their iron. |
| You are ironing at too high a temperature. | See our recommendations regarding temperature control setting. | |
| You are using starch. Always spray starch on the reverse side of the fabric to be ironed. | ||
| There is no steam or there is little steam. | The water tank is empty (red light on). | Fill the water tank. |
| The steam output control dial is set at minimum. | Increase the steam output (control dial on the control panel). | |
| The soleplate temperature is set to the maximum. | The steam generator operates normally but the steam is very hot and dry, and hard to see. | |
| Steam comes out around the collector. | The collector is not tightened correctly. | Tighten the collector. |
| The collector seal is damaged. | Contact an Approved Service Centre. | |
| The appliance is faulty. | Do not use the steam generator and contact an Approved Service Centre. | |
| The red “water tank empty” light is on. | The water tank is empty. | Fill the water tank. |
| Steam or water escapes under the appliance. | The rinse plug seal is damaged. | Do not use the steam generator and contact an Approved Service Centre. |
| The “anti calc” indicator is lit. | You have not pressed the “Restart” button. | Press the “Restart” button on the control panel. |
Environment protection first !
① Your appliance contains valuable materials which can be recovered or recycled.
Leave it at a local civic waste collection point.
If you have any problems or queries please call our Customer Relations team first for expert help and advice:
0845 602 1454 - UK
(01) 677 4003 - Ireland
or consult our website - www.tefal.co.uk
-En termosikring for å unngå overoppheting.
e - Knapp for dampbryter