
281444 - Microwave Oven Hendi - Free user manual and instructions
Find the device manual for free 281444 Hendi in PDF.
| Product type | Professional microwave oven |
| Brand | Hendi |
| Model | 281444 |
| Usage | Professional (commercial) |
| Power supply | 230 V ~ 50 Hz |
| Rated power | 1550 W |
| Microwave power | 1000 W |
| Capacity | 25 liters |
| Dimensions (W × D × H) | 511 × 432 × 311 mm |
| Net weight | 15.3 kg |
| Protection class | Class I (grounded) |
| Microwave frequency | 2450 MHz |
| Default programs | 10 programs |
| User programming | Up to 99 programs |
| Multi-stage cooking | Up to 3 stages |
| Power levels | 0%, 20% (defrost), 50%, 70%, 100% |
| Double quantity function | Yes |
| Interior lighting | Yes |
| Cooking plate | Ceramic plate |
| Safety | Door lock, grounding, automatic shut-off |
| Maintenance | Removable grease and air filter, clean with damp cloth and mild detergent |
| Warranty | 12 months |
Frequently Asked Questions - 281444 Hendi
User questions about 281444 Hendi
0 question about this device. Answer the ones you know or ask your own.
Ask a new question about this device
Download the instructions for your Microwave Oven in PDF format for free! Find your manual 281444 - Hendi and take your electronic device back in hand. On this page are published all the documents necessary for the use of your device. 281444 by Hendi.
USER MANUAL 281444 Hendi
MICROWAVE PROGRAMMABLE
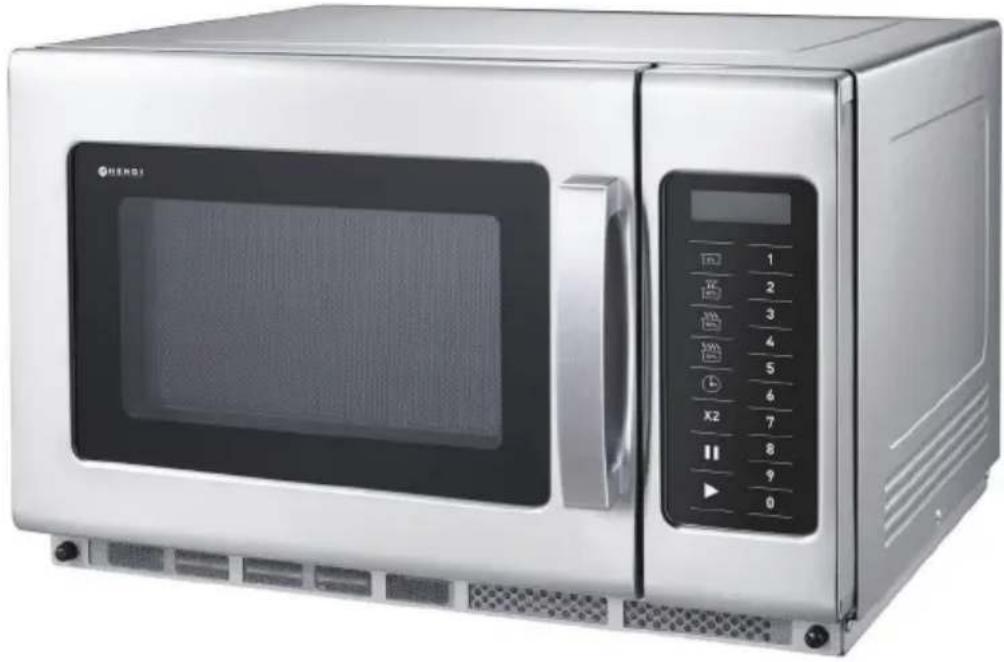
natural_image
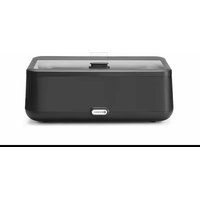
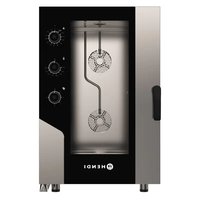
Exterior view of a modern kitchen microwave oven with control panel and door (no visible text or symbols)Item: 281369
281413
281444
You should read this user manual carefully before using the appliance.
Keep these instructions with the appliance.
natural_image
Simple icon of a house with an arrow pointing left, labeled 'INDOOR' below (no other text or symbols)For indoor use only.


natural_image
Symbolic icon of a person falling into a box with 'HEAVY' text below (no additional symbols or text)For item 281369 only.
Thank you for purchasing this Hendi appliance. Before using the appliance for the first time, please read this manual carefully, paying particular attention to the safety regulations outlined below.
Safety regulations
- This appliance is intended for commercial use only and must not be used for household use.
- The appliance must only be used for the purpose for which it was intended and designed. The manufacturer is not liable for any damage caused by incorrect operation and improper use.
- Keep the appliance and electrical plug away from water and any other liquids. In the event that the appliance should fall into water, immediately remove plug from the socket and do not use until the appliance has been checked by a certified technician. Failure to follow these instructions could cause a risk to lives.
- Never attempt to open the casing of the appliance yourself.
- Do not insert any objects in the casing of the appliance.
- Do not touch the plug with wet or damp hands.
- Danger of electric shock! Do not attempt to repair the appliance yourself. In case of malfunctions, repairs are to be conducted by qualified personnel only.
- Never use a damaged appliance! Disconnect the appliance from the electrical outlet and contact the retailer if it is damaged.
- Warning! Do not immerse the electrical parts of the appliance in water or other liquids. Never hold the appliance under running water.
- Regularly check the power plug and cord for any damage. If the power plug or power cord is damaged, it must be replaced by a service agent or similarly qualified persons in order to avoid danger or injury.
- Make sure the cord does not come in contact with sharp or hot objects and keep it away from open fire. To pull the plug out of the socket, always pull on the plug and not on the cord.
- Ensure that the cord (or extension cord) is positioned so that it will not cause a trip hazard.
• Always keep an eye on the appliance when in use. - Warning! As long as the plug is in the socket the appliance is connected to the power source.
- Turn off the appliance before pulling the plug out of the socket.
- Never carry the appliance by the cord.
- Do not use any extra devices that are not supplied along with the appliance.
- Only connect the appliance to an electrical outlet with the voltage and frequency mentioned on the appliance label.
- Connect the power plug to an easily accessible electrical outlet so that in case of emergency the appliance can be unplugged immediately. To completely switch off the appliance pull the power plug out of the electrical outlet.
• Always turn the appliance off before disconnecting the plug.
- Never use accessories other than those recommended by the manufacturer. Failure to do so could pose a safety risk to the user and could damage the appliance. Only use original parts and accessories.
- This appliance is not intended for use by persons (including children) with reduced physical, sensory or mental capabilities, or lack of experience and knowledge.
- This appliance must not be used by children under any circumstances.
- Keep the appliance and its cord out of reach of children.
- Always disconnect the appliance from the mains if it is left unattended or is not in use, and before assembly, disassembly or cleaning.
- Never leave the appliance unattended during use.
Special safety regulations
Warning: Liquids and other foods must not be heated in sealed containers since they are liable to explode.
- Never use this microwave without any food inside, it's very dangerous.
- This microwave is intended for heating food and beverages. Drying of food or clothing and heating of warming pads, slippers, sponges, damp clothes and similar may lead to fire.
- Use the appliance only as described in this manual.
- This appliance should be operated by trained personnel in kitchen of the restaurant, canteens or bar staff, etc.
- Caution! Hot surface! The temperature of the glass door and other accessible surfaces are very high during use. Touch the control panel only.
- This microwave should be cleaned regularly and any food deposits removed.
- This microwave is not to be operated by means of an external timer or separate remote control.
- Do not attempt to operate this microwave with the door open since this can result in harmful exposure to microwave energy. It is important not to break or tamper with the safety interlocks.
- Do not place any object between the microwave front face and the door or allow soil or cleaner residue to accumulate on sealing surfaces.
- WARNING: If the door or door seals are damaged, the microwave must not be operated until it has been repaired by a certified technician.
- If the microwave isn't maintained in a good state of cleanliness, its surface could be degraded and affect the lifespan of the microwave and lead to dangerous situations.
- Check if the grease filter and air filter are properly installed before using the microwave.
- WARNING: It is hazardous for anyone other than a certified technician to carry out any service or repair operation that involves the removal of a cover which
gives protection against exposure to microwave energy.
- Only use utensils suitable for use in microwaves. Do not use containers or cutlery made from or containing metal, aluminium foil, lead crystal glassware, temperature-sensitive plastics, wood or metal clips or wire ties. Do not use bowls with milled rims or plastic pots with the lid partially removed. Risk of fire.
- When heating food in plastic or paper containers, keep an eye on the oven due to the possibility of ignition.
- If smoke is observed, switch off or unplug the microwave and keep the door closed in order to stifle any flames.
- Do not use the oven cavity for storage purposes. Do not store items, such as bread, cookies, etc. inside the oven.
- Remove wire twist-ties and metal handles from paper or plastic containers/bags before placing them in the oven.
- Eggs in the shell and whole hard-boiled eggs should not be heated in microwaves since they may explode, even after microwave heating has ended.
- The temperature of accessible surfaces may be high when the microwave is operating.
- Warning: The contents of feeding bottles and baby food jars shall be stirred or shaken and the temperature checked before consumption, in order to avoid burns.
- Warning: Microwave heating of beverages can result in delayed eruptive boiling, therefore care must be taken when handling the container.
- The microwave shall not be placed in a cabinet unless it has been tested in a cabinet.
- Microwaves are not intended to be operated by means of an external timer or separate remote-control system.
- The door or the outer surface may get hot when the microwave is operating.
- The ceramic board inside the microwave chamber can become hot, don't touch it after use to prevent the risk of burn wounds.
- Never press down on the ceramic board forcefully.
- Place items gently inside the microwave chamber otherwise the ceramic board might be damaged.
- Do not place objects on the top of the appliance. Allow at least 15 cm of free space from the top surface of the appliance.
- The lamp inside the appliance is used for lighting. this lamp is not used for room illumination.
- Can cause burns. The appliance will become hot when it is in use. Please make sure that you do not touch the heating elements in the cooking cavity.
- Can cause burns. Cookware can also be heated by the heated food. Therefore, always use pothholders when you are removing cooked food from the appliance.
- Please ensure that the door closes properly when in use.
- Special care should be taken when moving or transporting the machine due to heavy weight. With at least 2 people or using a trolley for assistance. Move the machine slowly, carefully and never be inclined over 45^ .
- DANGER Electric Shock Hazard Touching some of the internal components can cause serious personal injury or death. Do not disassemble this microwave.
- WARNING Electric Shock Hazard Improper use of the grounding can result in electric shock. Do not plug into an outlet until microwave is properly installed and grounded.
Grounding Installation
This microwave is classified as protection class I appliance and must be connected to the ground. In the event of an electrical short circuit, grounding reduces the risk of electric shock by providing an escape wire for the electric current. This microwave is equipped with a cord having a grounding wire with a grounding plug. The plug must be plugged into an outlet
that is properly installed and grounded.
Consult a qualified electrician or serviceman if the grounding instructions are not completely understood or if doubt exists as to whether the microwave is properly grounded. If it is necessary to use an extension cord, use only a 3-wire extension cord.
Utensils
There may be certain non-metallic utensils that are not safe to use for microwaving. If in doubt, you can test the utensil in question following the procedure below.
Utensil Test:
Fill a microwave-safe container with 1 cup of
cold water (250ml) along with the utensil in question.
Cook on maximum power for 1 minute. Carefully feel the utensil. If the empty utensil is warm, do not use it for microwave cooking. Do not exceed 1-minute cooking time.
Preparations before first use
- Remove all packing material and accessories.
- Examine the micorwave for any damage such as dents or broken door. In case of incomplete delivery or damages, DO NOT use the microwave and contact the supplier (See = > Warranty).
- Remove any protective film found on the microwave cabinet surface.
- Clean the inside of the microwave with lukewarm water and a soft cloth. (See = => Cleaning and Maintenance)
-
Clean the components.
-
Place the microwave on a level surface.
- Keep an open space of at least 10 cm around the microwave and 20 cm from top to ensure proper ventilation.
- Do not place anything on top of the microwave.
- Position the microwave so that the plug can always be reached.
- Place the oven as far away from radios and TV as possible. Operation of microwave may cause interference to your radio or TV reception.
Operation
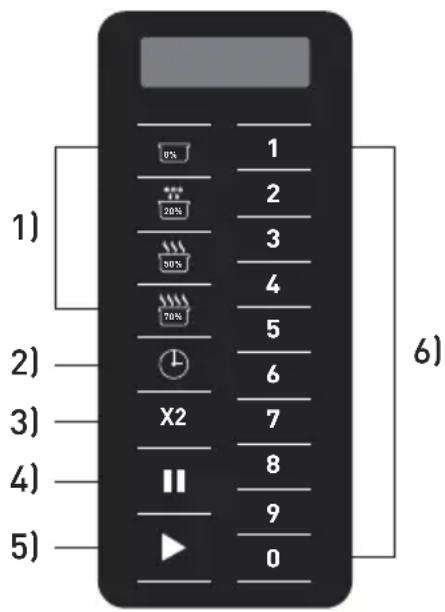
Control panel of the microwave (281369, 281444)
1) Different power level and defrost
2) Time Entry
3) Double quantity
4) Pause
5) Start
6) Number Keyboard (Button "1" is also used for programming mode and multi stage cooking mode)
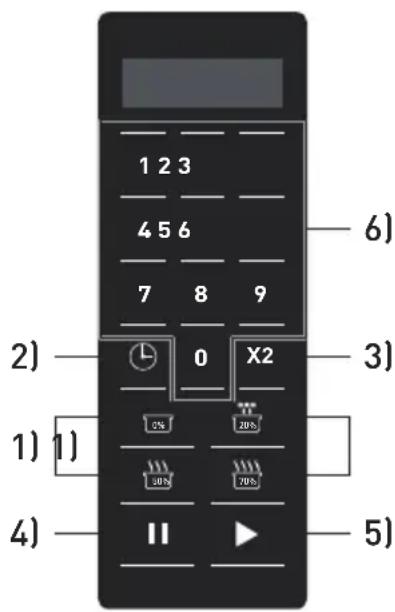
Control panel of the microwave (281413)
1) Different power level and defrost
2) Time Entry
3) Double quantity
4) Pause
5) Start
6) Number Keyboard (Button "1" is also used for programming mode and multi stage cooking mode)
When plug into the socket, “- - - -” will be shown on the display. It will disappear in 1 minute of inactivity. Then, the microwave will enter into the Idle Mode.
Idle Mode
During idle mode, the screen is blank and there will be no oven activity. Opening and then closing the oven door will activate the Ready Mode. The oven will enter idle mode after a minute of no use, The time it takes to activate idle mode can be changed with the 'user options' (Option 4, Timeout Window).
Ready Mode
Opening and closing the door while the oven is in Idle Mode will put the oven into Ready Mode. In this mode, the oven is ready to either begin a manual or preset cooking cycle. During Ready Mode, "READY" is displayed for item no. 281369, 281413 and 0:00 is displayed for item 281444. During Ready Mode, the oven can go to almost all of the other modes.
Door Open Mode
Door open mode is activated by opening the door. During this mode, the screen is blank. And the fan and oven lamp work. During operation, when the door is opened the program will be paused, the fan keeps rotating and the light is on.
Manual Entry Mode
Make sure the microwave is under Ready Mode. Select the time with the 📊 button, the display will show "00:00", select the requested time with the number keyboard. After that, select the power level by pressing [0%/20%(Defrost)/50%/70%]. The display will show the selected power. If you press again the same power level button, the power will be set back to 100% power. Also, if no power level button is set, the power will be default to 100% power. When everything is set, press the '▶' button, now the microwave will start operating. At the end of the cycle the display will show 'DONE' for item 281369, 281413 or 'End' for item 281444.
Pause Mode
This mode allows users to pause the cycle to inspect or stir the food while the microwave is operating. Open the door or press the 11 button to pause the cycle. The display will show the remaining time. To resume the cycle, close the door and press the ▶ button. When nothing is done the microwave will go into idle mode within 1 minute.
Preset program mode
This microwave comes with 10 preset programs. When the microwave is in 'Ready Mode' press one of the number keys and the microwave will run the program. Below you'll find the 10 preset programs. When operating the microwave shows the remaining time in the display, when it's a multi-stage program the total remaining time will be displayed.
| Button 1 2 3 4 5 6 7 8 9 0 | ||||||||||
| 281369 Display time | 0:10 0:20 0:30 0:45 1:00 1:30 2:00 2:30 3:00 3:30 | |||||||||
| 281413 Display time | 0:10 0:20 0:30 0:45 1:00 1:30 2:00 3:00 4:00 5:00 | |||||||||
| 281444 Display time | 0:10 0:20 0:30 0:45 1:00 1:30 2:00 3:00 4:00 5:00 | |||||||||
Programming
This microwave can preset up to 99 programs. See and follow "User options - 9 Double digit" session for setting program no. from 10 to 99. Open the door, then press and hold number "1" on the number keyboard for about 4 \~ 6 seconds, the buzzer will sound and the display will show 'PROGRAM' for item no. 281369, 281413 or ProG for item no.: 281444 to indicate you entered program mode. Select the time with the "button", the display will show "00:00", select the requested time with the number keyboard. After that, select the power level. Press the power level buttons [0%/20% (defrost) /50%/70%], the display will show the selected power. If you press again the same power level button, the power will be back to set 100% power. Also, if no power level button is set, the power will be default to 100%. After setting the time, power and press the ▶' button to save the program. The display will show 'PROGRAM' for item no. 281369, 281413 or ProG for item no.: 281444. Close the door to return to 'ready mode'. If you want to cancel during programming, press the 11 button and the oven will return to the 'door open' mode and the program won't be saved.
Below a quick guide how to make a program of 1.25 minutes at 70% power:
1) Open the door and press number button '1' for 5 seconds, display will show 'PROGRAM' for item 281369, 281413 or ProG for item 281444.
2) Press number button '3', display shows P:03 for item no.: 281369, 281413 only. After 2 seconds the display will show the time related with the program ':30'.
3) Press the number buttons '1' '2' '5' to set the cooking time.
4) Press 120% for the power level. The display will show '1:25 70' for item 281369, 281413 only.
5) Press the button for item no. 281369, 281413 only. The program is now saved under number keyboard '3'.
To overwrite the program repeat the steps above.
Note: Total programming time is limited to 60 minutes only.
Note: When the cooking time exceeds the maximum time the microwave can operate (standard 60 minutes) three beeps will be sound. This means you need to adjust the time before the program can work.
Note: See also == > Return to factory settings.
Double quantity (X2)
This microwave is equipped with a function to calculate the amount of time needed when preparing a double quantity of food. Press the 'X2' button followed by the program and the microwave will increase the time you preset and start the process. This function can only be used in combination with a preset program mode.
Multi stage cooking Mode
This function allows the user to cook the food under different combination of power levels by "Manual Entry mode or Programming mode. The maximum number of stages is 3. To use this function first follow the steps under 'Manual entry'. After setting the time and power of the first stage press 'again, the display shows 'STAGE-2' for item no. 281369, 281413 or S-2 for 281444 only, now input the desired time and power. If a third stage is needed, press 'time entry' once more, the display will show 'STAGE-3' for item no. 281369, 281413 or S-3 for 281444 only, and input the desired time and power. Now press the button to start the microwave. Multi stage input is set in a same manner while in programming mode. Bellow an example of how this could work:
1) Open the door, then press and hold number "1" on the number keyboard for 4 \~ 6 seconds, display will show 'PROGRAM' for item no. 281369, 281413 or ProG for item no.: 281444.
2) Press number button '3', display shows P:03 for item no.: 281369, 281413 only. After 2 seconds the display will show the time related with the program (standard ':30').
3) Press the number buttons '1' '2' '5' to set the cooking time.
4) Press for the power level of stage 1.
The display will show '1:25 70' for item no.: 281369, 281413 only.
5) To set the second stage press 'time entry' button, the display will show 'STAGE-2' for item no. 281369, 281413 or S-2 for 281444 only.
6) Press the number buttons '3' '3' '0' to input the time.
7) Press 50% for the power of stage 2. The display will show '3:30 50' for item no.: 281369, 281413 only.
8) Press the 'start' button. The multi stage program is now saved under button '3'.
Note: Total cooking time is limited to 60 minutes only.
Note: When multi stage cooking is active the microwave shows the total time remaining of all stages.
Note: See also == > Return to factory settings
Return to factory settings
To return the microwave back to the factory settings press and hold the ▶ and '0' button together until the buzzer sounds, the display will show 'CHECK' for item 281369, 281413 and 00 for item 281444. Then, press ▶ for item 281444. When the microwave restored the
factory settings the display will show '11'. If returning to the factory settings failed the display will show '00', press ▶ button and the display will now show 'CLEAR' and the buzzer will sound once.
User options
This microwave allows the user to change some options. To change first start by opening the door and press '2' for 5 seconds, the display will show 'OP:--'. Press the number button related with what needs to be changed, for example '2'. Now the display shows 'OP:22', keep pressing '2' until the desired setting is displayed 'OP:20'/'OP:21'/'OP:22' (it cycles trough these
options). To set the desired setting press 'start'. Now the change is saved. During changing the options you can cancel this by pressing 'pause'. The change won't be saved and the microwave will return to 'door open mode'. Bellow an list of the options that can be changes, bold printed items are the preset options.
| Option Setting Description | ||
| 1 EOC Tone | OP:10 3 seconds beep | |
| OP:11 Continuous beep | ||
| OP:12 5 quick beeps, repeating | ||
| 2 Beeper Volume | OP:20 Beeper Off | |
| OP:21 Low | ||
| OP:22 Medium | ||
| OP:23 High | ||
| 3 Beeper On/Off | OP:30 Key beep Off | |
| OP:31 Key beep On | ||
| 4 Keyboard Window | OP:40 15 seconds | |
| OP:41 30 seconds | ||
| OP:42 60 seconds | ||
| OP:43 120 seconds | ||
| 5 On the Fly | OP:50 On-the-Fly Disable | |
| OP:51 On-the-Fly Enable | ||
| 6 Door Reset | OP:60 Door reset Disable | |
| OP:61 Door Reset Enable | ||
| 7 Max time | OP:70 60 Minute Maximum Cook Time | |
| OP:71 10 Minute Maximum Cook Time | ||
| 8 Manual Programming | OP:80 Manual Programming Disable | |
| OP:81 Manual Programming Enable | ||
| 9 Double Digit | OP:90 Single Digit Mode (10 programs) | |
| OP:91 Double Digit Mode (99 programs) |
Cleaning and maintenance
- Always remove the plug from the socket before cleaning the microwave.
- Beware: Never immerse the microwave in water or any other liquid!
- Clean the outside of the microwave with a damp cloth and water with mild detergent. And dry afterwards.
- Clean the inside and door with a damp cloth and water with mild detergent to remove all food and grease build up.
-
Remove any spillage right after each use. Not cleaning can result in burnt is stains and bad smells.
-
Keep the sealing gaskets on the door clean, clean them regularly with a wet cloth and water with a mild detergent.
- Never use aggressive cleaning agents or abrasives. Do not use any sharp or pointed objects. Do not use petrol or solvents! Clean with a damp cloth and detergent if necessary. Do not use abrasive materials.
- Clean the grease and air filter regularly, the microwave might overheat when this isn't done properly or food will get contaminated with grease.
Trouble shooting
The following events can be considered as normal effects of working with this microwave.
- Radio and TV reception may be interfered when the microwave is operating.
- The light of the oven might be dimmed when operating.
- During heating steam can come from the food and can accumulate on the cooler parts of the microwave like for instance on the door.
| Trouble Possible cause | Solution | |
| Microwave doesn’t start working | Power cord not plugged in correctly. | Check if the power cord is plugged in correctly. |
| Fuse blown of circuit breaker active. | Replace fuse or reset circuit breaker. If not sure how to do this contact your supplier. | |
| Power outlet defective Test | outlet with other appliance and check circuit breaker. | |
| Oven doesn’t heat | Door not closed correctly | Check the door if it closes properly, if it can’t be closed properly contact your supplier. |
| The display shows ‘E-01’ or ‘E-02’ | Temperature sensor broken | Unplug the microwave from the power outlet and wait 10 seconds before plugging the power cord back in. If the problems isn’t solved after this contact your supplier. |
| The display shows ‘OVEN IS HOT DO NOT OPEN THE DOOR’ for item no.: 281369 only. | Warning is activated by the high temperature in the chamber. | Wait 3 minutes, the microwave will cool down. Check is the vents are clear. Never use the microwave without food in it, don’t overheat food. If the problem isn’t solved after these steps contact your supplier. |
| Light and fan make noise when the microwave finished operating. | High temperatures. | This is normal, the lamp and fan stop when the microwave has cooled down enough. If they don’t stop working unplug the microwave from the power socket and wait 10 seconds before plugging back in. If this doesn’t solve the problem contact your supplier. |
How to remove and re-install the air filter (Only for item no. 281369)
This filter is placed before the air inlet and should be cleaned regularly to keep the chamber clean.

natural_image
Line drawing of a microwave oven with ventilation slots and a handle (no text or symbols)Pull up the plastic nail cap.
natural_image
Line drawing of a microwave oven with a side-mounted rack and ventilation slots (no text or symbols)Take off the filter. Wash the filter with lukewarm water with a mild detergent until it's clean as possible. Let the filter dry before re-installing it.
natural_image
Line drawing of a microwave oven with lid and ventilation slots (no text or symbols)To re-install, align the base plate mounting holes, insert the plastic nails, press the plastic nail cap.
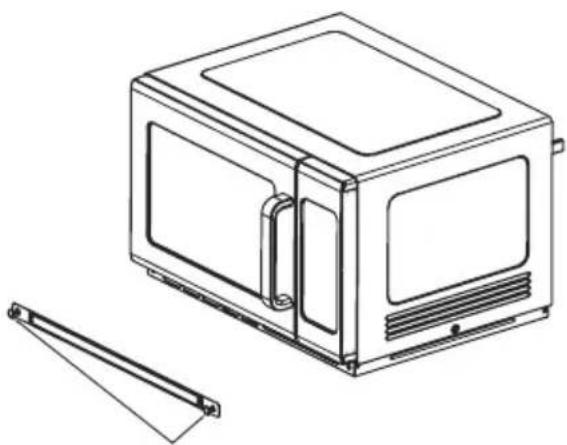
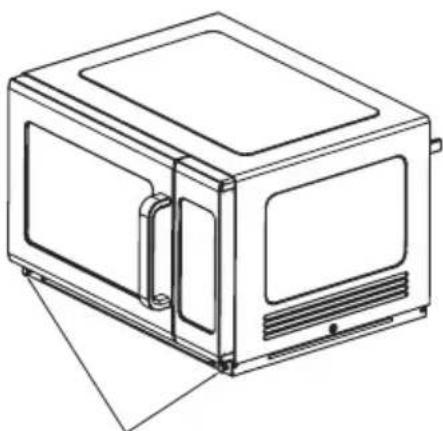
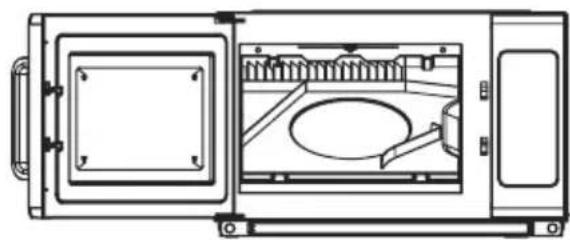
How to remove and re-install the splash shield (Only for item no. 281369)
Warning: before removing or installing the shield make sure the microwave is unplugged from the power outlet and that the microwave is cool.
Removing the splash shield Re-installing the splash shield:
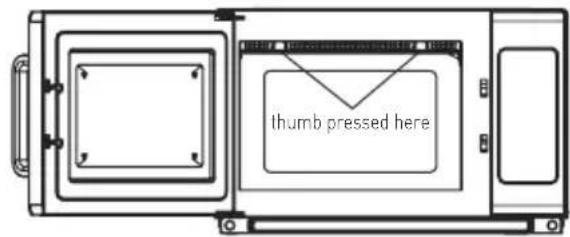
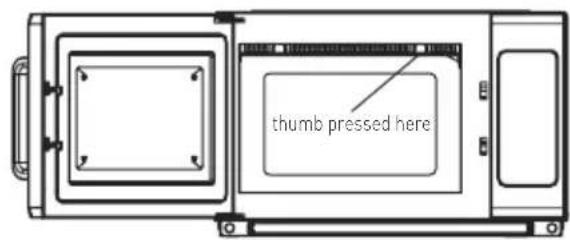
1) Use 2 thumbs to press the indicated locks of the splash shield.
natural_image
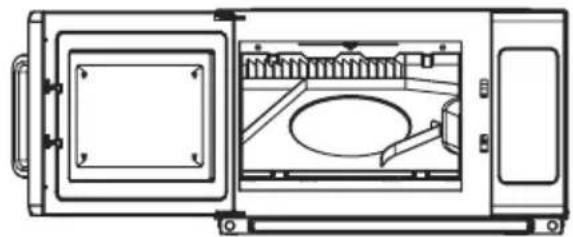
Technical line drawing of a microwave oven with internal components and mounting bracket (no text or symbols)1) Align the 3 pins at the back of the splash shield with the 3 holes at the back of the microwave.
natural_image
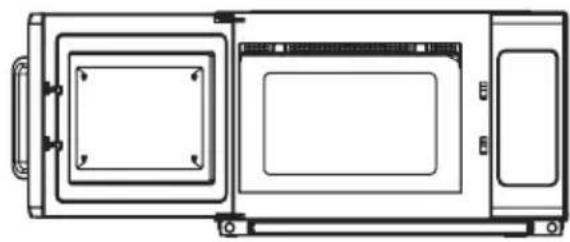
Technical line drawing of a mechanical device with internal components and mounting brackets (no text or symbols)2) The lock is released and you can remove the splash shield.
2) Push the 3 pins into the holes and use both hands to push splash shield into place until you hear it locking into place.

natural_image
Technical line drawing of a microwave oven with front and side views (no text or symbols)3) Wash the splash shield with lukewarm water and mild detergent.
natural_image
Technical line drawing of a microwave oven with front panel and side door (no text or symbols)Technical specification
| Item no. 281369 281413 281444 | |||
| Operating voltage & frequency 230V~ 50Hz | |||
| Rated input power 3000W 1500W 1550W | |||
| Rated output power 1800W 1000W 1000W | |||
| Oven cavity capacity 34 liters 34 liters 25 liters | |||
| Protection class Class I | |||
| Microwave frequency 2450MHz | |||
| Dimension | 574 x 528 x (H) 368mm | 553 x 488 x (H) 343 mm | 511 x 432 x (H) 311 mm |
| Weight | approx. 32 kg | approx. 19,2 kg | approx. 15,3 kg |
Remark: Technical specification is subjected to change without prior notification.
Warranty
Any defect affecting the functionality of the appliance which becomes apparent within one year after purchase will be repaired by free repair or replacement provided the appliance has been used and maintained in accordance with the instructions and has not been abused or misused in any way. Your statutory rights are not affected. If the appliance is claimed under warranty, state where and when it was purchased and include proof of purchase (e.g. receipt).
In line with our policy of continuous product development we reserve the right to change the product, packaging and documentation specifications without notice.
Discarding & Environment
At the end of the life of the appliance, please dispose of the appliance according to the regulations and guidelines applicable at the time. Throw packing materials like plastic and boxes in the appropriate containers.
natural_image
Line drawing of a microwave oven with lid and ventilation slots (no text or symbols)natural_image
Line drawing of a microwave oven with a side-mounted rack and ventilation slots (no text or symbols)natural_image
Line drawing of a microwave oven with lid and ventilation slots (no text or symbols)natural_image
Technical line drawing of a mechanical device with internal components and mounting brackets (no text or symbols)natural_image
Technical line drawing of a microwave oven with internal components and mounting bracket (no text or symbols)natural_image
Technical line drawing of a rectangular device with internal components and a side-view cross-section (no text or symbols)natural_image
Technical line drawing of a microwave oven with front panel and side door (no text or symbols)natural_image
Line drawing of a microwave oven with lid and ventilation slots (no text or symbols)natural_image
Line drawing of a microwave oven with a side panel and a separate bracket (no text or symbols)natural_image
Line drawing of a microwave oven with lid and ventilation slots (no text or symbols)natural_image
Technical line drawing of a microwave oven with internal components and mounting bracket (no text or symbols)natural_image
Technical line drawing of a microwave oven with internal components and mounting bracket (no text or symbols)natural_image
Technical line drawing of a mechanical component with no visible text or symbolsnatural_image
Technical line drawing of a microwave oven with front panel and side door (no text or symbols)Technische specificaties
natural_image
Line drawing of a microwave oven with lid, vent, and ventilation slots (no text or symbols)natural_image
Line drawing of a microwave oven with a side-mounted rack and ventilation slots (no text or symbols)natural_image
Line drawing of a microwave oven with ventilation slots and a handle (no text or symbols)natural_image
Technical line drawing of a microwave oven with internal components and mounting bracket (no text or symbols)natural_image
Technical line drawing of a microwave oven with internal components and mounting bracket (no text or symbols)natural_image
Technical line drawing of a rectangular device with internal compartments and mounting brackets (no text or symbols)natural_image
Technical line drawing of a microwave oven with front panel and side panels (no text or symbols)Below a quick guide how to make a program of 1.25 minutes at 70% power:
natural_image
Line drawing of a microwave oven with lid and ventilation slots (no text or symbols)natural_image
Line drawing of a microwave oven with a side-mounted rack and ventilation slots (no text or symbols)natural_image
Line drawing of a microwave oven with lid and ventilation slots (no text or symbols)natural_image
Technical line drawing of a microwave oven with internal components and mounting bracket (no text or symbols)natural_image
Technical line drawing of a mechanical device with internal components and mounting brackets (no text or symbols)natural_image
Technical line drawing of a microwave oven with front and side views (no text or symbols)natural_image
Technical line drawing of a microwave oven with front panel and side door (no text or symbols)- This microwave should be cleaned regularly and any food depos
natural_image
Line drawing of a microwave oven with lid, vent, and ventilation slots (no text or symbols)natural_image
Line drawing of a microwave oven with a side-mounted rack and ventilation slots (no text or symbols)natural_image
Line drawing of a microwave oven with lid, vent, and cooling panel (no text or symbols)natural_image
Technical line drawing of a microwave oven with internal components and mounting bracket (no text or symbols)natural_image
Technical line drawing of a mechanical device with internal components and mounting brackets (no text or symbols)natural_image
Technical line drawing of a mechanical component with no visible text or symbolsnatural_image
Technical line drawing of a mechanical or electrical component with no visible text, numbers, or symbols.Specifiche tecniche
natural_image
Line drawing of a microwave oven with lid and ventilation slots (no text or symbols)natural_image
Line drawing of a microwave oven with a side-mounted rack and ventilation slots (no text or symbols)natural_image
Line drawing of a microwave oven with lid, vent, and door (no text or symbols)natural_image
Technical line drawing of a mechanical device with internal components and mounting brackets (no text or symbols)natural_image
Technical line drawing of a microwave oven with internal components and mounting bracket (no text or symbols)natural_image
Technical line drawing of a rectangular device with internal compartments and mounting brackets (no text or symbols)natural_image
Technical line drawing of a rectangular device with internal compartments and mounting brackets (no text or symbols)natural_image
Line drawing of a microwave oven with doors and ventilation slots (no text or symbols)natural_image
Line drawing of a microwave oven with a side-mounted rack and ventilation slots (no text or symbols)natural_image
Line drawing of a microwave oven with lid, vent, and side door (no text or symbols)natural_image
Technical line drawing of a microwave oven with internal components and mounting bracket (no text or symbols)natural_image
Technical line drawing of a mechanical device with internal components and mounting brackets (no text or symbols)natural_image
Technical line drawing of a mechanical or electrical component with no visible text, numbers, or symbols.natural_image
Technical line drawing of a microwave oven with front panel and side door (no text or symbols)natural_image
Line drawing of a microwave oven with ventilation slots and a handle (no text or symbols)natural_image
Line drawing of a microwave oven with a side-mounted rack and ventilation slots (no text or symbols)natural_image
Line drawing of a microwave oven with lid and ventilation slots (no text or symbols)natural_image
Technical line drawing of a microwave oven with internal components and mounting bracket (no text or symbols)natural_image
Technical line drawing of a microwave oven with internal components and mounting bracket (no text or symbols)natural_image
Technical line drawing of a rectangular device with internal compartments and mounting brackets (no text or symbols)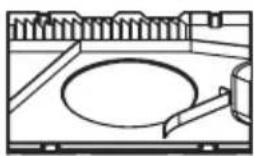
natural_image
Line drawing of a kitchen sink with faucet and plate (no text or symbols)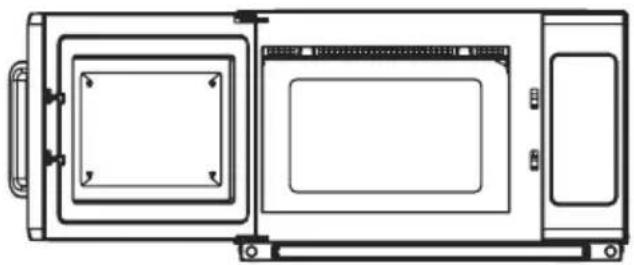
natural_image
Technical line drawing of a rectangular device with internal compartments and mounting brackets (no text or symbols)62-023 Gądki, Poland
Tel: +48 61 6587000
Email: info@hendi.pl
Hendi Food Service Equipment GmbH
Central Barn, Hornby Road
Lancaster, LA2 9JX, United Kingdom
Tel: +44 (0)333 0143200
Email: sales@hendi.co.uk
Hendi Food Service Equipment Romania Srl
PKS Hendi South East Europe SA
5 Metsovou Str.
18346 Moschato, Athens, Greece
Tel: +30 210 4839700
Email: office.greece@hendi.eu
Hendi HK Ltd.
1208, 12/F Exchange Tower
33 Wang Chiu Road, Kowloon Bay, Hong Kong
Tel: +852 2154 2618
Email: info-hk@hendi.eu
Find Hendi on internet:
www.hendi.eu
www.facebook.com/HendiFoodServiceEquipment
www.linkedin.com/company/hendi-food-service-equipment-b.v.
www.youtube.com/HendiEquipment
- Changes, printing and typesetting errors reserved.
- Änderungen und Druckfehler vorbehalten.
- Wijzigingen en drukfouten voorbehouden.
- Producent zastrzega sobie prawo do zmian oraz błędów drukarskich w instrukcji.
-
Variations et fautes d'impression réservés.
-
Errori di cambiamenti, di stampa e di impaginazione riservati.
- Drepturi rezervate cu privire la modificări și greșeli de imprimare.
- Изменения, печати и верстки ошибки защищены.
- Με επιφύλαξη αλλαγών, λαθών εκτύπωσης και στοιχειοθεσίας.


- MICROWAVE PROGRAMMABLE
- Safety regulations
- Special safety regulations
- Grounding Installation
- Utensils
- Preparations before first use
- Operation
- Control panel of the microwave (281369, 281444)
- Control panel of the microwave (281413)
- Idle Mode
- Ready Mode
- Door Open Mode
- Manual Entry Mode
- Pause Mode
- Preset program mode
- Programming
- Double quantity (X2)
- Multi stage cooking Mode
- Return to factory settings
- User options
- Cleaning and maintenance
- Trouble shooting
- How to remove and re-install the air filter (Only for item no. 281369)
- How to remove and re-install the splash shield (Only for item no. 281369)
- Removing the splash shield Re-installing the splash shield:
- Warranty
- Discarding & Environment
- Hendi Food Service Equipment GmbH
- Hendi Food Service Equipment Romania Srl
- PKS Hendi South East Europe SA
- Hendi HK Ltd.
- Find Hendi on internet:
Brand : Hendi
Model : 281444
Category : Microwave Oven