
ZDV-712 - Media player LG - Free user manual and instructions
Find the device manual for free ZDV-712 LG in PDF.
Download the instructions for your Media player in PDF format for free! Find your manual ZDV-712 - LG and take your electronic device back in hand. On this page are published all the documents necessary for the use of your device. ZDV-712 by LG.
USER MANUAL ZDV-712 LG
Installation and Operating Guide Model Number
uninsulated dangerous voltage within the product's enclosure that may
sufficient magnitude constitute risk
electric shock persons. The exclamation point within equilateral trian- gle
important operating and maintenance (servic- ing) instructions
the literature accompanying the product. CAUTION:
not block any ventilation openings. Install
accordance with the manufacturer's instructions. Slots and openings
the cabinet are provided for ventila- tion and toensure reliable operation
the product and protect
from over heating. The openings should
placing the product on a bed, sofa, rug other similar surface. This product should not
built-in installation such asa bookcase rack unless proper ventilation
provided the manufacturer's instruction have been adhered to. CAUTION: This product employs Laser System.
this product, please read this owner
manual carefully and retain
for future reference. Should the unit require maintenance, contactan authorized service center. Performing controls, adjustments, carrying out proce- dures other than those specified herein may result
haz- ardous radiation exposure.
prevent direct exposure laser beam,
not try open the enclosure. Visible laser radiation when open.
exposed towater (dripping splashing) and objects filled with liquids, such asvases, should
This equipment may generate oruse radio frequency energy. Changes modifications this equipment may cause harmful interference unless the modifications are expressly approved
the instruction manual. The user could lose the authority operate this equipment
unauthorized change modification
This epuipment has been tested and found comply with the limits for Class
digital device, pursuant Part
the FCC Rules. These limits are designed provide reasonable protection against harmful interference when the product
residential installation. This product generates, uses, and can radiate radio frequency energy and,
not installed and used
accordance with the instruction manual, may cause harmful interference radio communications. However, there
guarantee that interference will notoccur
particular installation.
this product does cause harmful interference radio televi- sion reception, which can
turning the product off and on, the user
encouraged try tocorrect the interference
the following measures:? Reorient relocate the receiving antenna.? Increase the separation between the product and receiver. Connect the product into outlet on a circuit differ- ent from that which the receiver
connected. Consult the dealer oran experienced radio/TV tech- nician for help. CAUTION concerning the Power Cord Most appliances recommend they
placed upon dedicated circuit; That is, single outlet circuit which powers only that appli- ance and has additional outlets branch circuits. Check the specification page
not overload wall outlets. Overloaded wall outlets, loose damaged wall outlets, extension cords, frayed power cords, damaged cracked wire insulation are danger- ous. Any
these conditions could result
electric shock fire. Periodically examine the cord
its appearance indicates damage deterioration, unplug it, discontinue use
the appliance, and have the cord replaced with anexact replacement part
authorized servicer. Protect the power cord from physical mechanical abuse, such being twisted, kinked, pinched, closed
door, walked upon. Pay particular attention plugs, wall outlets, and the point where the cord exits the appliance.
disconnect power from the mains, pull out the mains cord plug. When installing the product, ensure that the plug
easily accessible. CAUTION:
NOT EXPOSE THIS PRODUCT
Read these instructions. All these safety and operating instructions should
read before the product
Keep these instructions. The safety, operating and use instructions should
retained for future reference.
Heed all warnings. All warnings the product and
the operating instructions should be adhered to.
Follow all instructions. All operating and use instruc- tions should
not use this product near water. For example: neara bath tub, wash bowl, kitchen sink, laundry tub,
wet basement; orneara swimming pool; and other areas located near water.
Clean only with dry cloth. Unplug this product from the wall outlet before cleaning.
not use liquid cleaners.
not block any ventilation openings. Install
accor- dance with the manufacturer's instructions. Slots and openings
the cabinet are provided for ventilation and
ensure reliable operation
from over- heating. The openings should never
placing the product ona bed, sofa, rug other similar surface. This product should not
built-in installation such asa bookcase rack unless proper ven- tilation
provided the manufacturer's instructions have been adhered to.
not install near any heat sources such radiators, heat registers, stoves, other apparatus (including amplifiers) that produce heat.
not defeat the safety purpose
the polarized grounding-type plug.
polarized plug has two blades with one wider than the other.
grounding type plug has two blades and third grounding prong. The wide blade the third prong are provided for your safety.
the provided plug does not fit into your outlet, consult electrician for replacement
Protect the power cord from being walked onor pinched particularly
plugs, convenience recepta- cles, and the point where they exit from the product.
the manufacturer, sold with appara- tus. When cart
avoid injury from tip-over.
Unplug this product during lightning storms when unused for long periods
qualified service personnel. Servicing
required when the product has been damaged
any way, such power-supply cord plug
damaged, liquid has been spilled objects have fallen into the product, the product has been exposed
rain moisture, does not operate nor- mally, has been dropped. IMPORTANT SAFETY INSTRUCTIONS CAUTION: PLEASE READ AND OBSERVE ALL WARNINGS AND INSTRUCTIONS
THE PRODUCT. RETAIN THIS BOOKLET FOR FUTURE REFERENCE. This product has been designed and manufactured
assure personal safety. Improper use can result
electric shock fire hazard. The safeguards incorporated
this product will protect you
you observe the following procedures for installa- tion, use, and servicing. This product does not contain any parts that can
?ToAddorEraseChannels.
not useirregularlyshapedCDs(e.g.,heart-shapedoroctagonal)sincethey may resultinmalfunctions. ThisDVD+VCRrequiresdiscsandrecordings
meet certaintechnicalstandardsinorder achieveoptimalplaybackquality.Pre-recordedDVDsareautomatically set
thesestandards.Thereare many differenttypesofrecordablediscformats(includingCD-RcontainingMP3orWMAfiles)andtheserequirecertainpre-existingcondi-tions(seeabove) ensurecompatibleplayback. Customers should note that permission requiredinorder downloadMP3/WMA files and music from the Internet. Our company has noright grant such permission. Permission should alwaysbesoughtfrom the copyrightowner. Regional code Regional code Thisunithasaregionalcodeprintedontherearoftheunit.Thisunitcanplay onlyDVDdiscslabelledsameastherearoftheunitor"ALL". Notes
you try playaDVDwithadifferentregioncodefrom your player,the message "CheckRegionalCode" appears ontheTVscreen. Notes
DVDOpensorclosesthedisc tray.
M/> DVD:Skiptonextchapterortrack.Pressandholdfortwosecondsforafastforwardsearch.VCR:Advancesthe tape duringtheSTOPmodeorforfastforwardpicturesearch.
SelectsVCRchannels. Adjusts manually the tape's picture onscreen. ENTER/OK Confirmsmenuselections. Displays functionsontheTVscreen. RETURN (O) Removesthe setup menu. PAUSE/STEP (X) Pause playback recording. Press repeatedly for frame-by-frame playback. SKIP
Starts recording. Press repeatedly tosetthe recording time. REPEAT Repeat chapter, track, titleorall. RANDOM Plays tracksinrandomorder.
SKIP Fastforwards picture search through
secondsof recording. A-B Repeats sequencebetweentwo points
Preparation Depending your
andother equipment therearevarious ways you canconnectthe player. Pleaserefertothemanualsof your TV, VCR, stereo system orotherdevicesasnec- essary foradditionalconnectioninformation. Notes:
The picture andsoundof
radio may bedistorted during playback. Positiontheunits away fromeachother
turn offtheunitafter removing thedisc. Make sure theDVD+VCRisconnected directly
theTVand tune theTV the correct video input channel.
not connect theDVD+VCR'sAUDIOOUT jack
the phono jack (record deck) your audio system. not connect theDVD+VCRviaanotherVCR.TheDVD image couldbedistorted the copy protection system. Rear Panel Rear Panel Caution not touch the inner pins the jacks
the unit.10 Connecting Connecting Antenna Antenna Cable
aAntenna: Disconnect the antenna from the rear
and identify the antenna cable.
ohm coaxial cable connect
the jack marked ANT.IN
75-ohm antenna adap- tor (not supplied) and slip the adaptor over the ANT.IN jack. Don't attempt
your cable connection has
descrambler, unscrew the cable from your
coaxial cable from the wall jack
coaxial cable from the OUT connector
your DVD+VCR. This cable hookup permits both
and DVD+VCR operation. Toview record
With this connection, you cannot record one pro- gram while viewing another.
Connections Make one
the following connections, depending
Connections Optional
DVD+VCR Amplifier (Receiver)
Manufactured under license fromDolby Laboratories. "Dolby","ProLogic",and the double-Dsymbolare trademarks ofDolby Laboratories. DTSandDTSDigital Out are trademarks ofDigital Theater Systems,Inc.13 Preparation Initial Settings VCR Initial Settings VCR ByusingtheVCRSetupmenu, you can makevariousadjustments itemssuch clocksetting,andtimerrecordings.YourDVD+VCRallows remote controladjustmentofseveralfeatures. General Operation 1.PressVCR the remote control.2.PressMENUandtheMAIN menu will appear. 3.Use
choose desiredsetting.5.PressMENUwhenfinished. Note: Menusremain on-screen for3minutes. CLOCK TheDVD+VCRgives you two ways
set thetimeanddate:theAutoClockFeature Manually. Auto Clock Set
theclockwhiletheDVD+VCRisturnedoff. There are cases wheretheTVstationdoes not send sends wrong dateand/ortimeinformationandtheDVD+VCR sets theincorrecttime.If this happens recommend that you set the clockmanually. Manual Clock Set Use
the week will display automatically.
YEAR Choosethe year.
advance clock continuously. Notes:
Ifsettingtheclockmanually,"AUTOCLOCKSET" must set
incorrectdateand/ortimewillbeenteredagainwhentheDVD+VCRisturnedoff. Theclock uses the12-hour system. sure
set AMandPMcorrectly. PROGRAM TheTimerRecordingfunctionallows you
programs within periodof one year. (See pages 21-23).14 TUNING ThisDVD+VCRis equipped witha frequency synthe- sizedtuner capable receiving
you are using astandardantennatoreceivechannels. CATV
you are using basiccabletoreceivechannels.
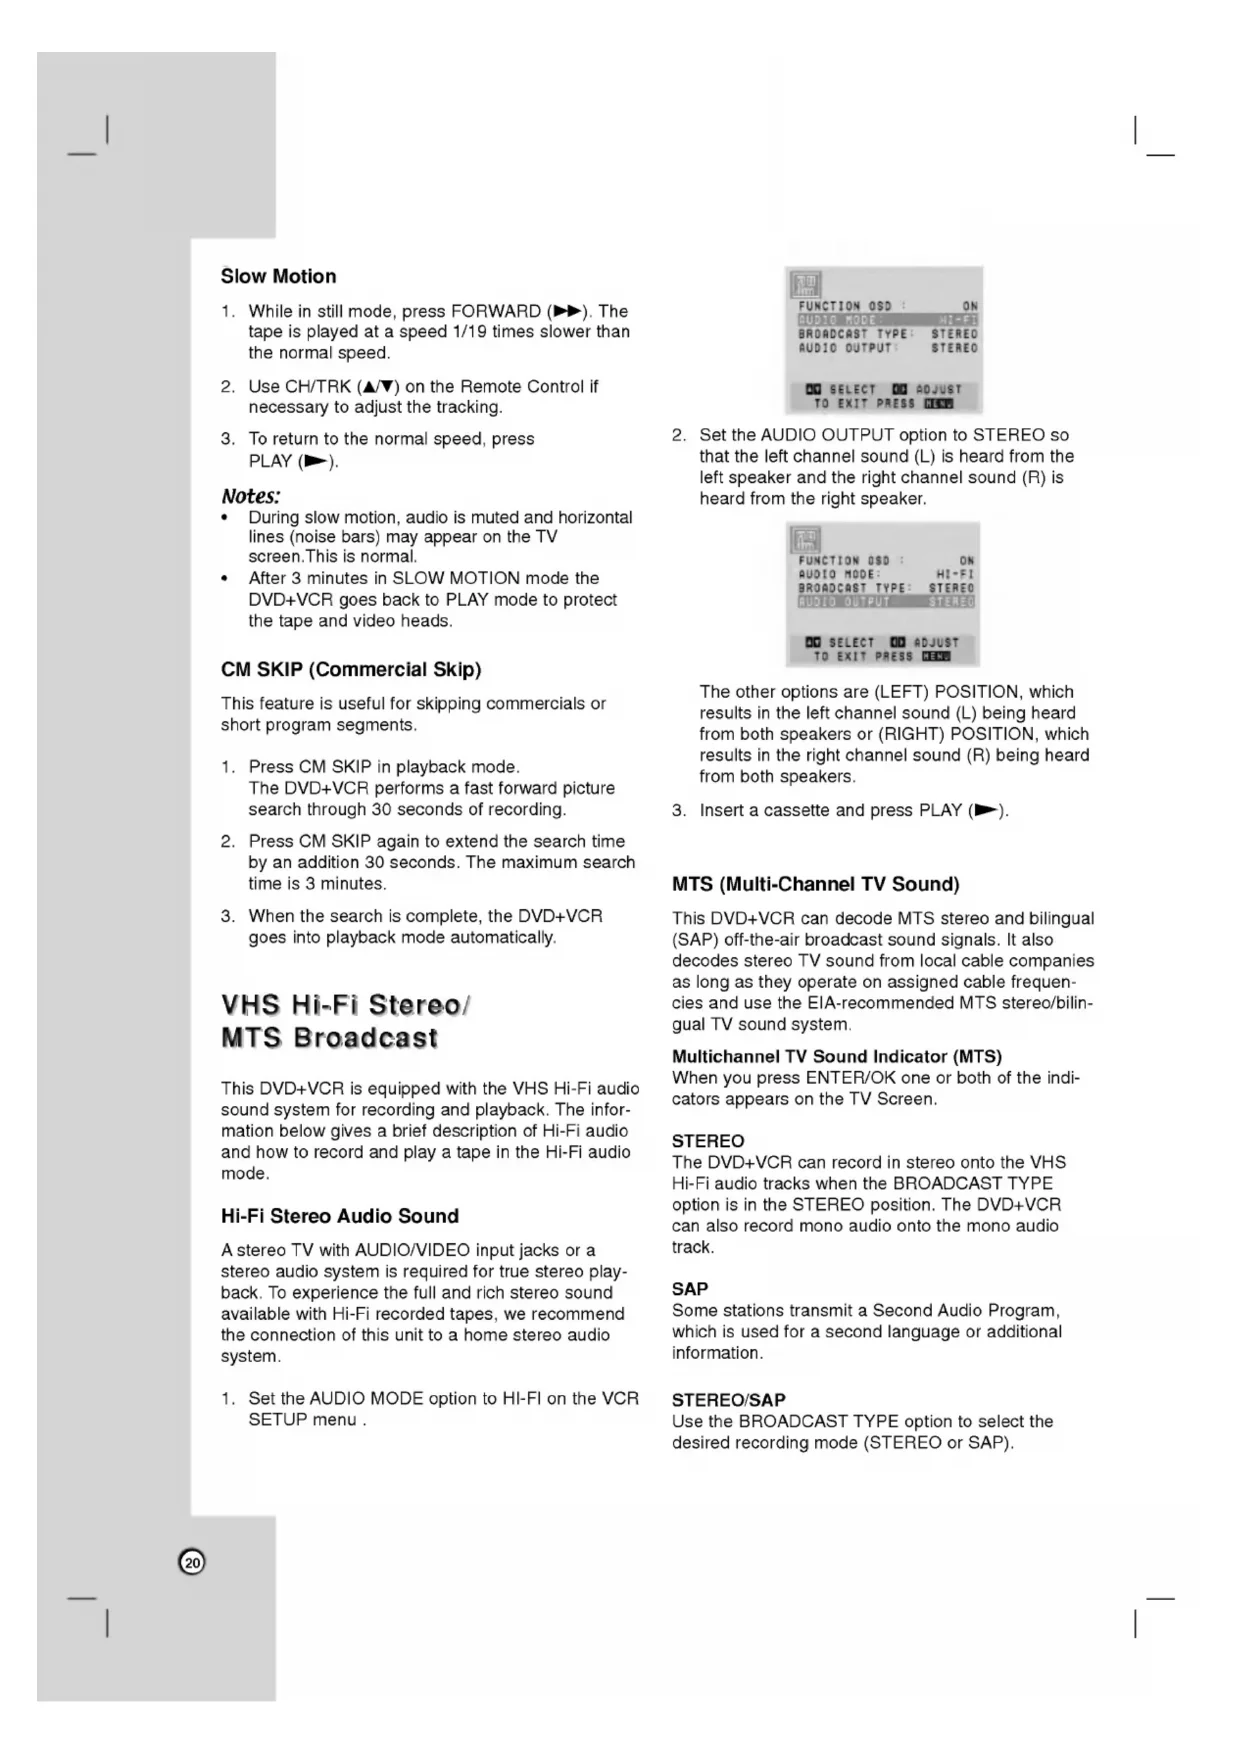
Erase Channels Thisfeatureallows you toaddorerasechannelsfrom memory manually. 1.ChoosetheCH.ADD/DEL option, thenuseb/Btoselectachanneltoaddorerase.2.UseENTER/OKtoaddorerasethechannel. Repeat steps 1and2toaddoreraseotherchannels.3.PressMENUtoreturntotheTVscreen. SETUP FUNCTIONOSDTheon-screen display canbeturnedonoroff.AUDIOMODETheDVD+VCRhastwo separate audio playback sys- tems, the high quality VHSHi-Fi system andstandardNORMALmono system. Thesameaudiois generally recordedonboth systems. TheVHSHi-Fi system plays separate (left and right) channels, andtheNORMAL system plays monauralsound.Thenormaltrackis always played sothecassettecanbe played onaDVD+VCRthatdoesnothaveVHSHi-Fi.BROADCASTTYPE (STEREO/SAP/MONO) MultichannelTelevisionSound (MTS) carriesstereoand/orSecondAudio Program (SAP) bilingual sig- nals.Setthis display tothedesired position whenbothMTSstereoandSAP signals arereceived.When only oneoftheMTS signal received, theDVD+VCR automatically selectsthe corresponding receiving mode (Stereo SAP) regardless oftheselected position. Fornormal operation, the display shouldbeintheSTEREO position. TheDVD+VCRwillthenrecordaSTEREO program when available, andrecordamono program IFthe program isNOTINSTEREO.ForweakSTEREOand/orSAPbroad- casts, changing the display tomono may give clearersound.AUDIOOUTPUT (STEREO/LEFT/RIGHT) Used during playback [when AUDIOMODE (HI- FI/NORMAL) isinHI-FI position] for selecting theaudio output signals fromtheAUDIOOUTterminals chandR ch), andRF.OUT.This display setting should normally beleftinthestereo position, sothatwhenastereo tape played, thestereosoundwillbeheard through theleftand right channels.Ifamono tape played andtheaudio output issetto stereo, thesamemonosoundwillbeheardfrombothleftand right channels.15 Preparation Displaying Disc Information Displaying Disc Information on-screen- DVD on-screen- DVD Youcan display variousinformationaboutthediscloadedon-screen. PressDISPLAY showvarious playback infor-mation.Theitems displayed differ depending onthedisctypeor playing status.
and change orselectthe setting
Currenttitle (or track) number/totalnumberoftitles (or tracks) Chapter
Selected angle/total numberof angles Sound SelectedsoundmodeNote:Ifnobuttonis pressed forafewseconds,theon-screen display disappears. Initial Settings DVD Initial Settings DVD
the previous level:Press onthe remote control. General Operation
move thethirdlevel. Use
enter the corresponding 4-digit number according
the language codelistinthereference chapter (see page 33). Ifyou enter thewrong language code, pressCLEAR.Off (for Disc Subtitle)
"4:3".Letterbox: Displays awide picture withbandsontheupperandlower portions ofthescreen.Panscan: Automatically displays thewide picture ontheentirescreenand cuts offthe portions thatdo not fit. Progressive Scan Progressive ScanVideo provides the highest quality pictures with less flickering. Ifyouare using the Component Video jacks forcon-nection aTVormonitorthatis compatible witha progressive scan signal, set Progressive Scan On.To turn progressive scan:Connect component/progressive out of thisunit the input ofyour monitor/television, set yourtelevisionormonitor
component/progressive Input.
kHzsoyour system candecodethem.Ifyourreceiveror amplifier capable handling
PressPAUSE/STEP(X)duringplayback.Astillpicture appears
During slow motion, audioismutedandhorizontallines (noise bars) mayappearontheTVscreen.Thisisnormal. After3minutesinSLOWMOTIONmodetheDVD+VCRgoesbacktoPLAYmodeto protect the tape andvideoheads.
SKIP (Commercial Skip) Thisfeatureisusefulfor skipping commercialsorshortprogram segments. 1.PressCMSKIPin playback mode.TheDVD+VCR performs afastforward picture search through 30secondsof recording. 2.PressCMSKIP again toextendthesearchtime anaddition30seconds.Themaximumsearchtimeis3minutes.3.Whenthesearchis complete, theDVD+VCRgoesinto playback mode automatically. VHS Hi-Fi Stereo/ VHS Hi-Fi Stereo/ MTS Broadcast MTS Broadcast ThisDVD+VCRis equipped withtheVHSHi-Fiaudiosound system for recording and playback. Theinfor-mationbelow gives abrief description ofHi-Fiaudioandhowtorecordand play tape intheHi-Fiaudiomode. Hi-Fi Stereo Audio Sound AstereoTVwithAUDIO/VIDEO input jacks orastereoaudio system required fortruestereo play- back.To experience thefullandrichstereosoundavailablewithHi-Firecorded tapes, werecommendtheconnectionofthisunittoahomestereoaudio system. 1.SettheAUDIOMODE option toHI-FIontheVCRSETUPmenu 2.SettheAUDIOOUTPUT option toSTEREOsothattheleftchannelsound (L) isheardfromtheleft speaker andthe right channelsound (R) isheardfromthe right speaker. Theother options are (LEFT) POSITION, whichresultsintheleftchannelsound (L) being heardfromboth speakers (RIGHT) POSITION, whichresultsinthe right channelsound (R) being heardfromboth speakers. 3.InsertacassetteandpressPLAY (N). MTS (Multi-Channel
front panel), selectLINE1 LINE2 using INPUT.6.Setthedesired recording speed (SP
pressing SPEED.ThisDVD+VCRis not designed
SAPif applicable. 8.PressREC/ITR (z) and recording starts. TheRECindicator appears inthe display window.If
safety tabis loaded, the cassette ejected. 9.PressSTOP
stop recording. Ifthe tape reachestheendbeforeSTOP
pressed, theDVD+VCR stops, rewindsand ejects the tape. Tip: UsePAUSE/STEP (X) forbestresultswhen making changes while recording. For example, you want
change channelswhile recording, first press PAUSE/STEP (X)
resume recording. Note: During theVCR recording mode, you cannot change
pause the recording 1.PressPAUSE/STEP (X)
pause the tape during recording. TheRECindicatorflashesinthe display window.2.When you want
continue recording, press PAUSE/STEP (X)
protect the tape andthevideoheads.
program while watching another 1.PressTV/VCR selecttheTVmode during recording. TheTVindicator appears. Using the TV, selectthechannel beviewed.Timer Recording Forunattended recording, you must input thechannels berecordedandthe starting and ending times.1.Turn theDVD+VCRandtheTV.2.Be sure theTVis set
4). 3.Make sure theTUNINGBANDintheTUNING menu set appropriately (TV
choosethePROGRAM menu and press ENTER/OK.If eight programs are already entered, theFULLYPROGRAMMED message appears for
moment andthenPROGRAM1 appears
buttons switchbetweenthe program options, andthe /Bbuttons
input the program information: Input the month, day, start and stop timesofthe program you want
set the program timerbefore setting the clock, "PLEASESETTHECLOCK" appears for
moment andthenCLOCK menu appears
theTV screen. Setthetimeanddatebefore proceeding. Things
and usea cable box (con- verter) you mustset the channel match the cable box output channel (usually
you usea cable converter, you can program multiple recordings only the con-verter box output channel. This
because the converter determines what channel you view through your DVD+VCR. SPEED: AUTO mode determines how much tape
left and switches the speed from
necessary complete recording the program.
this occurs there could
some picture and sound distortion the point where the speed changes. REPEAT:
every week select WEEKLY.
to8 programs the same time Monday through Friday select DAILY. Otherwise select ONCE. Press MENU and the program
the DVD+VCR. Additional programs may
repeating steps 1-7.9. Ensure you insert tape with the record safety tab intact before the first programmed time. Press STOP (x) end timer recording. Notes:
you make mistake orwantto change aset- ting, usevto select the option and correct
the program preset time
past, the "PAST TIME PROGRAMMED" message appears the
screen. Return the incorrect program and program
with the correct time.
you entera past date, the timer recording will
the power fails the DVD+VCR
unplugged the clock and timer settings are kept
memory for only seconds. Otherwise you mustreset the clock and timer.
When you are playing DVD programmed Recording time, the DVD+VCR automatically change VCR mode and start recording.
The DVD+VCR will automatically power off when Timer Recording ends. Checking
Erasing the Timer Program Programming can
turned on.1. Press MENU and the MAIN menu appears. Use
select program you wantto check orerase. erase the program, press CLEAR. Press MENU toreturnto the
screen. Program Priority
the recording start and end times
preset pro- grams overlap the same day (see the example), the second program
not recorded until the first
this example, the first part
selectthe recording time length. Eachtimeyoupressthisbuttonthe recording timeincreases30minutes (up
hours). Attheendofthe recording, theDVD+VCRwill stop recording andshutoff.Ifyou set thetime
stop the recording. Note: During InstantTimer Recording, you cannot change thechannelontheDVD+VCR. Checking the Recording TimePressREC/ITR (z) once checkthe recording time.Therecalled setting automatically returns
theTVscreenafter6seconds. Extending the Recording TimeThe recording timecanbeextended anytime
pressing REC/ITR (z). Subsequent pressesresultin advancing the recording time 30-minuteincrements. Note: IfyoupressPAUSE/STEP (X) during instanttimer recording, theinstanttimer recording iscancelled. Recording from External Components Youcanrecordfromanexternal component, suchasacamcorderor VCR, connected anyoftheDVD+VCR'sexternal inputs. 1.Makesurethatthe component you want
recordfromisconnected properly
theDVD+VCR.Seepage12.2.PressINPUT repeatedly
pressing SPEED repeatedly. Play the tape ordiscintheexternal component. IfyouhaveaTVattached your DVD+VCR, youcanseethevideo palying. 6.PressREC/ITR (z) once
stop recording. Notes:
Before recording, confirmthe recording start posi- tion. Ifyoursourceis copy-protected using CopyGuard, youwill not beable recordit using thisunit.See Copyright onpage6formoredetails. Torecordforafixed length time, seeInstantTimer Recording.
the DVD you are attempting
copy protected, you will not
copy Macrovision encoded DVDs (or Discs). "Lock"
You must stop the copy process manually when the DVD movie ends,
the unit may replay and record over and over again.
When you stop the DVD playback during copying, the recording
stopped automatically. On-Screen Display
VCR SomeofthesefunctionswillbedisplayedeverytimetheDVD+VCRisoperated.EachpressoftheENTER/OKchangestheTVscreeninthefollowingsequence. Real-Time Counter
tape with contents recorded
inserted into the VCR, the real-time counter shows length
hours, minutes, and seconds. Press CLK/CNT
illustrated below. Counter Memory This feature
view immediately after recording
the same point several times.
Press CLK/CNT until the real-time counter
the point that you want
locate later, reset the real-time counter
Press STOP (x) when recording
playback fin- ishes.
the tape during recording
playback. Press CLK/CNT repeatedly until the REM indicator displays
screen during recording
playback. The remaining tape length may not
the tape and the kind
the tape (T-140, T-160,
The clock (or tape counter, tape remaining) mode will
The tape counter and the remaining tape length indica- tor appear only when
inserted. Also, the remaining tape length indicator appears after any tape operation. PLAY HI-FI
and pressing theTV/VCRtoturntheDVD+VCR'sTVindicatoroff.?Donot attempt tohookupmorethanonetelevi-sionsettotheDVD+VCRforeither recording playback. VCR Auto Play System ThisDVD+VCRfeaturesautomatic playback. Whenyouloada tape withthe safety tabremovedthe following occurs:
VCR mode automatically.
automatically and playback begins.
the tape, the DVD+VCR stops, then rewinds.
ejected after rewinding and the turns itself off automatically. Note: Auto power off does not function during regular DVD play mode. (DVD+VCR power stays on.) S-VHS Quasi Playback (SQPB) ?ThisDVD+VCRcan play backS-VHSrecorded tapes, however, itcannotmake recordings using S-VHSformat tapes. ?SQPBisanabbreviationforS-VHSQuasi Playback. Easy Information IftheExtendedDataService (XDS) signals arepro-vided along withnormalTV signal inyourareaordur- ing playback ofa tape recordedwithExtendedDataService (XDS) signals, thestation ID, program title, andprogramdetailsareshownontheTVscreen.When viewing achannelwithExtendedDataService (XDS) signals, pressENTER/OKandthestationIDwillappearontheTVscreen.PressENTER/OK again andtheprogramdetailswillappearontheTVscreen.When viewing tape recordedwithExtendedDataService (XDS) signals, pressENTER/OKtwiceandtheprogramtitleandprogramdetailswillappearontheTVscreen. Program Details LENGTH: Indicates the run length
program. TIME REMAINING: Indicates the remaining time
program. RATING: Indicates the rating
the current program (N/A,
and Not Rated). The rating N/A means that the motion picture ratings are not applicable
WABC STEREO "Home video" APR 22,SAT 2:15
Load your chosendiscinthe tray withtheplaybacksidedown. PressOPEN/CLOSE (Z)
closethe tray. READING appears onthedisplay window, andplayback starts automatically.Ifplaybackdoes not start, press N(PLAY).Insome cases, thediscmenumight appear instead. Note: IfParentalControlis set andthediscis not withintheRatingsettings(notauthorized),the4-digitcode must beenteredand/orthedisc must beauthorized(see"Rating",on page 17). General features General features Buttons Operations
(OPEN/CLOSE)Opensorclosesthedisc tray. X(PAUSE)Duringplayback, press
pause playback.PressXrepeatedly playFrame-by-Frame.SKIP(./>)Duringplayback, press SKIP(.or>)
the next chapter/trackor
thebeginningofthecur- rent chapter/track.PressSKIP.twicebriefly
step back thepreviouschapter/track.BACKWORDDuringplayback, press SCAN(morM)repeatedly /FORWARD(m/M)selecttherequiredscanspeed. DVD, DivX disc;
steps Video CD, MP3, AudioCD
steps). Youcanmove through thezoomed picture using bBvVbuttons.PressCLEARtoexit. Note: Zoom may notworkonsomeDVDs.RANDOM During playback orin stop mode, press RANDOMforran-dom playback. TITLEIfthecurrentDVDtitlehasamenu,thetitlemenu appears onthescreen. Otherwise, thediscmenu may appears. DISCMENUThediscmenu appears onthescreen. (ANGLE) During playback ofDVDdisccontainsscenesrecordeddifferentcamera angles, press ANGLE repeatedly toselectadesired angle. Tip: TheCamera Angle iconis displayed ontheTVscreenwhenalternate angles areavailable. (SUBTITLE) During playback, press SUBTITLE repeatedly toselectadesiredsubtitle language. (AUDIO) During playback, press AUDIO repeatedly tohearadiffer-entaudio language oraudiotrack. Additional features Additional features 3DSurroundTo produce a3Dsurroundeffectthatsimulatesmulti-channelaudiofromtwostereo speakers (instead ofthefive+ speakers normally required formulti-channelaudiofromahometheater system). 1.PressDISPLAY during playback. 2.Use
enter Marker You canstart playback from
nine memorized points.
entera marker, press MARKER the desired point the disc. The Marker icon appears the
screen briefly. Repeat toenter
Recall Clear Marked Scene
During disc playback, press SEARCH. The mark- search menu appears the screen.
select marker number that you wantto recall clear.
Press ENTER/OK and playback starts from the marked scene. Or, Press CLEAR and the marker number
erased from the list.
You can play any marker
inputting its number the marker search menu. Last Scene Memory This player memorizes last scene from the last disc that
viewed. The last scene remains
you remove the disc from the player switch off the player.
you load disc that has the scene memorized, the scene
automatically recalled. Note: This player does not memorize the scene
you switch off the player before commencing play the disc. Screen Saver The screensaver appears when you leave the DVD+VCR
Stop mode for about five minutes.29 Operation Playing Playing Audio
store your favoritetracksfrom any discinthe player memory. program cancontain tracks. InsertanAudioCDorMP3/WMAfilesrecordedmedia.AUDIOCDorMUSICmenu appears.
During STOPmode, press PROGRAMandthemarkwill appear Note:PressPROGRAM again
exitthe program editmode,thenthemarkwill disappear.
place additionaltracksonthelist. Selectthetrack you want
start playing onthe "Program" list. PressPLAYorENTER/OK
start. Playback begins intheorderinwhich you programmed thetracks. Playback stopsafterallofthetracksonthe "Program" listhave played once. Toresumenormal playback from programmed playback, selectatrackonthelistandthen press PLAY. Repeat Programmed Tracks PressREPEAT selectadesiredrepeatmode. Track:repeatsthe current track All:repeatsallthe trackson programmed list.
Off(No display): does not play repeatedly. Note:If you press >once during Repeat Track playback, therepeat playback cancels. Erasing aTrackfrom "Program" List
During STOPmode, press PROGRAMandthemarkwill appear
UsevVbBtoselectthetrackthat you wish erasefromthe Program list. PressCLEAR. Repeat step 1~3
During STOPmode, press PROGRAMandthemarkwill appear
MP3/WMA disc compatibility with this player
Sampling frequency: within
The player cannot readanMP3/WMAfilethathasafileextensionotherthan ".mp3" /".wma". CD-R physical formatshouldbeISO
They should not contain special letterssuchas/?*:"<>letc. Thetotalnumberoffilesinafoldershouldbelessthan files.30
folder, andpressENTER/OK.Alistoffilesinthefolderappears.Ifyou are
thepreviousFolder list, use the
highlightandpressENTER/OK. Ifyou want
file, you can pressSTOP
There are threeSlideSpeedoptions
theslide show, pressPLAY(N) pressPAUSE/STEP(X) gain. Moving
once whileviewing picture advance the next
duringshowing picture
rotate thepictureclockwise
counter clockwise. JPEG disc compatibility withthis player islimited follows: DependinguponthesizeandnumberofJPEG files, itcouldtake longtimefortheDVD+VCR readthedisc's contents. Ifyoudon't see
on-screen displayafterseveral minutes, some ofthefilesmaybe too large reducetheresolutionoftheJPEGfiles lessthan (Horizontal)
select folder,and press ENTER/OK.Alistoffilesinthefolder appears.
PressSTOP stoptheplayback.TheMovie menu appears Tips:
the pre- viousFolderlist, use the
the numberof the screen frame over30 per 1second, this unit may not operatenor-mally.
the videoandaudio structure ofrecordedfile
not interleaved, either videooraudio outputted.
48kHz(WMA) Bit rate: within
TheDVD-VRmenu appears ontheTVscreenwhen you press DISCMENUbuttonswhile play- ing.
'CPRM'? CPRMisa copy protection system (with scramble system) only allowing the recording 'copy once'broadcast programs. CPRMstandsforContentProtectionforRecordableMedia.This player isCPRM compatible, whichmeansthat you canrecord copy-once broadcast programs, but you cannot thenmakea copy ofthose recordings. CPRM recordings can only bemadeonDVD-RWdiscsformattedinVR mode, andCPRM recordings can only played players thatare specifically compatible withCPRM. Maintenance and Service Maintenance and Service Refer theinformationinthis chapter beforecon- tacting aservicetechnician. Handling the Unit When shipping the unit Pleasesavethe original shipping carton and packing materials.If you need
ship the unit, formaximum protection, re-pack theunitasitwas originally packed
the factory. Keeping the exterior surfaces clean?Do not usevolatile liquids suchasinsecticide spray neartheunit.?Do not leaverubberor plastic products contact withtheunitfora long period oftime.since they leavemarksonthesurface. Cleaning the unit Tocleanthe player, usea soft, dry cloth.Ifthesur-facesare extremely dirty, useasoftcloth lightly mois-tenedwithamild detergent solution.Do not use strong solventssuchas alcohol, benzine, thinner, asthese might damage thesurfaceoftheunit. Maintaining the Unit TheDVD+VCRisa high-tech, precision device.Ifthe optical pick-up lensanddiscdrive parts are dirty worn, the picture quality couldbediminished. Depending onthe operating environment, regular inspection andmaintenancearerecommendedafter every 1,000 hoursofuse.For details, please contact your nearest authorizedservice center.33 Reference AreaCode Afghanistan Argentina ARAustraliaAUAustriaAT Belgium BEBhutanBTBoliviaBOBrazilBRCambodiaKHCanadaCAChileCLChinaCNColombiaCO Congo CGCostaRicaCRCroatiaHRCzech Republic CZDenmarkDKEcuadorEC Egypt EGElSalvadorSVAreaCode Ethiopia Fiji FJFinlandFIFranceFR Germany DEGreatBritainGBGreeceGRGreenlandGLIslandsHM Hong Kong Hungary HUIndiaINIndonesiaIDIsraelIL Italy ITJamaicaJM Japan Kenya KEKuwaitKW Libya Luxembourg LUAreaCode Malaysia MYMaldivesMVMexicoMXMonacoMC Mongolia MNMoroccoMA Nepal NPNetherlandsNLNetherlandsAntillesANNewZealandNZ Nigeria Norway NOOmanOMPakistanPKPanamaPA Paraguay Philippines PHPolandPL Portugal PTRomaniaRORussianFederationRUAreaCodeSaudiArabiaSA Senegal Singapore SGSlovak Republic SKSloveniaSISouthAfricaZASouthKoreaKR Spain ESSriLankaLKSwedenSESwitzerlandCHTaiwanTWThailandTH Turkey Uganda UGUkraineUAUnitedStatesUS Uruguay UYUzbekistanUZVietnamVNZimbabweZW Area Codes List Area Codes List Choosea areacodefromthislist. Language CodeAbkhazian6566Afar6565Afrikaans6570Albanian8381Ameharic6577Arabic6582Armenian7289Assamese6583 Aymara Azerbaijani 6590Bashkir6665 Basque Bengali; Bangla 6678Bhutani6890Bihari6672Breton6682 Bulgarian 6671Burmese7789 Byelorussian 6669Cambodian7577Catalan6765Chinese9072Corsican6779Croatian7282Czech6783Danish6865Dutch7876 English Esperanto 6979Estonian6984Faroese7079 Language Code Fiji 7074Finnish7073French7082Frisian7089Galician7176 Georgian 7565German6869Greek6976Greenlandic7576Guarani7178 Gujarati 7185Hausa7265Hebrew7387Hindi7273 Hungarian 7285Icelandic7383Indonesian7378 Interlingua 7365Irish7165Italian7384 Japanese 7465Javanese7487Kannada7578Kashmiri7583Kazakh7575 Kirghiz 7589Korean7579Kurdish7585Laothian7679Latin7665 Latvian, Lettish7686 Language Code Lingala 7678Lithuanian7684Macedonian7775 Malagasy Malay Malayalam 7776Maltese7784Maori7773Marathi7782Moldavian7779 Mongolian 7778Nauru7865 Nepali Norwegian Oriya Panjabi Pashto, Pushto8083Persian7065Polish8076 Portuguese Quechua 8185Rhaeto-Romance8277Rumanian8279Russian8285Samoan8377Sanskrit8365ScotsGaelic7168Serbian8382Serbo-Croatian8372Shona8378Sindhi8368 Language Code Singhalese 8373Slovak8375Slovenian8376Somali8379 Spanish 6983Sudanese8385Swahili8387Swedish8386 Tagalog Tajik 8471Tamil8465Tatar8484 Telugu 8469Thai8472Tibetan6679 Tigrinya Tonga 8479Turkish8482Turkmen8475Twi8487Ukrainian8575Urdu8582Uzbek8590Vietnamese8673 Volapuk 8679Welsh6789Wolof8779Xhosa8872Yiddish7473Yoruba8979Zulu9085 Language Codes List Language Codes List Usethislist
input your desired language forthe following initial settings: Disc Audio, Disc Subtitle, DiscMenu.34
roubleshooting roubleshooting Symptom power. The power ison,buttheDVD+VCRdoesnotwork.No picture. Nosound.The playback picture poor. The"PROGRESSIVESCANMODE" message remainstobe displayed. Cause The power cordisdisconnected.DVDorVCRbuttonisnotswitched properly. Nodiscisinserted.No tape isinserted.TheTVisnot settoreceiveDVD+VCR signal output. Thevideocableisnotconnected securely. Wrong connection.The equipment connectedwiththeaudio cableisnot settoreceiveDVD+VCR signal output. Theaudiocablesarenotconnected securely. The power ofthe equipment connectedwiththeaudiocableisturnedoff.TheAUDIO options aresettothe wrong position. Thediscis dirty. TheTVchannelsarenottunedin properly. Tape headsare dirty. Tape isarentalorwasrecordedonanotherVCR.Thisunitcan only output 525p Progressive scan picture. DVD+VCRwasturnedoffwhile setting the Progressive scanmode.The Progressive Scanissetto"On"onthe setup menubutisconnectedtoa standard(analog) televisionwith compo- nentvideo input. Correction Plug the power cordintothewallout-let securely. Referto page 6.Insertadiscor tape. (Check thatthediscor tape indicatorinthe display windowis lit.) Selectthe appropriate video input modeontheTVsothe picture fromtheDVD+VCR player appears ontheTVscreen.Connectthevideocableintothe jacks securely. Checktheconnection.Selectthecorrect input modeoftheaudioreceiverso you canlistentothesoundfromtheDVD+VCR.Connecttheaudiocableintothe jacks securely. Turnonthe equipment connectedwiththeaudiocable.SettheAUDIO options tothecorrect position. Cleanthedisc.Check tuning, carry out tuning again. Cleanvideoheads.UseCH/TRK (v/V) formanualtrack- ing adjustment while tape playing. Makesurethat your TVcan support 525p Progressive scan picture orset Progressive scantooff. Keep pressing theSTOPbuttonformorethan5seconds.Checkthe following guide forthe possible causeofa problem before contacting service.35 Symptom The DVD+VCR does not start playback. Video tape cannot
Hi-Fi sound The remote control does not work properly. Camcorder image
not shown. Camcorder image via
screen. Timer recording
placed upside down. The disc
not placed within the guide. The disc
dirty. The Rating level
the cassette compartment empty? Audio mode
not set properly. There
the remote control and this unit. The batteries
the remote control are exhausted. The remote control
too far from the DVD+VCR. This remote control use the same buttons for VCR and DVD functions (ex.PLAY). Camcorder is off. DVD+VCR SOURCE SELECT
correct time. Timer has been programmed incorrectly. indicator light does not appear after programming timer. Correction Insert playable disc. (Check the disc type and Regional code.) Place the disc with the playback side down. Place the disc the disc tray correctly inside the guide. Clean the disc. Cancel the Rating function change the rating level. Eject the tape in. Select STEREO
repeatedly pressing AUDIO the remote control. Remove the obstacle. Replace the batteries with newones. Point the remote control
correct time. Reprogram Timer. Reprogram Timer and turn DVD+VCR off
KHz, dB), ohms, RCA jack (L,
x1RFOUTChannel3or4 (Adjustable) VCR Specifications Head system Fourheadhelicalscanazimuth system Timer12-hour display type with AM, Tape speed SP:33.35 mm/sec, LP:16.67 mm/sec, SLP:11.12mm/sec Tape width12.7mmMaximum recording timeSP:2HOURS (T-120), SLP:6HOURS (T-120)/8 HOURS (T-160) RewindtimeAbout3minutes (T-120) ChannelcoverageVHF: 2-13, UHF: 14-69, CATV:1-125 (4A, A-W, W+1
Design and specifications are subject change without prior notice. Specifications Specifications P/NO.
KHz, dB), ohms, prise RCA (G,