MSC1500 - Vacuum Cleaner AERIAN - Free user manual and instructions
Find the device manual for free MSC1500 AERIAN in PDF.

| Product Type | Multi-surface Vacuum |
| Brand | AERIAN |
| Model | MSC1500 |
| Power Supply | 220-240 V ~ 50-60 Hz |
| Power | 400 W |
| Protection Class | Class II |
| Protection Rating | IPX4 |
| Clean Water Tank Capacity | 1 L |
| Dirty Water Tank Capacity | 1 L |
| Spray Mode | Trigger Spray |
| Included Accessories | Brush, crevice tool, hose |
| Automatic Shut-off Function | Yes (float ball) |
| Thermal Protection | Yes |
| Recommended Use | Cleaning carpets, upholstery |
| Recommended Detergents | Ionized water, baking soda, citric acid, hypochlorous acid |
| Cleaning Method | Spray solution then vacuum |
| Maintenance | Drain and rinse tanks, clean brushes and sponges |
| Maintenance Frequency | After each use |
| After-Sales Service | Hotline Darty 0 978 970 970, Fnac 0 969 324 334, Vanden Borre +32 2 334 00 00 |
| Disposal | Recycling at waste center or store |
| EU Declaration Number | N°862022053026 |
Frequently Asked Questions - MSC1500 AERIAN
User questions about MSC1500 AERIAN
0 question about this device. Answer the ones you know or ask your own.
Ask a new question about this device
Download the instructions for your Vacuum Cleaner in PDF format for free! Find your manual MSC1500 - AERIAN and take your electronic device back in hand. On this page are published all the documents necessary for the use of your device. MSC1500 by AERIAN.
USER MANUAL MSC1500 AERIAN
natural_image
Blue aerian vacuum cleaner with coiled hose and control panel (no visible text or symbols)
MANUEL D'UTILISATION

HANDLEIDING

natural_image
Line drawing of a container with liquid being poured into it, no text or symbols presentnatural_image
Technical line drawing of a mechanical component with coiled tubing and a valve (no text or symbols)6
natural_image
Illustration showing a plug inserted into an electrical outlet and a hand inserting a socket into a device (no text or symbols present)1
natural_image
Illustration of a hand holding a spray gun with an arrow pointing to it, next to a numbered circle labeled '5' (no text or symbols on the diagram itself)2
natural_image
Illustration of hands using a handheld tool to apply material, with an arrow indicating direction (no text or symbols present)3
natural_image
Illustration of hands using a tool to apply or install a mechanical component, with no visible text or symbols.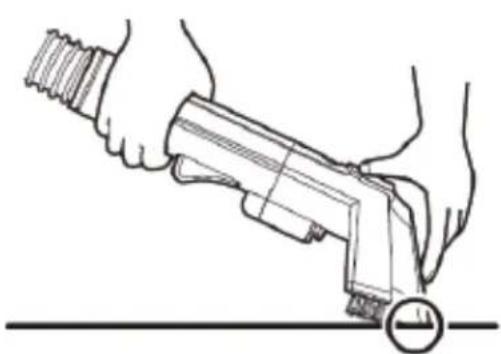
natural_image
Line drawing of a hand holding a handheld device with a circular button, no text or symbols present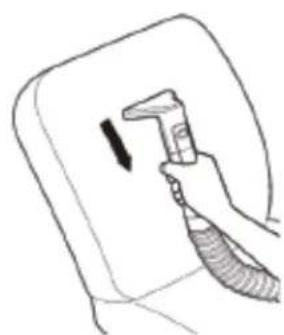
natural_image
Line drawing of a hand holding a tool near a wall-mounted device (no text or symbols)4
natural_image
Illustration showing a hand inserting a plug into a device and connecting to an electrical outlet (no text or symbols present)text_image
Scanned document with horizontal lines and a signature line, likely a form or checklistnatural_image
Technical line drawing of a mechanical device with internal components and ventilation slots (no text or symbols)Boule flottante
natural_image
Illustration of a water tap with a bag, a flat plate, and a handle (no text or symbols)natural_image
Simple line drawing of a mechanical lever or lever mechanism with directional arrows (no text or symbols)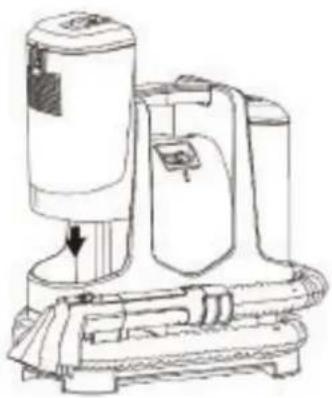
natural_image
Line drawing of a vacuum cleaner device with no visible text or symbolsnatural_image
Technical line drawing of a mechanical device with a separate view showing internal components (no text or symbols)natural_image
Illustration showing a hand cleaning a car engine and using a tool to clean the air (no text or symbols present)natural_image
Technical line drawing of a mechanical device with no visible text or symbolstext_image
Diagram of a gun with labeled parts and directional arrows indicating motion or forcenatural_image
Line drawing of a handgun with an arrow indicating motion (no text or symbols)text_image
Technical diagram of a device with labeled components and a vertical line marked 'V' and 'S'natural_image
Technical line drawing of a mechanical device with a magnified inset showing a component detail (no text or symbols)natural_image
Diagram of a car gear shift lever with a circular component and directional arrow (no text or labels)natural_image
Diagram of a mechanical device with concentric circles and a central arrow, no visible text or symbolsnatural_image
Simple line drawing of a faucet with two balls, no text or symbols presentHotline Darty France
natural_image
Line drawing of a container with a bottle pouring liquid from a glass (no text or symbols)Maximaal waterniveau
natural_image
Technical diagram of a mechanical component with coiled tubing and a valve (no text or symbols)6
natural_image
Illustration showing a plug inserted into an electrical outlet and a hand inserting a socket into a device (no text or symbols present)1
natural_image
Illustration of a hand holding a handgun with an arrow pointing to it, next to a numbered circle with the number 5 (no text or symbols on the diagram itself)2
natural_image
Illustration of hands using a handheld tool to apply material, with an arrow indicating left motion (no text or symbols)3
natural_image
Illustration of hands using a tool to cut a mechanical part, with two arrows indicating motion (no text or symbols)4
natural_image
Line drawing of hands using a handheld tool to apply a circular button (no text or symbols present)5
natural_image
Line drawing of a hand holding a tool near a wall-mounted device (no text or symbols)natural_image
Illustration showing a hand inserting a plug into a device and then connecting to an electrical outlet (no text or symbols present)natural_image
Cross-sectional diagram of a mechanical device with internal components (no text or symbols)Drijvende bal
natural_image
Technical line drawing of a mechanical device with a separate view showing internal components (no text or symbols)natural_image
Illustration showing a hand using a tool to clean or brush the battery (no text or symbols present)natural_image
Technical line drawing of a mechanical component with no visible text or symbolstext_image
Diagram of a gun with labeled parts and directional arrows indicating motion or forcetext_image
Diagram of a mobile phone with Chinese text labels on its screen and stand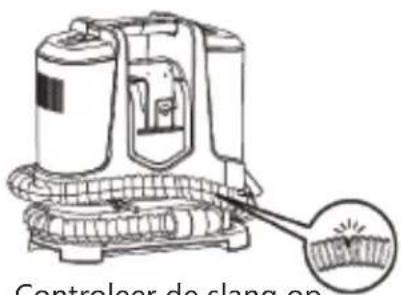
text_image
Controleer de slang onnatural_image
Diagram of a car intake manifold showing the shaft and wheel (no text or labels)natural_image
Mechanical diagram showing a pulley system with a central rotating wheel and concentric rings (no text or symbols)natural_image
Simple line drawing of a faucet with two wheels, no text or symbols presentnatural_image
Technical diagram of a mechanical component with coiled tubing and a valve (no text or symbols)6
natural_image
Illustration showing a plug inserted into a wall socket and a hand inserting a switch into a container (no text or symbols)1
natural_image
Illustration of a hand holding a handheld device with an arrow pointing to it, next to a numbered circle labeled '5' (no text or symbols on the device itself)2
natural_image
Illustration of hands using a handheld tool to apply material, with an arrow indicating left motion (no text or symbols)3
natural_image
Illustration of hands using a tool to apply or install a mechanical component, with no visible text or symbols.4
natural_image
Line drawing of a hand holding a tool with a circular button, no text or symbols present5
natural_image
Line drawing of a hand holding a tool near a wall-mounted device (no text or symbols)natural_image
Illustration showing a hand inserting a plug into a device and connecting to an electrical outlet (no text or symbols present)natural_image
Technical line drawing of a mechanical component with internal channels and housing (no text or symbols)Bola flotante
natural_image
Technical line drawing of a portable device with a side-view view showing internal components (no text or symbols)natural_image
Illustration of a hand using a tool to clean or brush the engine (no text or symbols present)natural_image
Technical line drawing of a mechanical component (no text or symbols)text_image
Diagram of a gun with labeled parts, showing two numbered components and directional arrows indicating movement or force.natural_image
Diagram of a portable vacuum cleaner with a magnified inset showing internal components (no text or symbols)natural_image
Diagram of a mechanical component with a central circular feature and an arrow indicating direction (no text or symbols)natural_image
Mechanical diagram showing a pulley system with concentric rings and a central hub (no text or labels)Esponja de filtrado

natural_image
Illustration of a faucet with two wheels and a handle, enclosed in a circle (no text or symbols)natural_image
Line drawing of a container with a bottle pouring liquid from a glass cup (no text or symbols)natural_image
Line drawing of a device with attached cable and bracket (no text or symbols)natural_image
Technical line drawing of a mechanical component with coiled tubing and a central connector (no text or symbols)6
natural_image
Illustration showing a plug inserted into a wall socket and a hand inserting a cable into a device (no text or symbols)1
natural_image
Illustration of a hand holding a handheld gun with an arrow indicating motion, next to a numbered circle labeled '5' (no text or symbols on the diagram itself)2
natural_image
Illustration of hands using a handheld tool to apply material, with an arrow indicating left motion (no text or symbols)3
natural_image
Illustration of hands using a tool to cut or mark a surface, with two arrows indicating direction (no text or symbols)4
natural_image
Line drawing of a hand holding a firearm with a circular button on the base (no text or symbols)5
natural_image
Line drawing of a hand holding a spray gun over a wall-mounted device (no text or symbols)natural_image
Illustration showing a hand inserting a plug into a device and connecting to an electrical outlet (no text or symbols present)natural_image
Three-step diagram showing a device with internal components, a hand holding a paper, and a final container with liquid being inserted (no text or symbols present)natural_image
Illustration of a water tap with a container and two other items (no text or symbols)natural_image
Simple line drawing of a mechanical lever or lift with directional arrows (no text or symbols)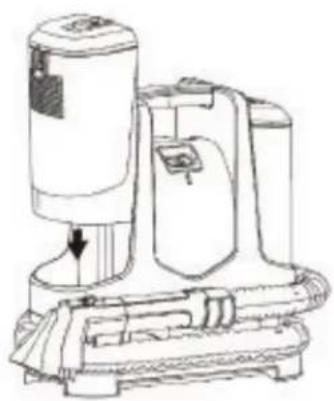
natural_image
Line drawing of a vacuum cleaner device with no visible text or symbolsnatural_image
Technical line drawing of a mechanical device with a separate view showing internal components (no text or symbols)natural_image
Illustration showing a hand using a tool to clean or brush the water of a water heater (no text or symbols present)natural_image
Technical line drawing of a mechanical device with no visible text or symbolstext_image
Diagram of a firearm with numbered parts and directional arrows indicating motion or movementnatural_image
Line drawing of a portable vacuum cleaner with a magnified inset showing its internal structure (no text or symbols)natural_image
Diagram of a car gear shift lever with a circular component and directional arrow (no text or labels)natural_image
Mechanical diagram showing a pulley system with a central rotating component and concentric rings (no text or symbols)natural_image
Simple line drawing of a faucet with two wheels, no text or symbols presentIMPORTANT SAFETY INSTRUCTIONS PLEASE READ THE FOLLOWING SAFETY WARNINGS AND THE INSTRUCTIONS CAREFULLY BEFORE USING THE APPLIANCE AND KEEP FOR FUTURE REFERENCE.
Warnings
- This appliance is intended for domestic household use only and should not be used for any other purpose or in any other application, such as for non-domestic use or in a commercial environment.
- If the supply cord is damaged, it must be replaced by the manufacturer, its service agent or similarly qualified persons in order to avoid a hazard.
- This appliance can be used by persons with reduced physical, sensory or mental capabilities or lack of experience and knowledge if they have been given supervision or instruction concerning use of the appliance in a safe way and understand the hazards involved.
Children shall not play with the appliance.
- The plug must be removed from the socket outlet before cleaning or maintaining the appliance.
- Regarding the detailed instructions for the method and frequency of cleaning and the precautions during user maintenance, refer to the section "CLEANING AND MAINTENANCE" on page 69-73 of the manual.
EN
- Regarding the detailed instructions for the safe use of the appliance, refer to the section "OPERATION".
- Following objects are strictly banned, otherwise the vacuum cleaner will be damaged or fire calamity will be caused, which bring such accidents as human body injuries:
- Don't pick up large or sharp broken objects such as glasses.
- Don't pick up harming or erodent liquids (solvent, corrosive, detergent...).
- Don't pick up inflammable or explosive substance such as gasoline or alcohol.
- Don't pick up/ vacuum burning or glowing objects (cigarettes, matches, hot ashes).
- The liquid or steam must not be directed towards equipment containing electrical components, such as the interior of ovens.
• The filling aperture must not be opened during use.
- The appliance has to be unplugged after use and before carrying out user maintenance on the appliance.
- The plug must be removed from the socket-outlet before cleaning or maintaining the appliance.
- The appliance shall not be left unattended while it is connected to the supply mains.
- The appliance is not to be used if it has been dropped, if there are visible signs of damage or if it is leaking.
- Keep the appliance out of reach of children when it is energized or cooling down.
EN
Safety Information
- Do not leave the appliance unattended when it is switched on.
• Do not use the appliance for any purpose other than those described in this instruction manual.
• Always disconnect the appliance from the power supply if it is left unattended and before assembling, disassembling or cleaning. - Do not unplug by pulling on cord. To unplug, grasp the plug, not the cord.
- Use only original accessories recommended by the manufacturer.
- Do not use outdoors.
•Children should be supervised to ensure that they do not play with the appliance.
- Do not use with any opening blocked; keep free of dust, lint, hair, and anything that may reduce air flow.
- DO NOT use the appliance to pick up the following items:
- Dry dust
- Lots of rubbish
-
Big plastic bags
– Large quantities of powder -
Metal such as needles, pins, etc.
– Large quantities of sands and pebbles
EN
PRODUCT OVERVIEW
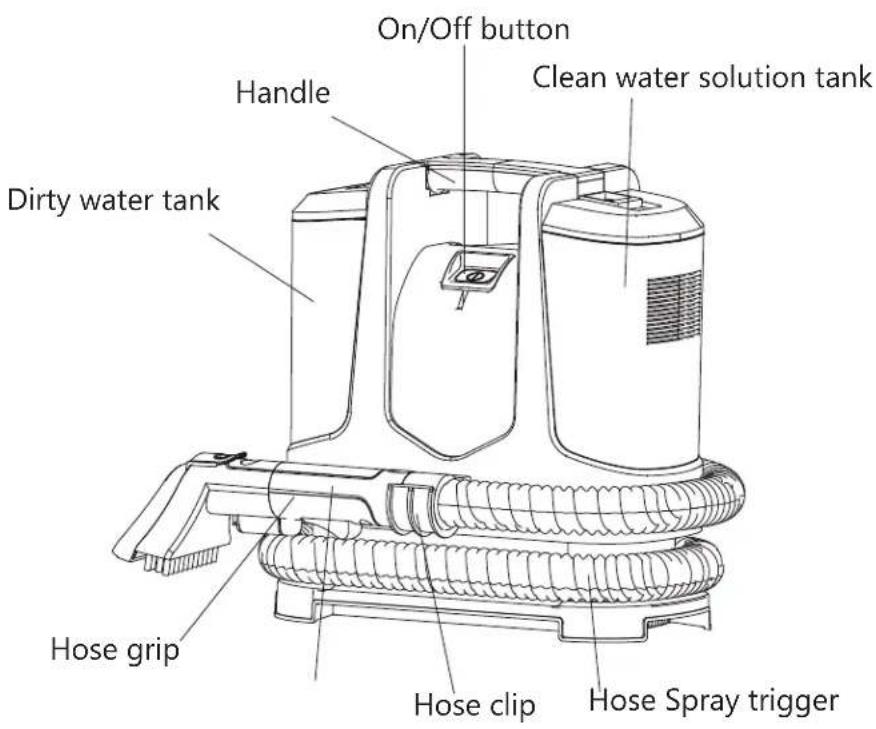
text_image
On/Off button Handle Clean water solution tank Dirty water tank Hose grip Hose clip Hose Spray trigger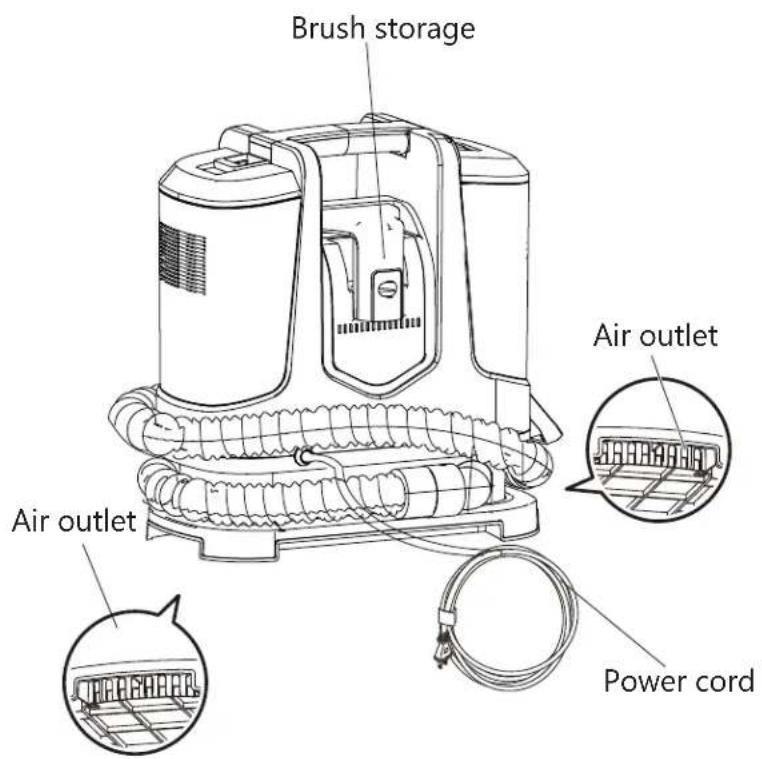
text_image
Brush storage Air outlet Air outlet Power cordBrush tool
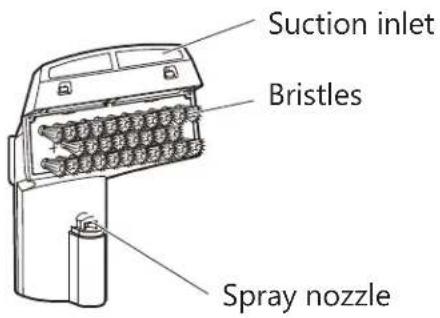
text_image
Suction inlet Bristles Spray nozzleCrevice tool
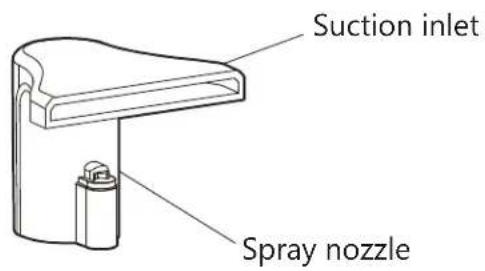
text_image
Suction inlet Spray nozzleGETTING STARTED
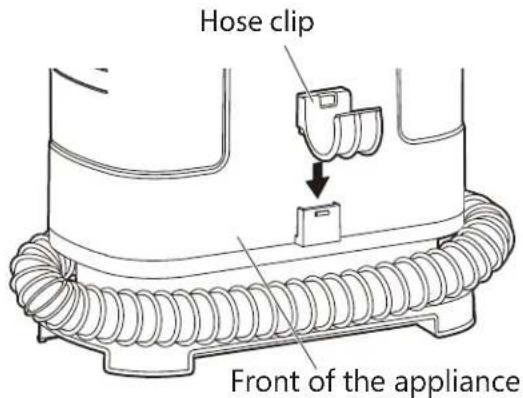
text_image
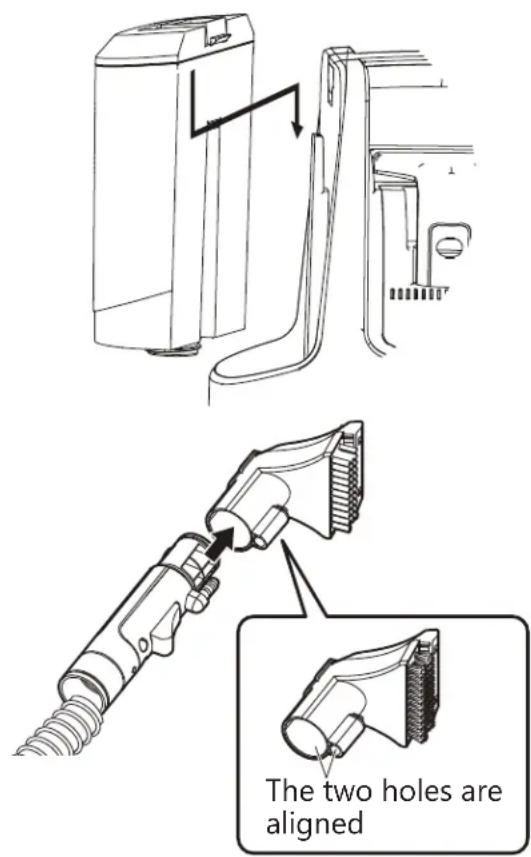
Hose clip Front of the appliance1 Insert the hose clip into the opening on the appliance.
natural_image
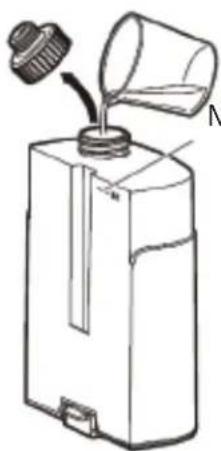
Line drawing of a container with a bottle pouring liquid from a glass (no text or symbols)Maximum water level
Maximum water capacity is about 1L.
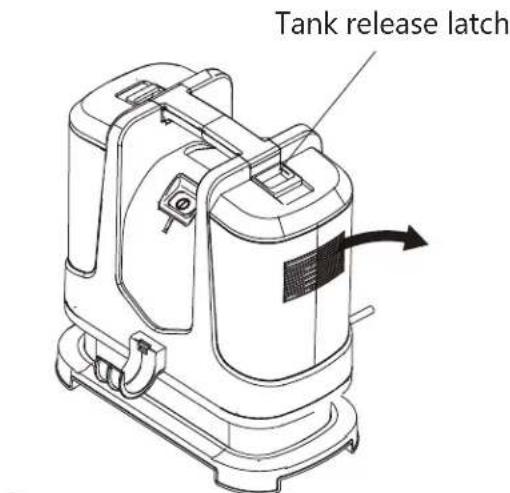
text_image
Tank release latch2 Press down on top latch of clean water/solution tank, tilt and lift up to remove.
3
Unscrew the tank cap and fill with tap water or alkaline ionized water up to the maximum water line.

CAUTION
Do not fill with water above 40^ C.
You can also pour detergent into tank. Use the recommended amount of detergent as per instructions on detergent label.
NOTE: Using more than the recommended amount of cleaning solution may cause excessive foaming.
EN
Recommended Detergent:
- Strong alkaline ionized water
- Baking soda
3.Citric acid
4.Hypochlorous acid
5.Weak acid electrolytic water
Such as detergent producing less foam.
Not appropriate:
- Neutral detergent for kitchen use
2.Strongly alkaline detergent
3.Strongly acidic detergent
When using a detergent with a lot of foam, the foam might get inside the cleaner.
Remark:
Do confirm that wash solvent does not cause damage to carpet before use.
When using detergent, first test it on the edge of the fabric being cleaned to make sure that there is no discoloration.
Do not use diluent, aniline, chloroform, and flammable solvents.
Do not spray any liquids such as insecticides, hair care products, or lubricating oil.
Do not use the product to vacuum flammable or combustible substances (such as kerosene, gasoline, thinner, copy product toner, etc.)
Do not use the product to vacuum oil, smoke or steam
Do not use the product to vacuum dry dust.
Do not operate this unit near combustible substances such as lit cigarettes or incense sticks, doing so may increase the risk of fire.
Only water (clean tap or recommended Detergent) that is 40^ C or cooler should be put into the clean water tank.
text_image
The two holes are aligned4 Replace the tank cap securely.
Replace tank by lining up tank indentation with the protrusion on the appliance. Press down firmly on tank to secure in position.

CAUTION
Do not shake the tank during installation, otherwise the leakage may occur.
5 Attach the brush tool to the hose grip.
EN
natural_image
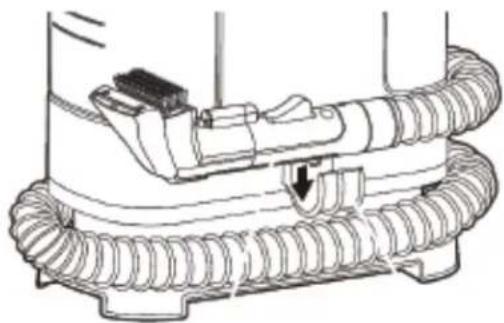
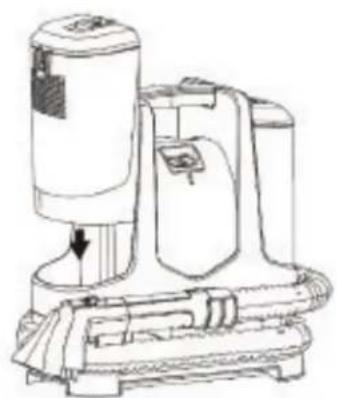
Technical line drawing of a mechanical component with coiled tubing and a valve (no text or symbols)6
Wrap the hose around the appliance base and snap hose grip into the hose clip.
OPERATION
To enhance cleaning effectiveness, it is recommended to pre-treat stains to help loosen and remove the heavily stained or soiled areas.
natural_image
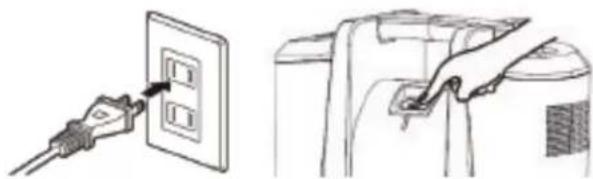
Illustration showing a plug inserted into an electrical outlet and a hand inserting a socket into a refrigerator (no text or symbols)1
Plug the appliance in the mains socket. Press the button to switch on the appliance.
natural_image
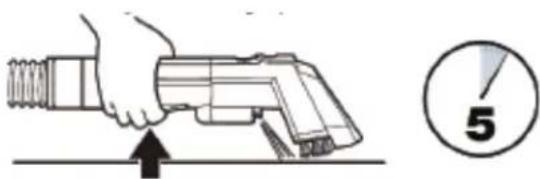
Illustration of a hand holding a tool with an arrow pointing to it, next to a numbered circle labeled '5' (no text or symbols on the diagram itself)2
Hold the cleaning tool just above surface of soiled areas to be cleaned. Press the spray trigger to release a spray of cleaning solution directly onto stained or soiled area. Wait for 5 minutes before cleaning.
natural_image
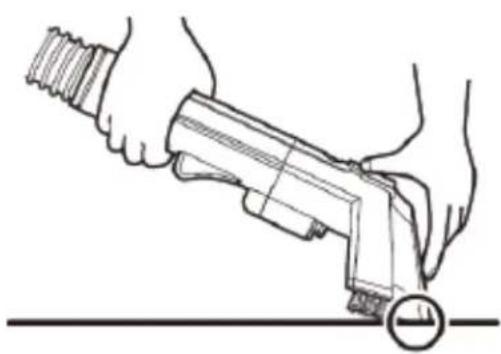
Illustration of hands using a tool to apply material, with an arrow indicating direction (no text or symbols present)3
Hold cleaning tool over soiled surface. Press spray trigger to apply water or cleaning solution to soiled area.
EN

natural_image
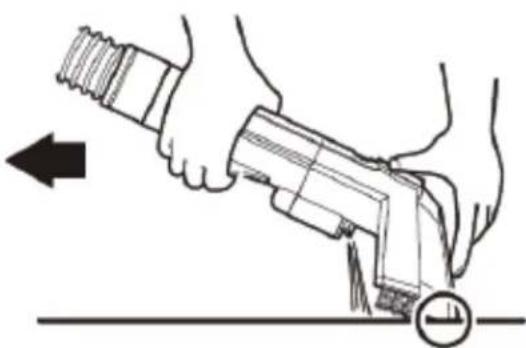
Illustration of hands using a tool to apply or install a mechanical component, with no visible text or symbols.4
Slowly move the tool over the stain, releasing the spray trigger when complete.
natural_image
Line drawing of a hand holding a tool with a circular button, no text or symbols present5
Excess liquid can be removed as much as possible without pressing the spray trigger. This may allow faster drying.
When cleaning is finished, switch off and unplug the appliance from the mains socket.
natural_image
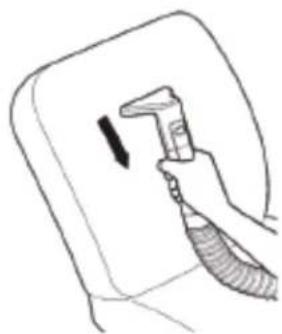
Line drawing of a hand holding a spray gun over a wall-mounted device (no text or symbols)You can attach the crevice tool to clean the back of chair by moving the tool from top to bottom.

CAUTION
Do not use the appliance to clean arts and crafts, non-waterproof fibres (nets, acetic acid, rayon, etc.), non-waterproof products (furs, leather products, white wood furniture, tea sets, etc.) and vulnerable surfaces (floors, tables).
Keep hair, loose clothing, fingers, and all parts of body away from openings and moving parts.
If there is a lot of foam or sewage at the bottom of the appliance when in use, please stop using it immediately and clean up the sewage before resuming operation.
EN
Thermal Protector
Your appliance has an internal thermal protector to protect the motor from overheating. When the thermal protector activates, the motor will stop operating. If this happens proceed as follows:
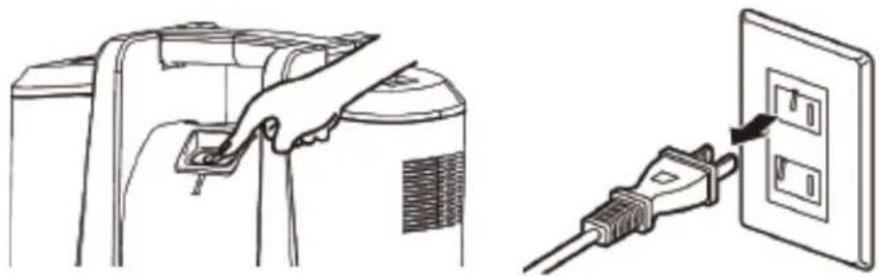
- Press the On/Off button to turn off the appliance. Unplug the appliance from the mains socket.
natural_image
Illustration showing a hand inserting a plug into a wall-mounted electrical outlet (no text or symbols present)- Place your appliance in a cool place and let the motor cool for about 1 hour. The thermal protector will automatically reset and cleaning may continue once you plug the appliance back in.
CLEANING AND MAINTENANCE

Important!
Always switch off the appliance and unplug from the mains socket before cleaning and carrying out any maintenance work.
Clean the outer surfaces of the appliance with a slightly damp cloth.
Never immerse the appliance in water or any other liquid. Do not use abrasive or chemical cleaning agents.
Empty and rinse dirty water tank
Empty and rinse dirty water tank after each use, OR when dirty water reaches indicated maximum fill line.
natural_image
Three-step diagram showing a device with scroll, hand placing a component, and pouring liquid into a container (no text or symbols)EN
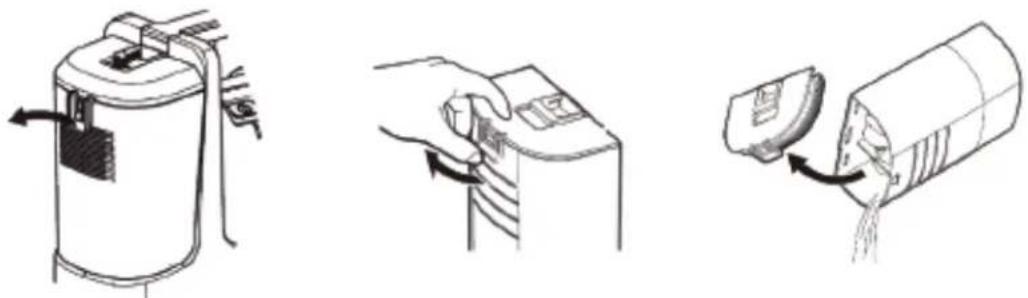
1 Remove the dirty water tank by pressing the tank release latch and lifting it off the appliance. Open the tank cover and empty the dirty water tank.
text_image
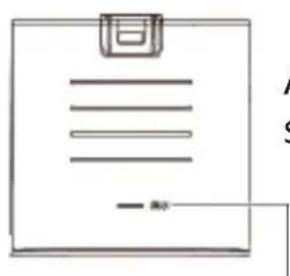
Scanned document page with placeholder text and a horizontal line, likely a form or templateAutomatic suction stop device
natural_image
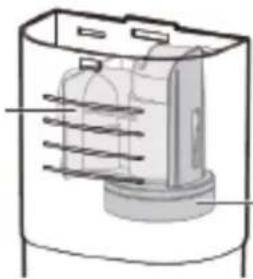
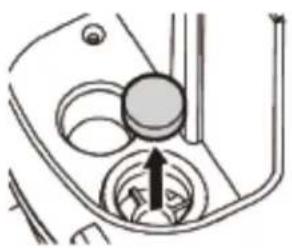
Technical line drawing of a mechanical component with internal channels and housing (no text or symbols)Floating ball
Maximum fill line
Pour away the sewage before it exceeds the maximum fill line. If the appliance continues to be used after the sewage exceeds the maximum fill level, the floating ball will work and the suction will stop.
natural_image
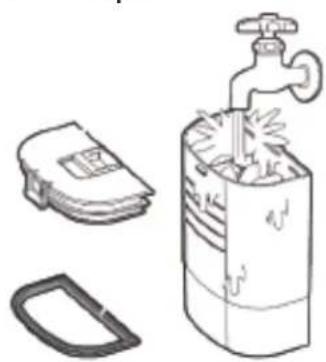
Illustration of a water tap with a bag, a switch, and a plastic container (no text or symbols)2 Rinse out tank with clean water after emptying.

text_image
Ribs Slots3 Attach the tank cover to the tank.
Align the ribs on the tank cover with the slots of tank.
EN
natural_image
Line drawing of a vacuum cleaner device with a downward arrow indicating airflow or movement (no text or symbols present)4 Place the dirty water tank back inside the appliance by pressing down firmly until it secures in place.
Empty and rinse clean water/solution tank
natural_image
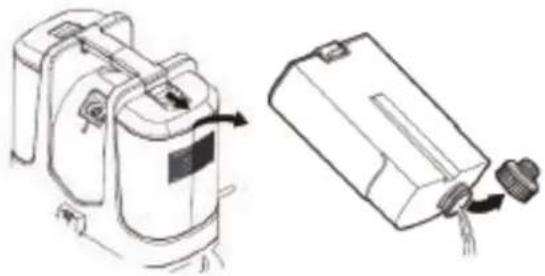
Technical line drawing of a portable device with attached ports and a separate view showing internal components (no text or symbols)Remove the tank from the appliance.
Unscrew the cap and empty the tank.
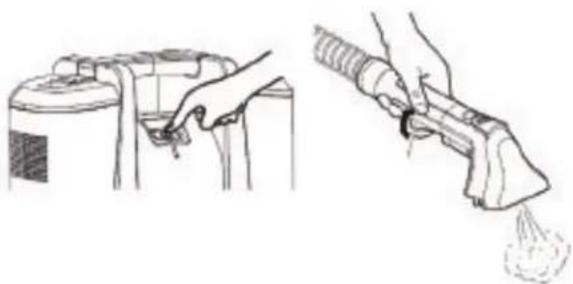
natural_image
Illustration of a hand using a spray gun to clean or exhaust air from a container (no text or symbols present)Replace the tank in the appliance. Plug in the appliance and turn it on.
Press the spray trigger to remove all remaining liquid.
When there is no liquid is discharged, turn off the appliance and unplug it.
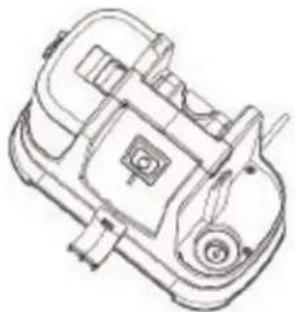
natural_image
Technical line drawing of a mechanical device with no visible text or symbolsTilt the appliance and pour away the remaining water at the bottom.
Cleaning the brush and crevice tools
EN
text_image
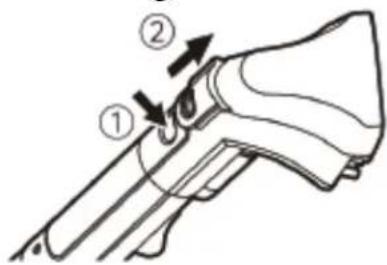
Diagram of a firearm with numbered parts indicating specific anatomical or mechanical featuresDisconnect cleaning tool from hose grip by pushing down on button lock and pulling off.
Open it with finger and then remove it.
Front cover
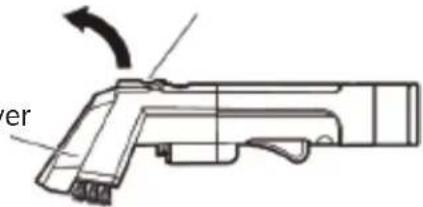
text_image
erRemove the front cover and rinse with clean water.
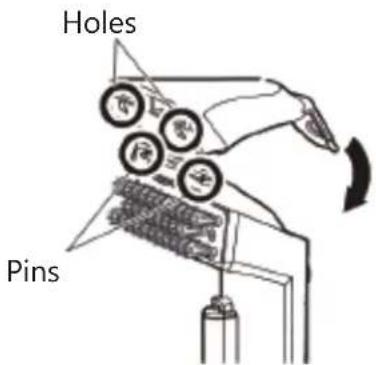
After cleaning, attach the front cover back to the brush tool. Align the holes on the cover with the pins of the brush tool. Press the front cover until it clicks in place.
text_image
Holes Pins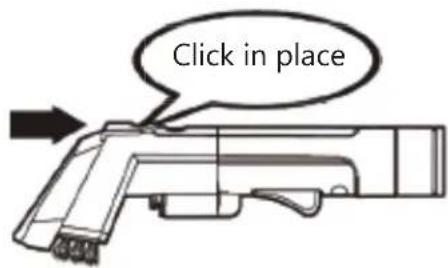
text_image
Click in place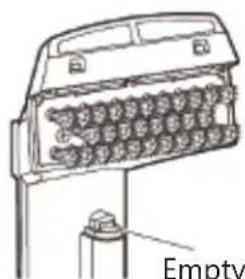
natural_image
Diagram of a vehicle's front-mounted engine compartment with no visible text or symbolsEmpty the spray nozzle if blocked.

natural_image
Line drawing of a portable vacuum cleaner with a magnified inset showing its internal structure (no text or symbols)Check the hose for breakage and leakage.
EN
Cleaning of inlet air sponge and filtering sponge
Rinse the inlet air sponge and filtering sponge after use, and replace them if they are damaged.
natural_image
Diagram of a car intake manifold showing the shaft and wheel (no text or labels)Inlet air sponge (side of dirty water tank)
natural_image
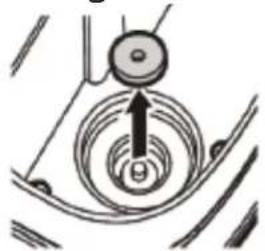
Diagram of a mechanical or electrical component with concentric circular patterns and an arrow indicating direction (no text or symbols)Filtering sponge (side of clean water/solution tank)
natural_image
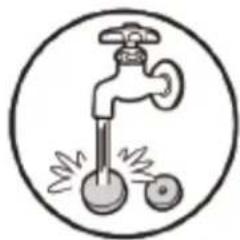
Simple line drawing of a faucet with two wheels, no text or symbols presentAir dry after cleaning.
Install the parts back to the machine after maintenance.
After maintenance, store the appliance in a dry place at room temperature, and avoid direct sunlight.
TROUBLESHOOTING
| Problem | Possible causes | Solution |
| The appliance does not work after turning it on. | The plug is not properly connected and loose, resulting in poor contact. | Turn off the power and plug it again. |
| On/Off button is not pressed. | Press the On/Off button. | |
| Overheats occurs and the thermal protector operates. | Refer to the instructions for thermal protector. |
| Reduced spray or no spray | Spray nozzle is clogged. Rinse spray | nozzle with clean water. |
| Reduced suction or no suction | On/Off button is not pressed. Press the On/Offbutton. | |
| The dirty water tank is full, causing the floating ball to work. | Empty dirty water tank. | |
| The hose is abnormal. Check the hose for cracks, breakage and clogs. | ||
| Dirty water tank is improperly seated onto base. | Remove dirty water tank and reseat onto base properly. | |
| The inlet air sponge is blocked | Clean or replace the sponge. | |
SPECIFICATIONS
Ratings: 220-240V\~ 50-60Hz
400W
IPX4
Class II
DISPOSAL
As a responsible retailer we care about the environment. As such we urge you to follow the correct disposal procedure for the appliance and packaging materials. This will help conserve natural resources and ensure that it is recycled in a manner that protects health and the environment.
You must dispose of this appliance and its packaging according to local laws and regulations. Because this appliance contains electronic components, the appliance and its accessories must be disposed of separately from household waste when the appliance reaches its end of life.
Contact your local authority to learn about disposal and recycling. The appliance should be taken to your local collection point for recycling. Some collection points accept appliance free of charge.
We apologise for any inconvenience caused by minor inconsistencies in these instructions, which may occur as a result of product improvement and development.
EU Declaration of Conformity
Product Description:
SPOT CLEANER
natural_image
Front view of a blue and white electric vacuum cleaner (no visible text or symbols)Aerian
The object of the declaration described above is in conformity with the relevant Union harmonisation legislation:
Low Voltage Directive (LVD)
Eco design requirements for energy-related products (ErP)
RoHS
EMC:
EN IEC 55014-1:2021
EN IEC 55014-2:2021
EN IEC 61000-3-2:2019+A1:2021
EN 61000-3-3:2013+A1:2019
LVD :
EN 60335-2-2:2010 + A11:2012 + A1:2013
EN 60335-2-54:2008+ A11:2012 + A1:2015
EN 60335-1 :2012 + AC:2014 + A11 :2014 + A13:2017 + A1 :2019 + A14:2019 + A2:2019
EN 62233:2008
This declaration of conformity is drawn up under the sole responsibility of the manufacturer.
The person responsible for this declaration is:
Place, Date / Lieu :
Ivry-sur-Seine, mai 10, 2022