
POWX0485 - Sander PowerPlus - Free user manual and instructions
Find the device manual for free POWX0485 PowerPlus in PDF.
| Product type | 3-in-1 multifunction sander |
| Brand | PowerPlus |
| Model | POWX0485 |
| Rated power | 260 W |
| Rated voltage | 230-240 V ~ 50 Hz |
| Rotation speed | 14,000 min⁻¹ |
| Oscillation speed | 28,000 min⁻¹ |
| Round sanding surface | ∅ 125 mm |
| Rectangular sanding surface | 100 x 157 mm |
| Iron-shaped sanding surface | 110 x 100 mm |
| Cable length | 3 m |
| Sound pressure level (LpA) | 79 dB(A) |
| Sound power level (LwA) | 90 dB(A) |
| Vibration (aw) | 3 m/s², K=1 m/s² |
| Weight (approx.) | 1.5 kg |
| Power supply | Mains with cable |
| Protection class | II (double insulation) |
| Main functions | Sanding and polishing of wood, plastic and similar materials; 3 interchangeable pads; dust collector; soft grip handle |
| Maintenance and cleaning | Clean ventilation slots; no lubrication required; replace worn pads |
| Safety | Mandatory wearing of safety glasses, dust mask and ear protection; do not sand plaster or magnesium |
| Package contents | Sander, 3 pads (round, iron-shaped, rectangular), 12 abrasive sheets, dust collector, manual |
| Warranty | 36 months |
Frequently Asked Questions - POWX0485 PowerPlus
User questions about POWX0485 PowerPlus
0 question about this device. Answer the ones you know or ask your own.
Ask a new question about this device
Download the instructions for your Sander in PDF format for free! Find your manual POWX0485 - PowerPlus and take your electronic device back in hand. On this page are published all the documents necessary for the use of your device. POWX0485 by PowerPlus.
USER MANUAL POWX0485 PowerPlus
natural_image
Three circular images showing a yellow and maroon power tool with a power cord, next to a second image of the same tool (no text or symbols visible)
natural_image
Yellow POWERPLUS power tool with black handle and red foam base, no visible text or symbols on the device itself.
NL NEDERLANDS VERTAALDE VERSIE VAN DE ORIGINELE HANDLEIDING
FR FRANÇAIS TRADUCTION DU MODE D'EMPLOI D'ORIGINE
EN ENGLISH ORIGINAL INSTRUCTION MANUAL
natural_image
Yellow POWERPLUS power tool with black handle and perforated base, labeled with number 9 (no text or symbols on the tool itself)Fig. 1

natural_image
Yellow POWERPLUS power tool with black handle and labeled 'POWERPLUS' (no additional text or symbols)Fig. 2
flowchart
graph TD
    A["Robot Arm"] --> B["Central Component"]
    A --> C["Mechanical Component"]
    A --> D["Final Assembly with Bullet Points"]
Fig. 3

natural_image
Yellow power tool with black base and white filter, attached to a black cable (no visible text or symbols)Fig. 4

natural_image
Yellow POWERPLUS power tool with black handle and circular head, showing internal components and a small outlet (no text or symbols visible)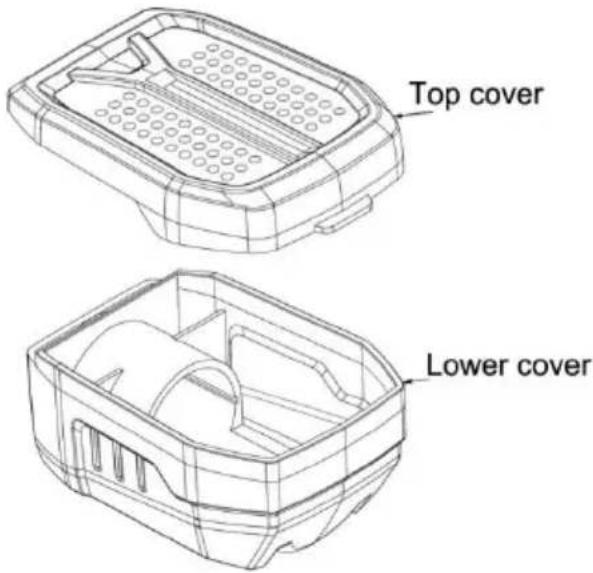
1 TOEPASSING 2
2 BESCHRIJVING....2
3 INHOUD VAN DE VERPAKKING....2
4 TOELICHTING VAN DE SYMBOLEN 2
5 ALGEMENE VEILIGHEIDSVOORSCHRIFTEN ....3
5.1 Werkplaats....3
5.2 Elektrische veiligheid....3
5.3 Veiligheid van personen 4
5.4 Zorgvuldige omgang met en gebruik van elektrisch gereedschap....4
5.5 Service....5
6 BIJKOMENDE VEILIGHEIDSINSTRUCTIES VOOR
SCHUURMACHINES ....5
7 GEBRUIK 5
7.1 Schuren 5
7.2 Aan- en uitschakelen (Fig. 1)....5
7.3 Vervangen en monteren van het rond/strijkijzervormig/rechthoekig schuurplateau (Fig. 2)....6
7.4 Schuurpapier aanbrengen (Fig. 3)....6
7.5 De stofopvangbak (4) gebruiken (Fig. 4)....6
8 TECHNISCHE GEGEVENS 7
9 GELUID 7
10 REINIGING EN ONDERHOUD 7
11 SERVICEDIENST....7
12 OPSLAG....8
13 GARANTIE 8
14 MILIEU....9
15 CONFORMITEITSVERKLARING 9
MULTISCHUURMACHINE 260W 3-IN-1 POWX0485
1 TOEPASSING
natural_image
Simple hand-drawn sketch of a rounded rectangular shape with a curved top and a small arrow at the top (no text or symbols)Philippe Vankerkhove
Regelgevings- en compliancemanager
20/01/2021, Lier - Belgium
15 DÉCLARATION DE CONFORMITÉ


VARO N.V. - Vic. Van Rompuy N.V. – Joseph Van Instraat 9 - BE2500 Lier - BELGIQUE, déclare que :
Appareil : MULTI-SANDER 260 W 3-IN-1
Marque : POWERplus
Modèle : POWX0485
20/01/2021, Lier - Belgium
1 APPLICATION....2
2 DESCRIPTION 2
3 PACKAGE CONTENT LIST....2
4 SYMBOLS 3
5 GENERAL POWER TOOL SAFETY WARNINGS .... 3
5.1 Work area .... 3
5.2 Electrical safety....3
5.3 Personal safety .... 3
5.4 Power tool use and care....4
5.5 Service....4
6 ADDITIONAL SAFETY-HINTS FOR SANDERS......4
7 OPERATING INSTRUCTIONS ....5
7.1 Sanding....5
7.2 Switching On-off (Fig. 1)....5
7.3 Replace and install the round / iron-shaped / rectangular sanding base (Fig. 2)..5
7.4 Backing Pad accessory Installation (Fig. 3)....6
7.5 Using the dust collection box (4) (Fig. 4)....6
8 TECHNICAL DATA....6
9 NOISE....7
10 CLEANING AND MAINTENANCE....7
11 SERVICE DEPARTMENT....7
12 STORAGE....7
13 WARRANTY 8
14 ENVIRONMENT 8
15 DECLARATION OF CONFORMITY 9
MULTI-SANDER 260W 3-IN-1
POWX0485
1 APPLICATION
The sander is used to sand and buff wood, plastic and similar materials. It is very important to use the correct sandpaper!!!! Not suitable for professional use.

WARNING! Read this manual and the general safety instructions carefully before using the machine, for your own safety. Your power tool should only be passed on together with these instructions.
2 DESCRIPTION
- ON/OFF switch button
- Soft grip
- Cable
- Dust collection box
-
Dust extraction port
-
Round sanding base
- Iron-shaped sanding base
- Rectangular sanding base
- Sandpaper
3 PACKAGE CONTENT LIST
■ Remove all packing materials
■ Remove remaining packaging and transit supports (if existing)
- Check the completeness of the packing content
- Check the appliance, the power cord, the power plug and all accessories for transportation damages.
- Keep the packaging materials as far as possible till the end of the warranty period. Dispose it into your local waste disposal system afterwards.

WARNING Packing materials are no toys! Children must not play with plastic bags! Danger of suffocation!
1x multi-sander 260w 3-in-1
1x dust collection box
1x Round sanding base
1x Iron-shaped sanding base
1x Rectangular sanding base
12 x sandpaper((round:2x60gr-2x120gr-2x240gr, other: 2x60gr-2x120gr-2x240gr)) manual

When parts are missing or damaged, please contact your dealer.
4 SYMBOLS
In this manual and/or on the machine the following symbols are used:
 | Denotes risk of personal injury or damage to the tool. |  | Read manual before use |
 | In accordance with essential safety standards of applicable European directives |  | Class II - The machine is double insulated; Earthing wire is therefore not necessary. |
 | Wear a mask In dusty conditions |  | Wear noise protection |
 | Mandatory use of eye protection. | ||
5 GENERAL POWER TOOL SAFETY WARNINGS
Read all safety warnings and all instructions. Failure to follow all warnings and instructions may result in electric shock, fire and/or serious injury. Save all warnings and instructions for future reference. The term "power tool" in the warnings refers to your mains operated (corded) power tool or battery operated (cordless) power tool.
5.1 Work area
- Keep work area clean and well lit. Cluttered and dark areas invite accidents.
- Do not operate power tools in explosive atmospheres, such as in the presence of flammable liquids, gases or dust. Power tools create sparks which may ignite the dust or fumes.
- Keep children and bystanders away while operating a power tool. Distractions can cause you to lose control.
5.2 Electrical safety
- Power tool plugs must match the outlet. Never modify the plug in any way. Do not use any adapter plugs with earthed (grounded) power tools. Unmodified plugs and matching outlets will reduce risk of electric shock.
- Avoid body contact with earthed or grounded surfaces such as pipes, radiators, ranges and refrigerators. There is an increased risk of electric shock if your body is earthed or grounded.
- Do not expose power tools to rain or wet conditions. Water entering a power tool will increase the risk of electric shock.
- Do not abuse the cord. Never use the cord for carrying, pulling or unplugging the power tool. Keep cord away from heat, oil, sharp edges or moving parts. Damaged or entangled cords increase the risk of electric shock.
- When operating a power tool outdoors, use an extension cord suitable for outdoor use. Use of a cord suitable for outdoor use reduces the risk of electric shock.
- If operating a power tool in a damp location is unavoidable, use a residual current device (RCD) protected supply. Use of an RCD reduces the risk of electric shock.
5.3 Personal safety
- Stay alert, watch what you are doing and use common sense when operating a power tool. Do not use a power tool while you are tired or under the influence of drugs, alcohol or medication. A moment of inattention while operating power tools may result in serious personal injury.
- Use safety equipment. Always wear eye protection. Safety equipment such as dust mask, non-skid safety shoes, hard hat, or hearing protection used whenever conditions require will reduce personal injuries.
- Avoid accidental starting. Ensure the switch is in the off position before plugging in. Carrying power tools with your finger on the switch or plugging in power tools that have the switch on invites accidents.
- Remove any adjusting key or wrench before turning the power tool on. A wrench or a key left attached to a rotating part of the power tool may result in personal injury.
- Do not overreach. Keep proper footing and balance at all times. This enables better control of the power tool in unexpected situations.
- Dress properly. Do not wear loose clothing or jewellery. Keep your hair, clothing and gloves away from moving parts. Loose clothes, jewellery or long hair can be caught in moving parts.
- If devices are provided for the connection of dust extraction and collection facilities, ensure these are connected and properly used. Use of these devices can reduce dust related hazards.
5.4 Power tool use and care
- Do not force the power tool. Use the correct power tool for your application. The correct power tool will do the job better and safer at the rate for which it was designed.
- Do not use the power tool if the switch does not turn it on and off. Any power tool that cannot be controlled with the switch is dangerous and must be repaired.
- Disconnect the plug from the power source before making any adjustments, changing accessories, or storing power tools. Such preventive safety measures reduce the risk of starting the power tool accidentally.
- Store idle power tools out of the reach of children and do not allow persons unfamiliar with the power tool or these instructions to operate the power tool. Power tools are dangerous in the hands of untrained users.
- Maintain power tools. Check for misalignment or sticking of moving parts, breakage of parts and any other condition that may affect the power tool's operation. If damaged, have the power tool repaired before use. Many accidents are caused by poorly maintained power tools.
- Keep cutting tools sharp and clean. Properly maintained cutting tools with sharp cutting edges are less likely to stick and are easier to control.
- Use the power tool, accessories and tool bits etc., in accordance with these instructions and in the manner intended for the particular type of power tool, taking into account the working conditions and the work to be performed. Use of the power tool for operations different from intended could lead to a hazardous situation.
5.5 Service
- Have your power tool serviced by a qualified repair person using only identical replacement parts. This will ensure that the safety of the power tool is maintained.
6 ADDITIONAL SAFETY-HINTS FOR SANDERS
■ Always wear safety-goggles and a dust-mask during your work with the finishing-sander.
■ Always secure the work piece by clamps or else to avoid slipping away.
■ Always keep the holes in the base plate clean from dust.
- Always connect a vacuum cleaner to the attached adaptor during your work.
■ Take special care when sanding lead based paint:
- All persons entering the work area must wear a mask specially designed for protection against lead paint dust and fumes.
- Children and pregnant women must not enter the work area.
-
Do not eat, drink or smoke in the work area.
-
Do not leave the tool running. Operate the tool only when hand-held.
- Ventilate your work area adequately when you perform sanding operations.
- Be sure that there are no cracks or breakage on the pad before use. Cracks or breakage may cause a personal injury.
7 OPERATING INSTRUCTIONS
Before attempting to use your sander be sure to familiarize yourself with all its operating features and safety requirements.

Warning! The sander should always be disconnected from the power supply when assembling parts, marking adjustments, cleaning or when the tool is not in use. Disconnecting the tool will prevent accidental starting that could cause serious injury.
Do not sand plaster surfaces, (WARNING: In this case your guarantee becomes void) this may clog the motor (brushes, ball bearings, ..).
7.1 Sanding
- Hold the sander in front and away from you, keeping it clear of the work piece.
■ Start the sander - Let the motor build up to speed then gradually lower it on to the work with a slight forward movement.
- Move the sander slowly over the work piece using forward and back or side to side strokes.
- Upon completion of the sanding operation remove the sander from the work piece before turning if off.
7.2 Switching On-off (Fig. 1)
Connect the plug to the power supply.
- Switch the power tool on: push the ON/OFF switch button (1) forwards onto the "I" position.
- Switch the power tool off: pull the ON/OFF switch button backwards to the "O" position.

WARNING: Never use the machine for sanding magnesium work piece.
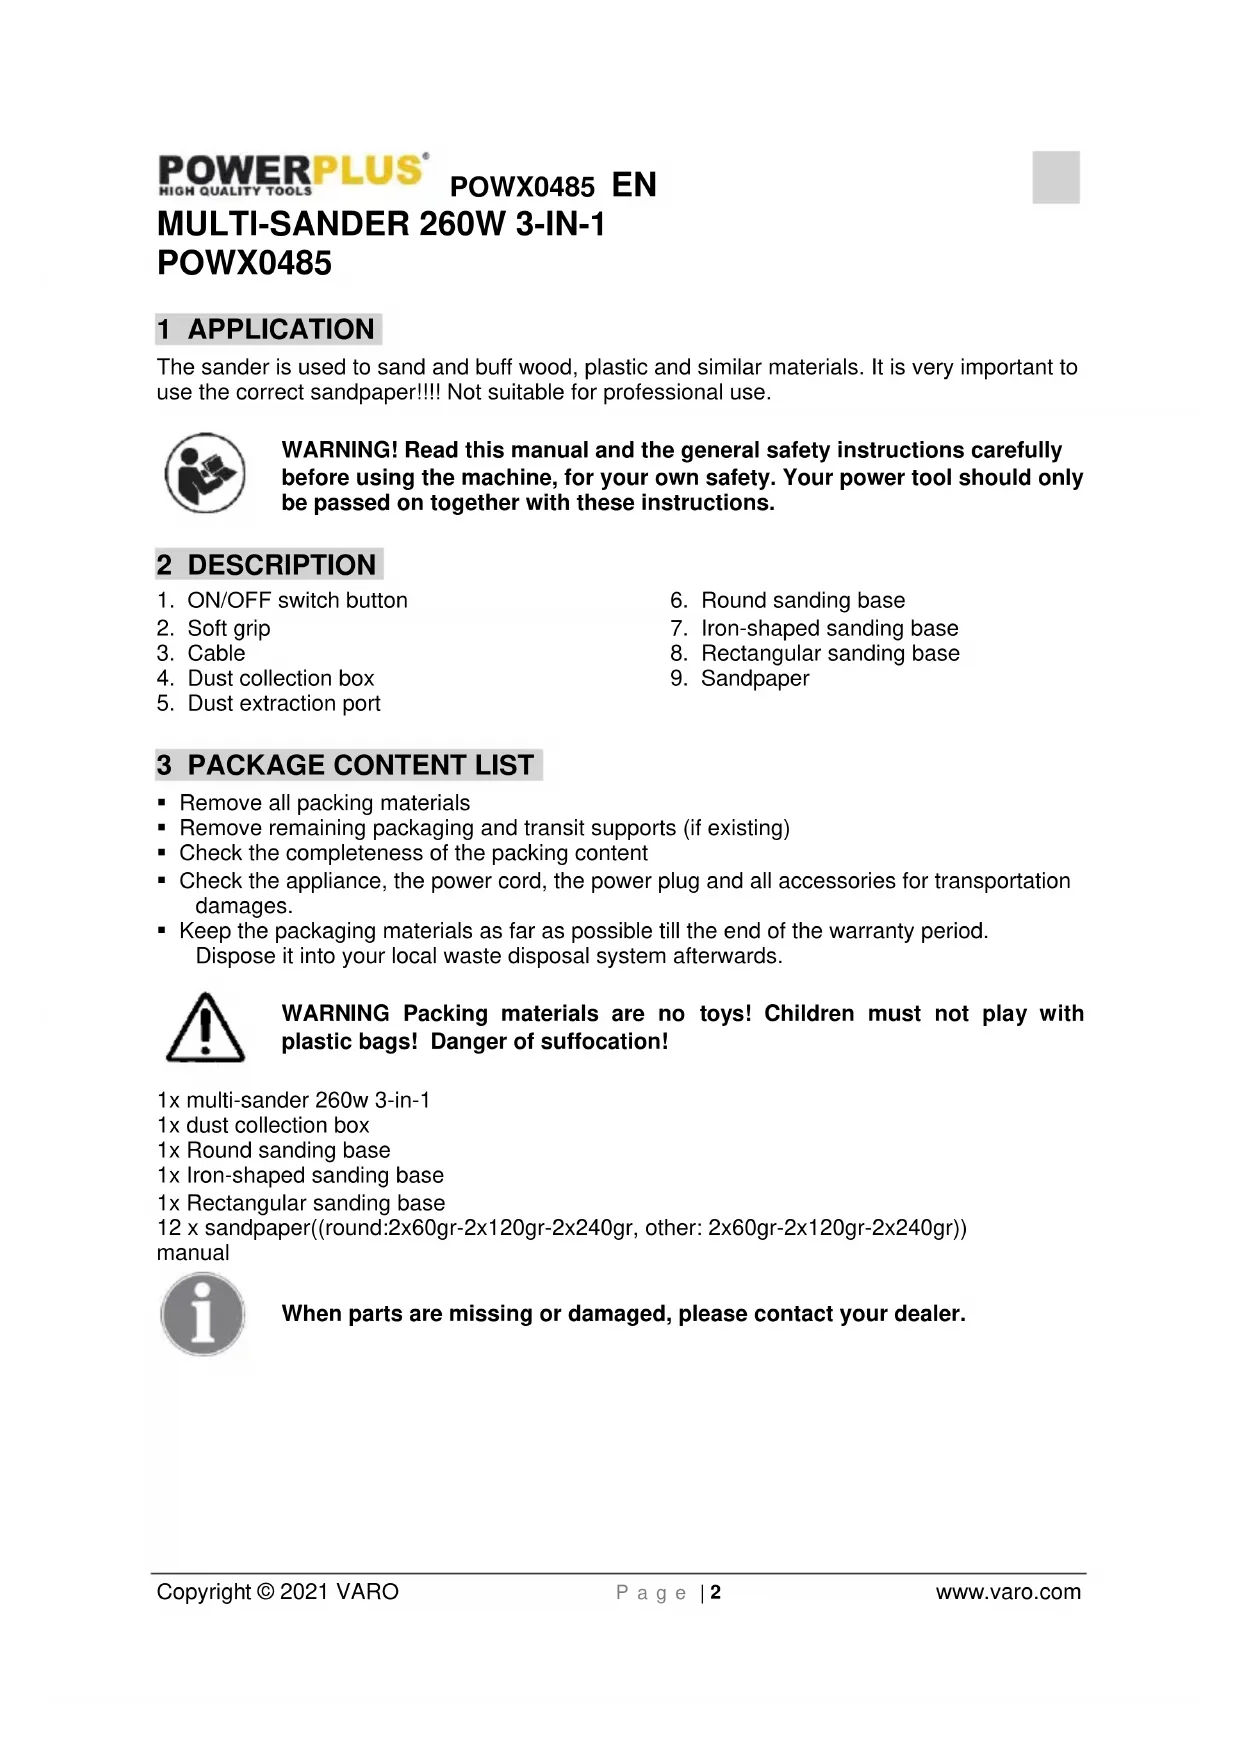
7.3 Replace and install the round / iron-shaped / rectangular sanding base (Fig. 2)

NOTE: There are three sanding bases (round / iron-shaped / rectangular) that suitable for requirements or statuses of the different sanding work.
Important: Prior to any assembly and adjustment always unplug the tool.
- Remove the round sanding base (6) from the sander by loosening the four screws.
- Fixed four rubber column onto the iron-shaped base (7) or rectangular base (8) with four screws, and then put the iron-shaped base (7) or rectangular base (8) onto the tool, using four other screws to fixed in the suitable position and tighten the screws.
■ Remove the sanding base (round / iron-shaped / rectangular) in the opposite way.

NOTE: the round sanding base and rectangular sanding base must be equipped with four rubber column before install onto the tool.
7.4 Backing Pad accessory Installation (Fig. 3)
The sanding plate (iron-shaped / round / rectangular sanding base) is equipped with a hook and loop rubber backing pad. This uses hook and loop backed accessories, which firmly grip the backing pad when applied with moderate pressure.
To change, merely peel off the old accessory, remove dust from the backing pad if necessary and press the new accessory in place. Be sure to align the sanding sheet holes with the holes in the backing pad as best you can to allow the dust extraction system to function effectively. After considerable use the backing pad surface will become worn, and must be replaced when it no longer offers a firm grip. If the backing pad facing is wearing prematurely, decrease the amount of pressure applied during the operation of the tool. Damage to the pad is not covered the warranty.
7.5 Using the dust collection box (4) (Fig. 4)
- The dust extraction system extracts sanding dust from the work piece through the holes in the backing pad. The dust is then transferred through the dust extraction port (5) on the rear of the sander housing.
- To install: pull and slide dust collection box (4) into the dust extraction port (5), make sure the latches on the right and left of the dust collection box (4) into place and it is secure before beginning operation.)
- To remove: When removing the dust collection box (4), follow the above procedure in reverse order.
If the dust collection box (4) is full, you can remove it from this tool and open the cover of box, empty dust, wood bust, etc. in the body, finally clean the dust collection box.
- To remove: Hold the top cover (A) with one hand and the lower cover with the other. Disconnect the top cover form the lower cover. (B)
- To install: When assembling the dust collection box, follow the above procedure in reverse order.
8 TECHNICAL DATA
| Rated Voltage | 230-240V |
| Rated Frequency | 50Hz |
| Rated Power | 260W |
| Rotation speed | 14000min ^-1 |
| Cable length | 3m |
| Sanding surface, rectangular | 100x157mm |
| Sanding surface, iro,-shaped | 110x100mm |
| Sanding surface, round | ∅ 125mm |
| Carbon brush motor | Yes |
| Oscillation speed | 28000min ^-1 |
| Soft grip | Yes |
| Hook&loop system | Yes |
| Self dust function | Yes |
9 NOISE
Noise emission values measured according to relevant standard. (K=3)
Acoustic pressure level LpA
79dB(A)
Acoustic power level LwA
90 dB(A)

ATTENTION! Wear hearing protection when sound pressure is over 85 dB(A).
aw (Vibration):
3 m/s²
K = 1.5 ~m / s^2
10 CLEANING AND MAINTENANCE
- The machine does not require any special maintenance.
- For safe and efficient working, always keep the machine and the ventilation slots clean.
- Always be sure that the tool is switched off and unplugged before carrying out any work on the tool.
11 SERVICE DEPARTMENT
- Damaged switches must be replaced by our after-sales service department.
- If the connecting cable (or mains plug) is damaged, it must be replaced by a particular connecting cable which is available from our service department. Replacement of the connecting cable must only be carried out by our service department (see last page) or by a qualified person (qualified electrician).
12 STORAGE
- Thoroughly clean the whole machine and its accessories.
- Store it out of the reach of children, in a stable and secure position, in a cool and dry place, avoid too high and too low temperatures.
- Protect it from exposure to direct sunlight. Keep it in the dark, if possible.
- Don't keep it in plastic bags to avoid humidity build-up.
13 WARRANTY
- This product is warranted as provided by law for a 36-month period effective from the date of purchase by the first user.
- This warranty covers all material or production flaws excluding : batteries, chargers, defective parts subject to normal wear & tear such as bearings, brushes, cables, and plugs, or accessories such as drills, drill bits, saw blades, etc. ; damage or defects resulting from maltreatment, accidents or alterations; nor the cost of transportation.
- Damage and/or defects resulting from inappropriate use also do not fall under the warranty provisions.
■ We also disclaim all liability for any bodily injury resulting from inappropriate use of the tool.
- Repairs may only be carried out by an authorised customer service centre for Powerplus tools.
- You can always obtain more information at the number 00 32 3 292 92 90.
- Any transportation costs shall always be borne by the customer, unless agreed otherwise in writing.
- At the same time, no claim can be made on the warranty if the damage of the device is the result of negligent maintenance or overload.
- Definitely excluded from the warranty is damage resulting from fluid permeation, excessive dust penetration, intentional damage (on purpose or by gross carelessness), inappropriate usage (use for purposes for which the device is not suitable), incompetent usage (e.g. not following the instructions given in the manual), inexpert assembly, lightning strike, erroneous net voltage. This list is not exhaustive.
- Acceptance of claims under warranty can never lead to the prolongation of the warranty period nor commencement of a new warranty period in case of a device replacement.
- Devices or parts which are replaced under the warranty therefore remain the property of Varo NV.
- We reserve the right to reject a claim whenever the purchase cannot be verified or when it is clear that the product has not been properly maintained. (Clean ventilation slots, carbon brushes serviced regularly, etc.).
- Your purchase receipt must be kept as proof of date of purchase.
- Your appliance must be returned undismantled to your dealer in an acceptably clean state, (in its original blow-moulded case if applicable to the unit), accompanied by proof of purchase.
14 ENVIRONMENT

Should your appliance need replacement after extended use, do not discard it with the household rubbish but dispose of it in an environmentally safe way. Waste produced by electrical machine items should not be handled like normal household rubbish. Please recycle where recycle facilities exist. Check with your Local Authority or retailer for recycling advice.
15 DECLARATION OF CONFORMITY


VARO N.V. - Vic. Van Rompuy N.V. - Joseph Van Instraat 9 - BE2500 Lier - BELGIUM, declares that,
Product: MULTI-SANDER 260W 3-IN-1
Trade mark: POWERplus
Model: POWX0485
is in conformity with the essential requirements and other relevant provisions of the applicable European Directives, based on the application of European harmonized standards. Any unauthorized modification of the apparatus voids this declaration.
European Directives (including, if applicable, their amendments up to the date of signature);
2011/65/EU
2006/42/EC
2014/30/EU
European harmonized standards (including, if applicable, their amendments up to the date of signature);
EN62841-1:2015
EN62841-2-4:2014
EN55014-1:2017
EN55014-2:2015
EN61000-3-2:2014
EN61000-3-3:2013
Keeper of the Technical Documentation : Philippe Vankerkhove, VARO – Vic. Van Rompuy N.V.
The undersigned acts on behalf of the company CEO,

natural_image
Simple hand-drawn outline of a rounded rectangular shape with no text or symbolsPhilippe Vankerkhove
Regulatory Affairs – Compliance Manager
20/01/2021, Lier - Belgium
natural_image
Simple line drawing of a rounded rectangular shape with a small protrusion (no text or symbols)Philippe Vankerkhove
20/01/2021, Lier - Belgium
natural_image
Simple line drawing of a rounded rectangular shape with a curved top edge (no text or symbols)Philippe Vankerkhove
20/01/2021, Lier - Belgium
natural_image
Simple line drawing of a rounded rectangular shape with a small protrusion (no text or symbols)Philippe Vankerkhove
Regulatory Affairs – Compliance Manager
20/01/2021, Lier - Belgium
POWERPLUS HIGH QUALITY TOOLS
POWX0485
PT
natural_image
Simple line drawing of a rounded rectangular shape with a small protrusion (no text or symbols)Philippe Vankerkhove
Regulatoriske saker - Samsvarsleder
20/01/2021, Lier - Belgium
1 ANVENDELSE 2
2 BESKRIVELSE....2
3 MEDF∅LGENDE INDHOLD 2
4 SYMBOLER....2
5 GENERELLE SIKKERHEDSFORSKRIFTER ....3
5.1 Arbejdsområde....3
5.2 Elektrisk sikkerhed ....3
5.3 Personlig sikkerhed....3
5.4 Omhyggelig håndtering og anvendelse af el-værktøjer....4
5.5 Service....4
6 YDERLIGERE SIKKERHEDSANVISNINGER FOR SLIBEMASKINER 4
7 BETJENING 5
7.1 Slibning....5
7.2 Start og slukning (Fig. 1)....5
7.3 Udskift og monter den runde/strygejernsformede/rektangulære slibesål (Fig. 2) 5
7.4 Montering af ekstraudstyr på bagskive (Fig. 3)....6
7.5 Brug af støvopsamlingsboksen (4) (Fig. 4)....6
8 TEKNISKE DATA....6
9 ST∅J....6
10 RENG∅RING OG VEDLIGEHOLDELSE....7
11 SERVICEAFDELING....7
12 OPBEVARING....7
13 GARANTI....7
14 MILJ∅....8
15 KONFORMITETSERKLÆRING....8
MULTISLIBER 260W 3-I-1
POWX0485
1 ANVENDELSE
natural_image
Simple line drawing of a rounded rectangular shape with a small protrusion (no text or symbols)Philippe Vankerkhove
Regulatory Affairs (afdelingen for juridiske anliggender) - Compliance Manager
20/01/2021, Lier - Belgium
3 FÖRPACKNINGSINNEHÅLL
natural_image
Simple line drawing of a rounded rectangular shape with a small protrusion (no text or symbols)Philippe Vankerkhove
20/01/2021, Lier - Belgium
natural_image
Simple line drawing of a curved object with no text or symbolsPhilippe Vankerkhove
20/01/2021, Lier - Belgium
20/01/2021, Lier - Belgium
1 PRIMJENA 2
2 OPIS 2
3 POPIS SADRŽAJA PAKETA 2
4 SIMBOLI....2
5 OPĆA UPOZORENJA O SIGURNOSTI RUKOVANJA
ELEKTRIČNIM ALATIMA....3
5.1 Radno mjesto 3
5.2 Električna sigurnost....3
5.3 Osobna sigurnost .... 3
5.4 Uporaba i održavanje električnog alata 4
5.5 Servis....4
6 DODATNI SIGURNOSNI SAVJETI ZA BRUSILICE......4
7 UPUTE ZA UPORABU 5
7.1 Brušenje 5
7.2 Uključivanje i isključivanje....5
7.3 Zamjena i postavljanje okrugle brusne baze / brusne baze u obliku glačala / pravokutne brusne baze (slika 2)....5
7.4 Ugradnja jastučića podloge (slika 3)....6
7.5 Korištenje kutije za prikupljanje prašine (4) (slika 4)....6
8 TEHNIČKI PODACI....6
9 BUKA 7
10 ČIŠĆENJE I ODRŽAVANJE....7
11 SERVIS....7
12 SKLADIŠTENJE....7
13 JAMSTVO 8
14 OKOLIŠ 8
15 IZJAVA O SUKLADNOSTI 9
VIŠENAMJENSKA BRUSILICA 260W 3-U-1 POWX0485
1 PRIMJENA
Brusilica se koristi za brušenje i poliranje drveta, plastike i sličnih materijala. Vrlo je važno da koristite brusni papir ispravne gradacije!!!! Nije prikladno za profesionalnu uporabu.

UPOZORENJE! Prije uporabe alata, a radi vaše vlastite sigurnosti pažljivo pročitajte ovaj priručnik i opće upute o sigurnosti. Ove upute čine sastavni dio opreme električnog alata, pa i u slučaju prodaje drugom vlasniku.
2 OPIS
- Sklopka za uključivanje i isključivanje
- Meki rukohvat
- Kabel
- Kutija za prikupljanje prašine
-
Izlaz za prašinu
-
Okrugli brusni jastučić
- Brusni jastučić u obliku glačala
- Pravokutni brusni jastučić
- brusni papir
3 POPIS SADRŽAJA PAKETA
natural_image
Simple line drawing of a rounded rectangular shape with a curved top edge (no text or symbols)Philippe Vankerkhove
20/01/2021, Lier - Belgium
1 PRIMENA 2
2 OPIS 2
3 SPISAK SADRŽAJA PAKOVANJA 2
4 SIMBOLI 3
5 OPŠTA BEZBEDNOSNA UPUTSTVA ZA ELEKTRIČNE ALATE .....3
5.1 Radna oblast 3
5.2 Električna bezbednost....3
5.3 Lična bezbednost....4
5.4 Korišćenje i održavanje električnog alata ....4
5.5 Servisiranje ....5
6 DODATNI BEZBEDNOSNI SAVETI ZA BRUSILICE....5
7 INSTRUKCIJE ZA RAD 5
7.1 Brušenje 5
7.2 Uključivanje/isključivanje (Sl. 1)....5
7.3 Zamena i instaliranje brusne ploče okrugle / u obliku pegle / pravougaone (Sl. 2)....6
7.4 Instaliranje pribora na podmetač (Sl. 3)....6
7.5 Upotreba kutije za sakupljanje prašine (4) (Sl. 4)....6
8 TEHNIČKI PODACI....7
9 BUKA....7
10 ČIŠĆENJE I ODRŽAVANJE....7
11 SERVISNO ODELJENJE....7
12 ODLAGANJE 7
13 GARANCIJA....8
14 ŽIVOTNA SREDINA....8
15 IZJAVA O USKLAĐENOSTI....9
MULTI-BRUSILICA 260W 3 U 1 POWX0485
1 PRIMENA
natural_image
Simple line drawing of a rounded rectangular shape with a curved top edge (no text or symbols)Philippe Vankerkhove Regulatorni poslovi - direktor za usklađenost 20/01/2021, Lier - Belgium
natural_image
Simple line drawing of a rounded rectangular shape with a small arrow on the top right corner (no text or symbols)Philippe Vankerkhove
20/01/2021, Lier - Belgium
1 POUŽÍVANIE 2
2 POPIS....2
3 OBSAH BALENIA....2
4 SYMBOLY 2
5 VŠEOBECNÉ BEZPEČNOSTNÉ VAROVANIA PRE ELEKTRICKÉ NÁRADIE....3
5.1 Pracovná plocha....3
5.2 Elektrická bezpečnost'......3
5.3 Osobná bezpečnost......4
5.4 Používanie elektrického náradia a starostlivost' oň....4
5.5 Servis....4
6 DOPLNKOVÉ BEZPEČNOSTNÉ POKYNY PRE BRÚSKY .....5
7 PREVÁDZKA....5
7.1 Brúsenie 5
7.2 Zapnutie (obr. 1)....5
7.3 Výmena a inštalácia okrúhlej/žehličkovitej/obdížnikovej brúsnej základne (obr. 2)....6
7.4 Inštalácia podložky (obr. 3) 6
7.5 Používanie schránky na zber prachu (4) (obr. 4)....6
8 TECHNICKÉ ÚDAJE....7
9 HLUK 7
10 ČISTENIE A ÚDRŽBA 7
11 SERVISNÁ SLUŽBA....7
12 SKLADOVANIE....7
13 ZÁRUKA....8
14 ŽIVOTNÉ PROSTREDIE....8
15 VYHLÁSENIE O ZHODE 9
VIACÚČELOVÁ BRÚSKA 260W 3-V-1 POWX0485
1 POUŽÍVANIE
natural_image
Simple line drawing of a rounded rectangular shape with a small protrusion (no text or symbols)Philippe Vankerkhove
Regulačné záležitosti – Compliance Manager
20/01/2021, Lier - Belgium
1 UPORABA....2
2 OPIS (SLIKA A)....2
3 VSEBINA ŠKATLE....2
4 SIMBOLI 2
5 SPLOŠNA VARNOSTNA OPOZORILA ZA ELEKTRIČNO
ORODJE....3
5.1 Delovno mesto....3
5.2 Električna varnost....3
5.3 Osebna varnost....3
5.4 Uporaba in nega električnega orodja....4
5.5 Servisiranje 4
6 DODATNI VARNOSTNI NAPOTKI ZA BRUSILNIKE 4
7 NAVODILA ZA UPORABO....5
7.1 Brušenje 5
7.2 Vklop in izklop (slika 1)....5
7.3 Menjava in namestitev brusne plošče – okrogle, plošče v obliki likalnika ali pravokotne (slika 2)....5
7.4 Namestitev dodatkov z gumijasto podlogo (slika 3)....6
7.5 Uporaba zbiralnika prahu (4) (slika 4)......6
8 TEHNIČNI PODATKI....6
9 HRUP 7
10 ČIŠČENJE IN VZDRŽEVANJE....7
11 SERVISNI ODDELEK 7
12 SHRANJEVANJE....7
13 GARANCIJA....7
14 OKOLJE 8
15 IZJAVA O SKLADNOSTI 8
VEČNAMENSKI BRUSILNIK 260 W »3 V 1« POWX0485
1 UPORABA
20/01/2021, Lier - Belgium
natural_image
Simple line drawing of a rounded rectangular shape with a small protrusion (no text or symbols)Philippe Vankerkhove
Divizia de reglementare – Director de conformitate
20/01/2021, Lier - Belgium
natural_image
Simple hand-drawn sketch of a rounded rectangular shape with a small arrow on top (no text or symbols)Philippe Vankerkhove
20/01/2021, Lier - Belgium
natural_image
Simple line drawing of a rounded rectangular shape with a small protrusion (no text or symbols)Philippe Vankerkhove
20/01/2021, Lier - Belgium
natural_image
Simple line drawing of a curved object with a small protrusion (no text or symbols)Philippe Vankerkhove
20/01/2021, Lier - Belgium

natural_image
Yellow power expander with black handle and circular base, attached to a wire (no visible text or symbols)
WWW.VARO.COM
DESIGNED AND MARKETED BY VARO
©copyright by varo
VARO - VIC. VAN ROMPUY nv
JOSEPH VAN INSTRAAT 9 - 2500 LIER - BELGIUM
OFFICES:


- MULTISCHUURMACHINE 260W 3-IN-1 POWX0485
- TOEPASSING
- DÉCLARATION DE CONFORMITÉ
- MULTI-SANDER 260W 3-IN-1
- POWX0485
- APPLICATION
- DESCRIPTION
- PACKAGE CONTENT LIST
- SYMBOLS
- GENERAL POWER TOOL SAFETY WARNINGS
- Work area
- Electrical safety
- Personal safety
- Power tool use and care
- Service
- ADDITIONAL SAFETY-HINTS FOR SANDERS
- OPERATING INSTRUCTIONS
- Sanding
- Switching On-off (Fig. 1)
- Replace and install the round / iron-shaped / rectangular sanding base (Fig. 2)
- Backing Pad accessory Installation (Fig. 3)
- Using the dust collection box (4) (Fig. 4)
- NOISE
- CLEANING AND MAINTENANCE
- SERVICE DEPARTMENT
- STORAGE
- WARRANTY
- ENVIRONMENT
- DECLARATION OF CONFORMITY
- POWERPLUS HIGH QUALITY TOOLS
- PT
- MULTISLIBER 260W 3-I-1
- ANVENDELSE
- FÖRPACKNINGSINNEHÅLL
- VIŠENAMJENSKA BRUSILICA 260W 3-U-1 POWX0485
- PRIMJENA
- OPIS
- POPIS SADRŽAJA PAKETA
- MULTI-BRUSILICA 260W 3 U 1 POWX0485
- PRIMENA
- VIACÚČELOVÁ BRÚSKA 260W 3-V-1 POWX0485
- POUŽÍVANIE
- VEČNAMENSKI BRUSILNIK 260 W »3 V 1« POWX0485
- UPORABA
Brand : PowerPlus
Model : POWX0485
Category : Sander