
d-Copia 400MF - Photocopier OLIVETTI - Free user manual and instructions
Find the device manual for free d-Copia 400MF OLIVETTI in PDF.

| Product type | Multifunction copier (copy, print, scan, fax optional) |
| Brand | Olivetti |
| Model | d-Copia 400MF |
| Dimensions (W × D × H) | 599 × 646 × 745 mm |
| Weight | 85 kg |
| Power supply | 120 V~ 60 Hz 11.5 A or 220-240 V~ 50 Hz 6.3 A |
| Energy consumption | Energy Star compliant; automatic standby after 15 min; low power sleep mode |
| Copy speed (A4/Letter) | 40 pages per minute |
| First copy (A4/Letter) | Less than 3.5 seconds |
| Scan/print resolution | 600 × 600 dpi (print up to 1800 dpi equivalent in Photo mode) |
| Standard paper capacity | 2 drawers of 500 sheets (80 g/m²) + MF tray 200 sheets |
| Duplex copy | Automatic, standard |
| Memory and storage | 512 MB RAM standard; 40 GB hard disk |
| Send functions | Email, SMB folder, FTP folder, TWAIN scanning |
| Available options | Document feeder, paper feeder, finishing module, fax kit, serial interface |
| Maintenance and cleaning | Clean the exposure glass, cover, and rollers with a soft dry cloth; replace the toner cartridge and waste toner box |
| Safety | Class 1 laser; mandatory grounding; do not open internal covers; disconnect power before servicing |
| Spare parts and repairability | Toner cartridge, waste toner box, maintenance kits; repairs by authorized technician |
| General information | User manual 379 pages (ref. July 2006); compliance with WEEE directive; recycled paper recommended |
Frequently Asked Questions - d-Copia 400MF OLIVETTI
User questions about d-Copia 400MF OLIVETTI
0 question about this device. Answer the ones you know or ask your own.
Ask a new question about this device
Download the instructions for your Photocopier in PDF format for free! Find your manual d-Copia 400MF - OLIVETTI and take your electronic device back in hand. On this page are published all the documents necessary for the use of your device. d-Copia 400MF by OLIVETTI.
USER MANUAL d-Copia 400MF OLIVETTI
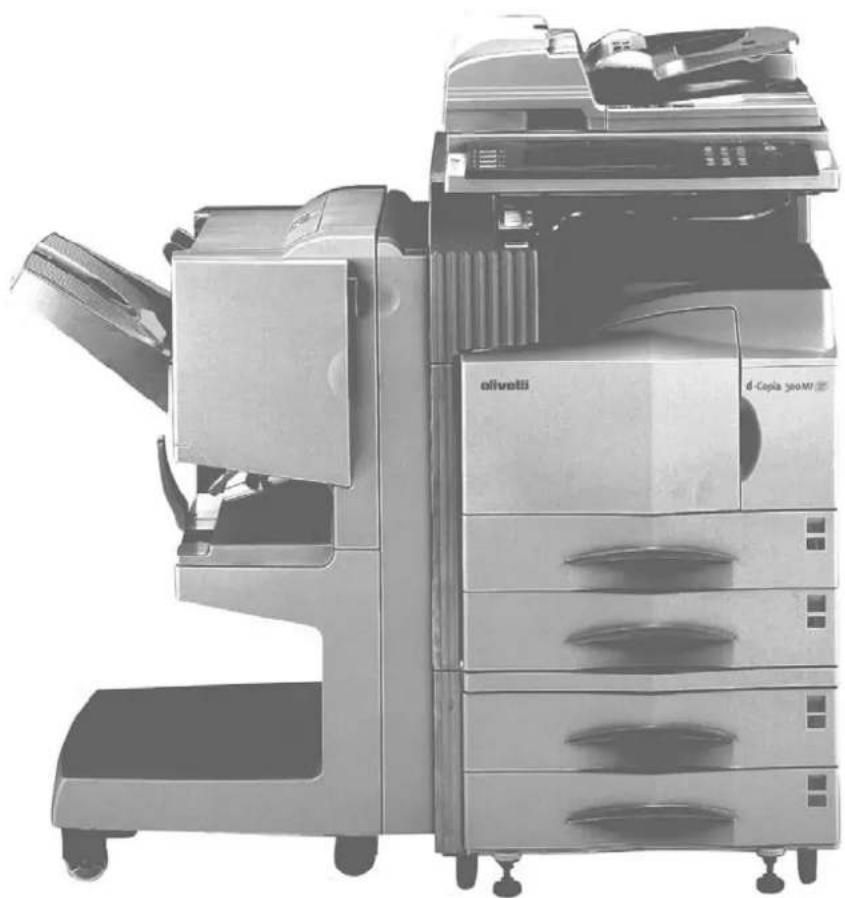
d-Copia 300MF/400MF/500MF operation guide - Color: black - Size: A4
| | |
[Non-Text]
[Non-Text]
[Non-Text]
[Non-Text]
[Non-Text]
[Non-Text]
[Non-Text]
[Non-Text]
[Non-Text]
[Non-Text]
[Non-Text]
[Non-Text]
[Non-Text]
[Non-Text]
[Non-Text]
[Non-Text]
[Non-Text]
[Non-Text]
[Non-Text]
[Non-Text]
[Non-Text]
[Non-Text]
The Ground Truth image displays a single, solid horizontal line. According to Rule 2 (UNDERSCORE & LINE RULES), this is a stylistic or background line, not a placeholder underscore. Therefore, the OCR result must ignore it. The provided OCR content is "____", which consists of four underscores. This is an incorrect interpretation of the line as a placeholder, violating the rule that stylistic lines must be ignored. The OCR has hallucinated text (underscores) where none should exist, violating the rule to ignore such lines. Hence, the OCR result is inconsistent with the Ground Truth.
| | |
[Non-Text]
[Non-Text]
[Non-Text]
[Non-Text]
[Non-Text]
[Non-Text]
[Non-Text]
[Non-Text]
[Non-Text]
[Non-Text]
[Non-Text]
[Non-Text]
[Non-Text]
[Non-Text]
[Non-Text]
[Non-Text]
[Non-Text]
d-Copia 300MF d-Copia 400MF d-Copia 500MF
natural_image
Exterior view of a modern office typewriter with open door, showing internal components and no visible text or symbols on the device itself.Please read the operation guide before using the copier.
Keep it close to the copier for easy reference.
PUBLICATION ISSUED BY:
Olivetti S.p.A.
Copyright © 2006, Olivetti
All rights reserved
July 2006
The C€ mark affixed to the product certifies that the product satisfies the basic quality requirements.

The manufacturer reserves the right to carry out modifications to the product described in this manual at any time and without any notice.

ENERGY STAR is a U.S. registered mark.
The ENERGY STAR program is an energy reduction plan introduced by the United States Environmental Protection Agency in response to environmental issues and for the purpose of advancing the development and utilization of more energy efficient office equipment.
Your attention is drawn to the following actions which could compromise the conformity attested to above, as well as the characteristics of the product:
- incorrect electrical power supply;
- incorrect installation, incorrect or improper use or use not in compliance with the warnings provided in the User's Manual supplied with the product;
- replacement of original components or accessories with others of a type not approved by the manufacturer, or performed by unauthorised personnel.
Legal and Safety Information
Please read this information before using your machine. This chapter provides information on the following topics.
- Legal Information......ii
- Regarding Trade Names ....iii
- Energy Star (ENERGY STAR ^ ) Program......vi
• Safety Conventions in This Guide......vii - Caution Labels ...... viii
• Installation Precautions ix - Precautions for Use....xi
- Laser Safety ...... xiv
- Safety Instructions Regarding the Disconnection of Power ....xv
Legal Information
Copying or other reproduction of all or part of this guide without the prior written consent of Olivetti S.p.A. Corporation is prohibited.
Legal Restriction on Copying/Scanning
- It may be prohibited to copy/scan copyrighted material without permission of the copyright owner.
- It is prohibited under any circumstances to copy/scan domestic or foreign currencies.
- Local laws and regulations may prohibit or restrict copying/scanning of other items not mentioned above.
Regarding Trade Names
- KPDL is a trademark of Kyocera Corporation.
- Microsoft, MS-DOS, Windows, Windows NT and Internet Explorer are registered trademarks of Microsoft Corporation in the U.S.A. and/or other countries.
- Windows Me and Window XP are trademarks of Microsoft Corporation.
- PCL is a trademark of Hewlett-Packard Company.
- Adobe Acrobat, Adobe Reader and PostScript are trademarks of Adobe Systems, Incorporated.
- Ethernet is a registered trademark of Xerox Corporation.
• Novell and NetWare are registered trademarks of Novell, Inc. - Centronics is a trademark of Centronics Data Computer Corporation.
- IBM and IBM PC/AT are trademarks of International Business Machines Corporation.
- Power PC is a trademark of IBM in the U.S.A. and/or other countries.
- AppleTalk is a registered trademark of Apple Computer, Inc.
- CompactFlash and CF are trademarks of SanDisk, Inc.
• PC-PR201/65A is a product of NEC Corporation.
• VP-1000 is a product of Seiko Epson Corporation. - This machine has been developed using embedded real-time operating system Tornado™ by Wind River Systems, Inc.
- PCL6, a command language of HP LaserJet emulated by this machine, is using the compatible system PeerelessPrintXL developed by Peerless Systems Corporation. PeerelessPrintXL is a trademark of Peerless Systems Corporation (2381 Rosecrans Ave. ElSegundo, CA 90245, U.S.A.).
- TrueType is a registered trademark of Apple Computer, Inc.
- DFHSGOTHIC-W5 and DFHSMINCHO-W3 are Heisei fonts. Kyocera Mita Corporation is using these fonts under agreements with the Japanese Standards Association. Any form of reproduction of these fonts without prior consent of Kyocera Mita Corporation is prohibited.
- Heisei fonts have been developed by the working groups in collaboration with the Japanese Standards Association. Reproduction of these fonts without permission is prohibited.
- TypeBankG-B, TypeBankM-M and Typebank-OCR are trademarks of TypeBank®.
- All European language fonts installed in this machine are used under licensing agreement with Monotype Imaging Inc.
- Helvetica, Palatino and Times are registered trademarks of Linotype-Hell AG.
-
ITC Avant Garde Gothic, ITC Bookman, ITC ZapfChancery and ITC ZapfDingbats are registered trademarks of International Type-face Corporation.
-
UFST™ MicroType ^® fonts by Monotype Imaging Inc. are installed in this machine.
- This machine contains the NF module developed by ACCESS Co., Ltd.
- This machine contains the software having modules developed by Independent JPEG Group.
All other brands and product names are registered trademarks or trademarks of their respective companies. The designations ^TM and ^® will not be used in this Operation Guide.
Monotype Imaging License Agreement
1 Software shall mean the digitally encoded, machine readable, scalable outline data as encoded in a special format as well as the UFST Software.
2 You agree to accept a non-exclusive license to use the Software to reproduce and display weights, styles and versions of letters, numerals, characters and symbols (Typefaces) solely for your own customary business or personal purposes at the address stated on the registration card you return to Monotype Imaging. Under the terms of this License Agreement, you have the right to use the Fonts on up to three printers. If you need to have access to the fonts on more than three printers, you need to acquire a multi-user license agreement which can be obtained from Monotype Imaging. Monotype Imaging retains all rights, title and interest to the Software and Typefaces and no rights are granted to you other than a License to use the Software on the terms expressly set forth in this Agreement.
3 To protect proprietary rights of Monotype Imaging, you agree to maintain the Software and other proprietary information concerning the Typefaces in strict confidence and to establish reasonable procedures regulating access to and use of the Software and Typefaces.
4 You agree not to duplicate or copy the Software or Typefaces, except that you may make one backup copy. You agree that any such copy shall contain the same proprietary notices as those appearing on the original.
5 This License shall continue until the last use of the Software and Typefaces, unless sooner terminated. This License may be terminated by Monotype Imaging if you fail to comply with the terms of this License and such failure is not remedied within thirty (30) days after notice from Monotype Imaging. When this License expires or is
terminated, you shall either return to Monotype Imaging or destroy all copies of the Software and Typefaces and documentation as requested.
6 You agree that you will not modify, alter, disassemble, decrypt, reverse engineer or decompile the Software.
7 Monotype Imaging warrants that for ninety (90) days after delivery, the Software will perform in accordance with Monotype Imaging-published specifications, and the diskette will be free from defects in material and workmanship. Monotype Imaging does not warrant that the Software is free from all bugs, errors and omissions.
The parties agree that all other warranties, expressed or implied, including warranties of fitness for a particular purpose and merchantability, are excluded.
8 Your exclusive remedy and the sole liability of Monotype Imaging in connection with the Software and Typefaces is repair or replacement of defective parts, upon their return to Monotype Imaging.
In no event will Monotype Imaging be liable for lost profits, lost data, or any other incidental or consequential damages, or any damages caused by abuse or misapplication of the Software and Typefaces.
9 Massachusetts U.S.A. law governs this Agreement.
10 You shall not sublicense, sell, lease, or otherwise transfer the Software and/or Typefaces without the prior written consent of Monotype Imaging.
11 Use, duplication or disclosure by the Government is subject to restrictions as set forth in the Rights in Technical Data and Computer Software clause at FAR 252-227-7013, subdivision (b)(3)(ii) or subparagraph (c)(1)(ii), as appropriate. Further use, duplication or disclosure is subject to restrictions applicable to restricted rights software as set forth in FAR 52.227-19 (c)(2).
12 You acknowledge that you have read this Agreement, understand it, and agree to be bound by its terms and conditions. Neither party shall be bound by any statement or representation not contained in this Agreement. No change in this Agreement is effective unless written and signed by properly authorized representatives of each party. By opening this diskette package, you agree to accept the terms and conditions of this Agreement.
Energy Star (ENERGY STAR®) Program
We have determined as a participating company in the International Energy Star Program that this machine is compliant with the standards laid out in the International Energy Star Program.

About the International Energy Star Program
International Energy Star Program has as its basic goals the promotion of efficient energy use and the reduction of the environmental pollution that accompanies energy consumption by promoting the manufacture and sale of products that fulfill program standards.
International Energy Star Program standards require that multi-function machines come equipped with a Low Power Mode where energy consumption is reduced after a certain amount of time elapses since the machine was last used, as well as an Off Mode where the machine automatically turns itself off after there is no activity within a set amount of time. When the machine includes printer and fax functions, the printer and fax must enter a Low Power Mode where power consumption is automatically reduced after a certain amount of time elapses since they were last used, and they must also support a Sleep Mode where power consumption is reduced to a minimum when there is not activity within a set amount of time.
This machine is equipped with the following features as a result of its compliance with International Energy Star Program standards.
This machine has a Sleep Mode only to attain further savings of energy.
Sleep
The machine automatically enters Sleep when 15 minutes have passed since the machine was last used. The amount of time of no activity that must pass before Sleep is activated may be lengthened. For more information refer to Sleep and Auto Sleep on page 3-4.
Automatic 2-Sided Copy Functions
The Energy Star Program encourages the use of 2-sided copying which reduces the load on the environment and this machine includes 2-sided copying as a standard function. For example, by copying two 1-sided originals onto a single sheet of paper as a 2-sided copy, it is possible to lower the amount of paper used. For more information refer to Duplex Copying on page 3-13.
Paper Recycling
The Energy Star Program encourages the use of environmentally friendly recycled paper. Your sales or service representative can provide information about recommended paper types.
Safety Conventions in This Guide
The sections of this guide and parts of the machine marked with symbols are safety warnings meant to protect the user, other individuals and surrounding objects, and ensure correct and safe usage of the machine. The symbols and their meanings are indicated below.

WARNING: Indicates that serious injury or even death may result from insufficient attention to or incorrect compliance with the related points.

CAUTION: Indicates that personal injury or mechanical damage may result from insufficient attention to or incorrect compliance with the related points.
Symbols
The symbol indicates that the related section includes safety warnings. Specific points of attention are indicated inside the symbol.

.... [General warning]

.... [Warning of danger of electrical shock]

..... [Warning of high temperature]
The symbol indicates that the related section includes information on prohibited actions. Specifics of the prohibited action are indicated inside the symbol.

..... [Warning of prohibited action]

.... [Disassembly prohibited]
The ● symbol indicates that the related section includes information on actions which must be performed. Specifics of the required action are indicated inside the symbol.

..... [Alert of required action]

.... [Remove the power plug from the outlet]

.... [Always connect the machine to an outlet with a ground connection]
Please contact your service representative to order a replacement if the safety warnings in this Operation Guide are illegible or if the guide itself is missing (fee required).
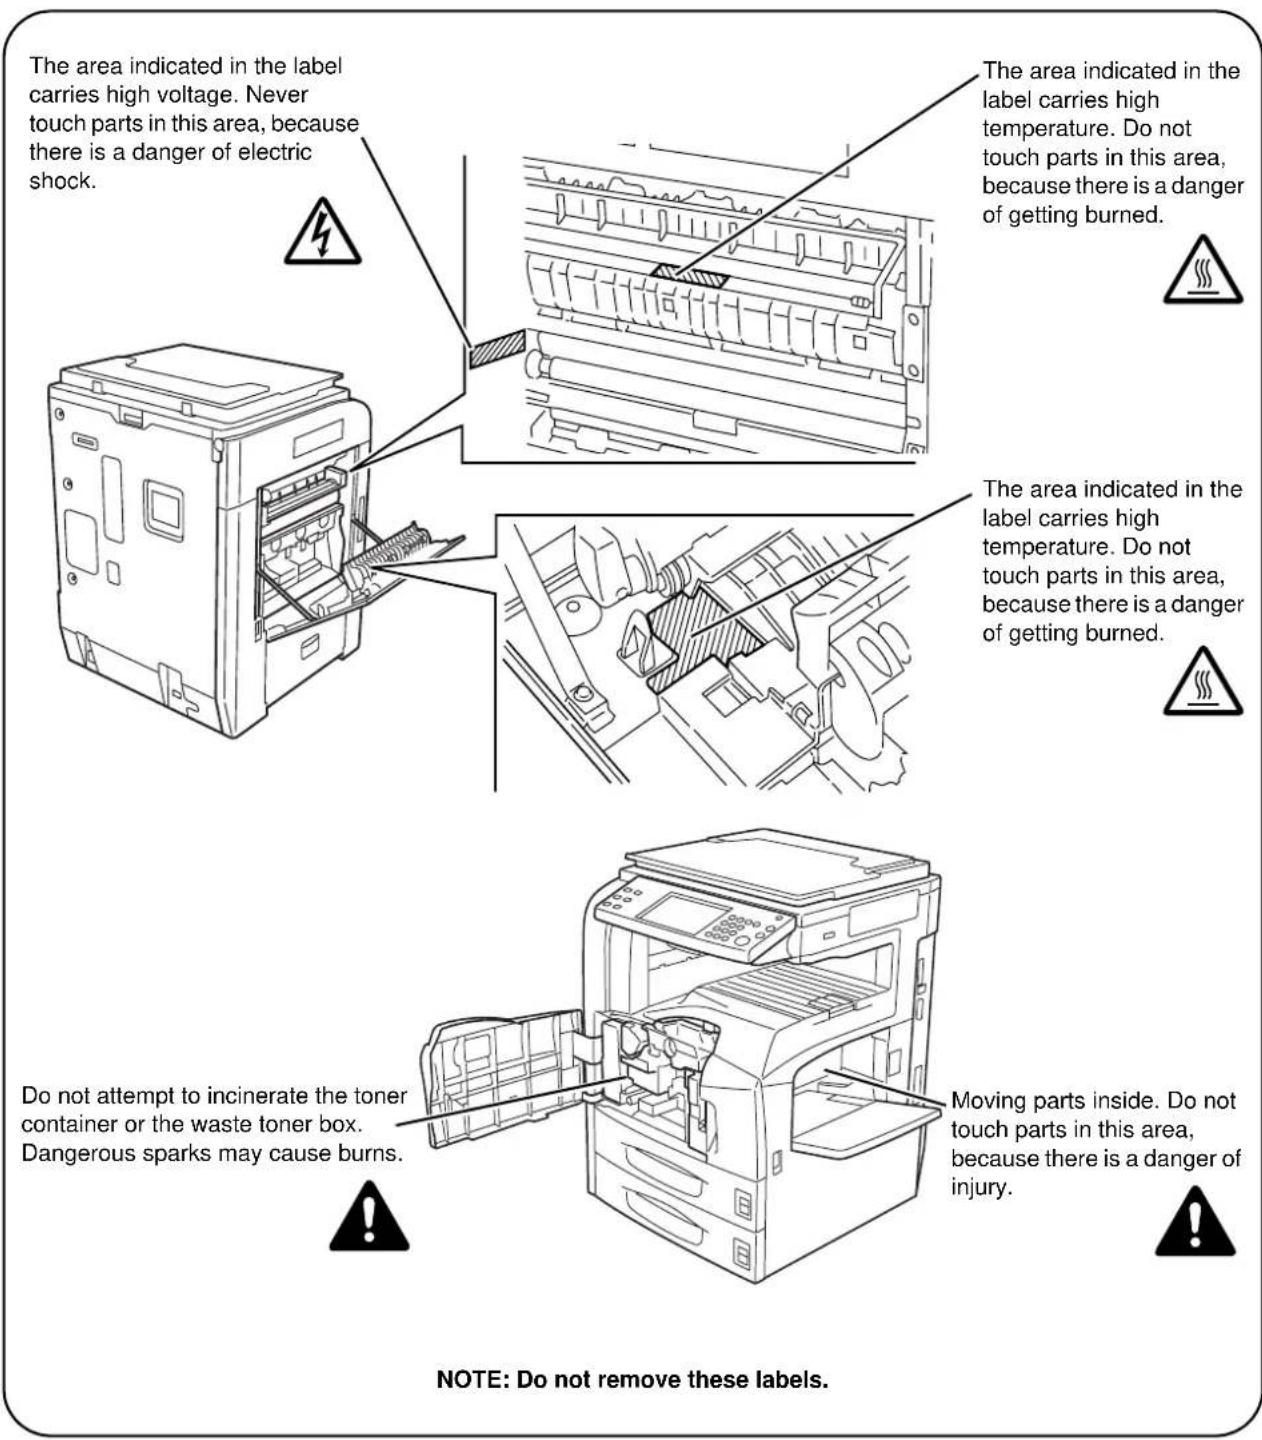
Caution Labels
Caution labels have been attached to the machine at the following locations for safety purposes. Be sufficiently careful to avoid fire or electric shock when removing a paper jam or when replacing toner.

Installation Precautions
Environment

CAUTION
Avoid placing the machine on or in locations which are unstable or not level. Such locations may cause the machine fall down or fall over. This type of situation presents a danger of personal injury or damage to the machine.

Avoid locations with humidity or dust and dirt. If dust or dirt become attached to the power plug, clean the plug to avoid the danger of fire or electrical shock.

Avoid locations near radiators, heaters or other heat sources, or locations near flammable items to avoid the danger of fire.

To keep the machine cool and facilitate changing of parts and maintenance, allow access space as shown below. Leave adequate space, especially around the rear cover, to allow air to be properly ventilated out of the machine.


Other precautions
Adverse environment conditions may affect the safe operation and performance of the machine. Install in an air-conditioned room and avoid the following locations when selecting a site for the machine.
- Avoid locations near a window or with exposure to direct sunlight.
- Avoid locations with vibrations.
- Avoid locations with drastic temperature fluctuations.
- Avoid locations with direct exposure to hot or cold air.
- Avoid poorly ventilated locations.
If the floor is delicate against casters, when this machine is moved after installation, the floor material may be damaged.
During copying, some ozone is released, but the amount does not cause any ill effect to one's health. If, however, the machine is used over a long period of time in a poorly ventilated room or when making an extremely large number of copies, the smell may become unpleasant. To maintain the appropriate environment for copy work, it is suggested that the room be properly ventilated.
Power supply/Grounding the machine

WARNING
Do not use a power supply with a voltage other than that specified. Avoid multiple connections in the same outlet. These types of situations present a danger of fire or electrical shock.

Plug the power cord securely into the outlet. If metallic objects come into contact with the prongs on the plug, it may cause a fire or electric shock.

Always connect the machine to an outlet with a ground connection to avoid the danger of fire or electrical shock in case of an electric short. If an earth connection is not possible, contact your service representative.

Other precautions
Connect the power plug to the closest outlet possible to the machine.
Handling of plastic bags

WARNING
Keep the plastic bags that are used with the machine away from children. The plastic may cling to their nose and mouth causing suffocation.


Precautions for Use
Cautions when using the machine

WARNING
Do not place metallic objects or containers with water (flower vases, flower pots, cups, etc.) on or near the machine. This type of situation presents a danger of fire or electrical shock should they fall inside.
Do not remove any of the covers from the machine as there is a danger of electrical shock from high voltage parts inside the machine.
Do not damage, break or attempt to repair the power cord. Do not place heavy objects on the cord, pull it unnecessarily or cause any other type of damage. These types of situations present a danger of fire or electrical shock.
Never attempt to repair or disassemble the machine or its parts as there is a danger of fire, electrical shock or exposure to the laser. If the laser beam escapes, there is a danger of it causing blindness.
If the machine becomes excessively hot, smoke appears from the machine, there is an odd smell, or any other abnormal situation occurs, there is a danger of fire or electrical shock. Turn the main power switch off immediately, be absolutely certain to remove the power plug from the outlet and then contact your service representative.
If anything harmful (paper clips, water, other fluids, etc.) falls into the machine, turn the main power switch off immediately. Next, be absolutely certain to remove the power plug from the outlet to avoid the danger of fire or electrical shock. Then contact your service representative.
Do not remove or connect the power plug with wet hands, as there is a danger of electrical shock.
Always contact your service representative for maintenance or repair of internal parts.


CAUTION
Do not pull the power cord when removing it from the outlet. If the power cord is pulled, the wires may become broken and there is a danger of fire or electrical shock. (Always grasp the power plug when removing the power cord from the outlet.)

Always remove the power plug from the outlet when moving the machine. If the power cord is damaged, there is a danger of fire or electrical shock.

Always hold the designated parts only when lifting or moving the machine.

For safety purposes, always remove the power plug from the outlet when performing cleaning operations.

If dust accumulates within the machine, there is a danger of fire or other trouble. It is therefore recommended that you consult with your service representative in regard to cleaning of internal parts. This is particularly effective if accomplished prior to seasons of high humidity. Consult with your service representative in regard to the cost of cleaning the internal parts of the machine.

Other precautions
Do not place heavy objects on the machine or cause other damage to the machine.
During the use, do not
- Open the front cover,
- Turn off the main power switch,
- Pull out the power plug.
When lifting or moving the machine, contact your service representative.
Do not touch electrical parts, such as connectors or printed circuit boards. They could be damaged by static electricity.
Do not attempt to perform any operations not explained in this guide.
Do not look directly at the light from the scanning lamp as it may cause your eyes to feel tired or painful.
This machine comes equipped with an HDD (hard disk drive). Do not attempt to move the machine while the power is still on. Since any resulting shock or vibration may cause damage to the hard disk, be sure to turn off the power before attempting to move the machine.
Cautions when handling consumables

CAUTION
Do not attempt to incinerate the toner container or the waste toner box. Dangerous sparks may cause burns.

Keep the toner container and the waste toner box out of the reach of children.

If toner happens to spill from the toner container or the waste toner box, avoid inhalation and ingestion, as well as contact with your eyes and skin.

- If you do happen to inhale toner, move to a place with fresh air and gargle thoroughly with a large amount of water. If coughing develops, contact a physician.
- If you do happen to ingest toner, rinse your mouth with water and drink 1 or 2 cups of water to dilute the contents of your stomach. If necessary, contact a physician.
- If you do happen to get toner in your eyes, flush them thoroughly with water. If there is any remaining tenderness, contact a physician.
- If toner does happen to get on your skin, wash with soap and water.
Do not attempt to force open or destroy the toner container or the waste toner box.

If the optional Fax kit is installed and the main power switch is off, transmitting/receiving Fax is disabled. Do not turn off the main power switch, but press the Power key on the operation panel to enter Sleep mode.
Other precautions
Return the exhausted toner container and waste toner box to your dealer or service representative. The collected toner container and waste toner box will be recycled or disposed in accordance with the relevant regulations.
Store the machine while avoiding exposure to direct sunlight.
Store the machine in a place where the temperature stays below 40^ C while avoiding sharp changes of temperature and humidity.
If the machine will not be used for an extended period of time, remove the paper from the cassette and the Multi Purpose (MP) Tray, return it to its original package and reseal it.
Laser Safety
Laser radiation could be hazardous to the human body. For this reason, laser radiation emitted inside this machine is hermetically sealed within the protective housing and external cover. In the normal operation of the product by user, no radiation can leak from the machine.
This machine is classified as Class 1 laser product under IEC 60825.
Caution: Performance of procedures other than those specified in this manual may result in hazardous radiation exposure.
These labels are attached to the laser scanner unit inside the machine and are not in a user access area.
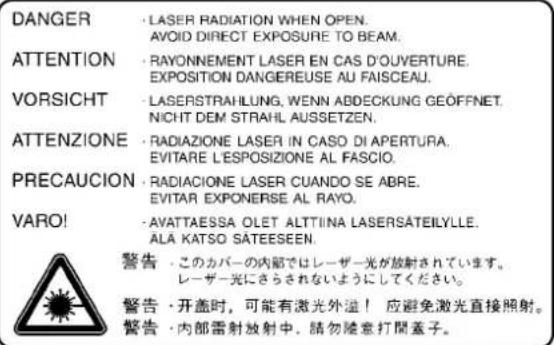
The label shown below is attached on the right side of the machine.

Safety Instructions Regarding the Disconnection of Power
Caution: The power plug is the main isolation device! Other switches on the equipment are only functional switches and are not suitable for isolating the equipment from the power source.
DECLARATION OF CONFORMITY
TO
89/336/EEC, 73/23/EEC, 93/68/EEC and 1995/5/EC
We declare under our sole responsibility that the product to which this declaration relates is in conformity with the following specifications.
EN55024
EN55022 Class B
EN61000-3-2
EN61000-3-3
EN60950
EN60825-1
EN300330-1
EN300330-2
Radio Frequency Transmitter
This machine contains the transmitter module. We, the manufacturer hereby declare that this equipment is in compliance with the essential requirements and other relevant provisions of Directive 1999/5/EC.
Radio Tag Technology
In some countries the radio tag technology used in this equipment to identify the toner container may be subject to authorization and the use of this equipment may consequently be restricted.
About this Operation Guide
This Operation Guide contains the following chapters.
Chapter 1 - Part Names
Identifies machine parts and operation panel keys.
Chapter 2 - Preparation before Use
Explains adding paper, placing original, connecting the machine, and necessary configurations before first use.
Chapter 3 - Basic Operation
Describes the procedures for basic copying, printing and scanning.
Chapter 4 - Optional Equipment
Introduces the convenient optional equipment available for this machine.
Chapter 5 - Maintenance
Describes cleaning and toner replacement.
Chapter 6 - Troubleshooting
Explains how to handle error messages, paper jams and other problems.
Appendix
Explains how to enter characters, and lists the machine specifications.
Included Guides
The following guides are supplied with the machine. Refer to them as necessary.
Operation Guide (This Guide)
Describes how to load paper, basic copy, print and scan operations, and troubleshooting.
Advanced Operation Guide
Explains copying, printing and scanning features in depth, as well as default settings.
Conventions in This Guide
The following conventions are used depending on the nature of the description.
| Convention Description Example | ||
| Bold Indicates the operation panelkey or a computer screen. | Press the Start key. | |
| [Regular] Indicates the touch panel keys. Press [OK]. | ||
| Italic Indicates the message displayed on the touch panel. | Ready to copy is displayed. | |
| Used to emphasize a key word,phrase or references toadditional information. | ||
| Note Indicates supplemental information or operations for reference. | NOTE: | |
| Important Indicates items that are requiredor prohibited so as to avoid problems. | IMPORTANT: | |
| Caution Indicates what must be observed to prevent injury or machine breakdown and how to deal with it. | CAUTION: | |
Description of Operation Procedure
In this Operation Guide, the continuous operation of the keys on the touch panel is as follows:
| Actual procedure | Description in this Operation Guide |
| Press [Copy].▼Press [Next] of Quick Setup.▼Press [▼] twice.▼Press [Change] of Original Image. | Press [Copy], [Next] of Quick Setup, [▼] twice, and then [Change] of Original Image. |
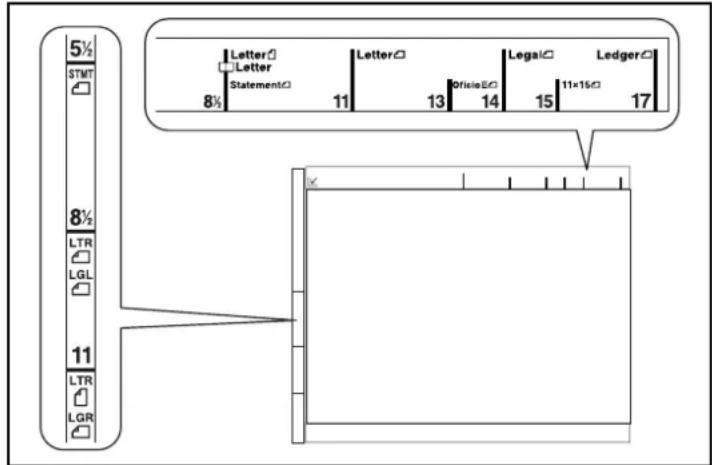
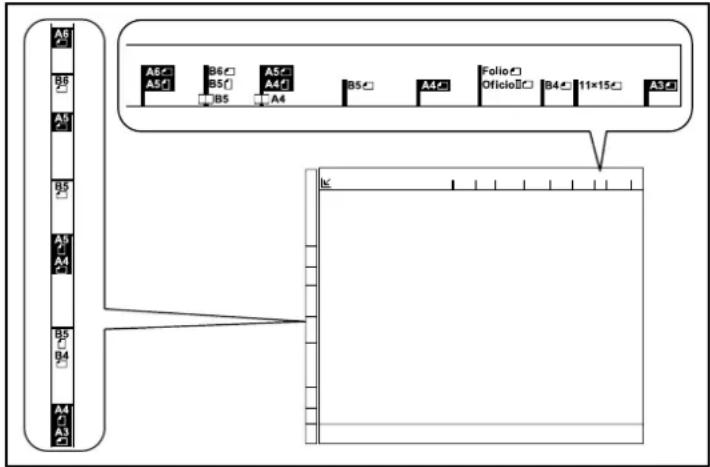
Originals and Paper Sizes
This section explains the notation used in this guide when referring to sizes of originals or paper sizes.
As in A4, B5 and Letter, which may be used either in the horizontal or vertical direction, horizontal direction is indicated by an additional R character in order to indicate the orientation of the original/paper.
| Set direction Indicated size * | |
Vertical direction A4, B5, A5, B6,  Original PaperFor original/paper, dimension A is longer than B. Original PaperFor original/paper, dimension A is longer than B. | A6, 16K, Letter, Statement |
Horizontal direction A4-R, B5-R, A5-R,  Original PaperFor original/paper, dimension A is shorter than B. Original PaperFor original/paper, dimension A is shorter than B. | B6-R, A6-R, 16K-R, Letter-R,Statement-R |
* The size of original/paper that can be used depends on the function and source tray. For further details, refer to the page detailing that function or source tray.
Icons on the Touch Panel
The following icons are used to indicate originals and paper set directions on the touch panel.
| Set direction Originals Paper | ||
| Vertical direction |  |  |
| Horizontal direction |  |  |
Contents
Legal and Safety Information
About this Operation Guide
1 P a r t N a m e s
Machine 1-2
Operation Panel 1-5
Touch Panel 1-6
2 Preparation before Use
Determining Connection Method and Preparing Cables 2-3
Connecting Cables 2-5
Setting Date and Time 2-8
Configuring Network (LAN Cable Connection) 2-10
Installing Software 2-12
Selecting Default Screen (Optional) 2-13
Changing Language (Optional) 2-14
Loading Paper 2-15
Loading Originals 2-25
3 Basic Operation
Power On/Off 3-2
Sleep and Auto Sleep 3-4
Adjusting Operation Panel Angle 3-5
Touch Panel Display 3-6
Copying 3-7
Printing - Printing from Applications 3-18
Sending 3-20
Specifying Destination 3-34
Using Document Box 3-37
Printing a Document Stored in Removable USB Memory 3-48
Canceling/Viewing/Changing Job 3-50
Checking Remaining Toner and Paper 3-54
Quick Setup Screen 3-55
4 Optional Equipment
Overview of Optional Equipment 4-2
Document Processor 4-4
Paper Feeder 4-4
3000 Sheet Paper Feeder 4-5
Built-in Finisher 4-5
Document Finisher 4-9
3000 Sheet Document Finisher 4-9
Job Separator 4-10
Document Table 4-10
Key Counter 4-11
Fax Kit 4-12
Data Backup Kit 4-12
Security Kit (USB Key) 4-13
Serial Interface 4-13
PDF Upgrade Kit (USB Key) 4-14
5 Maintenance
Cleaning 5-2
Toner Container and Waste Toner Box Replacement 5-7
6 Troubleshooting
Solving Malfunctions 6-2
Responding to Error Messages 6-4
Clearing Paper Jams 6-10
Appendix
Character Entry Method .....Appendix-2
Specifications ....Appendix-6
Index
1 Part Names
This chapter identifies the machine parts and operation panel keys.
- Machine.... 1-2
• Operation Panel 1-5 - Touch Panel.... 1-6
Machine

1 Original Cover (Option)
2 Original Size Indicator Plates
3 Clip Holder
4 Receive Indicator ... Blinks while data is received
5 Error Indicator ... Blinks when an error occurs and the job is stopped
6 Left Cover 1
7 Left Cover 1 Lever
8 Left Cover 2
9 Platen
10 Operation Panel
11 Cassette 1
12 Cassette 2
13 Toner Container
14 Toner Container Stopper
15 Waste Toner Box
16 Front Cover
17 Paper Width Adjusting Tab
18 Length Adjustment Plate
19 Top Tray
20 Main Power Switch
21 Paper Width Guides
22 Multi Purpose (MP) Tray
23 Memory Card Cover Holder
24 Handles
25 USB Memory Slot (A2)
26 USB Memory Slot (A3)
27 Memory Card Slot
28 Network Interface Connector
29 USB Interface Connector
30 Parallel Interface Connector
31 Option Interface Slot (OPT1)
32 Option Interface Slot (OPT2)
33 USB Memory Slot (A1)
34 Green Knob (A1)
35 Paper Feed Unit (A2)
36 Paper Feed Unit Cover (A2)
Operation Panel
1 System Menu Key/Indicator
2 Status/Job Cancel Key/Indicator
3 Program Key/Indicator
4 Application Key
5 Counter Key/Indicator
6 Copy Key/Indicator
7 Send Key/Indicator
8 Document Box Key/Indicator
9 Accessibility Display Key/Indicator
10 Print Indicator ... Blinks during printing operation
11 Send Indicator ... Blinks while data is transmitted
12 Receive Indicator ... Blinks while data is received
13 Memory Indicator ...Blinks while the machine is accessing to hard disk, fax memory, Data Backup Kit (Option) or USB memory (general-purpose item)
14 Error Indicator ... Blinks when an error occurs and the job is stopped
15 Help Key/Indicator
16 Logout Key/Indicator
17 Power Key
18 Main Power Indicator
19 Numeric Keys
20 Clear Key
21 Start Key/Indicator
22 Stop Key
23 Reset Key
Touch Panel
Copy Screen
Press Copy to access this screen.
1 [Quick Setup] Screen
2 [Original/Paper/Finishing] Screen
3 [Image Quality] Screen
4 [Layout /Edit] Screen
5 [Advanced Setup] Screen
Send Screen
Press the Send key to access this screen.
1 [Destination] Screen
2 [Quick Setup] Screen

3 [Type of Original/Transmission] Screen
4 [Color/Image] Screen
5 [Advanced Setup] Screen
Document Box Screen
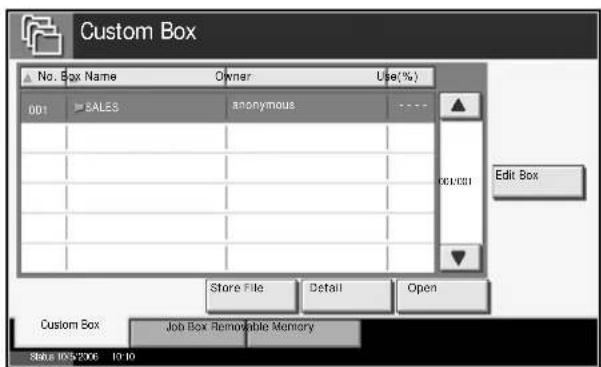
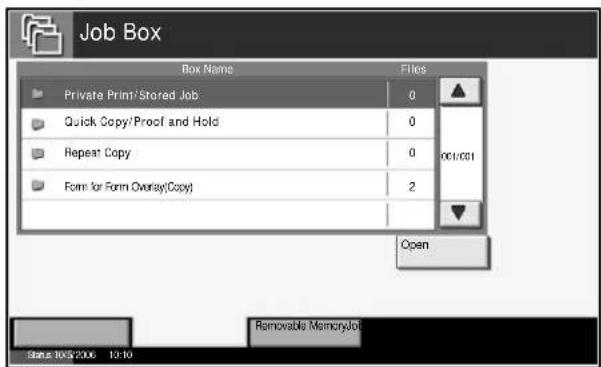
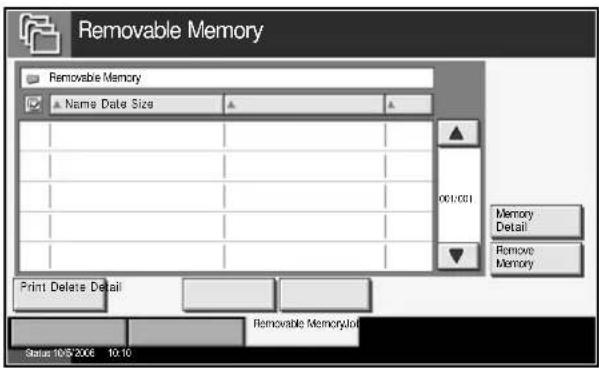
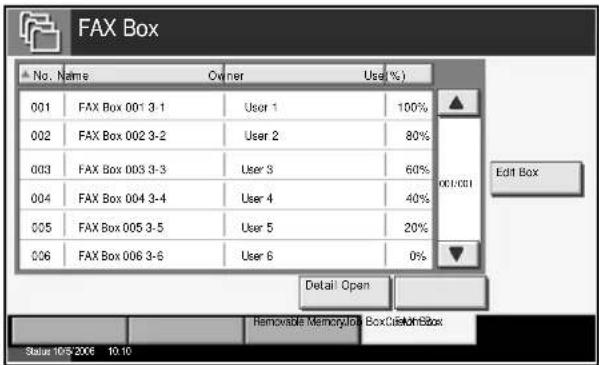
Press the Document Box key to access this screen.
1 [Custom Box] Screen
2 [Job Box] Screen
3 [Removable Memory] Screen
4 [FAX Box] Screen (Displayed only when optional FAX kit is installed)
Status/Job Cancel Screen
Press the Status/Job Cancel key to access this screen.
1 [Printing Jobs] Screen
2 [Sending Jobs] Screen
AAAA
Wait
3 [Storing Jobs] Screen
4 [Device/Communication Job] Screen
![OLIVETTI d-Copia 400MF - [Printing Jobs] Screen - 4](/content/2026/04/637475/images/0028d88809cfc7bc86bdf26201a13400c554696e06cea5ad72a4cf4ce8dbf02c.jpg)
flowchart
graph TD
    A["Scanner"] --> B["Reacy"]
    C["Printer"] --> D["Reacy"]
    E["Removable Memory"] --> F["Not connected."]
    G["Format"] --> H["Remove"]
    I["Display Error"] --> J["HP"]
    K["Hard Disk"] --> L["OK"]
    M["Memory Card"] --> N["Not connected."]
    O["Format"] --> P["Printing list"]
    Q["Printing Jobs"] --> R["Sending Jobs"] --> S["Siring Jobs"] --> T["Device/Communication"] --> U["Paper/Supplies"]
    V["10/5/2006"] --> W["10:10"]
5 [Paper/Supplies] Screen
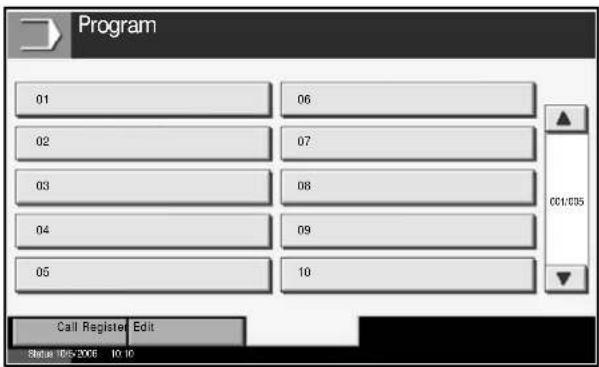
Program Screen
Press the Program key to access this screen.
1 [Call] Screen
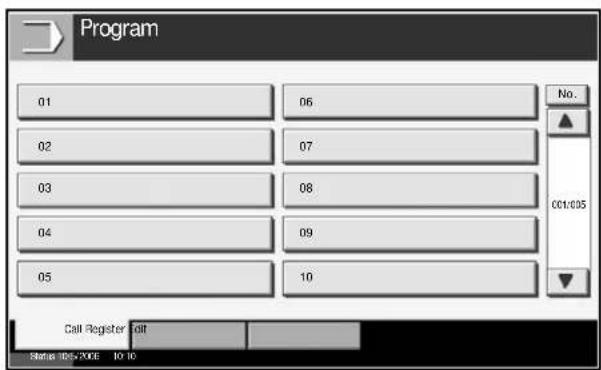
2 [Register] Screen
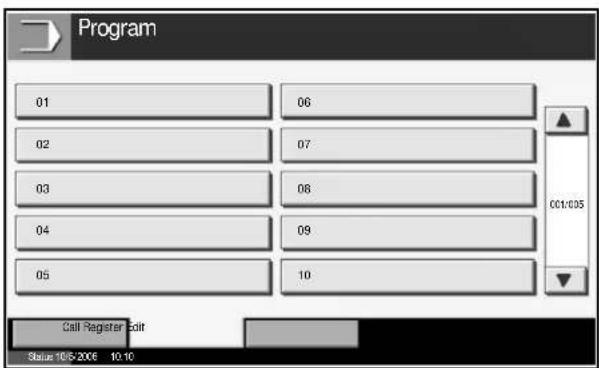
3 [Edit] Screen
2 Preparation before Use
This chapter explains the preparations before using this equipment for the first time as well as the procedures for loading papers and originals.
• Determining Connection Method and Preparing Cables .. 2-3
- Connecting Cables 2-5
- Setting Date and Time.... 2-8
- Configuring Network (LAN Cable Connection)...... 2-10
• Installing Software 2-12
- Selecting Default Screen (Optional) 2-13
- Changing Language (Optional) 2-14
- Loading Paper 2-15
- Loading Originals 2-25
Documents Contained in the Attached CD-ROM
The following documents are contained in the attached CD-ROM (Product Library). Refer to them as necessary.
Documents
Extended Printer Driver User Guide
Network FAX Driver Operation Guide
COMMAND CENTER Operation Guide
KM-NET for Clients Operation Guide
KM-NET for Direct Printing Operation Guide
PRESCRIBE Commands Technical Reference
PRESCRIBE Commands Command Reference
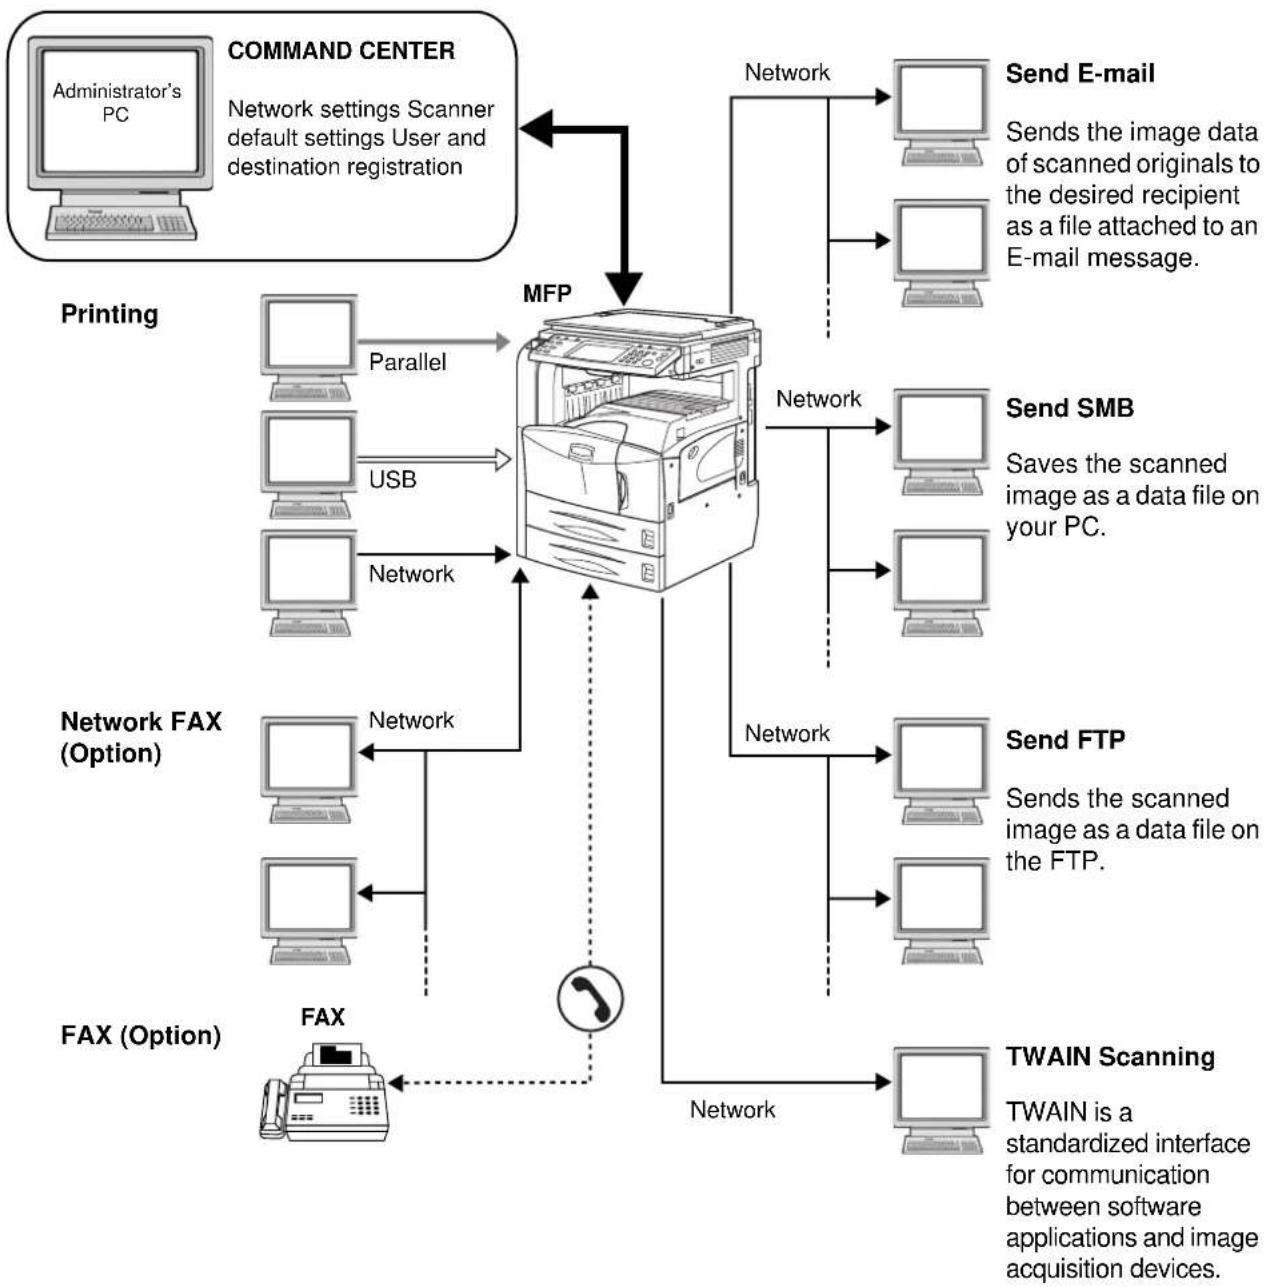
Determining Connection Method and Preparing Cables
Check the method to connect the equipment to PC or network, and have the necessary cables ready.
Connection Example
Determine the method to connect the equipment to PC or network by referring to the illustration below.
Connecting the scanner to your PC network with a network cable (100BASE-TX or 10BASE-T)
flowchart
graph TD
    A["COMMAND CENTER"] -->|Send E-mail| B["Server"]
    A -->|Send E-mail| C["Server"]
    A -->|Send E-mail| D["Server"]
    A -->|Send E-mail| E["Server"]
    A -->|Send E-mail| F["Server"]
    A -->|Send E-mail| G["Server"]
    A -->|Send E-mail| H["Server"]
    A -->|Send E-mail| I["Server"]
    A -->|Send E-mail| J["Server"]
    A -->|Send E-mail| K["Server"]
    A -->|Send E-mail| L["Server"]
    A -->|Send E-mail| M["Server"]
    A -->|Send E-mail| N["Server"]
    A -->|Send E-mail| O["Server"]
    A -->|Send E-mail| P["Server"]
    A -->|Send E-mail| Q["Server"]
    A -->|Send E-mail| R["Server"]
    A -->|Send E-mail| S["Server"]
    A -->|Send E-mail| T["Server"]
    A -->|Send E-mail| U["Server"]
    A -->|Send E-mail| V["Server"]
    A -->|Send E-mail| W["Server"]
    A -->|Send E-mail| X["Server"]
    A -->|Send E-mail| Y["Server"]
    A -->|Send E-mail| Z["Server"]
    A -->|Send E-mail| AA["Server"]
    A -->|Send E-mail| AB["Server"]
    A -->|Send E-mail| AC["Server"]
    A -->|Send E-mail| AD["Server"]
    A -->|Send E-mail| AE["Server"]
    A -->|Send E-mail| AF["Server"]
    A -->|Send E-mail| AG["Server"]
    A -->|Send E-mail| AH["Server"]
    A -->|Send E-mail| AI["Server"]
    A -->|Send E-mail| AJ["Server"]
    A -->|Send E-mail| AK["Server"]
    A -->|Send E-mail| AL["Server"]
    A -->|Send E-mail| AM["Server"]
    A -->|Send E-mail| AN["Server"]
    A -->|Send E-mail| AO["Server"]
    A -->|Send E-mail| AP["Server"]
    A -->|Send E-mail| AQ["Server"]
    A -->|Send E-mail| AR["Server"]
    A -->|Send E-mail| AS["Server"]
    A -->|Send E-mail| AT["Server"]
    A -->|Send E-mail| AU["Server"]
    A -->|Send E-mail| AV["Server"]
    A -->|Send E-mail| AW["Server"]
    A -->|Send E-mail| AX["Server"]
    A -->|Send E-mail| AY["Server"]
    A -->|Send SMB| AZ["Server"]
    AZ --> BA["Server"]
    BA --> BB["MSM"]
    BB --> BC["MFP"]
    BC --> BD["MFP"]
    BD --> BE["MFP"]
    BE --> BF["MFP"]
    BF --> BG["MFP"]
    BG --> BH["MFP"]
    BH --> BI["MFP"]
    BI --> BJ["MFP"]
    BJ --> BK["MFP"]
    BK --> BL["MFP"]
    BL --> BM["MFP"]
    BM --> BN["MFP"]
    BN --> BO["MFP"]
    BO --> BP["MFP"]
    BP --> BQ["MFP"]
    BQ --> BR["MFP"]
    BR --> BS["MFP"]
    BS --> BT["MFP"]
    BT --> BU["MFP"]
    BU --> BV["MFP"]
    BV --> BW["MFP"]
    BW --> BX["MFP"]
    BX --> BY["MFP"]
    BY --> BZ["MFP"]
    BZ --> CA["MFP"]
    CA --> CB["MFP"]
    CB --> CC["MFP"]
    CC --> CD["MFP"]
    CD --> CE["MFP"]
    CE --> CF["MFP"]
    CF --> GD["MFP"]
    GD --> DH["MFP"]
    DH --> DI["MFP"]
    DI --> DJ["MFP"]
    DJ --> DK["MFP"]
    DK --> DL["MFP"]
    DL --> DV["MFP"]
    DV --> DW["MFP"]
    DW --> DX["MFP"]
    DX --> DXB["MFP"]
    DXB --> DXC["MFP"]
    DXC --> DXD["MFP"]
    DXD --> DXE["MFP"]
    DXE --> DXF["MFP"]
    DXF --> DXG["MFP"]
    DXG --> DXH["MFP"]
    DXH --> DXI["MFP"]
    DXI --> DXJ["MFP"]
    DXJ --> DXK["MFP"]
    DXK --> DXL["MFP"]
    DXL --> DXM["MFP"]
    DXM --> DXN["MFP"]
    DXN --> DXO["MFP"]
    DXO --> DXP["MFP"]
    DXP --> DXQ["MFP"]
    DXQ --> DXR["MFP"]
    DXR --> DXS["MFP"]
    DXS --> DXSb["FAX Option: FAX System with Radio icon, dotted line indicates connection point."]
Preparing Necessary Cables
The following interfaces are available to connect the equipment to PC.
Prepare the necessary cables according to the interface you use.
Interfaces Available as Standard
| Function Interface Necessary Cable | ||
| Printer/Scanner /Network FAX* | Network interface LAN | (10Base-T or 100Base-TX, Shielded) |
| Printer USB interface | USB2.0 compatible | cable(Hi-Speed USB compliant, Max. 5.0 m, Shielded) |
| Parallel interface Parallel cable (IEEE1284 Compliant, Max. 1.5 m) | ||
* Function available by using optional fax kit. For details of Network FAX, refer to the operation guide of the fax kit.
Optional Interface
Serial interface is available as option.
| Function Interface Necessary Cable | |
| Printer Serial interface RS-232C cable (Max. 15 m) |
Connecting Cables
Connecting LAN Cable (Optional)
Follow the steps below to connect a LAN cable to the machine.
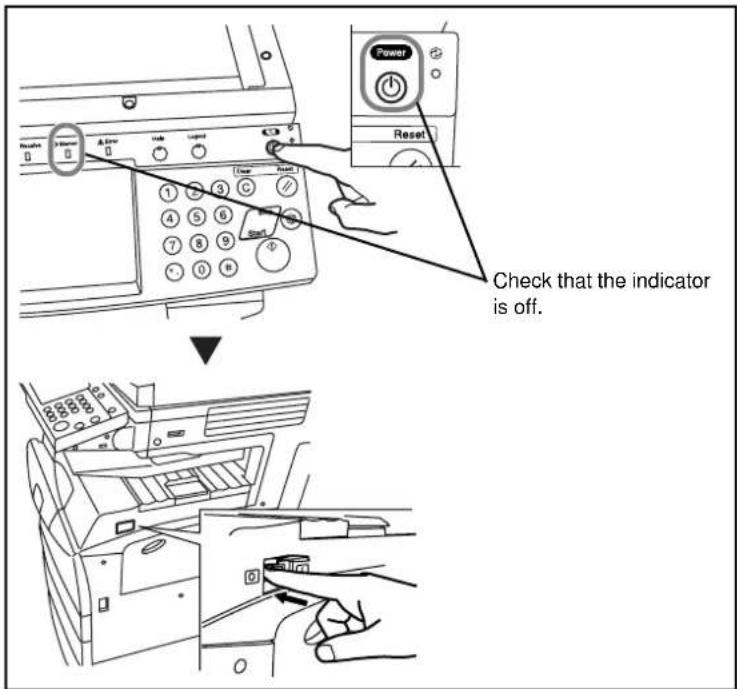
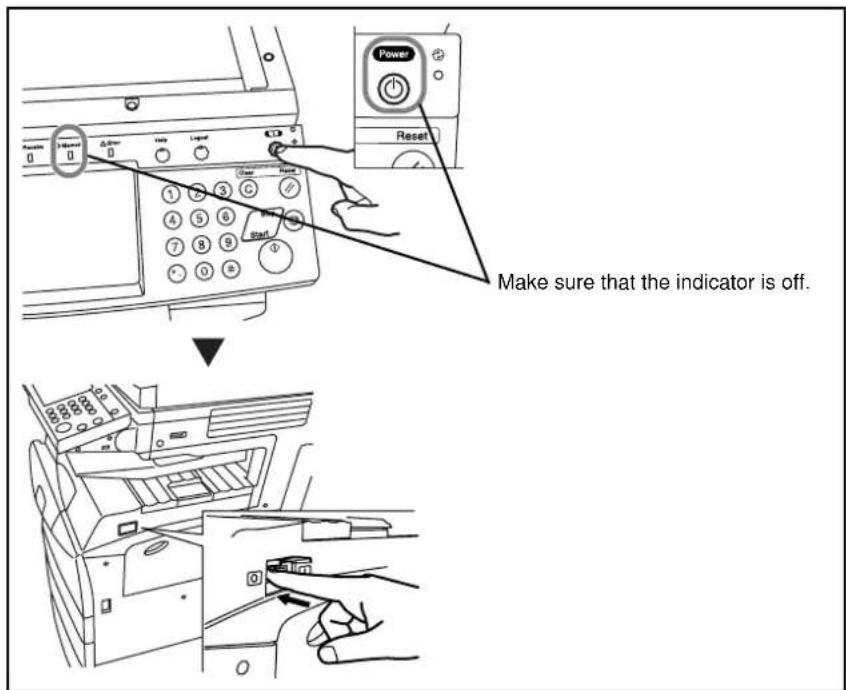
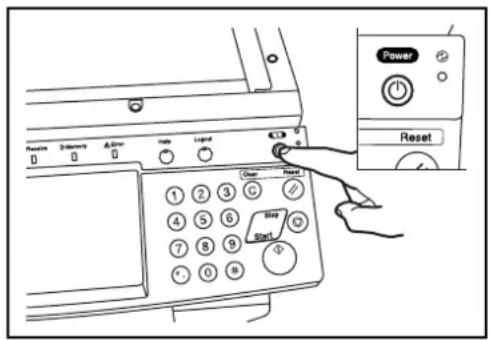
1 When the machine is powered, first press the Power key on the operation panel. Check that the Power indicator and the memory indicator are off. After this, turn off the main power switch.
2 Connect a LAN cable to the network interface located on right side of the body.
natural_image
Line drawing of a hand inserting a component into a device panel (no text or symbols)3 Connect the other end of the cable to HUB.
4 Configure the network. For details, refer to Configuring Network (LAN Cable Connection) on page 2-10.
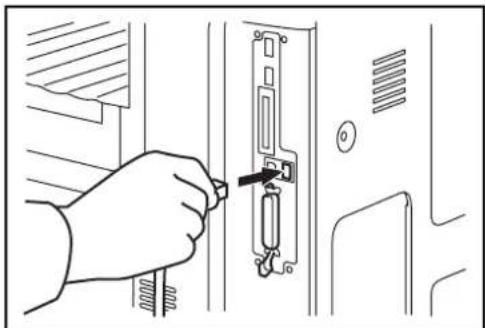
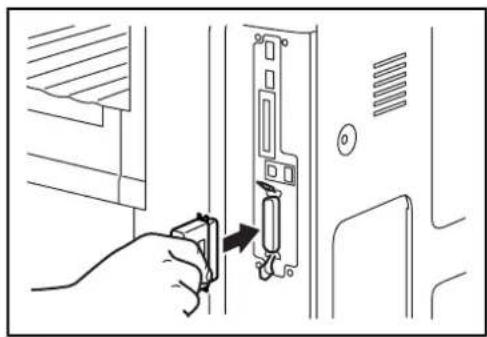
Connecting Parallel/USB Cable (Optional)
Follow the steps below to connect a printer cable of parallel or USB interface to the machine.
1 When the machine is powered, first press the Power key on the operation panel. Check that the Power indicator and the memory indicator are off. After this, turn off the main power switch.

2 If connection is established using a parallel cable, PC to be connected should also be powered off.
3 Connect the printer cable to each interface located on right side of the body.
When Connecting to Parallel Interface
natural_image
Line drawing of a hand inserting a USB into a CD drive slot (no text or symbols)When Connecting to USB Interface

natural_image
Illustration of a hand inserting a USB into a CD-ROM drive (no text or symbols visible)4 Connect the other end of the cable to PC.
Connecting Power Cable
Connect one end of the supplied power cable to the machine and the other end to power outlet.
IMPORTANT: Only use the power cable that comes with the machine.
Setting Date and Time
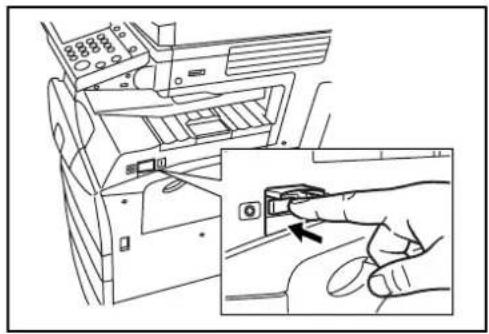
Follow the steps below to set date and time in the place of installation.
When you send an E-mail using the transmission function, the date and time of this setting will be printed in the header of E-mail message. Set the date, time and time difference from GMT of the region where the machine is used.
NOTE: Be sure to set the time difference before setting date and time.
1 Turn on the main power switch.
natural_image
Line drawing of a printer's front panel with an inset showing a hand pressing a button (no text or symbols)2 Press the System Menu key.
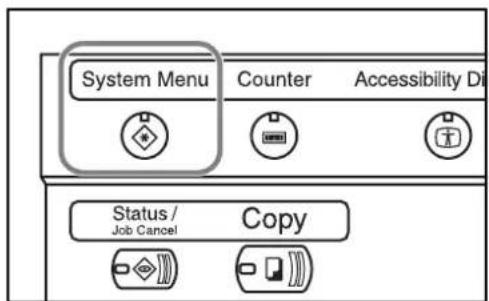
3 Press [▼], [Date/Timer] and then [Change] of Time Zone.
4 Select the region and press [OK].
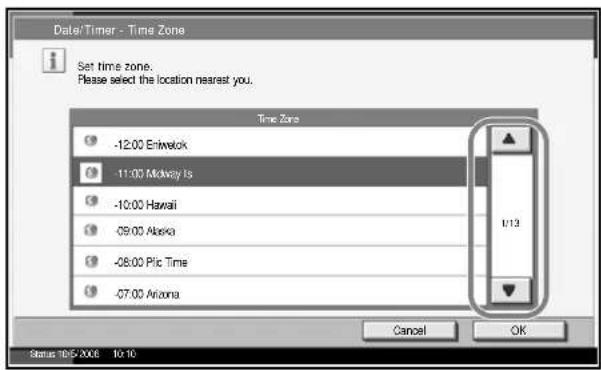
NOTE: Press [▲] or [▼] to view next region.
5 Press [Change] of Date/Time.
6 Press [Off] or [On] of Summer Time.
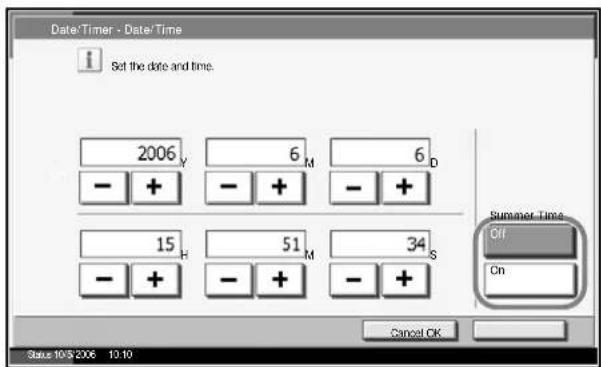
7 Set the date and time. Press [+] or [-] in each setting.
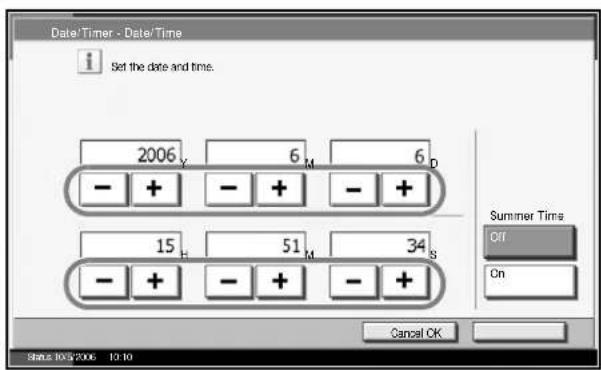
NOTE: Settings include Year (Y), Month (M), Date (D), Hour (H), Minute (M) and Second (S).
8 Press [OK].
9 When exiting, press [Close] repeatedly to return to the System Menu default screen.
Configuring Network (LAN Cable Connection)
The machine comes with the network interface as standard and supports each protocol of TCP/IP, IPX/SPX, NetBEUI and AppleTalk, allowing network printing on various platforms such as Windows, Macintosh, UNIX and NetWare.
Setting TCP/IP (When Using Fixed IP Address)
Follow the steps below to set TCP/IP when fixed IP address is used. Make sure that IP address is available by asking your network administrator to obtain it in advance.
1 Press the System Menu key.

2 Press [System], [Change] of Network and then [Change] of TCP/IP.
3 Press [On] of TCP/IP.
4 Press [Off] of DHCP.
5 Press [IP Address] and enter IP address using the numeric keys.
6 Press [Subnet Mask] and enter address using the numeric keys.
7 Press [Default Gateway] and enter address using the numeric keys.
8 Check that all addresses are entered correctly, and press [OK].
9 Press the Power key, and after confirming that the Power key/indicator and memory indicator have turned off, turn the main power switch off and on.
Setting TCP/IP (When Using DHCP)
Follow the steps below to set TCP/IP when DHCP server is available.
1 Press the System Menu key.
2 Press [System], [Change] of Network and then [Change] of TCP/IP.
3 Press [On] of TCP/IP and [On] of DHCP.
4 Press [OK].
5 Press the Power key, and after confirming that the Power key/indicator and memory indicator have turned off, turn the main power switch off and on.
Installing Software
Install appropriate software on your PC from the Product Library CD-ROM that is included if you want to use the printer function of this machine or perform TWAIN transmission or FAX transmission from your PC.
NOTE: Installation on Windows XP, Windows NT 4.0/2000 and Server 2003 must be installed by a user logged on with administrator privileges. Plug and Play is disabled on this device when in Sleep Mode. Wake the device from Sleep Mode before continuing. See Sleep and Auto Sleep on page 3-4.
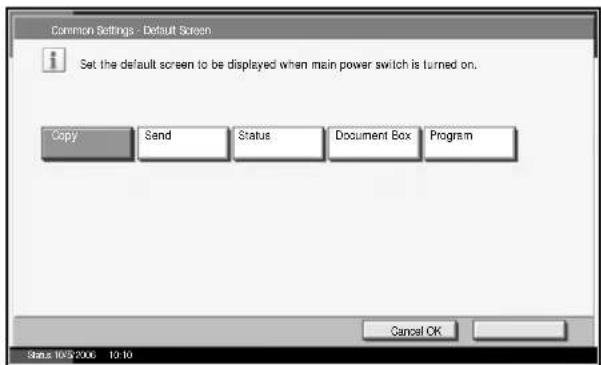
Selecting Default Screen (Optional)
Select the default screen (on the touch panel) to appear following the opening screen after power-on. The default screen is selectable from among the following.
| Default screen | $creen appearing immediately after power-on. |
| Copy Default screen for copying (screen to appear when the Copy key is pressed) | |
| Send Default screen for sending (screen to appear when the Send key is pressed) | |
| Status Default screen for status/job cancel (screen to appear when the Status/Job Cancel key is pressed) | |
| Document box Default screen for document box (screen to appear when the Document Box key is pressed) | |
| Program Default screen for program (screen to appear when the Program key is pressed) | |
1 Press the System Menu key.
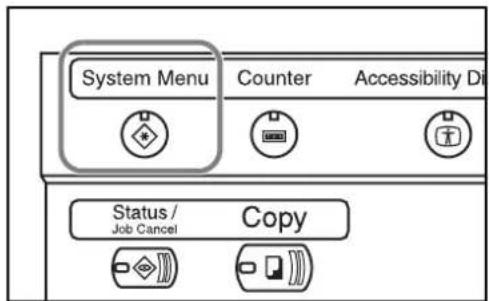
2 Press [Common Settings] and then [Change] of Default Screen.
3 Select the desired
4 Press [OK].
5 When exiting, press [Close] repeatedly to return to the System Menu screen.
Changing Language (Optional)
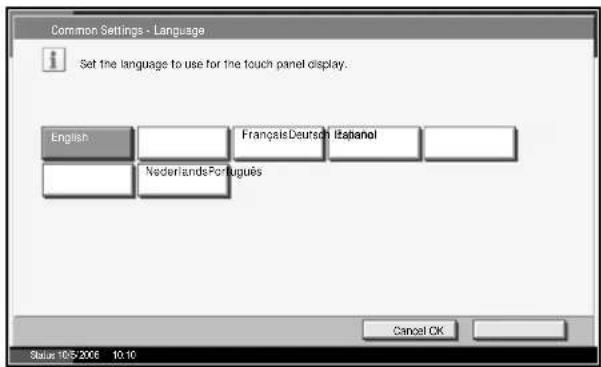
Follow the steps below to change the language to appear on the touch panel.
1 Press the System Menu key.
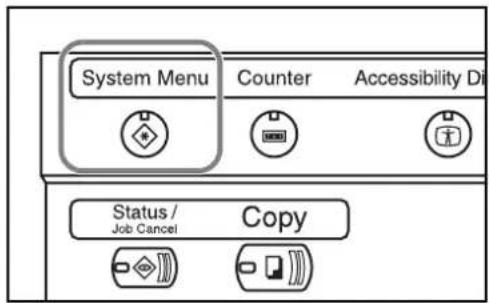
2 Press [Common Settings] and then [Change] of Language.
3 Press the key for the language you wish to use.
4 The message instructing you to turn the power off and on appears, press [OK].
5 Press the Power key on the operation panel. Check that the Power key and the memory indicator are off. After this, turn on the main power switch again.
Touch panel language will be changed.
Loading Paper
As standard, paper can be loaded in the two drawers of cassettes and the Multi Purpose Tray. As options, 2 paper feeders and the side feeder of 3,000 sheets capacity are also available (refer to Chapter 4 Options).
Before Loading Paper
When you open a new package of paper, fan through the sheets to separate them slightly prior to loading in the following steps.
1 Bend the whole set of papers to swell them in the middle.
2 Hold the papers at both ends and stretch them while giving a swell over the entire papers.
3 Raise the right and left hands alternately to create a gap and feed air between the papers.
4 Finally, align the papers on a level, flat table.
If the paper is curled or folded, straighten it before loading. Paper that is curled or folded may cause paper jam.
CAUTION: If you copy onto used paper (paper already used for copying), do not use paper that is stapled or clipped together. This may damage the machine or cause poor image quality.
NOTE: If print outputs are curled or not neatly stapled, turn the papers in the cassette upside down.
Avoid exposing opened paper to high temperatures and high humidity as dampness can be a cause of problem. Seal any remaining paper after loading the Multi Purpose Tray or cassette in the paper storage bag.
If the machine will not be used for a prolonged period, protect all paper from humidity by removing it from the cassettes and sealing it in the paper storage bag.
NOTE: If you use special paper such as letterheads, paper with holes or paper with pre-prints like logo or company name.
Loading Paper in the Cassettes
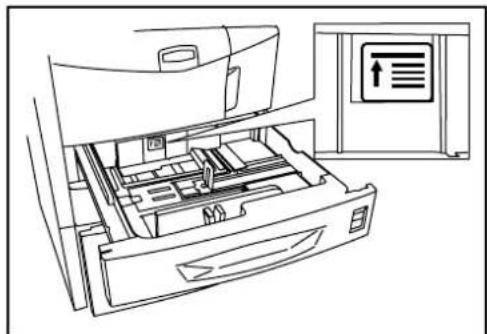
Up to 500 sheets of standard paper (80 g/m ^2 ) or colored paper may be loaded in each of the standard two drawers of cassettes.
The following paper sizes are supported: Ledger, Legal, Oficio II, 8.5×13.5", Letter, Letter-R, Statement-R, A3, B4, A4, A4-R, B5-R, A5-R, Folio, 8K, 16K, and 16K-R.
1 Pull the cassette out toward you until it stops.
NOTE: Do not pull out more than one cassette at a time.
natural_image
Line drawing of a hand inserting a device into a drawer (no text or symbols)2 Holding the paper width adjusting tab, move the paper width guide to fit the paper.
NOTE: Paper sizes are marked on the cassette.

natural_image
Line drawing of a hand inserting a device into a computer case (no text or symbols)3 Using the paper length adjusting tab, move the plate to fit the paper.
natural_image
Line drawing of a hand inserting a component into a device (no text or symbols visible)4 Align the paper flush against the left side of the cassette.
natural_image
Line drawing of a hand inserting a paper into a device (no text or symbols)IMPORTANT:
- Before loading the paper, be sure that it is not curled or folded. Paper that is curled or folded may cause paper jams.
- Ensure that the loaded paper does not exceed the level indicated (see illustration below).
- When loading the paper, keep the side toward the sealed side facing up.
- Paper length and width guides must be adjusted to the paper size. Loading the paper without adjusting these guides may cause skewed feeding and paper jams.
- Be sure that the paper length and width guides rest securely against the paper. If there is a gap, readjust the guides to fit the paper.
natural_image
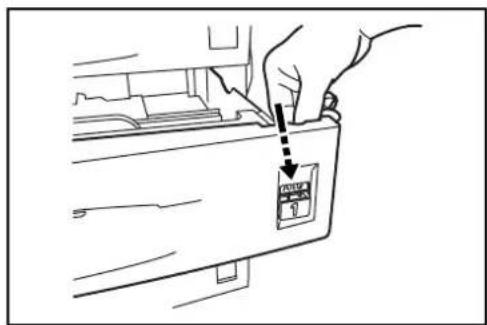
Line drawing of an open drawer with a door and directional arrow indicator (no text or symbols)5 Insert the appropriate paper size card in the slot to indicate the size of the paper inside.
6 Gently push the cassette back in.
NOTE: If the machine will not be used for a prolonged period, protect all paper from humidity by removing it from the cassettes and sealing it in the original package.
7 Select the type of the paper (plain, recycled, etc.) loaded in the cassette. (Refer to Selecting Paper Size and Type to the Cassettes on page 2-21).
Loading Paper in the Multi Purpose Tray
Up to 200 sheets of plain paper (80 g/m ^4 ) may be loaded in the Multi Purpose Tray.
The Multi Purpose Tray accepts the paper sizes from A3 to Hagaki and from Ledger to Statement-R. Be sure to use the Multi Purpose Tray when you print on any special paper.
NOTE: The capacity of the Multi Purpose Tray is as follows.
- Thick paper (120 g/m ^2 ): 130 sheets
- Thick paper (160 g/m ^2 ), Japanese noshi paper: 100 sheets
- Thick paper (200 g/m ^2 ), Rough paper (45 g/m ^2 ): 50 sheets
- Hagaki: 80 sheets
• OHP film: 25 sheets - Envelope DL, Envelope C5, Comm. #10, Monarch, Youkei 4, Youkei 2 : 20 sheets
NOTE: When you load custom size paper, enter the paper size by referring to Selecting Paper Size and Type to the Multi Purpose Tray on page 2-23.
When you use special paper such as transparency or thick paper, select the paper type by referring to Selecting Paper Size and Type to the Multi Purpose Tray on page 2-23.
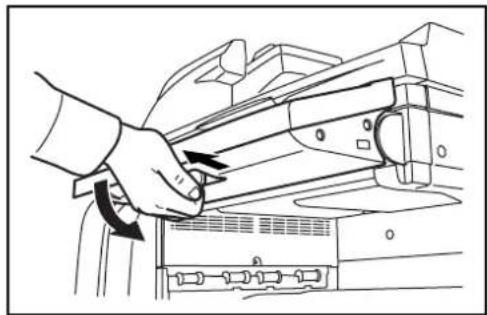
1 Open the Multi Purpose Tray.
natural_image
Line drawing of a hand inserting a component into a device housing (no text or symbols)2 Adjust the paper width guides to the width of the paper.
natural_image
Technical line drawing of a mechanical assembly with no visible text or symbols3 Insert the paper along the paper width guides into the tray until it stops.
natural_image
Line drawing of a hand holding a tablet device with a black arrow pointing to the screen (no text or symbols present)IMPORTANT: Keep the side toward the sealed side facing up.
Curled paper must be uncurled before use.
Straighten the top edge if it is curled.
Loading Envelopes
Up to 20 envelopes may be loaded in the Multi Purpose Tray.
Acceptable envelope sizes are as follows.
| Acceptable Envelope Size | |
| Monarch 3 1/8"×7 1/2" | |
| Comm. #10 4 1/8"×9 1/2" | |
| Envelope DL 110×220 (mm) | |
| Envelope C5 162×229 (mm) | |
| Executive 7 1/4"×10 1/2" | |
| Comm. #9 3 7/8"×8 7/8" | |
| Comm. #6-3/4 3 5/8"×6 1/2" | |
| ISO B5 176×250 (mm) | |
| Envelope C4 229×324 (mm) | |
| Oufuku Hagaki 200×148 (mm) | |
| Youkei 2 Haguruma Envelope Swiss-You 2 w/o border print WE-S2 | 162×114 (mm) |
| Youkei 4 LIFE E506B (w/o border print) 234×105 (mm) |
1 Open the Multi Purpose Tray.
natural_image
Line drawing of a hand inserting a component into a vehicle chassis (no text or symbols)2 Adjust the paper width guides to the width of the envelope.
natural_image
Technical line drawing of a mechanical assembly with no visible text or symbols3 In the case of the landscape form envelope, close the flap. Insert the envelope all the way along the width guides, keeping the printing side face-up and with the flap positioned backward.
In the case of the portrait form envelope, open the flap. Insert the envelope all the way along the width guides, keeping the printing side face-up and with the flap positioned opposite to the entrance.
flowchart
graph TD
    A["Block 1"] --> B["Block 2"]
    C["Block 3"] --> D["Block 4"]
    E["Circle"] --> F["Circle"]
IMPORTANT: How to load envelope (orientation and facing) will differ depending on the type of envelope. Be sure to load it in a correct way. Otherwise printing may be done in wrong direction or on wrong face.
NOTE: When you load envelope in the Multi Purpose Tray, select the envelope type by referring to Selecting Paper Size and Type to the Multi Purpose Tray on page 2-23.
Selecting Paper Size and Type
Selecting Paper Size and Type to the Cassettes
When you use the cassettes 1 or 2 or the optional side feeder (cassettes 3 and 4), select the paper size and paper type you load.
When you use the optional side feeder (cassette 3) of up to 3,000 sheets capacity, select the paper type only.
| Selection Item Selectable Size/Type | ||
| Paper Size Auto Paper size is automatically detected and selected. Select whether the paper is in Metric size or in Inch size. | ||
| Selection Item Selectable Size/Type | ||
| Paper Type Plain, Rough. | Vellum, Recycled, Preprinted,Bond, Color, Prepunched, Letterhead, HighQuality and Custom 1~8 | |
1 Press the System Menu key.

2 Press [Common Settings], [Change] of Original/Paper Setup, [Change] of Cassette setting, [Change] of the required paper source and then [Change] of Paper Size.
3 For automatic detection of the paper size, press [Auto] and select [Metric] or [Inch] as the unit.
To select the paper size, press [Standard Sizes 1] or [Standard Sizes 2] and select the paper size.
4 Press [OK].
5 Press [Change] in Media Type Setting and select the paper type. Then press [OK].
Selecting Paper Size and Type to the Multi Purpose Tray
Select the paper size and paper type when using the Multi Purpose Tray. You may select in advance the paper size and paper type that will be used often.
| Item Description | tion | |
| Paper Size | Auto Paper | size is automatically detected and selected. Select whether the paper is in Metric size or in Inch size. |
| Standard Size 1 | Select from the standard sizes. Selectable paper sizes are as follows.Inch size: Ledger, Letter-R, Letter, Legal, Statement-R, Executive, 8.5×13.5", and Oficio IIMetric size: A3, A4-R, A4, A5-R, A6-R B4-R, B5-R, B5, B6-R and Folio | |
| Standard Size 2 | Select from the standard sizes not included in the Standard Size 1. Selectable paper sizes are as follows.Inch size: A3, A4-R, A4, A5-R, A6-R B4-R, B5-R, B5, B6-R and Folio, 8K, 16K-R and 16KMetric size: Ledger, Letter-R, Letter, Legal, Statement-R, Executive, 8.5×13.5", and Oficio II, 8K, 16K-R and 16K | |
| Others Select from special standard sizes and custom sizes.Selectable paper sizes are as follows.ISO B5, Envelope #10, Envelope #9, Envelope #6, Envelope Monarch, Envelope DL, Envelope C5, Envelope C4, Hagaki, Oufuku Hagaki, Youkei 4, Youkei 2 | ||
| Size Entry | Enter the size not included in the standard size.Selectable paper sizes are as follows.Inch sizeX (Horizontal): 5.83~17" (in 0.01" increments),Y (Vertical): 3.86~11.69" (in 0.01" increments)Metric sizeX (Horizontal): 148~432 mm (in 1mm increments),Y (Vertical): 98~297 mm (in 1mm increments) | |
| Paper Type Selectable paper types are as follows.Plain, Transparency, Rough, Vellum, Labels, Letterhead, Recycled, Preprinted, Bond, Cardstock, Color, Prepunched, Envelope, Thick, High Quality and Custom 1~8 | ||
1 Press the System Menu key.

2 Press [Common Settings], [Change] in Original/Paper Setup, [Change] in MP Tray Setting, and then [Change] in Paper Size.
3 For automatic detection of the paper size, press [Auto] and select [Metric] or [Inch] as the unit.
To select the paper size, press any of [Standard Sizes 1], [Standard Sizes 2], [Others] or [Size Entry] and select the paper size.
If you have chosen [Size Entry], press [+] or [-] to enter X (horizontal) and Y (vertical) sizes. You may enter the size directly using the numeric keys by pressing [#-Keys].
4 Press [OK].
5 Press [Change] in Media Type Setting and select the paper type. Then press [OK].
Loading Originals
Follow the steps below to load originals for copying, sending or storing.
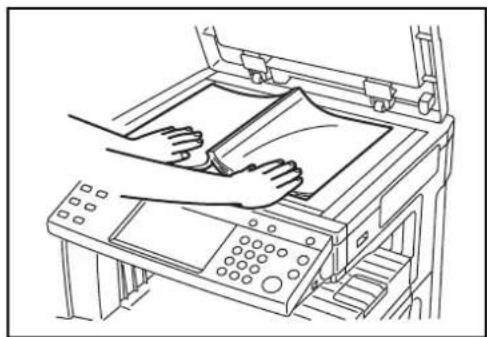
Placing Originals on the Platen
You may place book or magazine on the platen in addition to ordinary sheet originals.
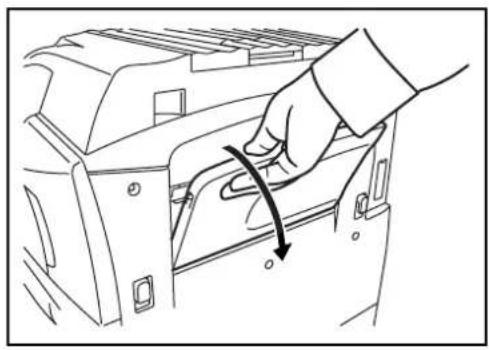
1 Open the original cover.
natural_image
Line drawing of an open industrial machine with control panel and display (no text or symbols)NOTE: If the optional document processor is installed, open the document processor. Before opening the document processor, be sure that there are no originals left on the original table or on the original eject table. Originals left on the original table or on the original eject table may fall off when the document processor is opened.
Keep the document processor open if the original is 40 mm or thicker.
2 Place the original. Put the scanning side facedown and align it flush against the original size indicator plates with the back left corner as the reference point.
natural_image
Line drawing of hands operating a printer with a control panel (no text or symbols)◆ Original size indicator plates (Inch models)
(Metric models)
3 Close the original cover.
CAUTION: Do not push the original cover forcefully when you close it. Excessive pressure may crack the platen glass.
NOTE: Shadows may be produced around the edges and in the middle of open-faced originals.

CAUTION: Do not leave the document processor open as there is a danger of personal injury.
Loading Originals in the Document Processor
The optional document processor automatically scans each sheet of multiple originals. Both sides of two-sided originals are scanned.
Part Names of Document Processor
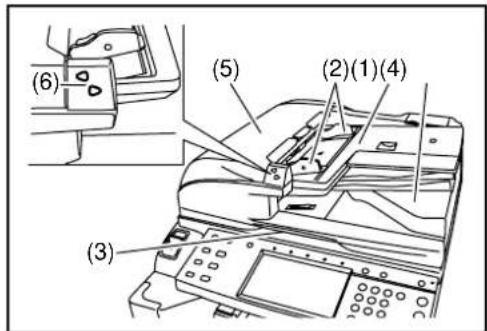
(1) Original table
(2) Original width guides
(3) Opening handle
(4) Original eject table
(5) Top cover
(6) Original placement indicator
Originals Supported by the Document Processor
The document processor supports the following types of originals.
| Weight 45 g/m ^2 to 160 g/m ^2 |
| Size Maximum A3 to Minimum A5-RMaximum Ledger to Minimum Statement-R |
| Capacity Plain paper (80 g/m ^2 ), High quality paper (50 g/m ^2 ),Colored paper, Recycled paper: 100 sheets (Mixed sized originals: 30 sheets)Thick paper (120 g/m ^2 ): 66 sheetsThick paper (160 g/m ^2 ): 50 sheetsArt paper, Rough paper, Coated paper: 1 sheetHigh quality paper (110 g/m ^2 ): 73 sheets |
Originals Not Supported by the Document Processor
Do not use the document processor for the following types of originals.
- Soft originals such as vinyl sheets
• Transparencies such as OHP film - Carbon paper
• Originals with very slippery surfaces
• Originals with adhesive tape or glue - Wet originals
• Originals with correction fluid which is not dried
- Irregularly shaped (non-rectangular) originals
• Originals with cut-out sections
- Crumpled paper
- Originals with folds (Straighten the folds before loading. Failure to do so may cause the originals to jam).
- Originals bound with clips or staples (Remove the clips or staples and straighten curls, wrinkles or creases before loading. Failure to do so may cause the originals to jam).
How to Load Originals
CAUTION: Before loading originals, be sure that there are no originals left on the original eject table. Originals left on the original eject table may cause the new originals to jam.
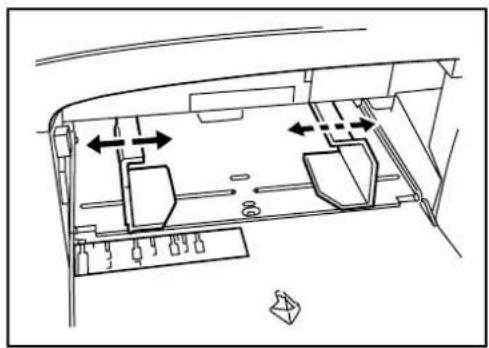
1 Adjust the original width guides to fit the originals.
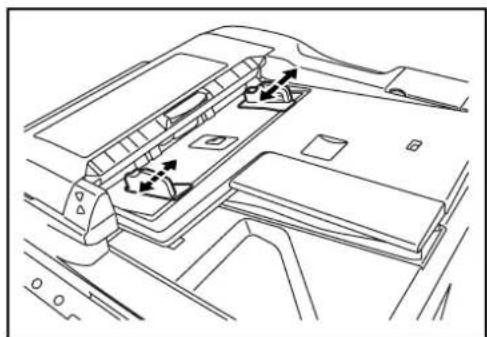
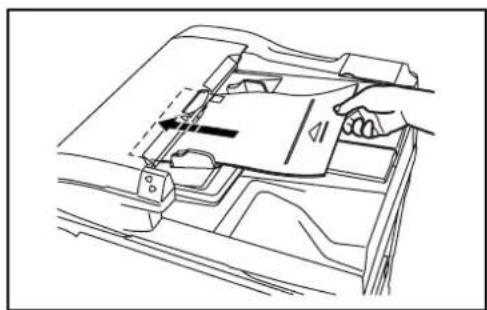
natural_image
Technical line drawing of a vehicle interior showing structural components and airflow indicators (no text or symbols)2 Place the originals. Put the side to be scanned (or the first side of two-sided originals) face-up. Slide the leading edge into the document processor as far as it will go. The originals placement indicator will be lit.
natural_image
Line drawing of a mechanical assembly with a hand operating a component (no text or symbols)CAUTION: Confirm that the original width guides exactly fit the originals. If there is a gap, readjust the original width guides. The gap may cause the originals to jam.
Ensure that loaded originals do not exceed the level indicated. Exceeding the maximum level may cause the originals to jam (see the figure below).
Originals with punched holes or perforated lines should be placed in such a way that the holes or perforations will be scanned last (not first).
natural_image
Line drawing of a printer with a hand inserting a card into the cover (no text or symbols)3 Basic Operation
This chapter explains the following operations.
• Power On/Off.... 3-2
- Sleep and Auto Sleep.... 3-4
- Adjusting Operation Panel Angle 3-5
- Touch Panel Display 3-6
- Copying.... 3-7
- Printing - Printing from Applications .... 3-18
- Sending 3-20
- Specifying Destination.... 3-34
• Using Document Box.... 3-37
- Printing a Document Stored in Removable USB Memory....3-48
- Canceling/Viewing/Changing Job.... 3-50
- Checking Remaining Toner and Paper...... 3-54
- Quick Setup Screen 3-55
Power On/Off
Power On
Open the main power switch cover and turn the main power switch on.
Blinking/Lighting of each Key/Indicator
When turning on the main power switch, the Key/Indicator such as the Copy key or the Send key blinks.
Blinking: This function is in preparation. When each key is ready, the indicator lights out one by one.
Light-out: This function is ready.
Light on: This function is selected. [Copy] is selected as the default so that the Copy key/indicator lights on first.
NOTE: The key which indicator is off can be used even if any other key remains blinking.
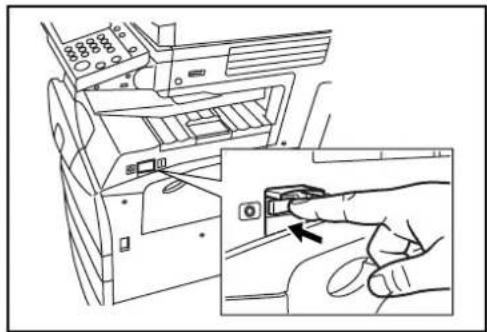
Power Off
When turning off the main power switch, press the Power key on the operation panel to off. Make sure that the Power key and the memory indicator are off before turning off the main power switch.
CAUTION: Turning off the main power switch before pressing the Power key to off may cause damage to the standard internal hard disk.
In case of not using the machine for extended period of time

CAUTION: If the machine will not be used for hours (overnight, etc.), turn the main power switch off. If it will not be used for an extended period of time (vacations, etc.), remove the power plug from the outlet for safety purposes.
CAUTION: Do not turn the main power switch off when the optional fax kit is installed. If you turn the main power switch off, you cannot receive FAX messages.
Sleep and Auto Sleep
Sleep
To enter Sleep, press the Power key. All indicators on the touch panel will go out to save power consumption except the Main Power indicator. This status refers to Sleep.
If print data is received during Sleep, the print job is performed while the touch panel remains unlit.
When using optional fax, received fax data is printed out also with the operation panel remaining unlit.
To resume, press the Power key. The machine will be ready to operate within 15 seconds.
Auto Sleep
Auto Sleep automatically switches the machine into Sleep if left idle for a preset time. The default preset time is 45 minutes for the 30 and 40 ppm models, and 90 minutes for the 50 ppm model.
Adjusting Operation Panel Angle
Adjust the angle of the operation panel in two steps by releasing the operation panel lock lever.
natural_image
Line drawing of a hand operating a mechanical device with a curved arrow indicating rotation (no text or symbols)Touch Panel Display
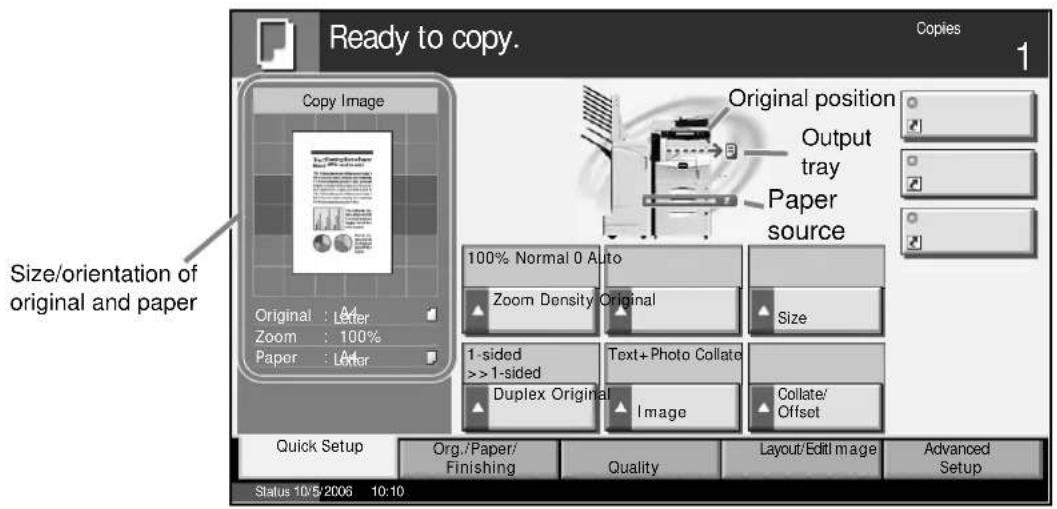
Display of Originals and Paper
The touch panel displays the selected paper source and output tray.
Display in Changing Screen
The stand-by display (icon) may appear when the touch panel screen is changed.
Normal stand-by display
Stand-by Display When System Menu Operation Is Completed
When the system menu operation is completed and another function (such as copying) is used, the display below appears.
Copying
Follow the steps as below for basic copying.
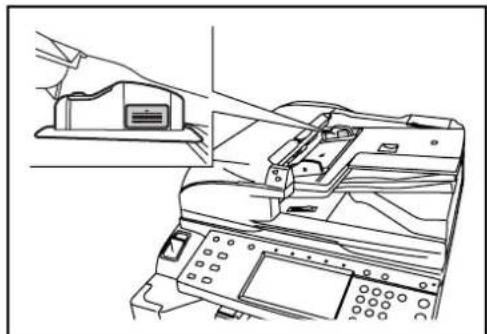
1 Press the Copy key when the Copy key/indicator is off.
natural_image
Line drawing of a printer's front panel with an inset showing the close-up of the clip (no text or symbols)NOTE: If you place the original and press the Start key before the copier has warmed up, only the scanning is performed in advance and the copying job starts upon completion of the warm-up.
2 Place the originals on the platen or in the optional document processor.
natural_image
Line drawing of a hand holding a tool interacting with a device inside a rack (no text or symbols)NOTE: For loading instructions, refer to Loading Originals on page 2-25.
3 Check that [Auto] is selected of Paper Selection on the touch panel. Paper that matches the size of the original will be selected automatically.
To change the paper size, press [Paper Selection] and select desired paper source.
NOTE: Select paper size manually, if necessary, instead of using automatic paper selection.
4 Use the numeric keys to enter the copy quantity. Specify desired number up to 999.
5 Press the Start key to start copy.
6 Remove the finished copies from the top tray.
natural_image
Line drawing of a kitchen appliance with a curved door and control panel (no text or symbols)Adjusting Density
Adjust the copy density.
| Density Adjustment Option | Description |
| Manual Adjust density using the 7 or 13 levels. | |
| Auto Optimum density is selected depending on density of original. | |
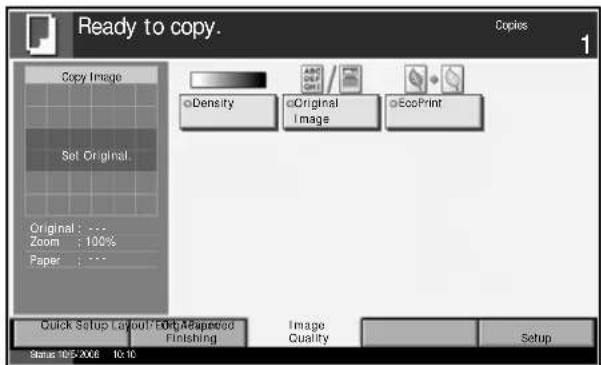
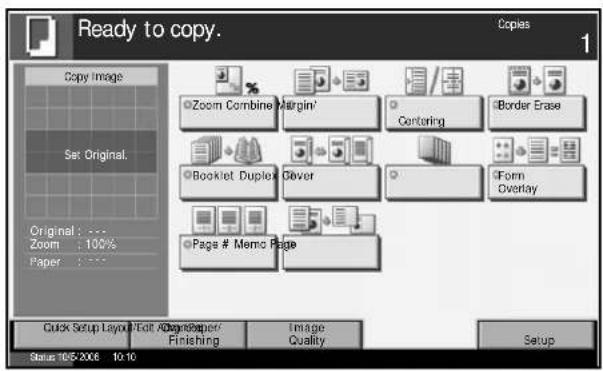
1 Press [Image Quality] and then [Density].

2 Adjust density manually pressing [-3] (Lighter) to [+3] (Darker). You can change the density level [-3] (Lighter) to [+3] (Darker) by half a step.
To change density adjustment from [Manual] to [Auto], press [Auto].
![Ready to copy. Copies 1 Density Press [OK] to display the image. Auto Lighter Normal Darker -3 -2.1 -1 +2 +3 -2.5 -1.5 -0.5 +0.3 +1.5 +2.5 Arts Shortcut Cancel OK Status 10/5-2006 10:10](/content/2026/04/637475/images/ca5c72502fef78a84a73f64c7036099c58a5893185b7c2cf1647b2cae7b9322b.jpg)
3 Press [OK].
Selecting Image Quality
Select image quality suited to the type of original.
| Image Quality Option | Description |
| Text+Photo | For originals with both text and photographs. |
| Text | For originals primarily consisting of text. |
| Photo | For originals primarily consisting of photographs. |
1 Press [Image Quality] and then [Original Image].

2 Select the image quality.
![Ready to copy. Copies Original Image Press [OK] to display the image. Select original document type for best copy results. [Text + Photo]: Text and photos together. [Text]: Only text, no photos. [Photo]: Only photos, no text. Add Shortcut Cancel OK Status: 10/5-2006 10:10](/content/2026/04/637475/images/fb103318230f891d661994baea5e694e27645350e521f48d58e8da3b52f30b72.jpg)
3 Press [OK].
Zoom Copying
Adjust the magnification to reduce or enlarge the original image. The following zoom options are available.
Auto Zoom
Automatically reduces or enlarges the original image suited to the selected paper size.
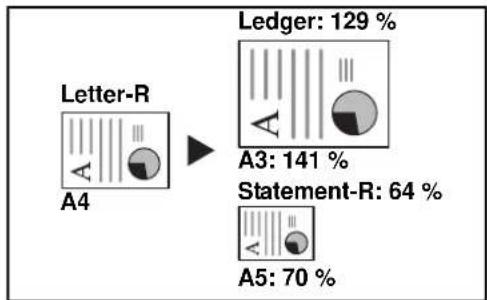
other
| Category | Percentage | | ------------ | ---------- | | Letter-R | 129% | | Ledger | 129% | | A3 | 141% | | Statement-R | 64% | | A5 | 70% |Manual Zoom
Manually reduces or enlarges the original image in 1% increment between 25 and 400%.
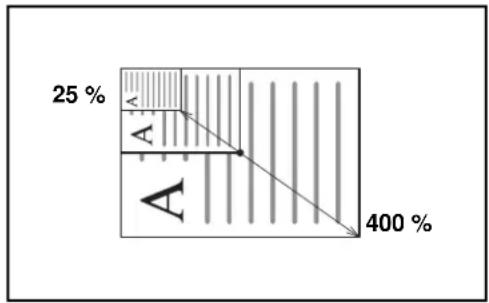
bar
| Category | Value (%) | |---|---| | A | 25 | | A | 400 |Preset Zoom
Reduces or enlarges at preset magnifications.
The following magnifications are available.
| Model Zoom Level (OriginalCopy) | |
| Inch Models 100% | Auto, 400% (Max.), 200% (STMT>>Ledger), 154%(STMT>>Legal), 129% (Letter>>Ledger), 121% (Legal>>Ledger), 78% (Legal>>Letter), 77% (Ledger>>Legal), 64% (Ledger>>Letter), 50% (Ledger>>STMT), 25% (Min.) |
| Metric Models 100%, Auto, 400% (Max.), 200% (A5>>A3), 141% (A4>>A3, A5>>A4), 127% (Folio>>A3), 106% (11×15">>A3), 90% (Folio>>A4), 75% (11×15">>A4), 70% (A3>>A4, A4>>A5), 50%, 25% (Min.) | |
| Metric Models (Asia Pacific) | Auto, 400%, Max, 200% (A5>>A3), 141% (A4>>A3, B5>>B4), 122% (A4>>B4, A5>>B5), 115% (B4>>A3, B5>>A4), 86% (A3>>B4, A4>>B5), 81%(B4>>A4, B5>>A5), 70% (A3>>A4, B4>>B5), 50%, 25% (Min.) |
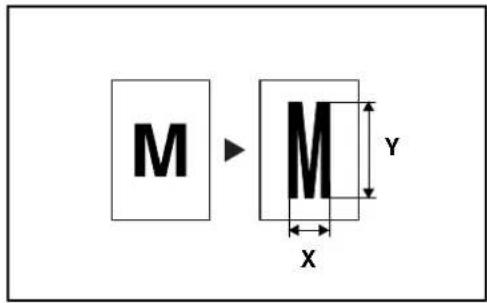
XY Zoom
Select vertical and horizontal magnifications individually. Reduce or enlarge original images in 1% increments between 25% and 400%.
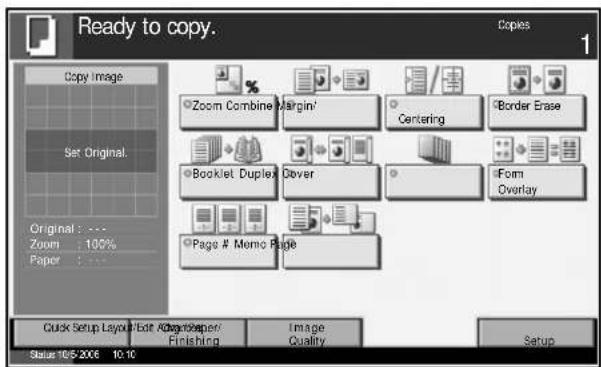
1 Press [Layout/Edit] and then [Zoom].

2 Press [Standard Zoom] to use Auto Zoom.
Press [+] or [-] to change the displayed magnification as desired. You can also enter the magnification directly using the numeric keys by pressing [# keys].
When using Preset Zoom, select the key of desired magnification.
When using XY Zoom, press [XY Zoom].
Press [+] or [-] to change the displayed
magnifications of X (horizontal) and Y (vertical). You can also enter the magnification directly using the numeric keys by pressing [# keys].
![Ready to copy. Copies 1 Zoom Standard Zoom XY Zoom Press [OK] to display the image X (25 - 400) 100 % - + Keys Y (25 - 400) 100 % - + Keys Top Edge Top Original Orientation Add Shortcut Cancel OK Status: 10/5-2008 10:10](/content/2026/04/637475/images/60a29851bd8eb9aa026ae269265d75f3bb93e6ba4399658877f600fda02574e8.jpg)
Press [Original Orientation] to select orientation of the originals, either [Top Edge Top] or [Top Edge Left]. Then press [OK].
3 Press [OK].
Duplex Copying
Produce two-sided copies. The following duplex options are available.
One-sided to Two-sided
Produces two-sided copies from one-sided originals. In case of an odd number of originals, the back side of the last copy will be blank.
The following binding options are available.
A Original Left/Right to Binding Left/Right: Images on the second sides are not rotated.
B Original Left/Right to Binding Top: Images on the second sides are rotated 180°. Copies can be bound on the top edge, facing the same orientation when turning the pages.
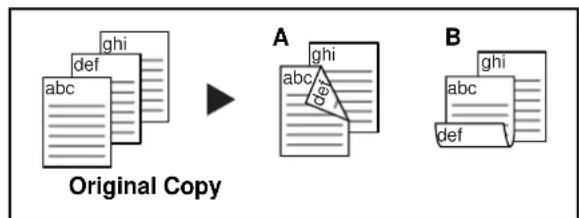
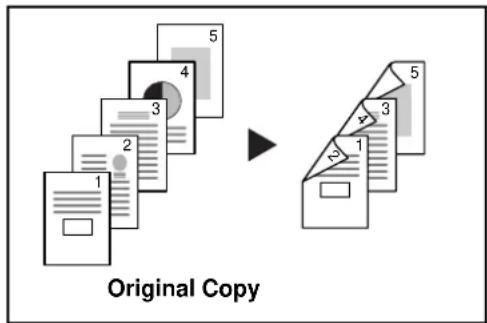
Two-sided to One-sided
Copies each side of a two-sided original onto two individual sheets. Optional document processor is required.
flowchart
graph LR
    A["Original Copy"] --> B["1"]
    A --> C["2"]
The following binding options are available.
Binding Left/Right: Images on the second sides are not rotated.
Binding Top: Images on the second sides are rotated 180°.
Two-sided to Two-sided
Produces two-sided copies from two-sided originals. Optional document processor is required.
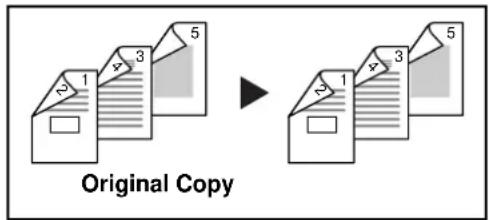
NOTE: The paper sizes supported in Two-sided to Two-sided are Ledger, Legal, Letter, Executive Statement-R, Oficio II, 8.5×13.5", A3, B4, A4, B5, A5-R and Folio.
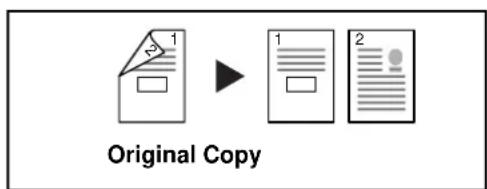
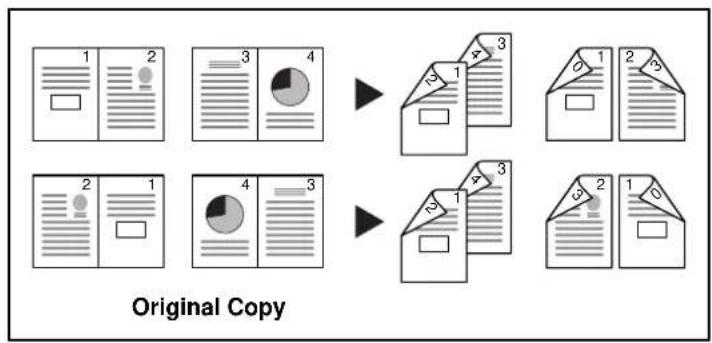
Book to One-sided
Produces a 1-sided copy of a 2-sided or open book original.
flowchart
graph LR
    A["Original Copy"] --> B["1"]
    A --> C["2"]
The following binding options are available.
Binding Left: Originals with facing pages are copied from left to right.
Binding Right: Originals with facing pages are copied from right to left.
NOTE: The following sizes of originals and paper are supported in Two-sided to One-sided and Book to One-sided. Original: Ledger, Letter-R, A3, B4, A4-R, B5-R, A5-R and 8K. Paper: Letter, A4, B5 and 16K. You may change paper size and reduce or enlarge copy to match that size.
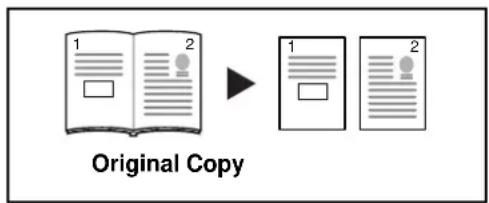
Book to Two-sided
Produces two-sided copies from an open book original with facing pages.
flowchart
graph TD
    A["Original Copy"] --> B["1: Sheet 1"]
    A --> C["2: Sheet 2"]
    A --> D["3: Sheet 3"]
    A --> E["4: Sheet 4"]
    B --> F["1: Page 1"]
    C --> G["2: Page 2"]
    D --> H["3: Page 3"]
    E --> I["4: Page 4"]
    F --> J["1: Page 5"]
    G --> K["2: Page 6"]
    H --> L["3: Page 7"]
    I --> M["4: Page 8"]
    J --> N["1: Page 9"]
    K --> O["2: Page 10"]
    L --> P["3: Page 11"]
    M --> Q["4: Page 12"]
    N --> R["1: Page 13"]
    O --> S["2: Page 14"]
    P --> T["3: Page 15"]
NOTE: The sizes of originals and paper supported in Book to Two-sided are Letter, A4, B5, and 16K.
1 Press [Layout/Edit] and then [Duplex].
2 Select the desired Duplex option.
![Ready to copy. Copies 1 Duplex Press [OK] to display the image. 1-sided >>1-sided 1-sided >>2-sided 2-sided >>1-sided 2-sided >>2-sided Book >>1-sided Book >>2-sided Finishing Binding Left/Right Binding Top Top Edge Top Original Orientation Add Shortcut Cancel OK Status 10/5/2005 10:10](/content/2026/04/637475/images/45ba49dc7d0cc28c10d93adfd6045018e1b647791b04e673cd564c08843cb1a7.jpg)
3 If you choose [2-sided>>2-sided], [2-sided>>1-sided], [Book>>1-sided] or [Book>>2-sided], select the binding edge of the originals of Original.
4 If you choose [1-sided>>2-sided], [2-sided>>2-sided] or [Book>>2-sided], select the binding edge of the finished copies of Finished.
5 Press [Original Orientation] to select orientation of the originals, either [Top Edge Top] or [Top Edge Left]. Then press [OK].
6 Press [OK].
7 Place the originals and press the Start key.
If the original is placed on the platen, scan it and replace it with a next one. Then, press the Start key.
After scanning all originals, press [Scan Finish] to start copying.
Collate/Offset Copying
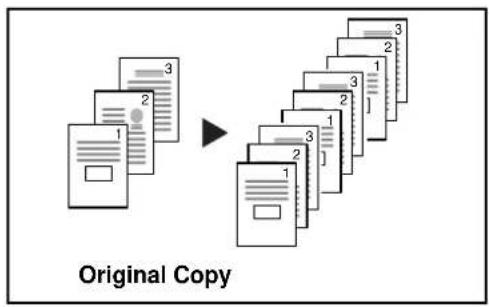
Collate
Scan multiple originals and deliver complete sets of copies as required according to page number.
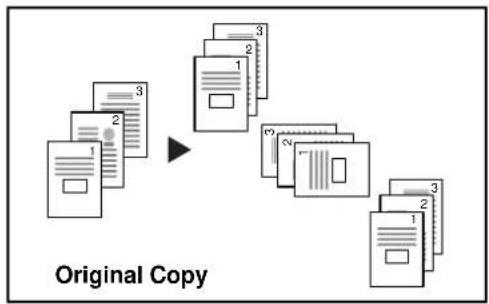
Offset
Use offset to produce copies after rotating each set (or page) by 90°.
flowchart
graph TD
    A["Original Copy"] --> B["1"]
    A --> C["2"]
    A --> D["3"]
    B --> E["1"]
    C --> F["2"]
    D --> G["3"]
    E --> H["1"]
    F --> I["2"]
    G --> J["3"]
NOTE: To use offset function, load the same sized paper with different orientation in the paper source other than the selected paper source. The paper sizes supported in Offset are A4, B5, Letter and 16K.
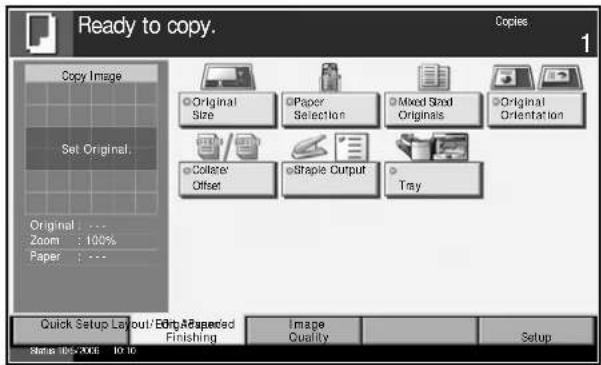
1 Press [Org./Paper/Finishing] and then [Collate/Offset].
![Ready to copy. Copies 1 Copy Image Press [OK] to display: the image Original : --- Zoom : 100% Paper : --- Original Size Paper Selection Mixed Stool Originals Original Orientation Colator Offset Staple Output Tray Quick Setup Layout/Export/Assessed Finishing Image Quality Setup Status: 06/05/2006](/content/2026/04/637475/images/2d239e9ff781d46c8a27f2b61ce8f878de4a3f4e748c8d46161069949eea2443.jpg)
2 To use collate copying, press [On] of Collate.
To use offset copying, press [Off] or [Each set] of Offset.
Press [OK].
![Ready to copy. Copies 1 Collate/Offset Press [OK] to display the image. Collate Off 12.5.13 17.5.13 Offset Off Each set Add Shortcut Cancel OK Status: 10/5/2008 10:10](/content/2026/04/637475/images/3e286cf2275e06c413ced8b80874075bff3e3df6eb61708e5e217439ca665ea6.jpg)
3 Use the numeric keys to enter the copy quantity.
4 Place the originals and press the Start key.
Printing - Printing from Applications
Follow the steps below to print documents from applications.
1 Create a document using an application.
2 Click File and select Print in the application. The Print dialog box appears.
3 Click Name of Printer and select this machine from the list.
4 Enter the desired print quantity in Number of copies box. Enter any number up to 999.
When there is more than one document, select Collate to print output one by one in the sequence of the page numbers.
5 Click Properties. The Properties dialog box appears.
6 Select Basic tab and click Page Size to select the paper size.
To print on the special paper such as thick paper or transparency, click Media Type menu and select the paper type.
7 Click Source and select the paper source.
NOTE: If you choose Auto Select, papers are supplied automatically from the paper source loaded with the papers of optimum size and type. To print on the special paper such as envelope or thick paper, place it on the Multi Purpose Tray and select MP Tray.
8 Select paper orientation, either Portrait or Landscape, to match the orientation of the document.
If you select Rotated, the document will be printed after being rotated 180°.
9 Click OK button to return to the Print dialog box.
10 Click OK button to start printing.
Sending
Follow the steps below for basic sending. The following four options are available.
- Send as E-mail: Sends a scanned original image as an attached file of E-mail...page 3-20
- Send to Folder (SMB): Stores a scanned original image in a shared folder of any PC...page 3-22
- Send to Folder (FTP): Stores a scanned original image in a folder of FTP server...page 3-25
- Image Data Scanning with TWAIN: Loads the document data stored in custom box to PC...page 3-28
NOTE: Originals in color can be scanned by adding more memory in the machine. Consult with your service.
Different sending options can be specified in combination. Refer to Sending to Different Types of Destinations (Multi Sending) on page 3-36.
Send as E-mail
Sends a scanned original image as an attached file of E-mail.
NOTE: To enable sending as E-mail, network connection and SMTP server setting are required. Consult your system administrator about the setting.
1 Place the originals on the platen or in the optional document processor.
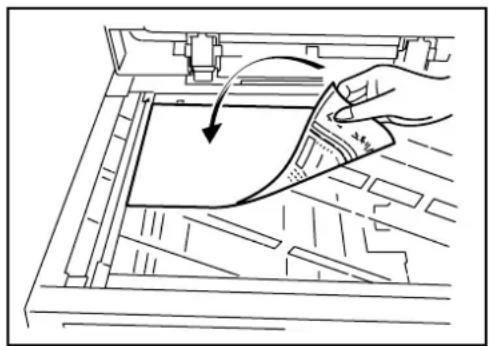
natural_image
Line drawing of a hand using a tool to press or print a document inside a machine (no text or symbols present)NOTE: For loading instructions, refer to Loading Originals on page 2-25.
2 Press the Send key.
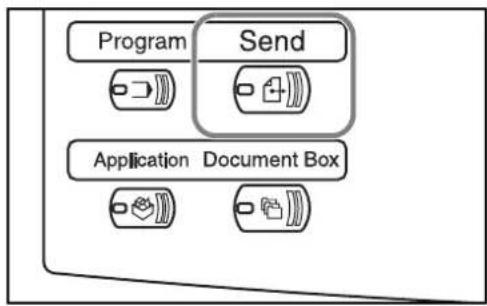
flowchart
graph TD
    A["Program"] --> B["Send"]
    B --> C["Application"]
    C --> D["Document Box"]
3 Press [E-mail Addr Entry] and then [E-mail Address].
NOTE: Destination can be specified using the address book or the one-touch keys. Refer to Specifying Destination on page 3-34.
4 Enter destination E-mail address and press [OK].
![Ready to send. Place original. Destination E-mail Address Entry E-mail Address Cc: Boc: Add a new E-mail destination. Press [E-mail Address], then enter the address using the keyboard screen. To/Co/Boc: can also be set. Next Dash, Add to Add Book Cancel OK Status 10-5-2006 10:10](/content/2026/04/637475/images/96e547f8ec0b5b2375376337e0522d3b47e8de95ee94999369e2607b412cd005.jpg)
5 Press [To:], [Cc:] or [Bcc:] to change the recipient status as necessary.
To specify another destination, go to the next step. To specify only one destination, go to the step 7.
6 Press [Next Dest.] and repeat the steps 4 and 5 to specify the destination. Up to 100 E-mail addresses can be specified.
NOTE: When [Add to Addr Book] is displayed, the destinations are registered in the address book.
7 Press [OK]. The destinations are registered in the destination list.
8 Check the destination list.
Select a destination and press [Detail/Edit] to check and edit it. Refer to the steps 4 and 5 to edit the destination as necessary.
Select a destination and press [Delete] to remove the destination from the list.
| AddressBook | ||||||
| E-mailAddr Entry | ||||||
| Folder PathEntry | ||||||
| Chain Detail/Edit Delete Recall | ||||||
| 001 | 002 | 003 | 004 | 005 | No. | |
| AAA BSS CCC DDD EEE | ||||||
| 006 | 007 008 | 009 | 010 | 1/10 | ||
| FFF GGG HHH III JJJ | ||||||
| Quick Setup Destination Figure 3010 (Image Advanced Transmission | Setup | |||||
9 Change the original size, scan resolution, etc. if necessary.
10 Press the Start key. The scanned original is sent to the specified E-mail address.
Send to Folder (SMB)
Stores a scanned original image file in the specified shared folder of any PC.
1 Place the originals on the platen or in the optional document processor.
NOTE: For loading instructions, refer to Loading Originals on page 2-25.
2 Press the Send key.
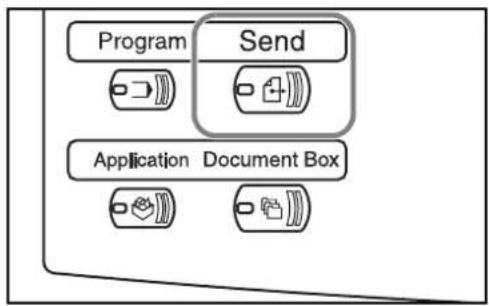
flowchart
graph TD
    A["Program"] --> B["Send"]
    B --> C["Application Document Box"]
    C --> D["Document Box"]
    style A fill:#f9f,stroke:#333
    style B fill:#ccf,stroke:#333
    style C fill:#cfc,stroke:#333
    style D fill:#fcc,stroke:#333
3 Press [Folder Path Entry] and then [SMB].
NOTE: Destination can be specified using the address book or the one-touch keys. For details, refer to Specifying Destination on page 3-34.
4 Enter host name, path, user name and password. Press the key of the item to be entered, and the entry screen appears.
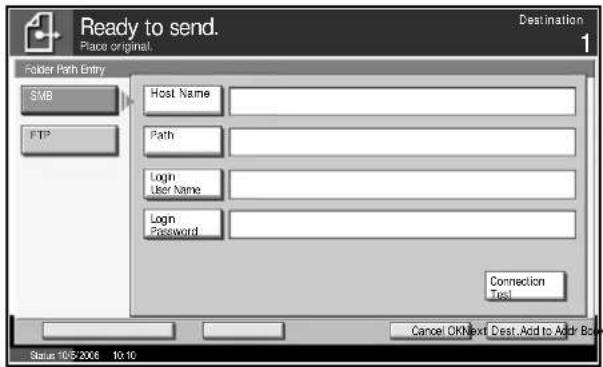
5 Enter the destination data and press [OK].
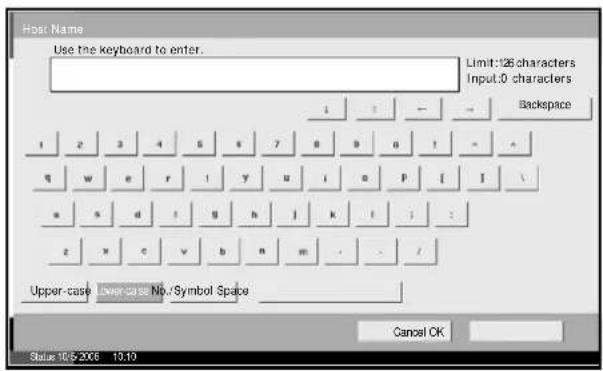
Data to be entered are as follows.
* Specify the port number different from the default (139) using the format of Host Name: Port No.
| Item Data to be entered | Max. characters | |
| Host name* | Host name or IP address of the PC to receive the data | Up to 62 characters |
| Path Path to | the receiving folder such as follows.For example, \User\ScanData. | Up to 126 characters |
| Login User Name | User name to access the PC Up to 62 | characters |
| Login Password | Password to access the PC Up to 62 | characters |
6 Upon completion of all entries, press [Connection Test] to check the connection.
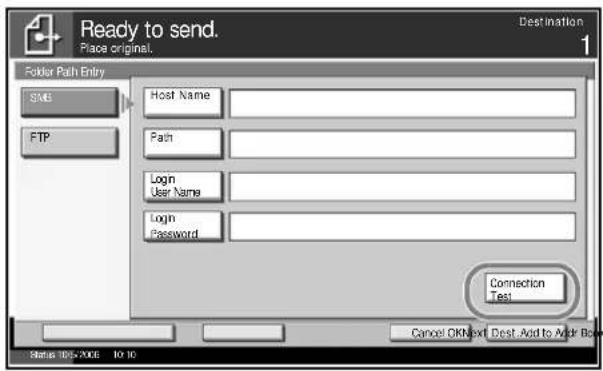
NOTE: Connected appears when connection to the destination is correctly established. If Cannot connect appears, review the entry.
To specify another destination, go to the next step. To specify only one destination, go to the step 8.
7 Press [Next Dest.] and repeat the steps 4 to 6 to specify the destination. Up to 10 folders can be specified.
NOTE: When [Add to Addr Book] is displayed, the entry is registered in the address book.
8 Press [OK] to register the entry in the destination list.
9 Check the destination list.
Select a destination and press [Detail/Edit] to check and edit it. Edit it, if necessary, referring to the steps 5 to 7.
Select a destination and press [Delete] to remove the destination from the list.
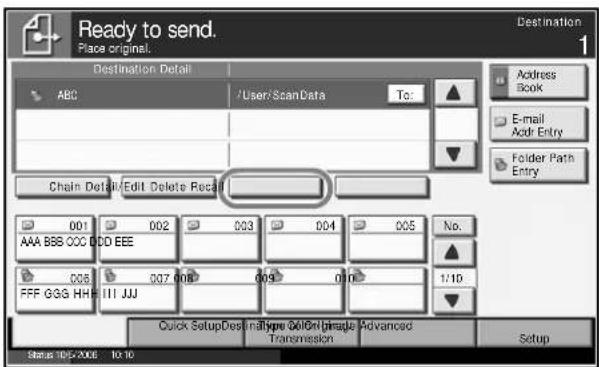
10 Change the original size, scan resolution, etc. if necessary.
11 Press the Start key. The scanned original data file is sent to the specified shared folder of PC.
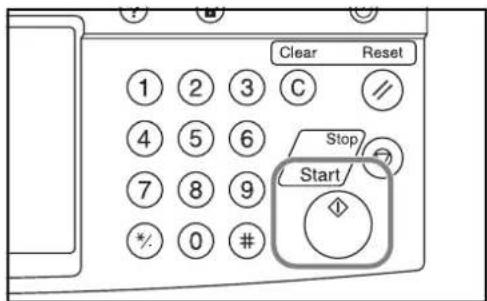
Send to Folder (FTP)
Stores a scanned original image in a folder of FTP server.
1 Place the originals on the platen or in the optional document processor.
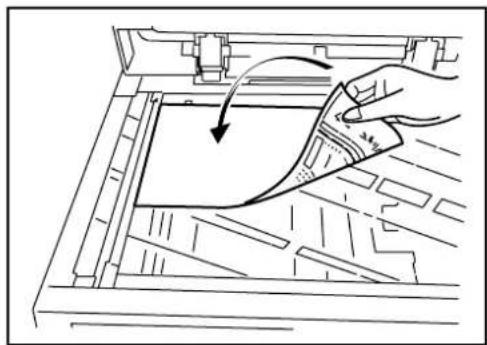
natural_image
Line drawing of a hand using a tool to press or spread material inside a device (no text or symbols visible)NOTE: For loading instructions, refer to Loading Originals on page 2-25.
2 Press the Send key.
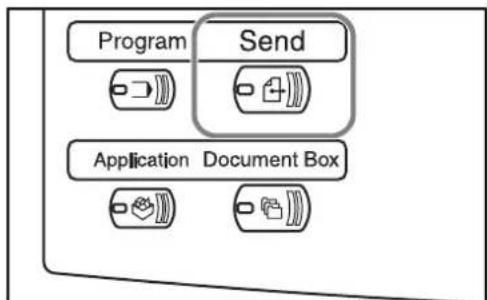
flowchart
graph TD
    A["Program"] --> B["Send"]
    B --> C["Application Document Box"]
    C --> D["Document Box"]
3 Press [Folder Path Entry] and then [FTP].
NOTE: Destination can be specified using the address book or the one-touch keys. Refer to Specifying Destination on page 3-34.
4 Enter host name, path, user name and password. Press the key of the item to be entered, and the entry screen appears.
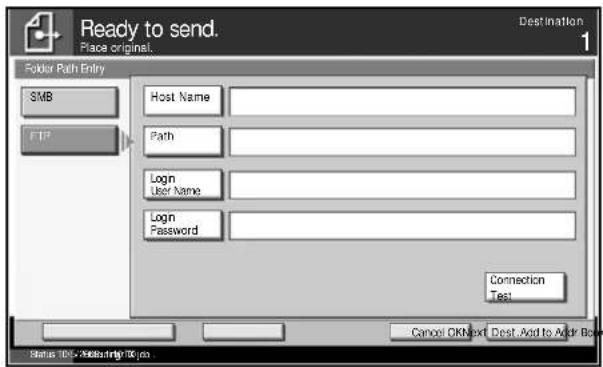
5 Enter the destination data and press [OK].
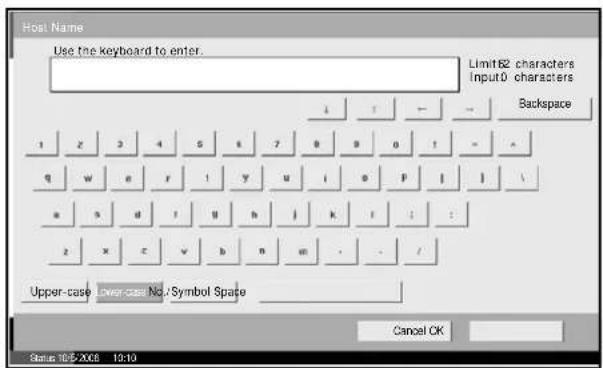
Data to be entered are as follows.
| Item Data to be entered | Max. characters | |
| Host name* | Host name or IP address of FTP server Up to | 62 characters |
| Path | Path to the receiving folder.For example, |User|ScanData.Otherwise the data will be saved in home directory. | Up to 126 characters |
| Login User Name | FTP server log-in user name | Up to 62 characters |
| Login Password | FTP server log-in password | Up to 62 characters |
* Specify the port number different from the default (21) using the format of Host Name: Port No.
6 Upon completion of all entries, press [Connection Test] to check the connection.
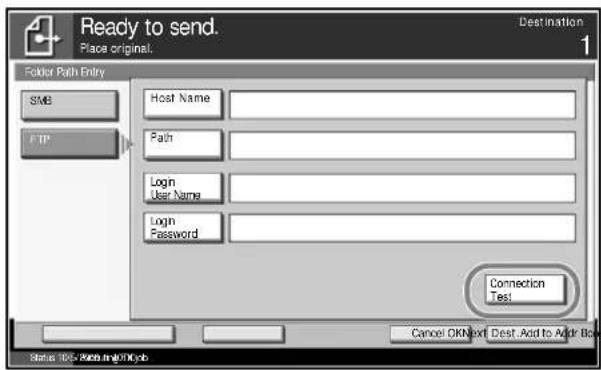
NOTE: Connected appears when connection to the destination is correctly established. If Cannot connect appears, review the entry.
If you wish to specify another destination, go to the next step. If the destination is only one, go to the step 8.
7 Press [Next Dest.] and repeat the steps 5 to 7 to specify the destination. Up to 10 folders (total number of SMB and FTP folders) can be specified.
NOTE: When [Add to Addr Book] is displayed, the entry is registered in the address book.
8 Press [OK] to register the entry in the destination list.
9 Check the destination list.
Select a destination and press [Detail/Edit] to check and edit it. Edit it, if necessary, referring to the steps 4 to 6.
Select a destination and press [Delete] to remove the destination from the list.
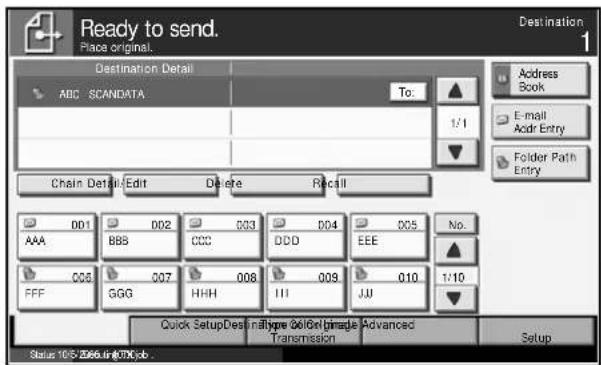
10 Change the original size, scan resolution, etc. if necessary.
11 Press the Start key. The scanned original data file is saved to the specified FTP server.
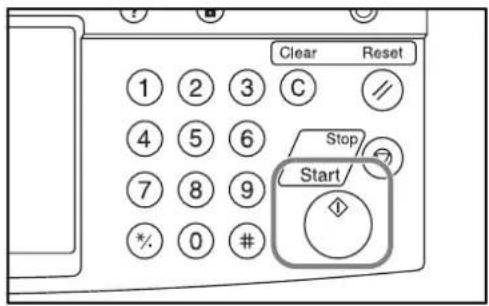
Image Data Scanning with TWAIN
Download the document data stored in custom box to PC.
NOTE: The document data must already be stored in the Custom Box. For detail, see Using Document Box on page 3-37.
Adding the machine to PC
Add this machine to PC to select the machine's Custom Box.
1 Select Start button of the Windows display, All Programs, and then TWAIN Driver Setting.
NOTE: You can also add the machine to PC when selecting Start of the Windows display, Control Panel and then TWAIN Driver Setting.
2 Click Add button.
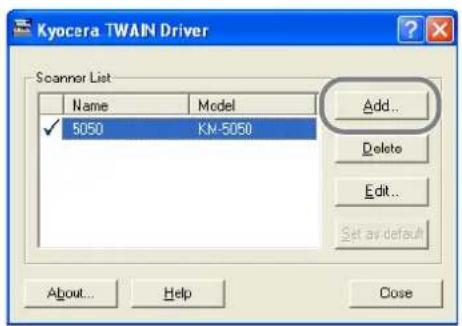
3 Enter the machine name in Name field.
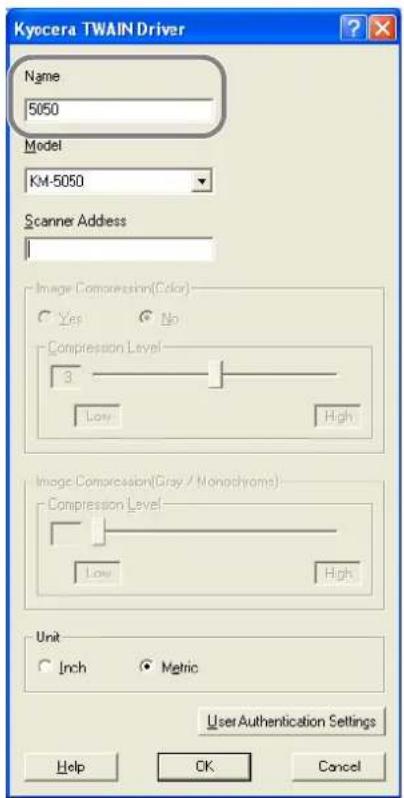
4 Select the machine from Model field.
5 Enter the machine address in Scanner Address field.
NOTE: When the machine address is unknown, contact Administrator.
6 Select Inch or Metric.
7 Click User Authentication Settings button.
8 Select the checkbox beside Authentication, enter Login User Name (up to 64 characters) and Password (up to 64 characters) and then click OK button.
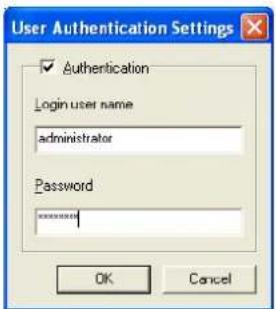
9 Click OK button.
10 The machine is added to PC and the machine name and model name are displayed in Scanner List field.
NOTE: Click Delete button to delete the added machine. Click Edit button to change names.
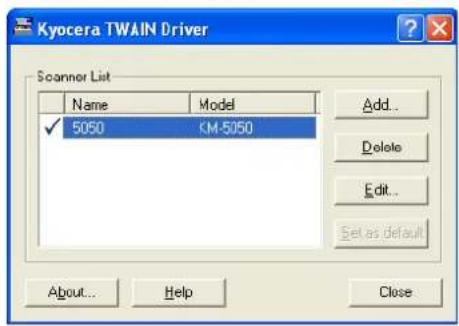
Scanning document data
Scan the document data stored in the Custom Box of the machine.
1 Activate the TWAIN compatible application.
2 Select the machine using the application and display the TWAIN dialog box.
NOTE: For selecting the machine, see the Operation Guide or Help for each application software.
3 Select Custom Box storing the document data to be scanned from Box List field. The document data in Custom Box appears in Document List field.
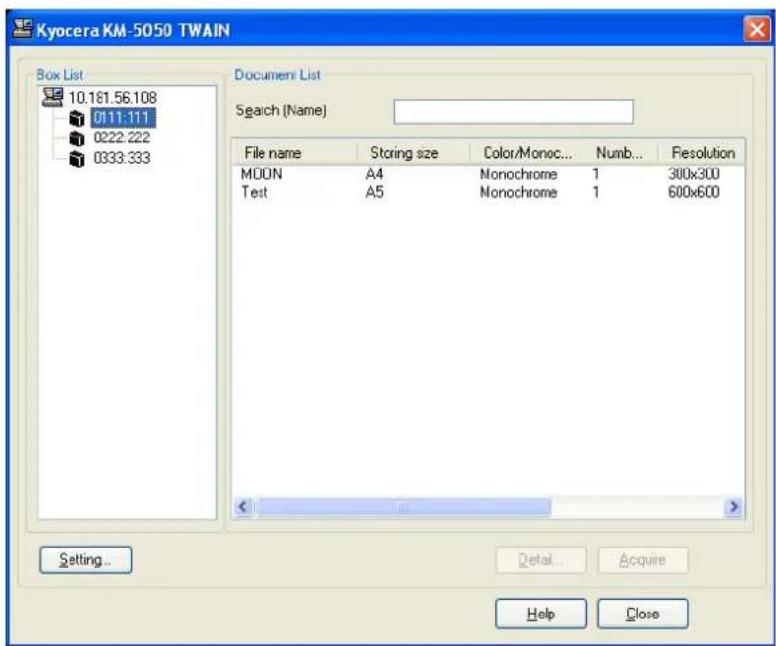
4 Set how to display the document data. Click Setting button to select each item.
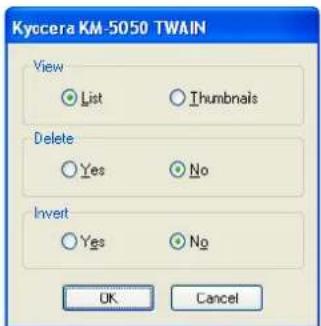
| Item Description | |
| View | Change the display in Document List field to List or Thumbnails. |
| Delete After scanning the | document data, delete the data from Custom Box. |
| Invert Invert the document | data color to start scanning. |
5 Click OK button.
6 Select the document data to be scanned from Document List files.
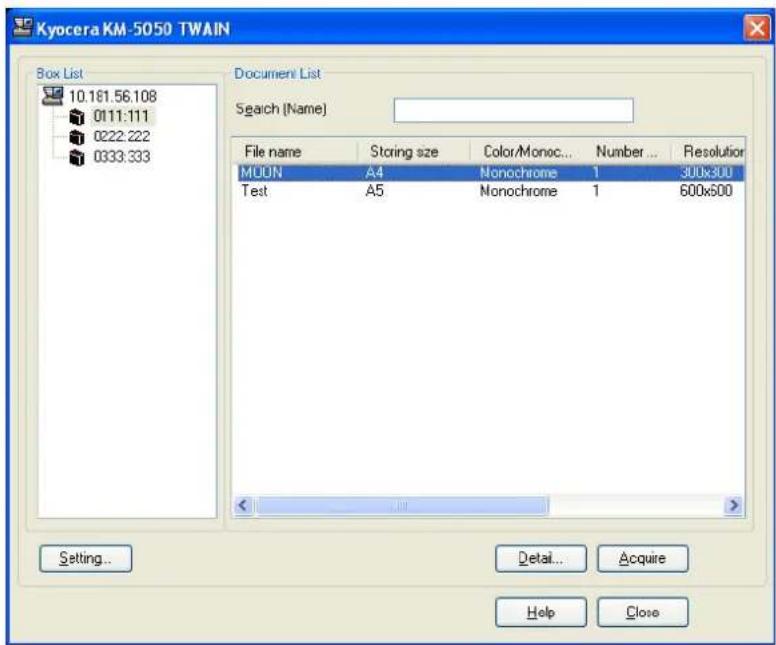
Enter the document data name in Search field to find the data having the same document data name or the same beginning of the document data name.
7 Click Detail button to display the selected document data. When the document data includes multiple pages, select the checkbox beside the pages you want to scan. The selected pages will be scanned.
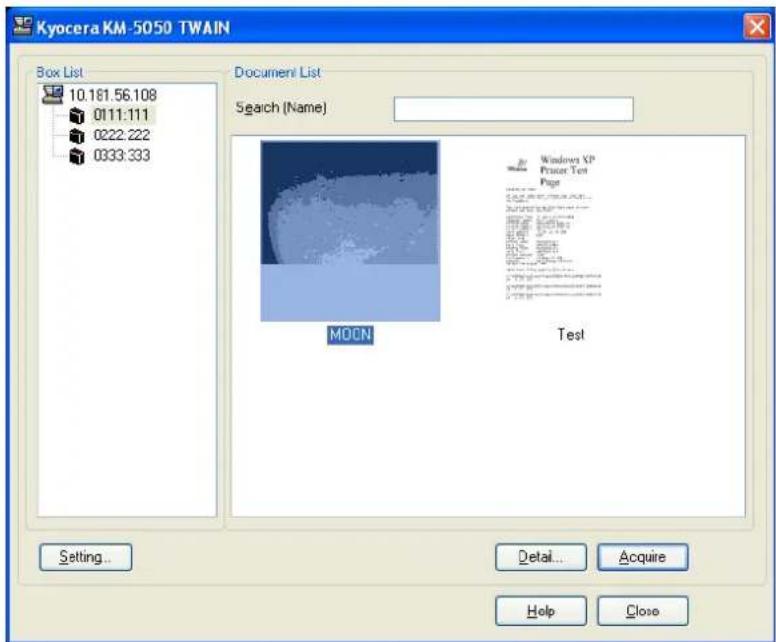
8 Click Acquire button. The document data is scanned.
Specifying Destination
When specifying destination, choose from the address book or use the one-touch keys.
Choosing from Address Book
Select the destination registered in the address book.
1 In the basic screen for sending, press [Address Book].

2 Press the checkbox to select the desired destination from the list. You may choose multiple destinations. The selected destination is indicated by a checkmark in the check box.
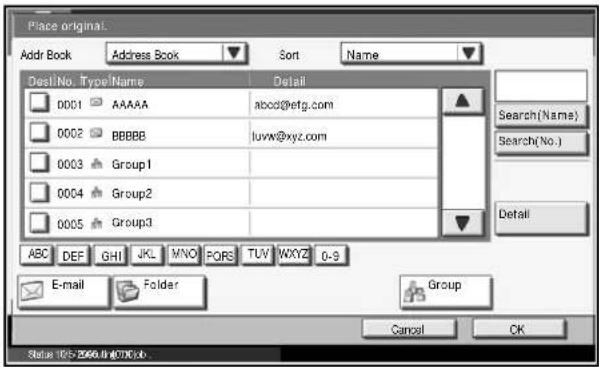
NOTE: To cancel the selection, press the check box and remove the check mark.
3 When sending as E-mail, press [To:], [Cc:] or [Bcc:] to change the recipient status if necessary.
4 Press [OK] to register the selected destination in the destination list.
NOTE: To delete the destination in the list, select the destination and press [Delete].
Destination Search
Destinations registered in the Addr Book address book can be searched. Advanced search by type or by initial letter is also available.
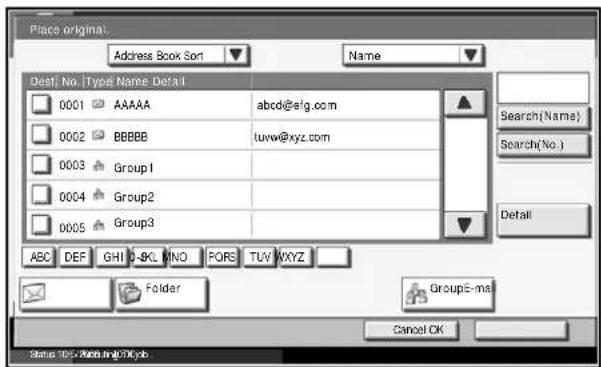
| Keys used | Search type Subjects searched | |
| 1 Search by name Search by registered name. | ||
| 2 Search by address number | Search by registered address number. | |
| 3 Advanced search by destination type | Advanced search by type of registered destination (E-mail, Folder (SMB/FTP), FAX or Group). (FAX: Only when optional fax kit is installed). | |
| 4 Advanced search by initial letter | Advanced search by initial letter of registered name. | |
Search by name
Press [Search(Name)] and enter the required name.
Search by address number
Press [Search (No.)] and enter the address number you wish to search.
Advanced search by destination type
Press any of [E-mail], [Folder], [FAX] or [Group]. The destinations registered by that type are displayed.
Advanced search by initial letter
Press the key for the required initial letter.
Choosing by One-Touch Key
Select the destination using the one-touch key.
In the basic screen for sending, press the one-touch key where the destination is registered.
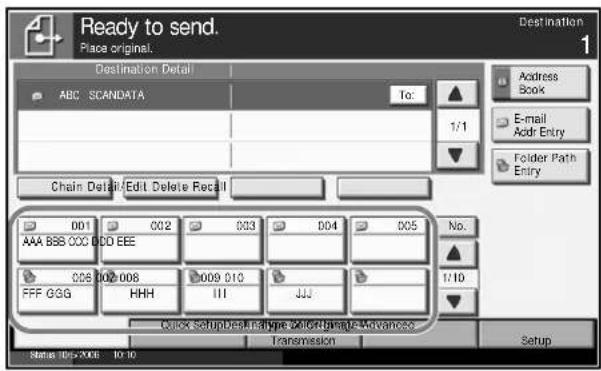
NOTE: If the one-touch key for desired destination is hidden on the touch panel, press [▼] or [▲] to scroll and view next or previous one-touch key.
Choosing by Speed Dial
Access the destination by specifying 3-digit one-touch key number (speed dial).
In the basic screen for sending, press the No. key and enter 3-digit one-touch key number in the numeric entry screen.
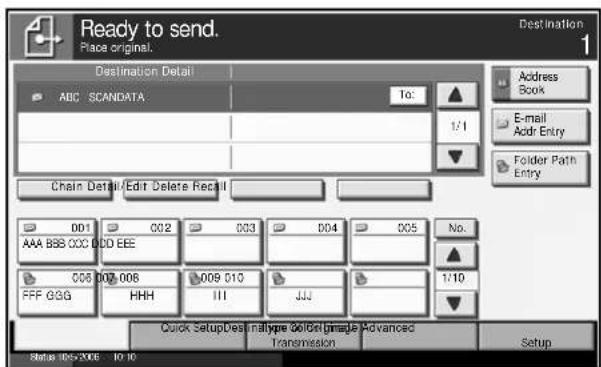
Sending to Different Types of Destinations (Multi Sending)
Multiple types of destinations, E-mail, Folder (SMB/FTP) or FAX (option), may be specified at one time for sending. This is called Multi Sending, a useful feature that allows transmission to different types of destinations (E-mail, folder, etc.) with a single operation.
Procedures are the same as used in specifying the destinations of respective types. Continue to enter E-mail address or folder path so that they appear in the destination list. Press the Start key to launch transmission to all destinations at one time.
Using Document Box
Follow the steps as below for basic operations for using document box.
NOTE: It is assumed that a custom document box has already been created and registered.
Storing Document in Custom Box
Store documents in the custom box.
1 Place the originals on the platen or in the optional document processor.
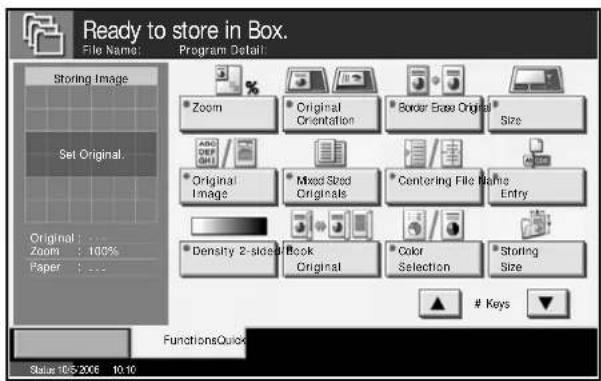
NOTE: For loading instructions, refer to Loading Originals on page 2-25.
2 Press the Document Box key.
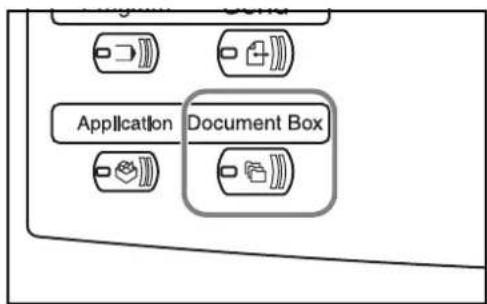
flowchart
graph TD
    A["Application"] --> B["Document Box"]
    C["Document Box"] --> D["Document Box"]
3 Press [Custom Box] and select the box in which the file is to be stored.
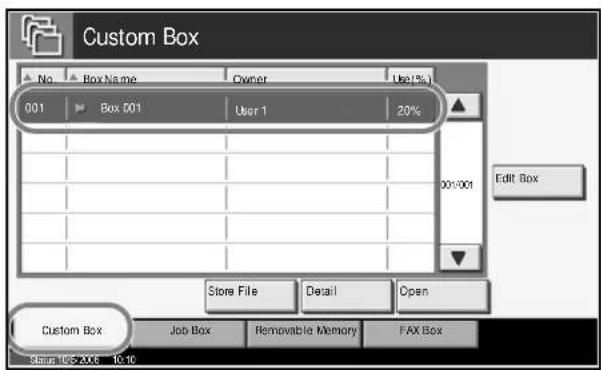
NOTE: The custom box to store a file needs to be created in advance.
4 Press [Store File].
NOTE: If a password is set for the custom box in advance, enter the correct password.
5 Change the original type, scan density, etc. if necessary.
6 Press the Start key. The original will be scanned and its data will be stored in the specified document box.
Printing Document Stored in Custom box
Print the documents stored in the custom box.
1 Press the Document Box key.
flowchart
graph TD
    A["Application"] --> B["Document Box"]
    C["Document Box"] --> D["Document Box"]
2 Press [Custom Box] and select the box containing the document you wish to print.
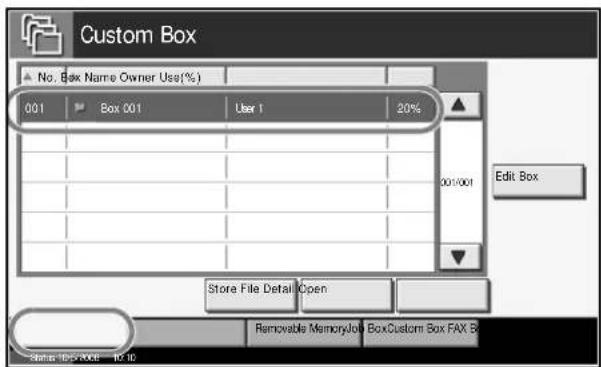
3 Press [Open].

NOTE: If a password is set for the custom box in advance, enter the correct password.
4 From the list, select the checkbox beside the document to be printed. The selected document is indicated by a checkmark in the check box.
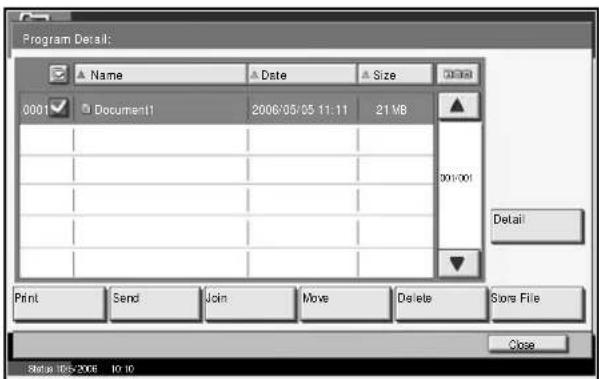
NOTE: Multiple documents cannot be selected and printed. To cancel the selection, press the check box and remove the check mark.
5 Press [Print].
6
Change paper selection, 1-sided/2-sided print, etc. if necessary.
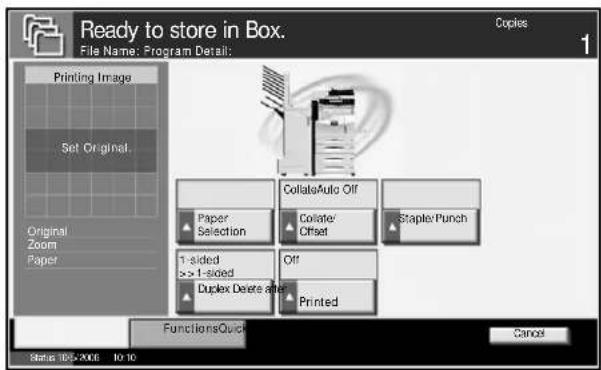
7
Press the Start key to start printing the selected document.
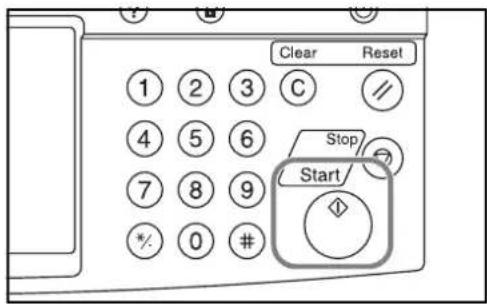
Sending Document Stored in Custom Box
Send the documents stored in the custom box.
1
Press the Document Box key.
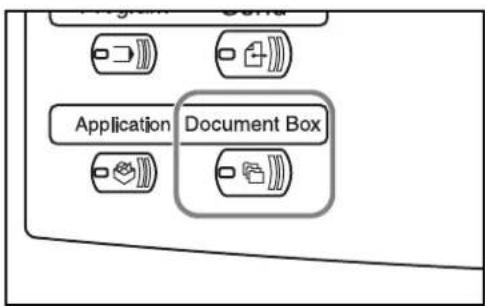
flowchart
graph TD
    A["Application"] --> B["Document Box"]
    C["Document Box"] --> D["Arrow pointing inward"]
2
Press [Custom Box] and select the box containing the document you want to be sent.
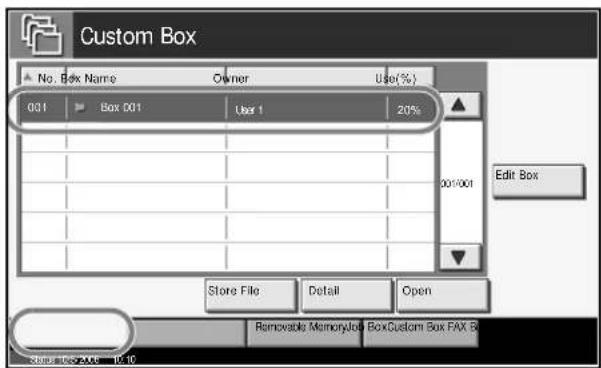
3 Press [Open].
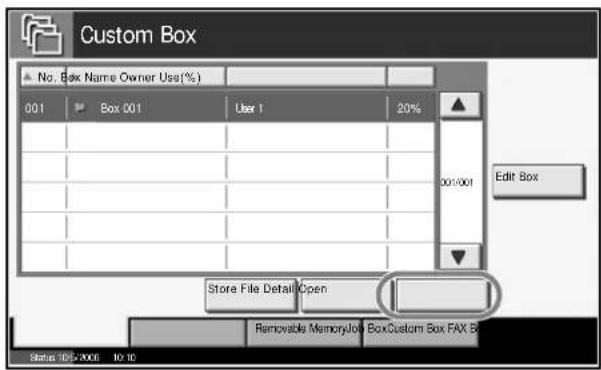
NOTE: If a password is set for the custom box in advance, enter the correct password.
4 From the list, select the checkbox beside the document to be sent. The selected document is indicated by a checkmark in the check box.
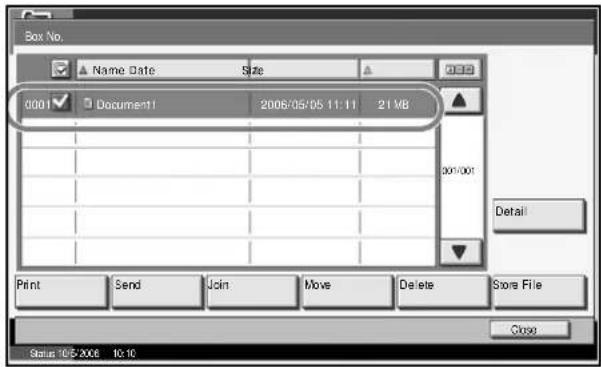
NOTE: Multiple documents cannot be selected and printed. To cancel the selection, press the check box to remove the check mark.
5 Press [Send].
6 Specify the destination.

NOTE: Refer to Specifying Destination on page 3-34 on how to choose destinations.
7 Press the Start key to start sending the selected document.

Editing Document Stored in Custom Box
Move a document from one custom box to another or join multiple documents together.
Move Documents
1 Press the Document Box key.
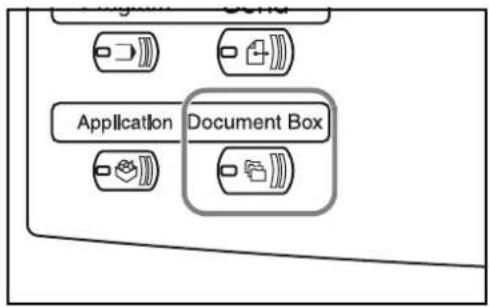
flowchart
graph TD
    A["Application"] --> B["Document Box"]
    C["Document Box"] --> D["Arrow pointing inward"]
    E["Arrow pointing inward"] --> F["Arrow pointing inward"]
2 Press [Custom Box] and select the box containing the document to be moved.
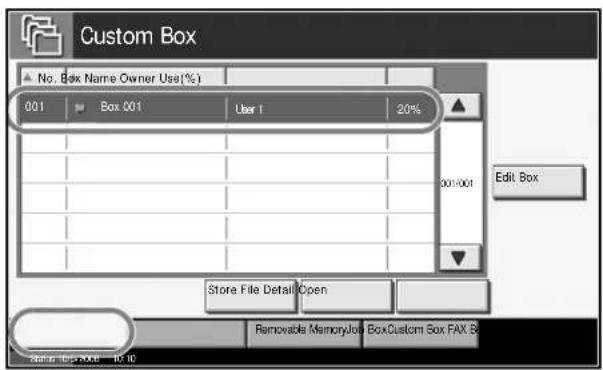
3 Press [Open].

NOTE: If a password is set for the custom box in advance, enter the correct password.
4 From the list, select the check box beside the document to be moved. The selected document is indicated by a checkmark in the check box.
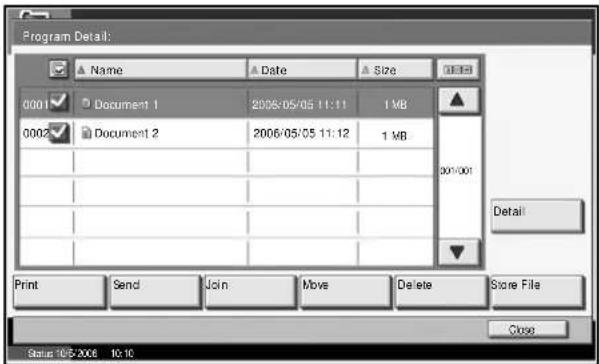
NOTE: To cancel the selection, press the check box to remove the check mark.
5 Press [Move].
6 Select the destination box and press [Move]. The document will be moved to the box.
![Move Select target location and press [Move]. Custom Box No. Box Name Owner Use(%) 0001 Box 001 AAAA 100% 0002 Box 002 AAAA 80% 201/01 Cancel Move Status 10/5-2006 10:10](/content/2026/04/637475/images/4810399073482c2cc1013bc6dbea0a4ce3ac83adf1533cf9c84cbf178c859f83.jpg)
NOTE: If a password is set for the destination box in advance, enter the correct password.
Join Documents
Join the documents stored in the custom box.
NOTE: Only documents contained in the same custom box can be joined. If necessary, move the documents to the same custom box in advance.
1 Press the Document Box key.
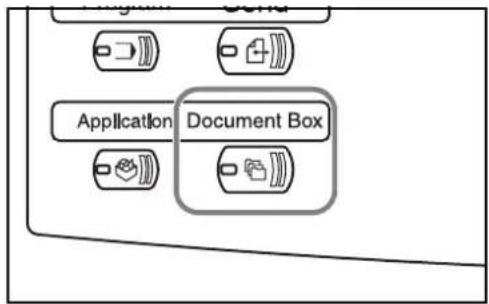
flowchart
graph TD
    A["Application"] --> B["Document Box"]
    C["File Icon"] --> B
    D["Folder Icon"] --> B
    E["Email Icon"] --> B
2 Press [Custom Box] and select the box containing the documents to be joined.

3 Press [Open].

NOTE: If a password is set for the custom box in advance, enter the correct password.
4 From the list, select the check box to indicate the documents to be joined. Up to 10 documents can be joined. The selected documents are indicated by a checkmark in the check box.
NOTE: To cancel the selection, press the check box and remove the check mark.
5 Press [Join].
6 Arrange the documents in the desired order.
Press the document to be rearranged. The document will be highlighted. Press [Up] or [Down] to move the document up or down according to the order to be joined.
7 Press [Next].
8 Press [File Name].
9 Enter a new file name for the documents joined, and press [OK].
NOTE: Refer to the Appendix for entering characters.
10 Press [Join]. The documents will be joined.
NOTE: Original documents before joining are retained. Delete them if unnecessary.
Printing Document Stored in Job Box
Print the documents stored in the job box. The following boxes and documents are contained in the job box.
| Type of box contained | Documents stored |
| Private Print/Stored Job | Print jobs stored by using Private Print or Stored Job functions. |
| Quick Copy/Proof and Hold | Print jobs stored by using Quick Print or Proof and Hold functions. |
| Repeat Copy | Copy job with Repeat Copy setting. |
| Form for Form Overlay (Copy) | Form data used for Form Overlay (Copy). |
1 Press the Document Box key.
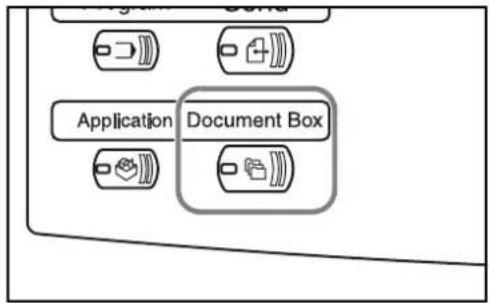
flowchart
graph TD
    A["Application"] --> B["Document Box"]
    C["File Icon"] --> B
    D["Folder Icon"] --> B
    E["Email Icon"] --> B
2 Press [Job Box].
3
Select the box containing the document to be printed among [Private Print/Stored Job], [Quick Copy/Proof and Hold], [Repeat Copy] or [Form for Form Overlay(Copy)]. Press [Open].
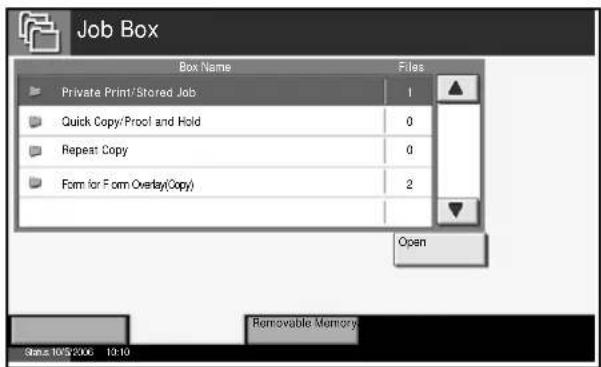
4
Select the document to be printed and press [Print] to start printing.
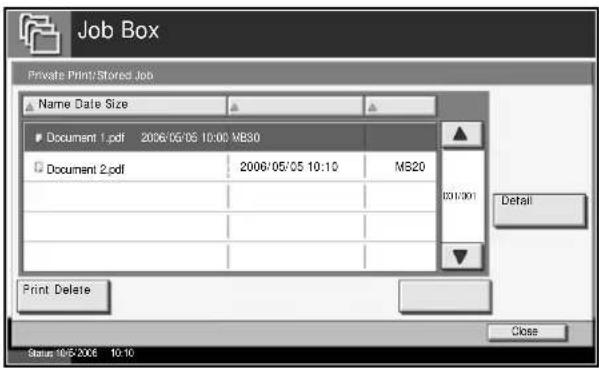
NOTE: If a password is set for the custom box in advance, enter the correct password.
Printing a Document Stored in Removable USB Memory
Connect a removable USB memory to the machine to print PDF data stored in the memory. Printing can be performed easily without using PC.
Limitations
- Only PDF file data (version 1.4 or earlier) is printable.
- High compression PDF files and encrypted PDF files are not supported.
- PDF file you wish to print should have an extension (.pdf).
- The PDF file to print must be at the root directory of the USB memory.
- Multiple documents cannot be selected and printed.
- Use the USB memory properly formatted by this machine.
- Plug a USB memory directly into the USB memory slot. We do not warrant that USB memory printing is error free if a USB hub is used.
Printing
Print documents stored in the removable USB memory.
1 Press the Document Box key.
2 Plug a USB memory into the USB memory slot.
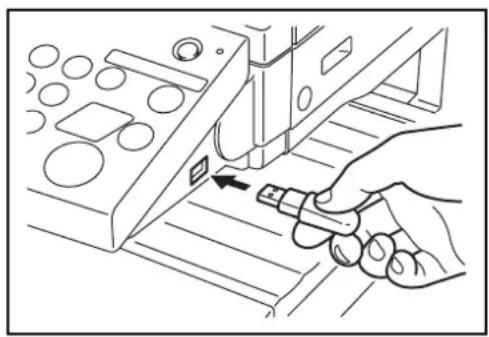
natural_image
Hand using a tool to adjust a component with circular and square parts (no text or symbols visible)NOTE: Use the USB memory formatted by this machine. If a USB memory formatted by any other device is used, Removable Memory is not formatted. may appear. To format a USB memory, press [Format] and follow the instructions on the screen.
3 Press [Removable Memory].
4 Select the file to be printed and press [Print].
5 Enter the number of copies you wish to print by using [+]/[-] or the numeric keys. Then press [Start Print] to start printing.
Removing USB Memory
Remove the USB memory.
CAUTION: Be sure to follow the proper procedure to avoid damaging the destruction of data or USB memory.
1 Press the Document Box key.
2 Press [Removable Memory].
3 Press [Remove Memory].
4 Remove the USB memory after Removable Memory can be safely removed is displayed.
Canceling/Viewing/Changing Job
Follow the steps below to cancel any print or send job being executed, view job detail, or perform the waiting print job first (Priority Override).
Job handling operation is done in the Status/Job Cancel screen.
Canceling Job
Cancel any job while it is under printing, sending or waiting.
NOTE: Printing of data received by fax cannot be cancelled.
1 Press the Status/Job Cancel key.
2 Press any of [Printing Jobs], [Sending Jobs] or [Storing Jobs].
Jobs which can be cancelled in each screen are as follows.
[Printing Jobs]: 7 jobs of Copy, Printer, Box, FAX, E-mail reception, Removal Memory and Report
[Sending Jobs]: 5 jobs of E-mail, Folder, TWAIN, FAX, Multiple (combination of multi sending methods)
[Storing Jobs]: 3 jobs of Scan, Printer and Fax
3 Select the job you wish to cancel and press [Cancel]. Canceling will appear of Status and the job will be canceled.
NOTE: The canceled job will be displayed in the Log screen.
4 Repeat the steps 2 and 3 to cancel other jobs.
Viewing Job Detail
View the status of the job being executed or under waiting.
1 Press the Status/Job Cancel key.
2 Press any of [Printing Jobs], [Sending Jobs] or [Storing Jobs].
3 Select the job you wish to view and press [Detail].
4 Details of the selected job will be displayed.
NOTE: Press [▲] or [▼] to view next detail. In the sending job, view the destination by pressing [Detail] of Destination or Status/Destination.
5 Press [Close] to end viewing.
Viewing Job Log
View the jobs that have been finished or canceled.
1 Press the Status/Job Cancel key.
2 Press any of [Printing Jobs], [Sending Jobs] or [Storing Jobs]. Then press [Log].
3 Select the job you wish to view and press [Detail].
000083 02/25 14:13 000084 02/25 14:10
4 Details of the selected job will be displayed.
NOTE: Press [▲] or [▼] to view next detail. Press [Detail] of Destination or Status/Destination in the Sending Jobs to view the destinations.
5 Press [Close] to end viewing.
Print Job Suspension and Interruption (Priority Override)
Suspend the current print job temporarily to run a more urgent queued job. This refers to Priority Override.
NOTE: If the current print job is specified as Priority Override, the new urgent job will be executed after completion of the current job.
1 Press the Status/Job Cancel key.
2 Select the job you wish to give priority and press [Priority Override]. The print job currently under way will be suspended to start the priority print job.
3 The suspended print job will resume after completion of the Priority Override.
Checking Remaining Toner and Paper
Follow the steps below to check remaining toner and paper on the touch panel.
NOTE: Size and type of paper loaded in each paper source can also be checked.
1 Press the Status/Job Cancel key.
2 Press [Paper/Supplies].
3 Check the remaining toner of Toner Information and the remaining paper of each paper source of Paper.
NOTE: Remaining toner level is indicated by any of the 11 levels between 100 and 0%. The smaller the number, the fewer the remaining toner.
Paper remaining in the Multi Purpose Tray is indicated either by 100% or 0%.
Quick Setup Screen
In the initial screen for copying and sending (the screen which appears immediately after the Copy or Send key is first pressed after power-on), the typical and generally often used functions are picked up and registered from among the versatile functions of this machine. This initial screen is called Quick Setup Screen. Registration of functions in the Quick Setup Screen can be adjusted to suit your work environment for better efficiency.
Functions Available for Registration in Quick Setup Screen
Default registrations and the functions available for registration are as follows.
| Function Default | Registration | Functions Available for Registration | |
| Copying 1: Zoom | 2: Density3: Staple/Punch4: Duplex5: Original Image6: Collate/Offset | Paper SelectionZoomStaple/PunchDensityDuplexCombineCollate/OffsetOriginal ImageOriginal S | |
| Sending 1: Zoom | 2: Density3: Resolution4: 2-sided/Book Original5: Original Image6: Color Selection | Original S2-sided/Book OriginalSending SizeOriginal OrientationFile FormatSend Setting-DensityOriginal ImageScan ResolutionColor SelectionZoom | |
| Function Default | Registration | Functions Available for Registration | |
| Document Box | Document Storage | 1: Zoom2: Density3: Resolution4: 2-side/Book Original5: Original Image6: Color Selection | • C o l o r• S t o r i n g S i z e• D e n s i t y• 2-side/Book Original• Resolution• Zoom• Original Orientation• O r i g i n a l S• Original Image |
| Sending From Box | 1: File Format2: Delete After Transmitted | • File Format• Delete After Transmitted | |
| Printing From Box | 1: Paper Selection2: Delete After Printed3: Staple/Punch4: Duplex5: Collate/Offset | • Paper Selection• Staple/Punch• Delete After Printed• Collate/Offset• D u p l e x | |
Changing Registration
The following procedure is one example for replacing the registration of Density with Original Image Quality in the Quick Setup Screen for copying.
1 Press the System Menu key.
2 Press [Copy], [Change] of Quick Setup Registration, and then [Change] of Original Image.
3 Press [Key 4] here as the key to set replacement location.
4 Press [OK]. The Original Image Quality function will be newly registered.
4 Optional Equipment
This chapter introduces the optional equipment available for the machine.
• Overview of Optional Equipment 4-2
- Document Processor 4-4
• Paper Feeder 4-4
• 3000 Sheet Paper Feeder 4-5
• Built-in Finisher.... 4-5
- Document Finisher 4-9
• 3000 Sheet Document Finisher......4-9
• Job Separator.... 4-10
- Document Table 4-10
• Key Counter 4-11
- Fax Kit 4-12
- Data Backup Kit.... 4-12
- Security Kit (USB Key) 4-13
- Serial Interface 4-13
• PDF Upgrade Kit (USB Key) 4-14
Overview of Optional Equipment
The following optional equipment is available for the machine.
flowchart
graph TD
    A["Mailbox"] --> B["Document Processor"]
    C["Built-in Finisher"] --> B
    D["Document Finisher"] --> B
    E["3000 Sheet Document Finisher"] --> B
    F["Folding Unit"] --> B
    G["Paper Feeder"] --> B
    H["3000 Sheet Paper Feeder"] --> B
    I["Job Separator"] --> B
    J["Document Table"] --> B
Document Processor
Automatically scans originals. Also you can perform duplex copying and split copying.
For document processor operation, refer to Loading Originals in the Document Processor on page 2-27.
natural_image
Line drawing of a mechanical device with control panel and buttons (no text or symbols)Paper Feeder
Add an additional 2 paper cassettes like Cassette 2 of the machine. Paper capacity and loading method are the same as Cassettes 1 and 2. Refer to Loading Paper in the Cassettes on page 2-16.
NOTE: Left cover 3 is located on the left side of the paper feeder for use in clearing paper jams.
natural_image
Line drawing of an open computer case with internal components (no text or symbols)3000 Sheet Paper Feeder
In addition to the standard cassettes, a 3000 sheet paper feeder holding 3,000 sheets of A4, Letter or B5 paper can be added.
NOTE: Left cover 3 is located on the left side of the 3000 sheet paper feeder for use in clearing paper jams.
natural_image
Line drawing of a computer case chassis with internal compartments and ventilation slots (no text or symbols)Built-in Finisher
The built-in finisher holds a large quantity of finished prints. The finisher offers a convenient means of sorting. Sorted finished prints may also be stapled.
1 Finisher tray
2 Finisher process tray
Finisher tray serves as an output tray of sorted prints.
natural_image
Technical line drawing of a mechanical assembly with no visible text or symbolsUse the auxiliary tray to sort Ledger, Legal, 8.5×13.5", Oficio II, Letter, Letter-R, A3, B4, A4, A4-R, B5, Folio, 8K or 16K prints.
natural_image
Technical line drawing of a mechanical component with arrows indicating motion direction (no text or symbols)Adding Staples
1 Pull to open the stapler front cover.
natural_image
Line drawing of a hand operating a sewing machine (no text or symbols)2 Pull out the staple holder.
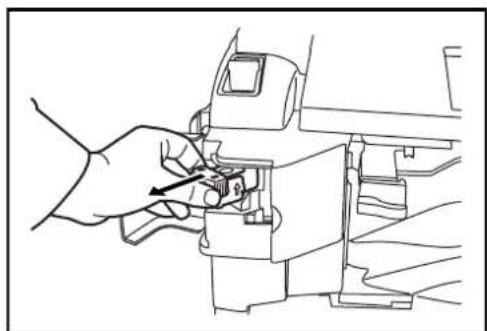
natural_image
Line drawing of a hand inserting a small component into a vehicle chassis (no text or symbols)3 Remove the empty staple case from the staple holder.
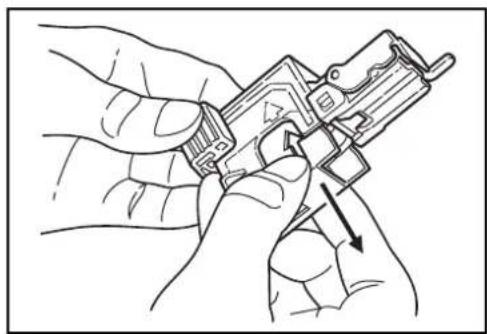
natural_image
Illustration of hands using a tool to adjust or install a mechanical component (no text or symbols visible)4 Holding the staple holder in your left hand and a new staple case in your right hand, insert the staple case into the staple holder in the direction of an arrow.
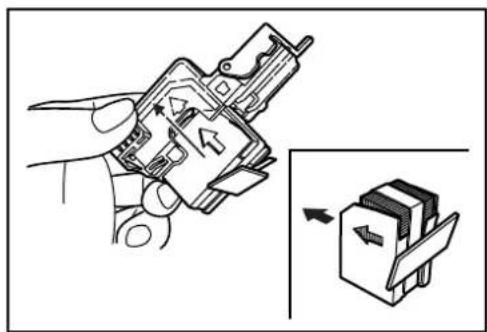
natural_image
Illustration of a hand holding a mechanical device with an inset showing a close-up of a device (no text or symbols present)5 Insert the staple case fully to the end. Pull to remove the paper tape wound on the staple case.
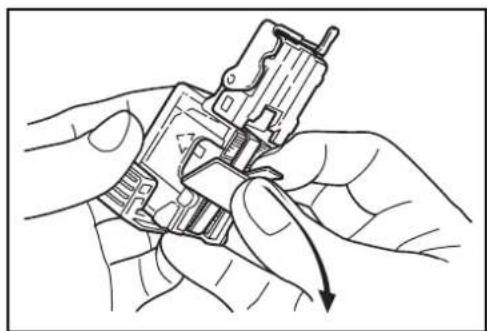
natural_image
Line drawing of hands holding a mechanical device with an arrow indicating rotation (no text or symbols)6 Insert the staple holder into the slot of the staple unit again. When fully inserted, the staple holder locks with a clicking sound.
natural_image
Line drawing of a hand inserting a small component into a vehicle chassis (no text or symbols)Clearing Staple Jam
1 Pull out the staple holder referring to Steps 1 and 2 of Adding Staples.
2 Holding the knob A on the face plate of the staple holder, lift the face plate.
natural_image
Line drawing of a hand holding a mechanical component, labeled with point A (no text or symbols beyond label)3 Clear the staple jammed in the cartridge end (staple-loaded side).
natural_image
Illustration of hands holding a small electronic component with an arrow indicating rotation (no text or symbols)4 Lower the face plate of the staple holder.
natural_image
Illustration of hands holding a mechanical component with a curved arrow indicating rotation (no text or symbols)5 Insert the face plate back in place. When fully inserted, the face plate locks with a clicking sound.
6 After lifting the staple unit slightly, lower it and insert it again into its place.
7 Close the stapler front cover.
Document Finisher
The document finisher holds a large quantity of finished copies. The finisher offers a convenient means of sorting. Sorted finished copies may also be stapled. For further details, refer to the document finisher Operation Guide.
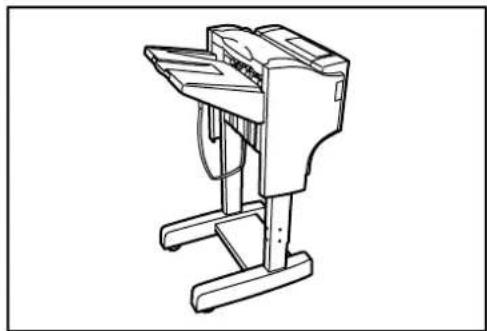
natural_image
Line drawing of a mechanical device with no visible text or symbols3000 Sheet Document Finisher
The document finisher holds a large quantity of finished copies. The finisher offers a convenient means of sorting. It can also staple finished sets and punch holes if equipped with the appropriate optional accessories. For further details, refer to the 3000 sheet document finisher Operation Guide. Other options include the mailbox and folding unit.
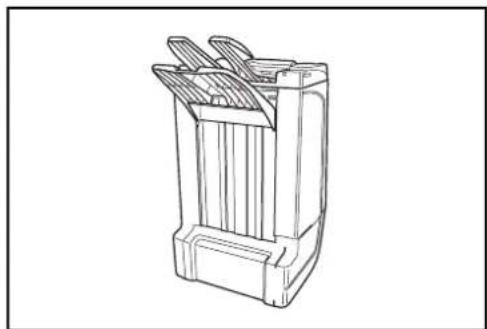
natural_image
Technical line drawing of a mechanical component with three blades (no text or symbols)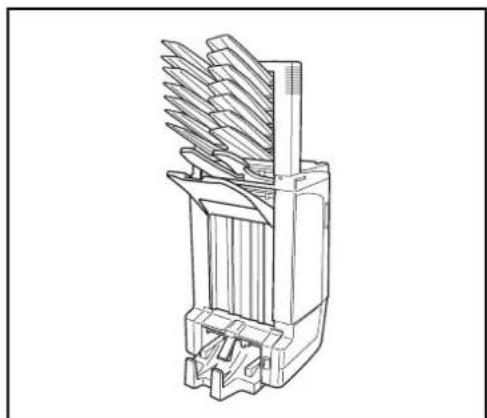
natural_image
Technical line drawing of a mechanical component with multiple blades (no text or symbols)Job Separator
Separates paper according to output tray for easier sorting. Specify an output tray for copy or print jobs. Or, specify the default output tray for printing from the copy or document box screen, printing from the PC, and printing of the received fax data.
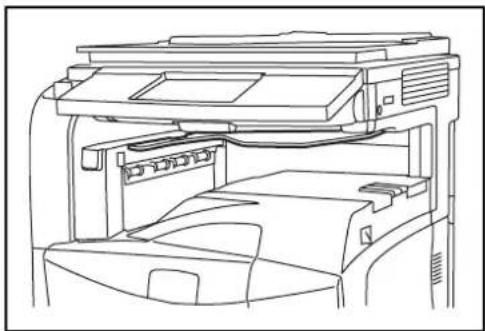
natural_image
Line drawing of an open industrial machine with internal components (no text or symbols)Document Table
Place original or other documents when using the machine. It has a drawer to accommodate clips.
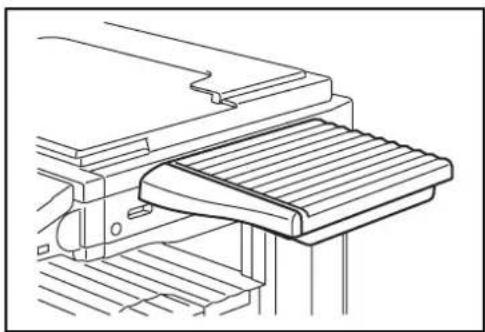
natural_image
Technical line drawing of a mechanical assembly with no visible text or symbolsKey Counter
Use the key counter to monitor machine usage. The key counter offers a convenient solution for centralized management of copy volume for different departments in a large company.
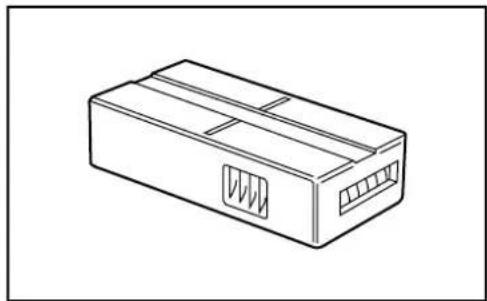
natural_image
Line drawing of a rectangular electronic component with slots and a side port (no text or symbols)Inserting the Key Counter
Insert the key counter securely into the key counter slot.
NOTE: When the key counter function is activated, copies can only be made when a key counter is inserted. If the key counter is not inserted, Insert key counter. will be displayed.
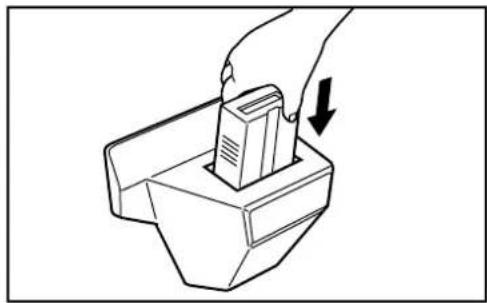
natural_image
Line drawing of a hand pressing a button into a device (no text or symbols)Fax Kit
By installing the fax kit, fax send/receive is enabled. Also, it is possible to use it as a network fax, by using it with a computer. When two units of the fax kit are installed, the units can be connected to two different telephone lines which will enable quicker message transmission to a number of recipients. If one of the lines is dedicated to receiving, the time of busy line can be reduced. For further details, refer to the operation guide of the fax kit.
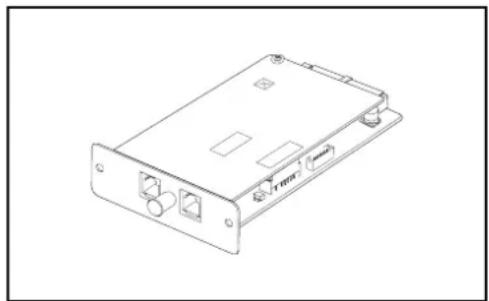
natural_image
Line drawing of a rectangular electronic device with ports and connectors (no text or symbols)Data Backup Kit
A microchip card for storing fax reception data and job accounting data. Installation and removal of the card is performed by our service representative.
Refer to the operation guide of the fax kit for the fax reception data to be stored for backup.
natural_image
Isometric line drawing of a square electronic component with a small labeled section (no text or symbols)Security Kit (USB Key)
This machine functions by temporarily storing scanned data on an internal hard disk. After being used for output, this data is not accessible from the operation panel, but a record of the data remains on the hard disk until it is overwritten by other data. Thus, the data could conceivably be retrieved by accessing the hard disk using specialized tools.
For greater security, the security kit prevents this by overwriting all unnecessary data in the storage area of the hard disk so that it cannot be retrieved.
natural_image
Line drawing of a USB flash drive with a cylindrical body and internal ports (no text or symbols)Serial Interface
Install for connecting to PCs with serial port interfaces. Supports the RS-232C serial interface.
natural_image
Technical line drawing of a hard drive with a cable and connector (no text or symbols)PDF Upgrade Kit (USB Key)
When saving scanned originals as PDF files, enables the creation of high compression PDF files and PDF encryption.
Use PDF file encryption to customize password-based rights access.
natural_image
Line drawing of a USB flash drive with a cylindrical body and two ports (no text or symbols)5 Maintenance
This chapter describes cleaning and toner replacement.
- Cleaning.... 5-2
- Toner Container and Waste Toner Box Replacement .. 5-7
Cleaning
Clean the machine regularly to ensure optimum output quality.

CAUTION: For safety, always unplug the power cord before cleaning the machine.
Platen Cover / Document Processor / Glass Surface
Wipe the backside of the platen cover, the inside of the document processor and the glass surface with a soft cloth dampened with alcohol or mild detergent.
IMPORTANT: Do not use thinner or other organic solvents.
Platen Cover
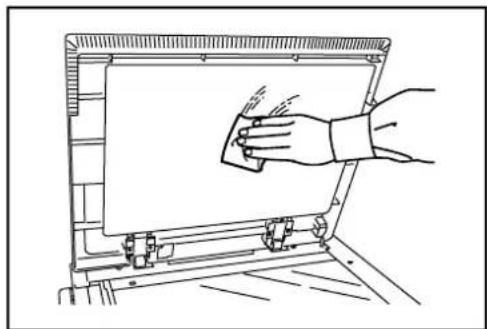
natural_image
Line drawing of a hand cleaning a blank board with a cloth (no text or symbols)Document Processor
1 Open the top cover of the document processor and hold the green knob to lift the reverse unit.
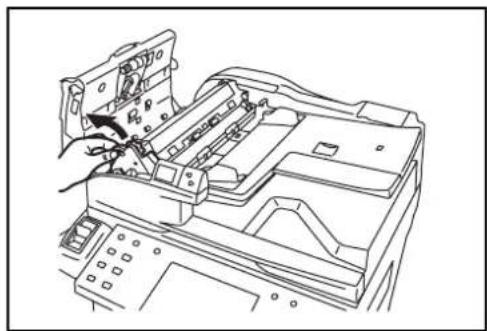
natural_image
Line drawing of a printer's internal structure with no visible text or symbols2 Clean the white roller at the inside of the bottom.
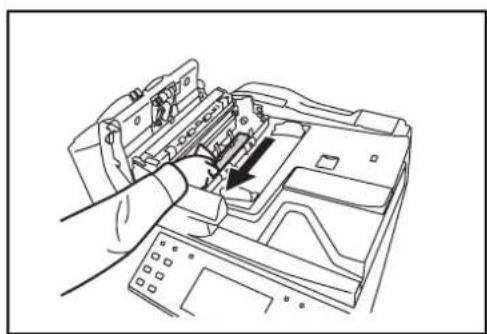
natural_image
Line drawing of a hand inserting a device into a printer case (no text or symbols)Glass Surface

natural_image
Line drawing of a hand cleaning or cleaning a machine window with a cloth (no text or symbols)Slit Glass
If black streaks or dirt appears in copies when using the optional document processor, clean the slit glass with the supplied cleaning cloth. The message Clean the slit glass. may be displayed if the slit glass requires cleaning.
![Clean the slit glass. 1.Open the document processor. 2.Clean the surface of the slit glass located on the left side with the supplied dry cloth. 3.Close the document processor and open the document processor cover. 4.Lift the reverse unit and clean the slit glass and the white sheet with a dry cloth. 5.Set the reverse unit and does the document processor cover. 6.Press [End]. Note that dry glass and sheet may cause black streaks to appear in the output. 03' 14 Hold End Status: 105.2005 10:10](/content/2026/04/637475/images/c11f9dfbd1043377757f6490c28c19d3d3284c6e23aef8e93cbf823bb389a883.jpg)
IMPORTANT: Lightly wipe the slit glass with a dry cloth. To remove adhesive material or ink, apply alcohol to a cloth and wipe lightly. Do not use water, thinner, or organic solvents.
1 Remove the cloth from the cleaning cloth compartment.
2 Open the document processor and wipe the slit glass (a).
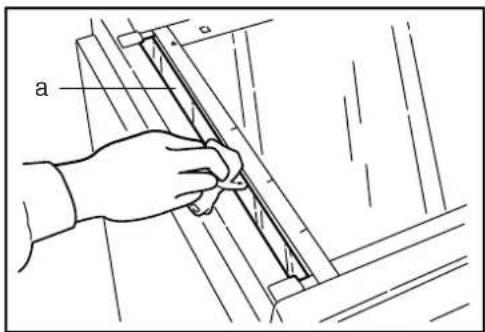
3 Press [End].
Separator
Clean the separator regularly (at least monthly) to ensure optimum output quality.
1 Open the front cover.

natural_image
Line drawing of a hand inserting a device into a machine (no text or symbols)2 Remove cleaning brush (blue colored).
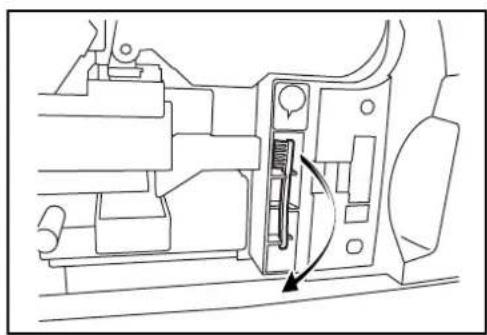
natural_image
Technical line drawing of a mechanical component with an arrow indicating a specific part (no text or symbols present)3 Pull up left cover 1 lever and open left cover 1.
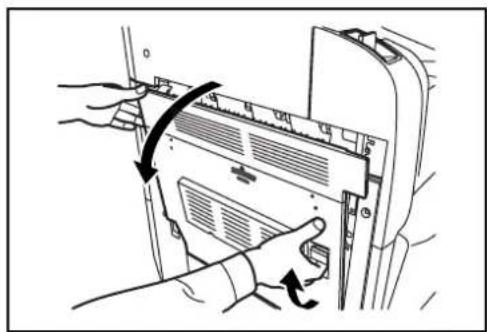
natural_image
Illustration of hands installing or adjusting a device panel with arrows indicating motion (no text or symbols)4 As shown in the figure, clean dirt from the separator by moving the brush from side to side along the separator.

natural_image
Technical diagram showing a mechanical assembly with an inset close-up of a tool interacting with a component (no text or symbols visible)5 Put away the cleaning brush, press the specified position of the front cover and left cover 1 to close.
Transfer Roller
1 Open the front cover.

natural_image
Line drawing of a hand inserting a device into a machine (no text or symbols)2 Remove the cleaning brush (blue colored).

natural_image
Technical line drawing of a mechanical component with an arrow indicating a specific part (no text or symbols present)3 Pull up left cover 1 lever and open left cover 1.
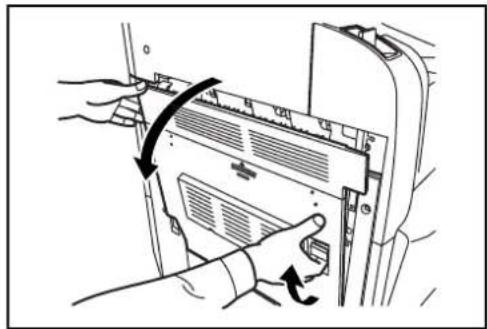
natural_image
Illustration of hands inserting a device into a computer case (no text or symbols visible)4
As shown in the figure, clean dirt from the transfer roller by moving the brush from side to side along the roller while rotating the roller by turning the gear at the left end of the roller.
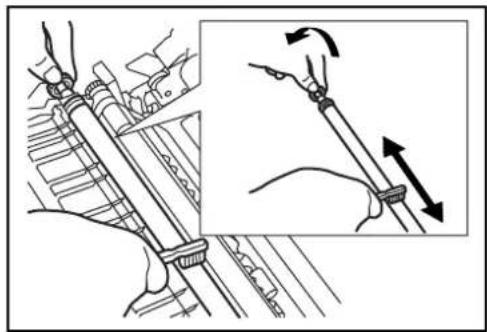
natural_image
Technical illustration of a mechanical assembly with an inset showing hand positioning and motion arrows (no text or symbols)5
Put away the cleaning brush, press the specified position of the front cover and left cover 1 to close.

Toner Container and Waste Toner Box Replacement
When the touch panel displays Add toner, replace the toner without delay although several more copies are still possible. When replacing the toner container, replace the waste toner box as well.
Every time you replace the toner container, be sure to clean the parts as instructed below. Dirty parts may deteriorate output quality.

CAUTION: Do not attempt to incinerate the toner container or the waste toner box. Dangerous sparks may cause burns.

CAUTION: Do not attempt to force open or destroy the toner container or the waste toner box.
1
Open the front cover.
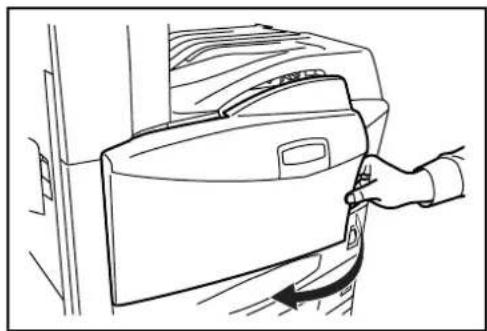
natural_image
Line drawing of a hand inserting a device into a cabinet (no text or symbols)2
Push up the toner container stopper and slowly pull out the used toner container until its handle is visible.
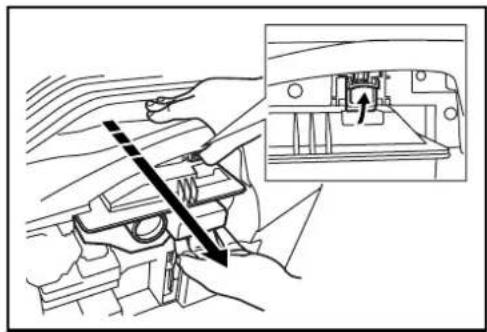
natural_image
Technical line drawing of a mechanical component with an inset showing a close-up view of a mechanical assembly (no text or symbols present)
WARNING: High voltage parts inside. Handle with care because there is a danger of electric shock.

CAUTION: Do not pull the toner container all the way out without holding the handle, otherwise it will drop.
3 Keep the stopper up, hold the toner container handle and take out slowly.
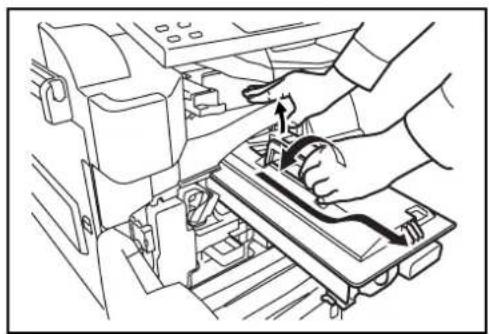
natural_image
Line drawing of a hand operating a mechanical device with a tool, no text or symbols present4 Unwrap a new toner container and tap its top 5-6 times.
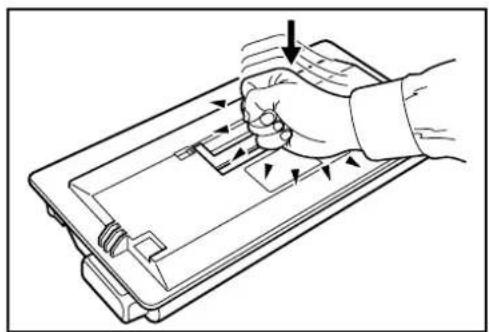
natural_image
Line drawing of a hand pressing down on a mechanical component with arrows indicating motion (no text or symbols)5 Shake the toner container at least 10 times horizontally to distribute the toner evenly.
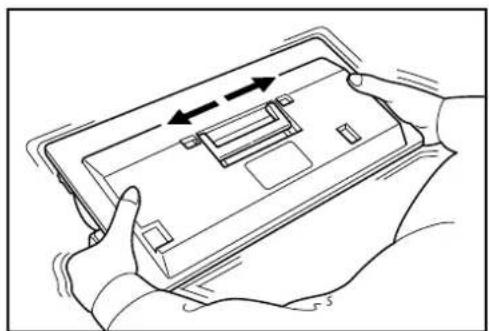
natural_image
Line drawing of hands holding a device with arrows indicating motion (no text or symbols)6 Insert the toner container slowly while holding its handle.
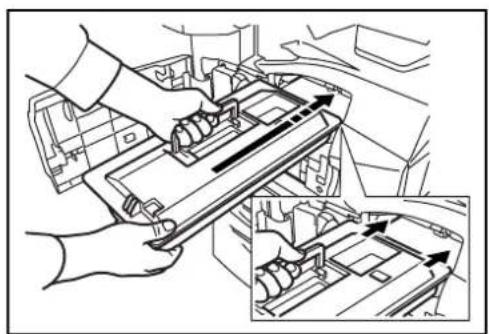
natural_image
Mechanical assembly diagram showing hands operating a component with arrows indicating motion direction (no text or symbols)7 Using both hands, push in the toner container until it is locked.
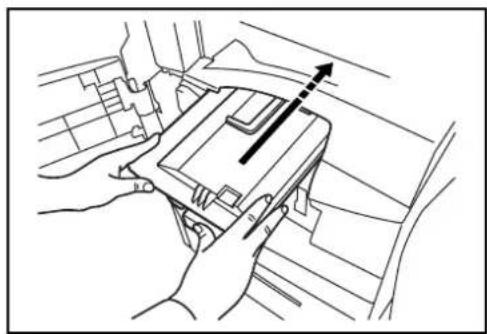
natural_image
Line drawing of hands holding a car seatbelt with an arrow indicating direction (no text or symbols)8 Remove the waste toner box.
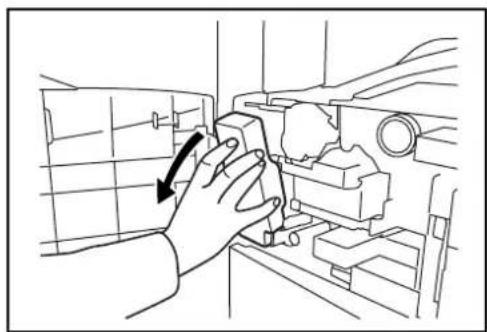
natural_image
Line drawing of hands operating a mechanical device with a curved arrow indicating motion (no text or symbols)9 Seal the opening of the waste toner box.
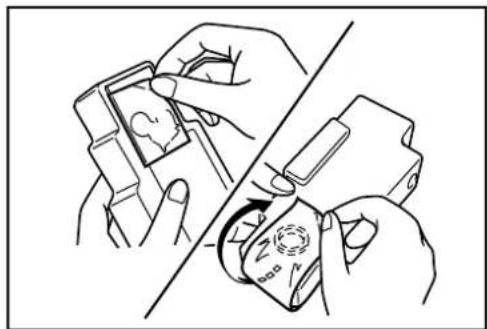
natural_image
Illustration of hands adjusting a device with a circular button, no text or symbols presentCAUTION: Do not attempt to incinerate the toner container or the waste toner box. Dangerous sparks may cause burns.
CAUTION: Do not attempt to force open or destroy the toner container or the waste toner box.
10 Install a new waste toner box.
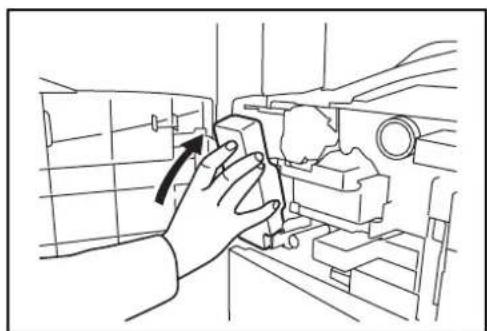
natural_image
Line drawing of a hand operating a mechanical device with a grid panel (no text or symbols)11 Remove the cleaning brush (blue colored).

natural_image
Technical line drawing of a mechanical component with an arrow indicating a specific part (no text or symbols present)12 Pull up left cover 1 lever and open left cover 1.

natural_image
Illustration of hands inserting a device into a computer monitor (no text or symbols visible)13 As shown in the figure, clean dirt from the separator by moving the brush from side to side along the separator.
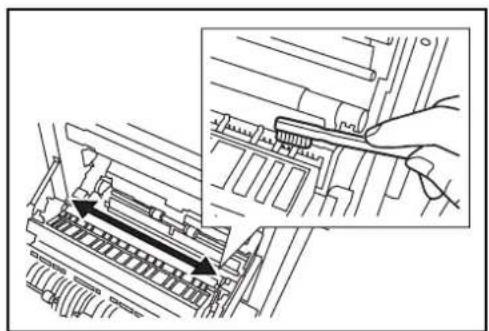
natural_image
Technical diagram showing a mechanical assembly with an inset close-up of a hand adjusting a component (no text or symbols visible)14 As shown in the figure, clean dirt from the transfer roller by moving the brush from side to side along the roller while rotating the roller by turning the gear at the left end of the roller.
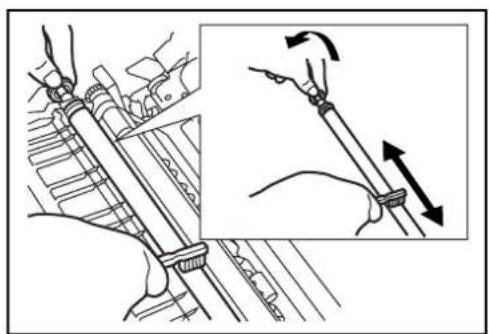
natural_image
Technical illustration of a mechanical assembly with an inset showing hand positioning and motion arrows (no text or symbols)15 Put away the cleaning brush after the cleaning. Close the front cover and left cover 1 by pressing specified part.
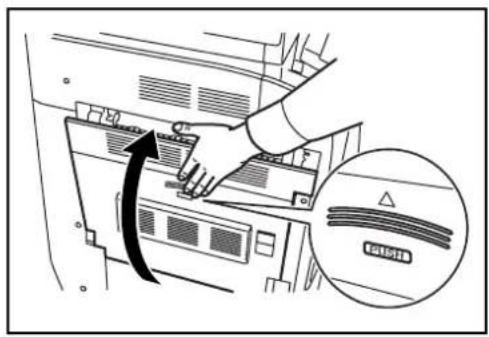
16 Open the Multi Purpose Tray and remove the filters F1 and F2.
17 Clean the filters using a vacuum cleaner or the like.
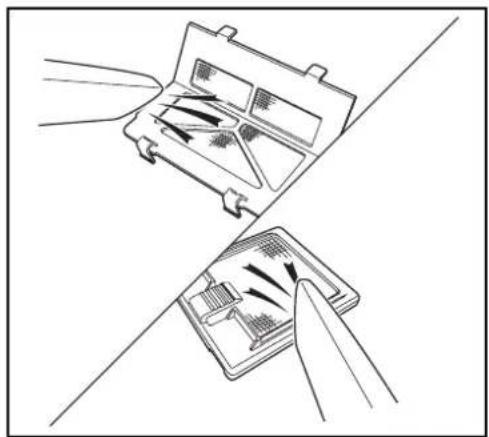
natural_image
Illustration of a tool interacting with a device, showing motion lines and components (no text or symbols)CAUTION: Do not wash the filters with water. Do not use the attached cleaning brush.
18 Put the filters back in place and close the Multi Purpose Tray.
NOTE: Return the exhausted toner container and waste toner box to your dealer or service representative. The collected toner container and waste toner box will be recycled or disposed in accordance with the relevant regulations.
6 Troubleshooting
This chapter explains how to solve problems with the machine.
- Solving Malfunctions ...... 6-2
- Responding to Error Messages....6-4
- Clearing Paper Jams....6-10
Solving Malfunctions
The table below provides general guidelines for problem solving.
If a problem occurs with your machine, look into the checkpoints and perform procedures indicated on the following pages. If the problem persists, contact your Service Representative.
| Symptom Checkpoints Corrective Actions | Reference Page | |
| The operation panel does not respond when the main power switch is turned on. | Is the machine plugged in? Plug the power cord into an AC outlet. | — |
| Pressing the Start key does not produce copies. | Is there a message on the touch panel? | Determine appropriate response to the message and respond accordingly. |
| Blank sheets are ejected. | Are the originals loaded correctly? | When placing originals on the platen, place them face-down and align them with the original size indicator plates. |
| When placing originals in the optional document processor, place them face-up. | ||
| Printouts are too light. Is the machine in Auto Density mode? | Set the correct density level for auto density. | |
| Use [Image Quality] to set the correct density level. | ||
| When changing the default density level, adjust the density manually and choose the desired level. | ||
| Shake the toner container from side to side about 10 times. | ||
| Replace the toner container. 5-7 | ||
| Is the paper damp? Replace the paper with new paper. 2-25 | ||
| Printouts are too dark. Is the machine in Auto Density mode? | Set the correct density level for auto density. | |
| Use [Image Quality] to set the correct density level. | ||
| When changing the default density level, adjust the density manually and choose the desired level. | ||
| Symptom | Checkpoints | Corrective Actions | Reference Page |
| Printouts are not clear. | Did you choose appropriate image quality for the original? | Select appropriate image quality. 3-9 | |
| Printouts are dirty. Is the | the platen or the document processor dirty? | Clean the platen or the document processor. | 5-2 |
| Is the transfer roller dirty? Brush | the transfer roller clean. 5-5 | ||
| Images are skewed. Are | the originals placed correctly? | When placing originals on the platen, align them with the original size indicator plates. | 2-27 |
| When placing originals in the optional document processor, align the original width guides securely before placing the originals. | 2-27 | ||
| Is the paper loaded correctly? | Check the position of the paper width guides. | 2-28 | |
| Papers often jam. Is the | paper loaded correctly? | Load the paper correctly. 2-16 | |
| Is the paper of the supported type? Is it in good condition? | Remove the paper, turn it over, and reload it. | 2-16 | |
| Is the paper curled, folded or wrinkled? | Replace the paper with new paper. 2-16 | ||
| Are there any loose scraps or jammed paper in the machine? | Remove any jammed paper. 6-10 | ||
| Printouts from the document processor have black lines. | Are the slit glasses dirty? Clean | the slit glasses. 5-3 | |
| Printouts are wrinkled. | Is the paper separator of the paper feed unit dirty? | Clean the paper separator. 5-4 | |
| Cannot print. | Is the machine plugged in? | Plug the power cord into an AC outlet. | — |
| Is the machine powered on? | Turn on the main power switch. | 3-2 | |
| Is the printer cable connected? | Connect the correct printer cable securely. | 2-3 | |
| Was the machine powered on before the printer cable was connected? | Power on the machine after connecting the printer cable. | 2-3 | |
| Documents are printed improperly. | Is the official application software used on PC? | Check that the official printer driver or application software is used. | — |
Responding to Error Messages
If the touch panel displays any of these messages, follow the corresponding procedure.
Alphanumeric
| Error Message Checkpoints Corrective Actions | Reference Page | ||
| Acceptable staple count exceeded. | Is the acceptable staple count exceeded? For details, refer to Specifications on page Appendix-6. | Press [Continue] to print without using Staple.Press [Cancel] to cancel the job. | — |
| Add paper in cassette #. | Is the indicated cassette out of paper? | Load paper. 2-15 | |
| Add paper in MP tray. Is | the paper of the selected size loaded in the Multi Purpose Tray? | Load the paper in the Multi Purpose Tray which is of the size and type indicated on the touch panel. | 2-18 |
| Add staples. Has any of | the built-in finisher, center binding finisher, document finisher or 3,000-sheet capacity document finisher run out of staples? | If the staples are depleted, the machine will stop and the location of staple depletion will be indicated on the touch panel.Leave the machine on and follow the instruction to replace the staple case. Press [Continue] to print without using Staple.Press [Cancel] to cancel the job. | 4-6 |
| Add toner. – Replace the toner container. 5-7 | |||
| An error has occurred. | – Internal error has occurred. | Turn the main power switch off and on.If error occurs repeatedly, make a note of the error code displayed on the touch panel, and contact your Service Representative. | — |
| Box limit exceeded. – Document box is full, and no | further storage is available. This job is canceled. Press [End]. | — | |
| – Repeat Copy box is full, and no further repeat copy is available.Press [Continue] to print without using Repeat Copy.Press [Cancel] to cancel the job. | — | ||
| Error Message Checkpoints Corrective Actions | Reference Page | ||
| Cannot connect to Authentication Server. | -Press [End] and check the following items:• Registration to Authentication Serve• Password and computer address for Authentication Server• Connection of Network | — | |
| Cannot duplex print this paper type. | Did you select a paper size/ type that cannot be duplex printed? | Select the available paper size/ type.Press [Continue] to print without using Duplex. | |
| Cannot execute this job. | -This job is canceled because it is restricted by Job Accounting.Press [End]. | — | |
| Cannot offset this paper type. | Did you select a paper size (A3, B4, A5-R, B6-R, Folio, Ledger, Statement and 8K) that cannot be offset? | Select the available paper size.Press [Continue] to print without using Offset. | |
| Cannot punch this paper type. | Did you select a paper size/ type that cannot be punched? | Select the available paper size/ type.Press [Continue] to print without using Punch. | |
| Cannot staple this paper type. | Did you select a paper size/ type that cannot be stapled? | Select the available paper size/ type.Press [Continue] to print without using Staple. | |
| Check the cover.Is there any cover which is open? | Close the cover indicated on the touch panel. | ||
| Check the document processor. | Is the document processor open? | Close the document processor. — | |
| Is the top cover of the document processor open? | Close the top cover of the document processor. | ||
| Check the finisher.Is the built-in finisher or the document finisher set correctly? | Set the built-in finisher or the document finisher correctly. For details, refer tothe respective Operation Guides. | ||
| Is the built-in finisher tray set correctly? | |||
| Clean the slit glass.- Clean the slit glass using the | attached cleaning cloth. | ||
| Empty the punch waste box. | - The punch waste box of the document finisher or 3,000-sheet capacity document finisher is full.Follow the instruction on the touch panel to empty the punch waste box. | - | |
| Failed to specify Job Accounting. | - This job is canceled. Press [End]. — | ||
| Failed to store job retention data. | - This job is canceled. Press [End]. — | ||
| FAX box limit exceeded. | - FAX box is full, and no further storage is available. This job is canceled. Press [End]. | - | |
| Finisher tray is full of paper. | Is the acceptable storage capacity exceeded for the document finisher tray? | Remove paper from the document finisher tray.If printing can be restarted, the touch panel display will prompt you to press [Continue]. Then press [Continue]. | |
| Folding tray is full of paper. | Is the acceptable storage capacity exceeded for the folding tray of the 3,000-sheet capacity document finisher? | Remove paper from the folding tray. | |
| Hard Disk error. - This job is canceled. Press [End]. — | |||
| Incorrect Account ID. - The Account ID does not match. | Check the registered Account ID. | - | |
| Incorrect Login User Name or Password. | - Enter correct login user name or password. | - | |
| Job Accounting restriction exceeded. | Is the acceptable printing count restricted by Job Accounting exceeded? | The printing count exceeded the acceptable count restricted by Job Accounting. Cannot print any more. This job is canceled. Press [End]. | |
| Job Separator is full of paper. | Is the maximum capacity of the job separator exceeded? | Remove paper from the job separator and press [Continue] to resume printing. | |
| KPDL Error. - PostScript error has occurred. | Job is canceled. Press [End]. | - | |
| Mailbox tray is full of paper. | - Remove paper from the mailbox tray. | - | |
| Memory card error. - Memory card is removed while it is accessed. Insert the memory card. | — | ||
| An invalid memory card is inserted. Insert the correct memory card. | — | ||
| Memory card error. Unable to continue the job. This job is canceled. Press [End]. | — | ||
| Memory is full. - Unable to continue the job as the memory is used up. Press [Continue] to print the scanned pages. The print job cannot be processed completely. Press [Cancel] to cancel the job. | — | ||
| Paper jam. - If a paper jam occurs, the machine will stop and the location of the jam will be indicated on the touch panel. Leave the machine on and follow the instruction to remove the jammed paper. | 6-10 | ||
| Print overrun. - Warning. Low printer memory. The job was paused. Press [Continue] to resume the job. | — | ||
| Removable memory error. - This job is canceled. Press [End]. — | |||
| Removable memory was removed. - Press [End]. — | |||
| Replace all originals and press [Continue]. - Remove originals from the document processor, put them in the original order, and place them. Press [Continue] to resume printing. Press [Cancel] to cancel the job. | 2-27 | ||
| Replace the waste toner box. - The waste toner box is full. Replace the waste toner box. | 5-7 | ||
| Reset all originals in document processor. Is there any original left in the document processor? | Remove originals from the document processor. | — | |
| Error Message Checkpoints Corrective Actions | Reference Page | ||
| Scanner memory is full. | - Scanning cannot be performed due to insufficient memory of scanner. Job is canceled. Press [End]. | — | |
| Is the acceptable scanning count exceeded? | Press [Continue] to print, send or store the scanned pages. Press [Cancel] to cancel printing, sending or storing. | — | |
| Send Error. - Job is canceled. Press [End]. — | |||
| Set the folding tray. Is the folding tray correctly set to the 3,000-sheet capacity document finisher? | Set the folding tray correctly to the 3,000-sheet capacity document finisher. For details, refer to the Operation Guide of the 3,000-sheet capacity document finisher. | — | |
| Set the folding unit. Is the folding unit correctly set to the 3,000-sheet capacity document finisher? | Set the folding unit correctly to the 3,000-sheet capacity document finisher. For details, refer to the Operation Guide of the 3,000-sheet capacity document finisher. | — | |
| Set the punch waste box. | - The punch waste box of the document finisher or 3,000-sheet capacity document finisher is not set correctly.Follow the instruction on the touch panel to set the punch waste box correctly. | — | |
| Set the waste toner box. | - The waste toner box is not set correctly. Set it correctly. | 5-7 | |
| Staple error. - If a staple error occurs, the machine will stop and the corrective action will be indicated on the touch panel.Leave the machine on and follow the instruction to take an appropriate action. | — | ||
| Staple jam. - If a staple jam occurs, the machine will stop and the location of the jam will be indicated on the touch panel.Leave the machine on and follow the instruction to remove the jammed staple. | 4-8 | ||
| The memory card is not formatted. | Is the memory card formatted? | Format the memory card. — |
| Error Message Checkpoints Corrective Actions | Reference Page | |
| The phone receiver is off the hook. | - Put down the receiver. — | |
| The removal memory is not formatted. | Is the removable memory formatted by this machine? | Use the removable memory formatted by this machine. |
| The source file is not found. | - The specified file is not found. This job is canceled. Press [End]. | — |
| Top tray of the machine is full of paper. | - Remove paper from the top tray, and press [Continue] to resume the job. | — |
| Tray # is full of paper. Is the acceptable storage capacity exceeded for any of the trays A to C of the 3,000-sheet capacity document finisher? | Remove paper from the tray # indicated on the touch panel. If the tray B or C is full of paper, press [Continue] to resume printing. | — |
| Warning low memory. - Further scanning cannot be | performed by insufficient memory Press [Continue] to print the scanned pages. Press [Cancel] to cancel the printing job | — |
Clearing Paper Jams
If a paper jam occurs, the touch panel will display Paper misfeed and the machine will stop. Refer to these procedures to remove the jammed paper.
Jam Location Indicators
If a paper jam occurs, the location of the jam will be displayed by the alphabet, which corresponds to the specific component in the machine as the following figure with clearing instructions.
| Paper Jam Location Indicator | Paper Jam Location | Reference Page |
| A | Cassette 1 | 6-11 |
| B | Cassette 2 | 6-13 |
| C | Cassette 3 or 4 (Option) | 6-14 |
| D | Multi Purpose Tray | 6-15 |
| E | Inside the left cover 1, 2 or 3 | 6-15 |
| F | Duplex unit | 6-16 |
| G | Job separator output port (Option) | — |
| Paper Jam Location Indicator | Paper Jam Location Reference Page |
| H Document processor (Option) 6-21 | |
| I Document finisher (Option) 6-22 |
After you remove the jam, the machine will warm up again and the error message will be cleared. The machine resumes with the page which jam has occurred.
Precautions of the Paper Jam
- Do not reuse jammed papers.
- If the paper tears during removal, be sure to remove any loose scraps of paper from the machine inside. Scraps of paper left in the machine could cause subsequent jamming.
- Discard the paper that jammed in the optional document finisher or 3,000-sheet capacity document finisher. The page which jam has occurred will be printed again.

WARNING: High voltage is present in the charger section. Take sufficient care when working in this area, as there is a danger of electrical shock.

CAUTION: The fixing unit is extremely hot. Take sufficient care when working in this area, as there is a danger of getting burned.
Cassette 1
Follow the steps below to clear paper jams in cassette 1.
1
Pull up left cover 1 lever and open left cover 1.
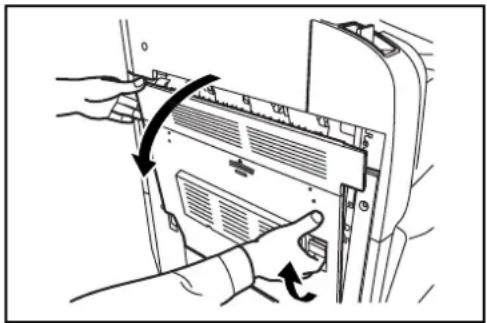
natural_image
Illustration of hands installing or adjusting a device panel with arrows indicating rotation (no text or symbols)2 Remove the jammed paper.
natural_image
Illustration of a hand inserting a component into a rack, with an arrow indicating the direction (no text or symbols present)3 Pull out cassette 1.
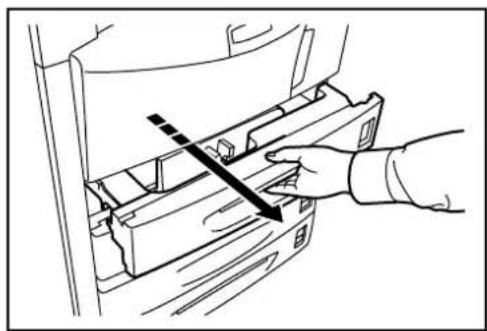
natural_image
Line drawing of a hand inserting a device into a drawer (no text or symbols)4 Remove the jammed paper.
If the paper tears, remove every loose scrap from inside the machine.
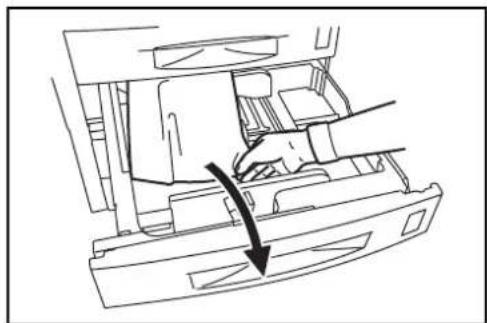
natural_image
Line drawing of a hand inserting a component into a device (no text or symbols)5 Push cassette 1 back in place securely.
6 Press the specified position to close left cover 1.
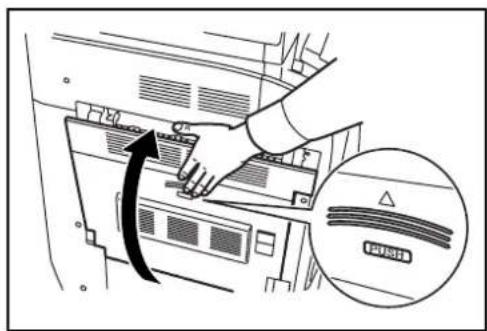
Cassette 2
Follow the steps below to clear paper jams in cassette 2.
1 Open left cover 2.

natural_image
Illustration of a hand inserting a component into a device panel (no text or symbols visible)2 Remove the jammed paper.
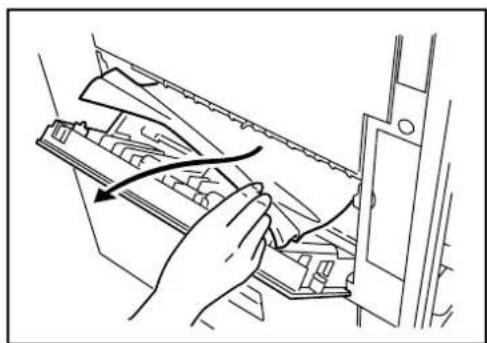
natural_image
Line drawing of a hand inserting a component into a device (no text or symbols)3 Pull out cassette 2.
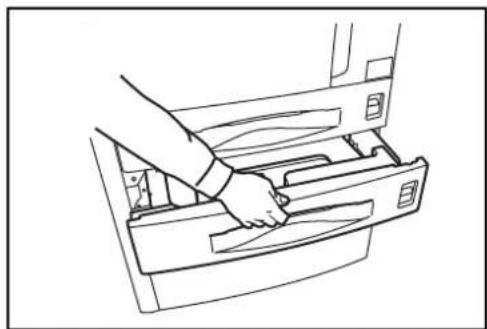
natural_image
Line drawing of a hand inserting a drawer into a machine drawer (no text or symbols)4 Remove the jammed paper.
If the paper tears, remove every loose scrap from inside the machine.
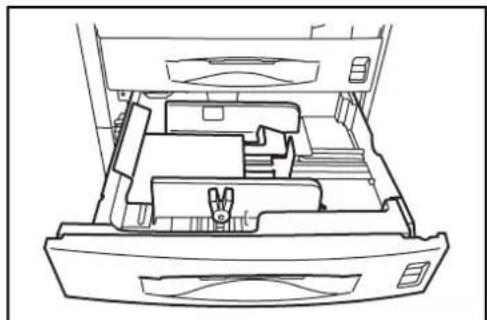
natural_image
Line drawing of a mechanical device interior showing internal compartments and housing (no text or symbols)5 Push cassette 2 back in place securely.
6
Close left cover 2.
Optional Cassettes 3 and 4
Follow the steps below to clear paper jams in cassettes 3 or 4 when using the optional paper feeder or 3,000-sheet capacity paper feeder.
1
Open left cover 3.
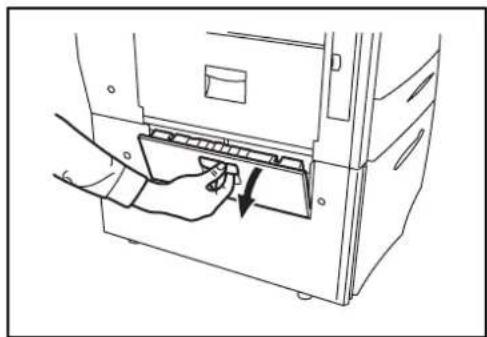
natural_image
Line drawing of a hand inserting a device into a rack (no text or symbols)2
Remove the jammed paper.
If the paper tears, remove every loose scrap from inside the machine.

natural_image
Line drawing of a hand inserting a component into a device drawer, with an arrow indicating the direction (no text or symbols present)3
Pull out the cassette in use.
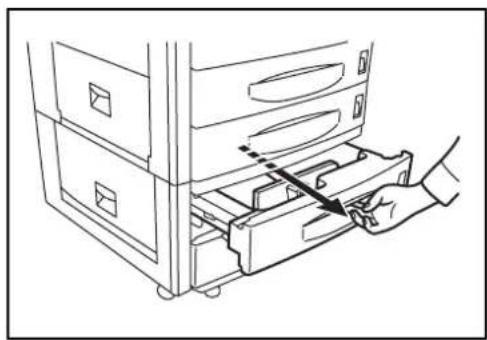
natural_image
Line drawing of a hand inserting a file into a rack (no text or symbols)4 Remove the jammed paper.

natural_image
Line drawing of a hand inserting a card into a file inside a rack (no text or symbols)5 Push the cassette back in place securely.
6 Close left cover 3.
Multi Purpose Tray
Follow the steps below to clear paper jams in the Multi Purpose Tray.
1 Remove all papers from the Multi Purpose Tray.
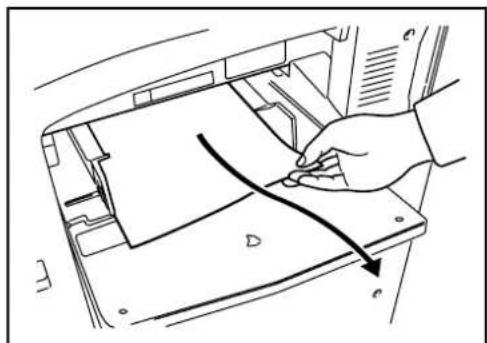
natural_image
Hand inserting a component into a device casing, showing a curved arrow indicating direction (no text or symbols present)2 If a paper is jammed inside, lift the lever to remove the paper.
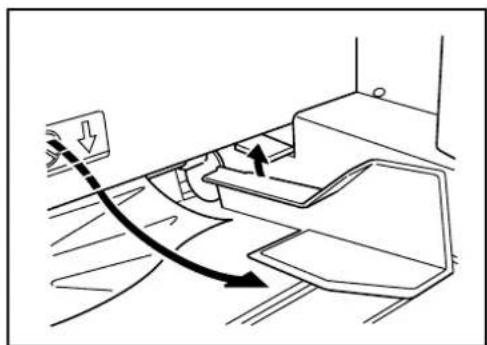
natural_image
Diagram of a vehicle's rearview and side view showing airflow direction (no text or symbols)Inside the Left Covers 1, 2 and 3
Follow the steps below to clear paper jams inside left cover 1, 2 or 3 when using the optional paper feeder or 3,000-sheet capacity paper feeder.
1 Open the left cover where the paper is jammed inside.

natural_image
Illustration of hands installing or adjusting a device panel with arrows indicating rotation (no text or symbols present)2 Remove the jammed paper.
If the paper tears, remove every loose scrap from inside the machine.
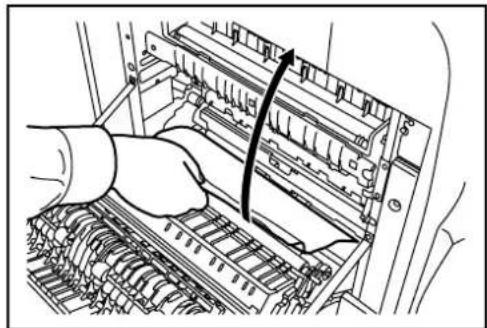
natural_image
Illustration of a hand inserting a component into a rack, showing internal structure and arrows indicating direction (no text or symbols)3 Close the left cover.
Duplex Unit
Follow the steps below to clear paper jams in the duplex unit.
1 Pull up left cover 1 lever and open the left cover.

natural_image
Illustration of hands installing or adjusting a device panel with arrows indicating rotation (no text or symbols present)2 Remove the jammed paper.
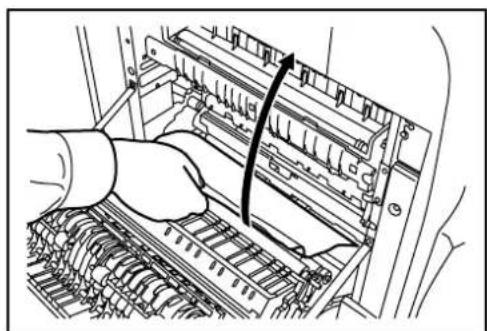
natural_image
Illustration of a hand inserting a component into a rack, showing internal structure and arrows indicating direction (no text or symbols)3 Lift the duplex unit and remove the jammed paper.
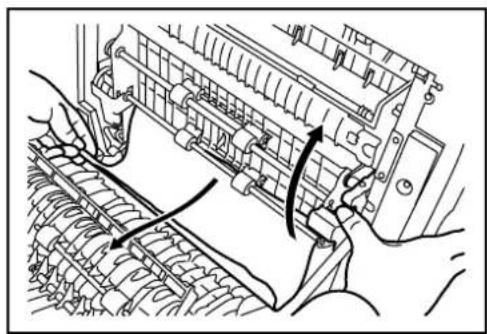
natural_image
Technical diagram of a vehicle engine component with arrows indicating assembly or movement (no text or symbols present)4 Press the specified position to close left cover 1.
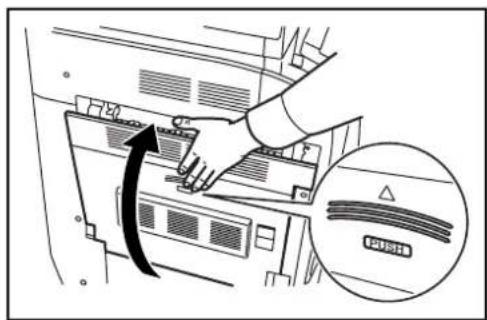
Duplex Unit and Cassette 1
Follow the steps below to clear paper jams in duplex unit and cassette 1.
1 Pull up left cover 1 handle and open left cover.

natural_image
Illustration of hands inserting a device into a device panel (no text or symbols visible)2 Remove the jammed paper.

natural_image
Illustration of a hand inserting a component into an electronic device (no text or symbols visible)3 Lift duplex unit and remove the jammed paper.

natural_image
Technical diagram of a vehicle engine compartment with arrows indicating assembly or movement (no text or symbols present)4 Pull out cassette 1 and remove the jammed paper.
If the paper tears, remove every loose scrap from inside the machine.

natural_image
Line drawing of a mechanical device with an arrow indicating rotation or movement (no text or symbols)5 Push cassette 1 back in place securely.
6 Press the specified position to close left cover 1.
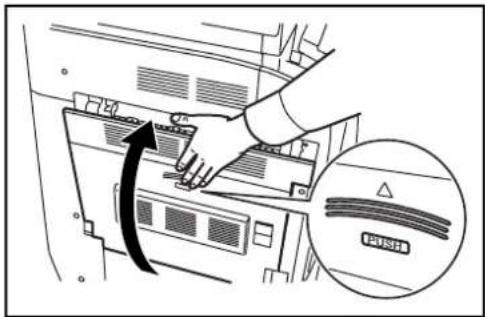
Paper Feed Unit
Follow the steps below to clear paper jams in the paper feed unit.
1 Open left cover 1.
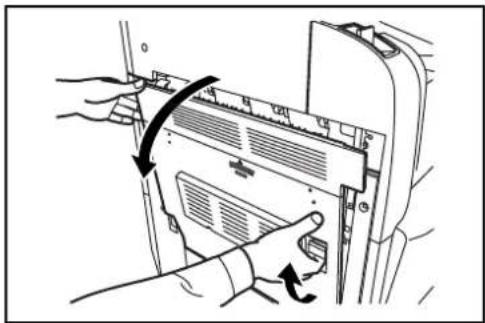
natural_image
Illustration of hands installing or adjusting a device panel with arrows indicating motion (no text or symbols)2 Remove the jammed paper.
If the paper tears, remove every loose scrap from inside the machine.

natural_image
Illustration of a hand inserting a component into a rack, with no visible text or symbols3 Open front cover.

natural_image
Line drawing of a hand inserting a device into a cabinet (no text or symbols)4 Turn green knob (A1) clockwise.

natural_image
Line drawing of a hand holding a knob inside an automotive engine compartment (no text or symbols)5 Remove the jammed paper.
If you cannot remove the paper, proceed with the next step.

natural_image
Illustration of a hand inserting a component into an electronic device (no text or symbols visible)6 Pull out paper feed unit (A2).
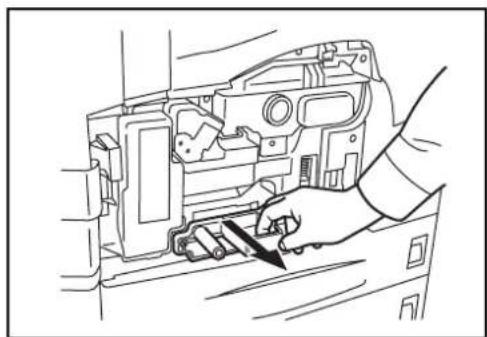
natural_image
Line drawing of a hand inserting a component into a device casing (no text or symbols)7 Open paper feed unit cover (A3) and remove the jammed paper.
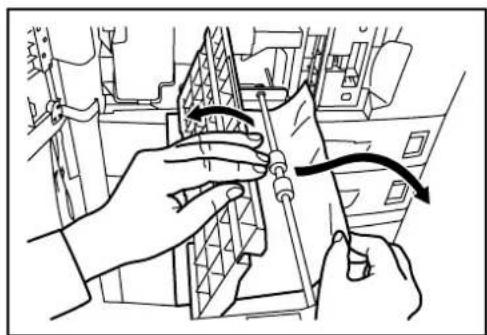
natural_image
Line drawing of hands installing or adjusting a mechanical component with a tool (no text or symbols visible)8 If the paper is torn, pull paper feed unit (A2) all the way out and lift it slightly to remove the paper.
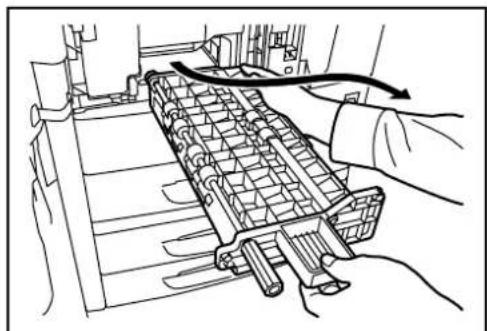
natural_image
Technical line drawing of a mechanical assembly with hands operating a component (no text or symbols visible)9 Remove the jammed paper.
If you cannot remove the paper, proceed with the next step.
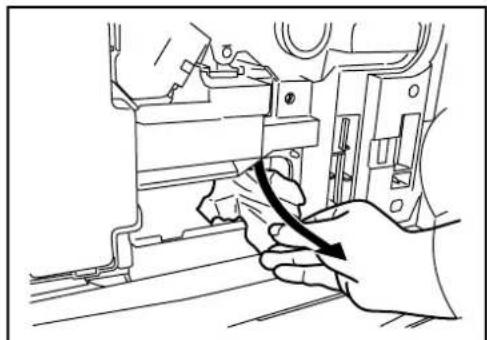
natural_image
Line drawing of a hand using a tool to adjust or install a mechanical component (no text or symbols visible)10 Push paper feed unit (A2) back in place, and close front cover.
11 Press the specified position to close left cover 1.
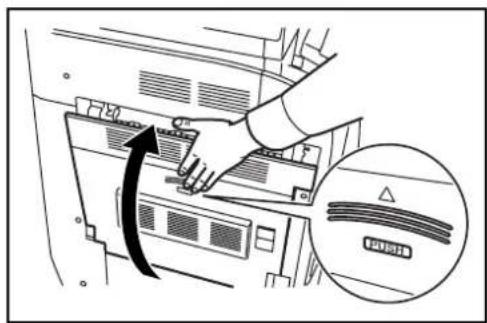
natural_image
Diagram of a computer monitor with an open rear panel and a magnified inset showing internal cable slots (no text or symbols)Optional Document Processor
Follow the steps below to clear paper jams in the optional document processor.
1 Remove the original from the original tray.
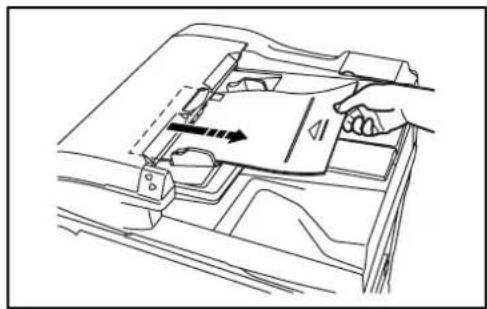
natural_image
Line drawing of a hand operating a device with an arrow indicating direction (no text or symbols)2 Open the document processor top cover.
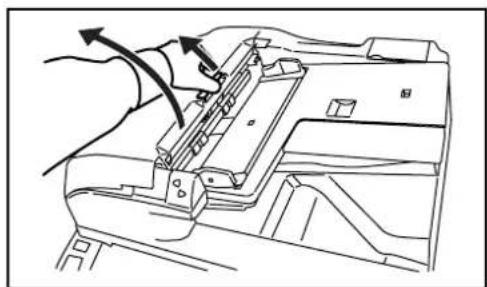
natural_image
Technical line drawing of a mechanical component with arrows indicating motion or assembly (no text or symbols)3 Remove the jammed original.
If the original tears, remove every loose scrap from inside the machine.
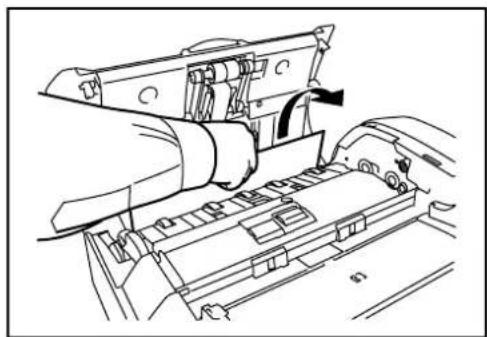
natural_image
Technical line drawing of a mechanical assembly with no visible text or symbolsIf it is difficult to remove the original, turn the feed dial. The original will be pushed to a place where it is easier to remove.
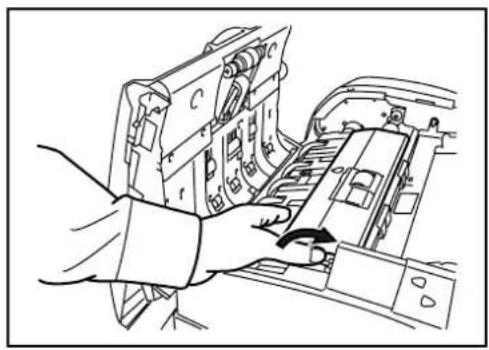
natural_image
Line drawing of a hand operating a mechanical device with a handle (no text or symbols visible)4 Lift reverse unit.
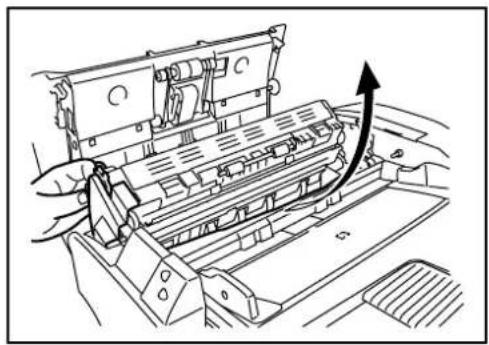
natural_image
Diagram of a printer or printer mechanism with an arrow indicating motion (no text or symbols present)5 Remove the jammed original.
If the original tears, remove every loose scrap from inside the machine.
6 Replace reverse unit, and close the document processor top cover.
7 Reload the originals on the document processor tray.
Optional Document Finisher
If a misfeed occurs in the optional document finisher or 3,000-sheet capacity document finisher, refer to the respective Operation Guides to clear the jam.
Appendix
- Character Entry Method...... Appendix-2
- Specifications ...... Appendix-6
Character Entry Method
To enter characters for a name, use the on-display keyboard in the touch panel following the steps as explained below.
NOTE: As keyboard layout, QWERTY, QWERTZ and AZERTY are available same as PC keyboard. Press the System Menu, [Common Settings] and then [Change] of Key board to choose desired layout. QWERTY layout is used here as an example. You may use other layout following the same steps.
Entry Screens
Lower-case Letter Entry Screen
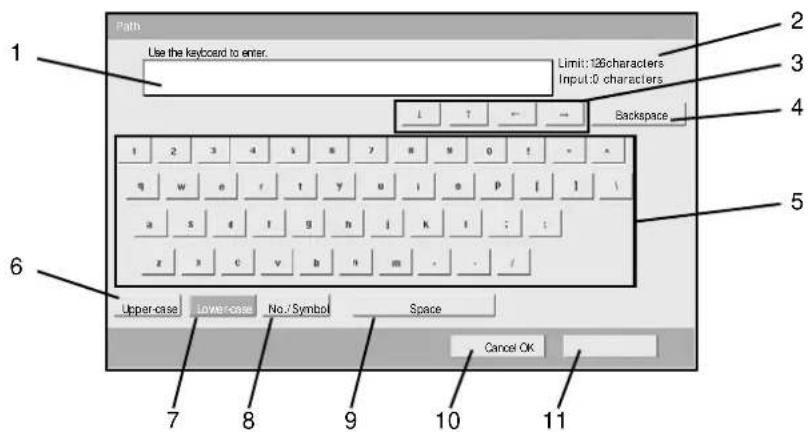
| No. | Display/Key Description |
| 1 | Display Displays entered characters. |
| 2 | Limit Display Displays maximum number of characters. |
| 3 | Cursor Key Press to move the cursor on the display. |
| 4 | [Back space] Press to delete a character next to the left of the cursor. |
| 5 | Keyboard Press the character to enter. |
| 6 | [Upper-case] Press to use upper-case letters. |
| 7 | [Lower-case] Press to use lower-case letters, |
| 8 | [No./Symbol] Press to enter numbers and symbols. |
| 9 | [Space] Press to insert space. |
| 10 [Cancel] Press to cancel entered character and return to the screen before the entry. | |
| 11 [OK] Press to finalize entry and return to the screen before the entry. | |
Upper-case Letter Enter Screen
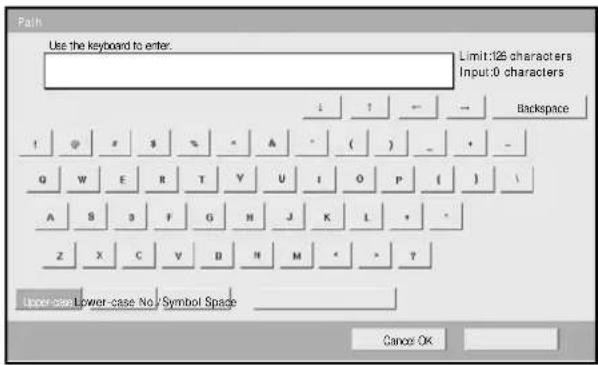
Number/Symbol Enter Screen
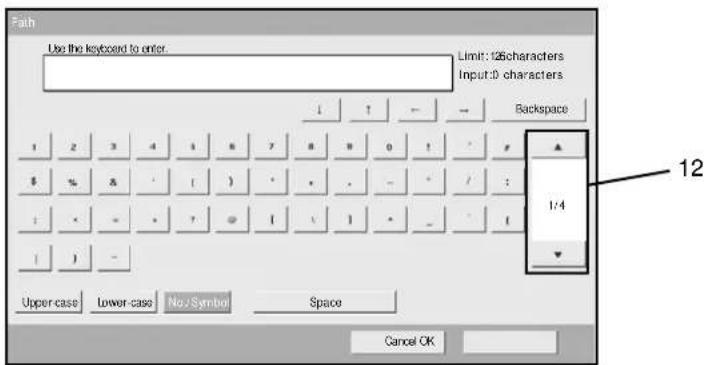
| No. | Display/Key | Description |
| 12 | [▲]/[▼] | To enter the number or symbol not shown in the keyboard, press the cursor key and scroll the screen to view other numbers or symbols to enter. |
Entering Characters
Follow the steps shown below to enter List A-1 for example.
1 Press [Upper-case].
2 Press [L]. The letter L is shown on the display.
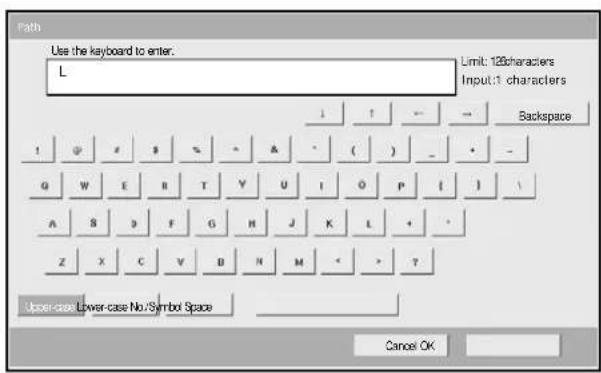
3 Press [Lower-case].
4 Press [i], [s], [t] and [Space].
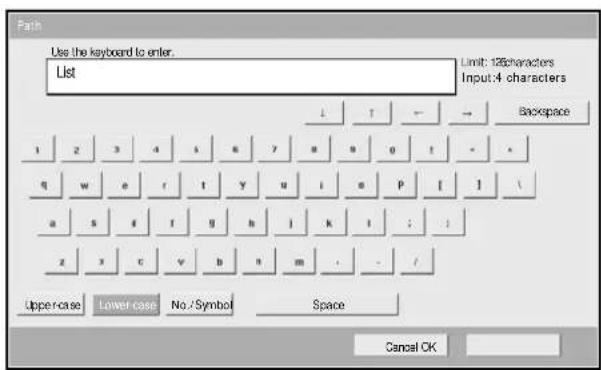
5 Press [Upper-case].
6 Press [A].
7 Press [No./Symbol].
8 Press [▲] or [▼] repeatedly to view the keyboard containing [-] and [1].
9 Press [-] and [1].
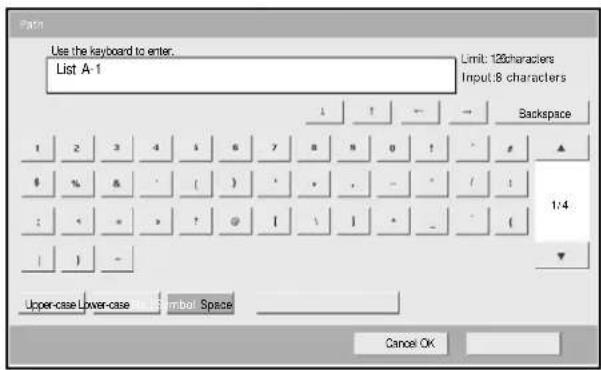
10 Check that the entry is correct. Press [OK].
Specifications
NOTE: Specifications are subject to change without notice.
Machine
| Copying System Indirect Electrostatic System | |
| Originals Supported | Sheets, Books, 3-dimensional objects (maximum original size: A3/Ledger) |
| Copy Sizes | |
| Cassettes 1 and 2 | Ledger, Legal, Oficio II, 8.5×13.5", Letter, Letter-R, Statement-R, A3, B4, A4, A4-R, B5, B5-R, A5-R, Folio, 8K, 16K, 16K-R |
| Multi Purpose Tray | Ledger, Legal, Oficio II, 8.5×13.5", Letter, Letter-R, Executive, Statement-R, A3, B4, A4, A4-R, B5, B5(ISO), B5-R, A5-R, B6-R, A6-R, Oufuku Hagaki, Hagaki, Envelope DL, Envelope C5, Envelope C4, Comm.#10, Comm.#9, Comm.#6-3/4, Monarch, Youkei 2, Youkei 4, Folio, 8K, 16K, 16K-R |
| Duplexing A3 to A5-R, Ledger to Statement-R | |
| Non-Copying Margin 0.5 to 5.5 mm maximum | |
| Paper Supply Capacity | |
| Cassettes 1 and 2 500 sheets (80 g/m ^2 ) | |
| Multi Purpose Tray 200 sheets (80 g/m ^2 ) | |
| Output Tray Capacity 250 sheets (80 g/m ^2 ), 150 sheets (80 g/m ^2 , with built-in finisher) | |
| Warm-up Time 30 sec. | Time for recovery from Sleep: 15 sec.(at room temperature 22°C/71.6°F, 60% RH) |
| Memory 512 MB as standard | |
| Hard Disk 40 GB | |
| Operating Environment | |
| Temperature 10 to 32.5°C/50 to 90.5°F | |
| Humidity | 15 to 80% |
| Altitude | 2,500 m maximum |
| Illumination | 1,500 lux maximum |
| Power Source | AC 120 V 60 Hz 11.5 A / AC 220 to 240 V 50 Hz 6.3 A |
| Dimensions (W) × (D) × (H) | 29 _9/16 × 25 _7/16 × 29 _5/16 " / 599 × 646 × 745 mm |
| Weight | 187 lbs / 85 kg |
| Footprint | 29 _5/8 × 25 _7/16 " (with Multi Purpose Tray)753 × 646 mm (with Multi Purpose Tray) |
Copier
| Copying Speed (Platen) | |
| 30 ppm model A3/Ledger: | 20 sheets/minB4/Legal: 20 sheets/minA4/Letter: 30 sheets/minA4-R/Letter-R: 22 sheets/minB5: 30 sheets/minB5-R: 20 sheets/minA5-R: 14 sheets/minA6-R: 16 sheets/min |
| 40 ppm model A3/Ledger: | 23 sheets/minB4/Legal: 23 sheets/minA4/Letter: 40 sheets/minA4-R/Letter-R: 27 sheets/minB5: 40 sheets/minB5-R: 22 sheets/minA5-R: 16 sheets/minA6-R: 18 sheets/min |
| 50 ppm model A3/Ledger: | 26 sheets/minB4/Legal: 26 sheets/minA4/Letter: 50 sheets/minA4-R/Letter-R: 31 sheets/minB5: 50 sheets/minB5-R: 24 sheets/minA5-R: 18 sheets/minA6-R: 18 sheets/min |
| First Copy Time | 30 ppm model: 3.9 sec. or less (1:1, A4/Letter, Platen)40/50 ppm model:3.5 sec. or less (1:1, A4/Letter, Platen) |
| Resolution Scanning: 600 × 600 dpi | Printing: 600 × 600 dpi (Photo mode: 1800 dpi equivalent × 600 dpi) |
| Continuous Copying 1 to 999 sheets | |
| Zoom Level Any level from 25 | to 400% in 1% increments(with the document processor: 25 to 200%)Includes preset zoom levels |
Printer
| Printing Speed | Same as Copying Speed. |
| First Print Time Same as First Copy Time | |
| Resolution 300 dpi (smoothing available), 600 dpi, Fast 1200 mode | |
| Operating System | Windows 95 (OSR2), Windows 98 (Second Edition), Windows NT 4.0 (Service Pack 5 or later), Windows 2000 (Service Pack 2 or later), Windows Me, Windows XP, Windows Server 2003, Apple Macintosh OS 9.x/OS X 10.x |
| Interface Parallel interface: 1 (based on IEEE1284)Network interface: 1USB memory slot: 3 (USB Hi-Speed) USB Interface Connector: 1 (USB Hi-Speed) Serial interface (optional): 1 (RS-232C) | |
| Controller Software | |
| PDL PRESCRIBE | |
| Emulation PCL6 (5e, XL)KPDL3 (PostScript3 compatible)KC-GLLine PrinterIBM Proprinter X24EDIABLO 630EPSON LQ-850 | |
| Fonts Outline font:80 fonts (PCL6)136 fonts (KPDL3)Bitmap font: 1 font79 fonts are processed by outline font. | |
| Connectivity Plug & PlaySNMP (printer MIB supported) | |
| Others | |
| EcoPrint ON/OFF (printing speed not affected)Smoothing KIR ON/OFF600 dpi mode: 2400 dpi equivalent × 600 dpi | |
| EcoMemory | Memory saving by means of compression and decompression of raster data with software |
| Internet Printing | IPP/1.0 |
| E-mail Printing | Printing of received E-mail data |
| e-MPS | Storing print data in HDD for print output |
Scanner
| Ethernet 10BASE-T/100BASE-TX | |
| Network Protocol TCP/IP | |
| Color/Monochrome | Both color and monochrome |
| Transmission System | PC transmission SMB Scan to SMBFTP Scan to FTPE-mail transmission SMTP Scan to E-mailTWAIN scan TWAIN source |
| Resolution 600 dpi, 400 dpi, 300 dpi, 200 dpi, 200 ×100 dpi, 200 × 400 dpi(* Resolution in FAX mode included) | |
| Gradation B/W: (a) Text mode: Binary/dot 256 gradations (error diffusion)(b) Photo mode: Binary/dot 256 gradations (error diffusion)(c) Text/Photo mode: Binary/dot 256 gradations (error diffusion)(d) OCR mode: Binary/dot 2 gradationsColor: RGB 256 values/dot | |
| Zoom Level | Same as Copier Zoom Level |
| Scanning Capacity | Max. 999 sheets (998 sheets for 2-sided originals) |
| File Format | Monochrome TIFF (MMR), PDF (MMR)Gray TIFF (JPEDG), PDF (JPEG)Color JPEG, PDF (high compression) |
| Scanning Speed | 1-sided B/W 50 sheets/minColor 25 sheets/min2-sided B/W 25 sheets/minColor 12.5 sheets/min(A4 landscape, 600 dpi, Image quality: Text/Photo original) |
Document Processor (option)
| Original Feed Method | Automatic feed |
| Supported Original Types | Sheet originals |
| Paper Size | Maximum: Ledger/A3Minimum: Statement-R/A5-R |
| Paper Weight | 45 to 160 g/m2 |
| Loading Capacity | 100 sheets (50 to 80 g/m2) maximumMixed original sizes (auto selection): 30 sheets (50 to 80 g/m2) maximum |
| Dimensions (W) × (D) × (H) | 22 3/8 × 20 11/16 × 5 7/8"569 × 525 × 149 mm |
| Weight | Approx. 28.6 lbs or less / Approx. 13 kg or less |
Paper Feeder (option)
| Paper Supply Method | Friction Feed (No. Sheets: 500, 80 g/m2, 2 cassettes) |
| Paper Size | Ledger, Legal, Oficio II, 8.5×13.5", Letter, Letter-R, Statement-R, A3, B4, A4, A4-R, B5, B5-R, A5-R, Folio, 8K, 16K, 16K-R |
| Supported Paper Paper weight: 60 - 105 g/m2Paper types: standard, recycled, color | |
| Dimensions(W) × (D) × (H) | 23 5/16 × 23 1/4 × 12 3/8"585 × 590 × 315 mm |
| Weight Approx. 57.2 | Ibs. / Approx. 26 kg |
3000 Sheet Paper Feeder (option)
| Paper Supply Method | Friction retard method (No. sheets: 3000, 80 g/m2) |
| Paper Size Letter, A4, B5 | |
| Supported Paper Paper weight: 60 - 105 g/m2Paper types: standard, recycled, color | |
| Dimensions(W) × (D) × (H) | 23 5/16 × 23 5/8 × 12 3/8"585 × 600 × 314 mm |
| Weight Approx. 50.6 | Ibs. / Approx. 23 kg |
Document Finisher (option)
| Number of Trays 1 tray | |
| Paper Size(Non-stapling) | Ledger, Legal, Oficio II, 8.5×13.5", A3, B4, Folio, 8K: 500sheetsLetter, Letter-R, A4, A4-R, B5, 16K: 1000 sheets |
| Supported Paper Weight | Stapling: 80 g/m2 or less |
| Maximum Sheets for Stapling | Ledger, Legal, Oficio II, 8.5×13.5", A3, B4, Folio: 20 sheetsLetter, Letter-R, A4, A4-R, B5: 30 sheets (Paper weight 80 g/m2 or less) |
| Dimensions(W) × (D) × (H) | 22 × 20 11/16 × 36 1/16"558 × 526 × 916 mm |
| Weight Approx. 55 lbs. / Approx. 25 kg | |
3000 Sheet Document Finisher (option)
| Number of Trays 3 tray | |
| Paper Size | |
| Tray A(Non-stapling) | Ledger, Legal, Oficio II, 8.5×13.5", A3, B4, Folio, 8K: 1500 sheetsLetter, Letter-R, A4, A4-R, B5, 16K: 3000 sheets |
| Tray B Ledger, Leg | gal, Oficio II, 8.5×13.5", A3, B4, Folio, 8K: 100 sheetsLetter, Letter-R, Statement-R, A4, A4-R, B5, B5-R, A5-R, B6-R, A6-R, 16K, 16K-R: 200 sheetsHagaki: 200 sheets |
| Tray C | Letter, Statement-R, A4, B5, A5-R, B6-R, A6-R, 16K: 50 sheetsHagaki: 50 sheets |
| Supported Paper Weight | Stapling: 90 g/m2 or lessPunching (option): 45 - 200 g/m2 |
| Maximum Sheets for Stapling | Ledger, Legal, Oficio II, 8.5×13.5", A3, B4, Folio, 8K: 30 sheets,Letter, Letter-R, A4, A4-R, B5, 16K: 50 sheets (Paper weight 90 g/m2 or less) |
| Dimensions(W) × (D) × (H) | 26 15/16 × 22 3/16 × 42 13/16"684 × 563 × 1087 mm |
| Weight Approx. 105.6 | Ibs. or less / Approx. 48 kg or less |
Job Separator (option)
| Number of Trays 1 tray | |
| Maximum Sheets 100 sheets (80 g/m ^2 ) | |
| Paper Size | Ledger, Legal, Oficio II, 8.5×13.5", Letter, Letter-R, Executive-R, Statement-R,A3, B4, A4, A4-R, B5, B5-R, A5-R, B6-R, Folio |
| Paper Type Paper weight: 45 - 160 g/m ^2 Paper type: plain, recycled, color, thin | |
| Dimensions(W) × (D) × (H) | 20 _13/16 × 18 _11/16 × 3 _3/16 "530 × 475 × 82 mm |
| Weight 3.3 lbs. or less / 1.5 kg or less | |
Built-in Finisher
| Number of Trays 1 tray | |
| Paper Size Ledger, Leg | Legal, Oficio II, 8.5×13.5", A3, B4, Folio: 250 sheets |
| (Non-Stapling) Supported Paper | Letter, Letter-R, A4, A4-R, B5: 500 sheets60 to 80 g/m2 |
| Weight 19.8 lbs or less / Approx. 9 kg or less | |
| Maximum Sheets for Stapling | Ledger, Legal, A3, B4, Folio: 20 sheetsLetter, Letter-R, A4, A4-R, B5: 30 sheets(Paper weight 80 g/m2 or less) |
| Dimensions (W) × (D) × (H) | 12 3/16 × 16 1/8 × 6 5/16"310 × 410 ×160 mm |
Environmental Specifications
| Time to Sleep mode (default setting) | 45 minutes (30 and 40 ppm models)90 minutes (50 ppm model) |
| Duplexing Standard | |
| Paper supply capability 100% recycled paper may be used. | |
NOTE: Consult your dealer or service representative for recommended paper types.
Index
Numerics
3000 Sheet Document Finisher 4-9 3000 Sheet Paper Feeder 4-5
A
About this Operation Guide xvii Adjusting Operation Panel Angle 3-5 Appendix Appendix-1
B
Basic Operation 3-1 Built-in Finisher 4-5
C
Canceling/Viewing/Changing Job 3-50 Caution Labels viii Changing Language (Optional) 2-14 Character Entry Method Appendix-2 Checking Remaining Toner and Paper 3-54 Cleaning 5-2 Clearing Paper Jams 6-10 Configuring Network (LAN Cable Connection) 2-10 Connecting Cables 2-5 Conventions in This Guide xviii Copying 3-7
D
Data Backup Kit 4-12 Description of Operation Procedure xix Determining Connection Method and Preparing Cables 2-3 Document Finisher 4-9
Document Processor 4-4 Document Table 4-10
E
Energy Star (ENERGY STAR®) Program vi
F
Fax Kit 4-12
|
Included Guides xviii Installation Precautions ix Installing Software 2-12
J
Job Separator 4-10
K
Key Counter 4-11
L
Laser Safety xiv Legal and Safety Information i Legal Information ii Loading Originals 2-25 Loading Paper 2-15
M
Machine 1-2 Maintenance 5-1
0
Operation Panel 1-5
Optional Equipment 4-1
Originals and Paper Sizes xx
Overview of Optional Equipment 4-2
P
Paper Feeder 4-4
Part Names 1-1
PDF Upgrade Kit (USB Key) 4-14
Power On/Off 3-2
Precautions for Use xi
Preparation before Use 2-1
Printing - Printing from Applications 3-18
Printing a Document Stored in Removable
USB Memory 3-48
Q
Quick Setup Screen 3-55
R
Regarding Trade Names iii
Responding to Error Messages 6-4
s
Safety Conventions in This Guide vii
Safety Instructions Regarding the
Disconnection of Power xv
Security Kit (USB Key) 4-13
Selecting Default Screen (Optional) 2-13
Sending 3-20
Serial Interface 4-13
Setting Date and Time 2-8
Sleep and Auto Sleep 3-4
Solving Malfunctions 6-2
Specifications Appendix-6
Specifying Destination 3-34
T
Toner Container and Waste Toner Box
Replacement 5-7
Touch Panel 1-6
Touch Panel Display 3-6
Troubleshooting 6-1
U
Using Document Box 3-37
For best results and machine performance, we recommend that you use only our original supplies for your products.

DIRECTIVE 2002/96/CE ON THE TREATMENT, COLLECTION, RECYCLING AND DISPOSAL OF ELECTRIC AND ELECTRONIC DEVICES AND THEIR COMPONENTS
INFORMATION
1. FOR COUNTRIES IN THE EUROPEAN UNION (EU)
The disposal of electric and electronic devices as solid urban waste is strictly prohibited: it must be collected separately.
The dumping of these devices at unequipped and unauthorized places may have hazardous effects on health and the environment.
Offenders will be subjected to the penalties and measures laid down by the law.
To dispose of our devices correctly:
a) Contact the Local Authorities, who will give you the practical information you need and the instructions for handling the waste correctly, for example: location and times of the waste collection centres, etc.
b) When you purchase a new device of ours, give a used device similar to the one purchased to our dealer for disposal.

The crossed dustbin symbol on the device means that:
- when it to be disposed of, the device is to be taken to the equipped waste collection centres and is to be handled separately from urban waste;
- The producer guarantees the activation of the treatment, collection, recycling and disposal procedures in accordance with Directive 2002/96/CE (and subsequent amendments).
2. FOR OTHER COUNTRIES (NOT IN THE EU)
The treatment, collection, recycling and disposal of electric and electronic devices will be carried out in accordance with the laws in force in the country in question.
d-Copia 300MF d-Copia 400MF d-Copia 500MF
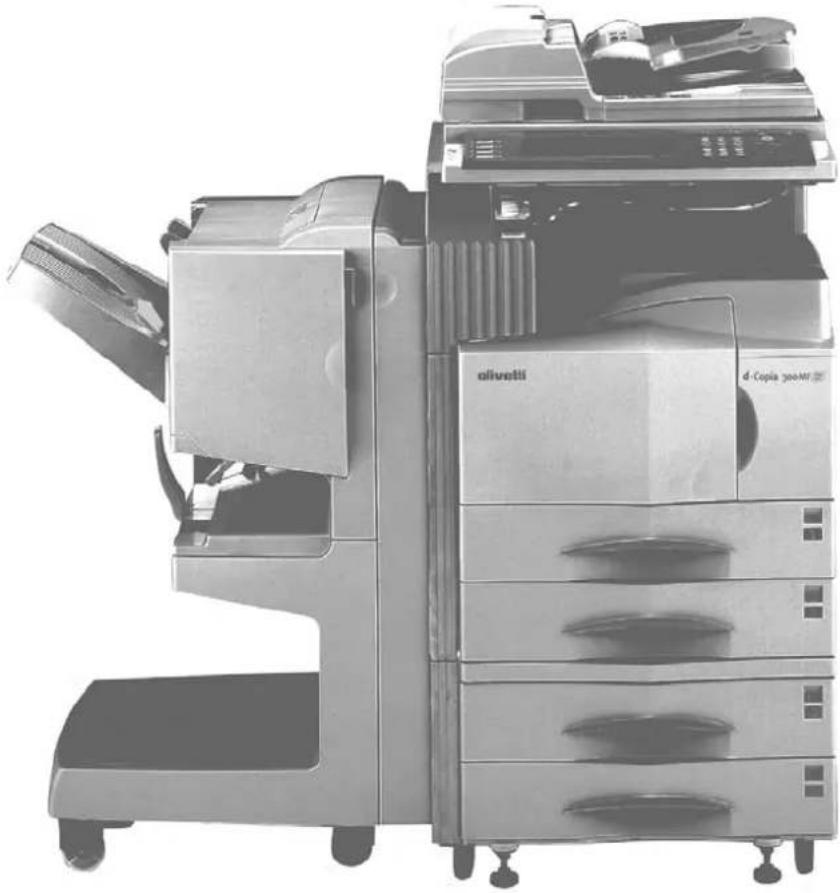
natural_image
Exterior view of a modern office building (no signage)Copyright © 2006 Olivetti
Monotype Imaging License Agreement
1 Software shall mean the digitally encoded, machine readable, scalable outline data as encoded in a special format as well as the UFST Software.
2 You agree to accept a non-exclusive license to use the Software to reproduce and display weights, styles and versions of letters, numerals, characters and symbols (Typefaces) solely for your own customary business or personal purposes at the address stated on the registration card you return to Monotype Imaging. Under the terms of this License Agreement, you have the right to use the Fonts on up to three printers. If you need to have access to the fonts on more than three printers, you need to acquire a multi-user license agreement which can be obtained from Monotype Imaging. Monotype Imaging retains all rights, title and interest to the Software and Typefaces and no rights are granted to you other than a License to use the Software on the terms expressly set forth in this Agreement.
3 To protect proprietary rights of Monotype Imaging, you agree to maintain the Software and other proprietary information concerning the Typefaces in strict confidence and to establish reasonable procedures regulating access to and use of the Software and Typefaces.
4 You agree not to duplicate or copy the Software or Typefaces, except that you may make one backup copy. You agree that any such copy shall contain the same proprietary notices as those appearing on the original.
5 This License shall continue until the last use of the Software and Typefaces, unless sooner terminated. This License may be terminated by Monotype Imaging if you fail to comply with the terms of this License and such failure is not remedied within thirty (30) days after notice from Monotype Imaging. When this License expires or is terminated, you shall either return to Monotype Imaging or destroy all copies of the Software and Typefaces and documentation as requested.
6 You agree that you will not modify, alter, disassemble, decrypt, reverse engineer or decompile the Software.
7 Monotype Imaging warrants that for ninety (90) days after delivery, the Software will perform in accordance with Monotype Imaging-published specifications, and the diskette will be free from defects in material and workmanship. Monotype Imaging does not warrant that the Software is free from all bugs, errors and omissions.
The parties agree that all other warranties, expressed or implied, including warranties of fitness for a particular purpose and merchantability, are excluded.
8 Your exclusive remedy and the sole liability of Monotype Imaging in connection with the Software and Typefaces is repair or replacement of defective parts, upon their return to Monotype Imaging.
In no event will Monotype Imaging be liable for lost profits, lost data, or any other incidental or consequential damages, or any damages caused by abuse or misapplication of the Software and Typefaces.
9 Massachusetts U.S.A. law governs this Agreement.
10 You shall not sublicense, sell, lease, or otherwise transfer the Software and/or Typefaces without the prior written consent of Monotype Imaging.
11 Use, duplication or disclosure by the Government is subject to restrictions as set forth in the Rights in Technical Data and Computer Software clause at FAR 252-227-7013, subdivision (b)(3)(ii) or subparagraph (c)(1)(ii), as appropriate. Further use, duplication or disclosure is subject to restrictions applicable to restricted rights software as set forth in FAR 52.227-19 (c)(2).
12 You acknowledge that you have read this Agreement, understand it, and agree to be bound by its terms and conditions. Neither party shall be bound by any statement or representation not contained in this Agreement. No change in this Agreement is effective unless written and signed by properly authorized representatives of each party. By opening this diskette package, you agree to accept the terms and conditions of this Agreement.
Energy Star (ENERGY STAR®) Program
DÉCLARATION DE CONFORMITÉ
AUX DIRECTIVES
89/336/EEC, 73/23/EEC, 93/68/EEC et 1995/5/EC
6 Touche/voyant Copy
7 Touche/voyant Envoyer
8 Touche/voyant Document Box
KM-NET for Clients Operation Guide
KM-NET for Direct Printing Operation Guide
PRESCRIBE Commands Technical Reference
PRESCRIBE Commands Command Reference
natural_image
Line drawing of a hand inserting a cable into a device panel (no text or symbols)natural_image
Line drawing of a hand inserting a USB into a CD drive slot (no text or symbols)natural_image
Illustration of a hand inserting a USB into a CD-ROM drive (no text or symbols visible)natural_image
Line drawing of a hand inserting a device into a drawer (no text or symbols)natural_image
Line drawing of a hand inserting a device into a computer case (no text or symbols)natural_image
Line drawing of a hand inserting a component into a device (no text or symbols visible)natural_image
Line drawing of a hand inserting a paper into a device (no text or symbols)IMPORTANT :
natural_image
Line drawing of an open file drawer with a door and directional arrow indicator (no text or symbols)natural_image
Line drawing of a hand inserting a component into a device casing, showing a curved arrow indicating rotation (no text or symbols present)natural_image
Technical line drawing of a mechanical assembly with no visible text or symbolsnatural_image
Line drawing of a hand holding a tablet device with a dashed line indicating a measurement or alignment (no text or symbols present)natural_image
Line drawing of a hand inserting a component into a device housing (no text or symbols)natural_image
Technical line drawing of a mechanical assembly with no visible text or symbolsnatural_image
Line drawing of an open industrial machine with control panel and display (no text or symbols)natural_image
Line drawing of hands operating a printer with a control panel (no text or symbols)natural_image
Technical line drawing of a mechanical assembly with directional arrows indicating motion or force (no text or symbols)natural_image
Line drawing of a mechanical device with a hand operating the component (no text or symbols)natural_image
Line drawing of a printer's internal circuit board with a hand inserting a package into it (no text or symbols present)Veille automatique
natural_image
Line drawing of a hand operating a mechanical device with a curved arrow indicating rotation (no text or symbols present)Écran tactile
natural_image
Line drawing of a printer drawer with an inset showing a hand inserting a cable into a cable (no text or symbols present)natural_image
Line drawing of a hand holding a tool over a mechanical component, with no visible text or symbols.natural_image
Line drawing of a kitchen appliance with control panel and door (no text or symbols)flowchart
graph LR
    A["Original Copy"] --> B["1"]
    A --> C["2"]
natural_image
Line drawing of a hand using a tool to press or print a document inside a machine frame (no text or symbols)natural_image
Line drawing of a hand using a tool to press or adjust a component in a machine (no text or symbols)natural_image
Line drawing of a hand using a tool to cut or mark a rectangular object on a mechanical component (no text or symbols)natural_image
Line drawing of a hand using a tool to adjust a component with circular and rectangular parts (no text or symbols)| R2 (year) | Year(s) | |
| 2019E | OR | |
| Type: non-1 | ||
| Imagerer - Cign | ||
| Non-Archivalancer | ||
| AD/EL | ||
| Non-Arthritis | ||
| AMMA | ||
| T stage: non-1 | Fence of flu | |
| 13.5.24 | 13.7.25 | |
Fouca
natural_image
Line drawing of a printer or scanner device with control panel and display (no text or symbols)Chargeur de papier
natural_image
Line drawing of an open computer case with internal components (no text or symbols)natural_image
Line drawing of a computer case chassis with internal compartments and ventilation slots (no text or symbols)natural_image
Technical line drawing of a mechanical assembly with no visible text or symbolsUtiliser le plateau auxiliaire pour trier les impressions Ledger, Legal, 8,5×13,5", Oficio II, Letter, Letter-R, A3, B4, A4, A4-R, B5, Folio, 8K ou 16K.
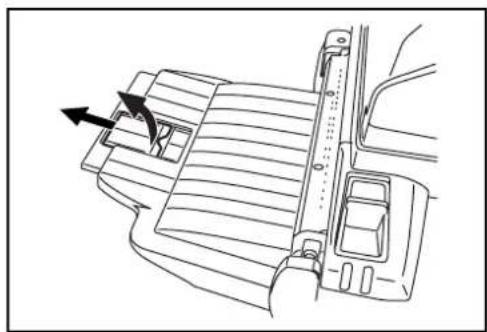
natural_image
Technical line drawing of a mechanical component with arrows indicating motion direction (no text or symbols)Ajout d'agrafes
natural_image
Line drawing of a hand operating a sewing machine (no text or symbols)2 Sortir le porte-agrafes.

natural_image
Line drawing of a hand using a tool to adjust or install a mechanical component (no text or symbols visible)natural_image
Illustration of hands using a tool to adjust or install a mechanical component (no text or symbols visible)natural_image
Illustration of a hand holding a mechanical device with an inset showing a close-up of a device (no text or symbols present)natural_image
Illustration of hands using a handheld device to adjust or install a component (no text or symbols visible)natural_image
Line drawing of a hand inserting a small component into a mechanical device (no text or symbols)natural_image
Line drawing of a hand holding a mechanical component with an arrow labeled 'A' pointing to a section (no text or symbols beyond label)natural_image
Line drawing of hands holding a small electronic component with an arrow indicating rotation (no text or symbols)natural_image
Illustration of hands holding a mechanical component with a curved arrow indicating rotation (no text or symbols)natural_image
Line drawing of a mechanical device with no visible text or symbolsnatural_image
Technical line drawing of a mechanical component with three blades (no text or symbols)
natural_image
Technical line drawing of a mechanical component with multiple blades (no text or symbols)natural_image
Line drawing of a mechanical device with internal components (no text or symbols)Table de documents
natural_image
Technical line drawing of a mechanical assembly with no visible text or symbolsCompteur clé
natural_image
Line drawing of a rectangular electronic component with internal slots and a slot on top (no text or symbols)natural_image
Line drawing of a hand pressing a button into a device (no text or symbols)Kit de fax
natural_image
Line drawing of a rectangular electronic device with ports and connectors (no text or symbols)natural_image
Isometric line drawing of a rectangular electronic component or package with a small protrusion and label 'A' on the top (no text or symbols beyond basic markings)natural_image
Line drawing of a USB flash drive with an open lid and ports (no text or symbols)Interface série
natural_image
Technical line drawing of a mechanical connector with a cable and housing (no text or symbols)natural_image
Line drawing of a USB flash drive with a cylindrical body and internal ports (no text or symbols)5 Maintenance
natural_image
Line drawing of a hand cleaning a whiteboard on a flat surface (no text or symbols)natural_image
Line drawing of a printer's internal structure with no visible text or symbolsnatural_image
Line drawing of a hand inserting a component into a printer case (no text or symbols)Glace d'exposition
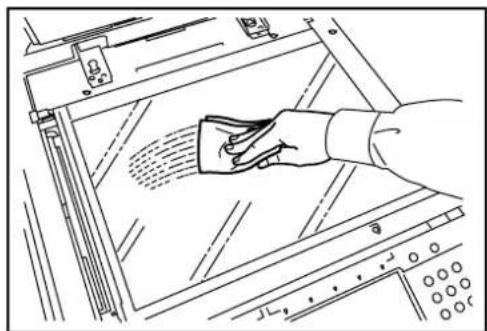
natural_image
Line drawing of a hand cleaning or polishing a machine window with a cloth (no text or symbols)Verre fendu
natural_image
Line drawing of a hand inserting a device into a machine (no text or symbols)natural_image
Technical line drawing of a mechanical component with an arrow indicating a specific part (no text or symbols present)natural_image
Illustration of hands installing or adjusting a device panel with arrows indicating motion (no text or symbols)natural_image
Technical diagram showing a mechanical assembly with an inset close-up of a tool interacting with a component (no text or symbols visible)natural_image
Line drawing of a hand inserting a device into a machine (no text or symbols)natural_image
Technical line drawing of a mechanical component with an arrow indicating a specific part (no text or symbols present)natural_image
Illustration of hands inserting a device into a computer case (no text or symbols visible)4
natural_image
Technical illustration of a mechanical assembly with an inset showing hand positioning and motion arrows (no text or symbols)5
natural_image
Line drawing of a hand inserting a device into a cabinet (no text or symbols)2
natural_image
Technical line drawing of a mechanical assembly with an inset showing a close-up of a component (no text or symbols present)
natural_image
Line drawing of a hand operating a mechanical device with a tool, no text or symbols presentnatural_image
Line drawing of a hand pressing down on a mechanical component with arrows indicating motion (no text or symbols)natural_image
Line drawing of hands holding a device with arrows indicating motion (no text or symbols)natural_image
Mechanical assembly diagram showing hands operating a component with arrows indicating motion direction (no text or symbols)natural_image
Line drawing of hands holding a car seatbelt with an arrow indicating direction (no text or symbols)natural_image
Line drawing of a hand operating a mechanical device with a circular arrow indicating rotation (no text or symbols)natural_image
Line drawing of hands adjusting a device with a magnifying glass (no text or symbols)natural_image
Line drawing of a hand operating a mechanical device with a grid panel (no text or symbols)natural_image
Technical line drawing of a mechanical component with an arrow indicating a specific part (no text or symbols present)natural_image
Illustration of hands installing or adjusting a device panel with arrows indicating motion (no text or symbols)natural_image
Technical diagram showing a mechanical assembly with an inset close-up of a hand adjusting a component (no text or symbols visible)natural_image
Technical illustration of a mechanical assembly with an inset showing hand positioning and motion arrows (no text or symbols)15
16
17
natural_image
Line drawing showing two tools: a tool moving through a device and a tool inserting a package into it (no text or symbols)natural_image
Illustration of hands installing or adjusting a device panel with arrows indicating rotation (no text or symbols present)natural_image
Illustration of a hand inserting a component into a rack, with an arrow indicating the direction (no text or symbols present)natural_image
Line drawing of a hand inserting a device into a drawer (no text or symbols)natural_image
Line drawing of a hand inserting a component into a device (no text or symbols)Magasin 2
natural_image
Illustration of a hand inserting a component into a device panel (no text or symbols visible)natural_image
Line drawing of a hand inserting or removing a device into a folder (no text or symbols visible)natural_image
Line drawing of a hand inserting a drawer into a machine (no text or symbols)natural_image
Line drawing of a mechanical device interior showing internal compartments and housing (no text or symbols)natural_image
Line drawing of a hand inserting a component into a device (no text or symbols)natural_image
Line drawing of a printer's internal structure with a hand inserting a component, showing no text or symbols.natural_image
Line drawing of a hand inserting a file into a rack (no text or symbols)natural_image
Line drawing of a hand inserting paper into a file into a rack (no text or symbols)natural_image
Illustration of a hand inserting a component into an electronic device (no text or symbols visible)natural_image
Illustration of hands installing or adjusting a device panel with arrows indicating motion (no text or symbols)natural_image
Illustration of a hand inserting a component into a rack, showing internal structure and arrows indicating direction (no text or symbols)natural_image
Technical line drawing of a mechanical component with arrows indicating assembly or movement (no text or symbols present)natural_image
Diagram of a computer monitor with an arrow indicating a cable or cable connector (no text or symbols present)natural_image
Illustration of hands installing or adjusting a device panel with arrows indicating rotation (no text or symbols present)natural_image
Illustration of a hand inserting a component into a rack, with no visible text or symbolsnatural_image
Technical diagram of a vehicle engine component with arrows indicating assembly or movement (no text or symbols present)natural_image
Line drawing of a hand inserting a component into a machine drawer (no text or symbols)natural_image
Illustration of hands installing or adjusting a device panel with arrows indicating motion (no text or symbols)natural_image
Illustration of a hand inserting a component into an electronic device panel (no text or symbols visible)natural_image
Line drawing of a hand inserting a device into a cabinet (no text or symbols)natural_image
Line drawing of a hand holding a knob inside an automotive engine compartment (no text or symbols)natural_image
Illustration of a hand inserting a component into a rack, with no visible text or symbolsnatural_image
Line drawing of a hand inserting a component into a device casing (no text or symbols)natural_image
Line drawing of hands installing or adjusting a mechanical component with arrows indicating motion (no text or symbols)natural_image
Technical line drawing of a mechanical assembly with hands operating a component (no text or symbols visible)natural_image
Line drawing of a hand using a tool to adjust or install components on a mechanical component (no text or symbols visible)natural_image
Line drawing of a mechanical device with an arrow indicating direction (no text or symbols)natural_image
Diagram of a printer's internal structure showing a slot and handle mechanism (no text or symbols)3 Retirer l'original coincé.
natural_image
Technical line drawing of a mechanical assembly with no visible text or symbolsnatural_image
Line drawing of a hand operating a mechanical device with no visible text or symbolsnatural_image
Technical line drawing of a mechanical assembly with hands operating a component (no text or symbols visible)5 Retirer l'original coincé.
Laser Safety -xiv Legal and Safety Information i Legal Information ii
M
Precautions for Use xi
Safety Conventions in This Guide vii
MANUFACTURER'S CE DECLARATION of CONFORMITY according to EN 45014
Declares under its sole responsibility that the product:
is in compliance with directive 99/5/EC dated 9^th march 1999
and fulfills the essential requirements of Electromagnetic Compatibility and of Electrical Safety as prescribed by the Directives:
89/336/EEC dated 3rd May 1989 with subsequent amendments (Directive 92/31/EEC dated 28th April 1992 and Directive 93/68/EEC dated 22nd July 1993);
73/23/CEE del 19 febbraio 1973 con successive modificazioni (Direttiva 93/68/CEE del 22 luglio 1993), 73/23/EEC dated 19th February 1973 with subsequent amendments (Directive 93/68/EEC dated 22nd July 1993).
since designed and manufactured in compliance with the following European Harmonized Standards:
EN 55022:1998 + A1 + A2 (Limits and methods of measurements of radio interference characteristics of Information Technology Equipment) / Class B;
EN 61000-3-2:2000 (Electromagnetic Compatibility (EMC) - Part 2 : Limits - Section 2 : Limits for harmonic current emissions (equipment input current ≤ 16 A per phase) / Class A
EN 61000-3-3:1995 + A1 (Electromagnetic Compatibility (EMC) - Part 3 : Limits - Section 3 : Limitation of voltage fluctuations and flicker in low voltage supply systems for equipment with rated current up to and including 16A);
EN 55024:1998 + A1 + A2 (Electromagnetic Compatibility – Information technology equipment – Immunity characteristics – Limits and methods of measurement);
EN 60950-1:2001 (Safety of Information Technology Equipment, including electrical business equipment).
EN 60825-1:1994 +A1:2002+A2:2001 (Radiation Safety of laser products, equipment classification, requirements ad user's guide).
ETSI TBR 21/1998 - Requirements for pan-European approval for connection to the analogue Public Switched Telephone Networks (PSTN) of TE (excluding TE supporting the voice telephony service) in which network addressing, if provided, is by means of Dual Tone Multi Frequency (DTMF) signaling.
EN300 330-1 V1.3.2
EN300 330-2 V1.1.1
Compliance with the above mentioned essential requirements is shown by affixing the CE marking on the product.
Ivrea, 14 ^th June 2006
Giovanni Ferrario
Chief Executive Officer Amministratore Delegato
Olivetti S.p.A.
Notes: 1) CE Marking has been affixed in 2006
2) The Quality System is in compliance with the UNI EN ISO 9000 series of Standards


- d-Copia 300MF d-Copia 400MF d-Copia 500MF
- PUBLICATION ISSUED BY:
- Legal and Safety Information
- Legal Information
- Legal Restriction on Copying/Scanning
- Regarding Trade Names
- Monotype Imaging License Agreement
- Energy Star (ENERGY STAR®) Program
- About the International Energy Star Program
- Sleep
- Automatic 2-Sided Copy Functions
- Paper Recycling
- Safety Conventions in This Guide
- Symbols
- Caution Labels
- Installation Precautions
- Environment
- CAUTION
- Other precautions
- Power supply/Grounding the machine
- WARNING
- Handling of plastic bags
- Precautions for Use
- Cautions when using the machine
- Cautions when handling consumables
- Laser Safety
- Safety Instructions Regarding the Disconnection of Power
- DECLARATION OF CONFORMITY
- Radio Frequency Transmitter
- Radio Tag Technology
- About this Operation Guide
- Included Guides
- Operation Guide (This Guide)
- Advanced Operation Guide
- Conventions in This Guide
- Description of Operation Procedure
- Originals and Paper Sizes
- Icons on the Touch Panel
- Contents
- P a r t N a m e s
- Preparation before Use
- Basic Operation
- Optional Equipment
- Maintenance
- Troubleshooting
- Part Names
- Machine
- Touch Panel
- Copy Screen
- Send Screen
- Document Box Screen
- [Job Box] Screen
- [Removable Memory] Screen
- [FAX Box] Screen (Displayed only when optional FAX kit is installed)
- Status/Job Cancel Screen
- [Printing Jobs] Screen
- Program Screen
- Documents Contained in the Attached CD-ROM
- Documents
- Determining Connection Method and Preparing Cables
- Connection Example
- Preparing Necessary Cables
- Optional Interface
- Connecting Cables
- Connecting LAN Cable (Optional)
- Connecting Parallel/USB Cable (Optional)
- When Connecting to USB Interface
- Connect the other end of the cable to PC.
- Connecting Power Cable
- Setting Date and Time
- Configuring Network (LAN Cable Connection)
- Setting TCP/IP (When Using Fixed IP Address)
- Setting TCP/IP (When Using DHCP)
- Installing Software
- Selecting Default Screen (Optional)
- Changing Language (Optional)
- Loading Paper
- Before Loading Paper
- Loading Paper in the Cassettes
- IMPORTANT:
- Loading Paper in the Multi Purpose Tray
- Loading Envelopes
- Selecting Paper Size and Type
- Selecting Paper Size and Type to the Cassettes
- Selecting Paper Size and Type to the Multi Purpose Tray
- Keys
- Loading Originals
- Placing Originals on the Platen
- Close the original cover.
- Loading Originals in the Document Processor
- Part Names of Document Processor
- Originals Supported by the Document Processor
- Originals Not Supported by the Document Processor
- How to Load Originals
- This chapter explains the following operations.
- Power On/Off
- Power On
- Blinking/Lighting of each Key/Indicator
- Power Off
- In case of not using the machine for extended period of time
- Sleep and Auto Sleep
- Auto Sleep
- Adjusting Operation Panel Angle
- Touch Panel Display
- Display of Originals and Paper
- Display in Changing Screen
- Copying
- Adjusting Density
- Selecting Image Quality
- Zoom Copying
- Auto Zoom
- Manual Zoom
- Preset Zoom
- XY Zoom
- Duplex Copying
- One-sided to Two-sided
- Two-sided to One-sided
- Two-sided to Two-sided
- Book to One-sided
- Book to Two-sided
- Collate/Offset Copying
- Collate
- Offset
- Printing - Printing from Applications
- Sending
- Send as E-mail
- Send to Folder (SMB)
- Press the Send key.
- Press [Folder Path Entry] and then [SMB].
- Enter host name, path, user name and password. Press the key of the item to be entered, and the entry screen appears.
- Enter the destination data and press [OK].
- Send to Folder (FTP)
- Press [Folder Path Entry] and then [FTP].
- Image Data Scanning with TWAIN
- Adding the machine to PC
- Scanning document data
- Select the document data to be scanned from Document List files.
- Specifying Destination
- Choosing from Address Book
- Destination Search
- Search by name
- Search by address number
- Advanced search by destination type
- Advanced search by initial letter
- Choosing by One-Touch Key
- Choosing by Speed Dial
- Sending to Different Types of Destinations (Multi Sending)
- Using Document Box
- Storing Document in Custom Box
- Printing Document Stored in Custom box
- 6
- 7
- Sending Document Stored in Custom Box
- 1
- 2
- Press [Open].
- From the list, select the checkbox beside the document to be sent. The selected document is indicated by a checkmark in the check box.
- Press [Send].
- Specify the destination.
- Editing Document Stored in Custom Box
- Move Documents
- Press [Move].
- Join Documents
- Press the Document Box key.
- Press [Custom Box] and select the box containing the documents to be joined.
- Printing Document Stored in Job Box
- 3
- 4
- Printing a Document Stored in Removable USB Memory
- Limitations
- Printing
- Removing USB Memory
- Canceling/Viewing/Changing Job
- Canceling Job
- Viewing Job Detail
- Viewing Job Log
- Print Job Suspension and Interruption (Priority Override)
- Checking Remaining Toner and Paper
- Quick Setup Screen
- Functions Available for Registration in Quick Setup Screen
- Changing Registration
- Overview of Optional Equipment
- Document Processor
- Paper Feeder
- Sheet Paper Feeder
- Built-in Finisher
- Adding Staples
- Clearing Staple Jam
- Document Finisher
- Sheet Document Finisher
- Job Separator
- Document Table
- Key Counter
- Inserting the Key Counter
- Fax Kit
- Data Backup Kit
- Security Kit (USB Key)
- Serial Interface
- PDF Upgrade Kit (USB Key)
- Cleaning
- Platen Cover / Document Processor / Glass Surface
- Platen Cover
- Glass Surface
- Slit Glass
- Separator
- Transfer Roller
- 5
- Toner Container and Waste Toner Box Replacement
- Solving Malfunctions
- Responding to Error Messages
- Clearing Paper Jams
- Jam Location Indicators
- Precautions of the Paper Jam
- Cassette 1
- Cassette 2
- Optional Cassettes 3 and 4
- Multi Purpose Tray
- Inside the Left Covers 1, 2 and 3
- Duplex Unit
- Duplex Unit and Cassette 1
- Paper Feed Unit
- Remove the jammed paper.
- Open front cover.
- Turn green knob (A1) clockwise.
- Remove the jammed paper.
- Optional Document Processor
- Optional Document Finisher
- Appendix
- Character Entry Method
- Entry Screens
- Upper-case Letter Enter Screen
- Number/Symbol Enter Screen
- Entering Characters
- Specifications
- Index
- Numerics
- A
- B
- C
- D
- E
- F
- |
- J
- K
- L
- M
- 0
- P
- Q
- R
- s
- T
- U
- DIRECTIVE 2002/96/CE ON THE TREATMENT, COLLECTION, RECYCLING AND DISPOSAL OF ELECTRIC AND ELECTRONIC DEVICES AND THEIR COMPONENTS
- INFORMATION
- FOR COUNTRIES IN THE EUROPEAN UNION (EU)
- To dispose of our devices correctly:
- FOR OTHER COUNTRIES (NOT IN THE EU)
- DÉCLARATION DE CONFORMITÉ
- AUX DIRECTIVES
- IMPORTANT :
- Veille automatique
- Écran tactile
- Chargeur de papier
- Ajout d'agrafes
- Table de documents
- Compteur clé
- Kit de fax
- Interface série
- Glace d'exposition
- Verre fendu
- Magasin 2
Brand : OLIVETTI
Model : d-Copia 400MF
Category : Photocopier