
B 300 - Humidifier Brune - Free user manual and instructions
Find the device manual for free B 300 Brune in PDF.

| Product type | Combined humidifier and air purifier |
| Brand | Brune |
| Model | B 300 |
| Dimensions (W x H x D) | 74 x 71 x 41 cm |
| Operating weight | 21 kg |
| Power supply | 230 V AC, 50/60 Hz |
| Maximum power | 58 W |
| Water tank capacity | Approx. 25 liters |
| Maximum air flow | 600 m³/h |
| Maximum evaporation capacity | 1.4 l/h |
| Operating principle | Natural evaporation with evaporation filter, purification by air filter and UV-C lamp |
| Fan speeds | 3 modes: Low, High, Auto |
| Humidity setting | Range from 20% to 95% in 5% steps |
| Child lock | Keyboard lock by pressing AIR + HUMIDITY +/- keys for 3 seconds |
| Device safety | Automatic shutdown of components when opening the housing via two reed switches |
| Filling | Manual via side flaps or optionally automatic (accessory AWZ) |
| Recommended maintenance | Cleaning every 3-4 months; replacement of air filter and evaporation filter every 20 weeks max; UV lamp every 5000 hours |
| Descaling | Use Brune descaling agent art. no. 9016 or a commercial product |
| Power cable length | 2.5 m |
| Inlet water pressure (AWZ option) | Min. 0 MPa, max. 1 MPa |
Frequently Asked Questions - B 300 Brune
User questions about B 300 Brune
0 question about this device. Answer the ones you know or ask your own.
Ask a new question about this device
Download the instructions for your Humidifier in PDF format for free! Find your manual B 300 - Brune and take your electronic device back in hand. On this page are published all the documents necessary for the use of your device. B 300 by Brune.
USER MANUAL B 300 Brune
MANUEL D'INSTRUCTION
natural_image
White rectangular container with side panels, labeled '3. Tank' above (no other text or symbols)natural_image
Close-up of hands using a tool to cut or adjust a metallic component (no visible text or symbols)Filterwechsel
Reinigungsfilter
natural_image
Close-up of a hand gripping a dark cylindrical object (no visible text or symbols)
natural_image
Close-up of a mechanical component with visible structural lines and internal components (no text or symbols)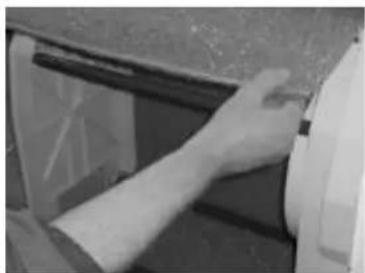
natural_image
Close-up of a hand inserting a small object into a vehicle's door panel (no visible text or symbols)
natural_image
Close-up of a hand pressing down on a textured surface (no visible text or symbols)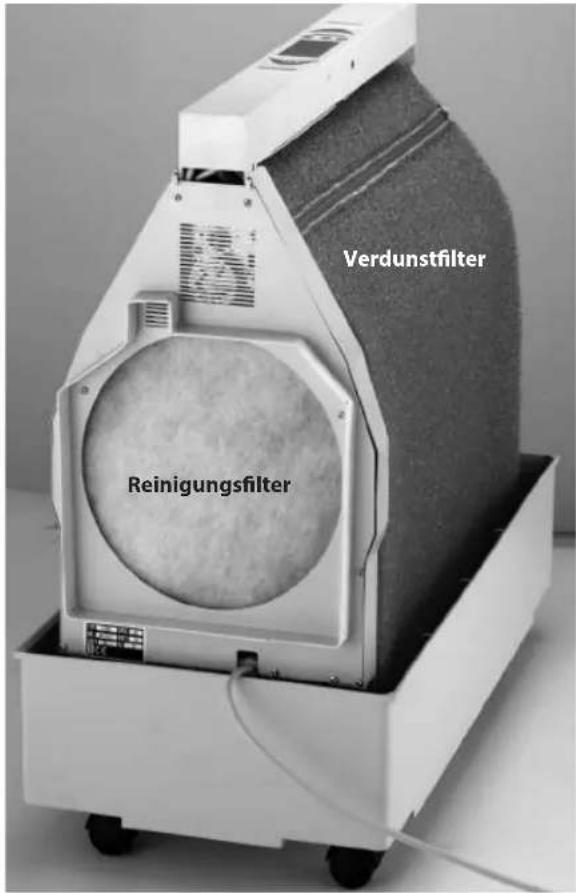
natural_image
Person handling a rolled roller or roller device with visible bands and a textured base (no text or symbols)natural_image
Close-up of hands installing or adjusting a white electrical component inside a large fan (no visible text or symbols)thank you for having chosen the Humidifier B 300. Please read the operating instructions carefully before using your new unit. We recommend that you keep the instructions in a safe place, so you may refer to them when needed.
Principle of operation
With this unit, you have purchased a highly effective humidifier and air purifier that offers you all the advantages of today's high-tech appliances. With the proper humidity level, you are not only protecting your health, but also prevent damaging of valuable furnishings, storage goods or prevent product loss when humidity-sensitive production processes are involved. The unit is operated with regular tap water and functions completely free of condensation. The minimal power consumption makes it an environmental friendly device.
The Humidifier B 300 works on the principle of natural evaporation. Thereby, the humidifying and purifying process works as described in the following:
The B 300 draws in the air through an air suction opening on the side of the power cable and passes it through an air filter, which filters out the larger dust particles and fine particles. In the inner chamber of the humidifier, the drawn-in air is treated with germicidal UVC rays and than passed on to the evaporation filter. The evaporation filter, which continuously glides through the water bath, produces with its special structure a large evaporation surface. This causes the air to be cleaned one more time. After the humidification and purification, the air is returned back into the room. The Humidifier B 300 thereby works based on the principle of circulating air, meaning that air in a closed room is drawn in, cleaned, and moistened time after time until the humidity level set has been reached. The measuring of the room humidity thereby takes place through a humidity sensor with a 2 meter cable. Displaying of the room humidity and the setting of the desired humidity takes place through the operating display. This is where you can also regulate the fan speed.
Humidifier B 300 offers a combined function – it cleans, purifies, and humidifies the air. If only the humidifying function is needed, the air purifying function can be reduced by removing the air filters in the suction area, which, however, does lead to a considerable increase of the evaporation performance. The function of the UV-lamp remains in the operating mode.
We hope that you enjoy your Humidifier B 300 unit.
3-module structure
Safety Instructions / Warning
- The unit may be operated only by authorized persons.
- Never operate an appliance with defective power input.
- Make sure that electrical parts do not come into contact with water.
• The appliance is not exposed to influence of the weather (rain, snow, frost); also do not operate the unit with wet hands. - The unit is set up stable and horizontally onto the ground.
- When absent for a longer time, always pull the power supply plug or ensure that the power supply is disconnected.
- Before cleaning, always first pull the power supply plug.
- Never pull the unit or the power cable at the power inlet, when pulling the power supply plug out of the socket.
- Never move the unit in a filled condition. Water can exit and cause damages to the unit or furnishings.
• Service work, for which tools have to be used, may only be performed by the authorized personnel.
The humidifier B 300 is exclusively meant to humidify the ambient air in private surroundings. Not intended to be used in healthcare premises!

ATTENTION!
Additional safety instructions / warning on page 18
Setup/ Location
- Open the packaging and remove all packaging parts from the humidifier.
- Setup the unit onto an even, horizontal surface.
- For an optimal function, the unit may be set up near a heat resource. However, the temperature in that area should not exceed 70^ C. Check the unit for any possible transportation damages.
- Check whether the delivery is complete, and that all parts belonging to the unit are fitted properly.
Operating your unit
Before operating your unit, you should ensure that all parts are installed appropriately and that the water reservoir is filled. Please proceed as follows:
Power Supply
Check whether local mains voltage is the same as the one on the identification label. The identification label is located above the power/net inlet cable and below the fan motor. To locate the label, you first have to remove the outer case of the unit.
Operating the humidifier B 300
The control panel of the B 300 informs you about the current status of the unit. You can read the room humidity, the set fan speed and the water level. You can make settings on the unit with the „+/-” and AIR-switches.
The indicator display and setting of the relative humidity takes place in 5% increments. Therefore, the values may deviate when using other control devices. At 3% and 8%, the display jumps over to the next higher value (e.g. actual humidity = 43% corresponds to = 45%) The user can, to a minor degree (+/- 5%), calibrate the display accuracy. Read more about this in the paragraph „Adjusting the humidity indicator“ (page 15).
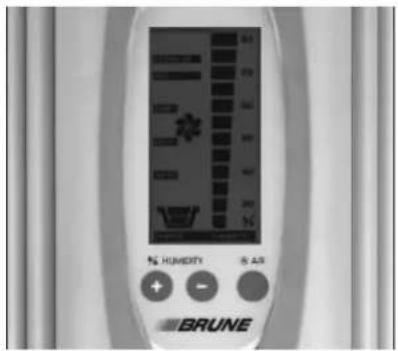
Switching On/Off and setting of the fan level – AIR-switch
The B 300 is switched on or off by pressing the AIR-switch twice. By repeatedly depressing the switch, the different fan modes can be changed.
- STANDBY: The humidifier is switched off and without function. Attention: The unit still receives power.
- LOW: The fan runs on the lowest output level. The noise level is optimized
- HIGH: The fan runs on the highest output level, for a maximum output of humidity and air purification.
- AUTO: The fan runs automatically according to the performance requirements, which is controlled by the actual room humidity.
If the AIR-switch is pressed, the symbol on the indicator display starts to blink and, after pressing the switch again, jumps to the next operating mode. By depressing the AIR-switch again, the status can be changed to the next mode. In this condition, the symbol blinks until the desired status is reached and for 2 seconds, another setting was not selected. After that, the symbol no longer blinks, and the selected operation mode is performed. Please note that when the AIR-switch is depressed the first time, only the setting mode is started and the operating mode does not change. Only by depressing the AIR-switch again, the operating modus is changed.
Changing of the - HUMIDITY-switch
If the unit is turned on, with the HUMIDITY-switches "+" or "-" the desired relative humidity can be changed upward or downward. During the pressing of the switches "+" or "-" the indicator jumps from the actual room humidity to the desired value according to the setting. By repeatedly pressing the "+" or "-" switch, the value is accordingly changed. If the desired value is adjusted, the indicator display jumps back after a few seconds to the actual room humidity and the new desired value was recorded and stored.
Function „Switch/ key lock“
To lock the control keys for children or strangers, to disable the use of the operating panel a key lock is integrated. It is switched on and/or deactivated by simultaneous pressing of the 3 keys (AIR-switch and the two HUMIDITY-switches) for 3 seconds. If the key disabling device is activated and a key is pressed, all control elements in the display blink. The key lock must be deactivated. Only after pressing the 3 keys again, the settings can be changed.
Safety of the unit
The unit is equipped with two reed contact, which, when opening the casing of the unit, switches via the control all components of the B 300 off. The disconnection via the reed contact is signalled via a flashing standby indicator. Only if the casing is completely closed, the standby indicator turns off and the air humidifier takes up again operations.
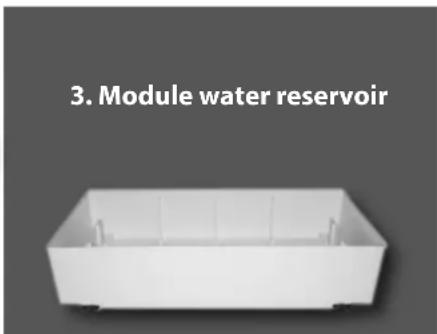
Filling the tank
To fill the water reservoir of the B 300, switch off the unit as described above. The indicator in the display helps you to determine the correct level. Now open the lateral filler flap on the right or left side. Grab the flap at the grip above and pull it up to the stop outward. Now you fill up the tank to the water level as indicated on the display, using a suitable container (e.g. watering can or similar).
It is important that you do not spill water around the unit or overfill the humidifier. The exiting water can damage your furnishings or your unit.
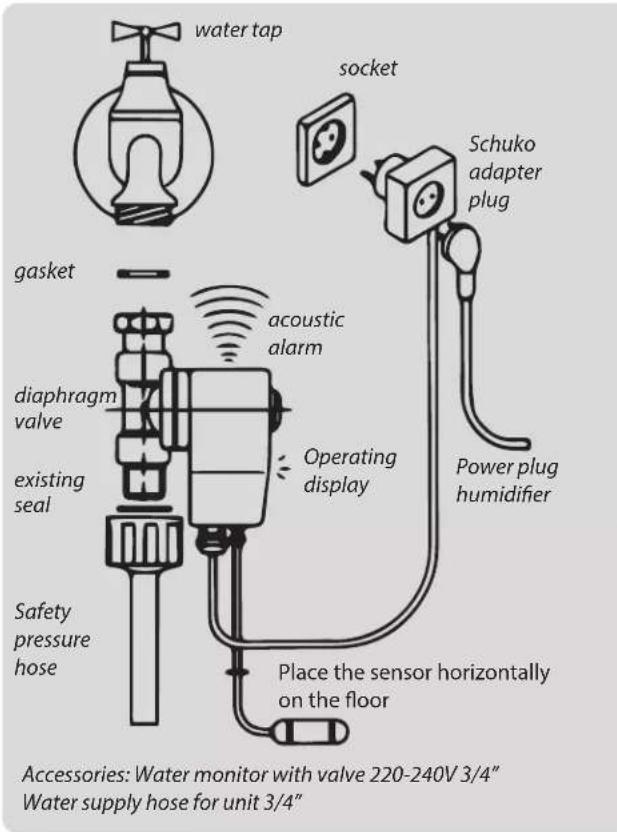
Accessory Water Supply (AWS)
The connection to the local water line network must take place via a specialist, e.g. a certified plumber. (Please comply with the regulations of the local water supply company). A return flow stop may be recommendable. The automatic water supply takes place, controlled by a solenoid valve (water inlet). The unit comes standardized with the water supply set automatically on a max. of 12 liters. This means that after the fill level has reached 12 liters, the water supply shuts off. The controlling of the water supply takes place via the electrode bars of the water level indicator. For a perfect functioning of the automatic water supply, the electrode bars must be cleaned regularly with a sponge to free them from lime and dirt deposits.
Repair and Maintenance
To guarantee an optimal functioning and a long lifetime of your B 300 unit, repair and maintenance are inevitable. Depending on the conditions in the room environment, (air and water quality), the need for repair and maintenance can differ (see the table maintenance intervals, page 15). The required works are described systematically in the following chapter.
For all works on the unit, always unplug the humidifier or otherwise make sure that power to the unit is off!
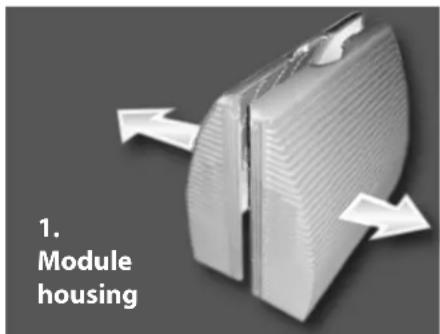
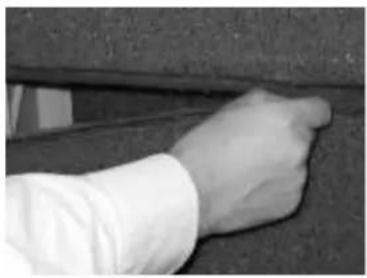
Opening the Casing
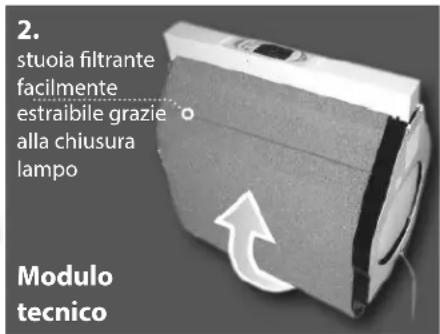
To perform various maintenance works, first the casing must be opened. Although the unit does provide for an automatic switch-off, when the casing is opened, to insure safety, the power should be turned off and/or the power supply should be pulled. For the opening of the casing, remove the lock clips at the upper and lower side of the humidifier. Now, the two halves of the casing can be pulled open in both arrow directions (see picture on page 11). Handle the casing parts with care so that they are not damaged.
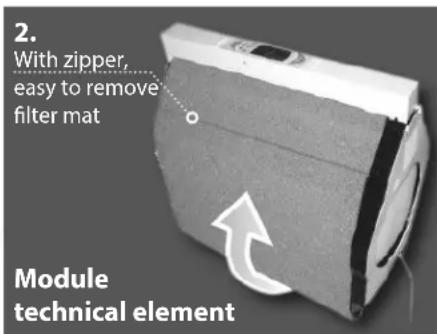
Now you can also remove the technical module. To remove the module, lift it completely upwards. For reinserting the technical module, slide it into the unit along the on the bottom of the water reservoir located gliding mechanism. Attention: check the tension of the blue evaporation filter; it can increase during the procedure. The tension can be increased prior to the maintenance procedure by means of the tension pulley delivered with the unit.
The reassembling takes place in reverse order. First, slide one half of the casing on the water reservoir up to the center of the unit. Afterwards, the second half of the casing is assembled likewise onto the tub and pushed toward the center.
Now you can snap the lock clips. Make sure that all lock clips are locked securely. Attention: When mounting the casing half, it is important that the orientation is followed correctly. See the recess for the power cable.
natural_image
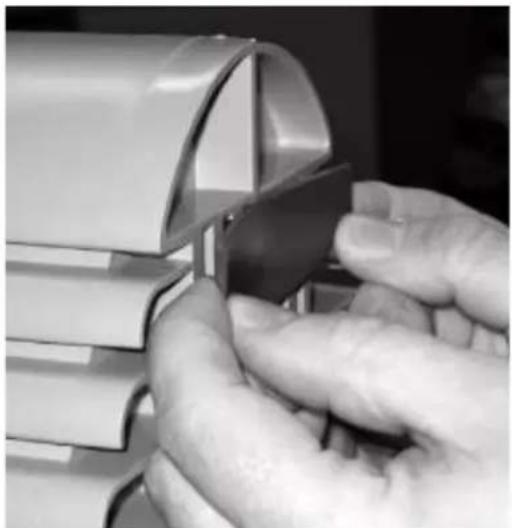
Close-up of hands using a tool to cut or apply a metallic component, no visible text or symbolsChanging the Filters
Cleaning filter
To change the cleaning filter, the casing has to be opened first (for instructions, see the chapter about opening the casing, page 13). Now the cleaning filter can be removed by hand from its position. It is important that no residue remain. Once the old filter is completely removed, the new filter (Art. No. 6361) can be inserted. Position the new filter into the same place as the old one. It is important that the filter does not interfere with the rotor blades of the fan. In addition, the filter edges should not extend outward.
Evaporation Filter
For a comfortable changing of the filter, we recommend keeping the water level as low as possible.
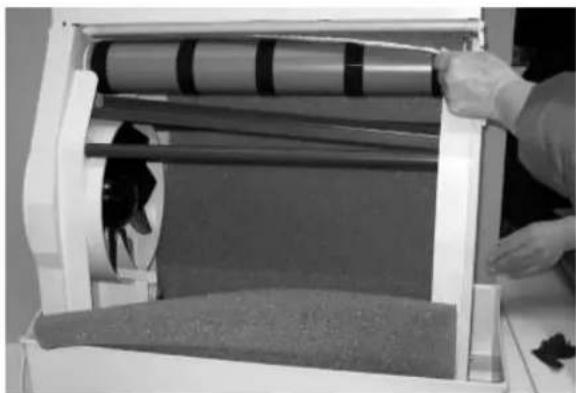
First, open the casing (for instructions, see the chapter about opening the casing, page 13). The old evaporation filter can now be removed in that you either open or cut the zipper. Remove the filter completely. Check the water reservoir for any residue, and if present, remove it. Dispose of the old filter fleece into the residual waste.
Now remove the tension pulley (see illustration). You can now start with the inserting of the new filter (Art. No. 6360) as shown on the picture. Close the zipper and check the tension. If it is sufficient, you can close the casing as described in the previous chapter. If the tension is not sufficient, insert the tension pulley and repeat the process as described above.
natural_image
Close-up of a hand pressing down on a textured surface (no visible text or symbols)
natural_image
Close-up of a mechanical component with visible internal structure and mounting brackets (no text or symbols)
natural_image
Close-up of a hand adjusting a wall corner component (no visible text or symbols)
natural_image
Close-up of a hand touching a textured surface near a vehicle (no visible text or symbols)

natural_image
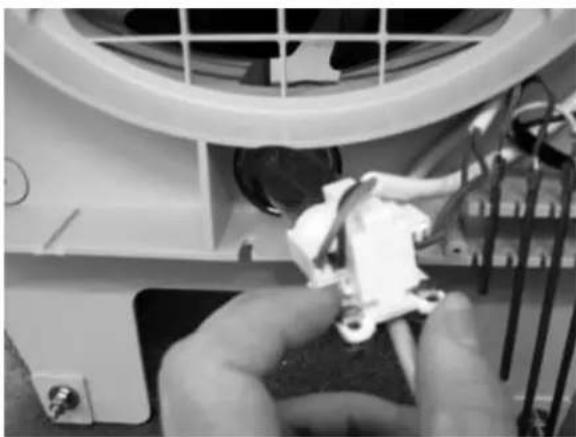
Person handling a rolled-up paper or plastic sheet on a machine (no visible text or symbols)Changing of the UVC Lamp
The change of the UVC lamp should take place via authorized technical personnel. For all work on the unit, pull the power supply plugs or ensure that the power is disconnected! For changing the UVC lamp, the casing is opened as described before and the technical unit is taken out of the water tank. Afterwards, the cover of the technical unit is unscrewed and the screws at the bulb socket of the UVC lamp are removed. Now the UVC lamp can be pulled out to the rear. Pull the defective lamp from its socket and insert the new UVC lamp (Art. No.: 6210). Afterwards, you push the lamp back again into the UVC protecting glass (Art. No. 6212), fit the socket with the existing screws and close the cover of the technical unit. Please also examine the surrounding parts during the exchange of the UVC lamp such as the UVC protecting glass and the seal (Art. No. 6213) of the UVC lamp. If you should determine damages, the unit may be operated again only after having exchanged the defective part. Please dispose the defective UVC lamp in the same manner as fluorescent tubes according to the specific local regulations of your domicile.
natural_image
Close-up of hands assembling or adjusting a mechanical component with visible wiring and components (no text or symbols)Hygienic operation
When operating with clean fresh drinking water and maintained as instructed in this manual, the device must be used safely for humidification in private households. Drinking water, however, contains bacteria and microorganisms. In order to ensure the hygienic and proper operation of the humidifier, regular water exchange and regular cleaning is essential. Failure to do so may cause health problems. Therefore, always follow the cleaning instructions and keep your device clean and fresh.
Cleaning of your Humidifier B 300
Every 3-4 months the unit should be cleaned from lime arrears and contamination (dependent on the site conditions: Water hardness dusty condition air quality). For this procedure, the casing is opened as in picture (see also chapter on „opening the casing“ (page 13). The cleaning can be accomplished with commercial cleaning agents. Do not use benzene or other solvents that can damage plastics! To remove lime residues, please use the lime remover of the brand Brune (Art. No. 9016) or a commercial lime remover. All cleaning agent residues must be completely removed (rinse well with clear water), since otherwise a foaming of the cleaning agents can damage the unit. If the unit is not operated for a longer time, the residual water is to be emptied and the tension of the evaporation filter is to be decreased (see the chapter on Changing Evaporation Filter (page 14). Additionally, the unit should be cleaned. A basic cleaning should take place annually (possibly by our maintenance service).
Adjusting the humidity indicator
An authorized specialist should perform the adjustment. The Humidifier B 300 offers the possibility to adjust the indication of the relative humidity within a range of +/- 5% of the actual value, and thereby to adapt the display to other devices or measures. Please note that there is a microclimate in each zone of a room area and therefore the different value displayed from one unit to another unit or appliance, is possible and correct. For adjustment/calibration, proceed as follows:
- opening the casing as described in the section „opening the casing“ (page 13)
- with a small screwdriver, carefully turn the adjustment pot (potentiometer). It is located underneath the circuit board and is accessible by a hole in the casing at the operating panel. You should make the adjustment in several steps, i.e. make only a small turn at the potentiometer, and check the result at the display. If the desired result should not be reached yet, turn again carefully at the potentiometer.
- Close casing after adjustment.
Maintenance intervals
The following listed maintenance works should be performed in the indicated time intervals. For all maintenance or repair, always pull the power supply plug or ensure that the power supply is disconnected!
| Maintenance intervals | Work to be performed |
| daily | Water level: check via the display. The unit shuts off automatically, when empty (not applicable for units with automatic water supply)Humidity level: check via the digital indicator (display) |
| 3-5 weeks | Casing: check for dirt (dust in the air take-in area, etc.), if necessary removeAir filter, check and if necessary change (only use original parts of the Brune brand). The filter should be changed no later than 20 weeks after initial operation.Evaporation filter, check and if necessary change, (only use original parts of the Brune brand). The filter should be changed no later than 20 weeks after initial operation.Cleaning of the water reservoir (see chapter on opening casing (page 13). Important: when using Wasserfrisch avoid over dosing.Electrode bars: check for dirt and lime residue (if necessary clean with a sponge and the appropriate cleaning agents)Evaporation filter fleece: check for sufficient tension (see chapter „changing filters“ (page 14) |
| 12 months | perform complete cleaning of the unit (e.g. with our lime solvent; Art.-No.: 9016).change air-cleaning filter (page 14)change evaporation filter (page 14)clean copper electrodescheck UVC lampclean glass of the UVCFor changing the UVC lamp, see chapter on Changing UVC lamp (normal operation time approx. 5000 hours) |
The indicated time intervals apply to normal water quality and normal dust accumulation, and may vary accordingly.
Technical Data
| Power supply: 230V AC |
| Performance: max. max. 58 W |
| Fuse: 2 A |
| Safety check: CE |
| Capacity of water reservoir: approx. 25l |
| Air performance max. (free blowing) 600 m3/h |
| Vapor performance max. 1,4 l/h |
| Length of power cord: 2,5 m |
| Weight (w/out water): 21 kg |
| Measurement (W x H x D): 74 x 71 x 41 cm |
| Maximum inlet water pressure: 1 MPa |
| Minimum inlet water pressure: 0 MPa |
Error Correction
| Error Cause Solution | ||
| Not functioning at all (no STANDBY indicator) | Unit not connected to power supply | Check power input |
| Fine-fuse of the circuit board blown | Replace fine-fuse of the circuit board | |
| No Function (STANDBY - Symbol blinks) | Reed switch deactivated unit | Check casing that it is completely locked |
| Water level indicator missing | Water level too low | refill water |
| Copper electrodes dirty | Clean copper electrodes | |
| Softenend water has been used | Use ordinary tab water | |
| Unit runs, but evaporation filter does not move | Tension too low | Increase tension, see „Changing of Filters" (page 14) |
| If still too low, replace evaporation filter. | ||
| Possibly exchange driving roller. | ||
| Unit leaks water | Evaporation filter rubs against casing | Increase tension see „Changing of Filters" (page 14) |
| Check water reservoir for damages | Replace water reservoir | |
| Automatic water supply runs uninterrupted | Water inlet valve (solenoid valve) does not close | Dirt residue in the water feed tube |
| Check Electrodes for pollutants | ||
| Replace solenoid valve | ||
| check water quality | ||
| Water guard gives acoustic signal | Water leaks | Check for the cause. Cut off supply for water guard from the net for some seconds |
Exploded view and list of parts
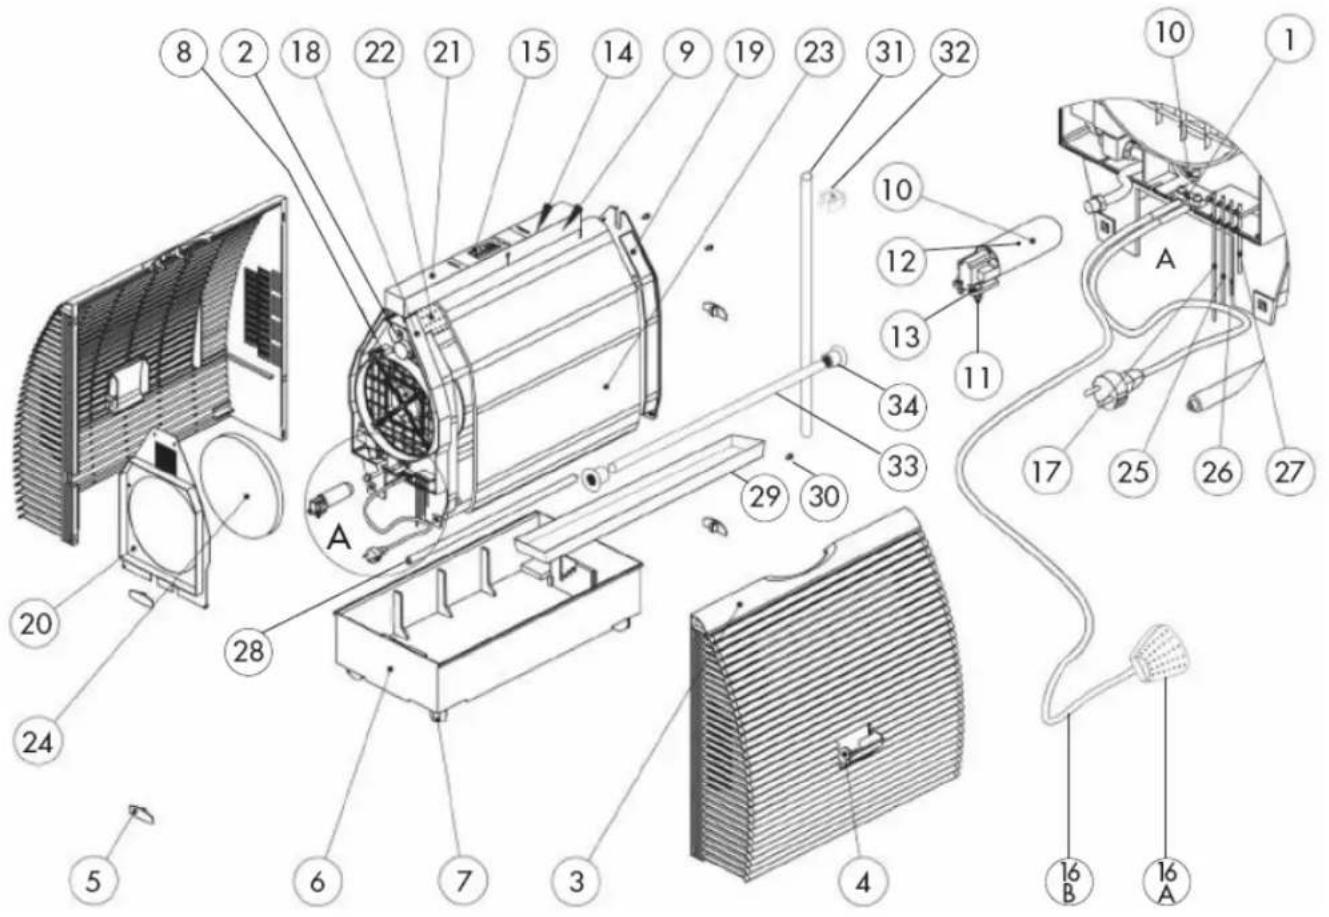
POS-NO. ART-NO. DESCRIPTION
| 1 1351 Strain relief cable |
| 2 2589/1 Gear motor B 300 |
| 3 6101 Casing exterior-1 |
| 4 6111 Latch water inlet B 300 |
| 5 6112 Latch clips |
| 6 6201 Water reservoir B 300 |
| 7 6202 Steering roller B 300 |
| 8 6205 Fan axial, diameter: 250 mm |
| 9 6206 Condensator for fan motor Art.-Nr. 6205 |
| 10 6210 UVC lamp 5 Watt |
| 11 6211 Lamp socket UVC lamp |
| 12 6212 Protective glass UVC lamp round |
| 13 6213 Gasket for UVC lamp diameter: 36 |
| 14 6217 Electronic ballast for UVC lamp B 300 |
| 15 6222 Keyboard foil |
| 16 Humidity sensor |
| 6/A 6225.2 Sensor box |
| 6/B 6225.1 Cable for humidity sensor |
17 6227 Electrode 152 mm
18 6301 Side panel B 300 technique motor
19 6302 Side panel B 300 without technique
20 6311 side panel B 300 technique
21 6321 Casing operating part B 300
22 6325/1 Drive cylinder B 300
23 6360 Evaporation filter blue
29 6329 Drip tray underneath the filter
30 6329.1 Screw for fastening of the drip tray
31 6329.2 Drain pipe for the drip tray
32 6329.3 Fastening clamp for drain pipe
33 6330 Filter roll above the drive roll
34 6312 Left and right mount for the drive roll
Legal Notice
These operating instructions contain the necessary information for the intended use, the correct operation, and adequate maintenance of the equipment.
The knowledge of and the complying with the instructions contained in these operating instructions are a condition for the safe use as well as for the safety during operation and maintenance.
These operating instructions cannot take into consideration of each conceivable use. The unit and the accessories are designed for private use.
In addition, we point out that the contents of these operating instructions are not part of an earlier or existing agreement, promise, or a legal relation or amendment of the original. All obligations of Brune Luftbefeuchtung Proklima GmbH are as specified in the respective sales contract, which also contains the complete and solely valid warranty conditions. These contractual warranties are neither extended nor limited by the statements in these operating instructions. The operating instructions contain information, which is protected by copyright. Photo copying or translating into another language is not permitted without previous written permission by Brune Luftbefeuchtung Proklima GmbH.
These operating instructions have been translated for your convenience. In case of conflict, the original operating instructions in the German language shall be applicable.
Additional Safety Instructions/Warning
This device may be used by children of 8 years of age and older, as well as by persons with reduced physical, sensory or mental abilities or lack of experience and knowledge under supervision or after instruction regarding the safe use of the equipment and the resulting dangers.
Children must not play with the appliance.
Cleaning and user maintenance must not be carried out by children without supervision.
Danger!
If the mains supply cord of this appliance is damaged, it must be replaced by the manufacturer or its customer service or a similarly qualified person in order to avoid hazards.
natural_image
Close-up of hands using a tool to cut or adjust a metallic component, no visible text or symbolsnatural_image
Close-up of a hand gripping a dark cylindrical object, possibly a metal or industrial component (no visible text or symbols)
natural_image
Close-up of a mechanical component with wooden rods and internal components (no visible text or symbols)
natural_image
Close-up of a hand adjusting a wall corner component (no visible text or symbols)
natural_image
Close-up of a hand pressing down on a textured surface, possibly part of a vehicle or industrial component (no visible text or symbols)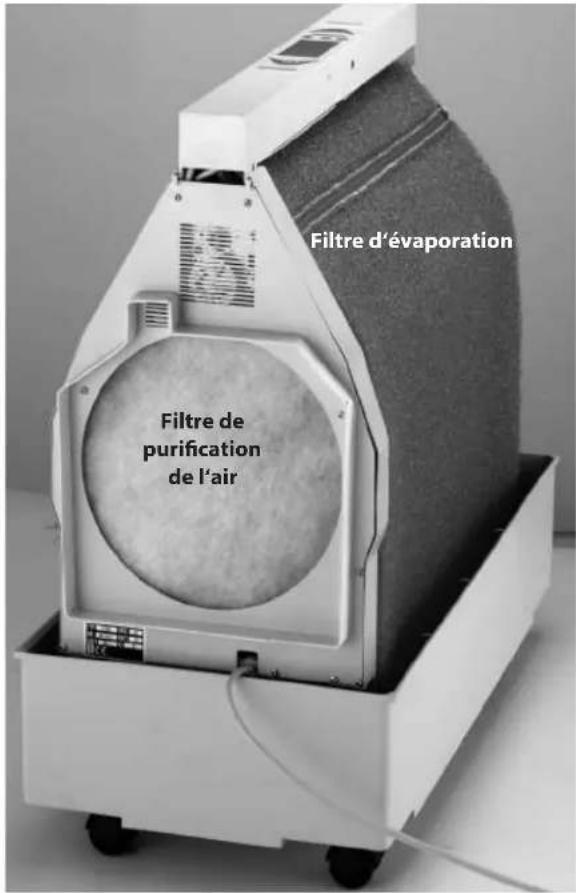
natural_image
Person handling a rolled roller or sheet material in a machine (no visible text or symbols)natural_image
Close-up of hands assembling or adjusting a white plastic component inside a large fan (no visible text or symbols)N°POS N°ART DÉSIGNATION
natural_image
Close-up of hands holding a small metallic object, possibly a tool or component, with no visible text or symbols.natural_image
Close-up of a hand gripping a cylindrical object, possibly a tool or component (no visible text or symbols)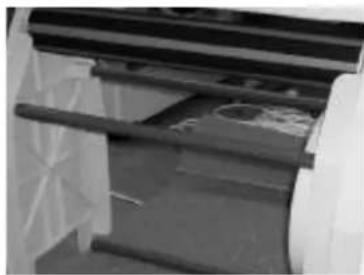
natural_image
Close-up of a mechanical device with visible structural elements and components (no text or symbols)
natural_image
Close-up of a hand adjusting a wall-mounted device (no visible text or symbols)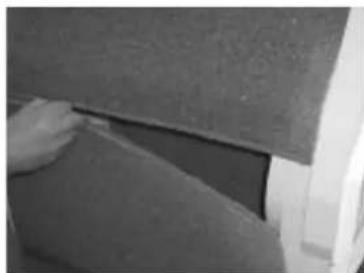
natural_image
Close-up of a hand pressing down on a textured surface (no visible text or symbols)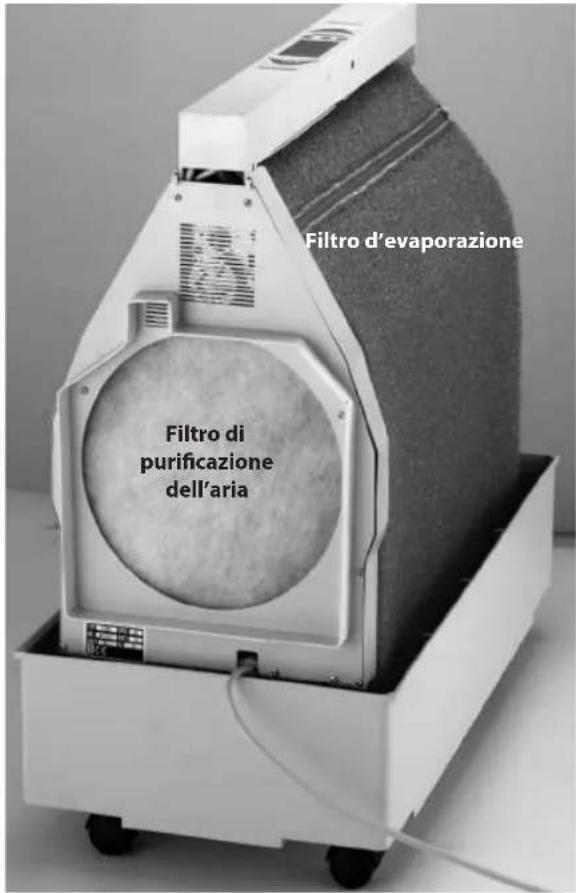
natural_image
Person handling a rolled roller or sheet material on a white mechanical device (no visible text or symbols)natural_image
Close-up of hands assembling or repairing a mechanical component with wires and components (no visible text or symbols)N°POS N°ART DÉSIGNATION