
LT-55VU3005 - Television JVC - Free user manual and instructions
Find the device manual for free LT-55VU3005 JVC in PDF.
| Product type | LED 4K UHD Television |
| Brand | JVC |
| Model | LT-55VU3005 |
| Screen size | 55 inches (139 cm) |
| Resolution | 3840 x 2160 pixels (4K UHD) |
| Connectivity | HDMI, USB, LAN Ethernet, Built-in Wi-Fi, Bluetooth |
| HDMI inputs | 3x HDMI |
| USB inputs | 2x USB 2.0 |
| Tuner | DVB-T2/C/S2 (triple tuner) |
| Operating system | Smart TV (Vestel proprietary) |
| Pre-installed applications | Netflix, YouTube, Amazon Prime Video |
| Audio | Dolby Audio, DTS TruSurround |
| Audio power | 2 x 8 W |
| Power supply | 220-240 V, 50/60 Hz |
| Consumption (standby) | < 0.5 W |
| Dimensions (without stand) | 123.2 x 71.5 x 8.5 cm |
| Dimensions (with stand) | 123.2 x 77.5 x 25.0 cm |
| Weight (without stand) | 15.0 kg |
| Weight (with stand) | 15.5 kg |
| VESA standard | 200 x 200 mm |
| Included accessories | Remote control RM-C3337, AAA batteries (x2), quick start guide |
| Maintenance | Clean with a soft, dry cloth. Do not use solvents. |
| Energy class | A+ (according to EU standard) |
Frequently Asked Questions - LT-55VU3005 JVC
User questions about LT-55VU3005 JVC
0 question about this device. Answer the ones you know or ask your own.
Ask a new question about this device
Download the instructions for your Television in PDF format for free! Find your manual LT-55VU3005 - JVC and take your electronic device back in hand. On this page are published all the documents necessary for the use of your device. LT-55VU3005 by JVC.
USER MANUAL LT-55VU3005 JVC
1 Insert the batteries into the Remote Control
Insert two AAA/R3 or equivalent type batteries inside. Observe the correct polarity (+/-) when inserting batteries and replace the battery cover.
natural_image
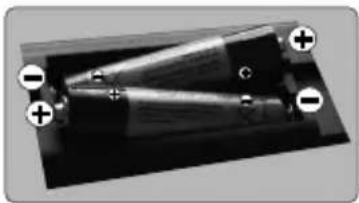
Diagram of a conical device with labeled terminals and light beams, no readable text or symbols present2 Connect the antenna to your TV
* The back connection options may differ depending on the model
REAR SIDE OF THE TV
text_image
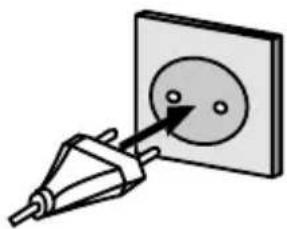
Satellite ANT SAT ANT TV Aerial or Cable3 Connect the TV to the mains socket
natural_image
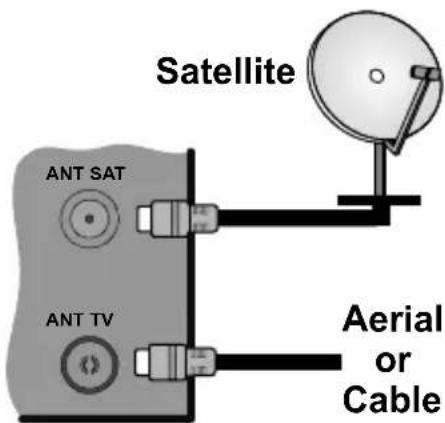
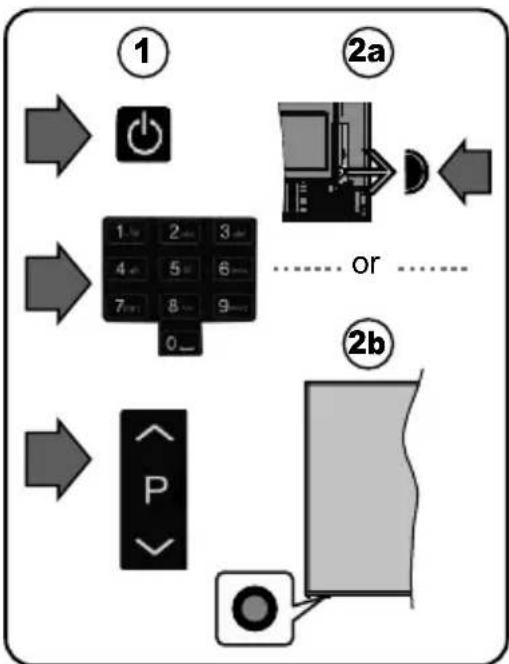
Simple line drawing of a plug inserted into a socket (no text or symbols)4 To switch the TV on (depending on the model)
After connecting the power cord to the mains socket, the standby LED lights up.
To switch on the TV from standby mode either;
- Press the Standby button, a numeric button or Programme +/- button on the remote control.
or
2a. Press the middle of the side function switch on the TV in.
2b. Press the control button on the TV.
* The appearance of the remote control buttons and the position of the control buttons on the TV may differ depending on the model
flowchart
graph TD
    A["①"] --> B["②a"]
    B --> C["②b"]
    C --> D["②b"]
    D --> E["②b"]
    E --> F["②b"]
    F --> G["②b"]
    G --> H["②b"]
    H --> I["②b"]
    I --> J["②b"]
    J --> K["②b"]
    K --> L["②b"]
    L --> M["②b"]
    M --> N["②b"]
    N --> O["②b"]
    O --> P["②b"]
    P --> Q["②b"]
    Q --> R["②b"]
    R --> S["②b"]
    S --> T["②b"]
    T --> U["②b"]
    U --> V["②b"]
    V --> W["②b"]
    W --> X["②b"]
    X --> Y["②b"]
    Y --> Z["②b"]
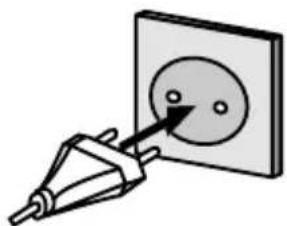
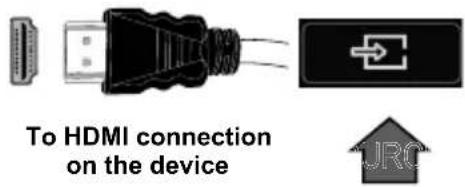
5 HDMI input
PLEASE ENSURE BOTH UNITS ARE SWITCHED OFF BEFORE CONNECTING. Use a HDMI to HDMI cable to connect the two units together. To select the HDMI input press the Source button on the remote control. Each time it is pressed the on-screen menu confirms your selection.
* The appearance of the Source button may differ depending on the model of the remote control
text_image
To HDMI connection on the device6 Auto Setup procedure
When turned on for the first time, the language selection screen is displayed. Select the desired language and press OK.
On the next screen set your country preference. Then press OK to continue.
Select Home Mode for home use. You can activate Store Mode option at this point if necessary, however, this option is only intended for store use.
Depending on the model of your TV and the country selection Privacy Settings menu may appear at this point. Using this menu you can set your privacy privileges. Highlight a feature and use Left and Right directional buttons to enable or disable. If the Internet Connection option is disabled Network/Internet Settings screen will be skipped and not displayed.
Highlight Next and press OK button on the remote control to continue and the Network/Internet Settings menu will be displayed.
Refer to Connect your TV to the internet section to configure a wired or a wireless connection. After the settings are completed highlight Next and press OK button to continue.
Broadcast Search;
On the next screens et your preferences.
Scan Encrypted Channels On
Select favourite network type Satellite
D.Aerial
D.Cable
Satellite
Analogue
When finished, highlight Next and press OK to start channel scan.
After the initial settings are completed TV will start to search for available broadcasts of the selected broadcast types.
While the search continues a message may appear, asking whether you want to sort channels according to the LCN(*). Select Yes and press OK to confirm.
(*) LCN is the Logical Channel Number system that organizes available broadcasts in accordance with a recognizable channel number sequence (if available).
After the channel scan has been completed the Choose Region menu may appear. Select the appropriate settings for your location using the directional buttons then press OK.
After all the available stations are stored, Channels menu will be displayed. You can edit the channel list according to your preferences using the Edit tab options or press the Menu button to quit and watch TV.
Note: Do not turn off the TV while initializing first time installation. Note that, some options may not be available depending on the country selection.
7
Connect your TV to the Internet
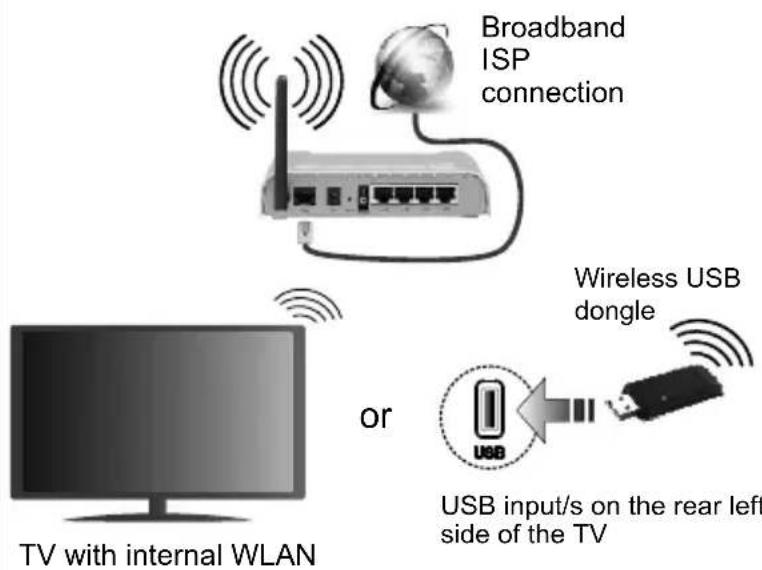
Connectivity feature allows you to connect your TV to the home network wired or wirelessly. You can use this networking system to connect to internet or to access photo, video and audio files that are stored on a Media server connected to the network and play/display them on the TV.
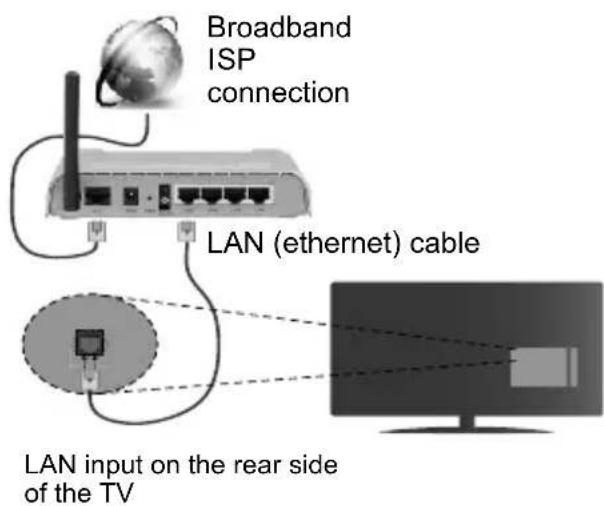
However, if your TV does not have Wireless USB dongle or doesn't support internal WLAN feature, you should use wired connection type. Add your TV to your home network by connecting it to the modem/router via an LAN cable (not supplied) as illustrated.
To use your TV with your wireless network, you may need a WLAN USB dongle. You should connect it to one of the USB inputs on the TV. If your TV supports internal WLAN feature you won't need a wireless LAN adaptor.
Press the Menu button to open the main TV menu. Select Settings by using the directional buttons, highlight Network and press OK. While Network Type is highlighted, press Left or Right buttons to select connection type. Wired connection will be established automatically. If wireless connection is selected, highlight Scan Wireless Networks and press OK. The TV will search for the available wireless networks and list them when finished. Select one and press the OK button to connect. If the wireless network is password-protected you should enter the correct password to access the network.
Wireless Connection
text_image
Broadband ISP connection Wireless USB dongle or USB input/s on the rear left side of the TV TV with internal WLANWired Connection
text_image
Broadband ISP connection LAN (ethernet) cable LAN input on the rear side of the TV8
E-Manual
This manual is not meant to be comprehensive and should not be taken as such. You can find detailed instructions for your TV's features in the E-Manual. To access the E-Manual, enter Settings menu, select Manuals and press OK. For quick access press Menu button and then Info button.
By using the directional buttons select a desired category. Every category includes different topics. Select a topic and press OK to read instructions. To close the E-Manual screen press the Exit or Menu button.
Note: The content of the E-Manual may vary according to the model.
Dear Customer
This apparatus is in conformance with the valid European directives and standards regarding electromagnetic compatibility and electrical safety.
European representative of the manufacturer is:
Vestel Germany GmbH
Parkring 6
85748 Garching b.München
Germany
Accessories Included
- Remote Control
- Batteries: 2 x AAA
- Quick Start Guide
Depends on model
• Side AV Connection Cable
• YPbPr Connection Cable
• WLAN USB Dongle and USB Extension Cable
- Wall Mount Kit
Safety Information

CAUTION
RISK OF ELECTRIC SHOCK DO NOT OPEN
CAUTION: TO REDUCE THE RISK OF ELECTRIC SHOCK DO NOT REMOVE COVER (OR BACK). NO USER-SERVICEABLE PARTS INSIDE. REFER SERVICING TO QUALIFIED SERVICE PERSONNEL.
In extreme weather (storms, lightning) and long inactivity periods (going on holiday) disconnect the TV set from the mains.
The mains plug is used to disconnect TV set from the mains and therefore it must remain readily operable. If the TV set is not disconnected electrically from the mains, the device will still draw power for all situations even if the TV is in standby mode or switched off.
Note: Follow the on screen instructions for operating the related features.
IMPORTANT - Please read these instructions fully before installing or operating
WARNING: This device is intended to be used by persons (including children) who are capable / experienced of operating such a device unsupervised, unless they have been given supervision or instruction concerning the use of the device by a person responsible for their safety.
- Use this TV set at an altitude of less than 2000 meters above the sea level, in dry locations and in regions with moderate or tropical climates.
-
The TV set is intended for household and similar general use but may also be used in public places.
-
For ventilation purposes, leave at least 5cm of free space around the TV.
- The ventilation should not be impeded by covering or blocking the ventilation openings with items, such as newspapers, table-cloths, curtains, etc.
- The power cord plug should be easily accessible. Do not place the TV, furniture, etc. on the power cord. A damaged power cord/plug can cause fire or give you an electric shock. Handle the power cord by the plug, do not unplug the TV by pulling the power cord. Never touch the power cord/plug with wet hands as this could cause a short circuit or electric shock. Never make a knot in the power cord or tie it with other cords. When damaged it must be replaced, this should only be done by qualified personnel.
- Do not expose the TV to dripping or splashing of liquids and do not place objects filled with liquids, such as vases, cups, etc. on or over the TV (e.g., on shelves above the unit).
- Do not expose the TV to direct sunlight or do not place open flames such as lit candles on the top of or near the TV.
- Do not place any heat sources such as electric heaters, radiators, etc. near the TV set.
- Do not place the TV on the floor and inclined surfaces.
- To avoid danger of suffocation, keep plastic bags out of the reach of the babies, children and domestic animals.
- Carefully attach the stand to the TV. If the stand is provided with screws, tighten the screws firmly to prevent the TV from tilting. Do not over-tighten the screws and mount the stand rubbers properly.
- Do not dispose of the batteries in fire or with hazardous or flammable materials.
WARNING - Batteries must not be exposed to excessive heat such as sunshine, fire or the like.
WARNING - Excessive sound pressure from earphones or headphones can cause hearing loss.
ABOVE ALL - NEVER let anyone, especially children, push or hit the screen, push anything into holes, slots or any other openings in the case.
 Caution Caution | Serious injury or death risk |
 Risk of electric shock Risk of electric shock | Dangerous voltage risk |
 Maintenance Maintenance | Important maintenance component |
Markings on the Product
The following symbols are used on the product as a marker for restrictions and precautions and safety instructions. Each explanation shall be considered where the product bears related marking only. Note such information for security reasons.

Class II Equipment: This appliance is designed in such a way that it does not require a safety connection to electrical earth.

Hazardous Live Terminal: The marked terminal(s) is/are hazardous live under normal operating conditions.

Caution, See Operating Instructions: The marked area(s) contain(s) user replaceable coin or button cell batteries.

text_image
CLASS 1 LASER PRODUCTClass 1 Laser Product: This product contains Class 1 laser source that is safe under reasonably foreseeable conditions of operation.
WARNING
Do not ingest the battery, Chemical Burn Hazard This product or the accessories supplied with the product may contain a coin/button cell battery. If the coin/button cell battery is swallowed, it can cause severe internal burns in just 2 hours and can lead to death.
Keep new and used batteries away from children. If the battery compartment does not close securely, stop using the product and keep it away from children. If you think batteries might have been swallowed or placed inside any part of the body, seek immediate medical attention.
Never place a television set in unstable or inclined locations. A television set may fall, causing serious personal injury or death. Many injuries, particularly to children, can be avoided by taking simple precautions such as;
• Using cabinets or stands recommended by the manufacturer of the television set.
- Only using furniture that can safely support the television set.
- Ensuring the television set is not overhanging the edge of the supporting furniture.
- Not placing the television set on tall furniture (for example, cupboards or bookcases) without anchoring both the furniture and the television set to a suitable support.
- Not standing the television set on cloth or other materials placed between the television and supporting furniture.
• Educating children about the dangers of climbing on furniture to reach the television set or its controls.
If your existing television set is being retained and relocated, the same considerations as above should be applied.

Apparatus connected to the protective earthing of the building installation through the MAINS connection or through other apparatus with a connection to protective earthing – and to a television distribution system using coaxial cable, may in some circumstances create a fire hazard. Connection to a television distribution system has therefore to be provided through a device providing electrical isolation below a certain frequency range (galvanic isolator)
WALL MOUNTING WARNINGS
- Read the instructions before mounting your TV on the wall.
- The wall mount kit is optional. You can obtain from your local dealer, if not supplied with your TV.
- Do not install the TV on a ceiling or on an inclined wall.
- Use the specified wall mounting screws and other accessories.
- Tight the wall mounting screws firmly to prevent the TV from fall. Do not over-tighten the screws.
Figures and illustrations in this user manual are provided for reference only and may differ from the actual product appearance. Product design and specifications may be changed without notice.
License Notification
The terms HDMI, HDMI High-Definition Multimedia Interface, and the HDMI Logo are trademarks or registered trademarks of HDMI Licensing Administrator, Inc.

Manufactured under license from Dolby Laboratories. Dolby, Dolby Audio, Dolby Vision, and the double-D symbol are trademarks of Dolby Laboratories. Confidential unpublished works. Copyright ©1992-2019 Dolby Laboratories. All rights reserved.
YouTube and the YouTube logo are trademarks of Google Inc.
This product contains technology subject to certain intellectual property rights of Microsoft. Use or distribution of this technology outside of this product is prohibited without the appropriate license(s) from Microsoft.
Content owners use Microsoft PlayReady™ content access technology to protect their intellectual property, including copyrighted content. This device uses PlayReady technology to access PlayReady-protected content and/or WMDRM-protected content. If the
device fails to properly enforce restrictions on content usage, content owners may require Microsoft to revoke the device's ability to consume PlayReady-protected content. Revocation should not affect un content or content protected by other content access technologies. Content owners may require you to upgrade PlayReady to access their content. If you decline an upgrade, you will not be able to access content that requires the upgrade.
The "CI Plus" Logo is a trademark of CI Plus LLP.
This product is protected by certain intellectual property rights of Microsoft Corporation. Use or distribution of such technology outside of this product is prohibited without a license from Microsoft or an authorized Microsoft subsidiary.
Depends on model
The Bluetooth ^® word mark and logos are registered trademarks owned by the Bluetooth SIG, Inc. and any use of such marks by Vestel Elektronik Sanayi ve Ticaret A.S. is under license. Other trademarks and trade names are those of their respective owners.
For DTS patents, see http://patents.dts.com. Manufactured under license from DTS Licensing Limited. DTS, the Symbol, & DTS and the Symbol together are registered trademarks, and DTS TruSurround is a trademark of DTS, Inc. ^© DTS, Inc. All Rights Reserved.

dts
TruSurround
For DTS patents, see http://patents.dts.com. Manufactured under license from DTS Licensing Limited. DTS, DTS-HD, the Symbol, & DTS or DTS-HD and the Symbol together are registered trademarks of DTS, Inc.© DTS, Inc. All Rights Reserved.

dts-HD®
DVB is a registered trademark of the DVB Project.

Digital Video Broadcasting
This product is manufactured, distributed and warranted exclusively by VESTEL Ticaret A.Ş and serviced by its designated service providers. "JVC" is the trademark of JVCKENWOOD Corporation, used by such companies under licence.
JVC
Wall mounting instructions (depending on the model)
WaterMounting the TV
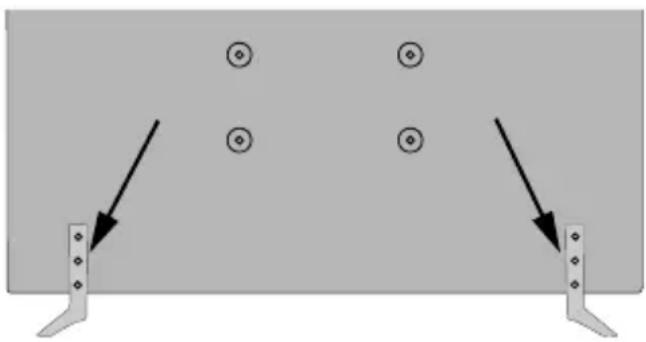
The TV can be mounted on a wall using a MX X*X mm (*) VESA mounting kit supplied separately. Remove the base stand as shown. Mount the TV according to the instructions supplied with the kit. Beware of electrical cables, gas and water pipes in the wall. In case of any doubt please contact a qualified installer. The screw thread length must not exceed X mm (*) into the TV. Contact the store where you purchased the product for information on where to purchase the VESA kit.
(*) Refer to the related additional page for the accurate VESA measurements and screw specifications.
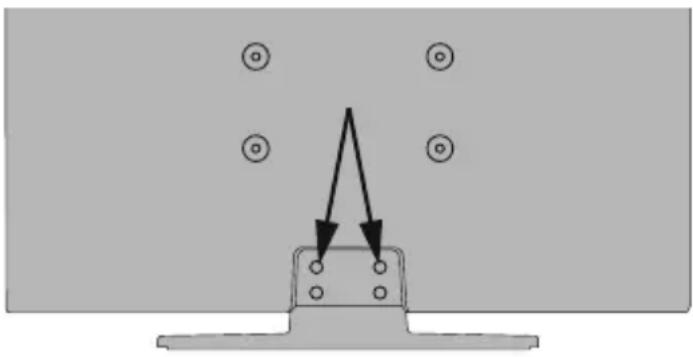
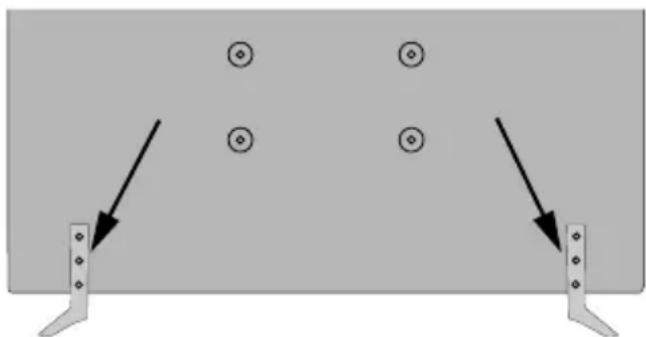
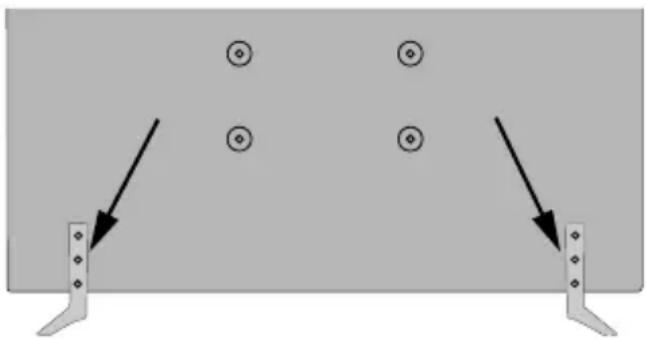
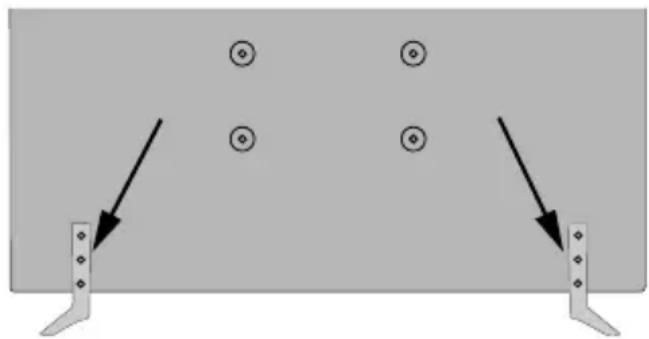
Removing the base stand
- To remove the base stand, protect the screen and lay the TV flat on its face on a stable table with the base over the edge. Remove the screws fixing the stand to the TV.
natural_image
Diagram showing a mechanical or electrical component with arrows indicating direction, surrounded by circular symbols (no text or labels)-or-
natural_image
Diagram showing two vertical metal supports with circular holes and an arrow pointing to the left side of each, no text or symbols present.Disposal Information
[European Union]
These symbols indicate that the electrical and electronic equipment and the battery with this symbol should not be disposed of as general household waste at its end-of-life. Instead, the products should be handed over to the applicable collection points for the recycling of electrical and electronic equipment as well as batteries for proper treatment, recovery and recycling in accordance with your national legislation and the Directive 2012/19/EU and 2013/56/EU.
By disposing of these products correctly, you will help to conserve natural resources and will help to prevent potential negative effects on the environment human health which could otherwise be caused by inappropriate waste handling of these products.
For more information about collection points and recycling of these products, please contact your local municipal office, your household waste disposal service or the shop where you purchased the product.
Penalties may be applicable for incorrect disposal of this waste, in accordance with national legislation.
[Business users]
If you wish to dispose of this product, please contact your supplier and check the terms and conditions of the purchase contract.
[Other Countries outside the European Union]
These symbols are only valid in the European Union.
Contact your local authority to learn about disposal and recycling.
The product and packaging should be taken to your local collection point for recycling.
Some collection points accept products free of charge.
Note: The sign Pb below the symbol for batteries indicates that this battery contains lead.
![JVC LT-55VU3005 - [Other Countries outside the European Union] - 1](/content/2026/04/635854/images/100ddc99fa8df956890c4d54598048b70b45b17041c155e16012009bd0423b90.jpg)
Products
![JVC LT-55VU3005 - [Other Countries outside the European Union] - 2](/content/2026/04/635854/images/fb832b6b29312c5e2eaf8c4d95387efb5e61fda952093bb54984f7c7bd9efaf9.jpg)
Battery
and
Remote Control
text_image
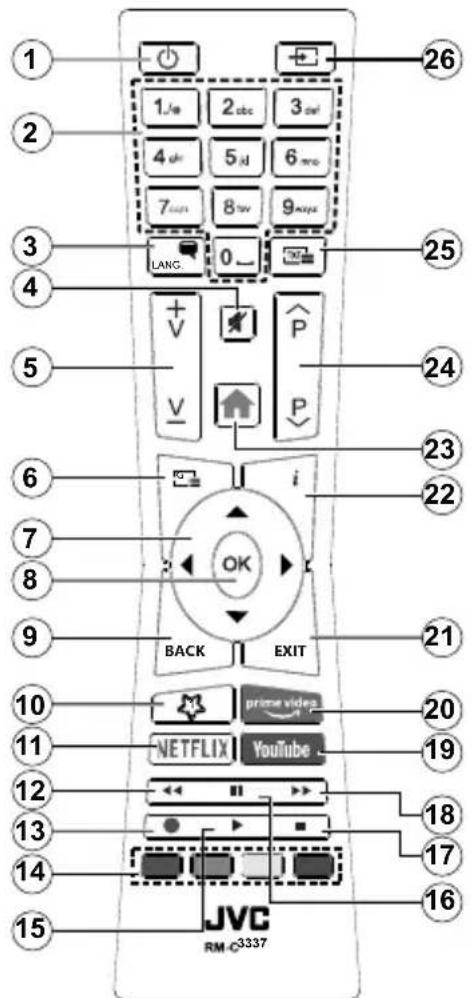
1 2 3 4 5 6 7 8 9 10 11 12 13 14 15 1 /a 2 abc 3 sw 4 sh 5 id 6 msc 7 mss 8 tv 9 mws LANG 0 - V P V P i OK BACK EXIT 21 22 23 24 25 26 20 19 18 17 16 JVC RM-C3337(\*) MY BUTTON 1:
This button may have default function depending on the model. However you can set a special function to this button by pressing on it for five seconds when on a desired source or channel. A confirmation message will be displayed on the screen. Now the My Button 1 is associated with the selected function.
Note that if you perform First Time Installation, My Button 1 will return to its default function.
Teletext Services
Press the Text button to enter. Press again to activate mix mode, which allows you to see the teletext page and the TV broadcast at the same time. Press once more to exit. If available, sections in the teletext pages will become colour-coded and can be selected by pressing the coloured buttons. Follow the instructions displayed on the screen.
Digital Teletext
Press the Text button to view digital teletext information. Operate it with the coloured buttons, cursor buttons and the OK button. The operation method may differ depending on the contents of the digital teletext. Follow the instructions displayed on the digital teletext screen. When the Text button is pressed again, the TV returns to television broadcast.
- Standby: Switches On / Off the TV
- Numeric buttons: Switches the channel, enters a number or a letter in the text box on the screen
- Language: Switches among sound modes (analogue TV), displays and changes audio/subtitle language and turns subtitles on or off (digital TV, where available)
-
Mute: Completely turns off the volume of the TV
-
Volume +/-
-
Guide: Displays the electronic programme guide
-
Directional buttons: Helps navigate menus, content etc. and displays the subpages in TXT mode when pressed Right or Left
-
OK: Confirms user selections, holds the page (in TXT mode), views Channels menu (DTV mode)
-
Back/Return: Returns to previous screen, previous menu, opens index page (in TXT mode). Quickly cycles between previous and current channels or sources
-
My Button 1 (*)
-
Netflix: Launches the Netflix application
-
Rewind: Moves frames backwards in media such as movies
-
Record: Records programmes**
-
Coloured Buttons: Follow the on-screen instructions for coloured button functions
-
Play: Starts to play selected media
-
Pause: Pauses the media being played, starts timeshift recording**
-
Stop: Stops the media being played
-
Fast Forward: Moves frames forward in media such as movies
-
YouTube: Launches the YouTube application
-
Prime Video: Launches the Amazon Prime Video application
-
Exit: Closes and exits from displayed menus or returns to previous screen
-
Info: Displays information about on-screen content, shows hidden information (reveal - in TXT mode)
-
Menu: Displays TV menu
-
Programme +/-
-
Text: Displays teletext (where available), press again to superimpose the teletext over a normal broadcast picture (mix)
-
Source: Shows available broadcast and content sources
Footnote:
Red, green, blue and yellow buttons are multifunction; please follow on-screen prompts and section instructions.
(**) If this feature is supported by your TV.
natural_image
Diagram of a mechanical or electrical component with two labeled terminals and internal light beams (no text or symbols present)natural_image
Simple line drawing of a plug inserted into a socket (no text or symbols)natural_image
Diagram showing a USB connector with cable, alongside a separate icon of a USB port and a right-pointing arrow (no text or symbols)text_image
CLASS 1 LASER PRODUCTnatural_image
Diagram showing a mechanical or electrical component with arrows indicating direction, surrounded by circular symbols (no text or labels)-0-
natural_image
Diagram showing two vertical supports with circular symbols and arrows pointing to them, no text or labels present.natural_image
Diagram of a cylindrical device with two positive charges and a central conical structure, no text or symbols present.natural_image
Simple line drawing of a plug inserted into a socket socket (no text or symbols)4 Para ligar a TV (Dependendo do modelo)
natural_image
Simple diagram showing a gray rectangular shape with a small circular element below it, no text or symbols present.5 Entrada HDMI
text_image
CLASS 1 LASER PRODUCTDigital Video Broadcasting
natural_image
Diagram showing a mechanical component with arrows indicating direction, surrounded by circular symbols (no text or labels)-OU-

natural_image
Diagram showing two vertical supports with circular symbols and arrows pointing to each, no text or labels present.natural_image
Close-up of a mechanical component with two positive charges and a central conical tip (no visible text or symbols)natural_image
Simple line drawing of a plug inserted into a socket (no text or symbols)natural_image
Simple diagram showing a circular object and a vertical line with a curved top, no text or symbols present.5 HDMI-Eingang
text_image
CLASS 1 LASER PRODUCTnatural_image
Diagram showing a mechanical or electrical component with arrows indicating direction, surrounded by circular symbols (no text or labels)-oder-
natural_image
Diagram showing two vertical supports with circular symbols and arrows pointing to them, no text or labels present.natural_image
Close-up of a mechanical component with two positive charges and a central conical structure (no visible text or symbols)natural_image
Simple line drawing of a plug inserted into a socket (no text or symbols)4 Zapnutí televizoru )v závislosti od modelu(
natural_image
Simple diagram showing a gray rectangular shape with a small circular element below it, no text or symbols present.5
HDMI vstup
natural_image
Diagram showing a USB connector connected to a port with an arrow symbol (no text or labels)text_image
CLASS 1 LASER PRODUCTDigital Video Broadcasting
natural_image
Diagram showing a mechanical component with arrows indicating direction, surrounded by circular symbols (no text or labels)-nebo-
natural_image
Diagram showing two vertical supports with circular symbols and arrows pointing to each, no text or labels present.Informace o likvidaci
Evropská Unie
natural_image
Pure electrical circuit lines without any symbolsnatural_image
Simple line drawing of a plug inserted into a socket (no text or symbols)natural_image
Diagram showing a USB connector connected to a black D-sub and a black connector with an arrow symbol (no text or labels)text_image
CLASS 1 LASER PRODUCTDigital Video Broadcasting
natural_image
Diagram showing a mechanical component with arrows indicating direction, surrounded by circular symbols (no text or labels)-alebo-

natural_image
Diagram showing two vertical metal supports with circular symbols and arrows pointing to them, no text or labels present.natural_image
Close-up of a conical device with two labeled terminals (no visible text or symbols)natural_image
Simple line drawing of a plug inserted into a socket (no text or symbols)text_image
CLASS 1 LASER PRODUCTnatural_image
Diagram showing a mechanical component with arrows indicating direction, surrounded by circular symbols (no text or labels)-vagy-
natural_image
Diagram showing two vertical supports with circular symbols and arrows pointing to the left side of each, no text or labels present.natural_image
Close-up of a mechanical component with two positive charges and a central conical tip (no visible text or symbols)2 Lidhni antenën me televizorin
natural_image
Simple line drawing of a plug inserted into a socket (no text or symbols)text_image
CLASS 1 LASER PRODUCTDigital Video Broadcasting
natural_image
Diagram showing a mechanical component with arrows indicating direction, surrounded by circular symbols (no text or labels)-ose-

natural_image
Diagram showing two vertical supports with circular symbols and arrows pointing to them, no text or labels present.text_image
1 2 3 4 5 6 7 8 9 0 1/oo 2nd 3nd 4th 5th 6th 7th 8th 9th LANG. 26 25 24 23 22 21 20 19 18 17 16 15 JVC RM-C3337(\*) BUTONI IM 1:
text_image
CLASS 1 LASER PRODUCTnatural_image
Diagram showing a mechanical or electrical component with arrows indicating direction, surrounded by circular symbols (no text or labels)-ИЛУ-

natural_image
Diagram showing two vertical metal supports with circular holes and directional arrows pointing to each, against a plain gray background (no text or symbols)natural_image
Diagram of a conical device with two positive charges and a central circular component (no text or symbols)2 Povezite antenu na vaš TV
* Opcije povezivanja sa stražnje strane se mogu razlikovati u zavisnosti od modela
TV STRAGA

text_image
Satelit ANT SAT Ant TV Antena ili Kabel3 Povezite TV u struju
natural_image
Simple line drawing of a plug inserted into a square socket with a circular outlet (no text or symbols)4 Uključivanje TV-a (ovisno od modela)
text_image
CLASS 1 LASER PRODUCTLaserski proizvod klase 1: Ovaj proizvod sadrži laserski izvor Klase 1 koji je siguran u razumno predvidljivim uvjetima funkcioniranja.
UPOZORENJE
Nemojte gutati bateriju, opasnot od hemijskih opekotina
Ovaj proizvod ili dodatna oprema isporučena uz ovaj proizvod mogu da sadrže dugmastu bateriju. Ukoliko se baterija proguta, može dovesti do teške unutrašnje opekotine u samo 2 sata i može dovesti do smrti.
Digital Video Broadcasting
„Ovaj proizvod proizvodi, distribuira i za njega daje garanciju isključivo kompanija VESTEL Ticaret A.Ş „JVC“ je zaštitni znak korporacije JVC KENWOOD, koji takve kompanije koriste pod licencom."

Uputstva za montažu na zid (ovisno o modelu)
Postavljanje TV-a na zid
TV se može postaviti na zid korištenjem MX X*X mm (*) VESA kompleta za montažu koji se isporučuje zasebno. Otklonite nogaru baze kao šta je pokazano. Postavite TV u skladu sa instrukcijama dostavljenim u kompletu. Čuvati se od električnih kablova i cevi za gas i vodu koje mogu biti u zidu. U slučaju sumnje, javite se kvalifikovanom instalateru. Navoj šrafa ne sme da uđe više od X mm (*) u unutrašnjost televizora. Pitajte u radnji gdje ste kupili TV gdje možete kupiti VESA komplet.
(*) Pogledajte povezanu dodatnu stranicu za precizne specifikacije VESA dimenzija i navoja.
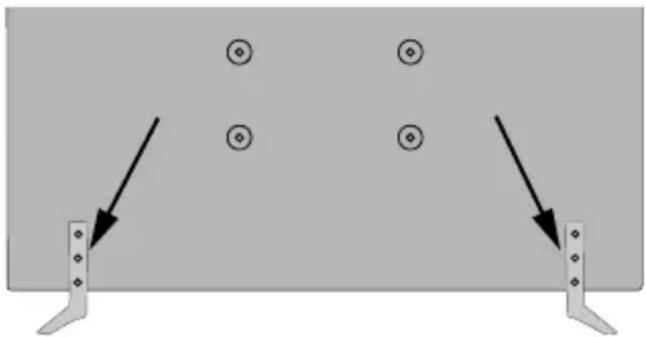
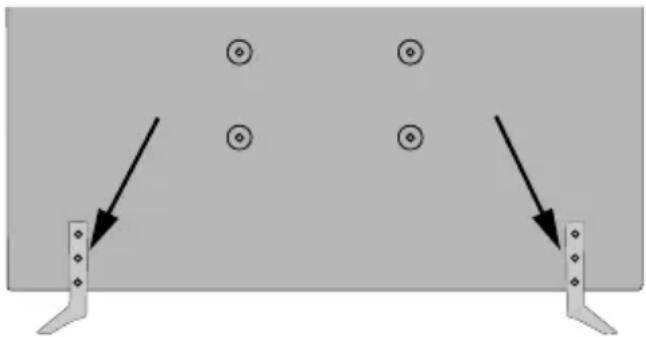
Uklanjanje nogare baze
- Da biste uklonili nogaru baze, zaštitite ekran i postavite TV licem prema dolje na stabilnom stolu i baza da visi preko ruba. Uklonite vijke koji pričvršćuju stalak na TV.

natural_image
Diagram showing a mechanical or electrical component with arrows indicating direction, surrounded by circular symbols (no text or labels)-iji-

natural_image
Diagram showing two vertical metal supports with circular symbols and arrows pointing to them, no text or labels present.natural_image
Close-up of a conical device with two labeled terminals (no visible text or symbols)natural_image
Simple line drawing of a plug inserted into a socket (no text or symbols)natural_image
Simple diagram showing a gray rectangular shape with a small circular element below it, no text or symbols present.5 Entrée HDMI
natural_image
Diagram showing a USB connector with cable, alongside a separate icon of an Ethernet connection (no text or symbols present)text_image
CLASS 1 LASER PRODUCTnatural_image
Diagram showing a mechanical or electrical component with arrows indicating direction, surrounded by circular symbols (no text or labels)-OU-
natural_image
Diagram showing two vertical metal supports with circular holes and directional arrows indicating movement or force (no text or symbols)Informations de la disposition
[Union européenne]
natural_image
Diagram of a conical device with positive and negative terminals, no visible text or symbolsnatural_image
Simple line drawing of a plug inserted into a socket (no text or symbols)natural_image
Simple diagram showing a gray rectangular shape with a small circular element below it, no text or symbols present.5 Ingresso HDMI
natural_image
Diagram showing three electronic components: a USB connector, a USB cable, and a black connector with an arrow symbol (no text or labels)text_image
CLASS 1 LASER PRODUCTnatural_image
Diagram showing a mechanical component with arrows indicating direction, surrounded by circular symbols (no text or labels)-oppure-
