
POWP3010 - Drill PowerPlus - Free user manual and instructions
Find the device manual for free POWP3010 PowerPlus in PDF.
| Product type | Hammer drill |
| Brand | PowerPlus |
| Model | POWP3010 |
| Power supply | 230-240 V ~ 50 Hz |
| Power consumption | 750 W |
| No-load speed | 0 - 1050 min⁻¹ |
| Impact speed | 0 - 4860 min⁻¹ |
| Chuck type | SDS-plus |
| Max drilling capacity (concrete) | 26 mm |
| Max drilling capacity (steel) | 13 mm |
| Max drilling capacity (wood) | 40 mm |
| Weight | Approx. 2.7 kg |
| Main functions | Drilling, hammer drilling, chiseling (hammer only), chisel rotation |
| Maintenance and cleaning | Clean with a dry cloth, do not use corrosive products, check carbon brushes if excessive sparks, keep ventilation slots clear |
| Safety | Double insulation (class II), lock-on switch, auxiliary handle for better grip, dust protection |
| Spare parts and repairability | Replaceable carbon brushes, SDS drill bits (8/10/12 x 150 mm), chisels (14 x 250 mm), auxiliary handle, depth stop, dust cap. Repairs by authorized service only. |
| General information | 2-year warranty (excluding normal wear and accessories), complies with European CE directives |
Frequently Asked Questions - POWP3010 PowerPlus
User questions about POWP3010 PowerPlus
0 question about this device. Answer the ones you know or ask your own.
Ask a new question about this device
Download the instructions for your Drill in PDF format for free! Find your manual POWP3010 - PowerPlus and take your electronic device back in hand. On this page are published all the documents necessary for the use of your device. POWP3010 by PowerPlus.
USER MANUAL POWP3010 PowerPlus
natural_image
Exterior view of a PRO POWER drill put tool with control buttons and handle (no text or symbols on the device itself)NL | FR | EN | DE | ES | IT | PT | NO | DA | SV | FI
EL | HR | SR | CS | SK | RO | PL | HU | RU | BG
POWP3010

POWERPLUS
NL NEDERLANDS VERTAALDE VERSIE VAN DE ORIGINELE HANDLEIDING
FR FRANÇAIS TRADUCTION DU MODE D'EMPLOI D'ORIGINE
EN ENGLISH ORIGINAL INSTRUCTION MANUAL
natural_image
Product photo of a PRO electric drill with open case, tool holder, and multiple screwdriver tools (no visible text or symbols)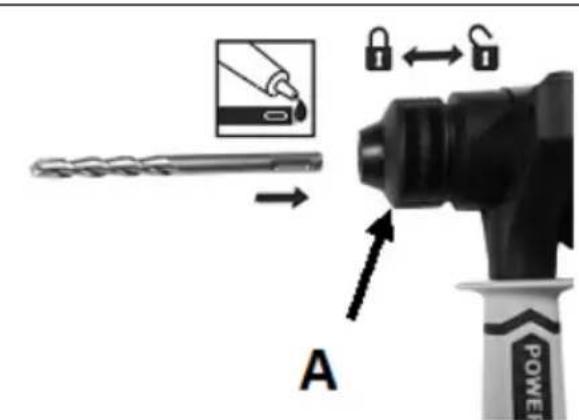
Fig. 1

natural_image
Close-up of a black cylindrical mechanical component with adjustment knobs and a red control knob (no visible text or symbols)Fig. 2

natural_image
Green and black industrial power tool with a curved arrow indicating rotation (no text or symbols visible)Fig. 3
natural_image
Close-up of a black mechanical device's rotary knob and adjustment knob (no text or symbols visible)Fig. 4
POWERPLUS POWP3010 NL
1 BEOOGD GEBRUIK 2
2 BESCHRIJVING (FIG. A)....2
3 INHOUD....2
4 VERKLARING VAN DE SYMBOLEN....3
5 ALGEMENE VEILIGHEIDSVOORSCHRIFTEN....3
5.1 Werkplaats....3
5.2 Elektrische veiligheid....3
5.3 Veiligheid van personen....4
5.4 Zorgvuldige omgang met en gebruik van elektrisch gereedschap....4
5.5 Service....5
6 SPECIFIEKE VEILIGHEIDSREGELS VOOR KLOPBOREN EN BOORHAMERS. 5
7 VÓÓR U START MET WERKEN....6
7.1 Plaatsen en vervangen van gereedschappen (Fig. 1)....6
7.2 Dieptestop (Fig. 2)....6
7.3 Stofopname-inrichting....6
7.4 Monteren van de hulphandgreep (Fig. 3)....6
7.5 Keuze van de functie (Fig. 4)....6
8 BEDIENING....7
8.1 Aan- en uitzetten....7
9 TECHNISCHE GEGEVENS....7
10 GELUID 8
11 ONDERHOUD....8
12 GARANTIE......8
13 MILIEU....9
14 CONFORMITEITSVERKLARING....9
POWERPLUS POWP3010 NL BOORHAMER 800W POWP3010
1 BEOOGD GEBRUIK
2 BESCHRIJVING (FIG. A)
natural_image
Simple hand-drawn sketch of a rounded rectangle with a curved line on top (no text or symbols)Philippe Vankerkhove
Regelgevings- en compliancemanager
Datum: 10/05/2021, Lier - Belgium
POWERPLUS
POWP3010 FR
14 DÉCLARATION DE CONFORMITÉ
C ∈

VARO - VIC. VAN ROMPUY N.V. - Joseph Van Instraat 9 - BE2500 Lier - BELGIQUE, déclare que :
natural_image
Simple hand-drawn sketch of a rounded rectangular shape with a small mark on top (no text or symbols)Philippe Vankerkhove
10/05/2021, Lier - Belgium
POWERPLUS
POWP3010 EN
1 INTENDED USE....2
2 DESCRIPTION (FIG. A)....2
3 PACKAGE CONTENT LIST 2
4 EXPLANATION OF SYMBOLS......2
5 GENERAL POWER TOOL SAFETY WARNINGS....3
5.1 Work area ....3
5.2 Electrical safety....3
5.3 Personal safety ....3
5.4 Power tool use and care....4
5.5 Service....4
6 SPECIFIC SAFETY RULES FOR IMPACT DRILL AND ROTARY HAMMERS 4
7 BEFORE STARTING WORK....5
7.1 Fitting and changing tools (Fig. 1)....5
7.2 Depth guide (Fig. 2)....5
7.3 Dust collection device ....5
7.4 Fitting the auxiliary handle (Fig. 3)....5
7.5 Selecting the operation mode (Fig. 4)....6
8 OPERATION 6
8.1 Switch on/off 6
9 TECHNICAL DATA....7
10 NOISE....7
11 MAINTENANCE....7
12 WARRANTY....8
13 ENVIRONMENT 8
14 DECLARATION OF CONFORMITY 9
POWERPLUS POWP3010 EN
HAMMER DRILL 800W
POWP3010
1 INTENDED USE
The power tool is intended for driving and drilling through wood, metal, plastics and masonry.

WARNING Please read and understand this operating manual before use and keep it for your future reference.
2 DESCRIPTION (FIG. A)
-
Depth stop
-
Lock knob for depth stop
-
SDS Chuck
-
Soft grip
-
Auxiliary handle
-
On/off trigger
-
Mode selector
-
Lock on button
3 PACKAGE CONTENT LIST
■ Remove all packing materials
- Remove remaining packaging and transit supports (if existing)
- Check the completeness of the packing content
- Check the appliance, the power cord, the power plug and all accessories for transportation damages.
- Keep the packaging materials as long as possible till the end of the warranty period. Dispose it into your local waste disposal system afterwards.

WARNING Packing materials are no toys! Children must not play with plastic bags! Danger of suffocation!
1 hammer drill
Depth stop
1 manual
Auxiliary handle
3 SDS drill (8/10/12 x 150mm)
Dust cap
2 chisel (14 x 250mm, 1 point, 1 flat)

When parts are missing or damaged, please contact your dealer.
4 EXPLANATION OF SYMBOLS
In this manual and/or on the machine the following symbols are used:
 | In accordance with essential requirements of the European directive(s) |  | Read instructions carefully |
 | "Class II - The machine is double insulated; Earthing wire is therefore not necessary |  | Wear safety glasses and ear protection |
 | Denotes risk of personal injury or damage to the tool. |  | Wear gloves |
5 GENERAL POWER TOOL SAFETY WARNINGS
Read all safety warnings and all instructions. Failure to follow all warnings and instructions may result in electric shock, fire and/or serious injury. Save all warnings and instructions for future reference. The term "power tool" in the warnings refers to your mains operated (corded) power tool or battery operated (cordless) power tool.
5.1 Work area
- Keep work area clean and well lit. Cluttered and dark areas invite accidents.
- Do not operate power tools in explosive atmospheres, such as in the presence of flammable liquids, gases or dust. Power tools create sparks which may ignite the dust or fumes.
- Keep children and bystanders away while operating a power tool. Distractions can cause you to lose control.
5.2 Electrical safety
- Power tool plugs must match the outlet. Never modify the plug in any way. Do not use any adapter plugs with earthed (grounded) power tools. Unmodified plugs and matching outlets will reduce risk of electric shock.
- Avoid body contact with earthed or grounded surfaces such as pipes, radiators, ranges and refrigerators. There is an increased risk of electric shock if your body is earthed or grounded.
- Do not expose power tools to rain or wet conditions. Water entering a power tool will increase the risk of electric shock.
- Do not abuse the cord. Never use the cord for carrying, pulling or unplugging the power tool. Keep cord away from heat, oil, sharp edges or moving parts. Damaged or entangled cords increase the risk of electric shock.
- When operating a power tool outdoors, use an extension cord suitable for outdoor use. Use of a cord suitable for outdoor use reduces the risk of electric shock.
- If operating a power tool in a damp location is unavoidable, use a residual current device (RCD) protected supply. Use of an RCD reduces the risk of electric shock.
5.3 Personal safety
- Stay alert, watch what you are doing and use common sense when operating a power tool. Do not use a power tool while you are tired or under the influence of drugs, alcohol or medication. A moment of inattention while operating power tools may result in serious personal injury.
- Use safety equipment. Always wear eye protection. Safety equipment such as dust mask, non-skid safety shoes, hard hat, or hearing protection used whenever conditions require will reduce personal injuries.
- Avoid accidental starting. Ensure the switch is in the off position before plugging in. Carrying power tools with your finger on the switch or plugging in power tools that have the switch on invites accidents.
- Remove any adjusting key or wrench before turning the power tool on. A wrench or a key left attached to a rotating part of the power tool may result in personal injury.
- Do not overreach. Keep proper footing and balance at all times. This enables better control of the power tool in unexpected situations.
- Dress properly. Do not wear loose clothing or jewellery. Keep your hair, clothing and gloves away from moving parts. Loose clothes, jewellery or long hair can be caught in moving parts.
- If devices are provided for the connection of dust extraction and collection facilities, ensure these are connected and properly used. Use of these devices can reduce dust related hazards.
5.4 Power tool use and care
- Do not force the power tool. Use the correct power tool for your application. The correct power tool will do the job better and safer at the rate for which it was designed.
- Do not use the power tool if the switch does not turn it on and off. Any power tool that cannot be controlled with the switch is dangerous and must be repaired.
- Disconnect the plug from the power source before making any adjustments, changing accessories, or storing power tools. Such preventive safety measures reduce the risk of starting the power tool accidentally.
- Store idle power tools out of the reach of children and do not allow persons unfamiliar with the power tool or these instructions to operate the power tool. Power tools are dangerous in the hands of untrained users.
- Maintain power tools. Check for misalignment or sticking of moving parts, breakage of parts and any other condition that may affect the power tool's operation. If damaged, have the power tool repaired before use. Many accidents are caused by poorly maintained power tools.
- Keep cutting tools sharp and clean. Properly maintained cutting tools with sharp cutting edges are less likely to stick and are easier to control.
- Use the power tool, accessories and tool bits etc., in accordance with these instructions and in the manner intended for the particular type of power tool, taking into account the working conditions and the work to be performed. Use of the power tool for operations different from intended could lead to a hazardous situation.
5.5 Service
- Have your power tool serviced by a qualified repair person using only identical replacement parts. This will ensure that the safety of the power tool is maintained.
6 SPECIFIC SAFETY RULES FOR IMPACT DRILL AND ROTARY HAMMERS
- Important to protect yourself from the risk of electric shock, injury and fire when using an electric tool, it is imperative to take the following basic safety precautions. Read and note these instructions before you use the machine.
- Check the voltage (volt) marked on the rating plate.
- When using cable drums, run all the cable off the drum. Minimum conductor cross section: 1.0mm ^2 .
■ Make sure of your footing on ladders and scaffolding when drilling free-handed - Use a line detector to localize lines in walls with concealed electric, water or gas lines. Avoid touching live components or conductors.
- Wear ear muffs to protect your hearing. Loss of hearing can be a gradual process!
- Do not use in areas where there are vapours or flammable liquids
- Always pull the plug out of the socket before cleaning or making changes to the machine.
- Protect the power cable from damage. Oil and acid can damage the cable.
- Never overload the machine. Secure all work pieces sufficiently.
- Important! It is imperative to follow all national safety regulations concerning installation. Operation and maintenance.
- Chisel bits and drill bits may be flung out of the machine accidentally and cause serious injury.
- Before starting to work, always check that the chisel or drill bit is properly locked in the chuck.
- Examine the chuck regularly for signs of wear or damage.
- Never start up a hammer tool until it pressed against a work piece (wall, ceiling, etc).
- When you are finished, unplug the hammer drill from the electric supply and remove the chisel or drill bit from the machine.
POWERPLUS POWP3010 EN
- Always disconnect the hammer drill from the electric supply before you change a chisel or drill bit.
- Protect your eyes and other workers from flying particles and splinters. Wear a helmet! Set up partition walls!
- Wear work gloves to protect fingers from bruising and grazing.
- Vibrations can injure the hand-arm system. Keep exposure to vibrations as short as possible.
■ Always lead the mains cable away backwards from the device.
■ Store the device where it is inaccessible to children. - When carrying out work, always hold the device with both hands and ensure that you have a stable standing position.
7 BEFORE STARTING WORK
- Examine the place where the device is to be used for hidden electrical cables, gas and water pipes using a pipe finding device.
- Before connecting to the mains, ensure care that the mains voltage corresponds to the details on the rating plate.
7.1 Fitting and changing tools (Fig. 1)
The device is equipped with a SDS- plus attachment system.
- Clean tools and grease with a thin layer of machine grease before fitting.
For assembly:
■ Pull back fastening sleeve (A) and hold.
- Push and rotate the dust-free tool into the tool holder as far as it will go. The tool will lock automatically.
- Check that it has locked by pulling the tool.
Removing SDS-plus tool
■ Pull back fastening sleeve (A), hold and remove tool.

Accessories can be hot after use. Don't touch the tip of acceleroty by hand!
Always use protective gloves to remove the accessory!
7.2 Depth guide (Fig. 2)
Your drilling depth can be pre-set and/or repeated by using the depth stop.
Insert the required drill bit. Fit the depth stop into the hole of auxiliary handle and set the required depth
7.3 Dust collection device
Before carrying out hammer-drilling work vertically overhead pull dust collecting device over the drill bit.
7.4 Fitting the auxiliary handle (Fig. 3)
The auxiliary handle can be fitted to suit both right-handed and left-handed users.

Always use the tool with the auxiliary handle properly assembly.
Loosen the auxiliary handle by unscrewing it.
For right handed users, slide the auxiliary handle clamp over the collar behind the bit holder, handle at the left.
For left handed users, Slide the auxiliary handle clamp over the collar behind the bit holder, handle at the right.
Rotate the side handle to the desire position and tighten the handle.
POWERPLUS POWP3010 EN
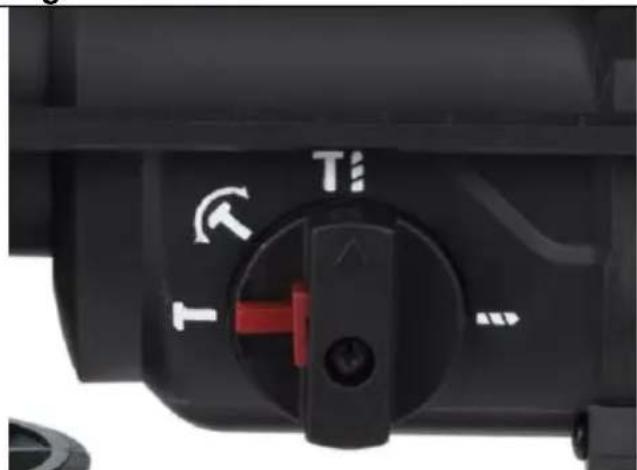
7.5 Selecting the operation mode (Fig. 4)
The rotary hammer drill can be used in the following operation modes.
■ Rotary drilling
For screwdriver and for drilling into steel, wood and plastics.
Ti - Hammer drilling
Simultaneous rotating and impacting for concrete and masonry drilling
■ Hammer only
for light chipping, chiselling and demolition applications .
■ Bit rotation
Non-working position used only to rotate a flat chisel into the desire position.
Select the required operating mode by depressing the safety button and rotating the mode selector switch until it points to the symbol of the required mode.
Release the safety button and check that the mode selector switch is locked place.
Do not select the operating mode when the tool is running.
For screw driving, refer to section: "Instructions for use".

Always wait until the machine has come to a complete standstill before changing the drilling, hammer/drilling function.

Do not use the chuck with SDS connector in combination with the hammer/hammer drill function!
8 OPERATION

Important! When hammer drilling you will require a low pressure. Too much pressure will place unnecessary load on the motor. Check the drill bits regularly. Resharpen or replace blunt drill bits.
8.1 Switch on/off
Plug the cord set into power socket.
To start the tool squeeze the on/off switch (7).
To stop the tool, release the on/off switch.
If you press the lock-on button (8) while the on/off switch is depressed, the on/off switch is kept in the operating position.
To release the on/off switch (7) again, press it briefly to and turn the tool off.
The harder you squeeze the on/off switch (7) the faster the tool will operate.
Use lower speeds for starting.
9 TECHNICAL DATA
| Model | POWP3010 | |
| Voltage | 230-240 V~ 50 Hz | |
| Power Input | 800 Watt | |
| No load speed | 0-1050 min-1 | |
| Impact rates | 0-4860 min-1 | |
| Shank style | SDS | |
| Max. drilling capacity | Concrete | 26 mm |
| Steel | 13 mm | |
| Wood | 40 mm | |
| Insulation class |  / II / II | |
10 NOISE
Noise emission values measured according to relevant standard. (K=3)
| Acoustic pressure level LpA | 91 dB(A) |
| Acoustic power level LwA | 102 dB(A) |

ATTENTION! Wear hearing protection when sound pressure is over 85 dB(A).
aw (Vibration)
8,5 m/s²
K = 1.5 ~m / s^2
11 MAINTENANCE
■ Always keep the drill clean.
- Do not use corroding agents for cleaning plastic.
- Check carbon brushes in the case of excessive sparking.
- Keep ventilation channels free.
12 WARRANTY
- This warranty covers all material or production flaws excluding : batteries, chargers, defective parts subject to normal wear & tear such as bearings, brushes, cables, and plugs, or accessories such as drills, drill bits, saw blades, etc. ; damage or defects resulting from maltreatment, accidents or alterations; nor the cost of transportation.
- Damage and/or defects resulting from inappropriate use also do not fall under the warranty provisions.
- We also disclaim all liability for any bodily injury resulting from inappropriate use of the tool.
- Repairs may only be carried out by an authorised customer service centre for Powerplus tools.
- You can always obtain more information at the number 00 32 3 292 92 90.
- Any transportation costs shall always be borne by the customer, unless agreed otherwise in writing.
- At the same time, no claim can be made on the warranty if the damage of the device is the result of negligent maintenance or overload.
- Definitely excluded from the warranty is damage resulting from fluid permeation, excessive dust penetration, intentional damage (on purpose or by gross carelessness), inappropriate usage (use for purposes for which the device is not suitable), incompetent usage (e.g. not following the instructions given in the manual), inexpert assembly, lightning strike, erroneous net voltage. This list is not exhaustive.
- Acceptance of claims under warranty can never lead to the prolongation of the warranty period nor commencement of a new warranty period in case of a device replacement.
- Devices or parts which are replaced under the warranty therefore remain the property of Varo NV.
- We reserve the right to reject a claim whenever the purchase cannot be verified or when it is clear that the product has not been properly maintained. (Clean ventilation slots, carbon brushes serviced regularly, etc.).
- Your purchase receipt must be kept as proof of date of purchase.
- Your appliance must be returned undismantled to your dealer in an acceptably clean state, (in its original blow-moulded case if applicable to the unit), accompanied by proof of purchase.
13 ENVIRONMENT
Should your machine need replacement after extended use, do not put it in the domestic waste but dispose of it in an environmentally safe way.
Waste electrical products should not be disposed of with household waste. Please recycle where facilities exist. Check with your Local Authority or retailer for recycling advice.
14 DECLARATION OF CONFORMITY
C€

VARO - VIC. VAN ROMPUY N.V. - Joseph Van Instraat 9 - BE2500 Lier - BELGIUM, declares that,
product: Hammer drill 800 W
trade mark: PowerPlus
model: POWP3010
is in conformity with the essential requirements and other relevant provisions of the applicable European Directives, based on the application of European harmonized standards. Any unauthorized modification of the apparatus voids this declaration.
European Directives (including, if applicable, their amendments up to the date of signature):
2011/65/EU
2006/42/EC
2014/30/EU
European harmonized standards (including, if applicable, their amendments up to the date of signature):
EN60745-1:2009
EN60745-2-6:2010
EN55014-1:2017
EN55014-2:2015
EN IEC 61000-3-2 : 2019
EN61000-3-3:2013
Keeper of the Technical Documentation: Philippe Vankerkhove, VARO – Vic. Van Rompuy N.V.
The undersigned acts on behalf of the company CEO,
natural_image
Simple hand-drawn sketch of a rounded rectangular shape with a small circular mark on top (no text or symbols)Philippe Vankerkhove
Regulatory Affairs – Compliance Manager
10/05/2021, Lier - Belgium
POWERPLUS
POWP3010 DE
natural_image
Simple hand-drawn sketch of a rounded rectangular shape with a small circular mark on top (no text or symbols)Philippe Vankerkhove
10/05/2021, Lier - Belgium
POWERPLUS POWP3010 ES
natural_image
Simple hand-drawn sketch of a rounded rectangular shape with a small circular mark on top (no text or symbols)Philippe Vankerkhove
10/05/2021, Lier - Belgium
POWERPLUS POWP3010 IT
natural_image
Simple hand-drawn sketch of a rounded rectangular shape with a small mark at the top (no text or symbols)Philippe Vankerkhove
Regulatory Affairs – Compliance Manager
10/05/2021, Lier - Belgium
POWERPLUS
POWP3010 PT
natural_image
Simple hand-drawn sketch of a rounded rectangular shape with a small circular mark on top (no text or symbols)Philippe Vankerkhove
10/05/2021, Lier - Belgium
POWERPLUS POWP3010 NO
1 TILTENKT BRUK....2
2 BESKRIVELSE (FIG. A) 2
3 PAKKENS INNHOLD....2
4 FORKLARING AV SYMBOLENE....3
5 GENERELLE SIKKERHETSFORSKRIFTER....3
5.1 Arbeidsplassen ....3
5.2 Elektrisk sikkerhet ....3
5.3 Personsikkerhet....3
5.4 Vær nøyaktig og omhyggelig når du omgås elektroverktøy 4
5.5 Service....4
6 SPESIFIKKE SIKKERHETSREGLER FOR SLAGBOR OG BORHAMMERE 4
7 F∅R DU STARTER ARBEIDET 5
7.1 Montere og skifte verktøy (Fig. 1) ....5
7.2 Dybdestopp (Fig. 2)....5
7.3 Støvavsug....5
7.4 Feste hjelpehåndtaket (Fig. 3)....6
7.5 Velge bruksmodus (Fig. 4)....6
8 BRUK 6
8.1 Slá på/av 6
9 TEKNISKE DATA ....7
10 ST∅Y....7
11 VEDLIKEHOLD....7
12 GARANTI 8
13 MILJ∅....8
14 SAMSVARSERKLÆRING....9
POWERPLUS POWP3010 NO BORHAMMER 800W POWP3010
1 TILTENKT BRUK
natural_image
Simple hand-drawn sketch of a rounded rectangular shape with a small circular mark on top (no text or symbols)Philippe Vankerkhove
Regulatoriske saker – Samsvarsleder
10/05/2021, Lier - Belgium
POWERPLUS POWP3010 DA
POWERPLUS POWP3010 DA
POWERPLUS POWP3010 DA
natural_image
Simple hand-drawn sketch of an irregular shape with a small circular mark on top (no text or symbols)Philippe Vankerkhove
Regulatory Affairs (afdelingen for juridiske anliggender) – Compliance Manager 10/05/2021, Lier - Belgium
POWERPLUS POWP3010 SV
3 FÖRPACKNINGSINNEHÅLL
7 INNAN ARBETET PÅBÖRJAS
14 KONFORMITETSDEKLARATION
C€

VARO – VIC. VAN ROMPUY N.V. – Joseph Van Instraat 9 – BE2500 Lier – Belgien, deklarerar härmed att,
natural_image
Simple hand-drawn sketch of a rounded rectangular shape with a small circular mark on top (no text or symbols)Philippe Vankerkhove
10/05/2021, Lier - Belgium
POWERPLUS
POWP3010 FI
natural_image
Simple hand-drawn sketch of a rounded rectangular shape with a small circular mark on top (no text or symbols)Philippe Vankerkhove
10/05/2021, Lier - Belgium
POWERPLUS
POWP3010 EL
natural_image
Simple hand-drawn sketch of a rounded rectangular shape with a small circular mark on top (no text or symbols)Philippe Vankerkhove
10/05/2021, Lier - Belgium
POWERPLUS
POWP3010 HR
1 NAMJENA....2
2 OPIS (SL. A) 2
3 POPIS SADRŽAJA PAKETA 2
4 SIMBOLI....3
5 OPĆA UPOZORENJA O SIGURNOSTI RUKOVANJA
ELEKTRIČNIM ALATIMA....3
5.1 Radno mjesto....3
5.2 Električna sigurnost....3
5.3 Osobna sigurnost ....4
5.4 Uporaba i održavanje električnog alata ....4
5.5 Servis....4
6 POSEBNA SIGURNOSNA PRAVILA ZA VIBRACIJSKU BUŠILICU
I ROTACIJSKE ČEKIĆE......5
7 PRIJE POČETKA RADA 5
7.1 Postavljanje i zamjena alata (slika 1)....5
7.2 Dubinska vodilica (slika 2)....6
7.3 Uređaj za prikupljanje prašine....6
7.4 Poklopac protiv prašine (slika 3)....6
7.5 Postavljanje pomoćne drške (slika 4)....6
7.6 Izbor načina rada (slika 5)....6
8 KORIŠTENJE....7
8.1 Uključivanje/isključivanje....7
9 TEHNIČKI PODACI....7
10 BUKA 7
11 ODRŽAVANJE....7
12 JAMSTVO 8
13 OKOLIŠ 8
14 IZJAVA O SUKLADNOSTI 9
POWERPLUS POWP3010 HR VIBRACIJSKA BUŠILICA 800W POWP3010
1 NAMJENA
natural_image
Simple hand-drawn outline of an irregular shape with no text or symbolsPhilippe Vankerkhove
10/05/2021, Lier - Belgium
POWERPLUS
POWP3010 SR
natural_image
Simple hand-drawn outline of an irregular shape with no text or symbolsPhilippe Vankerkhove
10/05/2021, Lier - Belgium
POWERPLUS POWP3010 CS
natural_image
Simple hand-drawn outline of a rounded rectangular shape with a small circular mark at the top (no text or symbols)Philippe Vankerkhove
10/05/2021, Lier - Belgium
POWERPLUS POWP3010 SK
1 ZAMÝŠL'ANÉ POUŽITIE....2
2 POPIS (OBR. A)....2
3 OBSAH BALENIA....2
4 VYSVETLENIE SYMBOLOV 3
5 VŠEOBECNÉ BEZPEČNOSTNÉ VAROVANIA PRE ELEKTRICKÉ NÁRADIE ....3
5.1 Pracovná plocha .... 3
5.2 Elektrická bezpečnost'....3
5.3 Osobná bezpečnost'......4
5.4 Používanie elektrického náradia a starostlivost' oň....4
5.5 Servis....5
6 ŠPECIFICKÉ BEZPEČNOSTNÉ ZÁSADY PRE PRÍKLEPOVÉ VŘTAČKY A ROTAČNÉ KLADIVÁ......5
7 PRED ZAČATÍM PRÁCE......5
7.1 Uchytenie a výmena nástrojov (obr. 1)....5
7.2 Híbkové vodidlo (Obr. 2)....6
7.3 Zariadenie na zber prachu....6
7.4 Inštalácia prídavnej rukoväte (obr. 3) ......6
7.5 Zvolenie prevádzkového režimu (obr. 4)....6
8 PREVÁDZKA 7
8.1 Zapnutie/vypnutie 7
9 TECHNICKÉ ÚDAJE 7
10 HLUK....8
11 ÚDRŽBA....8
12 ZÁRUKA....8
13 ŽIVOTNÉ PROSTREDIE....9
14 VYHLÁSENIE O ZHODE 9
POWERPLUS POWP3010 SK VŘTACIE KLADIVO 800W POWP3010
1 ZAMÝŠL'ANÉ POUŽITIE
Toto elektrické náradie je určené na razenie a vrtanie do dreva, kovu, plastu a muriva.

natural_image
Simple hand-drawn outline of an irregular shape with no text or symbolsPhilippe Vankerkhove
Regulačné záležitosti – Compliance Manager
10/05/2021, Lier - Belgium
POWERPLUS POWP3010 RO
natural_image
Simple hand-drawn sketch of a rounded rectangular shape with a small dot inside (no text or symbols)Philippe Vankerkhove
Divizia de reglementare – Director de conformitate
10/05/2021, Lier - Belgium
POWERPLUS
POWP3010 PL
natural_image
Simple hand-drawn outline of a rounded rectangular shape with no text or symbolsPhilippe Vankerkhove
10/05/2021, Lier - Belgium
POWERPLUS POWP3010 HU
natural_image
Simple hand-drawn sketch of a rounded rectangular shape with a small circular top (no text or symbols)Philippe Vankerkhove
natural_image
Simple hand-drawn sketch of an irregular shape with a small circular mark on top (no text or symbols)Philippe Vankerkhove
natural_image
Simple hand-drawn sketch of a rounded rectangular shape with no text or symbolsPhilippe Vankerkhove
10/05/2021, Lier - Belgium

natural_image
Exterior view of a green DRC 1000 electric drill putter (no text or symbols visible)varo
WWW.VARO.COM
DESIGNED AND MARKETED BY VARO
©copyright by varo
VARO - VIC. VAN ROMPUY nv
JOSEPH VAN INSTRAAT 9 - 2500 LIER - BELGIUM
OFFICES:


- POWERPLUS
- POWERPLUS POWP3010 NL
- POWERPLUS POWP3010 NL BOORHAMER 800W POWP3010
- BEOOGD GEBRUIK
- BESCHRIJVING (FIG. A)
- POWP3010 FR
- DÉCLARATION DE CONFORMITÉ
- C ∈
- POWP3010 EN
- POWERPLUS POWP3010 EN
- HAMMER DRILL 800W
- POWP3010
- INTENDED USE
- DESCRIPTION (FIG. A)
- PACKAGE CONTENT LIST
- EXPLANATION OF SYMBOLS
- GENERAL POWER TOOL SAFETY WARNINGS
- Work area
- Electrical safety
- Personal safety
- Power tool use and care
- Service
- SPECIFIC SAFETY RULES FOR IMPACT DRILL AND ROTARY HAMMERS
- BEFORE STARTING WORK
- Fitting and changing tools (Fig. 1)
- Accessories can be hot after use. Don't touch the tip of acceleroty by hand!
- Always use protective gloves to remove the accessory!
- Depth guide (Fig. 2)
- Dust collection device
- Fitting the auxiliary handle (Fig. 3)
- Always use the tool with the auxiliary handle properly assembly.
- Selecting the operation mode (Fig. 4)
- OPERATION
- Switch on/off
- NOISE
- MAINTENANCE
- WARRANTY
- ENVIRONMENT
- DECLARATION OF CONFORMITY
- C€
- POWP3010 DE
- POWERPLUS POWP3010 ES
- POWERPLUS POWP3010 IT
- POWP3010 PT
- POWERPLUS POWP3010 NO
- POWERPLUS POWP3010 NO BORHAMMER 800W POWP3010
- TILTENKT BRUK
- POWERPLUS POWP3010 DA
- POWERPLUS POWP3010 SV
- FÖRPACKNINGSINNEHÅLL
- INNAN ARBETET PÅBÖRJAS
- KONFORMITETSDEKLARATION
- POWP3010 FI
- POWP3010 EL
- POWP3010 HR
- POWERPLUS POWP3010 HR VIBRACIJSKA BUŠILICA 800W POWP3010
- NAMJENA
- POWP3010 SR
- POWERPLUS POWP3010 CS
- POWERPLUS POWP3010 SK
- POWERPLUS POWP3010 SK VŘTACIE KLADIVO 800W POWP3010
- ZAMÝŠL'ANÉ POUŽITIE
- POWERPLUS POWP3010 RO
- POWP3010 PL
- POWERPLUS POWP3010 HU
Brand : PowerPlus
Model : POWP3010
Category : Drill