
TX300 - Receiver Hartke - Free user manual and instructions
Find the device manual for free TX300 Hartke in PDF.

| Product Type | Bass Amplifier (Class D) |
| Brand | Hartke |
| Model | TX300 |
| Output Power | 300 W RMS @ 4 Ω, 200 W RMS @ 8 Ω |
| Input Impedance | > 1 MΩ (unbalanced) |
| Equalizer | 3-band (Bass, Mid, Treble) + Shape with frequency control |
| Compressor | Variable, adjustable threshold, fixed ratio 1.6:1 |
| Drive Control | Adjustable saturation |
| Inputs | 1 x 6.35 mm jack (instrument), 1 x 3.5 mm stereo jack (Aux) |
| Outputs | Speakers: 2 x 6.35 mm jack + 2 x Neutrik Speakon (parallel), Preamp Out (6.35 mm jack), Power Amp In (6.35 mm jack), Direct Out XLR (balanced), Headphones (3.5 mm stereo jack) |
| Dimensions (W x H x D) | 365 x 161 x 273 mm |
| Weight | 2.3 kg |
| Power Supply | Mains: 100-120 V~ / 220-240 V~ (selector), 50/60 Hz |
| Fuse | Built-in, value according to voltage (see marking) |
| Cooling | Variable speed fan |
| Chassis Material | Aluminum |
| Mute Function | Switchable (red LED) |
| Headphone Output | Automatically cuts speakers |
| Compliance | FCC Class B, CE (mentioned) |
| Maintenance | Clean with dry cloth; do not expose to water or moisture |
| Safety | Grounding mandatory; disconnect during storms; do not open (risk of shock) |
| Included Accessories | IEC power cord |
| Intended Use | Professional use, bass guitar amplifier |
Frequently Asked Questions - TX300 Hartke
User questions about TX300 Hartke
0 question about this device. Answer the ones you know or ask your own.
Ask a new question about this device
Download the instructions for your Receiver in PDF format for free! Find your manual TX300 - Hartke and take your electronic device back in hand. On this page are published all the documents necessary for the use of your device. TX300 by Hartke.
USER MANUAL TX300 Hartke
This lightning flash with arrowhead symbol within an equilateral triangle is intended to alert the user to the presence of non-insulated “dangerous voltage” within the product’s enclosure that may be of sufficient magnitude to constitute a risk of electric shock.

The exclamation point within an equilateral triangle is intended to alert the user to the presence of important operating and maintenance instructions in the literature accompanying the appliance.
WARNING: To reduce the risk of fire or electric shock, do not expose this apparatus to rain or moisture.
WARNING: The mains plug/appliance coupler is used as disconnect device, the disconnect device shall remain readily operable.

Protective earthing terminal. The apparatus should be connected to a mains socket outlet with a protective earthing connection.
Voltage selector: Used to adjust the input rating (100-120Vac 50/60Hz and 220-240Vac 50/60Hz), please just insert the mains power plug into the socket-outlet with voltage within the setting of the selector. The current ratings of mains fuse links are different for different input rating (see marking for details), and the fitted mains fuse link was just related to the input rating as setting of the selector during factory assembly line work, please ask a qualified personnel to help you replace the mains fuse link before you adjust the voltage selector.
FCC Notice
This device complies with part 15 of the FCC Rules. Operation is subject to the following two conditions: (1) this device may not cause harmful interference, and (2) this device must accept any interference received, including interference that may cause undesired operation.
Changes or modifications not expressly approved by the party responsible for compliance could void the user's authority to operate the equipment.
NOTE: This equipment has been tested and found to comply with the limits for a Class B digital device, pursuant to Part 15 of the FCC Rules. These limits are designed to provide reasonable protection against harmful interference in a residential installation. This equipment generates, uses and can radiate radio frequency energy and, if not installed and used in accordance with the instructions, may cause harmful interference to radio communications. However, there is no guarantee that interference will not occur in a particular installation. If this equipment does cause harmful interference to radio or television reception, which can be determined by turning the equipment off and on, the user is encouraged to try to correct the interference by one or more of the following measures:
- Reorient or relocate the receiving antenna.
- Increase the separation between the equipment and receiver.
- Connect the equipment into an outlet on a circuit different from that to which the receiver is connected.
- Consult the dealer or an experienced radio/TV technician for help.
Important Safety Information
- Read these instructions.
- Keep these instructions.
-
Heed all warnings.
-
Follow all instructions.
-
Do not use this apparatus near water.
-
Clean only with dry cloth.
-
Do not block any ventilation openings. Install in accordance with the manufacturer's instructions.
-
Do not install near any heat sources such as radiators, heat registers, stoves, or other apparatus (including amplifiers) that produce heat.
-
Do not defeat the safety purpose of the polarized or grounding type plug. A polarized plug has two blades with one wider than the other. A grounding type plug has two blades and a third grounding prong. The wide blade or the third prong are provided for your safety. If the provided plug does not fit into your outlet, consult an electrician for replacement of the obsolete outlet.
-
Protect the power cord from being walked on or pinched particularly at the plugs, convenience receptacles, and at the point where they exit from the apparatus.
-
Only use attachments/accessories specified by the manufacturer.
-
Use only with the cart, stand, tripod, bracket, or table specified by the manufacturer, or sold with the apparatus. When a cart is used, use caution when moving the cart/apparatus combination to avoid injury from tip-over.

-
Unplug the apparatus during lightening storms or when unused for long periods of time.
-
Refer all servicing to qualified personnel. Service is required when the apparatus has been damaged in any way, such as power supply cord or plug is damaged, liquid has been spilled or objects have fallen into the apparatus has been exposed to rain or moisture, does not operate normally, or has been dropped.
-
This appliance shall not be exposed to dripping or splashing water and that no object filled with liquid such as vases shall be placed on the apparatus.
-
Caution-to prevent electrical shock, match wide blade plug wide slot fully insert.
-
Please keep a good ventilation environment around the entire unit.
-
No naked flame sources, such as lighted candles, should be placed on the apparatus.
-
Do not install this equipment in a confined or building-in space such as a book case or similar unit, and remain a well ventilation conditions at open site. The ventilation should not be impeded by covering the ventilation openings with items such as newspaper, table-cloths, curtains etc.
-
This apparatus is for professional use only.
-
The apparatus is intended to be used in moderate climates.
-
WARNING: For the terminals marked with symbol of “↓” may be of sufficient magnitude to constitute a risk of electric shock. The external wiring connected to the terminals requires installation by an instructed person or the used of ready-made leads or cords.
-
Class 2 wiring: To reduce the risk of electric shock, The external wiring connected to the terminals marked with “class 2 wiring” requires installed with class 2 wiring by an instructed person or the used of ready-made leads or cords.
Introduction
Congratulations on the purchase of your new Hartke TX300 Bass Amplifier! We know you don't like reading owner's manuals, but we suggest you take some time to go through these pages to fully understand how we've implemented a number of unique features.
The TX300 is a lightweight, 300-watt Class D bass amplifier that offers the legendary Hartke preamp circuitry in a highly portable design. To sculpt your sound, the TX300 features three-band EQ, with Hartke's Shape circuit. The Drive control can add a little warmth to blazing distortion, and to round out the dynamics, there is a fast and articulate variable Compressor.
With an aluminum chassis, the TX300 is rugged yet lightweight, making it the perfect amplifier for taking on the road. To connect your amplifier to speaker cabinets, the TX300 has both 1/4" and twist-and-lock output jacks. The TX300 also provides connections for signal routing features, including a Direct Output as well as Preamp Out and Power Amp In. You'll find the TX300 the ideal choice for every performance situation—from the studio to the stage.
In these pages, you'll find descriptions of the many features of the TX300 bass amplifier as well as instructions for setting up and using the amplifier. You'll also find a registration card enclosed—please don't forget to follow the instructions so that you can receive online technical support and so we can send you updated information about these and other Hartke products in the future. Also, be sure to check out our website, hartke.com, for complete information about our full product line.
We recommend you keep the following records for reference, as well as a copy of your sales receipt.
Serial number: ____
Date of purchase: ____
With proper care and maintenance, your TX300 will operate trouble-free for many years. Should your TX300 ever require servicing, a Return Authorization (RA) number must be obtained before shipping your unit to Hartke. Without this number, the unit will not be accepted. Please call Samson at 1-800-372-6766 for an RA number prior to shipping your unit. Please retain the original packing materials and, if possible, return the unit in its original carton. If your Hartke TX300 was purchased outside of the United States, contact your local distributor for warranty details and service information.
Features
• 300 watts at 4Ω
• Lightweight aluminum construction weighing only 5lb
- 3-band active equalizer offers a broad range of tonal colors for your instrument.
- Shape control sweeps a preset EQ curve through a wide frequency range.
- 1/4" plus twist-and-lock Output connectors for connecting speaker cabinets
- Variable compressor adds punch to your bass sound, and allows you to smooth out volume differences between notes
- Preamp out and Power Amp In to connect to professional outboard effects processors
- Electronically balanced direct output for routing signal to professional mixing consoles
- Rugged construction makes the TX300 exceedingly road-worthy
Front Panel Callouts
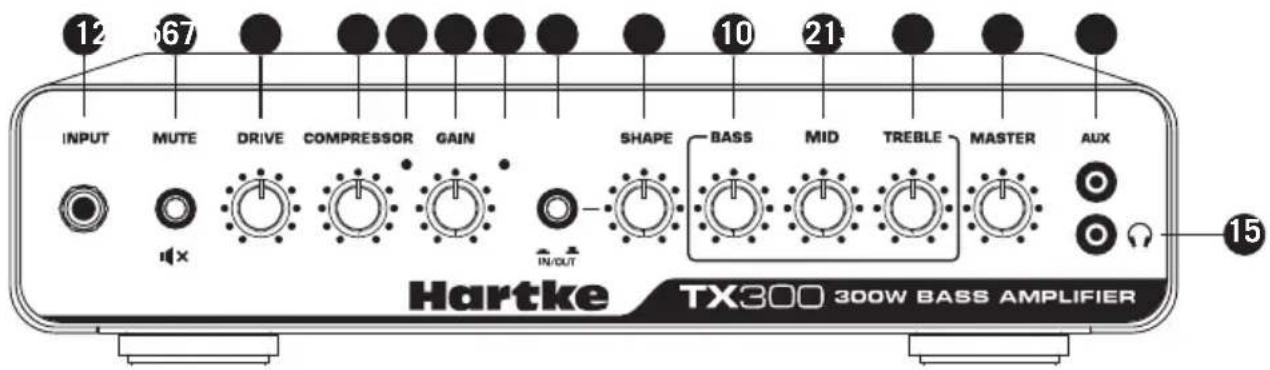
- INPUT - Connect your bass guitar here using a standard 1/4" instrument cable.
- MUTE Switch - This switch lights orange when the TX300 is powered on. When engaged, the switch lights red and mutes all of the outputs.
- DRIVE - This control knob adjusts the amount of overdrive applied to the input signal.
- COMPRESSOR Knob - This knob determines the amount of compression by adjusting the threshold level. The compressor allows you to control the overall dynamic range of your performance by reducing sudden peaks, and increasing the sustain of the instrument. At the fully counterclockwise position, no compression is applied. As the knob is turned clockwise an increasing amount of compression is applied.
- Compression Indicator - Provides a visual indicator of the status of the compression circuitry. This yellow LED lights when the input signal crosses the threshold level and activates the compressor circuit.
- GAIN Knob - This control adjusts the amount of level provided to the preamp stage.
- Peak Indicator - This red light illuminates when clipping occurs in the preamp signal path. If you notice that the Peak light is continuously lighting, turn the GAIN control down.
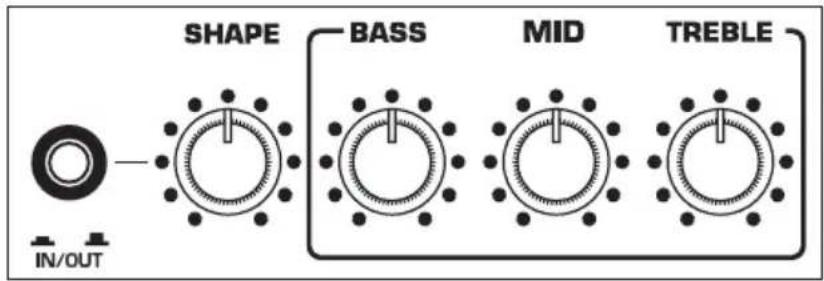
- SHAPE switch - When pressed it activates a special equalization curve that is designed to enhance the sound of your bass instrument.
- SHAPE Control - When the SHAPE switch is pressed in, this control is active. It applies a filter to the specified frequency area so that you can customize the effect of the Shape curve to best complement your particular bass instrument. Moving the Shape control clockwise causes the notch filter to be applied to higher frequencies while moving it counterclockwise causes it to be applied to lower frequencies.
- BASS Control - This control is used to adjust the low frequency shelf EQ.
- MID Control - This control is used to adjust the mid frequency peak EQ.
- TREBLE Control - This control is used to adjust the high frequency shelf EQ.
- MASTER Knob - This is the overall volume control for the amplifier.
- AUX Input - Use this 1/8" (3.5mm) input to connect a line level device like a portable CD or MP3 player.
- Headphones jack - Connect headphones to this stereo 1/8" (3.5mm) jack. When a plug is inserted into the headphone jack, the speaker output is disconnected, allowing you to use your TX300 as a practice amplifier.
Rear Panel Callouts

- PREAMP OUT Jack - This output jack is fed from the preamp, and may be used with an external power amplifier, to connect to a mixing console, or to an effects processor. Use a standard 1/4" instrument cable when connecting to external devices.
- POWER AMP IN Jack - This line level input, low impedance jack connects directly to the internal power amp, and can be used with external preamps. Use a standard 1/4" instrument cable when connecting devices to this input. The internal signal path is interrupted when a cable is connected to the POWER AMP IN jack.
- DIRECT OUT GROUND LIFT Switch - When pressed in (the "LIFT" position), pin 1 is removed from the chassis. This should be used only when a ground loop hum or buzz is heard. Otherwise, leave it in the out ("GROUND") position.
- DIRECT OUT Jack - Use this electronically balanced XLR jack to route signal from the TX300 to a professional mixing console, as a tap to a main PA system via a mic input on the console, or to an external amplifier. The DIRECT OUT signal is pre EQ, meaning that the signal is taken right after the input and is unaffected by the onboard EQ.
- SPEAKER OUTPUT - Use these outputs to connect speakers to the amplifier output. The amplifier provides both 1/4" and twist-and-lock output connectors, wired in parallel. It is recommended to use the twist-and-lock jack whenever possible. The total impedance of the speakers connected to all of the jacks must not be less than 4Ω.
- Fan - The variable speed fan provides vital cooling to the amplifier. Make sure that it is kept free of all obstructions and that cool, fresh air is accessible at all times.
- AC input V- Connect the supplied standard 3-pin "IEC" plug here.
- AC Voltage selection switch - This switch is used to set the operation voltage. Be sure to check that the switch is set correctly for your country.
- Fuse sled - This contains a fuse holder for the amplifier. Make sure the voltage rating is correctly set before powering up the amplifier.
- POWER Switch - Use this to power the TX300 on or off. The switch lights whenever the amplifier is powered on.
Quick Start
Setting up your Hartke TX300 Amplifier is a simple procedure, which takes only a few minutes.
- Remove all packing materials (save them in case your unit requires servicing in the future) and decide where the amplifier is to be physically placed. To avoid potential overheating, be sure that the rear panel fan is unobstructed and that there is proper ventilation around the entire unit.
- Begin by hooking up your bass cabinet(s) to the twist-and-lock or 1/4" speaker output connectors on the rear panel. Any appropriately rated bass cabinets with a total minimum impedance of 4Ω (that is, 4Ω or greater) can be used. In order to ensure correct phase correlation when using the 1/4" outputs, the tip of the amplifier's speaker jack should be connected to the "+" (hot) input of your loudspeaker, and the sleeve of the amplifier's speaker jack should be connected to the "-" (ground) input of your loudspeaker. When using the twist-and-lock outputs, the +1 output should be connected to the "+" (hot) input of your loudspeaker, and the -1 output should be connected to the "-" (ground) input of your loudspeaker.
- Next, connect the 3-pin AC plug into any grounded AC socket. Don't turn the amplifier on just yet.
- Use a standard shielded instrument cable to connect your bass to the TX300 INPUT jack on the front panel. On the front panel of the, set the MASTER control to the 12 o'clock position and set the GAIN knob to the fully counterclockwise "O" position. Set the COMPRESSOR knob counterclockwise until it is in the "O" position, and set the EQ knobs to the 12 o'clock position.
- Press the Power switch on the rear panel to turn on the amplifier.
- Set the output of your bass to its maximum level. Then, while playing, slowly turn the TX300 GAIN knob control up until the desired level is reached. If you hear distortion, even at a low master MASTER setting, lower the GAIN control or back off the output of your bass. If the problem persists, check for a faulty cable.
- When you have settled on a GAIN and MASTER volume, the next step is to adjust the tonal characteristics of your sound. Set the Drive control and three band EQ controls to taste. When you get an equalization setting that complements your instrument and playing style, it's a good idea to write it down for future use.
- Now try out the compression circuit. As you rotate the COMPRESSOR knob, the input signal from your bass becomes more compressed. You'll hear peak signals (such as string slaps and pulls) begin to sound increasingly "squashed" relative to the lower-level signals produced by standard playing. The result will be a decreased dynamic range, but an overall leveling of signal throughout the full range of your instrument.
- If you're using an external signal processor, turn the amplifier off momentarily and connect a standard audio cable from the PREAMP OUT jack to your effects processor input, and a second standard audio cable between the POWER AMP IN jack and your effects processor output. Then turn the amp back on and play your bass while adjusting the controls of your outboard effects processor. For best results, set both the input and output gain of all connected effects processor(s) to 0 dB (unity gain), so that there is no increase or decrease in level whether the effects are switched in or out.
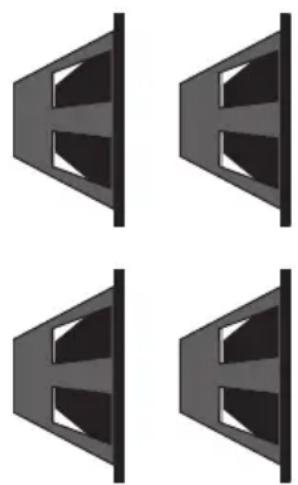
Choosing the Correct Speaker Cabinets
When choosing a speaker cabinet to use with your Hartke TX300, there are many specifications to consider (impedance, power handling, frequency response, etc). While most specs are pretty straight forward, there is often questions about impedance. Basically, impedance is the amount of current that will flow through a speaker at a certain voltage. It is measured in Ohms ( ). The actual impedance of a speaker is not constant across all frequencies. So, for convenience we use the term “nominal impedance”, which refers to the impedance that a speaker presents to an amplifier at a reference frequency.
A typical speaker has an impedance rating of 4Ω, 8Ω, or 16Ω. Generally, the lower the impedance of a speaker, the more power will be developed by a given amplifier. For example, a 4Ω speaker will extract more power from your amplifier than an 8 ohm speaker. If you connect a speaker with an impedance lower than the rating of the amplifier's output, the amplifier can overheat and damage the power output section. It is important to learn how to connect multiple speaker cabinets safely without damaging the speakers or the amplifier in this way.
Typically, amplifier speaker output jacks and speaker cabinet input jacks are parallel connections, and will follow the rules described in this section. When speakers are connected in parallel, the impedance is reduced. The formula to calculate the total impedance of your speaker system is:
$$ 1 / R _ {t} = 1 / R _ {1} + 1 / R _ {2} + 1 / R _ {3} + \dots 1 / R _ {n}. $$
Where "R" is the impedance of a speaker cabinet.
If all speakers have the same impedance, the total impedance will be equal to the impedance of a single speaker divided by the total number of speakers. For example, if you have two 4 speakers connected in parallel, the total impedance is 4 divided by 2, or 2 . You must be careful when connecting speakers in parallel to an amplifier. The impedance can quickly fall below safe levels. This is especially true when connecting speakers in parallel to a bridged amplifier.
The amplifier can deliver 300 watts of power to a minimum 4Ω speaker load. When choosing speakers, make sure that they can match or exceed the output power of the amplifier, or you can damage the speakers.
Typical Impedance Calculations
$$ 1 6 \Omega + 1 6 \Omega = 8 \Omega $$
$$ 8 \Omega + 1 6 \Omega = 5. 3 \Omega $$
$$ 8 \Omega + 8 \Omega = 4 \Omega $$
$$ 8 \Omega + 1 6 \Omega + 1 6 \Omega = 4 \Omega $$
$$ 1 6 \Omega + 1 6 \Omega + 1 6 \Omega + 1 6 \Omega = 4 \Omega $$
$$ 4 \Omega + 8 \Omega = 2. 7 \Omega $$
$$ 4 \Omega + 4 \Omega = 2 \Omega $$
About Compression
The dynamic range of a sound is the difference between its loudest and softest levels. For example, as you play your bass, you'll probably find that some notes (such as notes played on the upper frets of the lowest string) are considerably louder than others. The function of the compression circuitry in the TX300 amplifier is to reduce overall dynamic range by automatically reducing the level of the loudest sounds you play so that they are closer in level to softer ones. The end result is a smooth, even sound.
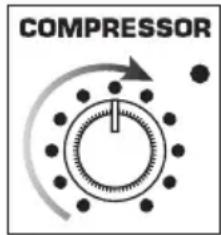
The front-panel COMPRESSOR control determines the amount of compression (peak signal reduction) by adjusting the threshold. Threshold is the limit above which compression is applied. As you turn the COMPRESSOR control clockwise, the threshold level is lowered. The compression ratio is set to around 1.6:1, which means that any input signal 1.6dB over the threshold level will be decreased 1dB.
The TX300 compression circuit follows the incoming signal, and will adjust the compression ratio down when you play notes with fast attack to avoid “squashing” your sound. This is useful when playing fast staccato passages, as it will cause all the notes to sound at the same level, even if the signal is above the threshold level.
The TX300 provides front-panel compression lights that visually indicate when the audio signal crosses the threshold level and activates the compressor circuit. When orange, no compression is being applied. When the indicator light yellows, compression is being applied to the incoming signal.
Compression has three main uses. First, as described above, it “evens” out the notes played by your bass so that they all are at virtually equal levels. Second, it adds “punch” to a sound. Since all levels are nearly the same, you can play with greater force without worrying about the loudest notes distorting. Finally, it serves to protect your loudspeakers from damage as a result of brief (transient) high output levels, which might otherwise be caused by slapping, finger-popping or other performance techniques.
Whether or not you need to use compression with your TX300 will be a matter of personal taste and playing style. Experiment and see if you like the effect. If you usually play at low volume levels, you'll find that even with the COMPRESSOR knob turned up, the compression circuitry may have no audible effect. In general, if you don't need compression, leave it off.
About Equalization
The Hartke TX300 Bass Amplifier gives you control over shaping the sound of your bass, using a process called equalization. To understand how this works, it's important to know that every naturally occurring sound consists of a broad range of pitches, or frequencies, combined together in a unique way. This blend is what gives every sound its distinctive tonal color. The TX300 EQ controls allow you to alter a sound by boosting or attenuating specific frequency areas - they operate much like the bass and treble controls on stereo, but with much greater precision.
The TX300 offers three bands of equalization. Each EQ knob, labeled Bass, Midrange, and Treble, affects a different frequency area of the audio. We carefully selected these frequency areas because they have maximum impact on bass guitar signals. The Bass and Treble controls are shelving EQs, which provide boost when the control is moved clockwise from the center or cut when the control is moved counterclockwise from the center. The Mid EQ control is a peaking EQ. As the Mid control is turned clockwise the frequency area is boosted; as it is turned counterclockwise the frequency area is attenuated.
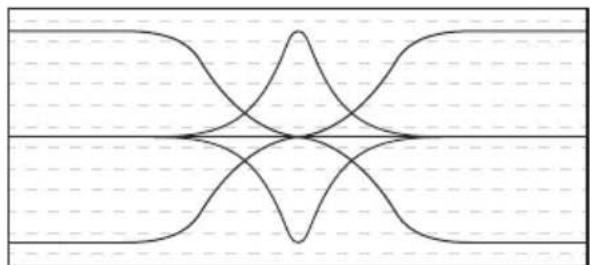
natural_image
Symmetrical abstract line pattern with intersecting curves and dashed horizontal lines (no text or symbols)BassTrebleMidrange
In many instances, the best way to deal with equalization is to think in terms of which frequency areas you need to attenuate, as opposed to which ones you need to boost. Be aware that boosting a frequency area also has the effect of boosting the overall signal; specifically, too much Low EQ boost can actually cause overload distortion or even harm the connected speaker.
The TX300 also includes a Shape control, which enables the sound of your bass instrument to be enhanced at the touch of a button. When the front panel Shape switch is pressed in, a special equalization curve is activated that is designed to enhance the sound of most electric bass instruments. This curve provides moderate boost at certain frequency areas and deep attenuation at other frequency areas. Furthermore, the Shape control adds a filter to a selected frequency area within the Shape curve. As the Shape knob is turned clockwise, the filter is applied to higher frequency areas; as it is turned counterclockwise, the filter is applied to lower frequency areas.
Even when Shape is activated, the front-panel EQ controls remain operational. When all three EQ controls are set to their "O" (flat) position, they add no boost or attenuation to the preset Shape curve. However, when any EQ controls are turned left or right of their 12 o'clock ("O") position, their boost or attenuation effect is layered upon the preset Shape curve. In this way, you can customize the sound of the TX300 amplifier further still to complement your particular bass instrument and playing style.
Note that, when the Shape switch is out, the EQ controls operate on the “flat” signal coming from your bass (that is, there is no preset equalization curve imposed).
Specifications
Rated Output Power 300 watts @ 4 ohms
200 watts @ 8 ohms
Input >1MΩ unbalanced
Compressor Ratio Fixed 1.6:1
Compressor Threshold Off to -30dBu to Input
Mute >80dB (100dB typical) at Direct Output & Speaker Output
EQ
Bass Shelf +/-16dB @ 30Hz (+/-12dB @ 70Hz)
Mid Peak +/-16dB @ 700Hz
Treble Shelf +/-16dB @ 6.5kHz (+/-12dB @ 3kHz)
Shape Range 185Hz - 860Hz (-20dB @ Fo)
Preamp Output 100Ω unbalanced
Power Amp In 20kΩ balanced, 0dBu for Rated Output Power
Direct Output 125Ω balanced
Stereo Aux Input 3kΩ unbalanced, -10dBV
Phones 80mW max @ 32Ω
Dimensions 6.25" x 14.25" x 10.75" (161mm x 365mm x 273mm)
Weight 5 lb (2.3kg)
At Hartke, we are continually improving our products, therefore specifications and images are subject to change without notice.
natural_image
Symmetrical abstract line pattern with intersecting curves and dashed horizontal lines (no text or symbols)BassTrebleMidrange
natural_image
Symmetrical abstract line pattern with intersecting curves and dashed horizontal lines (no text or symbols)natural_image
Symmetrical abstract line pattern with intersecting curves and dashed grid lines (no text or symbols)natural_image
Four identical abstract geometric shapes with internal cutouts, arranged in a 2x2 grid (no text or symbols)natural_image
Symmetrical abstract line pattern with intersecting curves and dashed horizontal lines (no text or symbols)Bassi AltiMidrange
If you want to dispose this product, do not mix it with general household waste. There is a separate collection system for used electronic products in accordance with legislation that requires proper treatment, recovery and recycling.

Private household in the 28 member states of the EU, in Switzerland and Norway may return their used electronic products free of charge to designated collection facilities or to a retailer (if you
purchase a similar new one).
For Countries not mentioned above, please contact your local authorities for a correct method of disposal.
By doing so you will ensure that your disposed product undergoes the necessary treatment, recovery and recycling and thus prevent potential negative effects on the environment and human health.


Brand : Hartke
Model : TX300
Category : Receiver