
AP 4800 - Vacuum Cleaner Orbegozo - Free user manual and instructions
Find the device manual for free AP 4800 Orbegozo in PDF.



| Brand | Orbegozo |
| Model | AP 4800 |
| Product type | Bagless canister vacuum cleaner |
| Usage | Household only |
| Power supply | 230 V ~ 50 Hz |
| Dimensions (approx.) | 30 × 25 × 25 cm |
| Weight (approx.) | 4 kg |
| Brush | Dual position for carpets and hard floors |
| Tank capacity | Approx. 1.5 L |
| Filter | Washable with lukewarm water |
| Assembly | Snap-together tubes and brush |
| Maintenance | Clean the filter regularly with lukewarm water without soap, dry before reassembling |
| Safety | Do not vacuum liquids, hot ashes, or sharp objects. Unplug before cleaning |
| Warranty | Legal 2-year warranty |
| Compliance | Directives 2014/35/EU and 2014/30/EU |
| Recycling | Do not dispose of with household waste - separate WEEE collection |
| Included accessories | Tube 1, tube 2, brush, filter |
Frequently Asked Questions - AP 4800 Orbegozo
User questions about AP 4800 Orbegozo
0 question about this device. Answer the ones you know or ask your own.
Ask a new question about this device
Download the instructions for your Vacuum Cleaner in PDF format for free! Find your manual AP 4800 - Orbegozo and take your electronic device back in hand. On this page are published all the documents necessary for the use of your device. AP 4800 by Orbegozo.
USER MANUAL AP 4800 Orbegozo
natural_image
Blue and black handheld vacuum cleaner against white background (no text or symbols visible)AP 4800
Sonifer, S.A.
Read this manual carefully before running this appliance and save it for reference in order to obtain the best results and ensure safe use.
natural_image
Line drawing of a handheld device with an arrow indicating assembly or operation (no text or symbols present)natural_image
Technical line drawing of a mechanical component with two views, one showing a shaft and end caps, the other showing a flanged shaft (no text or symbols)natural_image
Technical line drawing of a mechanical component with an arrow indicating assembly direction (no text or symbols)INSTRUCCIONES DE USO
natural_image
Diagram of a hand using a tool to press or install a component on a grid-patterned surface (no text or symbols)natural_image
Diagram of a person using a tool to lift a tiled floor, showing mechanical components and texture (no text or symbols)LIMPIEZA Y MANTENIMIENTO
natural_image
Technical line drawing of a mechanical device with cross-sectional and top views (no text or symbols)Limpiar el filtro
natural_image
Technical line drawing of a mechanical component with cross-sectional views (no text or symbols)General Safety Instructions
Read the operating instructions carefully before putting the appliance into operation and keep the instructions including the warranty, the receipt and, if possible, the box with the internal packing.
- This appliance can be used by children aged from 8 years and above and persons with reduced physical, sensory or mental capabilities or lack of experience and knowledge if they have been given supervision or instruction concerning use of the appliance in a safe way and understand the hazards involved. Children must never play with the appliance. Cleaning and user maintenance must never be carried out by children without supervision.
- Children should be supervised to ensure that they do not play with the appliance.
- Keep the appliance and the cable cord out of the reach of children less than 8 years old.
- WARNING: In order to ensure your children's safety, please keep all packaging (plastic bags, boxes, polystyrene etc.) out of their reach.
- If the supply cord is damaged it must be repaired by the Authorized Service Agent to avoid a hazard.
- Never pull on the cord when unplugging.
-
Do not use the unit with a damaged cord or plug, or if it is not working properly.
-
Do not handle the appliance with wet hands.
- Never immerse the appliance in water or any other liquid.
- Make sure the appliance has been unplugged before cleaning.
- This appliance must be installed following the national regulations for electrical installations.
- This appliance is for household use only.
- In case that you need a copy of the instruction manual, you can find it in www.orbegozo.com
- WARNING: In case of misuse, there is a risk of possible injury.
Information for this unit
• Vacuum only dust and small crumbs. Do not vacuum sharp objects, liquids or hot ashes.
- This appliance is only intended for household use and for this end has been manufactured.
- The appliance is to be used with the power supply unit supplied with the unit.
Do not remove the plug by pulling on the cord or the appliance itself.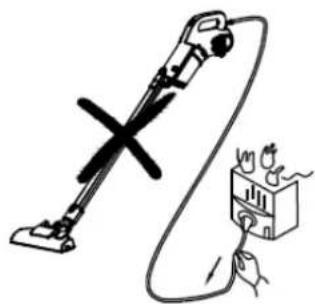 | Do not operate the appliance on the power cord.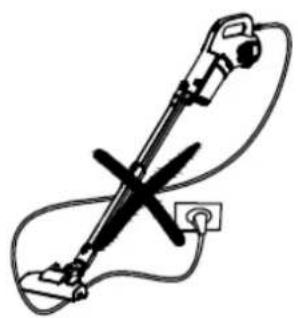 | Do not obstruct the air intake or exhaust vent.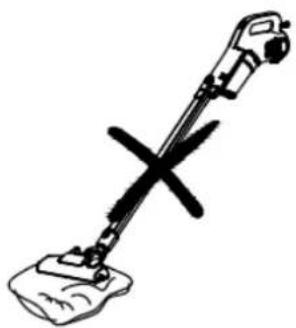 |
Do not use the appliance on wet surfaces.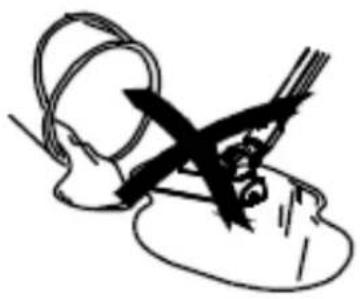 | Do not use the appliance to vacuum up lighted matches, cigarette butts or hot ashes.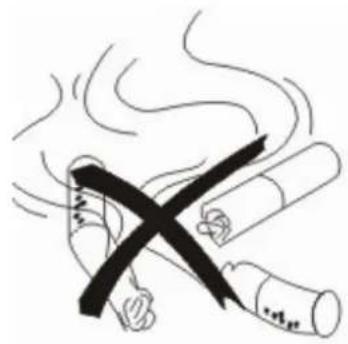 | Do not use the appliance to suck up needles, pins or string.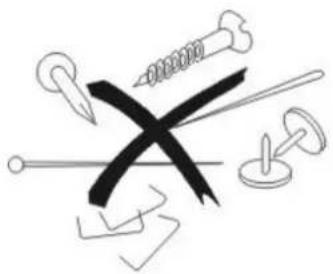 |
VACUUM ASSEMBLY
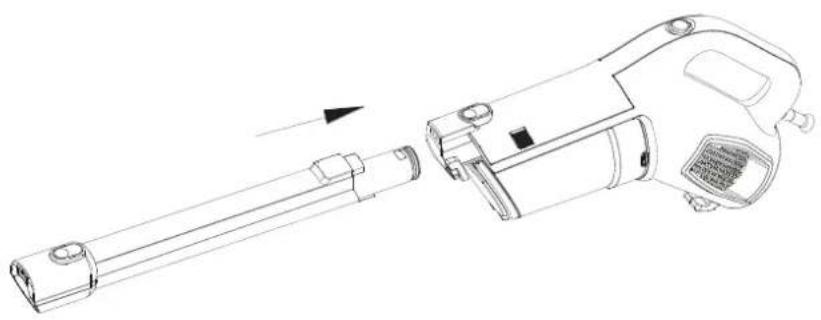
- Insert tube 1 into the body.
natural_image
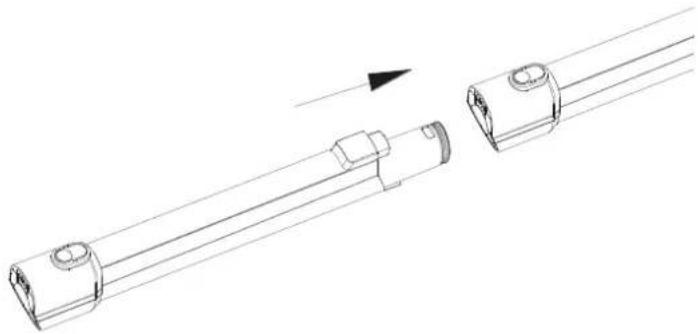
Line drawing of a handheld device with an arrow indicating assembly or operation (no text or symbols present)- Insert tube 2 into tube 1.
natural_image
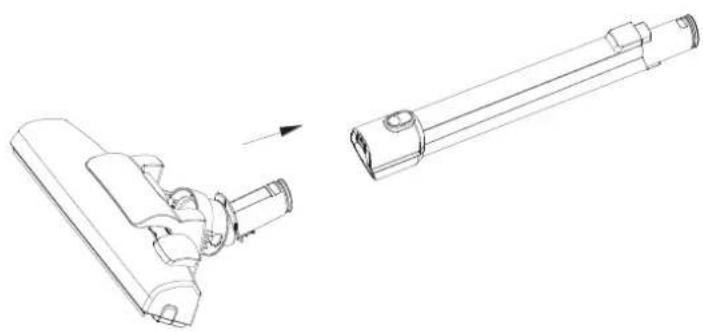
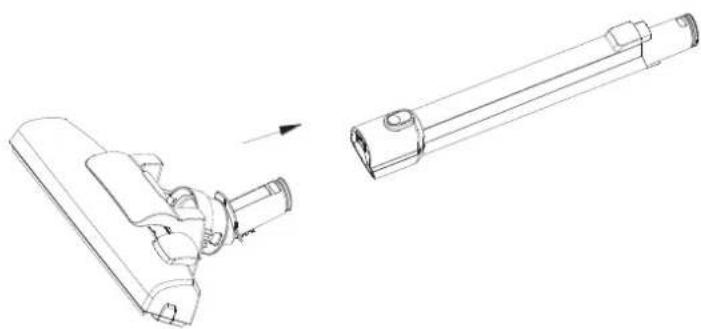
Technical line drawing of a mechanical component with two cylindrical parts and a separate section showing internal features (no text or symbols)- Insert the brush into tube 2.
natural_image
Technical line drawing of a mechanical component with an arrow indicating assembly direction (no text or symbols)INSTRUCTIONS FOR USE
- Insert the plug into a 230v outlet, then press the switch, the vacuum cleaner will start to work.
- To turn off the vacuum cleaner press the switch again, remove the plug from the outlet.
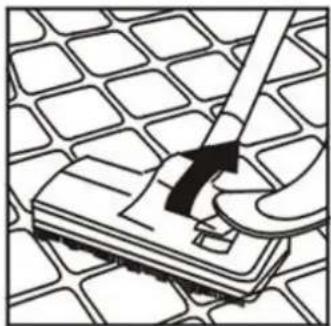
Position 1: extended bristles for hard floors
natural_image
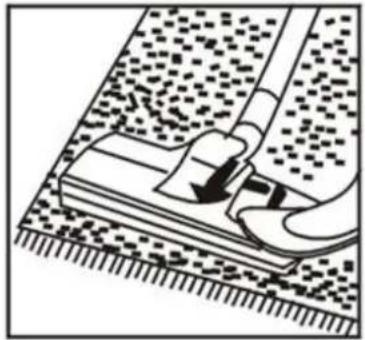
Illustration of a hand using a tool to clean or repair a grid-patterned surface (no text or symbols)Position 2: bristles retracted for carpets
natural_image
Illustration of a person using a foot push tool on a tiled floor (no text or symbols)CLEANING AND MAINTENANCE
Remove the dust from the container
- Remove the tank from the body of the vacuum cleaner by pressing the button located on the side of the tube.
- The fastest way is to slide the tab on the bottom of the container and drop the contents inside into the garbage can
- Another way would be to remove the filter from the tank for a more thorough cleaning.
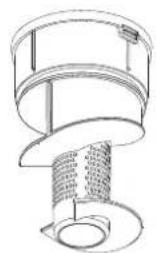
natural_image
Technical line drawing of a mechanical component with threaded base and flange (no text or symbols)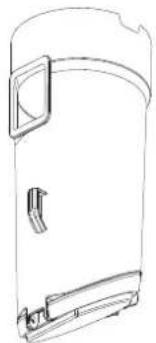
natural_image
Line drawing of a cylindrical container with internal compartments and mounting feet (no text or symbols)Clean the filter
- Remove the filter when it is dirty
- Clean it with warm water.
Air dry before next use.
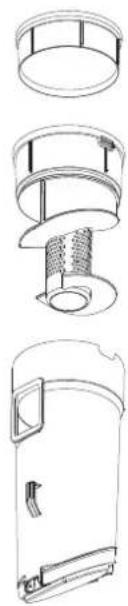
natural_image
Technical line drawing of a mechanical device showing cross-sectional views (no text or symbols)Cleaning before storage
- Disconnect the plug from the outlet before cleaning!
- Clean the device with a dry cloth.
- Take out the filter and clean it with warm water without any kind of soap and put it back when it is completely dry.
- If you do not want to use this appliance for a period of time, please store it in a dry and well-ventilated place. Keep out of children reach.
DISPOSAL OF OLD ELECTRICAL APPLIANCES

The European directive 2012/19/EU on Waste Electrical and Electronic Equipment (WEEE), requires that old household electrical appliances must not be disposed of in the normal unsorted municipal waste stream. Old appliances must be collected separately in order to optimize the recovery and recycling of the materials they contain, and reduce the impact on human health and the environment. The crossed out "wheeled bin" symbol on the product reminds you of your obligation, that when you dispose of the appliance, it must be
separately collected. Consumers should contact their local authority or retailer for information concerning the correct disposal of their old appliance.
DECLARATION OF CONFORMITY:
This device complies with the requirements of the Low Voltage Directive 2014/35/EU and the requirements of the EMC directive 2014/30/EU.
GUARANTEE
This appliance is covered and is entitled to the legal guarantee in accordance with the legislation in force from the date of purchase. Keep the purchase receipt to be able to claim your right to the guarantee. To find the closest service to your location, contact through the following web link: https://orbegozo.com/asistencia-tecnica/
For any type of query, doubt or incident, you can contact us through our email shown on the main page of this manual or through our technical assistance service at https://orbegozo.com/contacto/
Orbegozo is not responsible for components and accessories that are subject to wear and tear due to use, as well as perishable compounds or those that have deteriorated due to improper use. Nor will it be held responsible if the owner has technically modified the device. Check the legal conditions on our website.
FRANÇAIS
natural_image
Line drawing of a handheld device with an arrow indicating assembly or operation (no text or symbols present)natural_image
Technical line drawing of a mechanical component with two views, one showing a shaft and the other a flanged end (no text or symbols)natural_image
Technical line drawing of a mechanical component with an arrow indicating assembly direction (no text or symbols)MODE D'EMPLOI
natural_image
Diagram of a hand using a tool to press or install a component on a grid-patterned surface (no text or symbols)natural_image
Illustration of a person using a tool to clean or slide on a tiled floor (no text or symbols visible)NETTOYAGE ET ENTRETIEN
natural_image
Technical line drawings of a mechanical device with internal components and mounting brackets (no text or symbols)Nettoyer le filtre
natural_image
Technical line drawings of a mechanical device showing cross-sectional views (no text or symbols)natural_image
Line drawing of a handheld electric shaver with an arrow indicating assembly (no text or symbols)- Insira o tubo 2 no tubo 1.
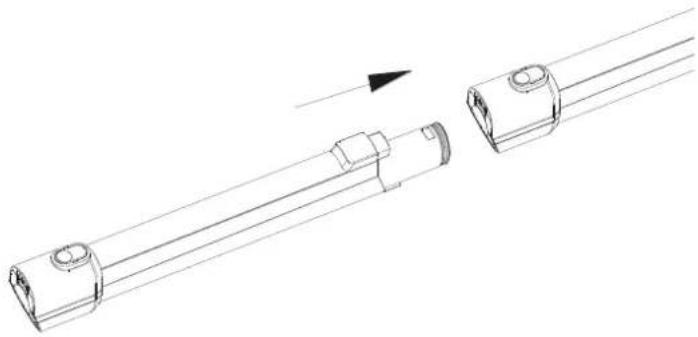
natural_image
Technical line drawing of a mechanical component with two cylindrical parts and an arrow indicating direction (no text or symbols)- Insira a escova no tubo 2.
natural_image
Technical line drawing of a mechanical component with an arrow indicating assembly (no text or symbols present)INSTRUÇÕES DE USO
natural_image
Illustration of a hand using a tool to clean or repair a grid-patterned surface (no text or symbols)natural_image
Illustration of a person using a tool to clean or slide on a tiled floor (no text or symbols visible)natural_image
Technical line drawing of a mechanical component with cross-sectional and top views (no text or symbols)Limpe o filtro
natural_image
Technical line drawing of a mechanical device with multiple views (top, front, side, and top) showing internal components like a cylindrical housing and a meshed component (no text or symbols)


- INSTRUCCIONES DE USO
- LIMPIEZA Y MANTENIMIENTO
- Limpiar el filtro
- General Safety Instructions
- Information for this unit
- VACUUM ASSEMBLY
- INSTRUCTIONS FOR USE
- CLEANING AND MAINTENANCE
- Clean the filter
- Cleaning before storage
- DISPOSAL OF OLD ELECTRICAL APPLIANCES
- DECLARATION OF CONFORMITY:
- GUARANTEE
- FRANÇAIS
- MODE D'EMPLOI
- NETTOYAGE ET ENTRETIEN
- Nettoyer le filtre
- INSTRUÇÕES DE USO
- Limpe o filtro
Brand : Orbegozo
Model : AP 4800
Category : Vacuum Cleaner