
Camedia C1 Zoom - Camera OLYMPUS - Free user manual and instructions
Find the device manual for free Camedia C1 Zoom OLYMPUS in PDF.

| Product type | Compact digital camera |
| Brand | Olympus |
| Model | Camedia C1 Zoom (D-150 Zoom) |
| Sensor | CCD 1/3.2", 1.31 MP (gross) |
| Max resolution | 1280 x 960 pixels (SHQ/HQ) |
| Lens | 5-15 mm (equiv. 38-114 mm in 35 mm), f/2.4-4.3 |
| Optical zoom | 3x |
| Digital zoom | 2x (up to 6x combined) |
| Focus | TTL autofocus by contrast detection |
| Light metering | Digital ESP via sensor |
| Shutter speed | 1/2 to 1/1000 s |
| Aperture | f/2.4 / f/5 (W), f/4.3 / f/9 (T) |
| Sensitivity | Automatic (not specified) |
| Viewfinder | Real-image optical + 1.5" TFT LCD (118,000 px) |
| Built-in flash | Automatic, red-eye reduction, fill-in, night scene, off |
| Flash range | 0.2 m to 3.5 m (wide-angle) |
| Shooting mode | Single, burst (2 fps, max 4), self-timer (12 s), close-up |
| White balance | Auto, sunny, cloudy, incandescent, fluorescent |
| Memory support | SmartMedia card (3V/3.3V) 4 to 128 MB |
| Image formats | JPEG (DCF), DPOF compatible |
| Connectivity | USB, video output (NTSC/PAL), DC input |
| Power supply | 1 lithium CR-V3 (LB-01) or 2 AA (alkaline, NiMH, NiCd) or optional AC adapter |
| Battery life | Variable by battery and usage |
| Dimensions | 112 x 62 x 35 mm (without protrusions) |
| Weight | 185 g (without batteries or card) |
Frequently Asked Questions - Camedia C1 Zoom OLYMPUS
User questions about Camedia C1 Zoom OLYMPUS
0 question about this device. Answer the ones you know or ask your own.
Ask a new question about this device
Download the instructions for your Camera in PDF format for free! Find your manual Camedia C1 Zoom - OLYMPUS and take your electronic device back in hand. On this page are published all the documents necessary for the use of your device. Camedia C1 Zoom by OLYMPUS.
USER MANUAL Camedia C1 Zoom OLYMPUS
San-Ei Building, 22-2, Nishi Shinjuku 1-chome, Shinjuku-ku, Tokyo, Japan
(Customer support) Tel. 0426-42-7499 Tokyo
OLYMPUS AMERICA INC.
Two Corporate Center Drive, Melville, NY 11747-3157, U.S.A. Tel. 631-844-5000
(Technical support) Tel. 1-888-553-4448 (Toll-free) (First 30 days after purchase)
Tel. 1-631-844-5520 (After 30 days)
(E-Mail) distec@olympus.com
OLYMPUS OPTICAL CO. (EUROPA) GMBH.
(Premises/Goods delivery) Wendenstraße 14-18, 20097 Hamburg, Germany Tel. 040-237730
(Letters) Postfach 10 49 08, 20034 Hamburg, Germany
For customers in Europe
(Hotline Numbers)
Tel. 01805-67 10 83 for Germany
Tel. 00800-67 10 83 00 for Austria, Belgium, Denmark, France, Netherlands,
Norway, Sweden, Switzerland, United Kingdom
Tel. +49 180 5-67 10 83 for Finland, Italy, Luxemburg, Portugal, Spain,
Czech Republic
Tel. +49 40-237 73 899 for Greece, Croatia, Hungary and the Rest of Europe
Our Hotline is available from 9 am to 6 pm (Monday to Friday)
(E-Mail) di.support@olympus-europa.com
© 2001 OLYMPUS CO., LTD.
VT277502Printed in Japan
OLYMPUS®
CAMEDIA
C-1 Zoom D-150 Zoom
DIGITAL CAMERA APPAREIL PHOTO NUMÉRIQUE DIGITAL-KAMERA CAMARA DIGITAL
BASIC MANUAL
MANUEL DE BASE
EINFACHE ANLEITUNG
MANUAL BÁSICO

natural_image
Line drawing of a Olympus digital camera with lens and screen (no text or symbols on body)ENGLISH (Pages 2 to 37)
Read the Following Before Use
This section provides important information about using this digital camera. Before using the camera, please be sure to read the following.
About this manual
●The information contained in this manual may be subject to change without notice. For the latest information on the product names, model numbers, etc., please consult authorized Olympus service center.
●The information contained in this manual has been compiled by taking all possible measures to ensure its accuracy. However, if you find any errors or incomplete information, please contact authorized Olympus service center.
- It is prohibited by copyright laws to duplicate in part or in whole the information contained in this manual, except for personal use. Reproduction without permission of the copyright owner is prohibited.
●Olympus will not assume any liability for damages, loss of profit or claim from a third party due to improper use of this product.
- Olympus will not assume any liability for damages and loss of profit due to loss of image data resulting from servicing by a third party who is not designated by Olympus or from other causes.
●The quality of the images shot with this product differs from that of the images shot with ordinary film-based cameras.
Radio and Television Interference
Change or modifications not expressly approved by the manufacturer may void the user's authority to operate this equipment. This equipment has been tested and found to comply with the limits for a Class B digital device, pursuant to Part 15 of the FCC Rules. These limits are designed to provide reasonable protection against harmful interference in a residential installation. This equipment generates, uses, and can radiate radio frequency energy and, if not installed and used in accordance with the instructions, may cause harmful interference to radio communications.
However, there is no guarantee that interference will not occur in a particular installation. If this equipment does cause harmful interference to radio or television reception, which can be determined by turning the equipment off and on, the user is encouraged to try to correct the interference by one or more of the following measures:
- Adjust or relocate the receiving antenna.
- Increase the distance between the camera and receiver.
- Connect the equipment to an outlet on a circuit different from that to which the receiver is connected.
Only the USB cable should be used to connect the camera to a personal computer (PC).
Declaration of Conformity
Model Number: D-150Zoom
Trade Name: OLYMPUS
Responsible Party: Olympus America Inc.
Address: 2 Corporate Center Drive, Melville, New York 11747-3157 USA
Telephone Number: 631-844-5000
Tested To Comply With FCC Standards
FOR HOME OR OFFICE USE
This device complies with Part 15 of the FCC rules. Operation is subject to the following two conditions:
(1) This device may not cause harmful interference, and
(2) This device must accept any interference received, including interference that may cause undesired operation.
This Class B digital apparatus meets all requirements of the Canadian Interference-Causing Equipment Regulations.

“CE” mark indicates that this product complies with the European requirements for safety, health, environment and customer protection.
Trademarks
● Microsoft products, such as Windows and Internet Explorer, are registered trademarks or trademarks of Microsoft Corporation in the United States of America and in other countries.
● Macintosh and Apple are registered trademarks of Apple Computers, Inc.
●Other brand names and product names mentioned in this manual are trademarks or registered trademarks of their respective owners.
■The DCF (Design rule for Camera File system) is a standard established by JEITA (Japan Electronics and Information Technology Association).
CONTENTS
Read the Following Before Use 2
| PREPARATION | |
| Names of Parts 5 | |
| Attaching the Provided Strap 7 | |
| Inserting the Memory Card (SmartMedia) 7 | |
| Loading the Battery 8 | |
| Setting the Date and Time 9 | |
| SHOOTING OPERATIONS | |
| Shooting Pictures 10 | |
| Shooting Using the Monitor 11 | |
| Deciding Whether to Use the Viewfinder or Monitor According to Working Distance | 11 |
| Checking the Camera Status Indication Next to the Viewfinder or on the Monitor (in Shooting Mode) | 12 |
| Selecting the Image Quality (Record Mode) | 15 |
| Using the Flash 16 | |
| Magnifying the Subject (Zooming) 17 | |
| Shooting a Close Subject (Macro Shooting) 19 | |
| Using the Self-Timer 20 | |
| Shooting Images Sequentially (Sequential Shooting) 21 | |
| Varying the Image Brightness (Exposure Compensation) | 22 |
| Varying the Image Color Tone (White Balance Control) | 23 |
| Muting the Beep Tones | 24 |
| VIEWING OR ERASING IMMEDIATELY AFTER SHOOTING | |
| Viewing Pictures | 25 |
| Image Playback Operations 26 | |
| Erasing Pictures (One-Frame Erase) | 28 |
| Erasing All Pictures (All-Frame Erase) | 29 |
| Viewing Multiple Images Automatically in Sequence (Slide Show) | 30 |
| Preventing Accidental Erasure (Protection) | 31 |
| Adjusting the Monitor Brightness | 32 |
| VIEWING OPTIONS | |
| If an Alarm Message Is Displayed | 33 |
| Making the Most of Your Digital Camera | 34 |
| Specifications | 36 |
PREPARATION
Names of Parts


text_image
Self-timer lamp (Indicates activation of the self-timer) Flash (Pops up automatically when you open the lens barrier. Push it down after you close the lens barrier) Viewfinder OLYMPUS Lens (Comes out automatically when you open the lens barrier)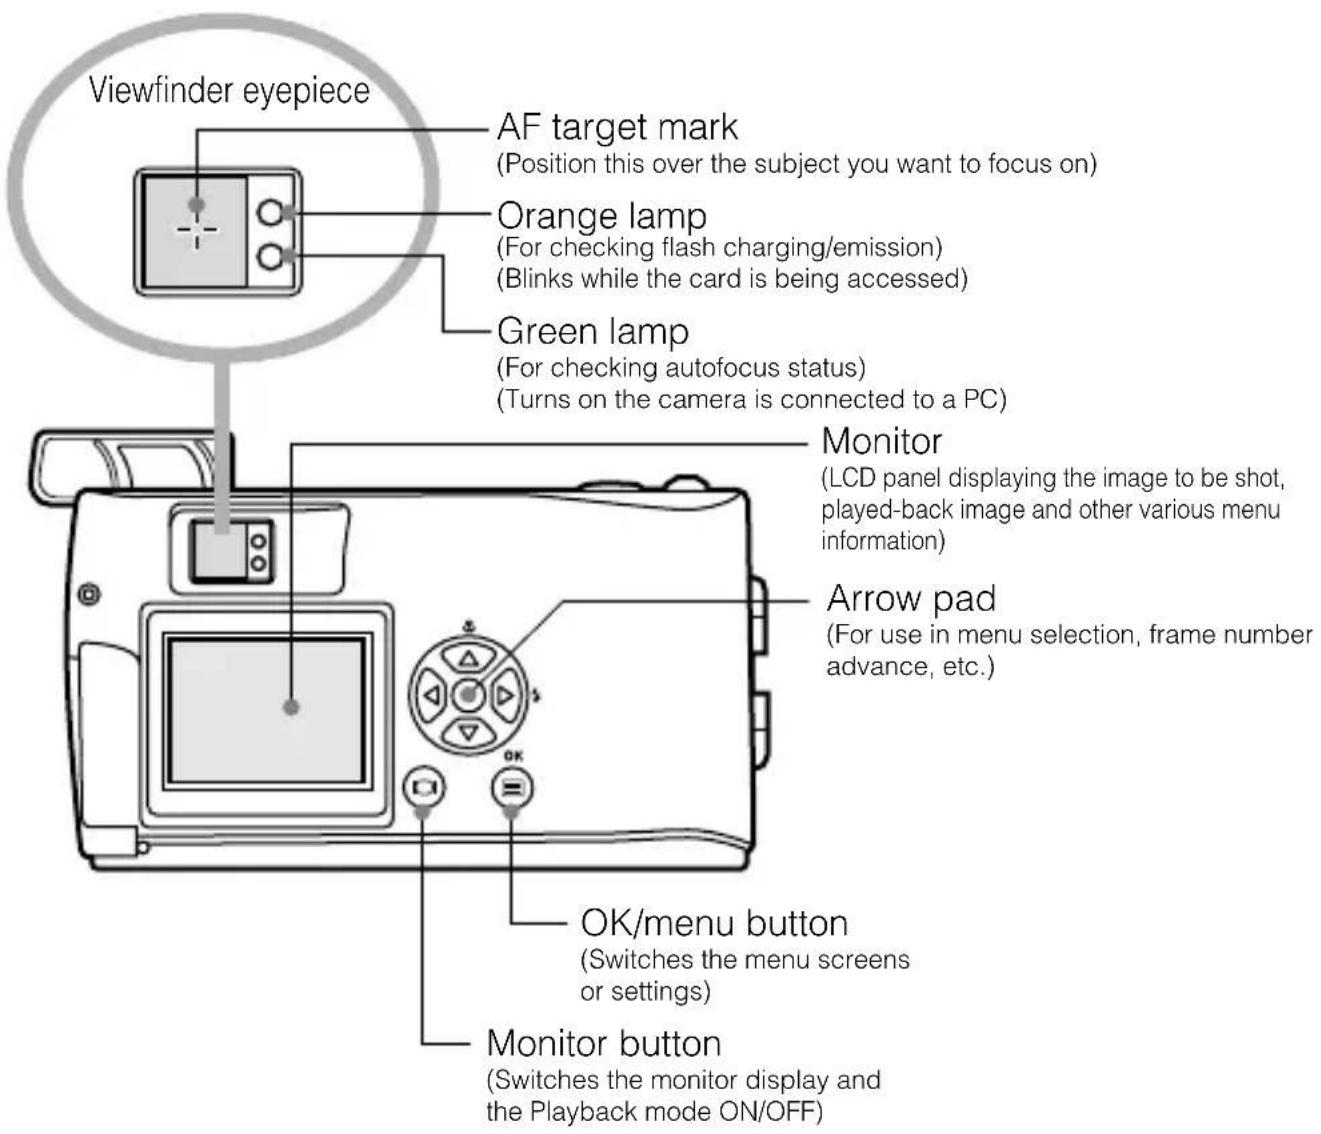
text_image
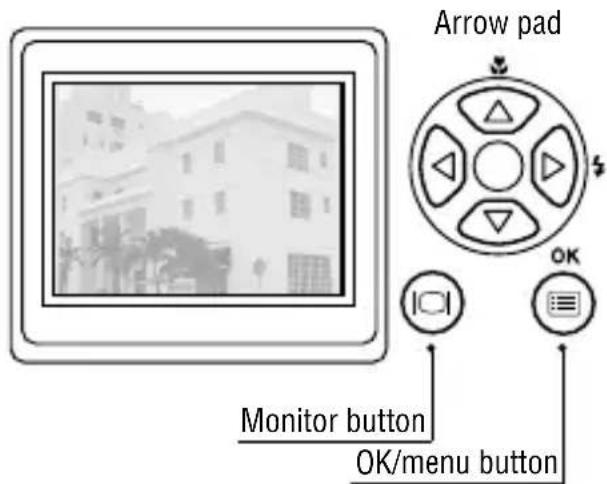
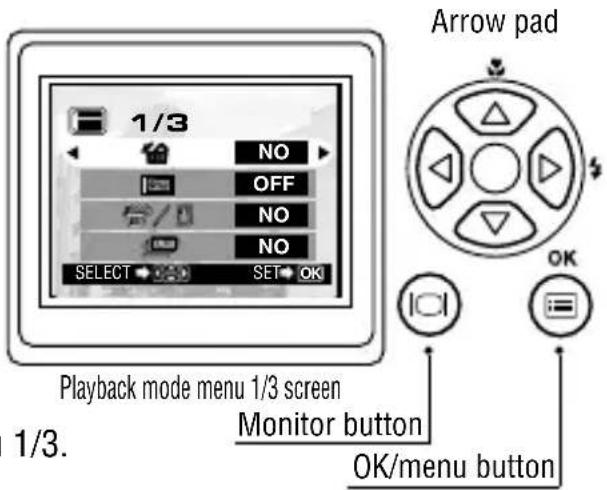
Viewfinder eyepiece AF target mark (Position this over the subject you want to focus on) Orange lamp (For checking flash charging/emission) (Blinks while the card is being accessed) Green lamp (For checking autofocus status) (Turns on the camera is connected to a PC) Monitor (LCD panel displaying the image to be shot, played-back image and other various menu information) Arrow pad (For use in menu selection, frame number advance, etc.) OK/menu button (Switches the menu screens or settings) Monitor button (Switches the monitor display and the Playback mode ON/OFF)■ Attaching the Provided Strap
1. Attach the strap as shown.

flowchart
graph TD
    A["Initial Cable"] --> B["Close-up Cable"]
    B --> C["Close-up Cable with Cable Link"]
    C --> D["Final Cable with Cable Link"]
■ Inserting the Memory Card (SmartMedia)
- Make sure the lens barrier is closed and nothing is displayed on the monitor.
- Open the card cover.
- Insert the card in the direction shown in the figure.
- Close the card cover until it clicks.

text_image
Card insertion direction markingCAUTION
- Be sure to hold the card so that the cut corner is positioned correctly. There is an arrow inside the card cover, indicating the insertion direction.
- To remove the card, press the card gently. When the card ejects slightly, pull out the card straight out as shown in the direction of Ⓐ.
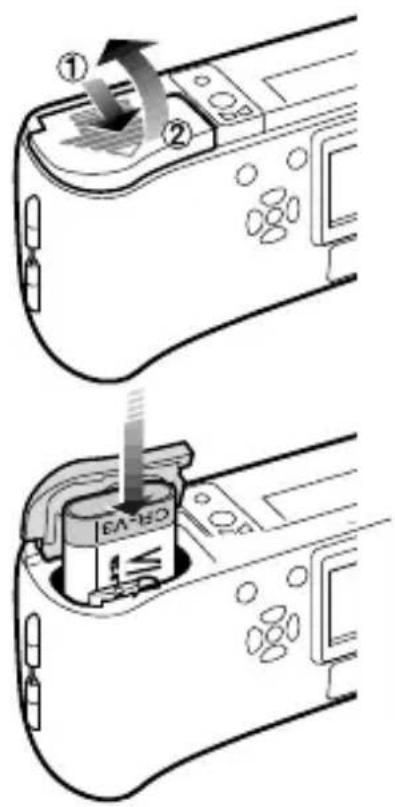
Loading the Battery
- Make sure the lens barrier is closed and nothing is displayed on the monitor.
- Slide the battery compartment cover in the direction of the arrow ①, and lift the cover in the direction of the arrow ②.
- Insert the battery in the direction shown in the figure.
- Close the battery compartment cover in the direction of the arrow ①, and press the cover in the direction of the arrow ② until it clicks.
text_image
Diagram showing two steps of a device's internal mechanism, labeled with numbered components and a highlighted component.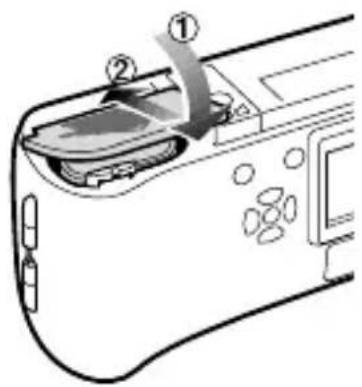
text_image
Diagram of a device interior showing labeled components with arrows indicating movement or flowThis camera can be powered by a single long-life lithium battery pack.
The CR-V3 lithium battery pack (Olympus LB-01) features a long service life, lasting many times longer than conventional batteries, offering great convenience when traveling. Insert the battery pack correctly.

text_image
CR-V3 OLYMPUS CAMEDI■ Setting the Date and Time
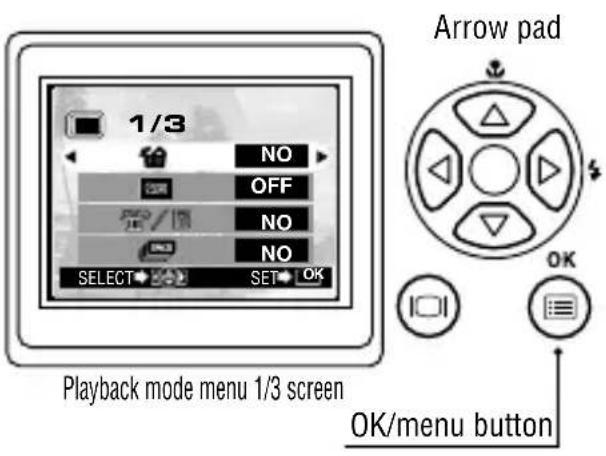
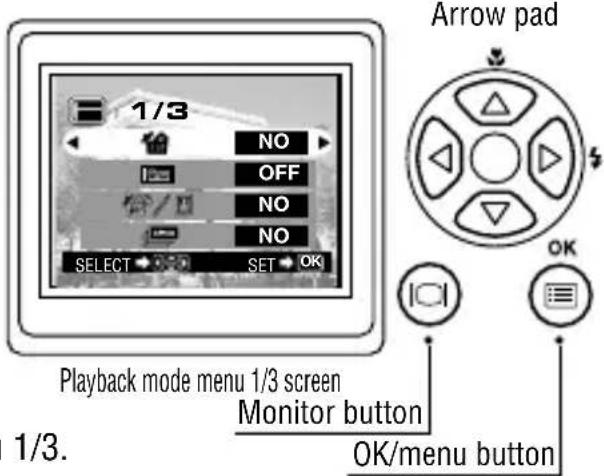
Operating Procedure
- Check that the camera is set to the Playback mode by holding down the ① monitor button for a moment.
- Press the OK/menu button.
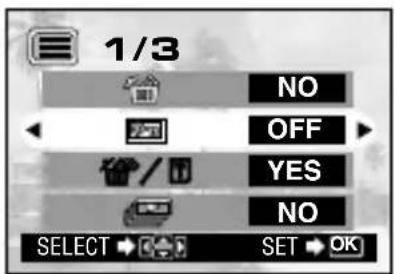
●The Playback mode menu 1/3 is displayed on the monitor. - Press the or arrow pad key to display the menu 3/3, and select 🔒
- Display the date/time setting menu by pressing the or arrow pad key.
- Select one of the following date/time display formats by pressing the or arrow pad key.
Y—M—D (Year·Month·Day)
M—D—Y (Month·Day·Year)
D—M—Y (Day·Month·Year)
Then press the arrow pad key.
●The cursor moves to the figure setting field.
- Set the first figure by pressing the or arrow pad key, and then press the arrow pad key.
●The cursor moves to the next figure. - Repeat the above steps to set the hour and minutes.
- When the actual time reaches zero seconds, press the OK/menu button.
●The date and time are set and the screen returns to the Playback mode menu 3/3.
text_image
1/3 NO OFF NO NO SELECT SET OK Arrow pad OK Playback mode menu 1/3 screen OK/menu button
text_image
3/3 '01.01.01 00:00 SELECT END OKPlayback mode menu 3/3 screen

text_image
Y—M—D 01.01.01 00:00 SELECT END OKDate/time setup screen
text_image
'.01 1 00 : 00 SELECT →← SET →OKDate/time setup screen
SHOOTING OPERATIONS
■ Shooting Pictures
Operating Procedure
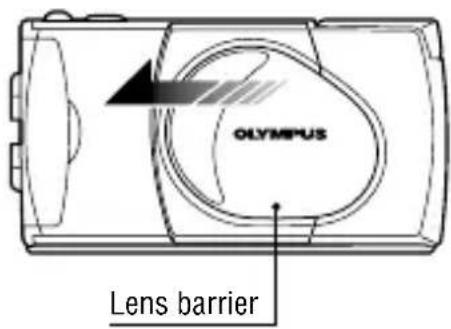
- Open the lens barrier until the flash pops up.
● The camera turns on, and the lens comes out.
2. Hold the camera, and look through the viewfinder.
3. Press the shutter button halfway (half-press) to make sure the green lamp on the right of the viewfinder lights.
- When lights: The subject is in focus. You can shoot.
- When blinking: The subject is out of focus. Half-press the shutter button again.

text_image
OLYMPUS
natural_image
Line drawing of a person holding a camera (no text or symbols)
text_image
ject is in focus. You can shoot. subject is out of focus. Half-press hutter button again. Green lamp- Press the shutter button all the way (full-press) to take the picture.
- The shutter is released and the picture is taken. Once the picture has been taken, it is displayed on the monitor for a short time.

natural_image
Line drawing of a digital camera with a dog display and a hand gesture icon (no text or symbols)- To view a recorded image immediately after it has been shot while the lens barrier is open (Quick-View Playback):
- Press the monitor button twice (double clicking).
- This switches the camera to the Playback mode; the image is displayed on the monitor.
- Press the shutter button or monitor button.
- This returns the camera to the Shooting mode; you can resume shooting.
- Close the lens barrier.
● The monitor and camera turn off.

text_image
Double clickingShooting Using the Monitor
Operating Procedure
- Check that the lens barrier is open.
- Press the monitor button.
- The monitor turns on.
- Determine the image composition by observing your subject in the monitor.
- Half-press the shutter button to focus on the subject, and then press it all the way to take the picture. (This operation is identical to the Shooting Using the Viewfinder).
- The orange lamp on the right of the viewfinder blinks for a moment while the image is being written to the card, and then goes out.

text_image
Monitor Monitor button■ Deciding Whether to Use the Viewfinder or Monitor According to Working Distance
Snapshot, landscape, etc. (approx. 1.5 m/4.9 ft. to infinity)
Use the viewfinder

natural_image
Monochrome landscape photo of palm trees and a distant building (no visible text or symbols)Hold the camera securely, keeping your upper arms pressed close to your body, to prevent camera shake.
Close-up of a person (approx. 0.5 m to 1.5 m/1.6 ft. to 4.9 ft.)
Use either the viewfinder or monitor

natural_image
Black-and-white photo of a smiling woman with shoulder-length hair, wearing a collared shirt (no visible text or symbols)Close-up images can usually be shot using the viewfinder, but using the monitor may be advantageous in certain cases.
Very short distance (0.2 m to 0.5 m/8 in. to 1.6 ft.)
Use the monitor (Macro mode)

natural_image
Close-up of a blooming rose flower with soft focus background (no text or symbols)When the subject is closer than 0.5 m/1.6 ft., use the Macro mode. Shooting without using the Macro mode is also possible, but correct focus may not be possible. The image area shown in the viewfinder is slightly different from the image area that is actually recorded. When shooting a close-up, confirm the image on the monitor.
Checking the Camera Status Indication Next to the Viewfinder or on the Monitor (in Shooting Mode)
Operating Procedure
-
Check that the lens barrier is open.
-
Half-press the shutter button.
●The lamps on the right of the viewfinder light or blink.

text_image
IF (In Shooting Mode) Orange lamp Green lamp Viewfinder① Indication lamps on the right of the viewfinder
| Lamp Status | Camera Status Meaning/Note | |
| When the green lamp is lit | Autofocus is locked. | Press the shutter button all the way to take the picture. |
| When the green lamp is blinking rapidly | ●The camera cannot focus on the subject.●This may be due to one of the following. | You can press the shutter button and take picture, but the subject may not be in focus. |
●When no card is inserted in the camera.
●When the write protect seal is attached to the card.
●When the card cover is open.
●When the card does not have enough space to store the image.
| When the orange lamp is not lit | The flash has been recharged. | Shooting is possible by pressing the shutter button all the way. |
| When the orange lamp is lit | The flash is ready and will fire. | Press the shutter button all the way to start shooting with automatic flash. |
| When the orange lamp blinks slowly | The flash is being charged. | Release your finger from the shutter button, and wait until the orange lamp goes out. |
| The flash is necessary, but it is set off ( ) | Set the flash to Auto or | |
| When both green and orange lamps blink slowly | Battery power is exhausted. | Replace the batteries with new ones. |
| When the orange lamp blinks rapidly | The camera is writing to or reading from the card. | Do not open the card cover or remove the battery. |
② Monitor

text_image
4 +1.0 HQ 24 T WWhen the monitor is turned by pressing the ① monitor button, the information displays on the left are shown on the monitor.
| No. of images that can be shot |  | Shows the approximate number of images you can shoot. |
| Battery status | [24xW] (Green) | Remaining battery power is insufficient. (The display goes out automatically.) |
| [T4x4] (Red) | The remaining battery power is too low. Replace the batteries with new ones. Shooting is possible when the batteries are low, but battery power could run out while the image is being processed. | |
| Record mode*1 |  | Shows the quality of the next image to be shot. The default setting is HQ (High Quality), middle of SQ and SHQ. |
 | ||
 | ||
| Flash mode | Auto(No display) | Auto-Flash*1The default setting is the Auto-Flash mode. No icon is displayed. |
 | Red-Eye Reduction Flash*1 | |
| ### | Fill-In Flash*2 | |
| ### | Night Scene*2 | |
| ### | Flash Off*2 | |
| Drive mode*2 | ### | Shows that the Sequential Shooting mode is switched on.The default setting is the Single-Frame mode, which is not displayed on the monitor. |
| ### | Shows that the Self-Timer mode is switched on.The default setting is no self-timer. |
* When you change the setting, it remains effective after the camera is turned off.
*2 When you change the setting, it returns to the factory setting when the camera is turned off.

| Exposure compensation*2 | +1.0 | Shows the amount of exposure compensation.The default setting is no exposure compensation. |
| Macro mode*2 |  | Shows that the Macro mode is switched on.The default setting is normal shooting. |
| Digital zoom*2 |  | Shows the Digital Zoom mode, with “T” indicating telephoto zoom and “W” indicating wide-angle shooting.The default setting is no digital zooming. |
| White balance*2 | Auto(No display) | Shows the use of the white balance control feature which adjusts the color tone of the image.The default setting is Auto control. |
 | Clear Sky | |
 | Cloudy Sky | |
| [KSA6] | Incandescent Lighting | |
 | Fluorescent Lighting |
*1 When you change the setting, it remains effective after the camera is turned off.
*2 When you change the setting, it returns to the factory setting when the camera is turned off.
Selecting the Image Quality (Record Mode)
The Record modes allow you to shoot images with higher quality (SHQ) or larger number of images per card (SQ). The default setting of the Record mode is HQ.
Operating Procedure
- Check that the lens barrier is open.
- Press the OK/menu button.
●The monitor shows the Shooting mode menu 1/3. - Press the or arrow pad key to display the Shooting menu 2/3, and then select ←:
- Each time you press the or arrow pad key, the Record mode is switched in the following sequence: "SHQ" "HQ" "SQ". Select one of these modes.
- Press the OK/menu button.
●The Record mode is set, the shooting screen reappears and the number of images you can shoot in current Record mode is displayed.

text_image
Arrow pad 1/3 AUTO OFF DIGITAL ZOOM OFF SELECT END OK Shooting mode menu 1/3 screen OK/menu button
text_image
2/3 HQ AUTO ON SELECT → END → OKShooting mode menu 2/3 screen
Using the Three Record Modes
 (Standard Quality) (Standard Quality) | Select this mode when you want to attach the image to e-mail, simply view it on your PC screen or want to shoot more images per card. |
 (High Quality) (High Quality) | Select this mode when you need image quality in between SQ and SHQ. This mode is ideal when you need to print out images or view them on your PC screen. (This is the default recording mode.) |
 | Select this mode when you want to print the image with high quality or a large size or to retouch it on your PC. |
Using the Flash
The flash has been designed to fire automatically when shooting under low light or against strong back light. You can select one of the 5 flash modes according to different shooting situations.
Operating Procedure
-
Check that the lens barrier is open.
-
Press the OK/menu button.
●The monitor shows the Shooting mode menu 1/3.
-
Select by pressing the or arrow pad key.
-
Each time you press the or arrow pad key, the Flash mode is switched in the sequence: Auto-Flash → Red-Eye Reduction Flash → Fill-In Flash → Night Scene → Flash Off. Select one of these modes.
-
Press the OK/menu button.
●The Flash mode is set and the shooting screen reappears. Now you can shoot images with the selected Flash mode.
Note
The Flash mode setting menu can also be displayed by simply pressing the ▶ (✗) arrow pad key when the lens barrier is open. Pressing the ▶ (✗) arrow pad key changes a Flash mode to another. The setting menu disappears after a moment if no operation is performed.

text_image
Arrow pad 1/3 AUTO OFF DIGITAL ZOOM OFF SELECT END OK Shooting mode menu 1/3 screen OK/menu button
text_image
1/3 AUTO OFF DIGITAL ZOOM OFF SELECT END OKShooting mode menu 1/3 screen
Red-Eye Reduction Flash

text_image
HQ 24
text_image
AUTO HQ 24Using the Flash Modes
| AUTO | The flash fires automatically in low light or back light conditions.To shoot a subject with back light, position the AF target mark ( ) over the subject in the viewfinder. |  | Use this mode to fire the flash with every image. |
 | Use this mode when shooting a subject against a night background. | ||
| The light from the flash may make the subject's eyes appear red in pictures. The Red-Eye Reduction Flash mode reduces this phenomenon. | |||
 | Use this mode for shooting in locations where flashes are prohibited (such as a museum). |
■ Magnifying the Subject (Zooming)
The optical zoom allows you to shoot an image magnifying up to 3X. The digital zoom is also available to magnify an image up to 2X. If you use both functions, you can shoot an image zoomed by up to 6X. To use the digital zoom, you need to set the Digital Zoom to “ON” using the setting menu display.
Operating Procedure
To use the optical zoom:
- Check that the lens barrier is open.
- Slide the zoom lever to (Telephoto) to zoom in the image (up to 3X), and slide to (Wide angle) to zoom out the image.

text_image
Zoom lever
text_image
HQ 24 ↓ T HQ 24 ↓ W HQ 24To use the digital zoom:
- Check that the lens barrier is open.
- Press the OK/menu button.
● The monitor shows the Shooting mode menu 1/3.
- Select "DIGITAL ZOOM" by pressing the △ or ▽ arrow pad key.
- Select "ON" by pressing the or arrow pad key, then press the OK/menu button.
- Slide the zoom lever to zoom in the image (up to 2X, or up to 6X with the optical zoom), and slide to zoom out the image.

text_image
1/3 AUTO OFF DIGITAL ZOOM OFF SELECT END OK Arrow pad OK Shooting mode menu 1/3 screen OK/menu button
text_image
1/3 AUTO OFF DIGITAL ZOOM OFF SELECT END OKShooting mode menu 1/3 screen

text_image
T W omDigital Zoom
Appears only when using digital zooming (and does not appear when using only optical zooming).
The zoom bar slides toward T when zooming-in, and toward W when zooming-out.
■ Shooting a Close Subject (Macro Shooting)
It is recommended to use the Macro mode when shooting a subject at a distance of less than 0.5 m/1.6 ft.
Operating Procedure
- Check that the lens barrier is open.
- Press the OK/menu button.
●The monitor shows the Shooting mode menu 1/3. - Select by pressing the or arrow pad key.
- Select "ON" by pressing the or arrow pad key.
- Press the OK/menu button.
●The monitor turns on so you can compose close-up images in the monitor. 🌐 displayed on the monitor.
text_image
1/3 AUTO OFF DIGITAL ZOOM OFF SELECT END OKShooting mode menu 1/3 screen

text_image
Arrow pad OK
OK/menu button
text_image
1/3 AUTO OFF DIGITAL ZOOM OFF SELECT → ⬆️ END → OKShooting mode menu 1/3 screen
Macro mark

natural_image
Black and white close-up of a rose with floral background (no text or symbols)Note
can also be displayed by pressing the ▲ arrow pad key when the lens barrier is open. Pressing the ▲ arrow pad key switches the Macro mode to On or Off. The setting menu disappears after a moment when no operation is performed.

text_image
HQ 24 OFFUsing the Self-Timer
You can shoot images with self-timer operation. This is useful for taking pictures with yourself included in the image. Fix the camera securely on a tripod, etc., before self-timer shooting.
Operating Procedure
- Check that the lens barrier is open.
- Press the OK/menu button.
●The monitor shows the Shooting mode menu 1/3.

text_image
1/3 AUTO OFF DIGITAL ZOOM OFF SELECT END OK Arrow pad OK Shooting mode menu 1/3 screen OK/menu button- Select □ / ⚙ by pressing the ▲ or ▼ arrow pad key.
- Select by pressing the or arrow pad key.
- Press the OK/menu button.
- Self-timer is set and the self-timer mark ( ) is displayed on the monitor.
- Compose the image in the monitor or viewfinder, and then press the shutter button.
●The self-timer lamp on the front of the camera lights for 10 seconds and then blinks for 2 seconds, after which the shutter is released.

text_image
1/3 AUTO OFF DIGITAL ZOOM OFF SELECT END OKShooting mode menu 1/3 screen

text_image
Self-timer mark HQ 24
text_image
Self-timer Lamp OLYMPUS■ Shooting Images Sequentially (Sequential Shooting)
The Sequential Shooting mode allows you to take a rapid succession of still images by pressing and holding the shutter button. You can choose the best image from a series of sequential shots. When you have found your best shot, you can also erase the rest of the images.
Operating Procedure
- Check that the lens barrier is open.
- Press the OK/menu button.
●The monitor shows the Shooting mode menu 1/3.

text_image
Arrow pad 1/3 AUTO OFF DIGITAL ZOOM OFF SELECT END OK Shooting mode menu 1/3 screen OK/menu button- Select ☐ / ⚙ by pressing the ▲ or ▼ arrow pad key.
- Select by pressing the or arrow pad key.
- Press the OK/menu button.
●The Sequential Shooting mode is engaged and is displayed on the monitor.
- Press and hold the shutter button.
●Multiple images will be shot in rapid succession for as long as your keep the button pressed.
- Close the lens barrier and open it again to restore the default Single-Frame Shooting mode.
CAUTION
Do not open the card cover or remove the AC adapter, batteries or card while the orange lamp on the right of the viewfinder is blinking. Otherwise, the data on the card may be destroyed.

text_image
1/3 AUTO OFF DIGITAL ZOOM OFF SELECT → ← → END → OKShooting mode menu 1/3 screen

text_image
Sequential Shooting mode HQ 24Varying the Image Brightness (Exposure Compensation)
Although the camera's exposure is set automatically, you can vary it to change the image brightness in the range of ±2 stops in 0.5-stop steps.
Operating Procedure
- Check that the lens barrier is open.
- Press the OK/menu button.
●The monitor shows the Shooting mode menu 1/3.
text_image
Arrow pad 1/3 AUTO OFF DIGITAL ZOOM OFF SELECT END OK Shooting mode menu 1/3 screen OK/menu button- Press the or arrow pad key to display the Shooting mode menu 2/3, and then select
- Select a + value (to brighten image) or - value (to darken image) by pressing the or arrow pad key.
- Press the OK/menu button.
●The camera returns to the Shooting mode and the monitor shows the corrected exposure value.
- Press the shutter button.
●Images can be shot successively while maintaining the corrected exposure value.
- Close the lens barrier to turn the camera off.
●The exposure value is reset to ±0 (no correction). The exposure compensation value on the monitor goes out.

text_image
2/3 HQ AUTO ON SELECT → END → OKShooting mode menu 2/3 screen

text_image
2/3 +1.5 HQ AUTO ON SELECT → ⬤️ END ➕ OKShooting mode menu 2/3 screen

text_image
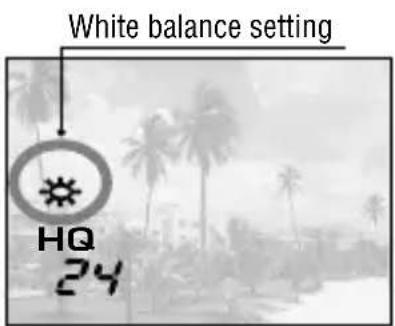
Corrected exposure value +1.5 HQ 24■ Varying the Image Color Tone (White Balance Control)
This camera incorporates electronic circuitry to automatically adjust color hues so that they look natural (auto white balance control circuit). If auto white balance control does not produce accurate results due to weather or illumination, you can control the white balance manually.
Operating Procedure
- Check that the lens barrier is open.
- Press the OK/menu button.
●The monitor shows the Shooting mode menu 1/3.
- Press the or arrow pad key to display the Shooting mode menu 2/3, and then select WB.
- Select one of the White Balance Control modes listed on next page by pressing the or arrow pad keys.
- Press the OK/menu button.
●The camera returns to the Shooting mode and the monitor shows the white balance setting.
- Press the shutter button.
●Images can be shot successively while maintaining the selected white balance setting. - Close the lens barrier to turn the camera off.
●The white balance setting is restored to AUTO.
White Balance Settings
| AUTO | This is the default setting, which is not displayed on the monitor. The white balance is controlled automatically so that colors look natural. | |
| Clear Sky | The white balance is controlled so that colors look natural outdoors under a clear sky. | |
| Cloudy Sky | The white balance is controlled so that colors look natural outdoors under a cloudy sky or in the shade under a clear sky. | |
| Incandescent Lamp | The white balance is controlled so that colors look natural under incandescent lighting. | |
| Fluorescent Lamp | The white balance is controlled so that colors look natural under fluorescent lighting. | |

text_image
1/3 AUTO OFF DIGITAL ZOOM OFF SELECT END OK Arrow pad OK Shooting mode menu 1/3 screen Listed OK/menu button
text_image
2/3 HQ AUTO ON SELECT END OKShooting mode menu 2/3 screen

text_image
2/3 HQ WB ON SELECT END OKShooting mode menu 2/3 screen
text_image
White balance setting HQ 24Muting the Beep Tones
The beep tones generated by the camera may be annoying when shooting images at a wedding, theater or when photographing animals. You can mute the beep tones in such cases.
Operating Procedure
- Check that the lens barrier is open.
- Press the OK/menu button.
●The monitor shows the Shooting mode menu 1/3.
- Press the or arrow pad key to display the Shooting mode menu 2/3, and then select 📄
- Select "OFF" by pressing the or arrow pad key.
- Press the OK/menu button.
●The camera returns to the Shooting mode.
- Now you can start shooting.
●Images can be shot with beep tones muted.

text_image
1/3 AUTO OFF DIGITAL ZOOM OFF SELECT END OK Arrow pad OK Shooting mode menu 1/3 screen OK/menu button
text_image
2/3 HQ AUTO ON SELECT END OKShooting mode menu 2/3 screen

text_image
2/3 HQ AUTO OFF SELECT END OKShooting mode menu 2/3 screen
VIEWING OR ERASING IMMEDIATELY AFTER SHOOTING
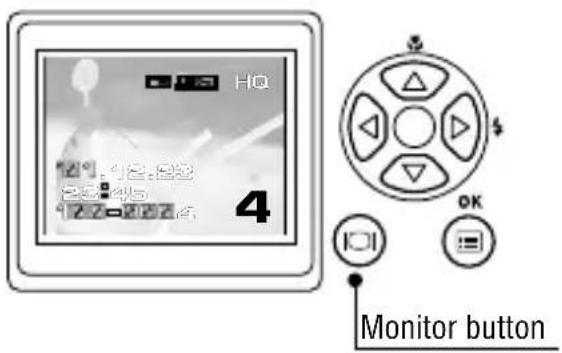
■ Viewing Pictures
Operating Procedure
- Check that the card is set and the lens barrier is closed.
- Keep the monitor button depressed for a moment.
●The camera turns on and enters the Playback mode. After a moment, the last picture you took appears on the monitor.
●The monitor information is displayed as shown on the right.
●After a moment, all displayed data except the frame No. and remaining battery power indicators disappear.
- Press the monitor button again to switch the monitor and the camera power off.

text_image
Monitor Monitor button
text_image
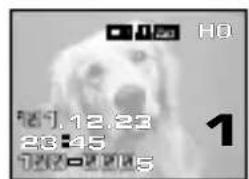
Record mode Protection indicator Printing indicator Remaining battery power HQ 101.12.23 23:45 100-00002 24. Date/time Frame No.File No.Monitor Information
●To enter the Shooting mode immediately after playback:
- Open the lens barrier.
●The monitor turns off and the Shooting mode is engaged. You can now shoot.
text_image
OLYMPUS Lens barrierImage Playback Operations
text_image
HQ 12°, 18.83 25°, 40° 122=222.5 4 Monitor buttonOperating Procedure
- Check that the lens barrier is closed and the last image you shot is displayed by holding down the monitor button for a moment.
a. To view an image: Select the image to view using the or arrow pad key.

b. To zoom an image: Slide the zoom lever toward to magnify the center of the displayed image to double size. Sliding the zoom lever toward while a double-size image is displayed restores the original image size.
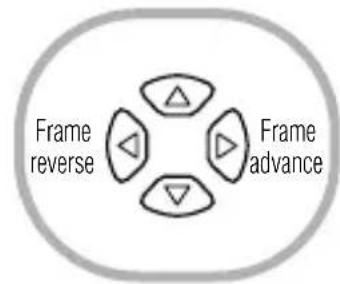
Frame operations of arrow pad keys
flowchart
graph TD
    A["Frame reverse"] --> B["Central Node"]
    C["Frame advance"] --> B
    D["Frame forward"] --> B
    E["Vertical Triangle"] --> B

text_image
2x 4 ↓ W T ↑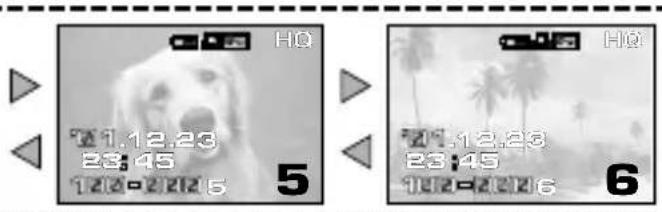
text_image
HQ 7:1.12:23 23:45 12:0-22:25 5 HQ 7:1.12:23 23:45 10:0-22:26 6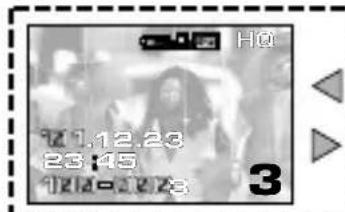
text_image
HQ 9:11.12.23 23:45 10:12-2078 3
text_image
HQ 201.12.23 202.1.5 12/2-2024 4...Press to select the image one frame before or after the current frame.

text_image
flowchart
graph TD
    A["Input Data"] --> B["Processing Module 1"]
    B --> C["Processing Module 2"]
    C --> D["Processing Module 3"]
    D --> E["Processing Module 4"]
    E --> F["Output Module"]
    style A fill:#f9f,stroke:#333
    style F fill:#bbf,stroke:#333
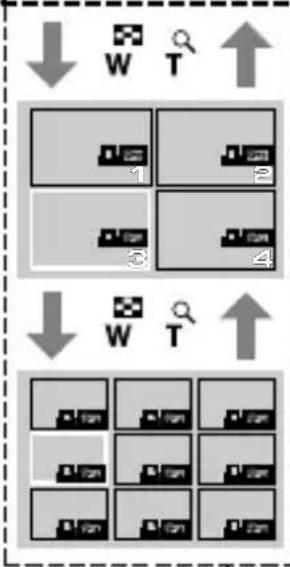
C. To display an image index: Slide the zoom lever toward to display 4 images including the current image. (The current image is highlighted in a green frame.)
Sliding the zoom lever toward again displays 9 images. (The current image is highlighted in a green frame.) Sliding the zoom lever toward while 9 images are displayed changes the number of simultaneously displayed images to 4. Sliding toward again changes to the single-image display.
: Slide the zoom lever for zooming and index display
Pressing the arrow pad key while 4 (or 9) images are displayed advances the selected image (with the green frame) to the next image. When the last displayed image in the index is selected, pressing the arrow pad key brings up the next index.
Similarly, pressing the arrow pad key moves the green frame to the previous image. Pressing when the first image in the index is selected brings up the previous index.

text_image
1 2 3 4 4 5 6 7Pressing the ▲ or ▼ arrow pad key moves the frame 4 (or 9) images before or after. (When you are in the single-image display, every pressing the or ▲ arrow pad key moves 10 images before or after.)
To magnify part of image
text_image
12.23 2:3:45 12:23 2015You can magnify any part of an image by the zooming operation on the previous page together with the arrow pad keys.

natural_image
Grayscale abstract image with circular shapes and triangular markers, no readable text or symbols- Slide the zoom lever to to magnify the central area of the image by 2X.
- △, ▽, ◀ and are displayed on the top, bottom, left and right of the screen respectively.

natural_image
Close-up grayscale image of a dog's face with visible eye and nose, no text or symbols present- Move the cross-cursor to the desired part of the image using the arrow pad keys.
natural_image
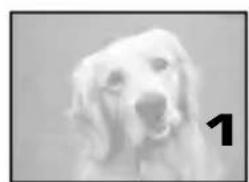
Close-up of a fluffy white dog with a visible black number '1' on the side (no text or symbols on the dog itself)- Slide the zoom lever to restore the original display size.
Erasing Pictures (One-Frame Erase)
You can increase the number of images that can be stored on the card by erasing unnecessary images.
Operating Procedure
text_image
Arrow pad Monitor button OK/menu button- Check that the lens barrier is closed and the camera is set to the Playback mode by holding down the monitor button for a moment.
- Display the frame to erase by pressing the or arrow pad key.
(The frame can also be selected even when the 4-split or 9-split display is selected.) - Press the OK/menu button.
●The monitor shows the Playback mode menu 1/3. - Select by pressing the or arrow pad key.
- Select "YES" by pressing the or arrow pad key.
- Press the OK/menu button.
●The selected image is erased.
The orange lamp on the right of the viewfinder blinks during erasure.

text_image
1/3 NO OFF NO NO SELECT → SET → OKPlayback mode menu 1/3 screen

text_image
1/3 YES OFF NO NO SELECT → SET → OKPlayback mode menu 1/3 screen
To cancel single-frame erasure:
In step 5, select "NO" and press the ⒽK/menu button.
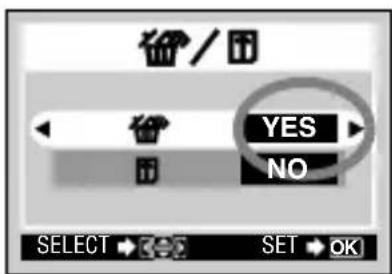
■ Erasing All Pictures (All-Frame Erase)
The following operation clears the card of all stored image data.
Operating Procedure
-
Check that the lens barrier is closed and the camera is set to the Playback mode by holding down the ① monitor button for a moment.
-
Press the OK/menu button.
●The monitor shows the Playback mode menu 1/3.
- Press the or arrow pad key to select

- The display changes to "YES".
- Press the OK/menu button.
●The card setup screen is displayed.
-
Select by pressing the or arrow pad key.
-
Select "YES" by pressing the or arrow pad key.
-
Press the OK/menu button.
●All of the image frame data saved in the card will be erased.
To cancel all-frame erasure:
In step 6, select "NO" and press the OK/menu button.
text_image
1/3 NO OFF YES NO SELECT → SET OKPlayback mode menu 1/3 screen

text_image
1/3 NO OFF YES NO SELECT → SET → OKPlayback mode menu 1/3 screen
text_image
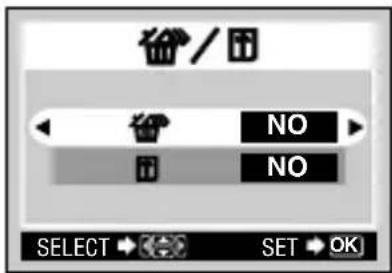
俯/团 NO NO SELECT → SET OKCard setup screen
text_image
音/团 YES NO SELECT → SET OKCard setup screen
■Viewing Multiple Images Automatically in Sequence (Slide Show)
Images in the card can be viewed on the monitor automatically in their stored order. This function is useful for presentation purposes at a meeting, etc. because the images can be displayed on a large television screen, as well as for checking all the images stored in the card.
Operating Procedure
-
Check that the lens barrier is closed and the camera is set to the Playback mode by holding down the monitor button for a moment.
-
Press the OK/menu button.
●The monitor shows the Playback mode menu 1/3.
-
Select by pressing the or arrow pad key, and then select "YES" by pressing the or arrow pad key.
-
Press the OK/menu button.
- Slide Show starts by displaying each frame for 3 seconds.
To cancel Slide Show:
- Press the OK/menu button twice.
text_image
Arrow pad 1/3 NO OFF NO NO SELECT SET OK Playback mode menu 1/3 screen Monitor button 1/3. OK/menu button
text_image
1/3 NO OFF NO NO SELECT → SET → OKPlayback mode menu 1/3 screen
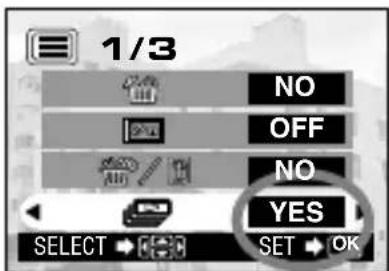
text_image
1/3 NO OFF NO YES SELECT → SET → OKPlayback mode menu 1/3 screen
■ Preventing Accidental Erasure (Protection)
It is recommended that you protect important images to avoid accidentally erasing them. When an image is protected, it cannot be erased, unless the card is formatted.
Operating Procedure
- Check that the lens barrier is closed and the camera is set to the Playback mode by holding down the monitor button for a moment.

text_image
1/3 NO OFF NO NO SELECT SET OK Arrow pad OK Playback mode menu 1/3 screen Monitor button OK/menu button ent.- Select the image frame to protect by pressing the or arrow pad key.
(The frame can also be selected even in the 4-frame or 9-frame display mode.)
- Press the OK/menu button.
●The monitor shows the Playback mode menu 1/3.
4. Select by pressing the or arrow pad key.
5. Select "ON" by pressing the or arrow pad key.
6. Press the OK/menu button.
●The selected image frame is protected (image locked) and the protect indicator 📄 displayed at the top right of the image. The protect indicator 📄 disappears after a while.
Unprotecting an image:
-
Press the OK/menu button to select . Select "OFF" by pressing the or arrow pad key.
-
Press the OK/menu button.
●Protection is canceled and the protect indicator ( ) disappears.

text_image
1/3 NO OFF NO NO SELECT → SET → OKPlayback mode menu 1/3 screen
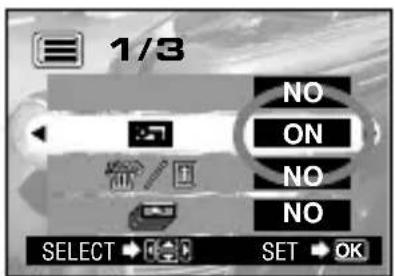
text_image
1/3 NO ON NO NO SELECT → SET → OKPlayback mode menu 1/3 screen

text_image
Protection indicator HQ '01.12.23 23:45 24■Adjusting the Monitor Brightness
You can adjust the brightness of the monitor to make it easier to see when shooting under daylight or in the dark, as well as when viewing images on the monitor.
Operating Procedure
-
Check that the lens barrier is closed and the camera is set to the Playback mode by holding down the monitor button for a moment.
-
Press the OK/menu button.
●The monitor shows the Playback mode menu 1/3.
-
Press the or arrow pad key to display the menu 3/3, and select
-
Adjust to the desired brightness by pressing the (+/to brighten) or (-/to darken) arrow pad key.
-
Press the OK/menu button.
●All the images will be displayed at the set brightness.
text_image
Arrow pad 1/3 NO OFF NO NO SELECT SET OK Playback mode menu 1/3 screen Monitor button 1/3. OK/menu button
text_image
3/3 '01.12.23 23:45 SELECT → END → OKPlayback mode menu 3/3 screen

text_image
SELECT → SET → OKMonitor adjustment screen
If an Alarm Message Is Displayed
| Warning Monitor Display Error Meaning Treatment | ||
Card absence | Card is not inserted or recognized. | Insert a card or, if it is already inserted, remove and insert it in the correct direction. |
Card full | No more image can be shot because the number of shootable images have reached 0. | Replace the card or erase unnecessary images. |
Write protect | The card is write-protected. | If you want to save images on the card, remove the write protect seal.(See the SmartMedia instructions.) |
Card error | Shooting, playback and erasure are not possible. | Clean the card's connector with a piece of cleaning paper and format the card again. A card which cannot be formatted is unusable. |
Playback error | The image cannot be viewed. | The image file in use is not compatible with the camera. You cannot use images on a card taken by other manufacturers' camera and image data recorded by PC. |
No image | Playback is impossible. | You are trying to play back a card on which no images have been recorded. |
Card cover | The camera does not work properly. | Close the card cover until it clicks. |
Making the Most of Your Digital Camera

flowchart
graph TD
    A["C-1Zoom/D-150Zoom"] --> B["Video cable"]
    A --> C["Card (SmartMedia)"]
    B --> D["Television"]
    C --> E["Digital color printer P-400/P-200/P-330N(E)"]
    C --> F["Photo lab"]
    C --> G["FlashPath floppy disk adapter"]
    C --> H["PC card adapter"]
    C --> I["USB SmartMedia reader/writer"]
    C --> J["USB cable"]
    C --> K["AC adapter"]
A variety of optional accessories make possible many different ways to view and enjoy the images you shoot with your camera. In some cases, you will need a personal computer to take full advantage of these features.
(Use a dedicated printer.)
(Bring the SmartMedia card.)
Note: Some photo studios and labs do not handle images shot with a digital camera.
(This can be read in a floppy disk drive.)
(This can be read in a PC card slot.)
(This can be used when it is connected to the camera's USB port.)

natural_image
Simple line drawing of a laptop computer with 'PC' label above (no additional text or symbols)
Viewing images on a TV screen
When the camera is connected to a television using the provided video cable, images can be viewed on large screen.
Printing without a PC
Images can be printed out directly from the card with a DPOF-compatible printer or at a photo lab. By specifying the desired number of prints for each of the images saved on a card, you can print out the desired number of copies of each image (single-frame print & all-frame print).
Viewing and processing images on a PC
There are various ways to enjoy images that have been downloaded to a PC via the provided USB cable or other means.
- Printing on a printer
- Storing and processing images
- Attaching images to e-mail
System requirements (USB cable):
• Windows 2000 Professional/Me
• Windows 98/98 Second Edition
• Mac OS 9.0 to 9.1
Note: For details on equipment connection, print reservation, PC downloading, refer to the Reference Manual on the provided CD-ROM.
Using AC outlet power
When you use the AC adapter, the camera is powered from the AC outlet so that you can use the camera without worrying about the battery life.
Specifications
Type : Digital camera (record/play type)
Recording system : Digital recording, JPEG (DCF-compliant)/DPOF-compatible
Recording medium : 3 V (3.3 V) SmartMedia 4 MB, 8 MB, 16 MB, 32 MB, 64 MB and 128 MB
Number of shootable : Approx. 8 (SHQ mode, 8 MB card)
frames Approx. 24 (HQ mode, 8 MB card)
Approx. 82 (SQ mode, 8 MB card)
Erasure : Single-frame erasure, all-frame erasure
Image pickup device : 1/3.2-inch CCD solid-state image pickup device, 1.31 million pixels (total)
No. of recording pixels : 1280 x 960 pixels (SHQ and HQ modes) 640 x 480 pixels (SQ mode)
White balance control : Full-auto TTL, presets (Clear Sky, Cloudy Sky, Incandescent Lamp and Fluorescent Lamp)
Lens : Olympus lens, 5 mm to 15 mm, f2.4 (W)/4.3(T), 8 elements in 7 groups (equivalent to 38 mm to 114 mm lens with 35 mm camera)
Photometric system : Digital ESP metering using image pickup device
Exposure control system : Programmed auto exposure
Aperture settings ^* : f2.4/f5, f4.3/f9
Shutter speed* : 1/2 to 1/1000 sec. (in combination with the mechanical shutter) *Manual setting is not available.
Sequential shooting : 2 frames/sec., Max. 4 frames
Shooting distance : 0.5 m/1.6 ft. to ∞ (Normal mode), 0.2 m to 0.5 m/8 in. to 1.6 ft. (Macro mode)
Viewfinder : Optical, real-image viewfinder (with AF target) and LCD monitor
Monitor : 1.5-inch, TFT color LCD monitor
No. of monitor screen pixels : Approx. 118,000 pixels
On-screen display : Date/time, frame number, protection, Record mode, remaining battery power, file number, print reservation, menus, etc.
Flash recharging time : Approx. 10 sec. or less (at normal temperature, new batteries)
Flash working range : Approx. 0.2 m to 3.5 m/8 in. to 11.5 ft. (Wide-angle)
Flash modes : Auto-Flash (automatic flash activation in low light and back light), Red-Eye Reduction Flash, Fill-In Flash, Night Scene and Flash-Off
Autofocus : TTL system autofocus, contrast detection/focusing range from 0.2 m/8 in. to ∞
Self-timer : Operating time approx. 12 sec.
External connectors : DC-IN connector, data input/output connector (USB), video output jack (Video signal is either NTSC or PAL compatible depending on the regional video standard in the intended area of distribution.)
Date/time : Simultaneous recording in image data
Auto calendar : Automatic correction in range of 2001 to 2031
Calendar power supply : Backed up by a built-in capacitor (Date and time data lost when batteries are removed for over 30 minutes.)
Card function : DPOF print reservation
Operating environment
Temperature : 0 to 40°C/32 to 104°F (operating)/ -20 to 60°C/-4 to 140 °F (storage)
Humidity : 30% to 90% (operating)/10% to 90% (storage)
Power supply : One CR-V3 lithium battery pack, two NiMH batteries or NiCd batteries, or two AA (R6) alkaline batteries ^ , or optional AC adapter. Zinc-carbon (manganese) batteries and commercially available AA (R6) lithium batteries cannot be used. ^ Alkaline batteries have a lot of variation in their performance and deteriorate particularly in low temperatures. It is recommended that lithium battery packs or NiMH batteries be used.
Dimensions : 112(W) x 62(H) x 35(D) mm/4.4(W) x 2.4(H) x 1.4(D) in. (excluding projections)
Weight : Approx. 185 g/6.5 oz. (excluding batteries and card)
Design and specifications are subject to change without any notice or obligation on the part of the manufacturer.
Partie responsible: Olympus America Inc.
Adresse: 2 Corporate Center Drive, Melville, New York 11747-3157 USA
OPTIONS DE VISUALISATION
flowchart
graph TD
    A["Device with cable"] --> B["Close-up cable"]
    B --> C["Close-up cable with cable links"]
    C --> D["Close-up cable with cable links"]
text_image
Diagram showing two views of a device's internal components with numbered labels and directional arrows indicating movement or assembly.
text_image
Diagram of a car interior showing labeled parts with numbered annotationstext_image
CR-V3 OLYMPUS CMEDA ①text_image
'□. 01 1 00 : 00 SELECT → SET → OKnatural_image
Line drawing of a person holding a camera (no text or symbols)
natural_image
Silhouetted palm trees against a hazy sky with distant buildings (no visible text or symbols)natural_image
Black-and-white photo of a smiling woman with shoulder-length hair, wearing a light-colored top (no visible text or symbols)natural_image
Close-up of a blooming rose with soft focus background (no text or symbols)text_image
4 +1.0 HQ 24 T Wtext_image
HQ 24 ↓ T HQ 24 ↓ W HQ 24natural_image
Black and white close-up of a rose with floral background (no text or symbols)Remarque
text_image
Diagram of a circular device with directional arrows and labeled buttons, including symbols like 'OK' and control icons.Touche OK/menu
text_image
2 /3 +1 .5 HQ AUTO ON SELECT → END → OKtext_image
2 4 ↓ W T ↑text_image
W T 1 2 3 4

natural_image
Grid of identical rectangular blocks with no text, numbers, or symbols
natural_image
Grayscale close-up of a dog's face with visible teeth and open mouth, no text or symbols presentnatural_image
Close-up of a white dog's face with visible eyes and nose, marked with number 1 (no text or symbols on the dog itself)natural_image
Close-up of a white dog's head with a tongue out (no text or symbols visible)text_image
SELECT → ⬤ SET → OKflowchart
graph TD
    A["Device with cable and connector"] --> B["Close-up assembly"]
    B --> C["Close-up assembly with cable and connector"]
    C --> D["Close-up assembly with cable and connector"]
text_image
Diagram of a device's internal components with numbered parts and directional arrow indicating rotation or movement
natural_image
Diagram of a camera lens assembly showing internal components and a tool inserted (no text or symbols)
text_image
Diagram of a device interior showing labeled parts with numbered annotationstext_image
CP-V3 OLYMPUS ① CMEDItext_image
'0. 01 1 00: 00 SELECT SET OKnatural_image
Line drawing of a person holding a camera (no text or symbols)
natural_image
Silhouetted palm trees against a hazy sky with distant buildings (no visible text or symbols)natural_image
Portrait of a smiling woman with shoulder-length hair, wearing a collared shirt (no visible text or symbols)natural_image
Close-up of a blooming rose flower with soft petals (no text or symbols visible)text_image
4 +1.0 HQ 24 T Wnatural_image
Monochrome image of a bird in flight with a vertical scale labeled T and W (no text or symbols on the bird itself)natural_image
Black and white close-up of a rose with floral background (no text or symbols)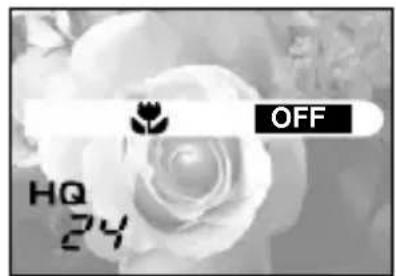
text_image
HQ 24 OFFtext_image
2 / 3 +1 . 5 HQ AUTO ON SELECT → END → OKtext_image
LCD-Monitor LCD-Monitor-Taste
text_image
4 LCD-Monitor-TasteBedienungsschritte
natural_image
Grayscale close-up of a dog's face with visible eye and mouth, no text or symbols presentnatural_image
Close-up grayscale image of a dog's face with visible eye and nose (no text or symbols)natural_image
Close-up of a fluffy white dog with a visible sound effect (no text or symbols)text_image
留/闭 NO NO SELECT → SET → OKnatural_image
Circular diagram with four directional arrows (triangle, arrow, circle, triangle) pointing outward from center, no text or symbols present.

OK/Menü-Taste
text_image
SELECT → SET → OKLCD-Monitor-Einstellmenü
Responsible: Olympus America Inc.
natural_image
Illustration of a hand holding a device with a curved arrow indicating motion (no text or symbols)

text_image
OVMUS PUSS T1 EACT

natural_image
Mechanical assembly diagram showing a piston and cylinder inside a housing (no text or symbols)text_image
Diagram of a device's internal components with numbered parts and directional arrow indicating rotation or movement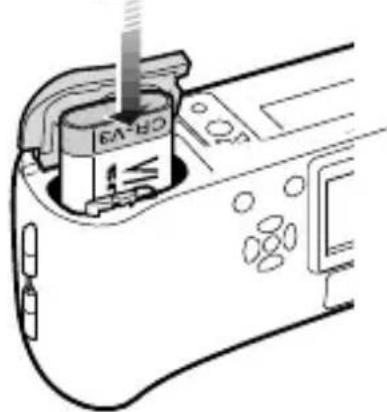
natural_image
Diagram of a camera lens assembly showing internal components and a tool interacting with the lens (no text or symbols present)text_image
Diagram of a device's internal components with numbered labels indicating parts of the lid and door.text_image
CP-V3 OLYMPUS CMEDAtext_image
'. 01 1 00 : 00 SELECT → SET OKnatural_image
Line drawing of a person holding a camera (no text or symbols)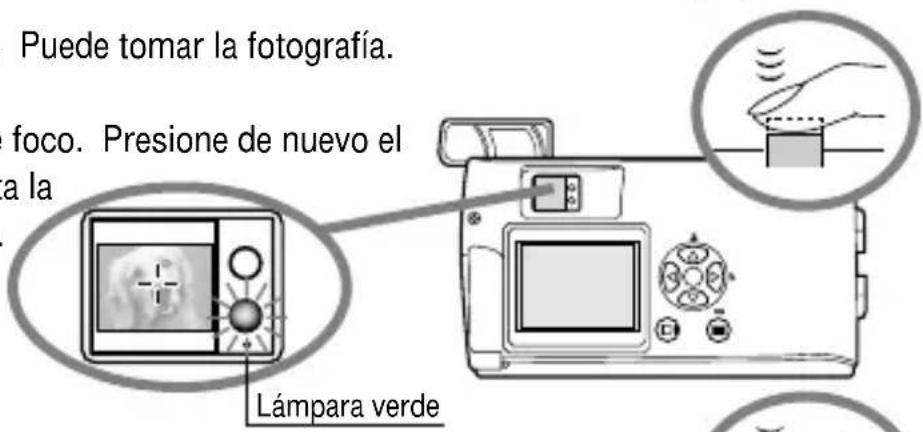
natural_image
Illustration of a digital camera with a dog display and a hand gesture icon (no text or symbols)natural_image
Grayscale photo of palm trees and a distant building under overcast sky (no visible text or symbols)natural_image
Black-and-white photo of a smiling woman with shoulder-length hair, outdoors with blurred background (no text or symbols visible)natural_image
Close-up of a blooming rose with soft black and white tones (no text or symbols)text_image
+ 1.0 HQ 24 T Wtext_image
T W CapitalZoom digital
text_image
2x 4 ↓ W T ↑
text_image
HQ 29.1 21 5.23 23 4 第 4 5 TAX=V2M3 3
text_image
HQ 12: 1 2.23 2: 3 45 12:20:04 4
text_image
Deslice la palanca del zoom W T
flowchart
graph TD
    A["Step 1: Document Icon"] --> B["Step 2: Document Icon"]
    B --> C["Step 3: Document Icon"]
    C --> D["Step 4: Document Icon"]
    D --> E["Step 5: Document Icon"]
    E --> F["Step 6: Document Icon"]
    F --> G["Step 7: Document Icon"]
    G --> H["Step 8: Document Icon"]
    H --> I["Step 9: Document Icon"]
    I --> J["Step 10: Document Icon"]

text_image
HQ 1 2 3 4 5 0x12=0.015natural_image
Grayscale close-up of a dog's face with visible eye and mouth, marked with triangular symbols (no text or labels)natural_image
Close-up grayscale image of a dog's face with visible eye and nose (no text or symbols)natural_image
Close-up of a white dog's face with a visible smile (no text or symbols)text_image
Select → SET OKPantalla de ajustes de tarjeta

text_image
値/囲 YES NO SELECT → SET → OKPantalla de ajustes de tarjeta
text_image
SELECT → SET → OKPantalla de ajuste del monitor
natural_image
Simple line drawing of a desktop computer with monitor and keyboard (no text or symbols)